Piecing Together Colusa in the Sacramento Northern Electric Era

A walk around Colusa in 2025 provides several architectural highlights from the 19th and early 20th century. One example is the International Order of Odd Fellows at 5th St. and Market St., constructed in 1892 and seen here on Apr. 1, 2018 in a east view. Except for the warehouse area just west of 14th St., it would be hard to imagine that Colusa had been a stopping point for three railroads, the three coexisting for just a few years beginning in 1913.
L338-05-Stuart Swiedler Photo, (Image 1 of 52)

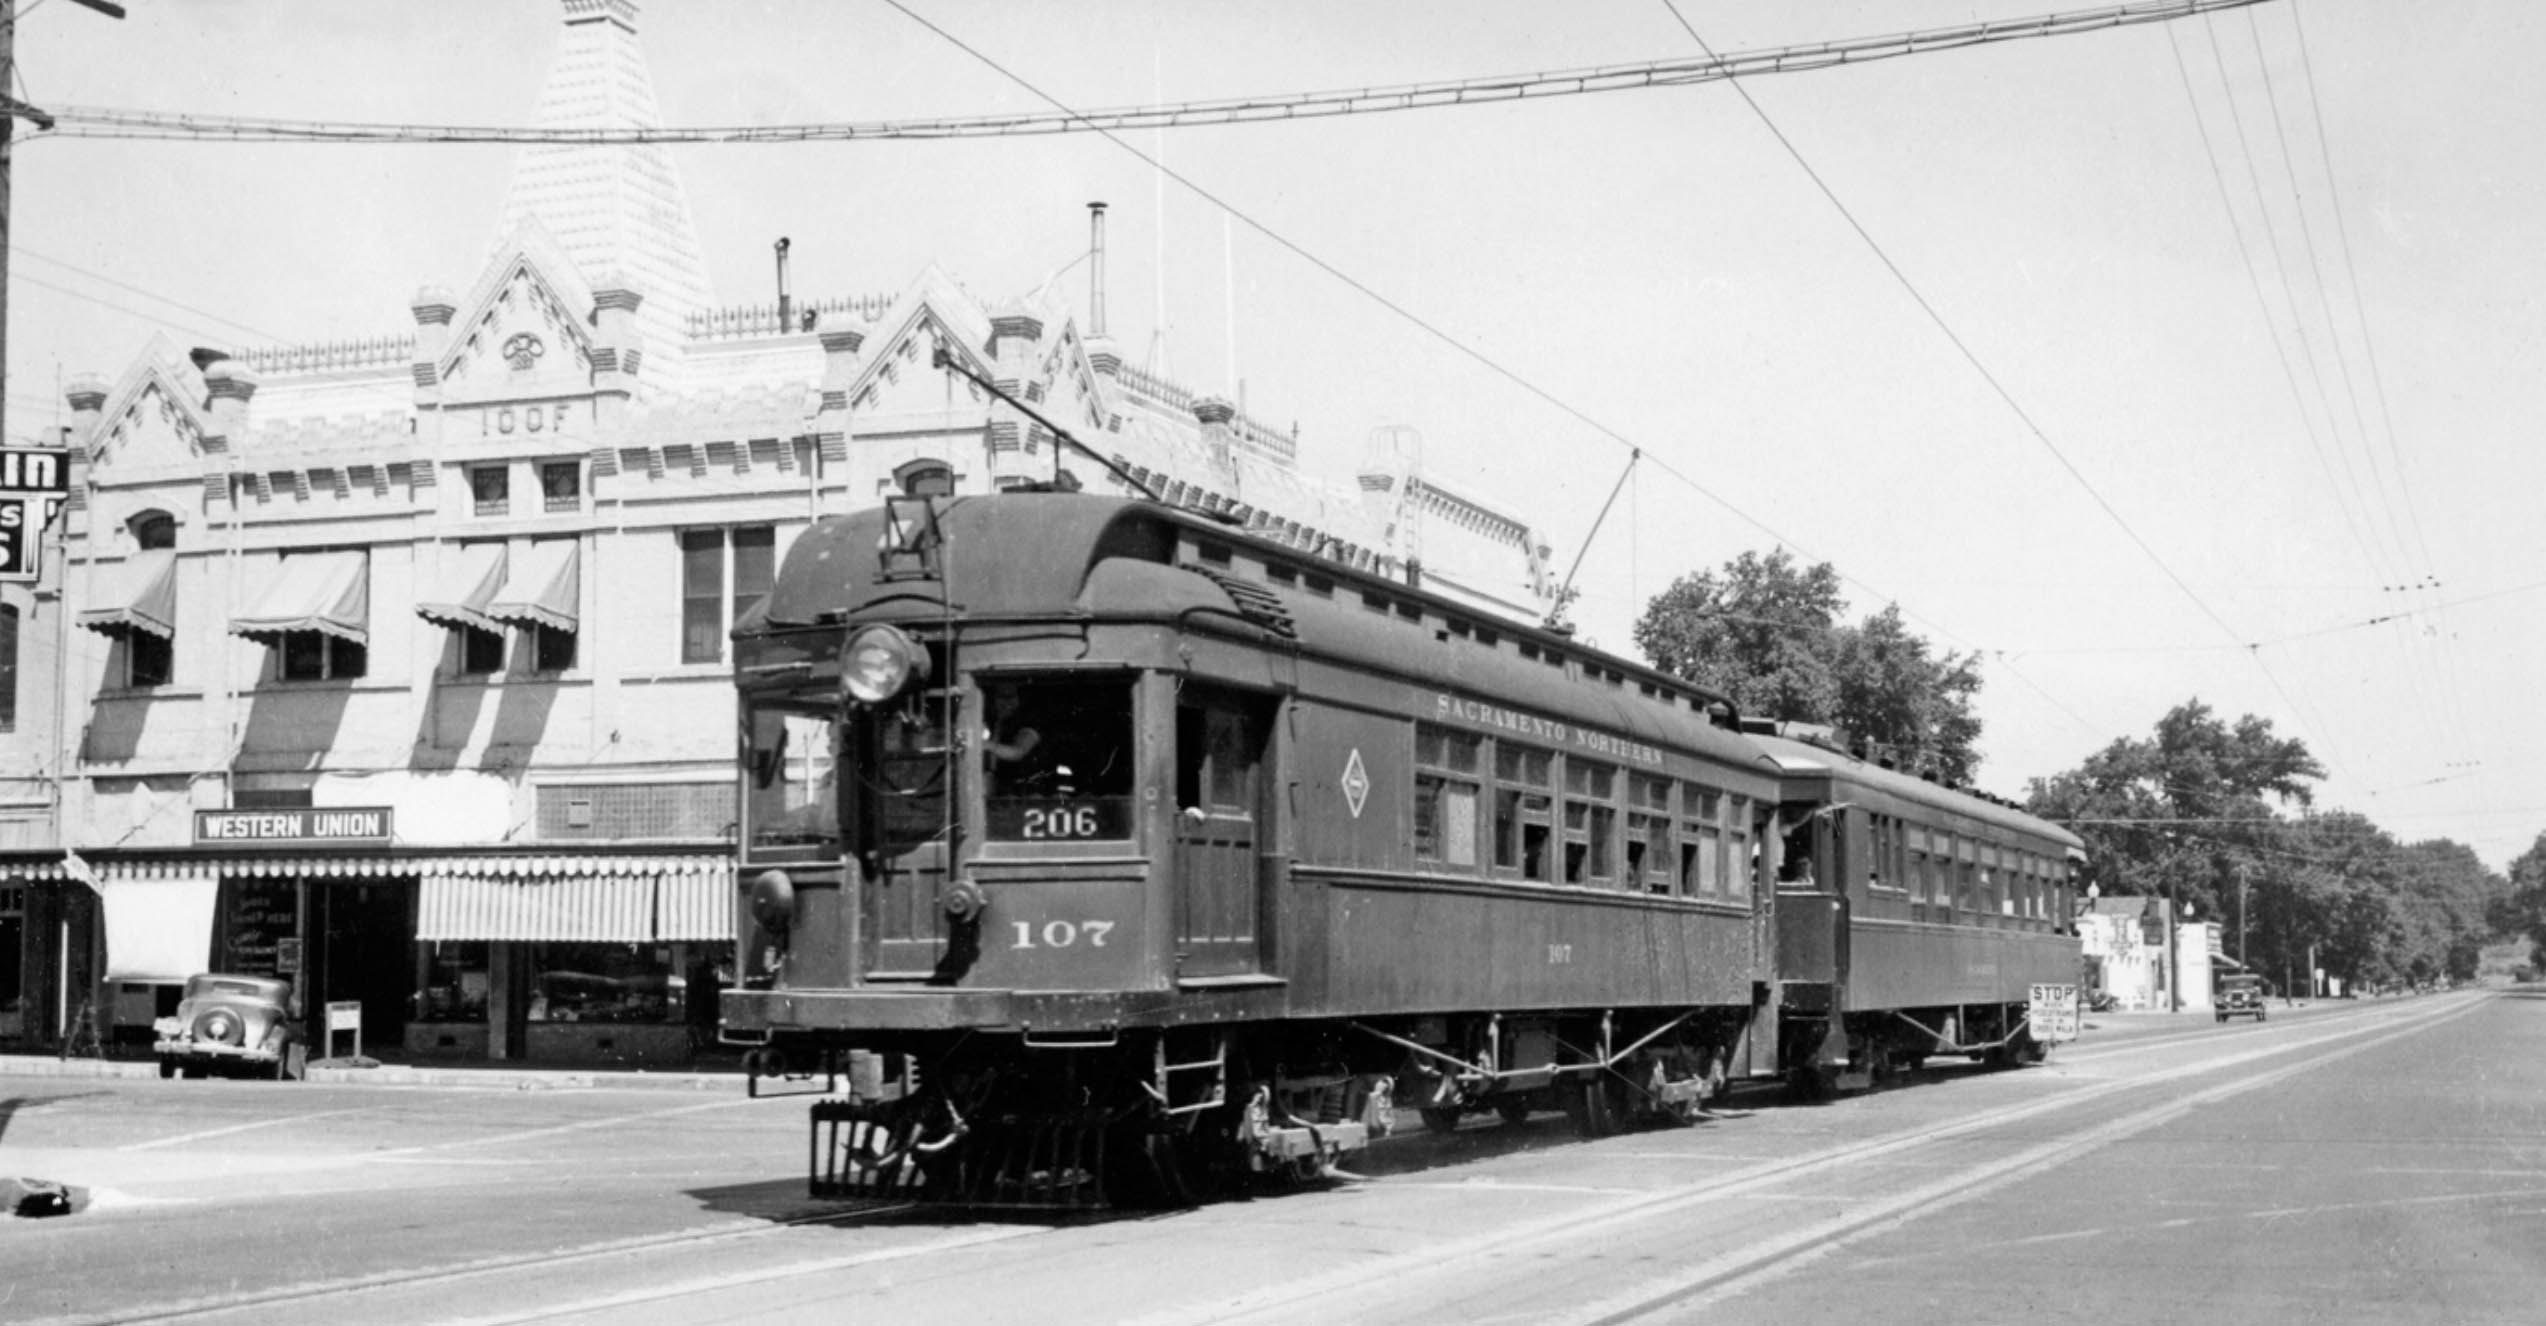
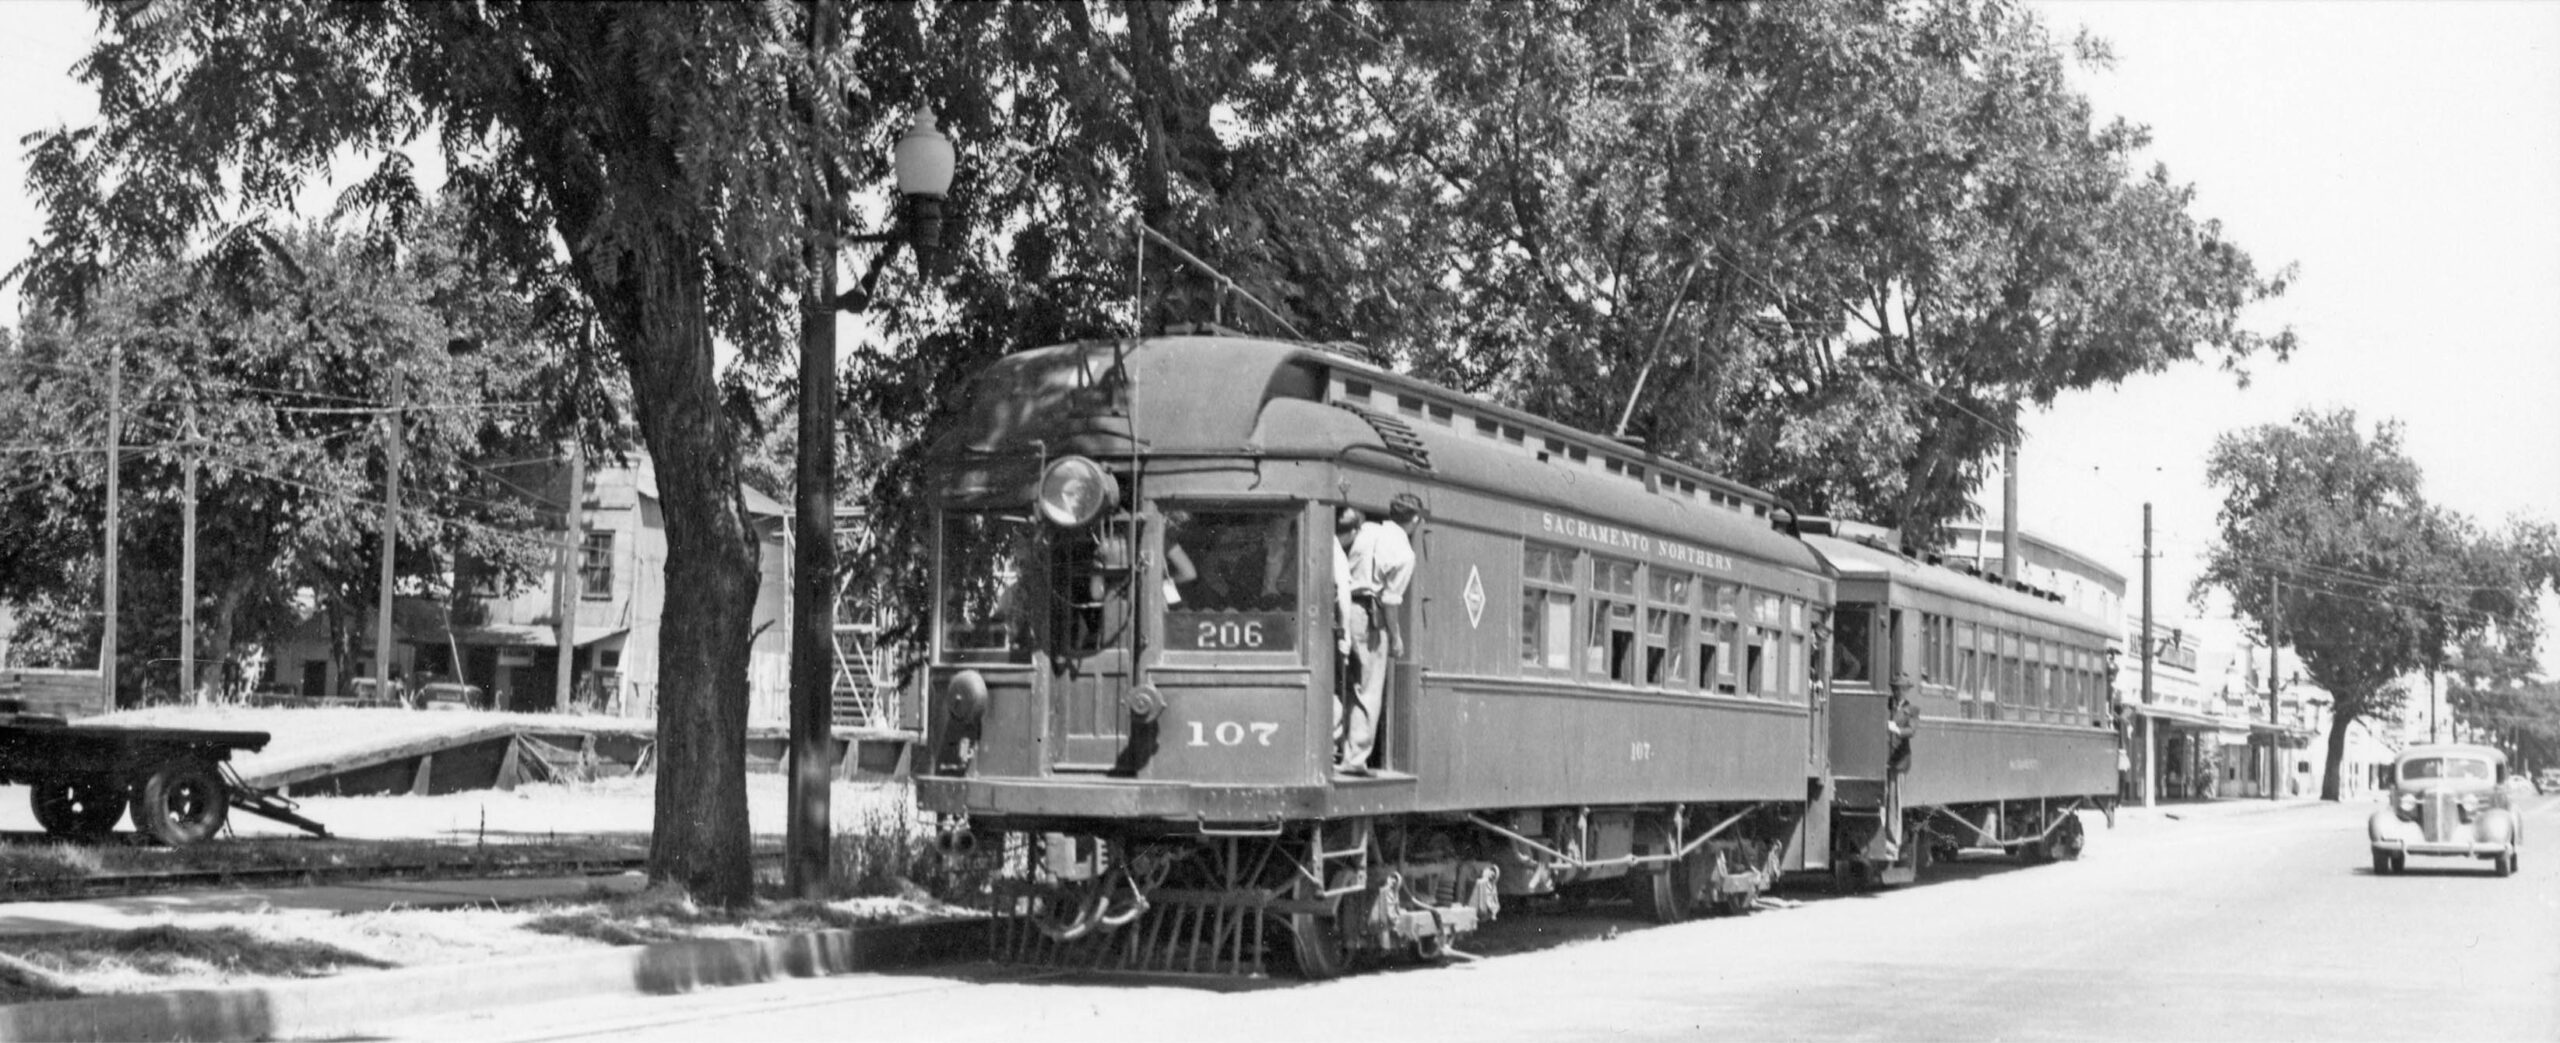
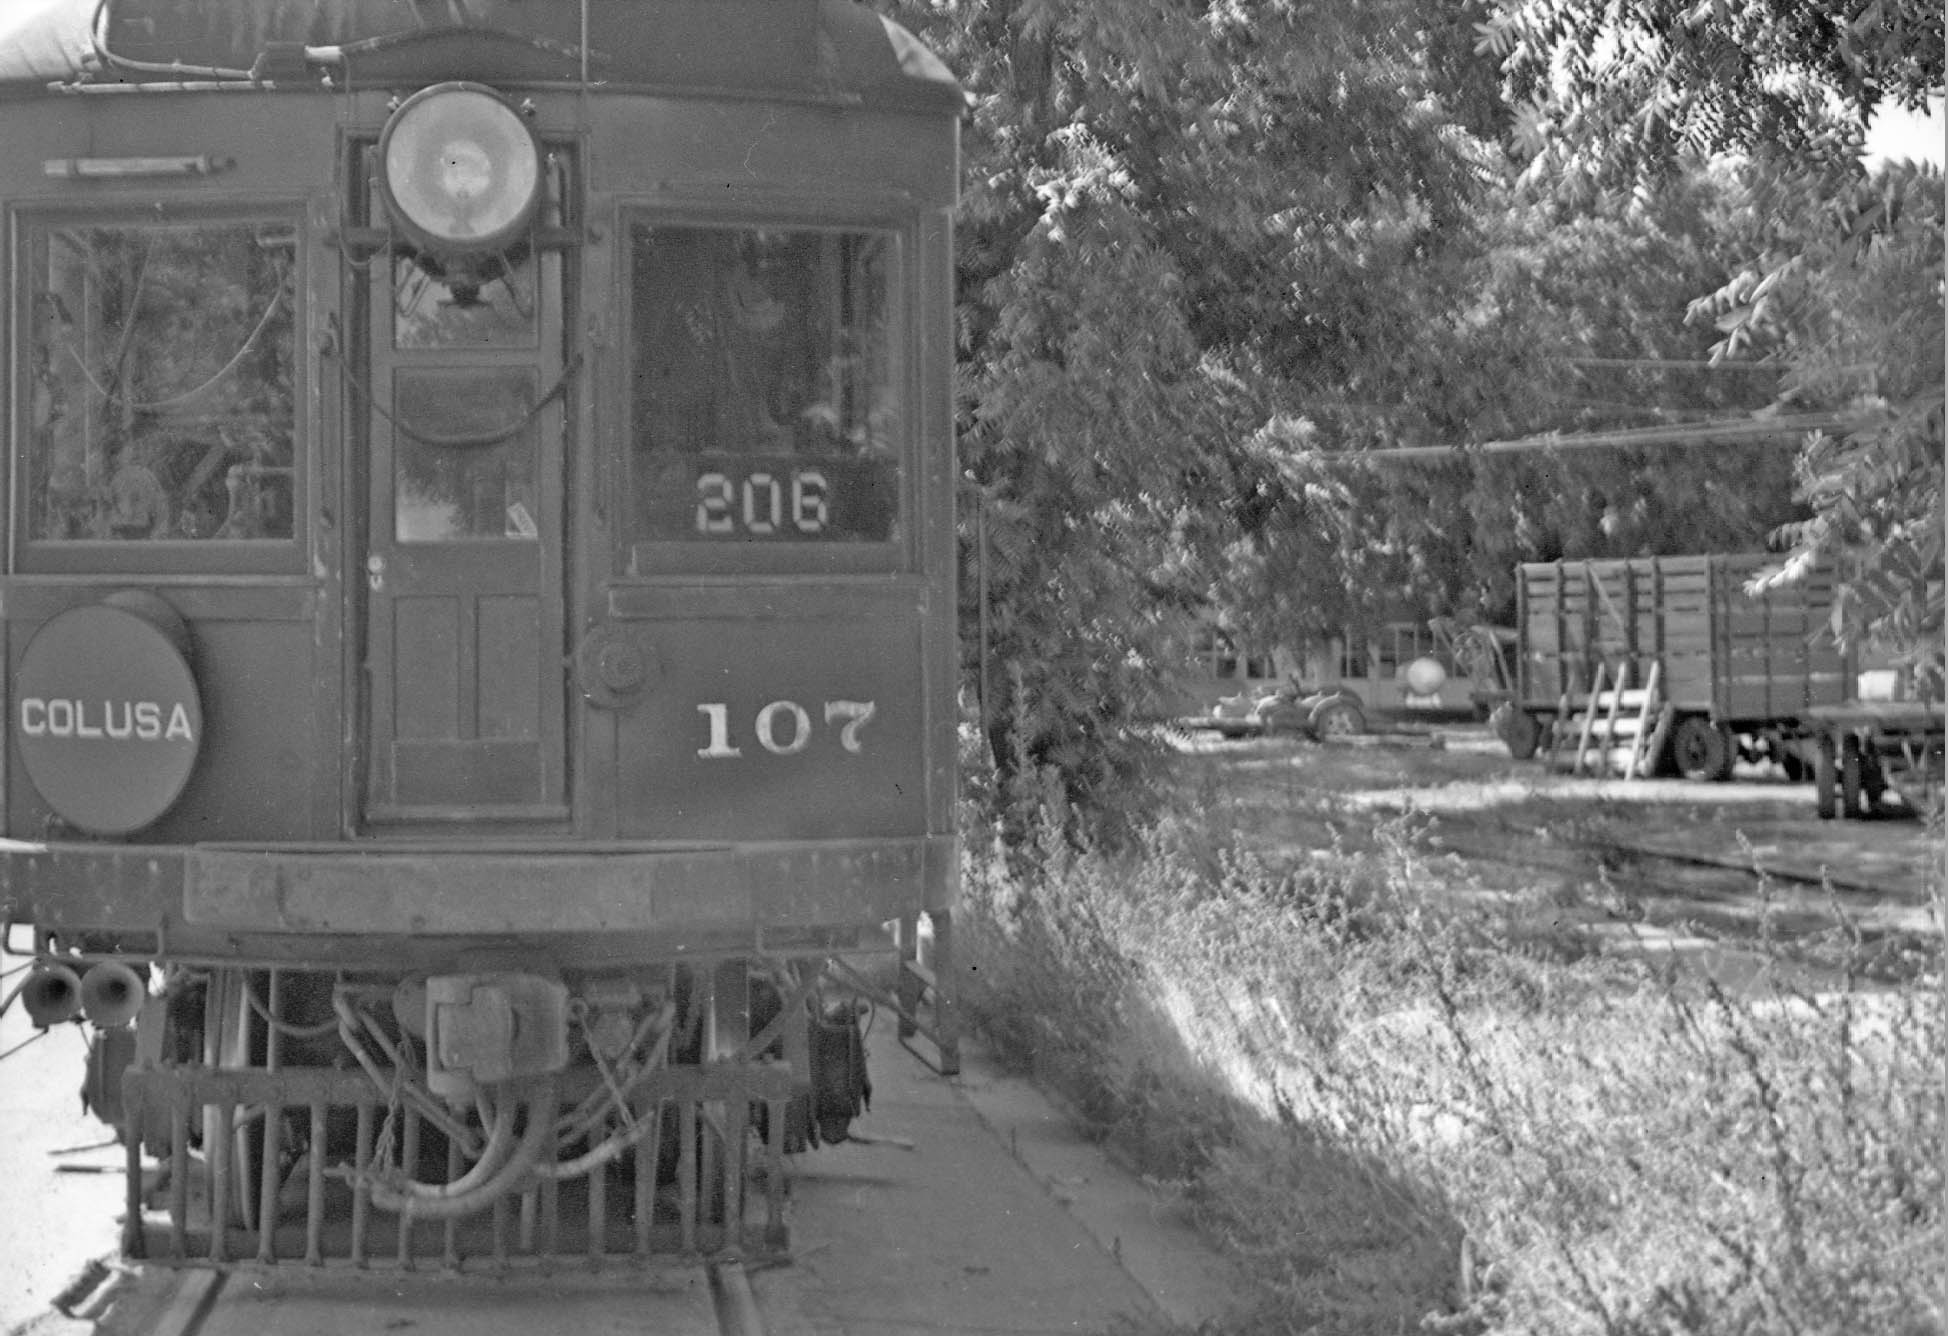
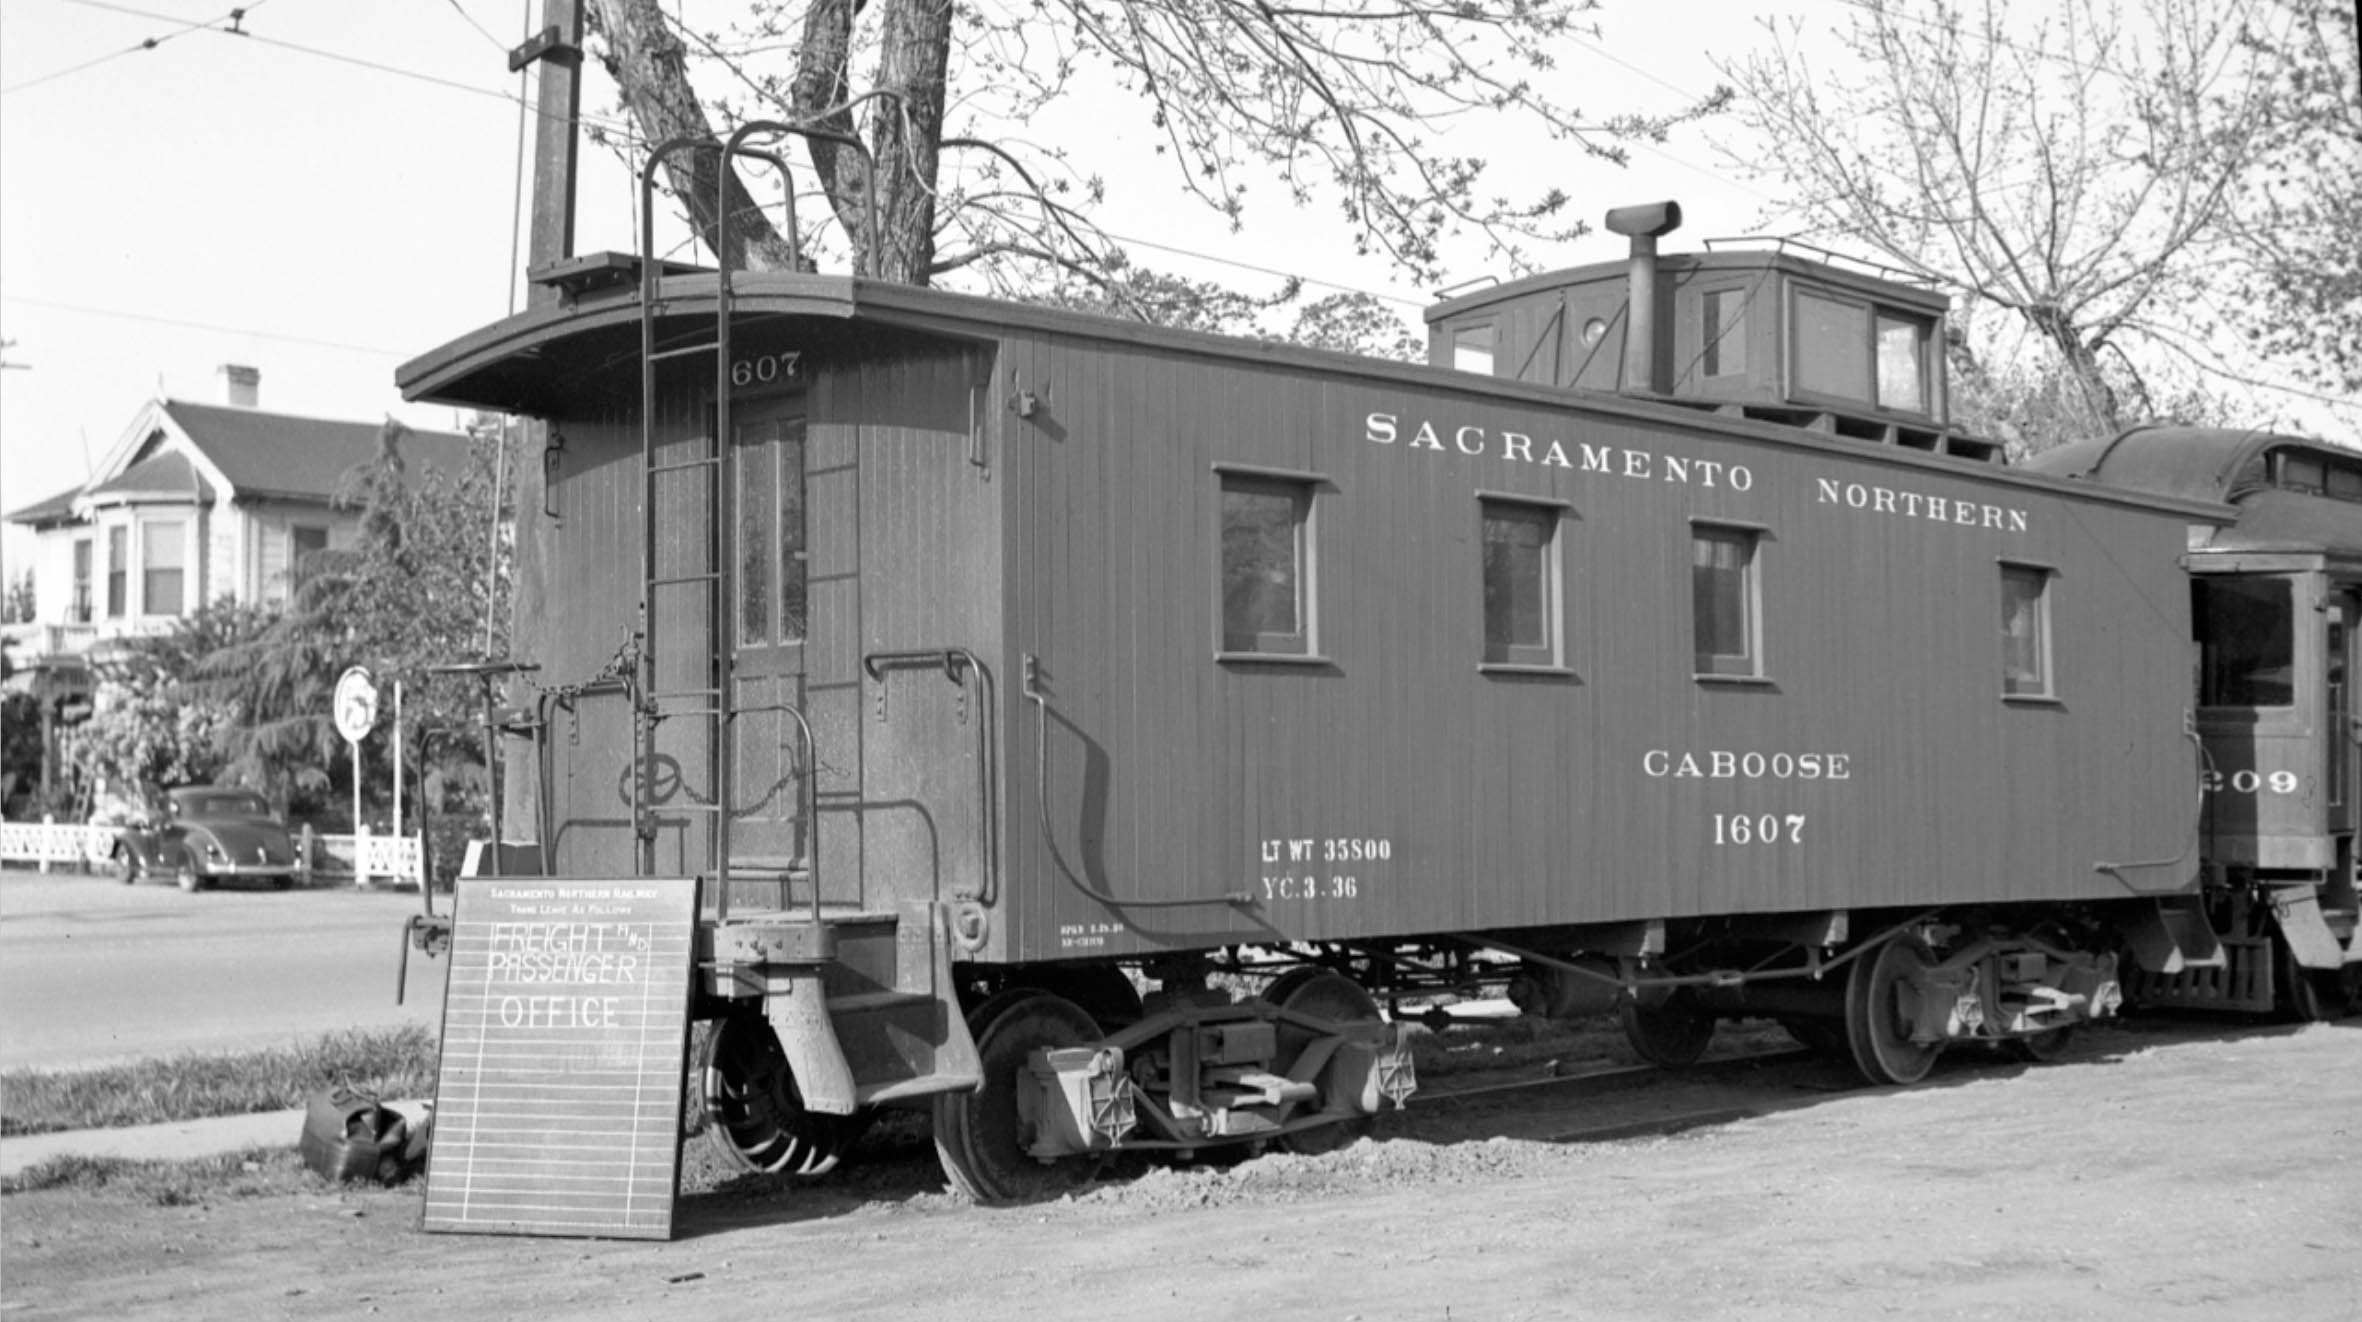
Colusa was the terminal station for a branch line that originated off the Sacramento Northern, SN, mainline at Colusa Jct. in Sutter County, where it headed west. This update will attempt to piece together the scene on Market St. when the electric interurban railway serviced the city. The image shown here from a private excursion of SN 107 and parlor car Sacramento on June 16, 1940 at 5th St. is a starting point.
L338-10-Wilbur C. Whittaker Photo, Courtesy Arnold Menke, (Image 2 of 52)
From Colusa Jct. in Sutter County, green arrow, to the passenger ticket office in Colusa at Market St. and 7th St., turquoise arrow, the line covered 21.17 miles of single track mainline with a third rail power source that became double-track with overhead wire within the town. It had two large water crossings, the seasonal Butte Slough, and the Sacramento River west of Meridian. The line was prone to flooding that temporarily suspended service on multiple occasions. The agricultural section between Colusa Jct. and Colusa will be covered in other updates.
L338-15-David Rumsey Map Collection, David Rumsey Map Center, Stanford Libraries, top, Google Maps, Bottom, (Image 3 of 52)
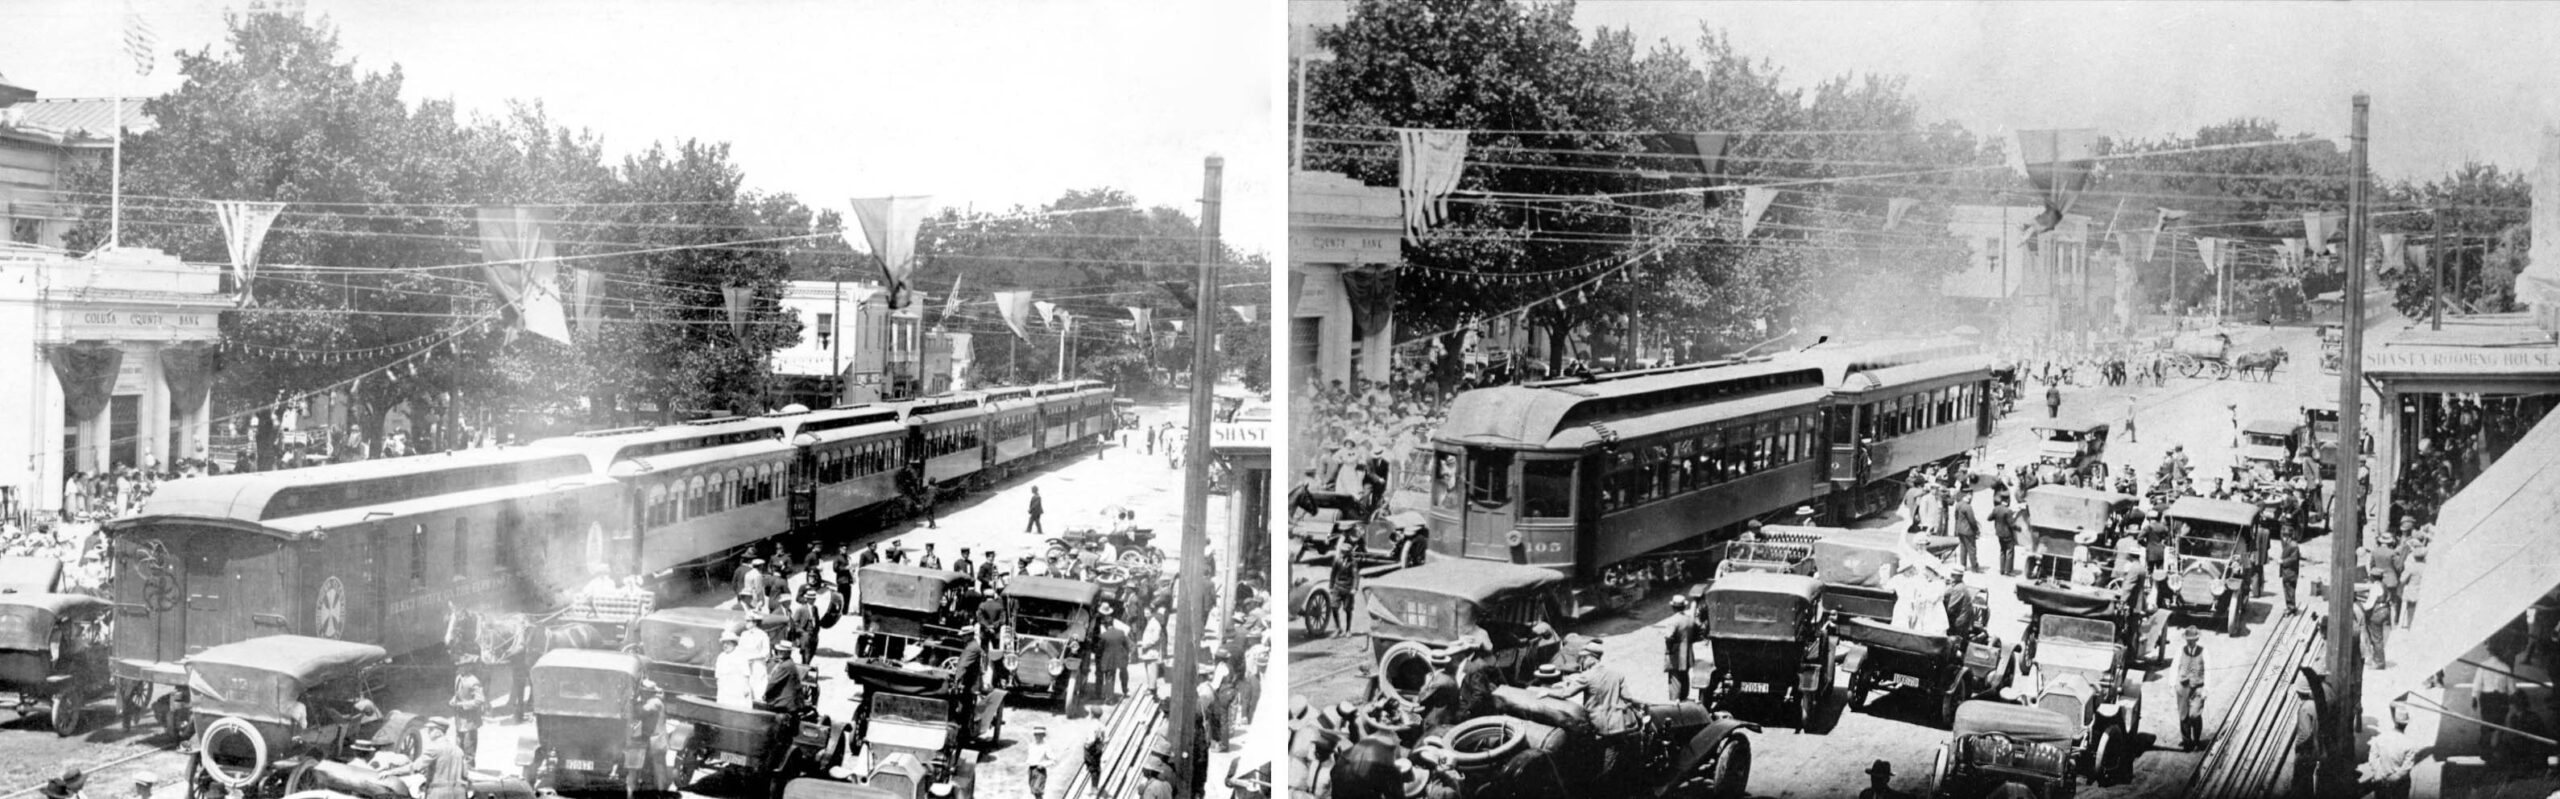
As Ira Swett wrote in the publication “Sacramento Northern”, Interurban Press, the Northern Electric Railway, NE, Marysville-Colusa Branch, M&C, as it was known since its incorporation on May 6, 1910, began operation on June 13, 1913, with the seven-car train seen on the left as the first train with cars 127, 129, 106, 220, 226, 229, and baggage trailer 90. The second train, seen on the right, consisted of no. 10 of the M&C and NE 105. The Colusa County Bank building seen in these images is still standing next to the Colusa County Courthouse in 2025.
L338-20-NE Photos, Courtesy BAERA, Western Railway Museum Archives, 258940sn, l, 211979, r, (Image 4 of 52)
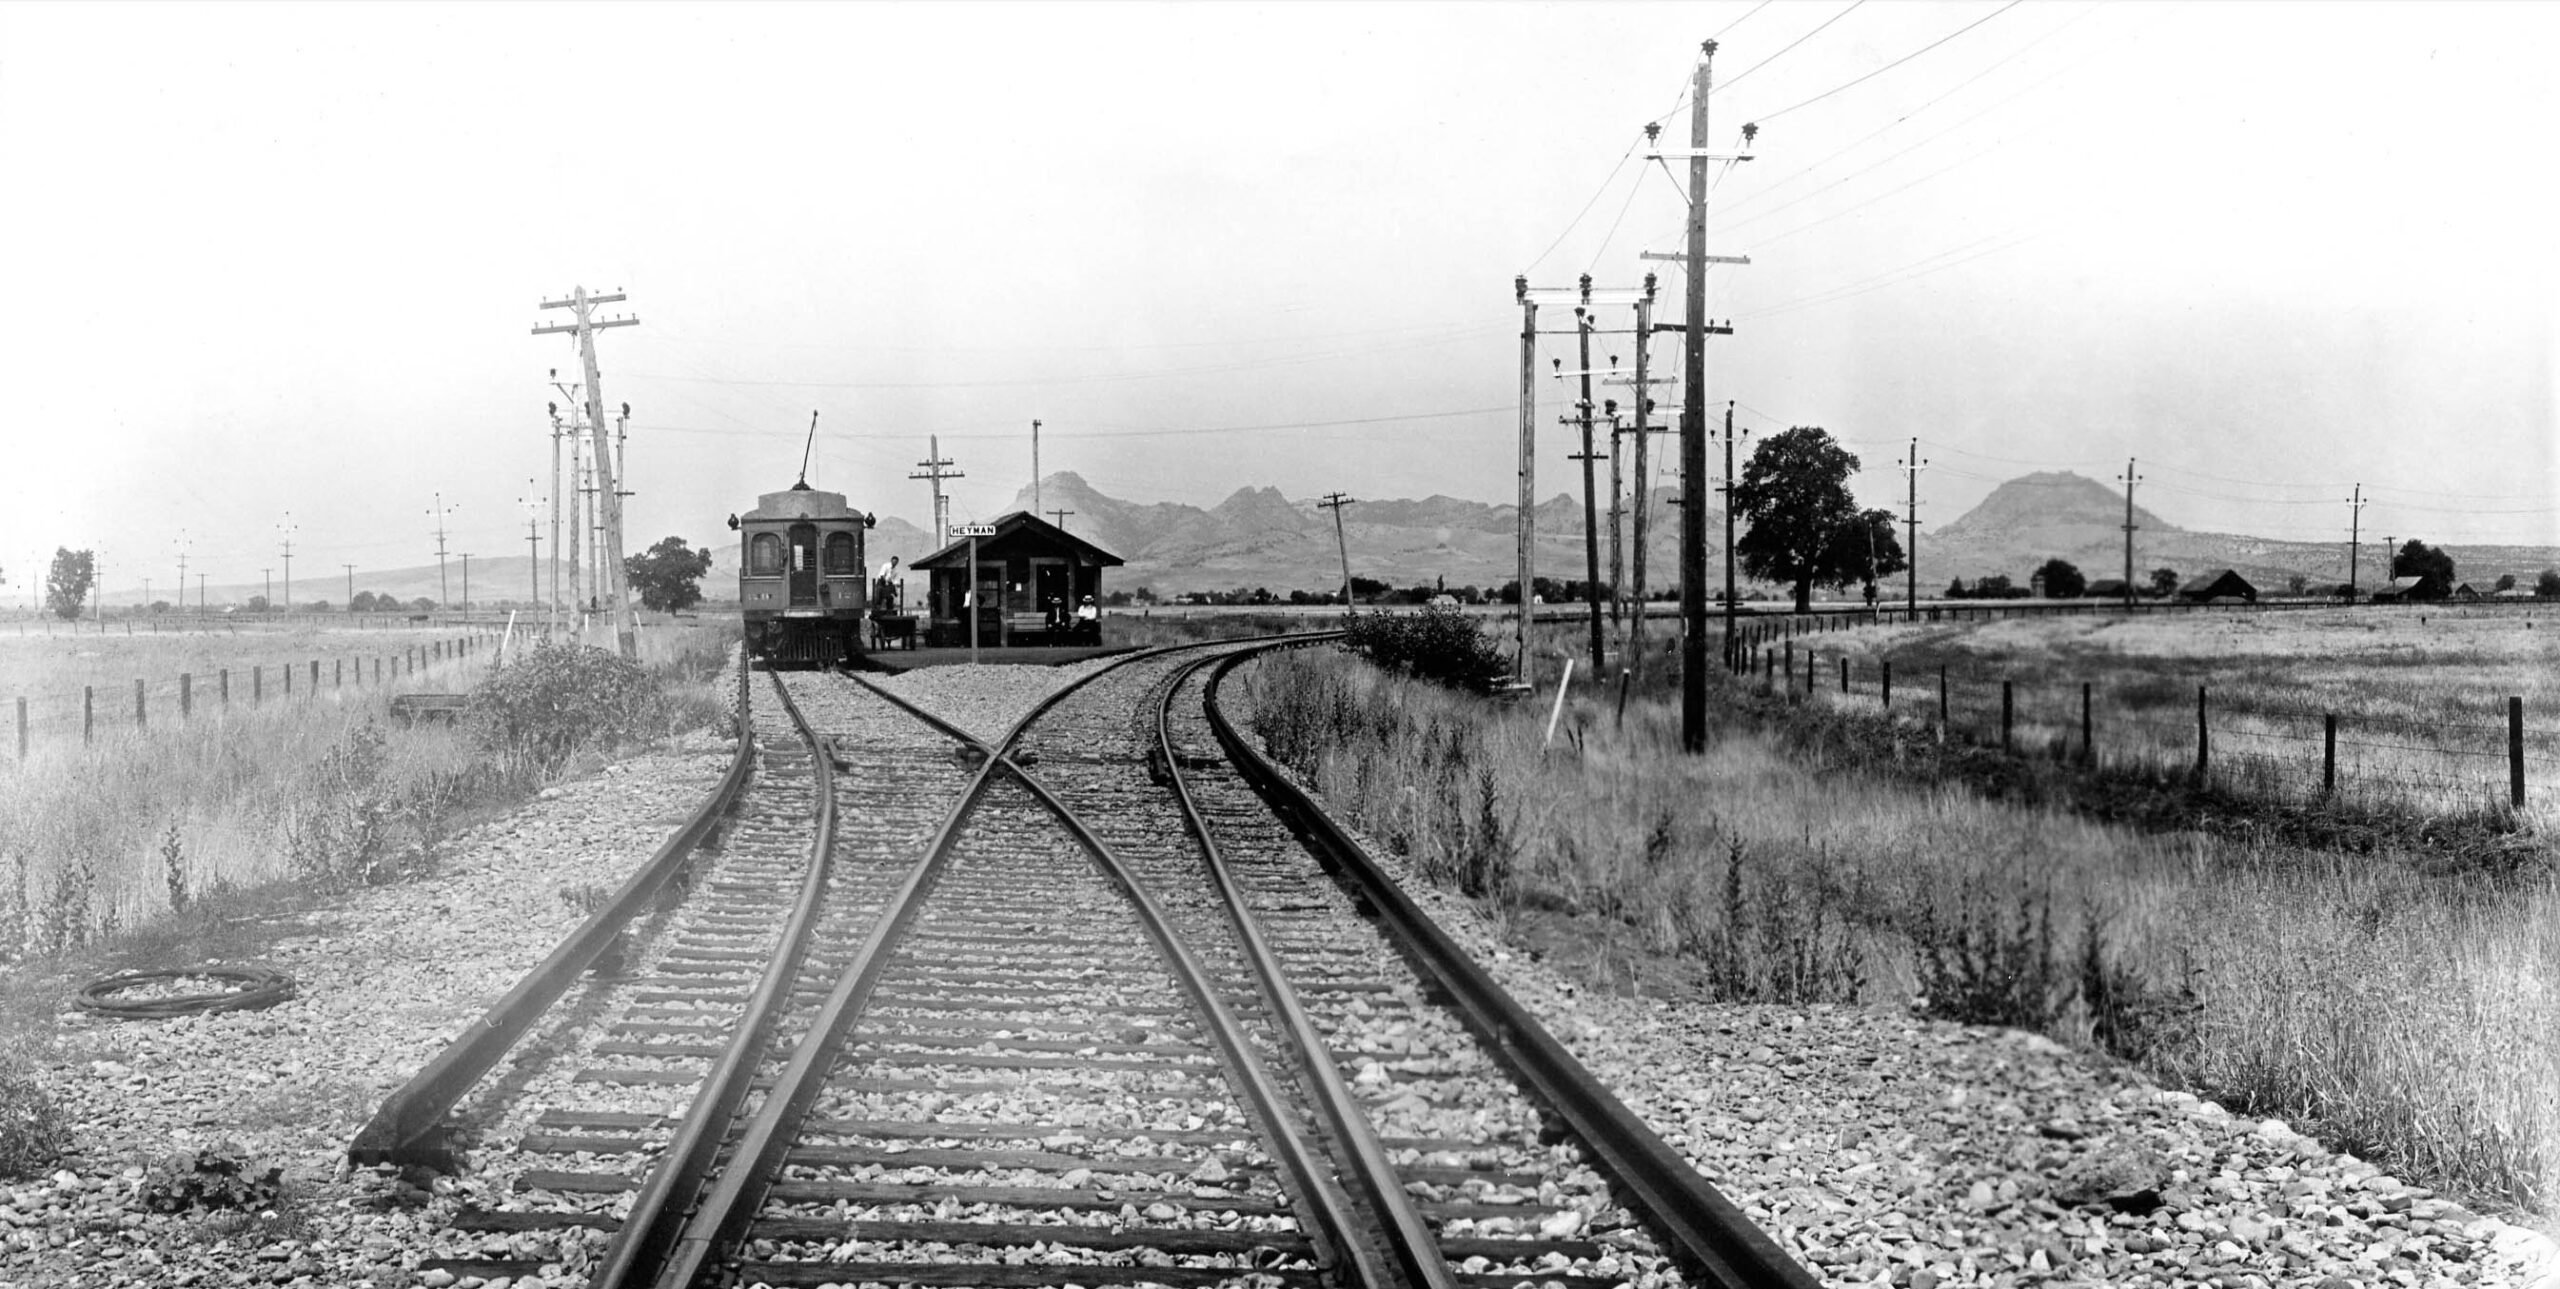
Despite the name M&C, the branch line initially only went as far east as Colusa Jct., named Heyman until about 1925. The Oct. 2, 1913 Appeal-Democrat, page 1, indicated that the NE hired separate dispatchers at Heyman to handle the heavy traffic on the new branch. The Dec. 11-12, 1914 editions indicated that after some experimenting, the NE would extend Colusa Branch trains to Marysville in 1915. Colusa patrons would no longer have to deal with rainy weather at the small shelter seen here in an east view ca. 1913 A win-win for the NE and the City of Marysville. Credit to Jeff Asay for uncovering this information. For Oct. 2nd article, click here, For Dec. 11th article, click here, for Dec. 12th article, click here.
L338-22-American Photo Co. Photo, Robert L. Stein Collection, Courtesy BAERA, Western Railway Museum Archives, 178857sn, (Image 5 of 52)
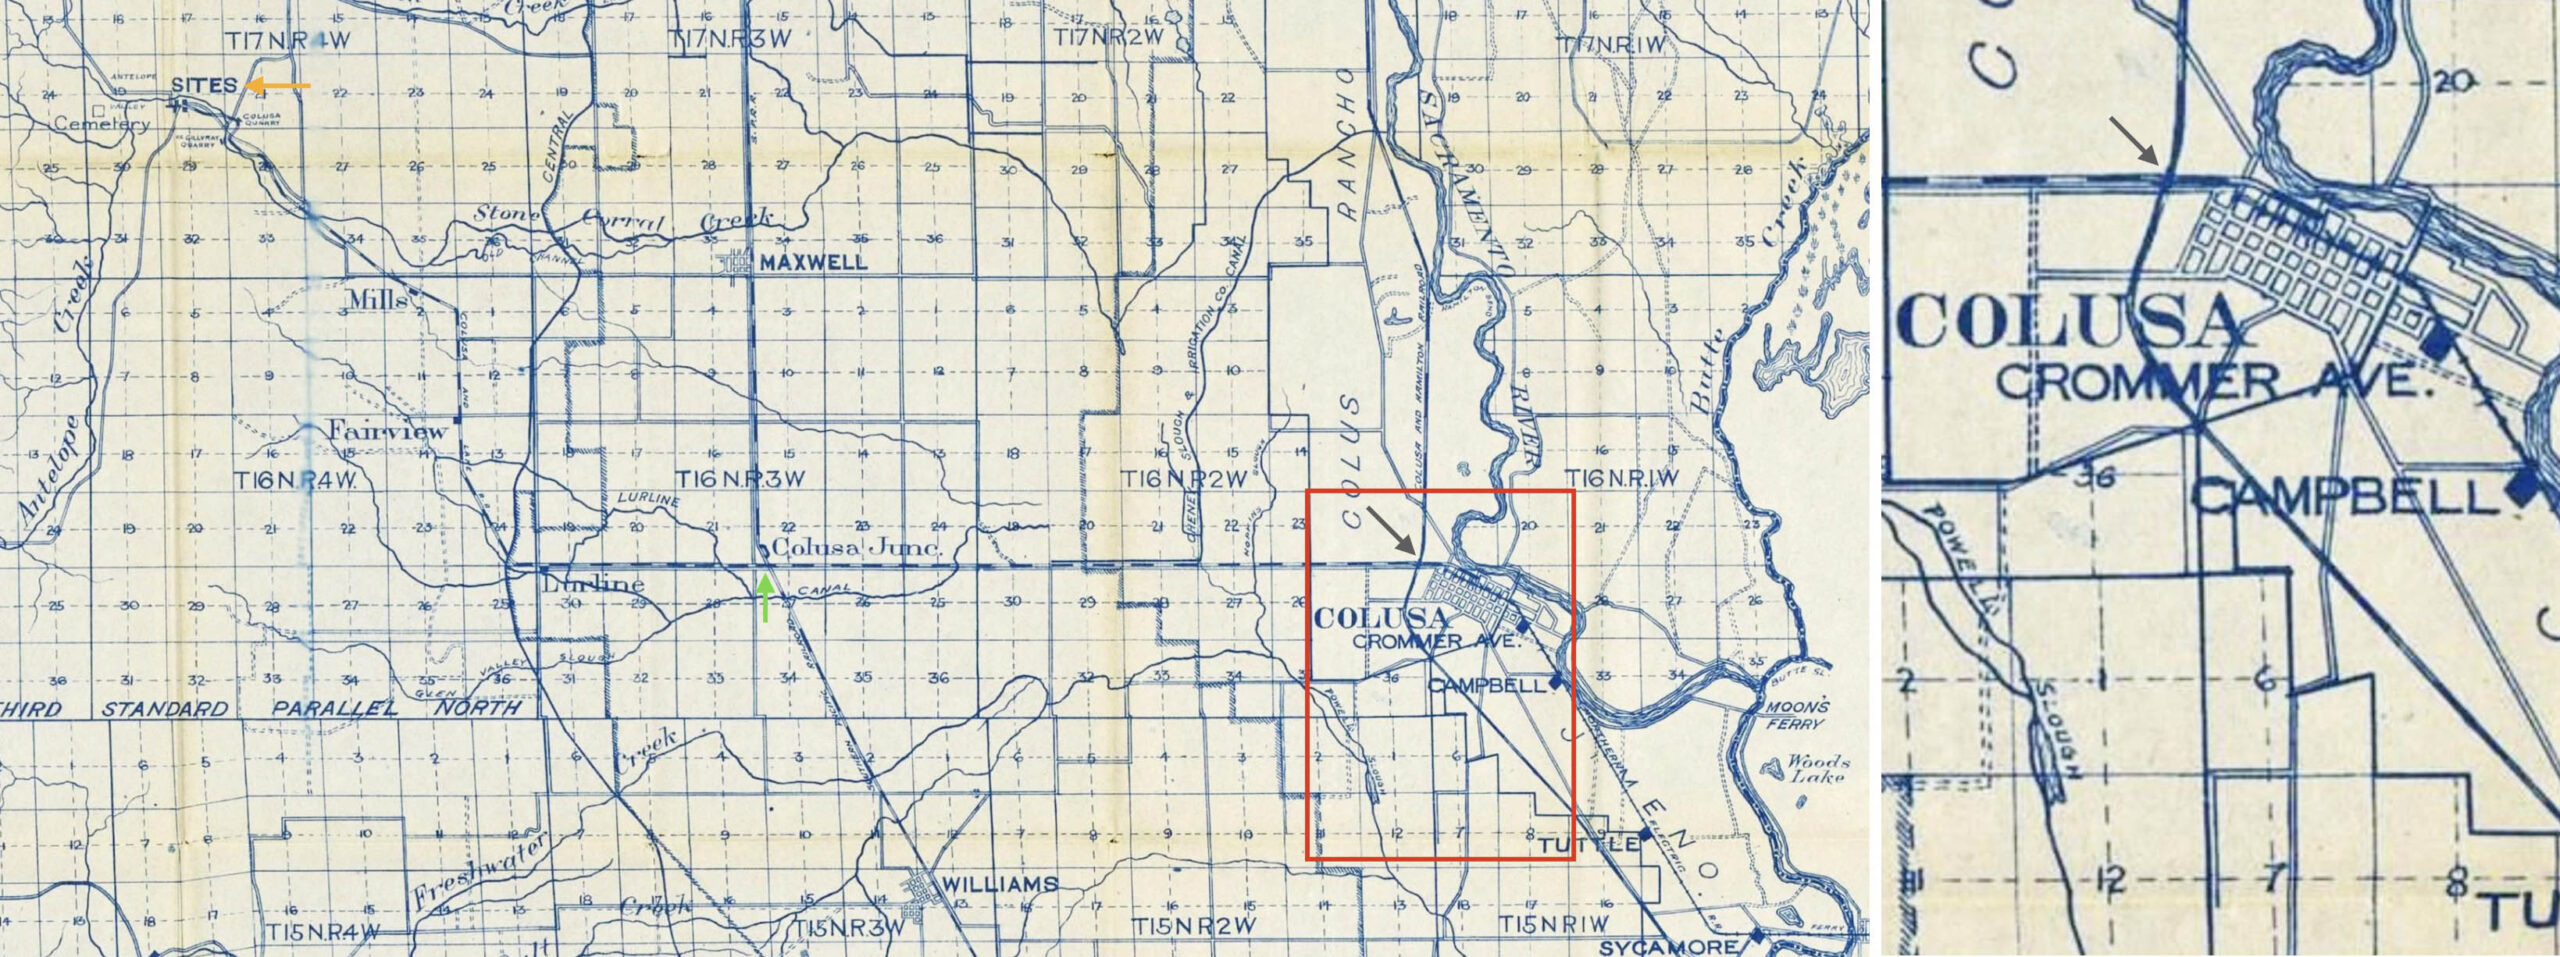
When the M&C began service it had company as shown on this map and insert from 1913. The Colusa & Lake RR, C&L, was a narrow gauge line that ran from Colusa to Sites, orange arrow, beginning in 1886, handling both freight and passengers until those services ceased in 1914 and 1916, respectively. It crossed the Colusa & Hamilton RR, C&H, grey arrow, and the Southern Pacific, SP, mainline at a different Colusa Jct. in Colusa Co., green arrow. The C&H was incorporated in 1911 to connect Harrington north to Hamilton City.
L338-25-University of North Texas Libraries, The Portal to Texas History, University of Texas at Arlington Library (See Legend of L338-26 for Full Attribution), (Image 6 of 52)
The repeat of this figure is to provide space for the preferred attribution. Edward Denny & Co. Denny’s pocket map of Colusa County, California, compiled from latest official and private data, map, 1913, San Francisco, click here, accessed November 13, 2025, University of North Texas Libraries, The Portal to Texas History, click here, crediting University of Texas at Arlington Library.
L338-26-University of North Texas Libraries, The Portal to Texas History, University of Texas at Arlington Library (See Legend of L338-26 for Full Attribution), (Image 7 of 52)
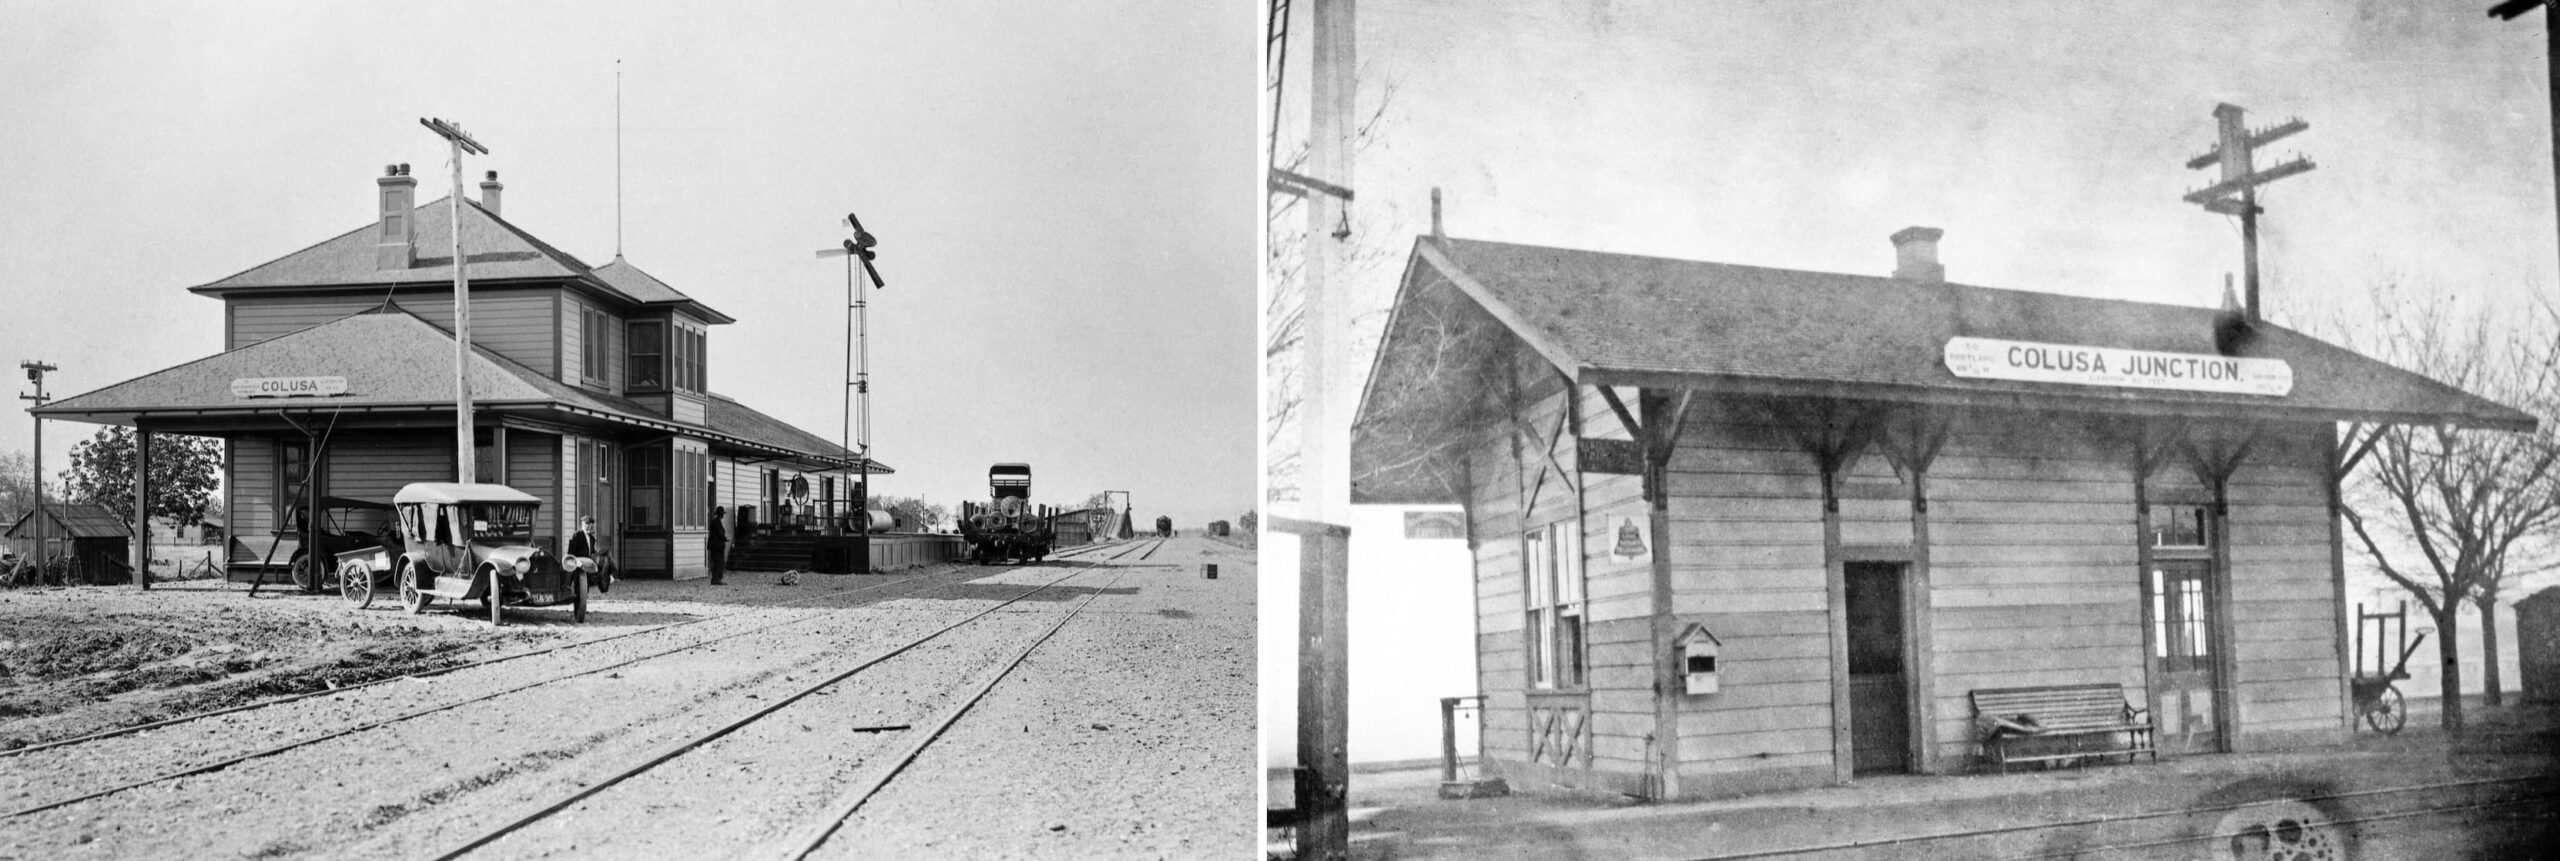
The SP would acquire the C&H in 1917, and it would run as a branch line between Hamilton City connecting to the mainline in Harrington until the SP filed for abandonment of the line in three phases between 1973-1984. The depot building west of 14th St in Colusa is seen on the left from Apr. 21, 1921. On the right is the SP mainline depot at Colusa Jct. ca. 1912. The C&L crossed the SP mainline here, and secret survey photos taken by the SP housed at the Western Railway Museum Archives, nos. 155544-155563, suggest they did consider acquiring the right-of-way, but never did. For more on the C&L, click here, for more on the C&H, click here.
L338-28-Southern Pacific Photos, Courtesy BAERA, Western Railway Museum Archives, 30001, l, 30002, r, (Image 8 of 52)
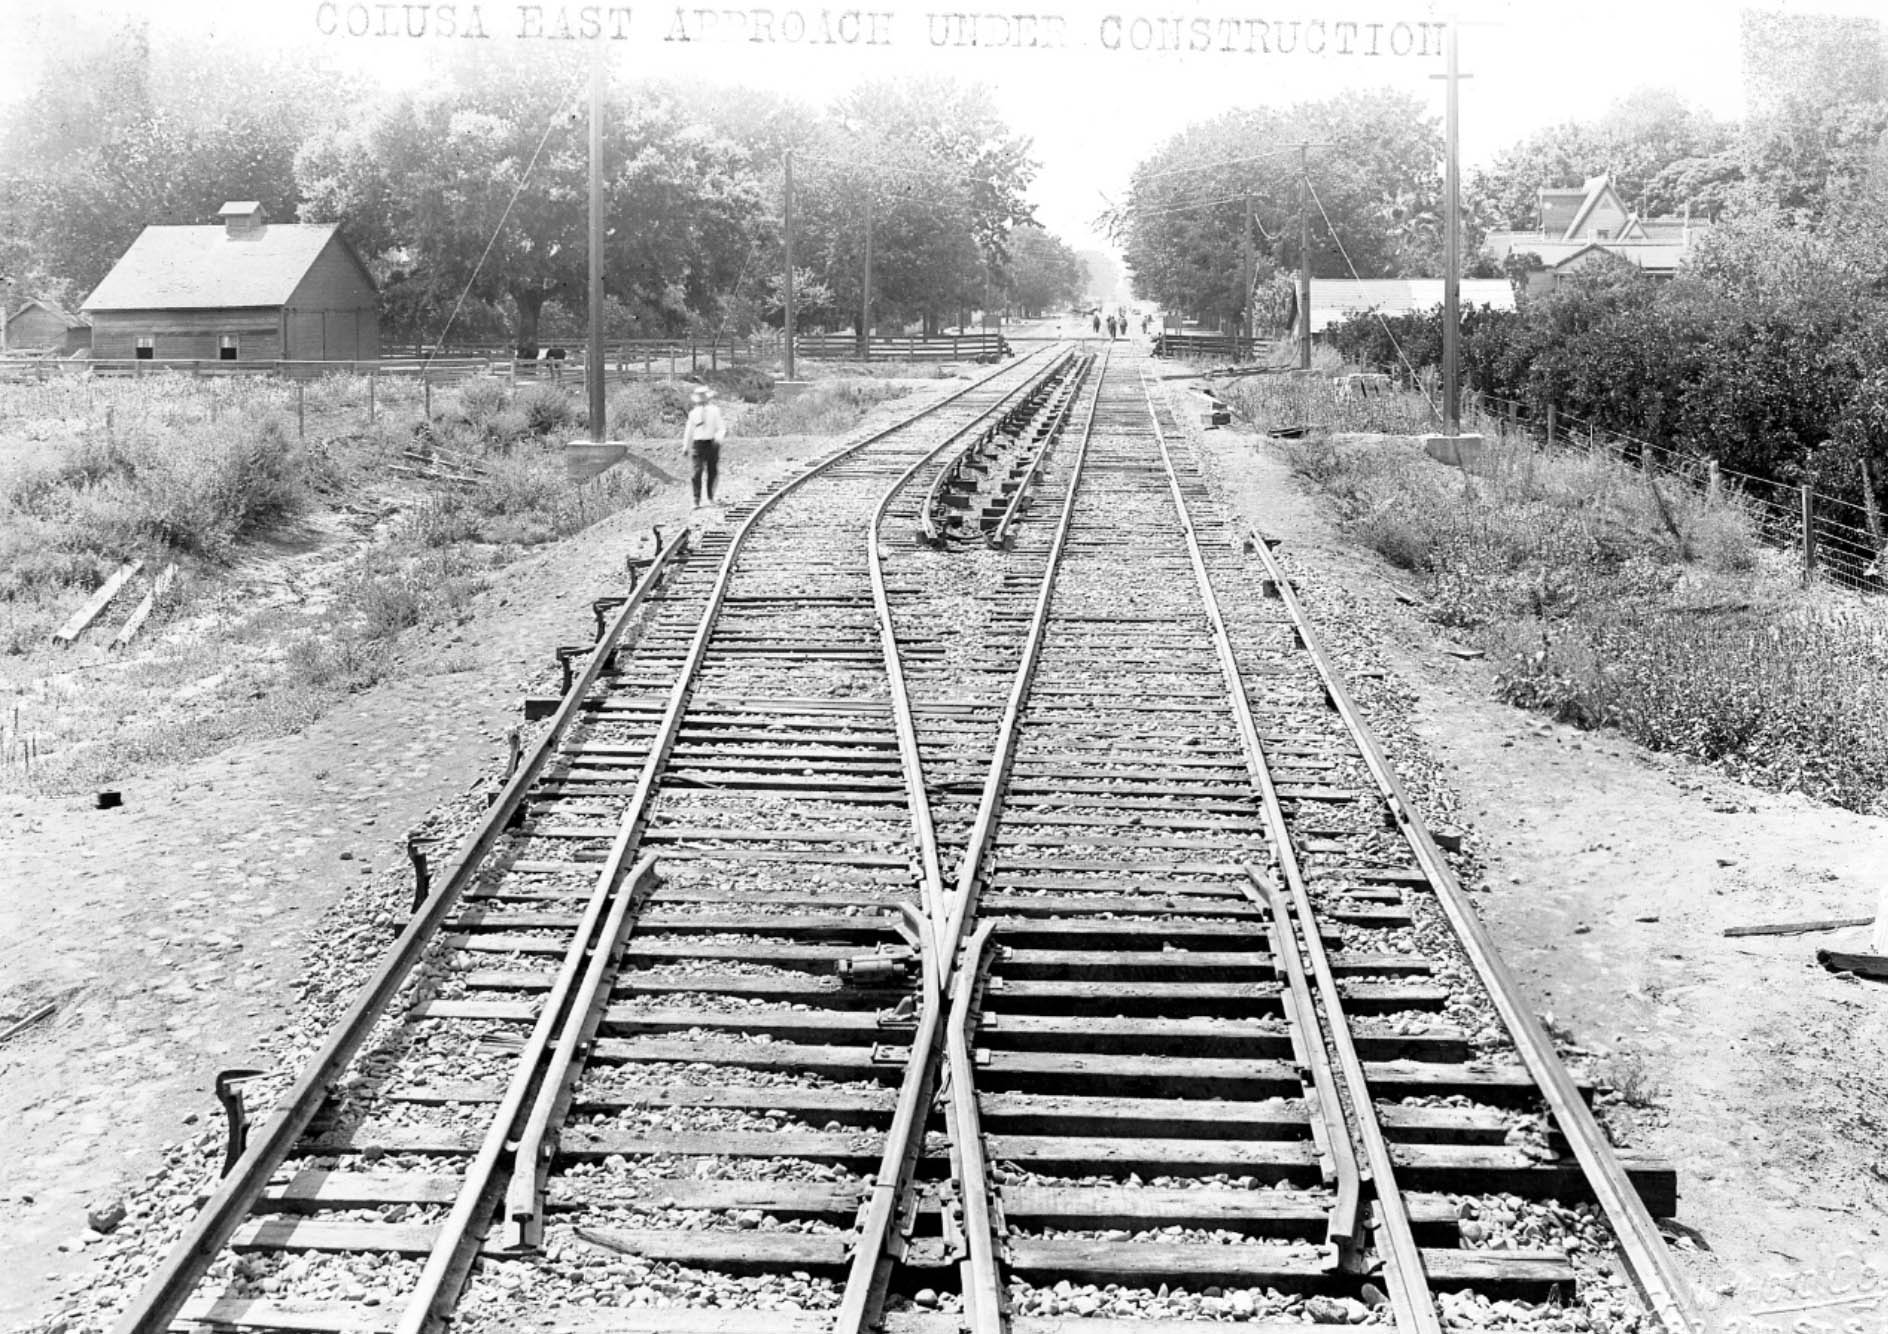
This west view from 1913 shows the entry of the NE into Colusa as it formed a second track and transitioned to overhead catenary before starting at Market St. at Bridge St. Swett had a few more tidbits about the competition in his book. Once acquired, the SP Branch line had infrequent service. For the few years of overlap, the NE did interchange freight with the C&L, albeit by carting transfer of goods due to the different gauges of track. He mentions it was no surprise that the NE took over most of the passenger business as well as having a productive freight business from the orchards and rice fields to the east.
L338-30-American Photo Co. Photo, Courtesy BAERA, Western Railway Museum Archives, 259510sn, (Image 9 of 52)
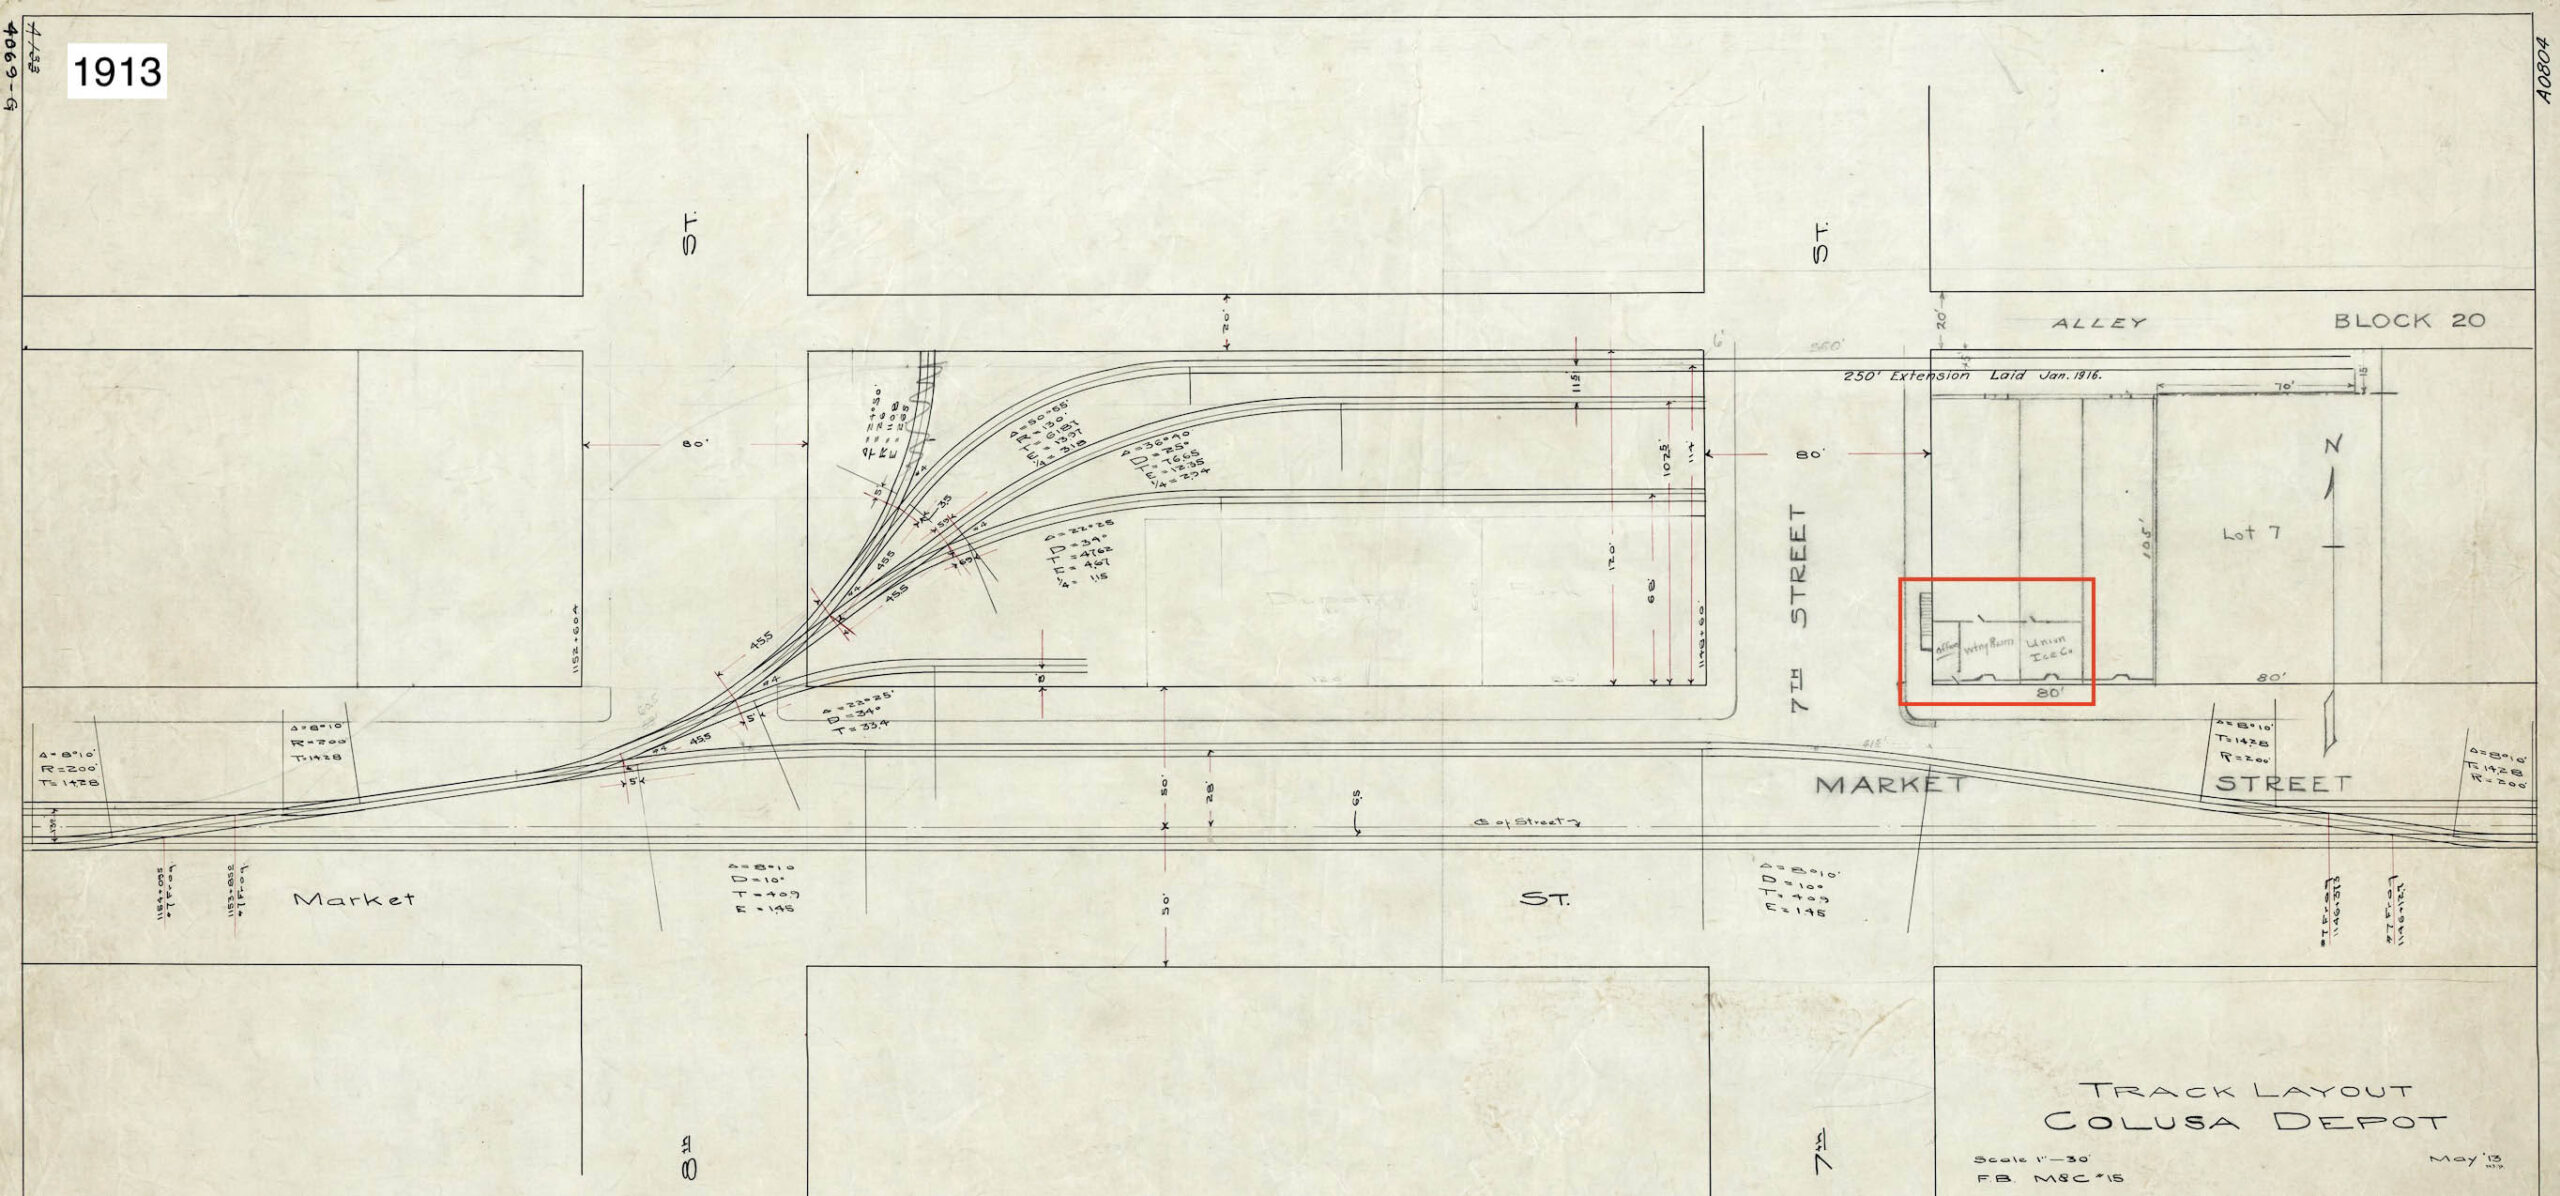
The NE passenger terminus and freight yard are shown in the drawing from 1913. Just to the east of 7th St., the double-track arrangement had a crossover that allowed trains from both directions to approach the ticket office and waiting room at 7th St., enclosed in red, or gain access to the yard between 7th and 8th Sts. Note the adjacent position of Union Ice Co. to the waiting room.
L338-35-Courtesy BAERA, Western Railway Museum Archives, 26993sn, (Image 10 of 52)
This drawing from Jan. 1922 proposed increasing the track entry from the west into the yard, building a freight house in the yard, and moving passenger services to space adjacent to it. None of these changes ever came to fruition.
L338-40-Courtesy BAERA, Western Railway Museum Archives, 36143sn, (Image 11 of 52)
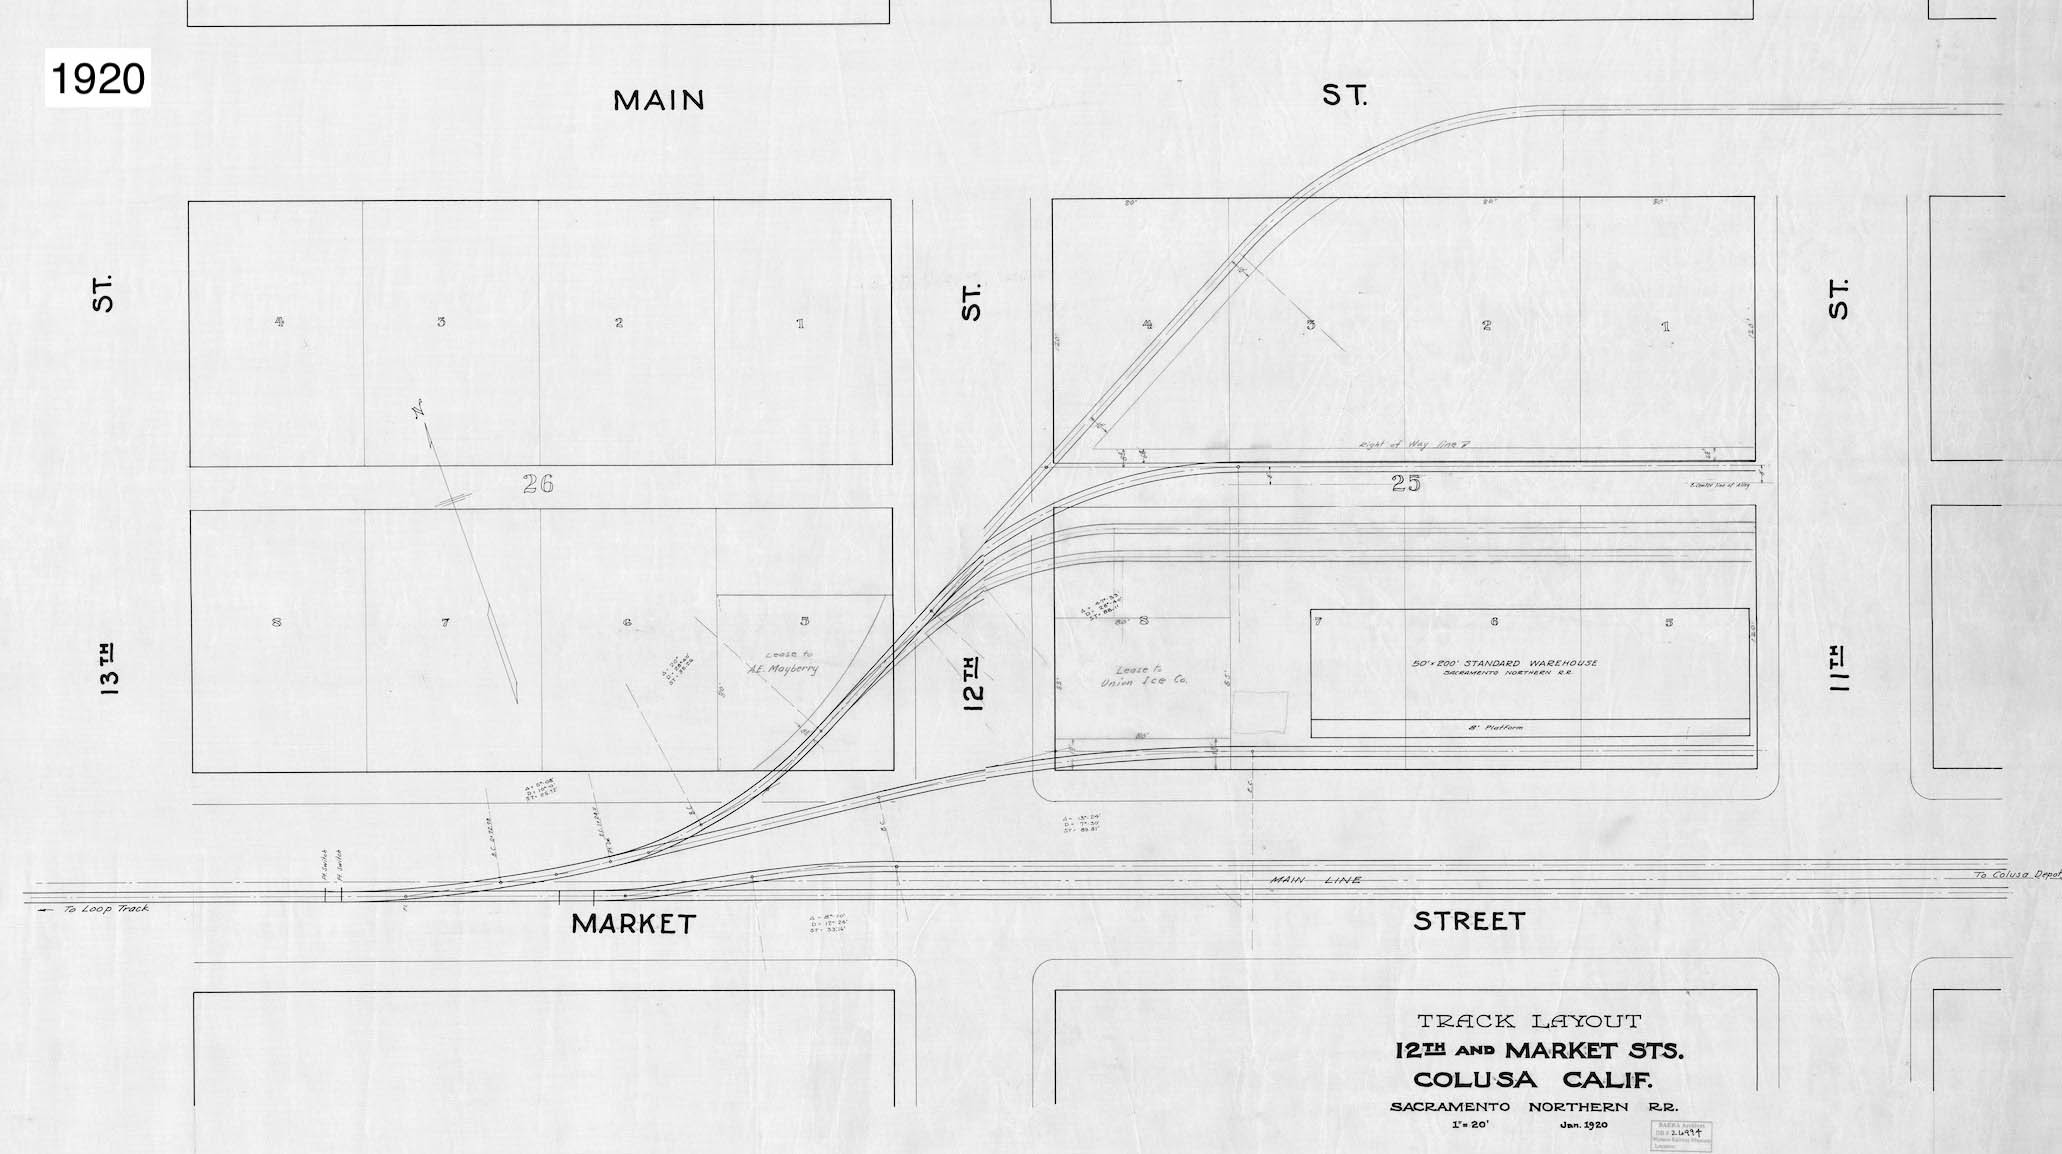
This drawing from Jan. 1920 shows the track arrangement of freight spurs at 12th St. including the track used to transfer goods with the C&L on Main St., although by 1920 the latter was already abandoned. In addition to the SN’s warehouse, it would appear that the Union Ice Co. and A. F. Mayberry received freight service.
L338-45-Courtesy BAERA, Western Railway Museum Archives, 26994sn, (Image 12 of 52)
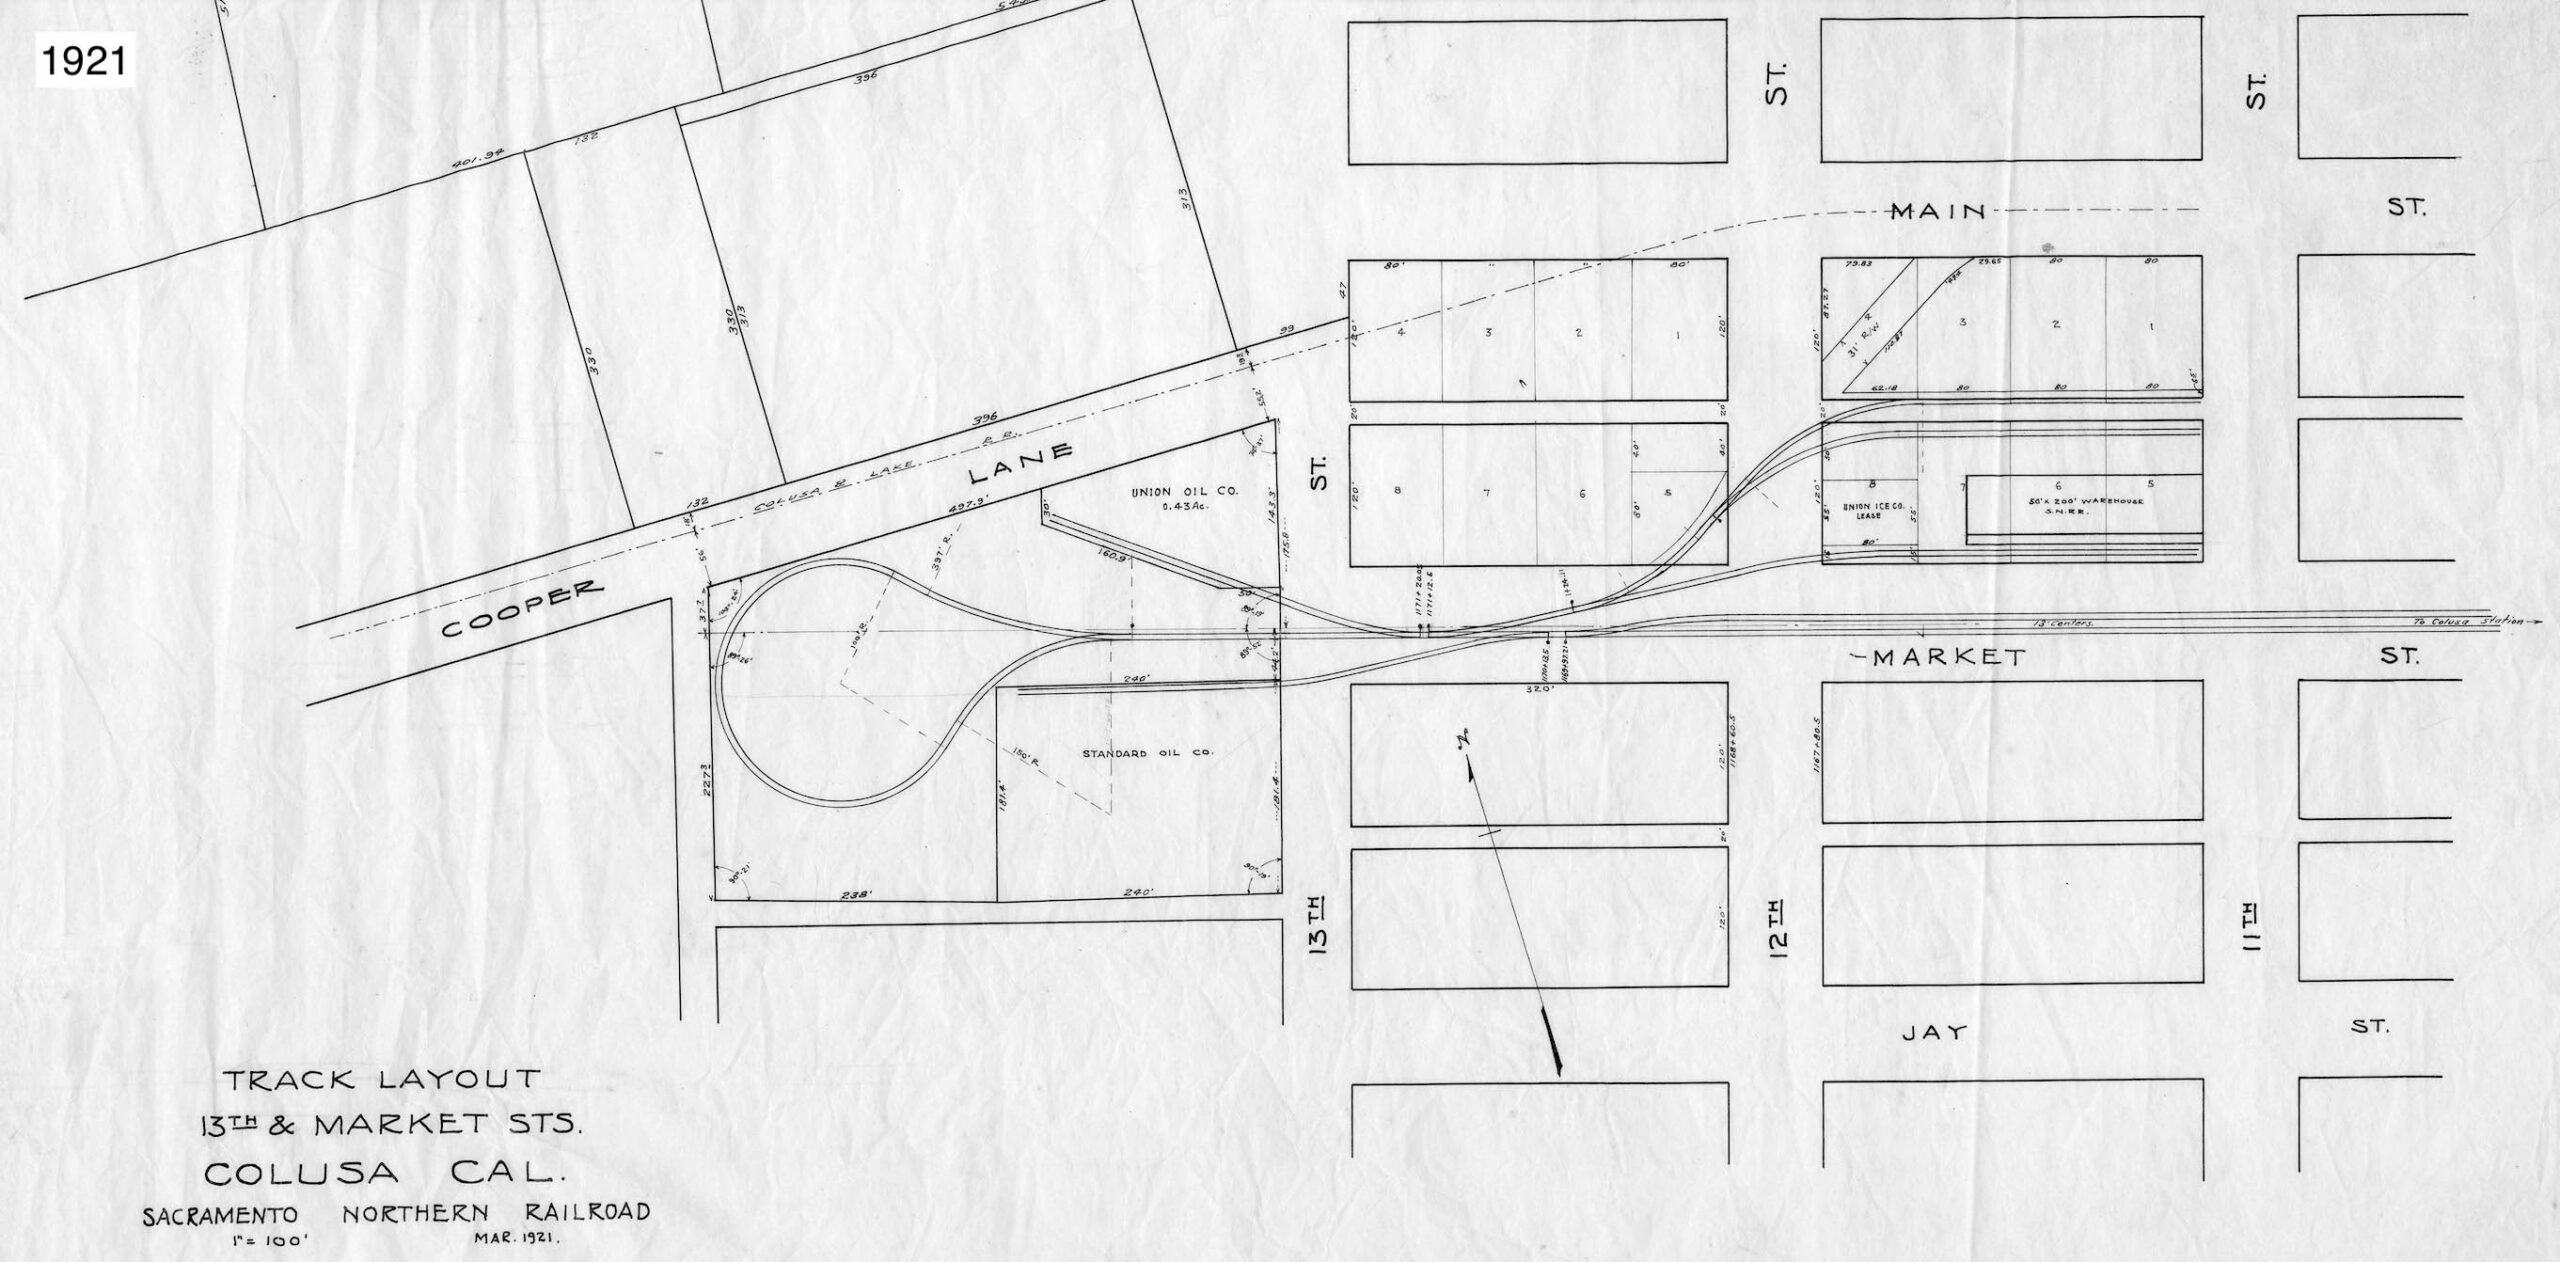
This drawing from Mar. 1921 shows the corral loop that was situated between 13th and 14th Sts. Separate tracks serviced both Union Oil and Standard Oil. Note that the interchange with C&L heading to Main St. at 12th St. has been removed relative to what was shown in the previous diagram from 1920.
L338-50-Courtesy BAERA, Western Railway Museum Archives, 37112sn, (Image 13 of 52)
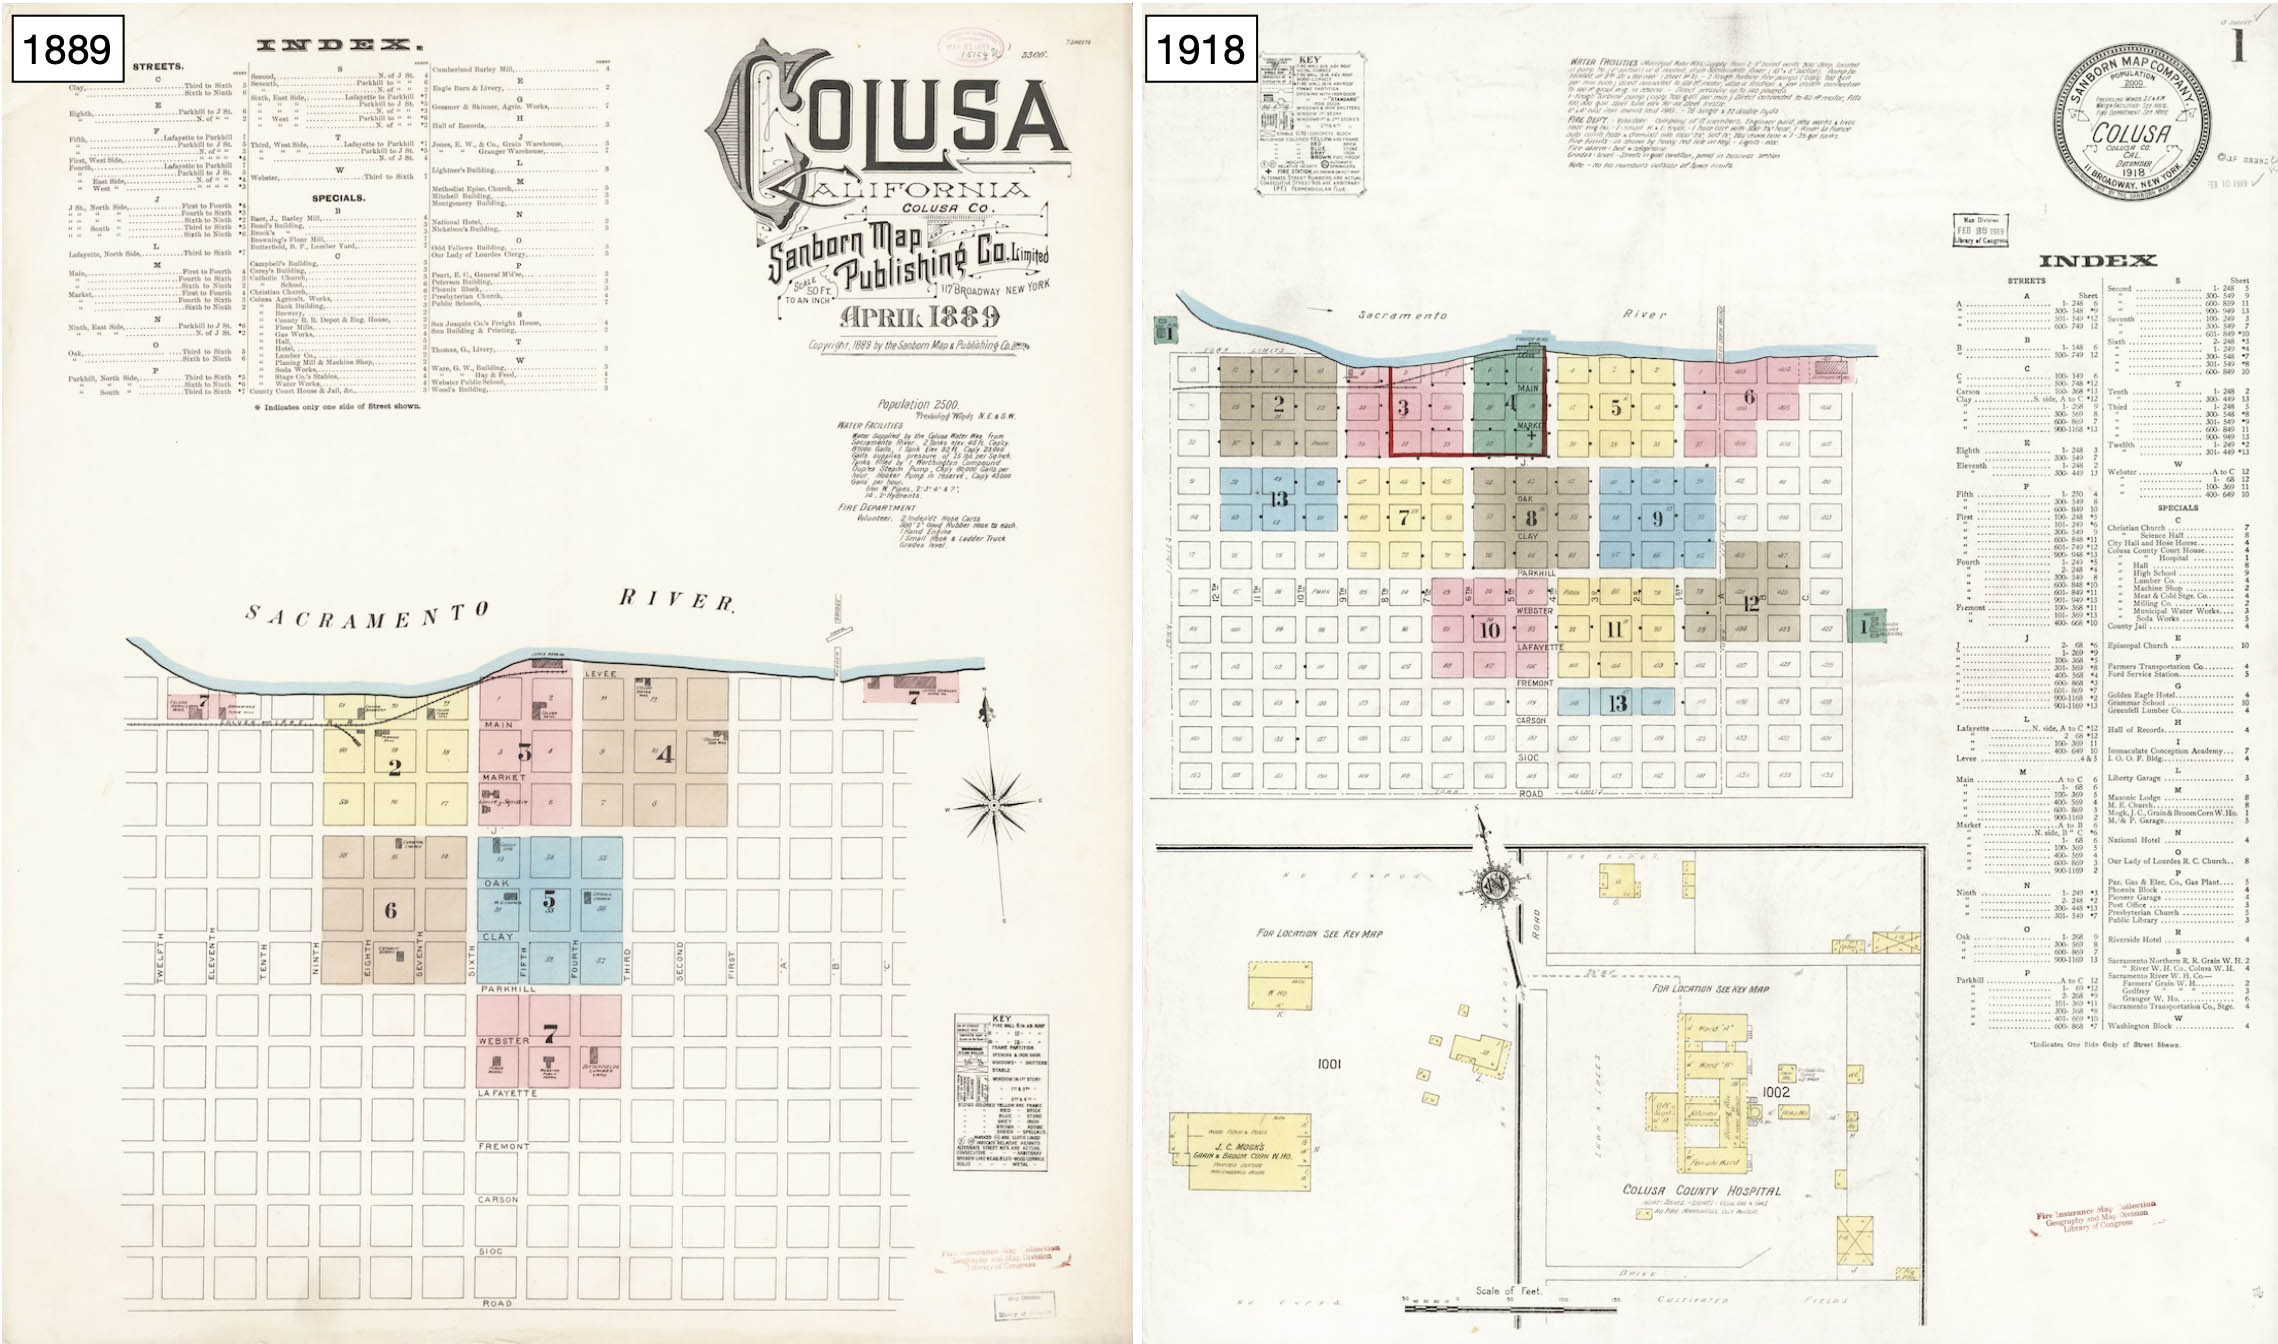
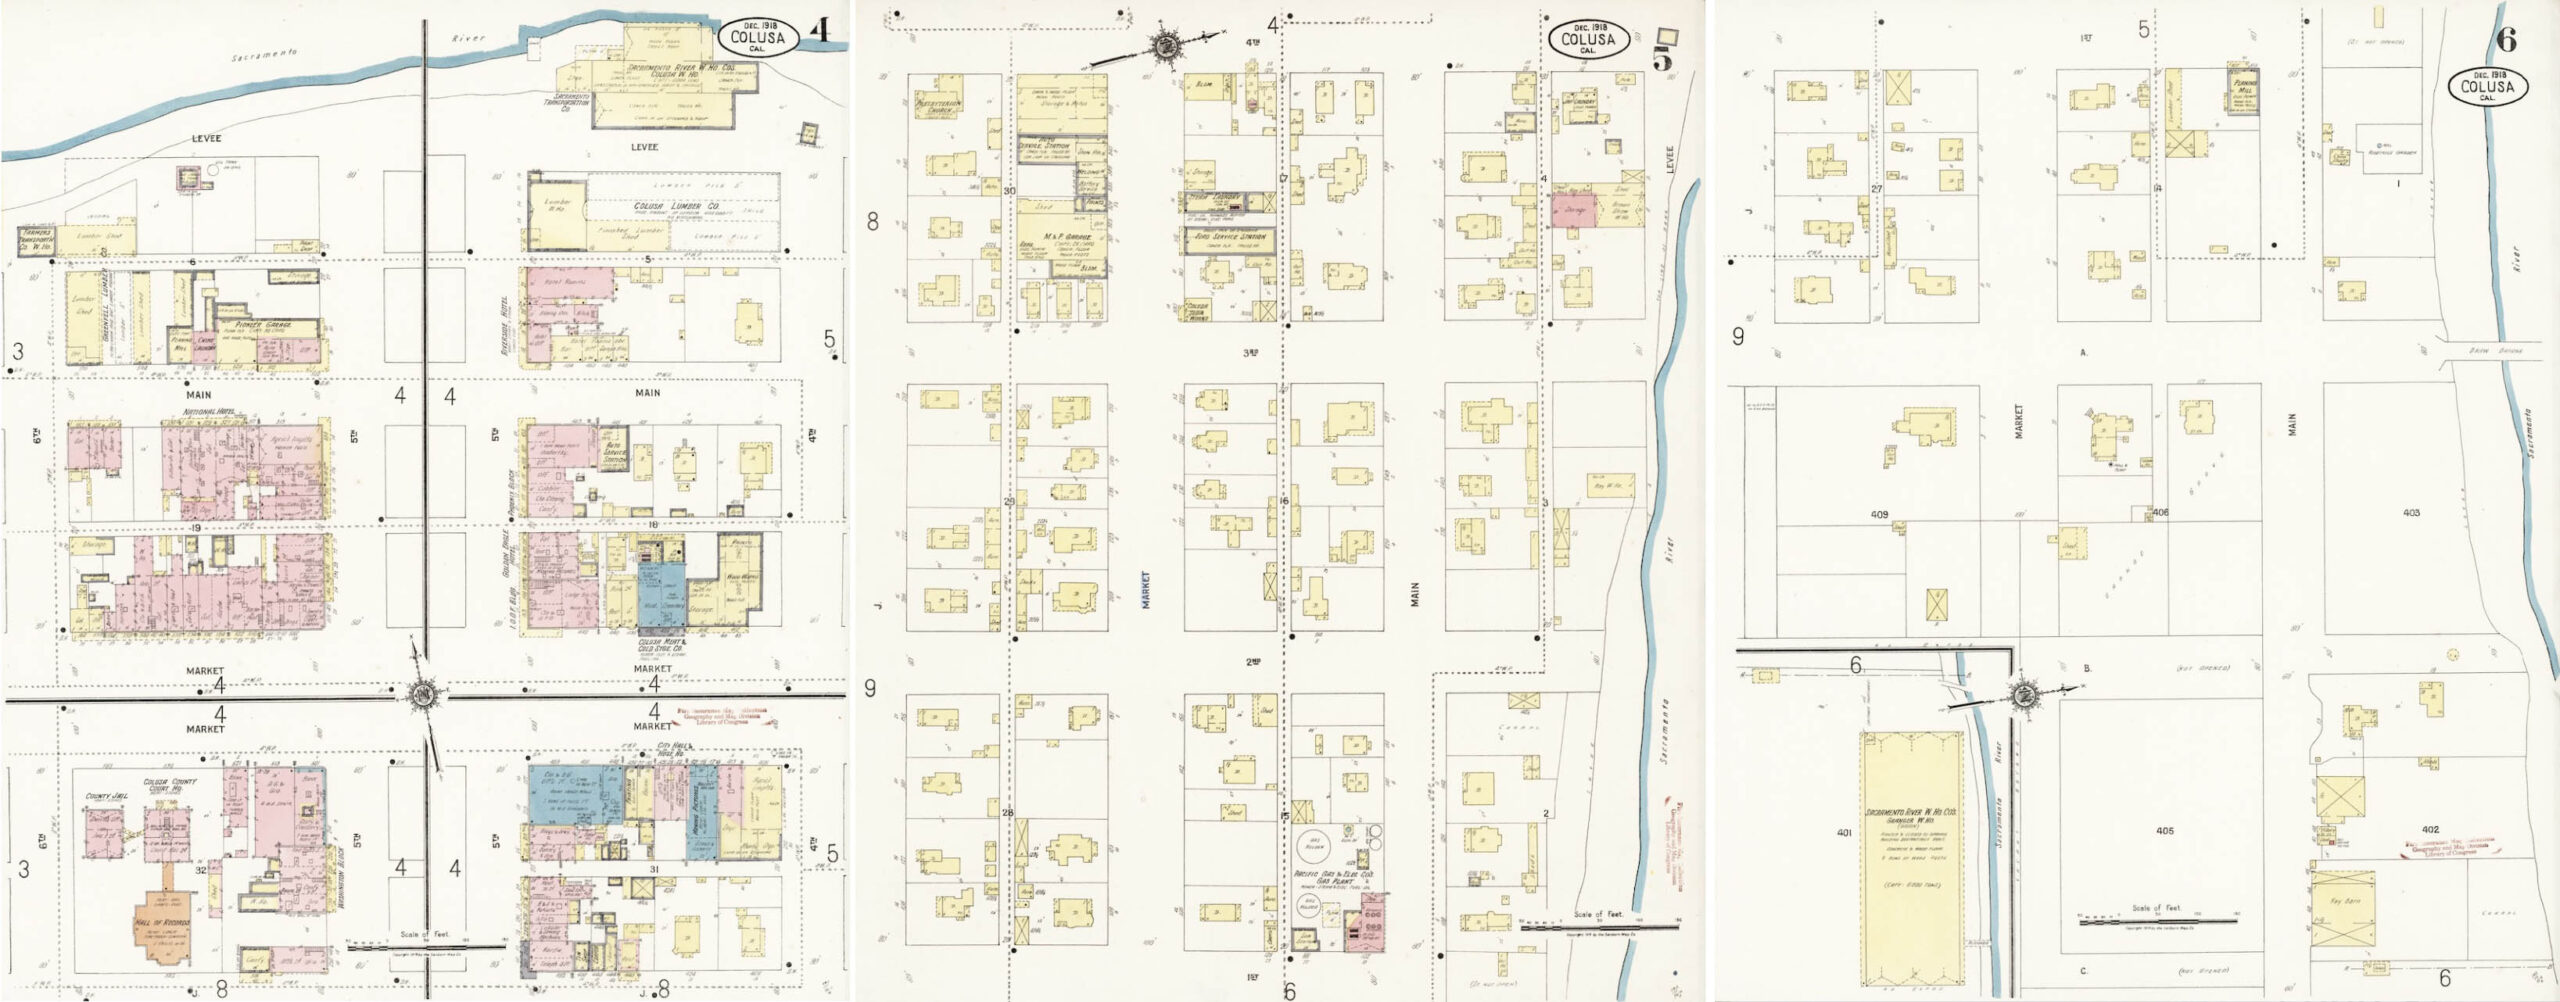
Next for additional details from Sanborn maps from 1889 and 1918 shown here left to right, respectively.
L338-55-Library of Congress Geography and Map Division, Sanborn Map Company, Apr. 1889, l, Dec. 1918, r, (Image 14 of 52)
These maps from 1889 and 1918 show that the track layout of the C&L did not vary much during its existence in Colusa, again noting that the railroad had already been abandoned by 1918. The map from 1918 does not show the position of the SN tracks on Market St., but it does list associated structures as will be seen next.
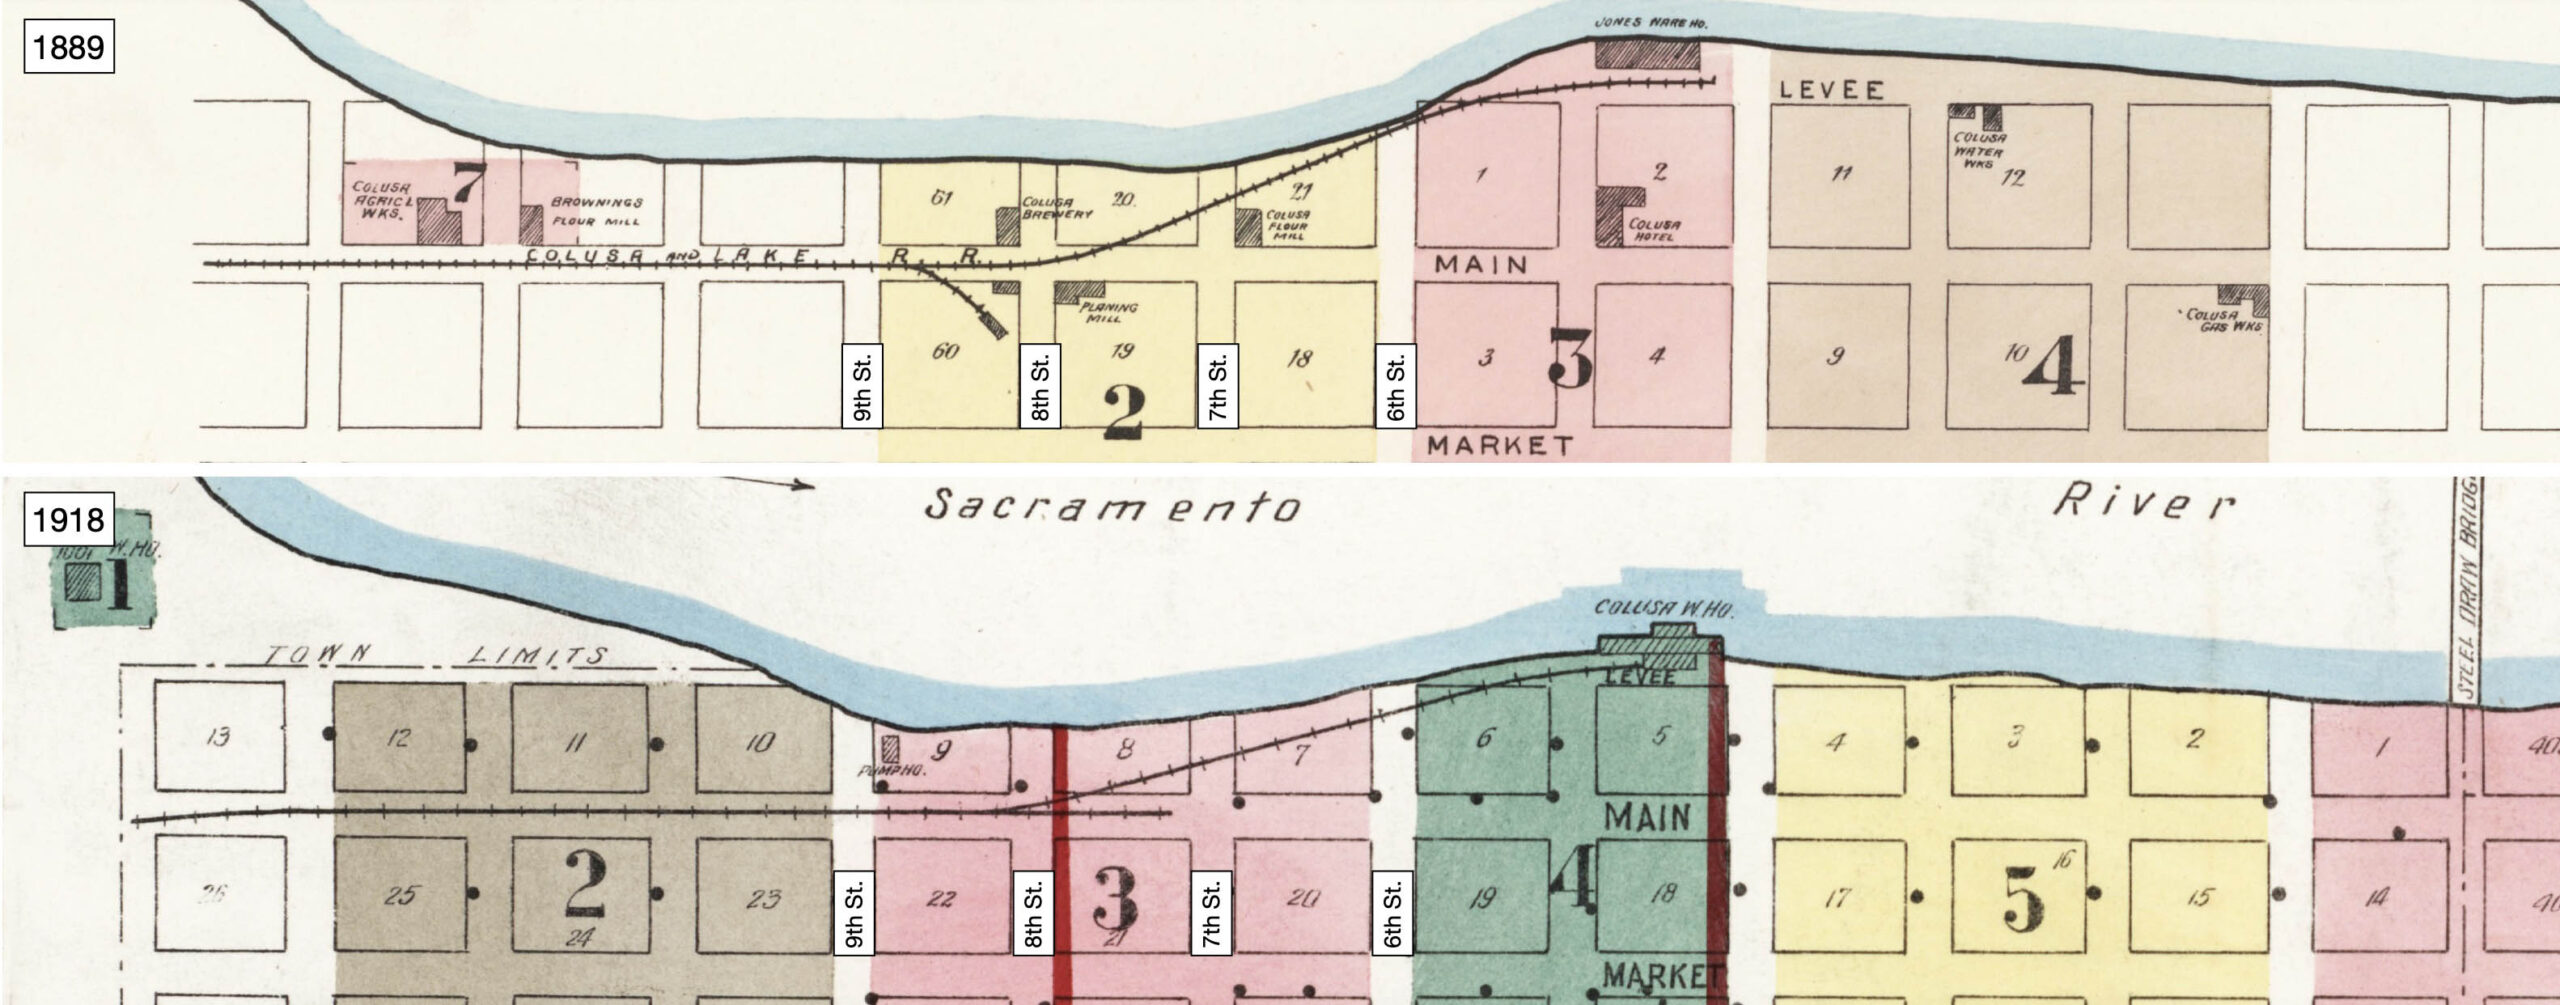
L338-60-Library of Congress Geography and Map Division, Sanborn Map Company, Apr. 1889, top, Dec. 1918, bottom, (Image 15 of 52)
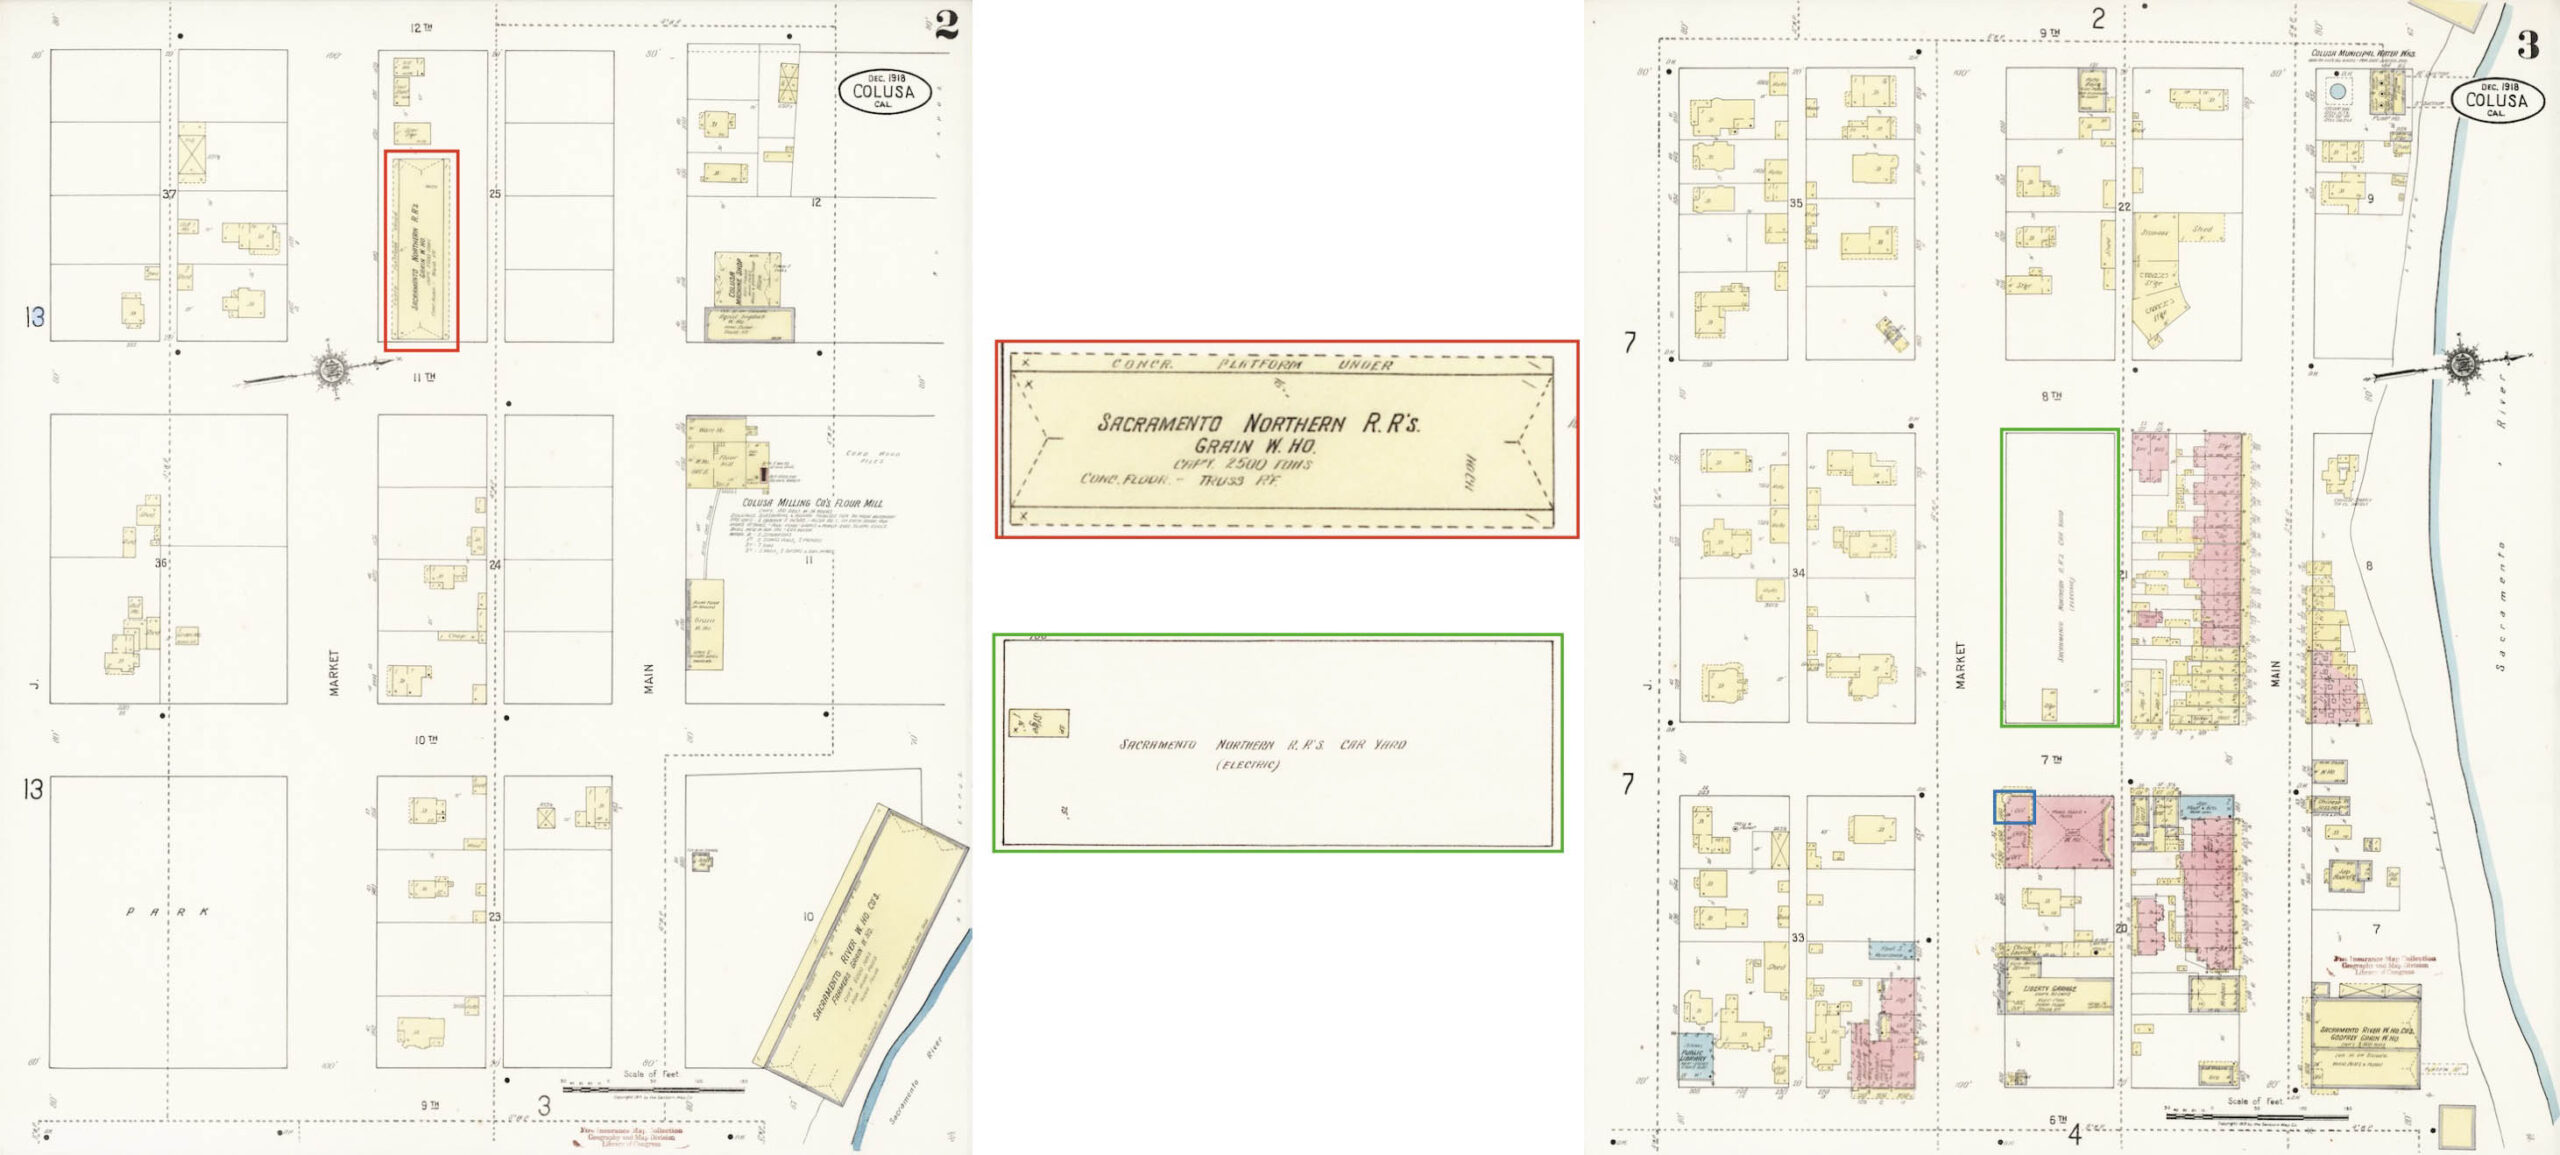
These sections from the 1918 Sanborn add that the SN warehouse between 11th and 12th Sts., boxed in red and detail, was designated for grain, and confirm the location of the yard, boxed in green. The SN ticket office and waiting room are boxed in blue on the right, although the map provides no specific information.
L338-65-Library of Congress Geography and Map Division, Sanborn Map Company, Dec. 1918, (Image 16 of 52)
These three maps complete the route along Market St. going west to east, left to right. Note, however, that the map between 4th and 6th Sts. on the left is oriented ninety degrees relative to the other two.
L338-70-Library of Congress Geography and Map Division, Sanborn Map Company, Dec. 1918, (Image 17 of 52)
Two additional sheets were added to the 1918 Sanborn map in 1930. This first one shows the warehouse for Rosenberg Bros. & Co. with its own SN spur track. Although earlier known for dried fruit packing, by 1930 this San Francisco-based firm had expanded in the rice business, and that is what the Colusa operation focused on. Note the phrase “not in city limits”, and the indication of the arrow indicating north, both to be addressed shortly. For more on Rosenberg Bros., click here.
L338-72-Courtesy Earth Science and Map Library, University of California, Berkeley, (Image 18 of 52)
A second company to get a SN spur track was California Prune and Apricot Growers. They were also outside the city limits, and the facility was also served by the SP. The W. D. De Jarnett Dehydrater and Packing Plant was just to the south, and it appears it also got serviced by the SN. More about this facility in the next update.
L338-73-Courtesy Earth Science and Map Library, University of California, Berkeley, (Image 19 of 52)
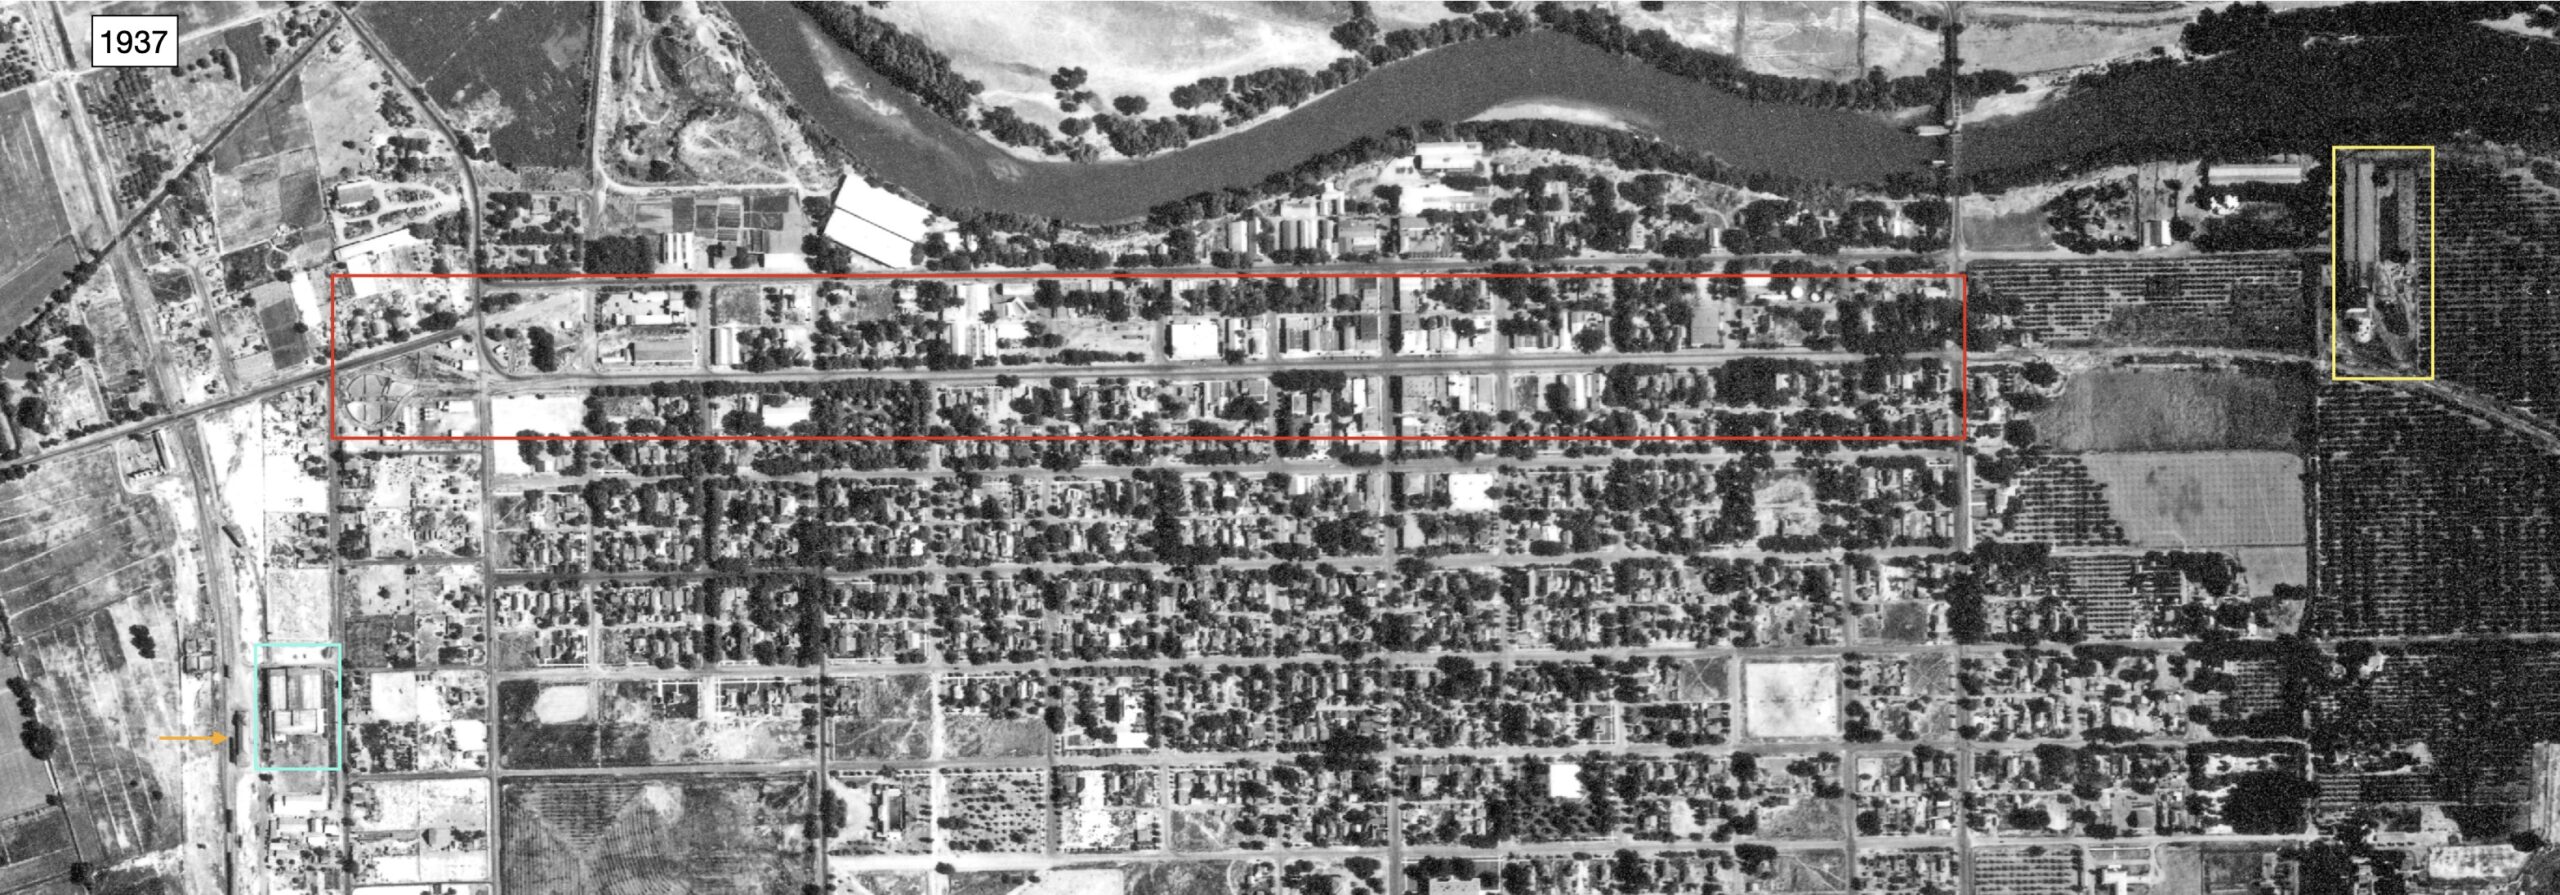
The next section brings the presentation to when most of the photographs of the SN in Colusa were taken. This detail from an aerial from 1937 provides significant detail of the area to be reviewed. The area boxed in red is the portion of the SN within the city limits of Colusa. The area boxed in yellow marks the Rosenberg Bros. warehouse, and the area boxed in turquoise surrounds California Prune and Apricot Growers. The orange arrow denotes the SP depot. In 2025, the land on which the latter two companies operated are still outside the city limits of Colusa.
L338-75-USDA Aerial AAY-24-77, Courtesy Map Collection, Shields Library, University of California, Davis, G4363 C5A4 1937 U6, Detail, (Image 20 of 52)
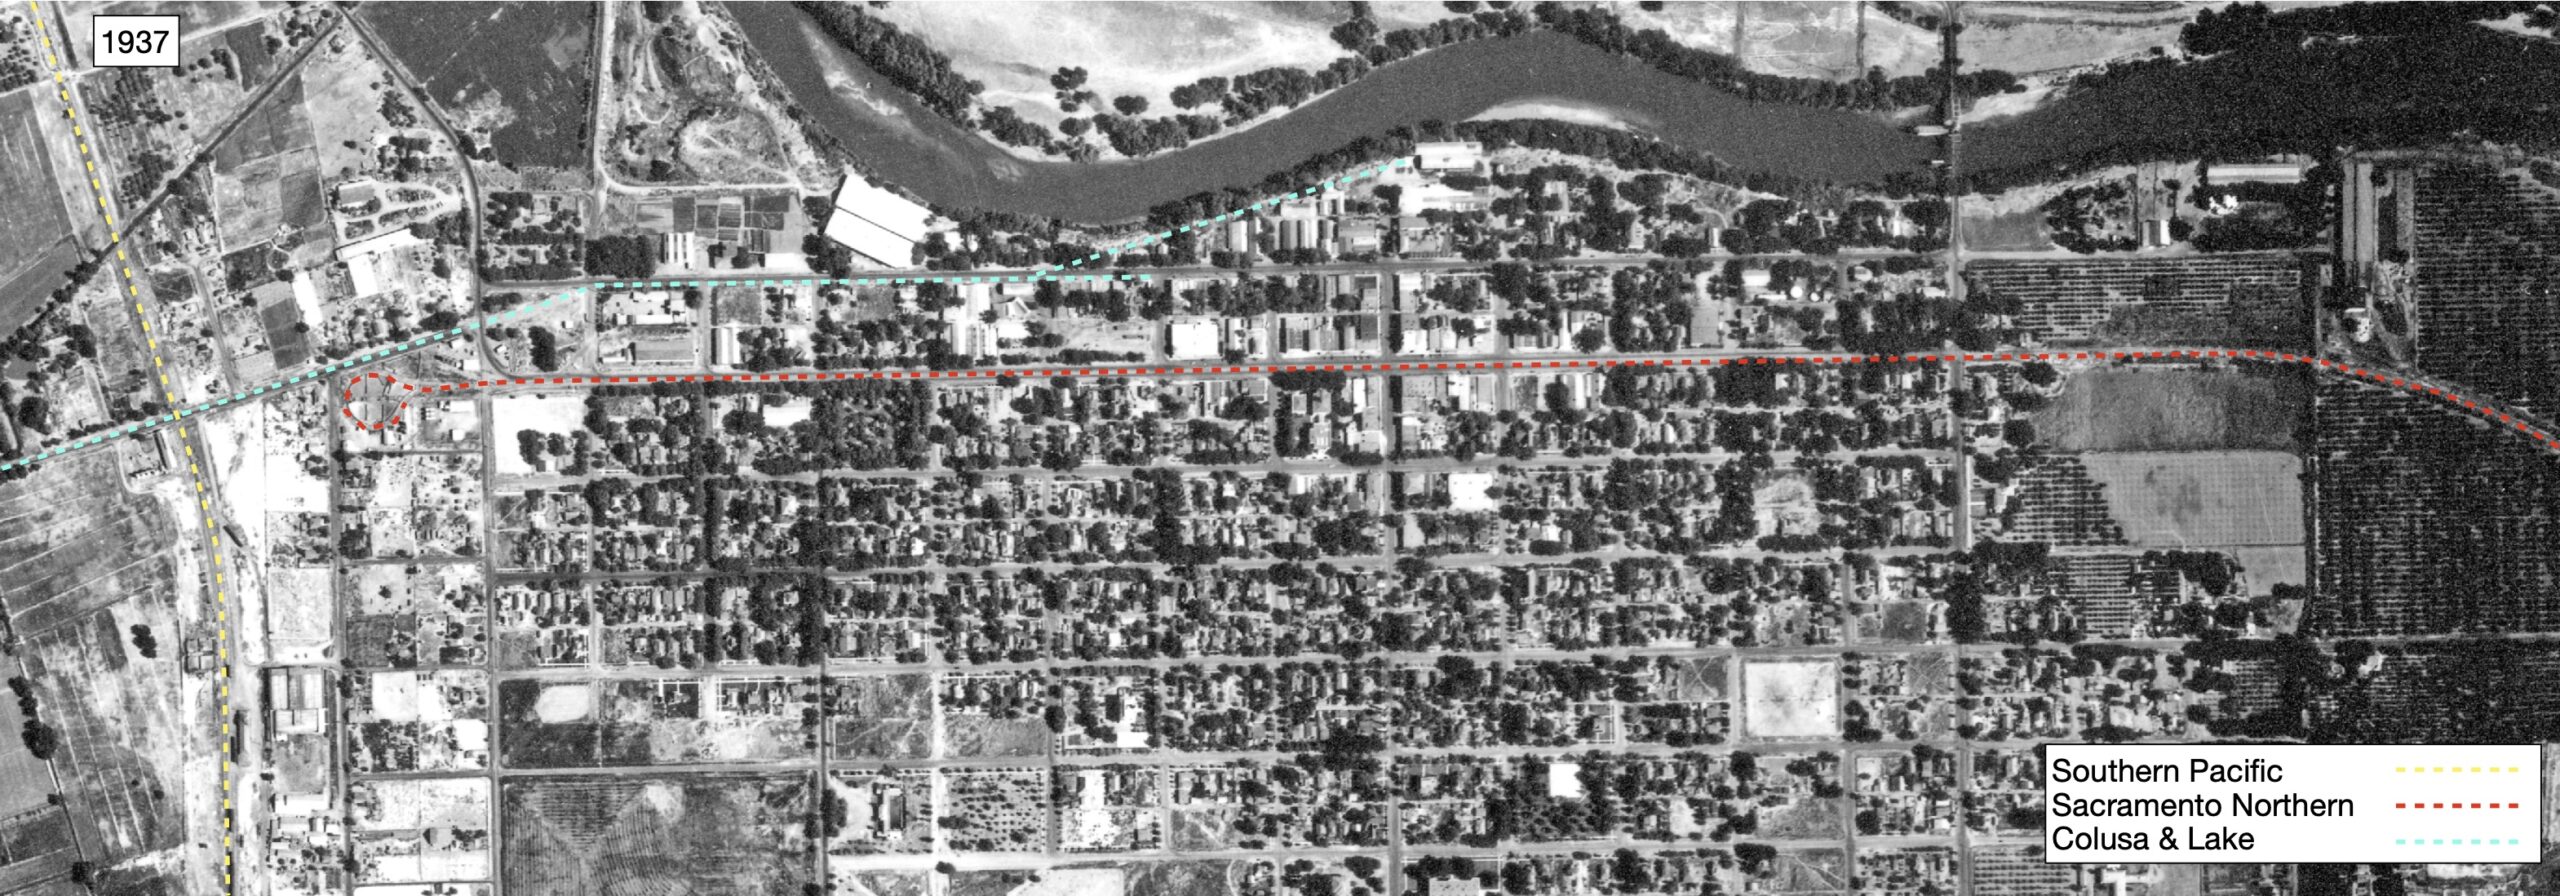
The routes of the three railroads discussed so far are provided from the previous aerial detail.
L338-80-USDA Aerial AAY-24-77, Courtesy Map Collection, Shields Library, University of California, Davis, G4363 C5A4 1937 U6, Detail, (Image 21 of 52)
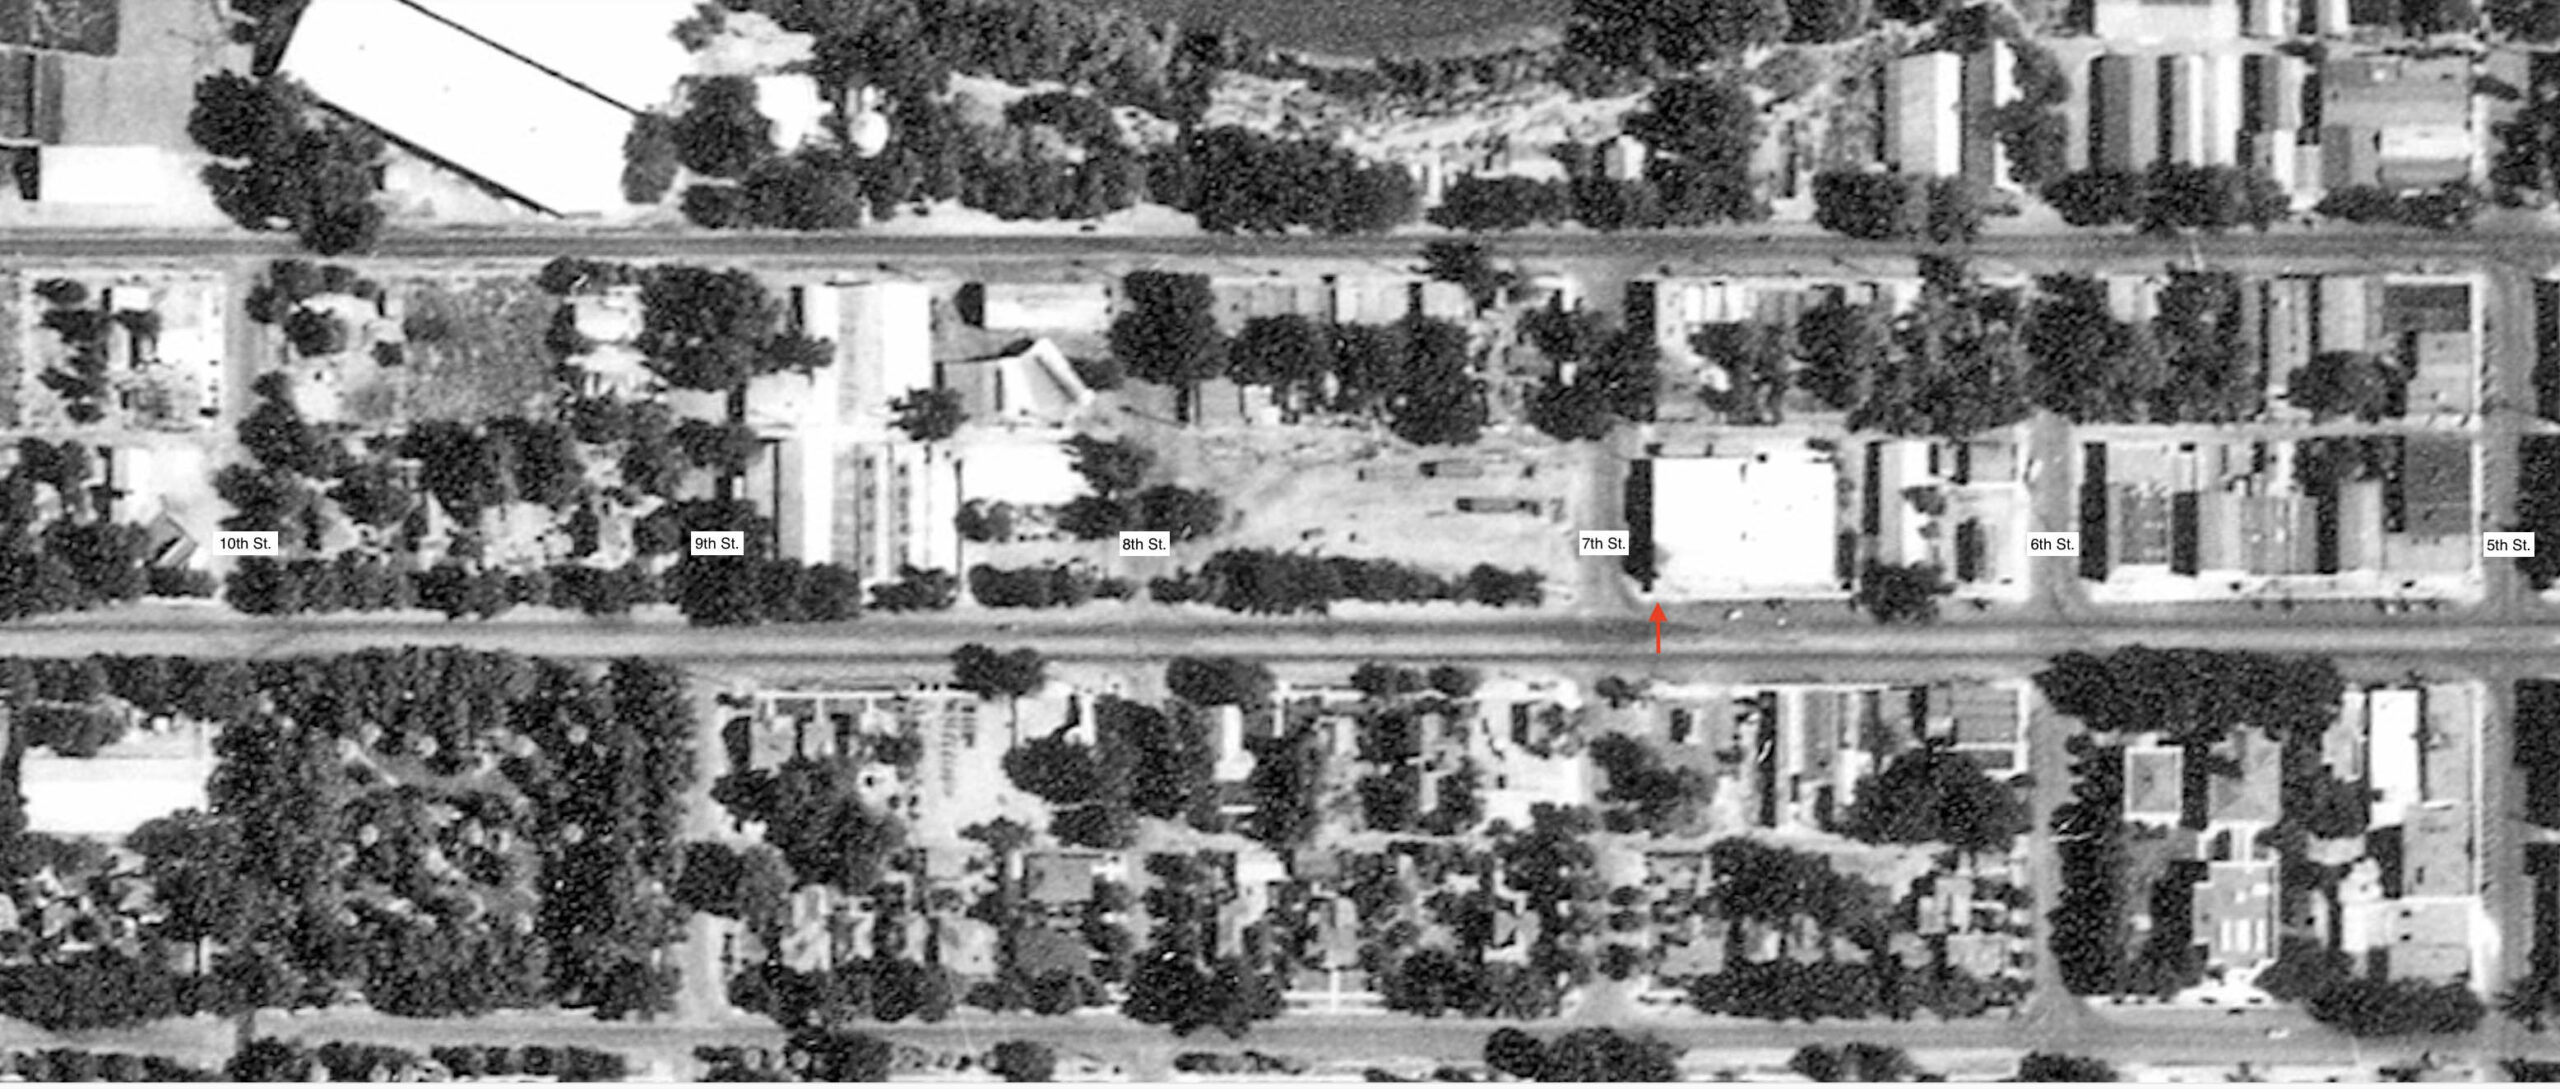
This first section will present images that have information about the area between 5th and 10th Sts, between 1938 and 1940. The SN ticket office and waiting room were at the northeast corner of Market St. and 7th St., red arrow. Boxcars are evident in the adjacent yard between 7th and 8th Sts
L338-85-USDA Aerial AAY-24-77, Courtesy Map Collection, Shields Library, University of California, Davis, G4363 C5A4 1937 U6, Detail, (Image 22 of 52)
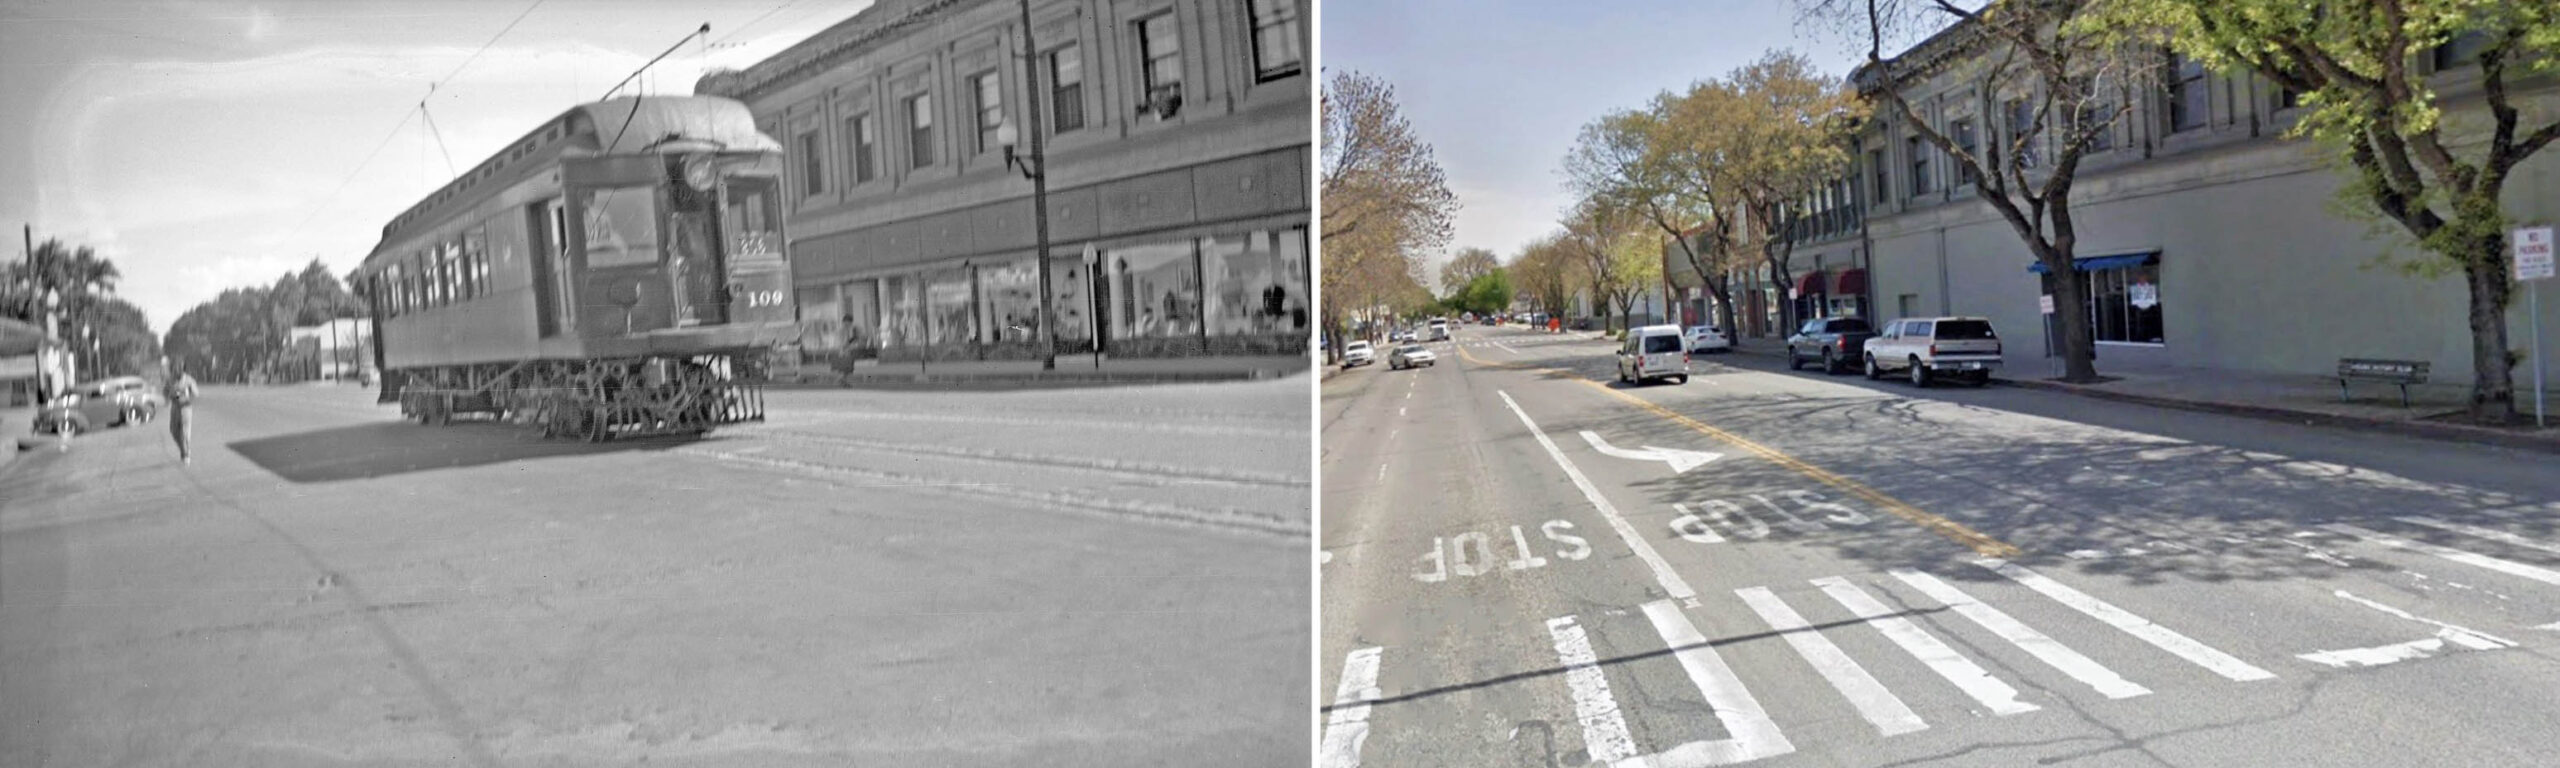
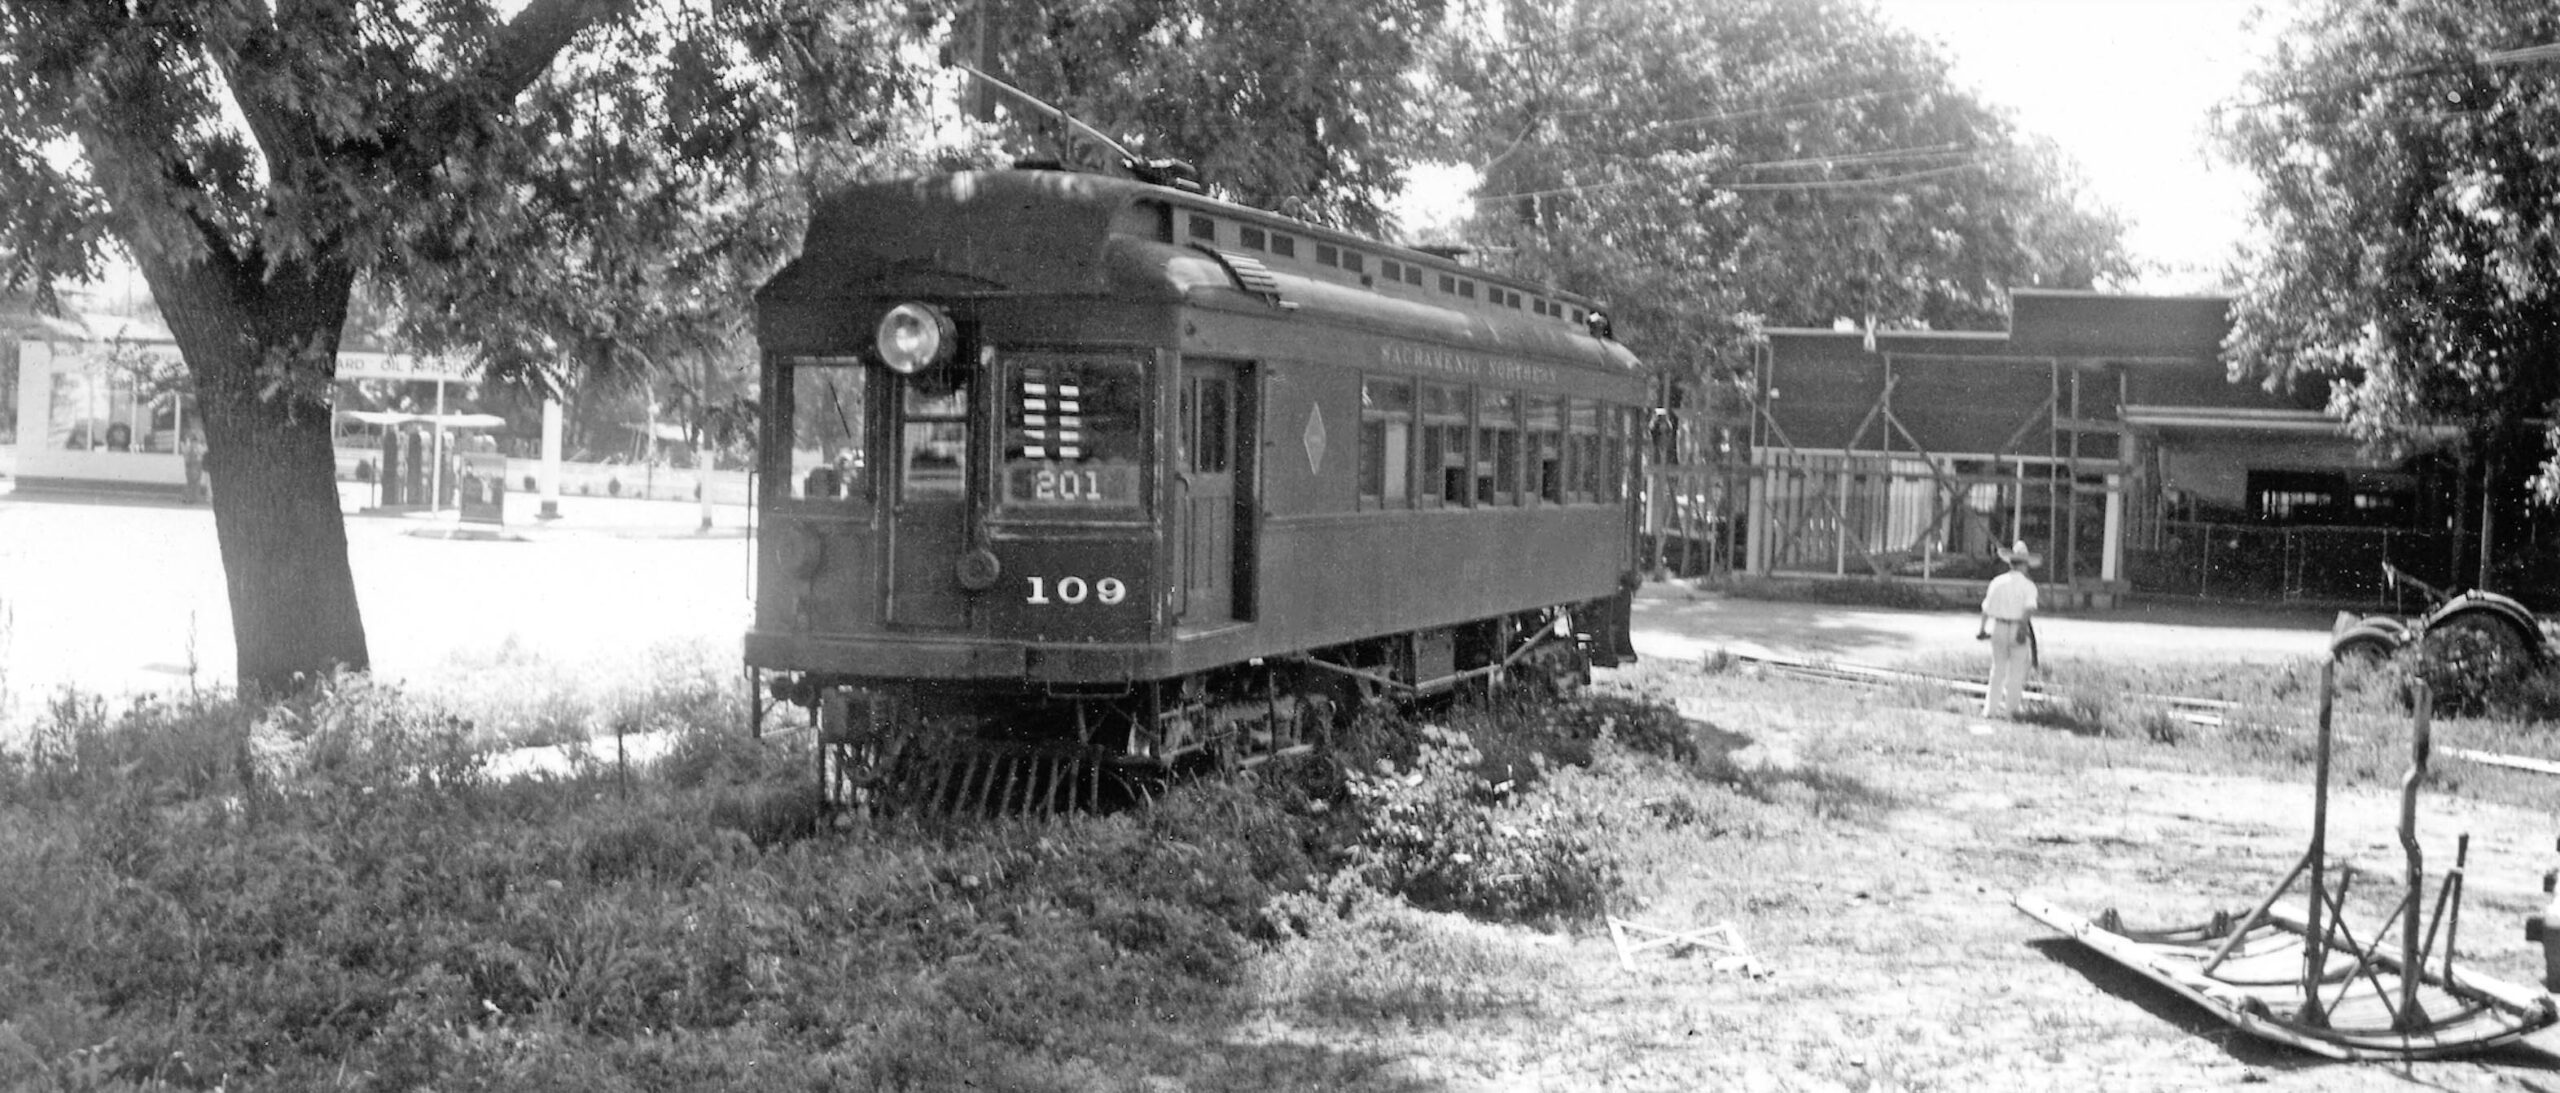
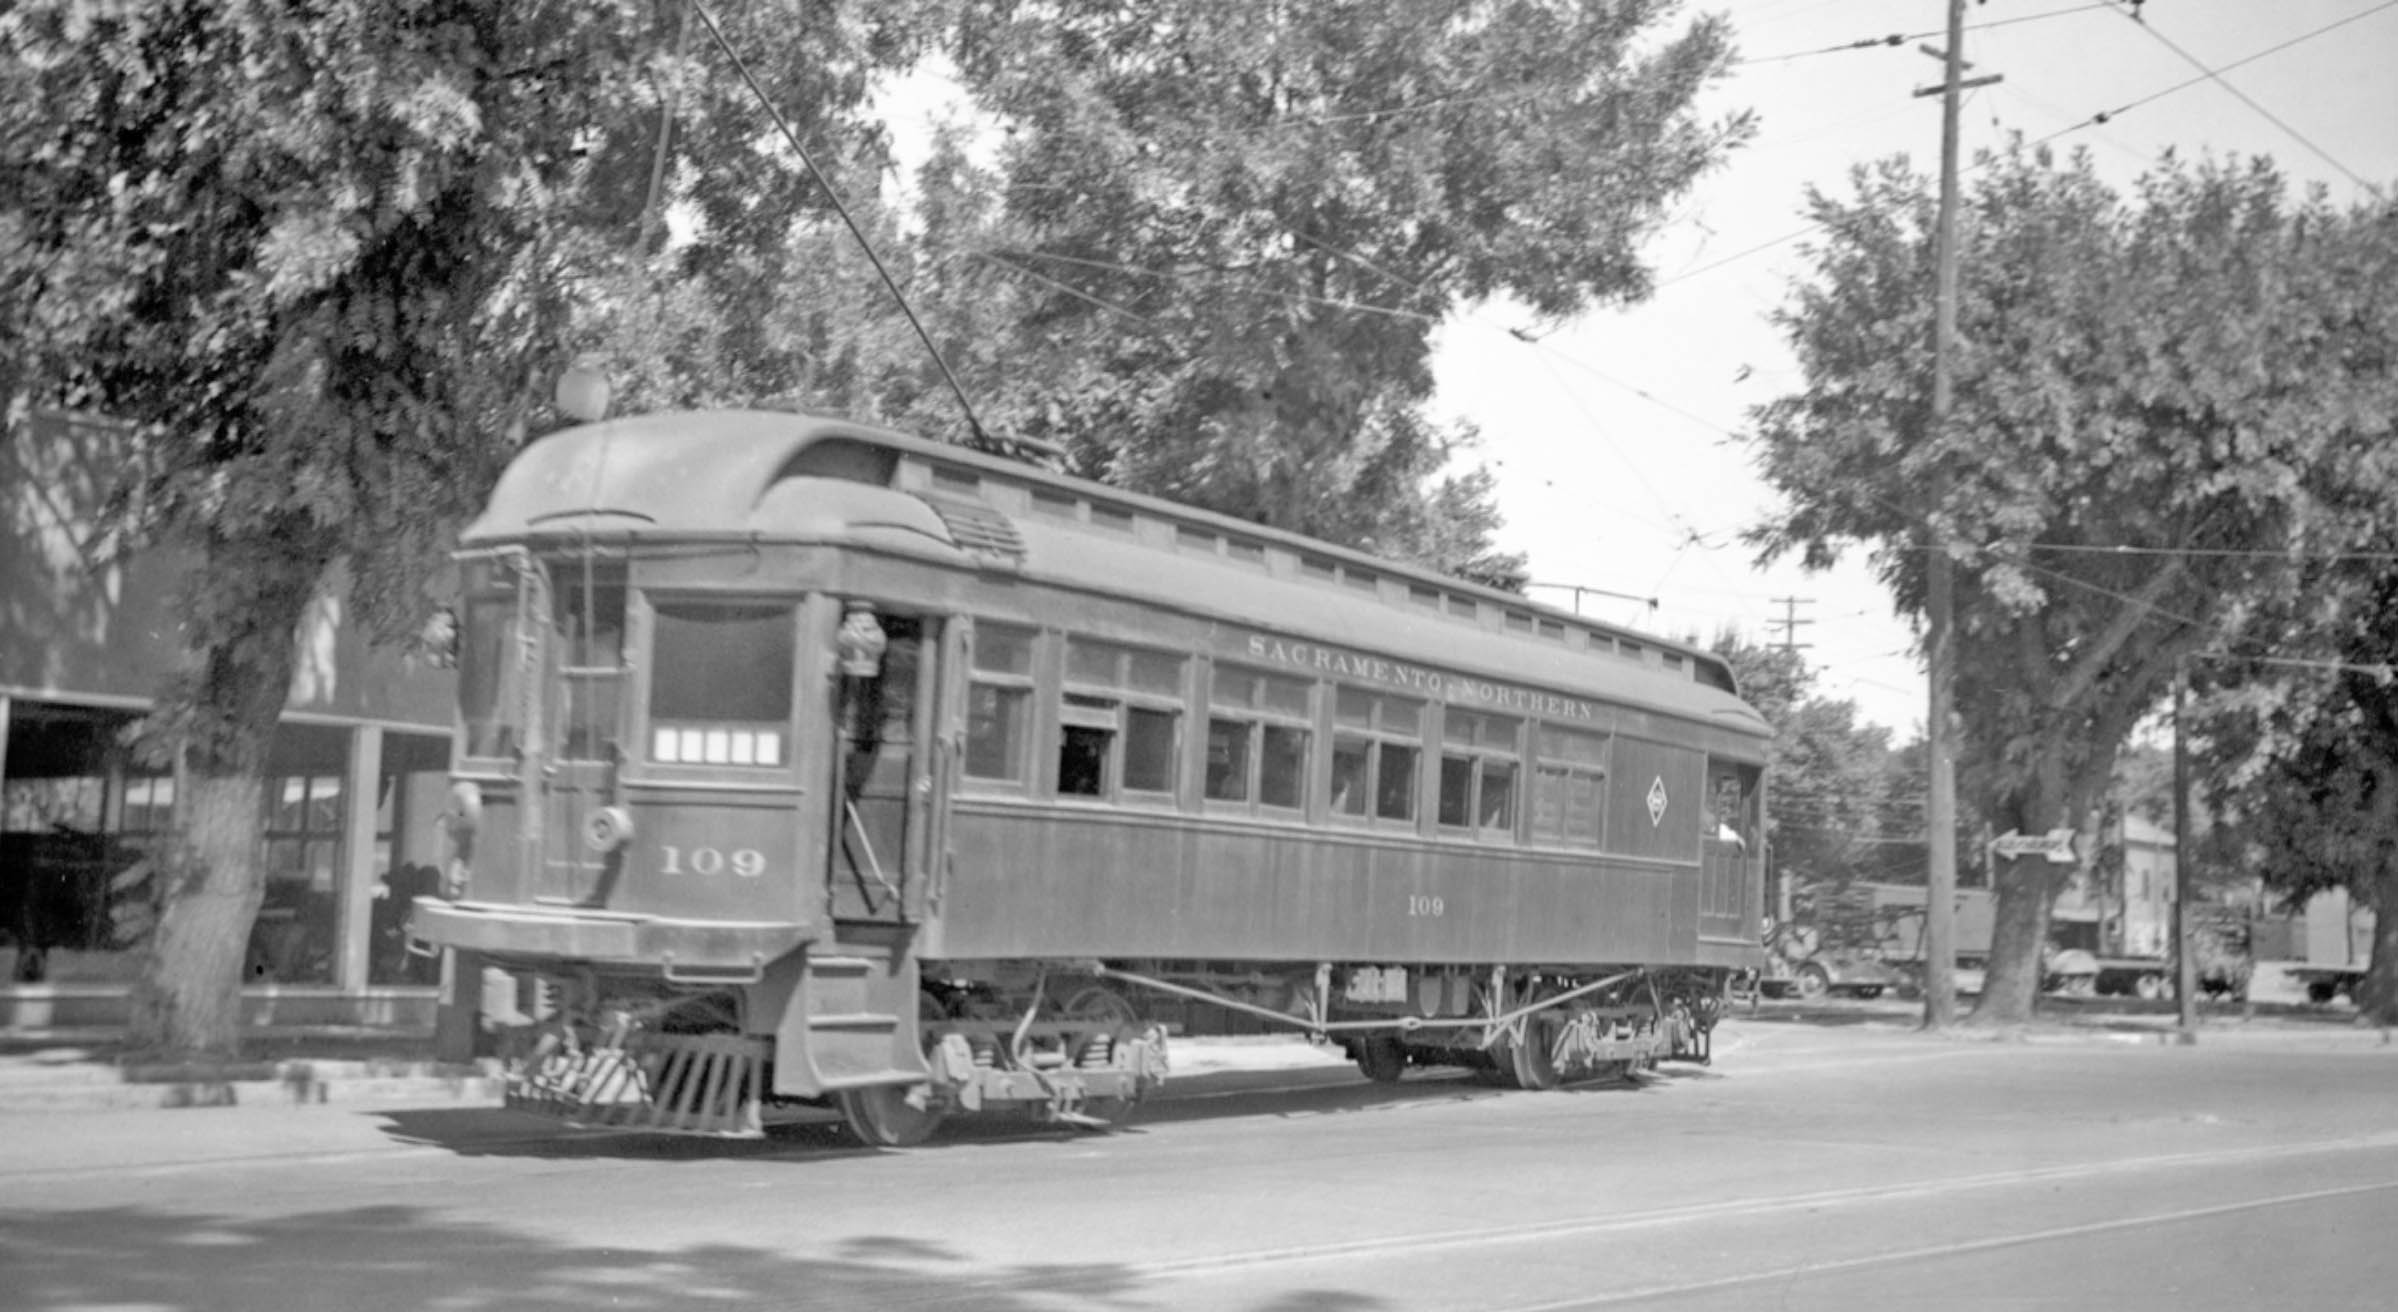
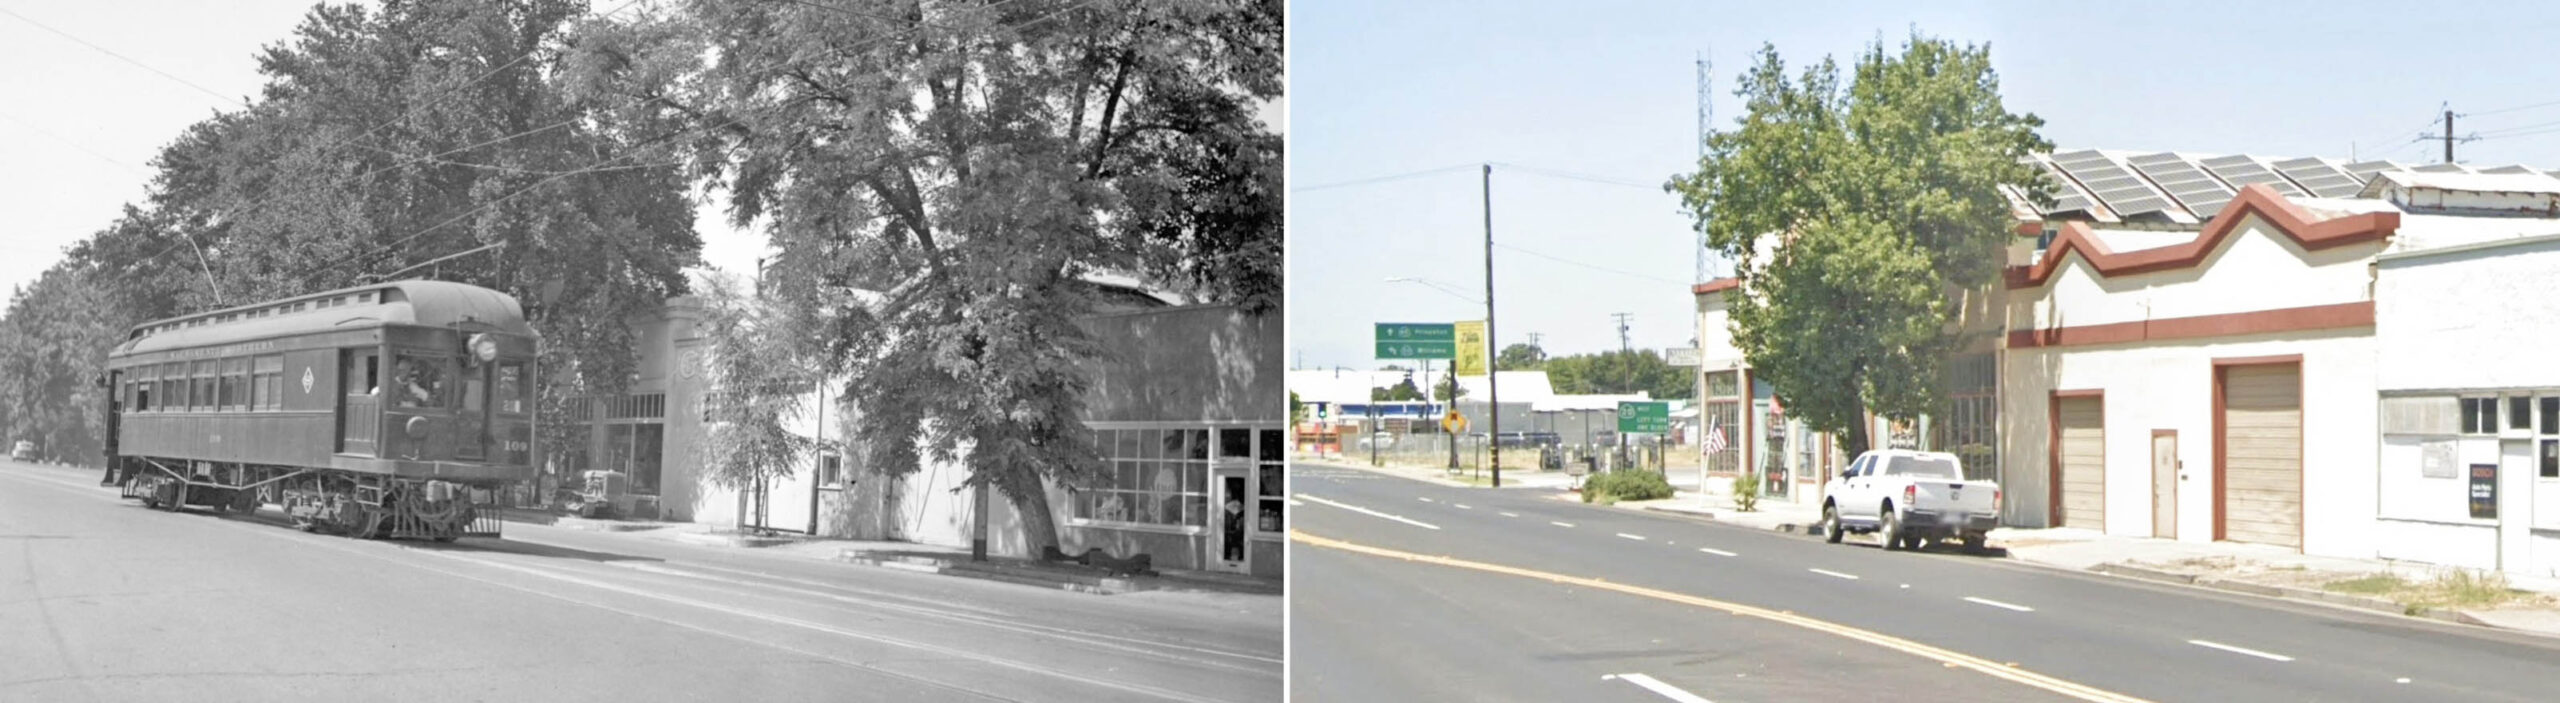
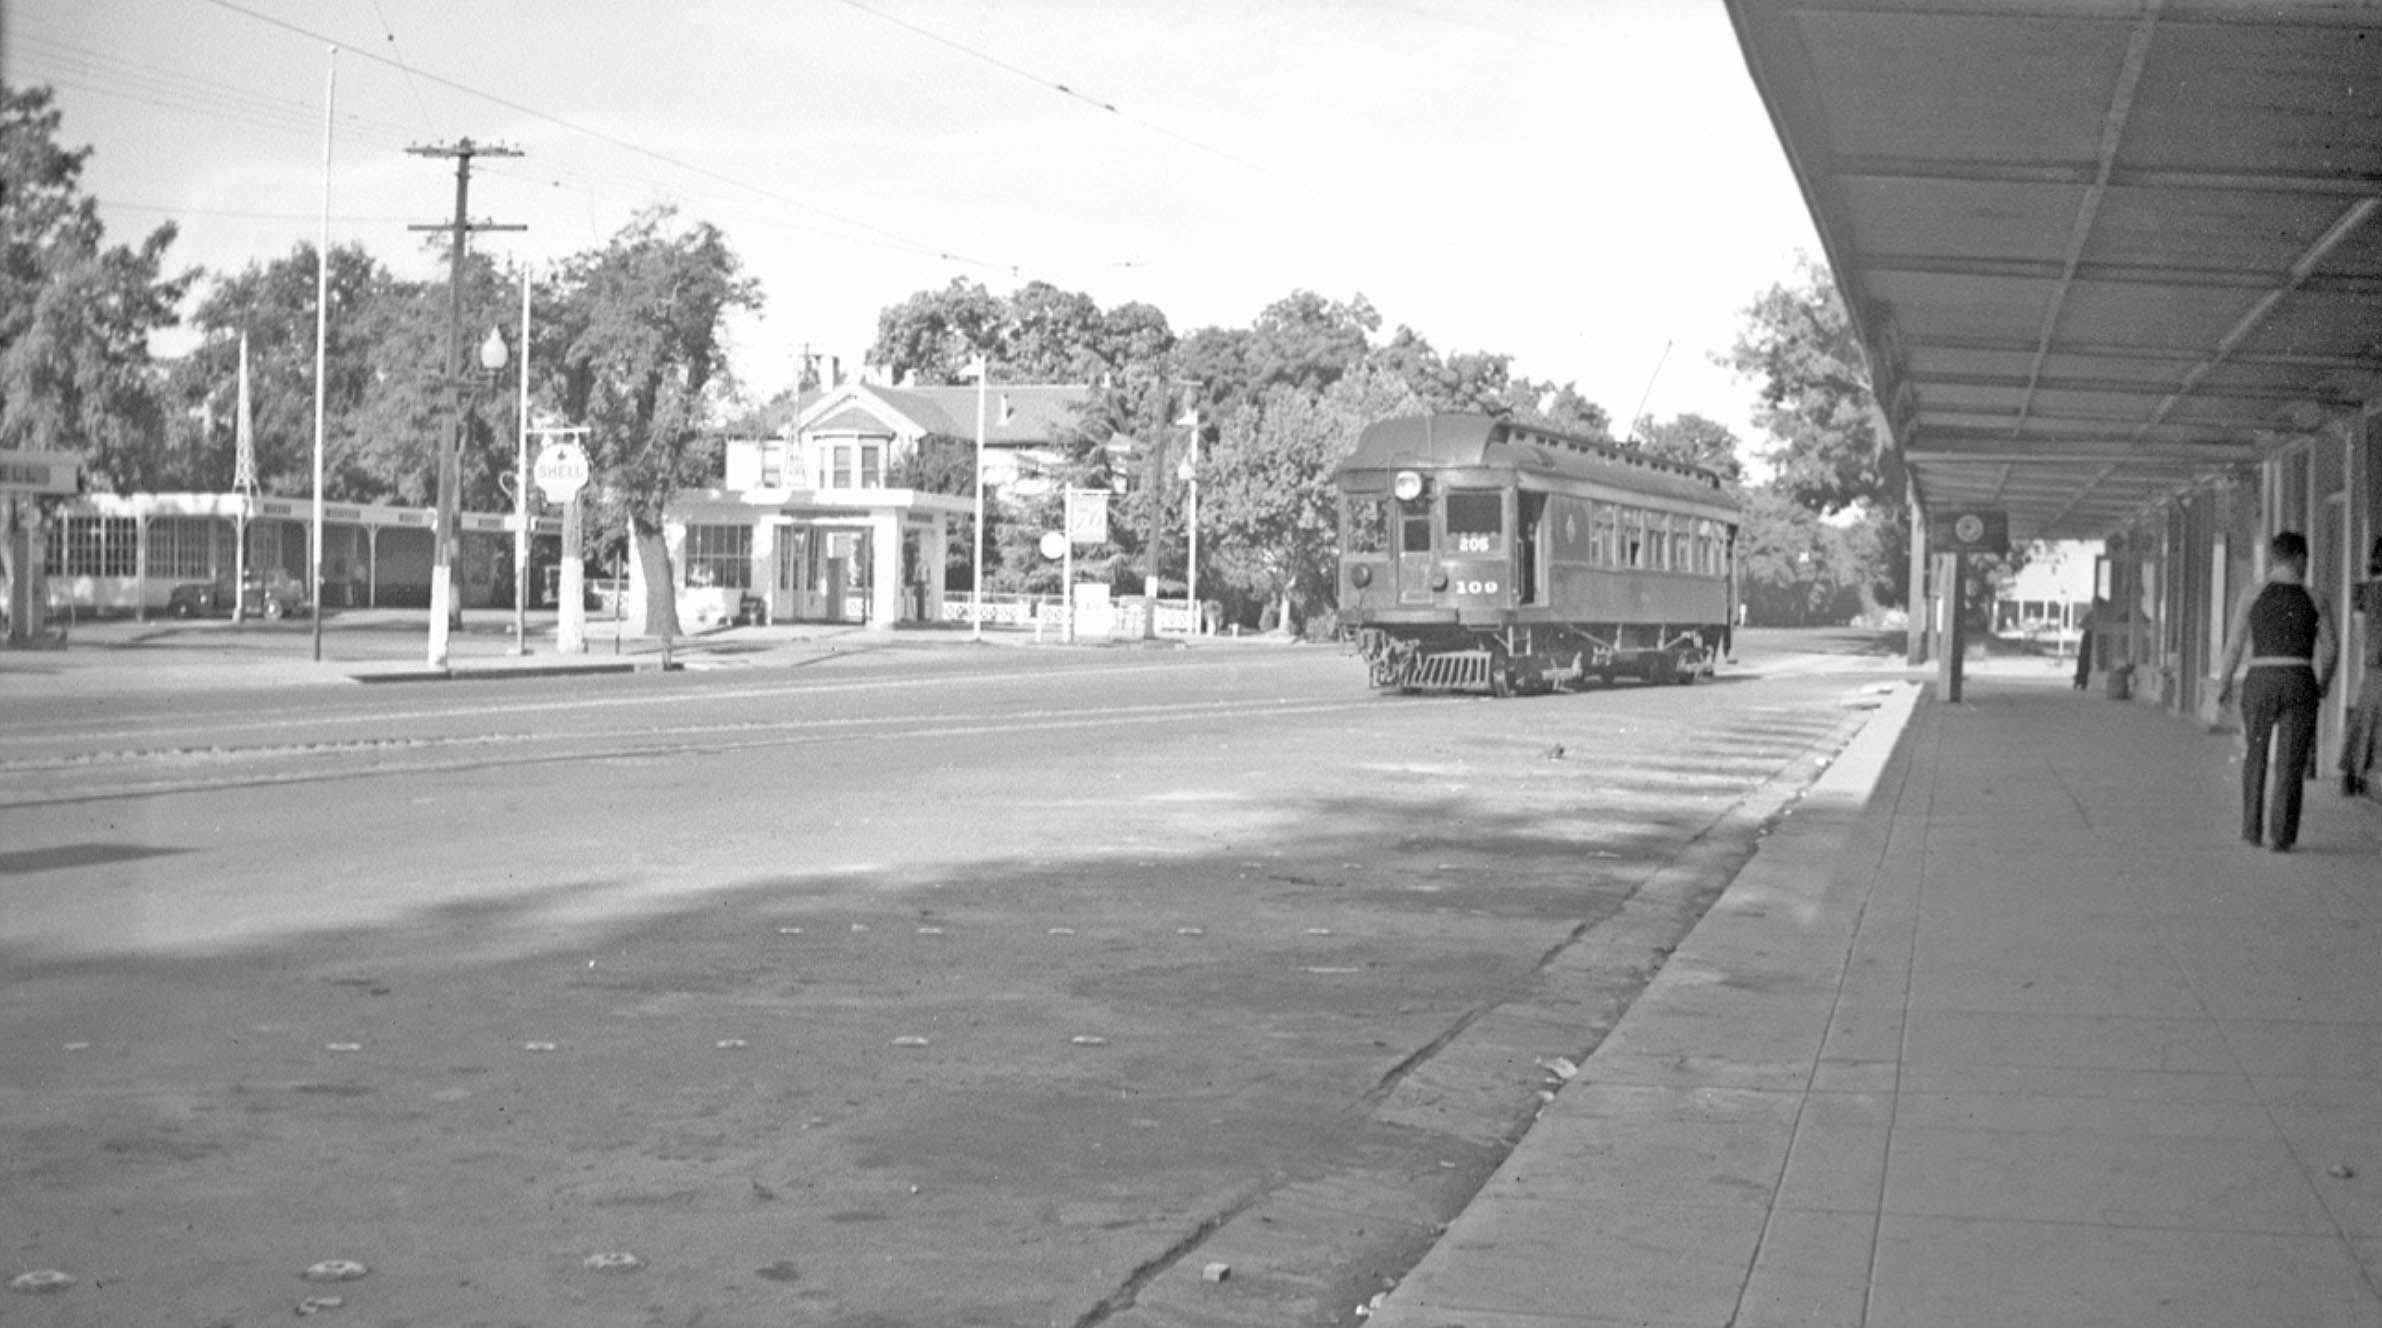
Except for the image shown in L338-10, this was the only other image found where a train was below 7th St. Here the image shows the northeast corner at Market St. and 5th St., east view, with SN 109 passing the Colusa Department Store in the O'Rourke building in July 1940, left, that building still there with a modified ground floor in 2025, right, the image used here was from the Google Maps Archive from Apr. 2018. The store opened on Dec. 2nd, 1911. It survived a large fire that occurred on Mar. 13-14, 1960.
L338-87-Vernon Sappers Collection, Courtesy BAERA, Western Railway Museum Archives, 136892sn, l, Google Maps, r, (Image 23 of 52)
Next for images from railfans from 7th St. to the west in an attempt to piece together how the town appeared along Market St. ca. 1940 during the electric era, that is, June 13, 1913-December 26, 1946, the latter date when the overhead wires in the town were inactivated. Appreciate that passenger service ended on Oct. 31, 1940. Here is shown an east view from that period with the SN ticket office to the left, and cupola of the courthouse on the right.
L338-90-Courtesy BAERA, Western Railway Museum Archives, 180477sn, (Image 24 of 52)
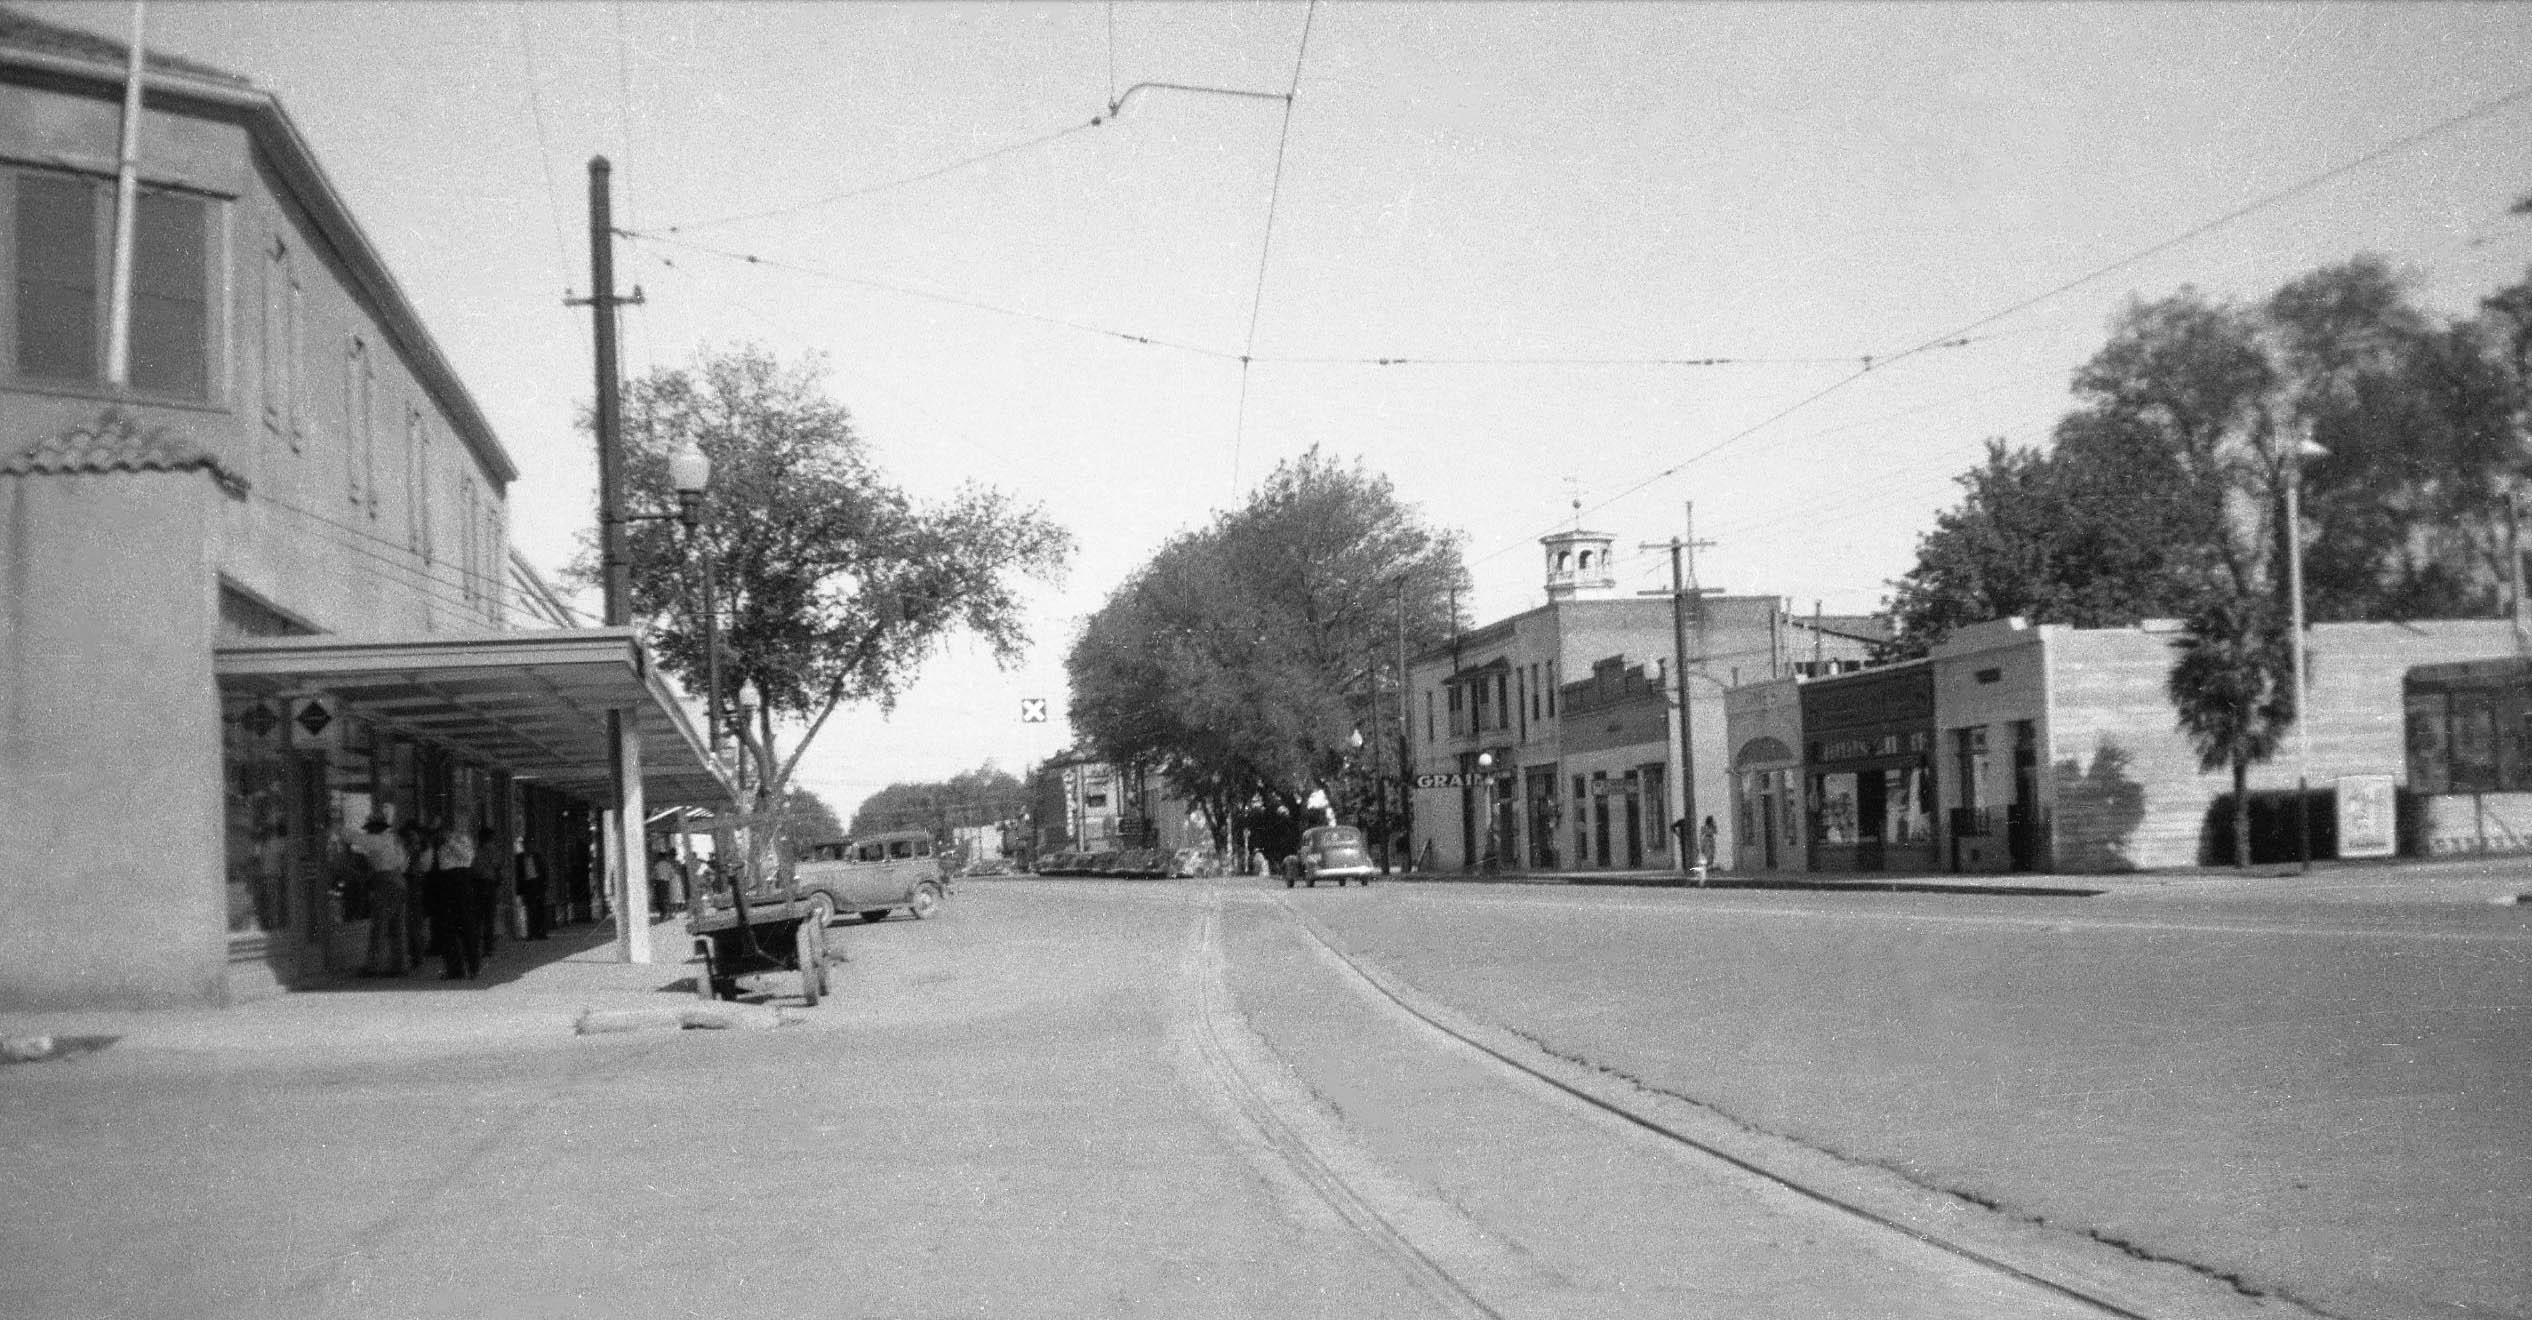
Once past the opening day ceremonies, only a few images between 1913 and the mid-1930s of SN operations in Colusa were found. This undated northwest view toward 7th St. was probably taken in the 1930s based on the rail passenger car, SN 103, in use. It shows a few of the storefronts along this section, and a portion of an open boxcar in the yard.
L338-95-Wilbur C. Whittaker Photo, Courtesy Arnold Menke, (Image 25 of 52)
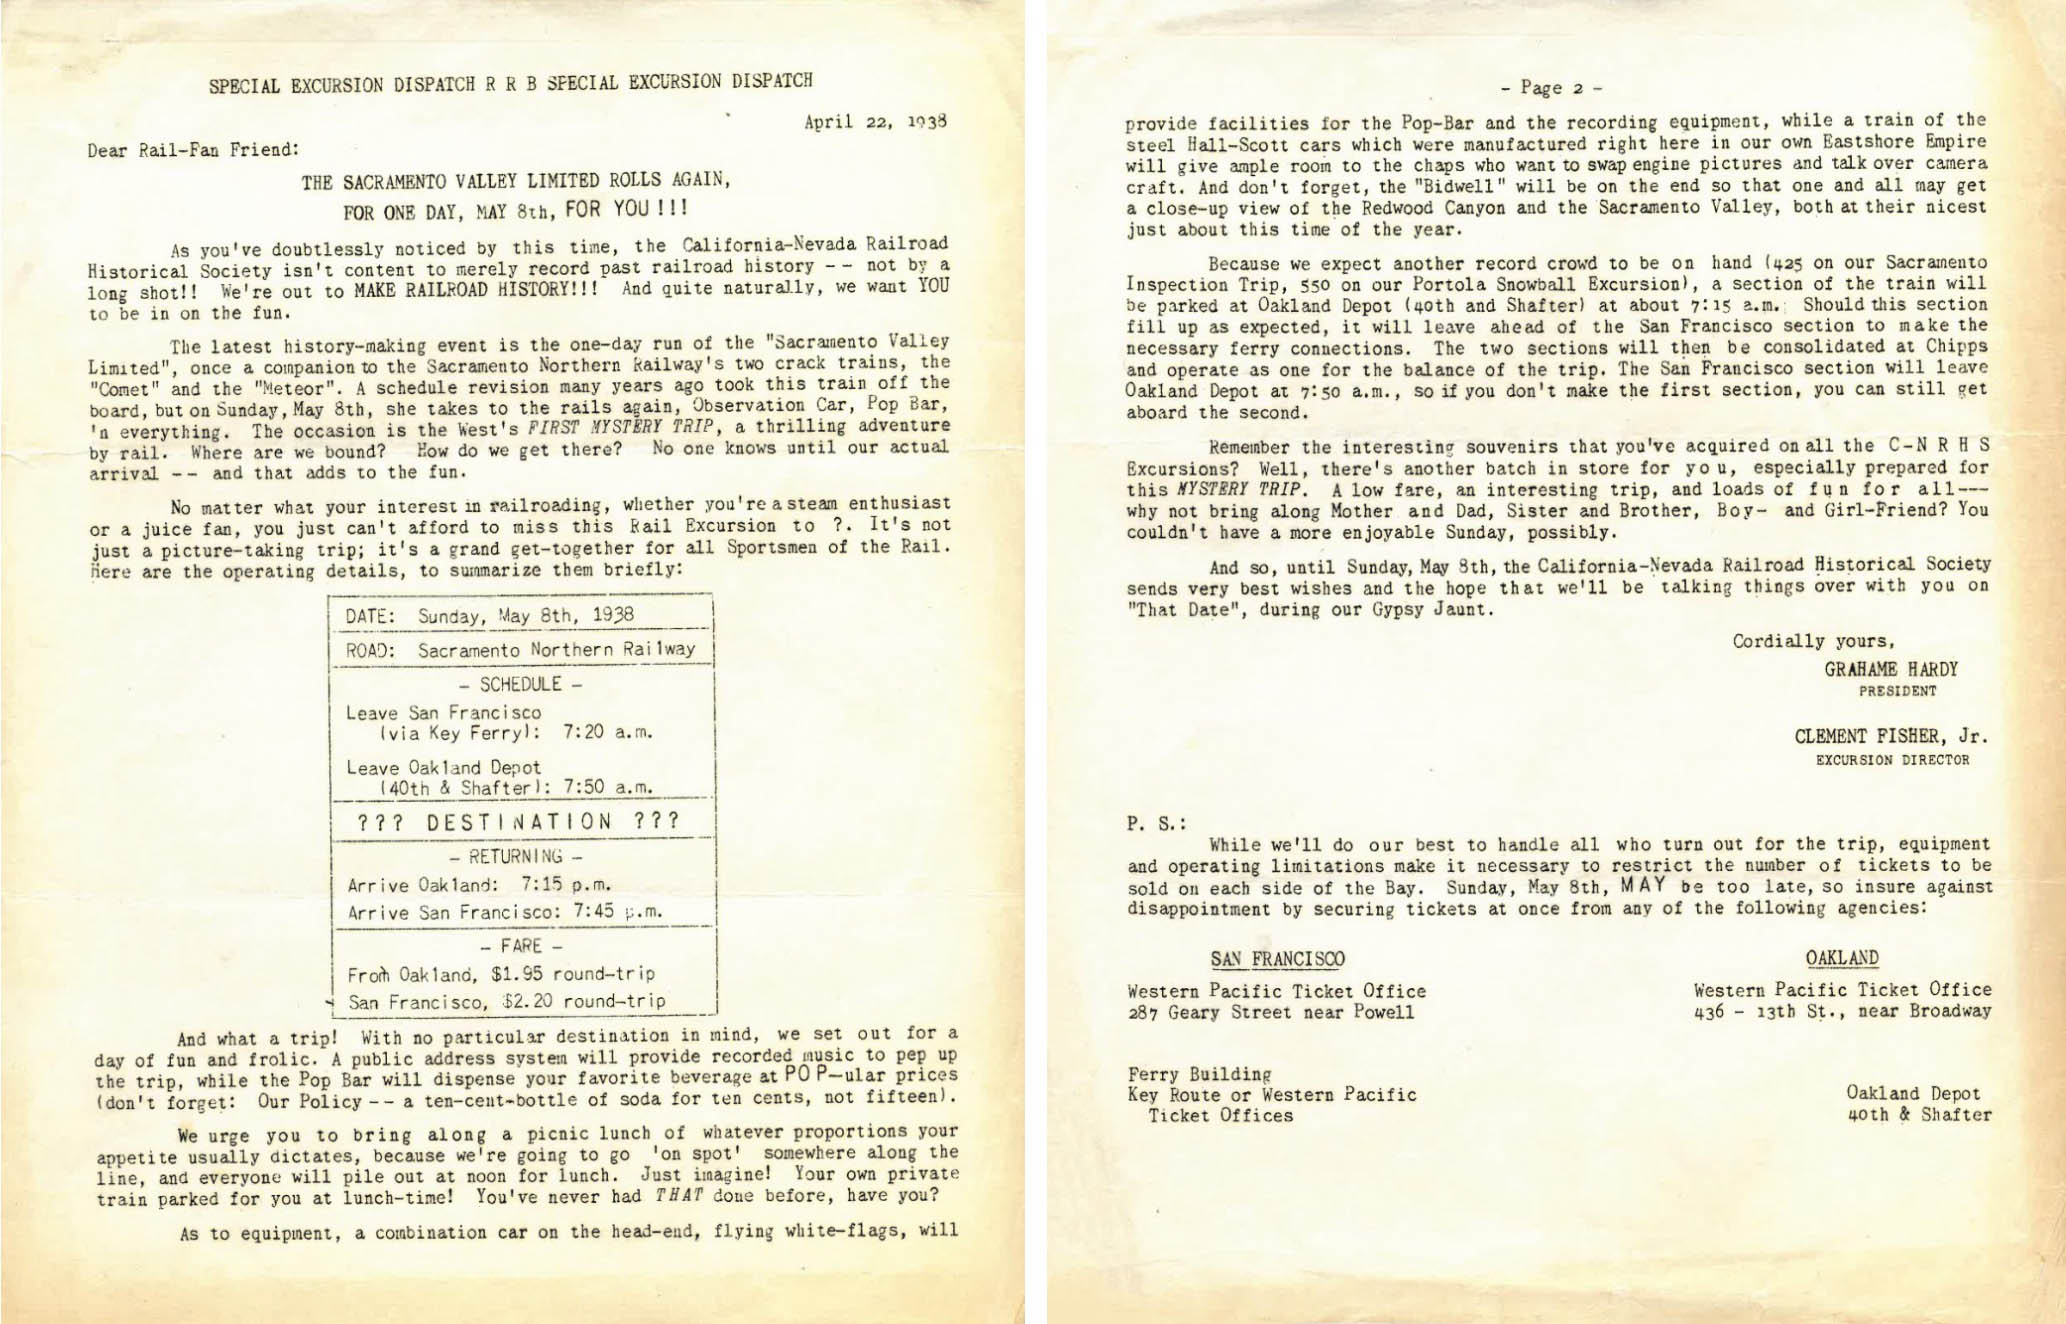
Images of the area became more plentiful primarily due to two excursions, the first sponsored by the Cal.-Nev. Railroad Historical Association that took place on May 8, 1938 as described in the announcement provided here. The participants were not told where the destination would be, so it was called the “Mystery Excursion.” There was a private excursion with SN 107 and SN parlor car Sacramento on June 16, 1940 for which no documentation could be found. Otherwise, some individuals visited Colusa close to the time of passenger service termination.
L338-100-Courtesy BAERA, Western Railway Museum Archives, (Image 26 of 52)
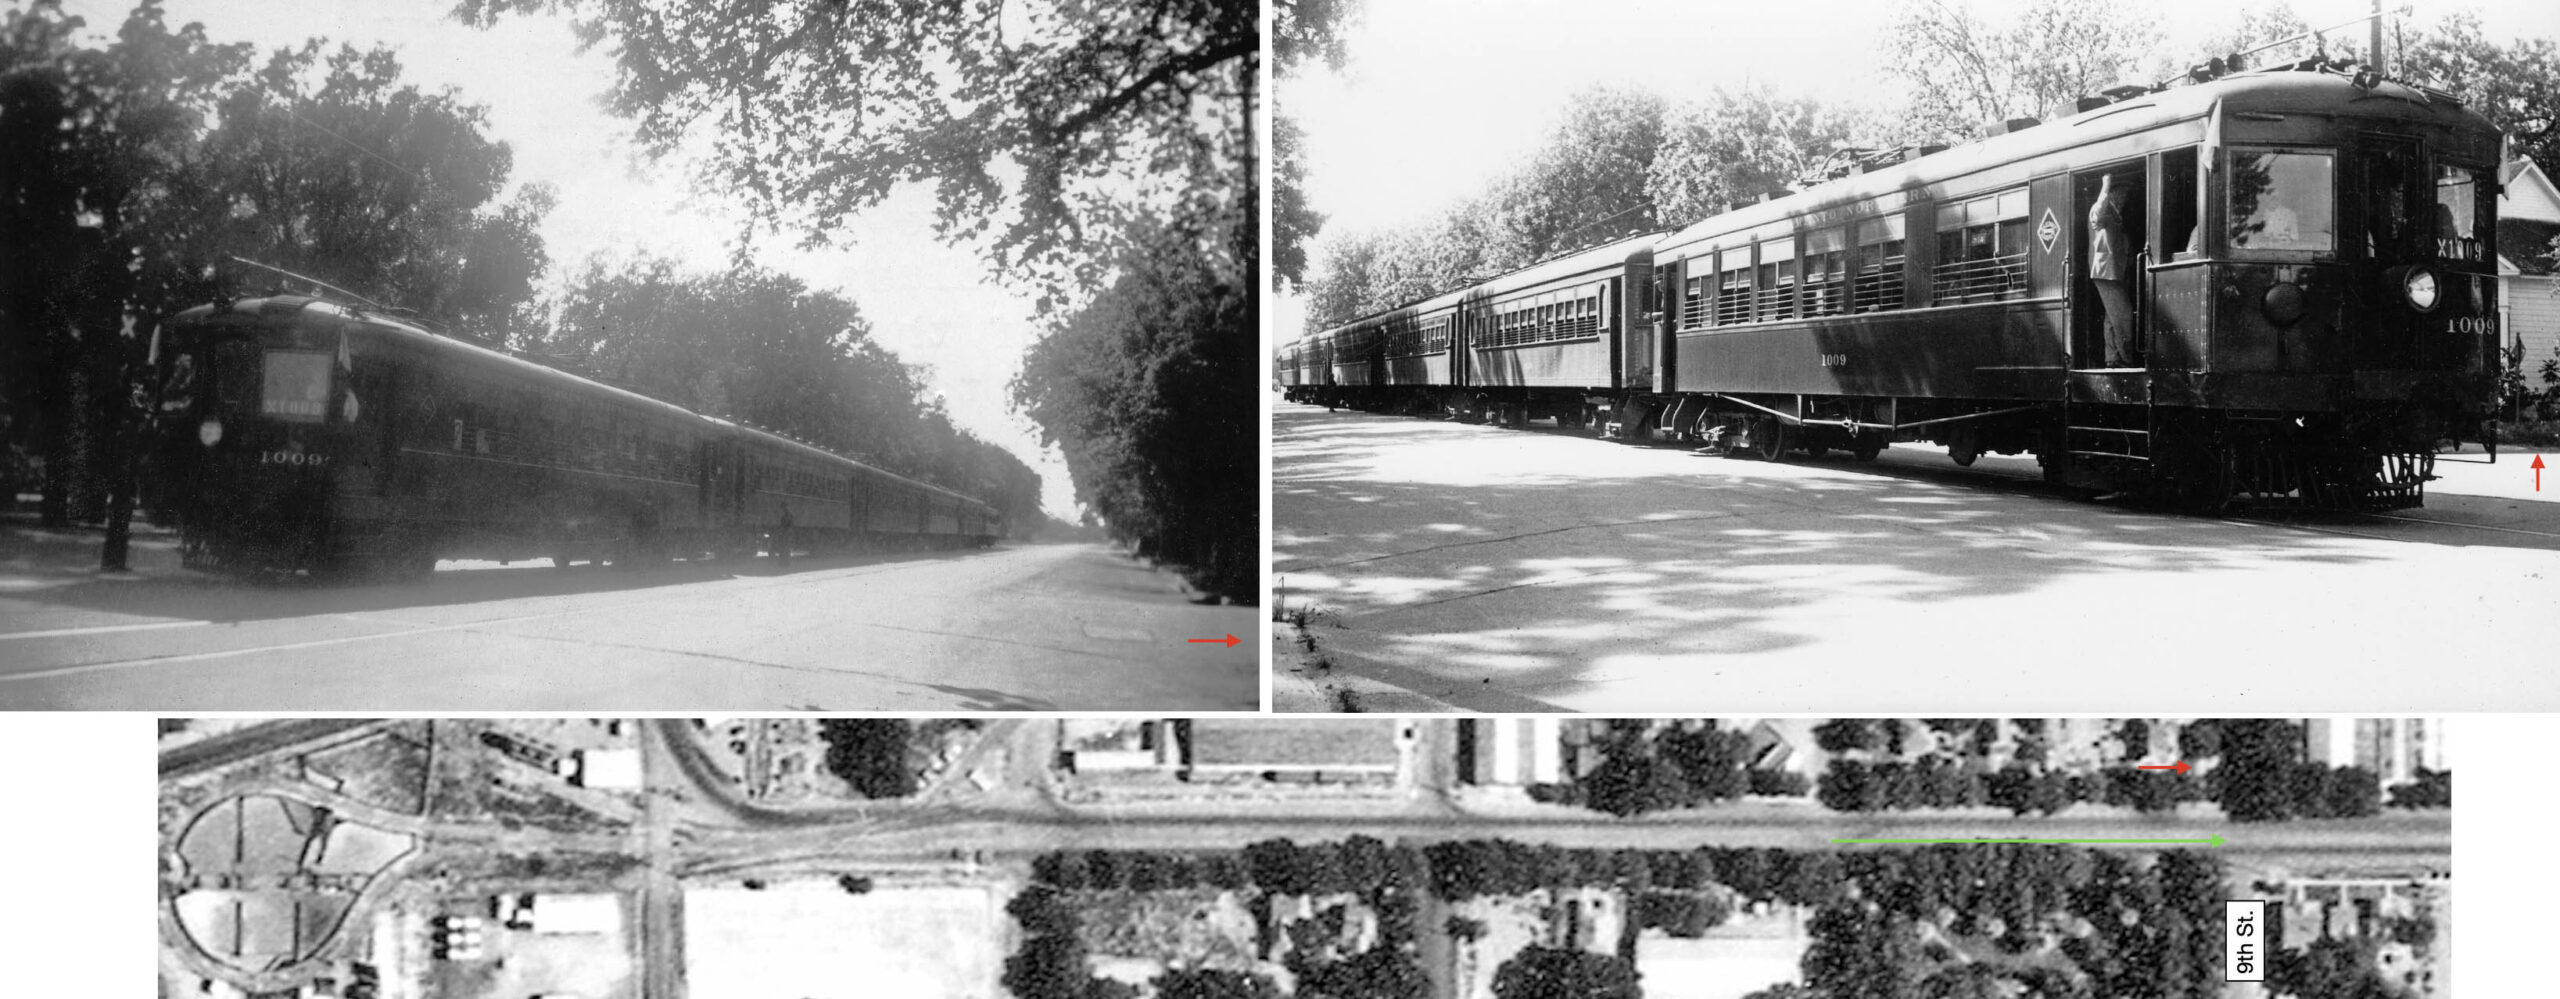
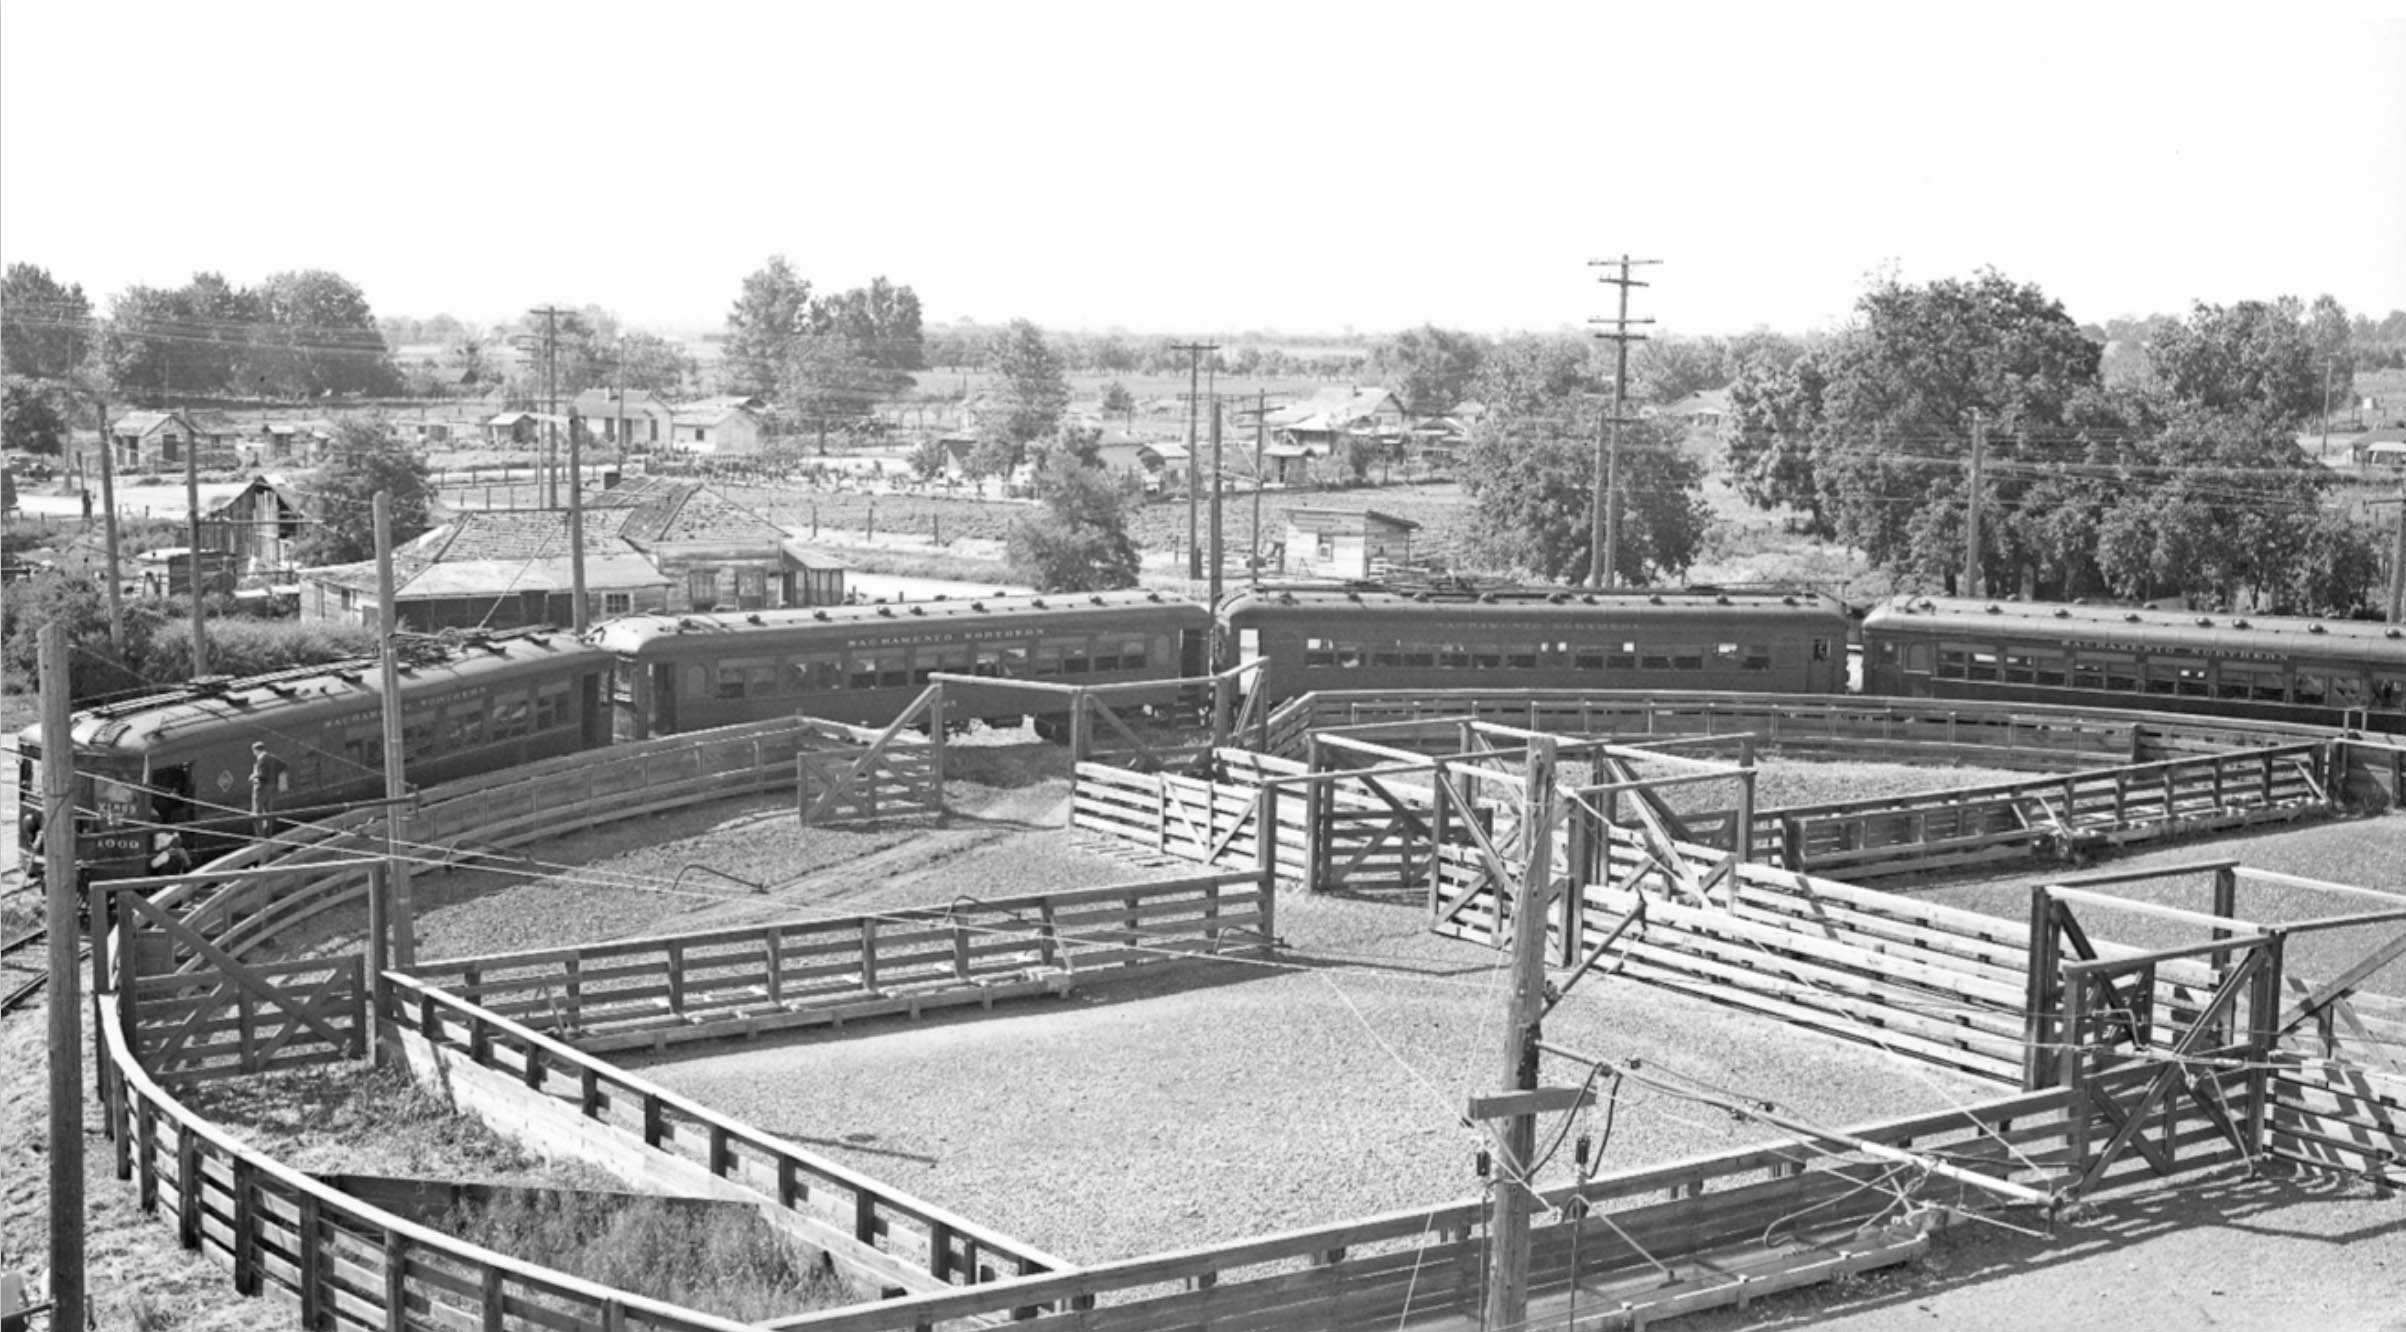
The Mystery Excursion train of May 8, 1938 in Colusa is shown in these two images, a southwest view on the left, a northwest view on the right. This was the longest passenger train ever to go to Colusa in the SN era with SN 1009, SN 1025, SN 1019, SN 1021, SN 1020 and SN Bidwell, but fell one short of the the seven-car train on opening day shown in L338-20. The red arrow points to the corner of 9th St. and the house on that corner. The green arrow shows the position of the train in the images. More on how it got to the position shown later. Ref: G4363 C5A4 1937 U6, Detail
L338-105-Paul Smith Photo, Courtesy BAERA, WRM Archives, 258937sn, Wilbur C. Whittaker Photo, Courtesy Arnold Menke, r, Courtesy Map Collection, Shields Library, University of California, Davis, (Image 27 of 52)
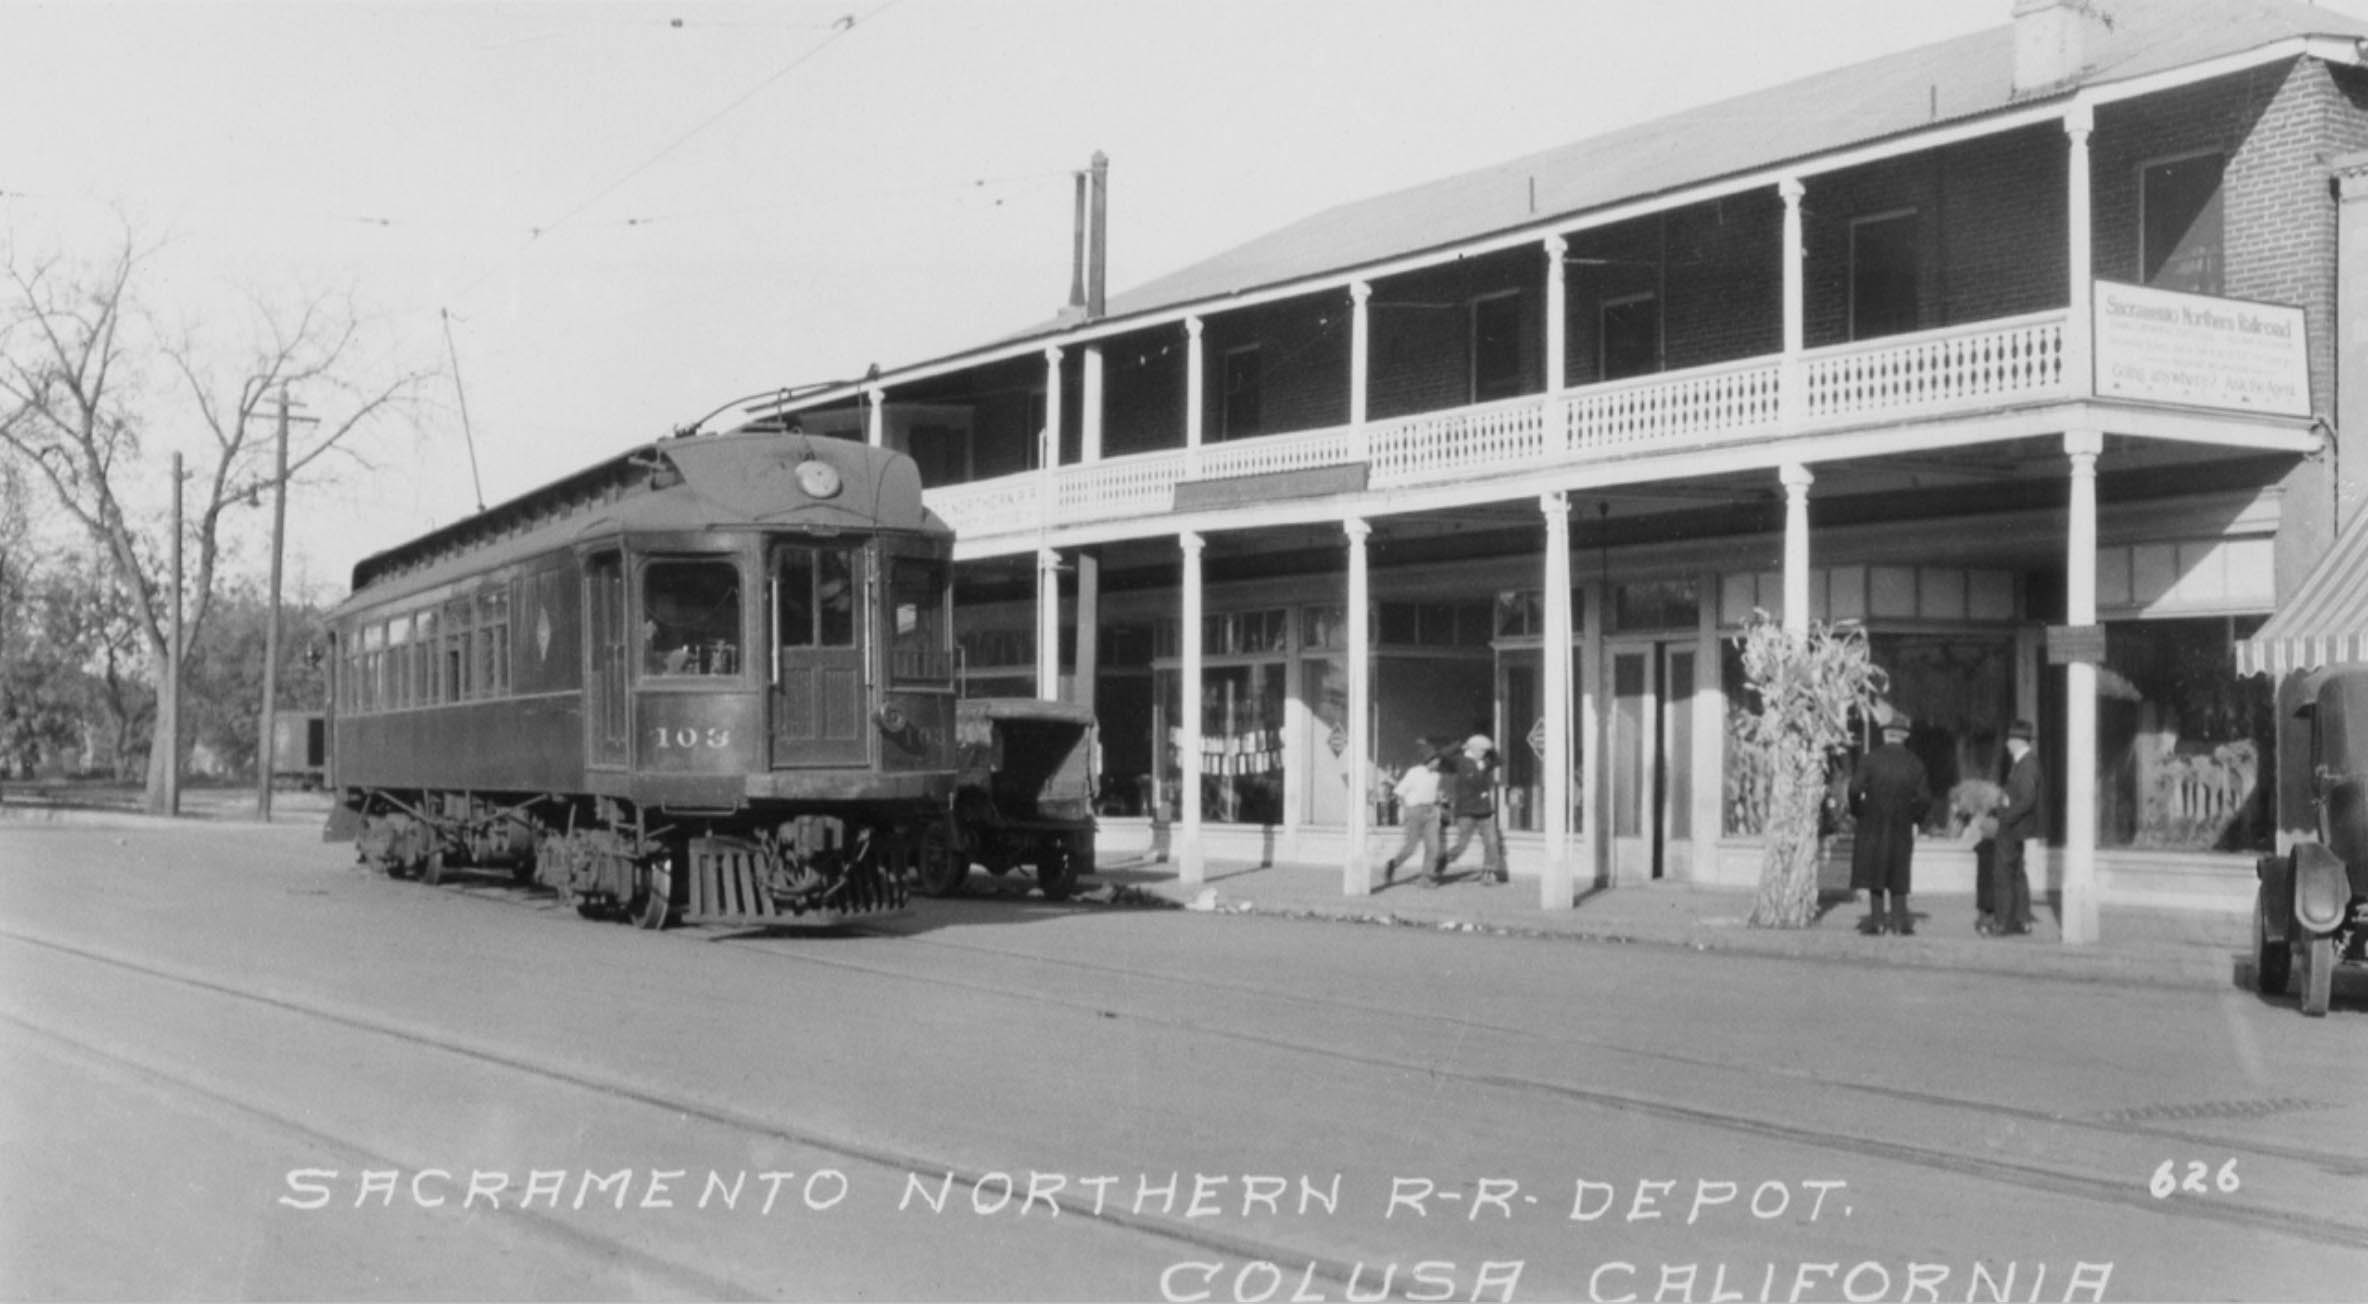
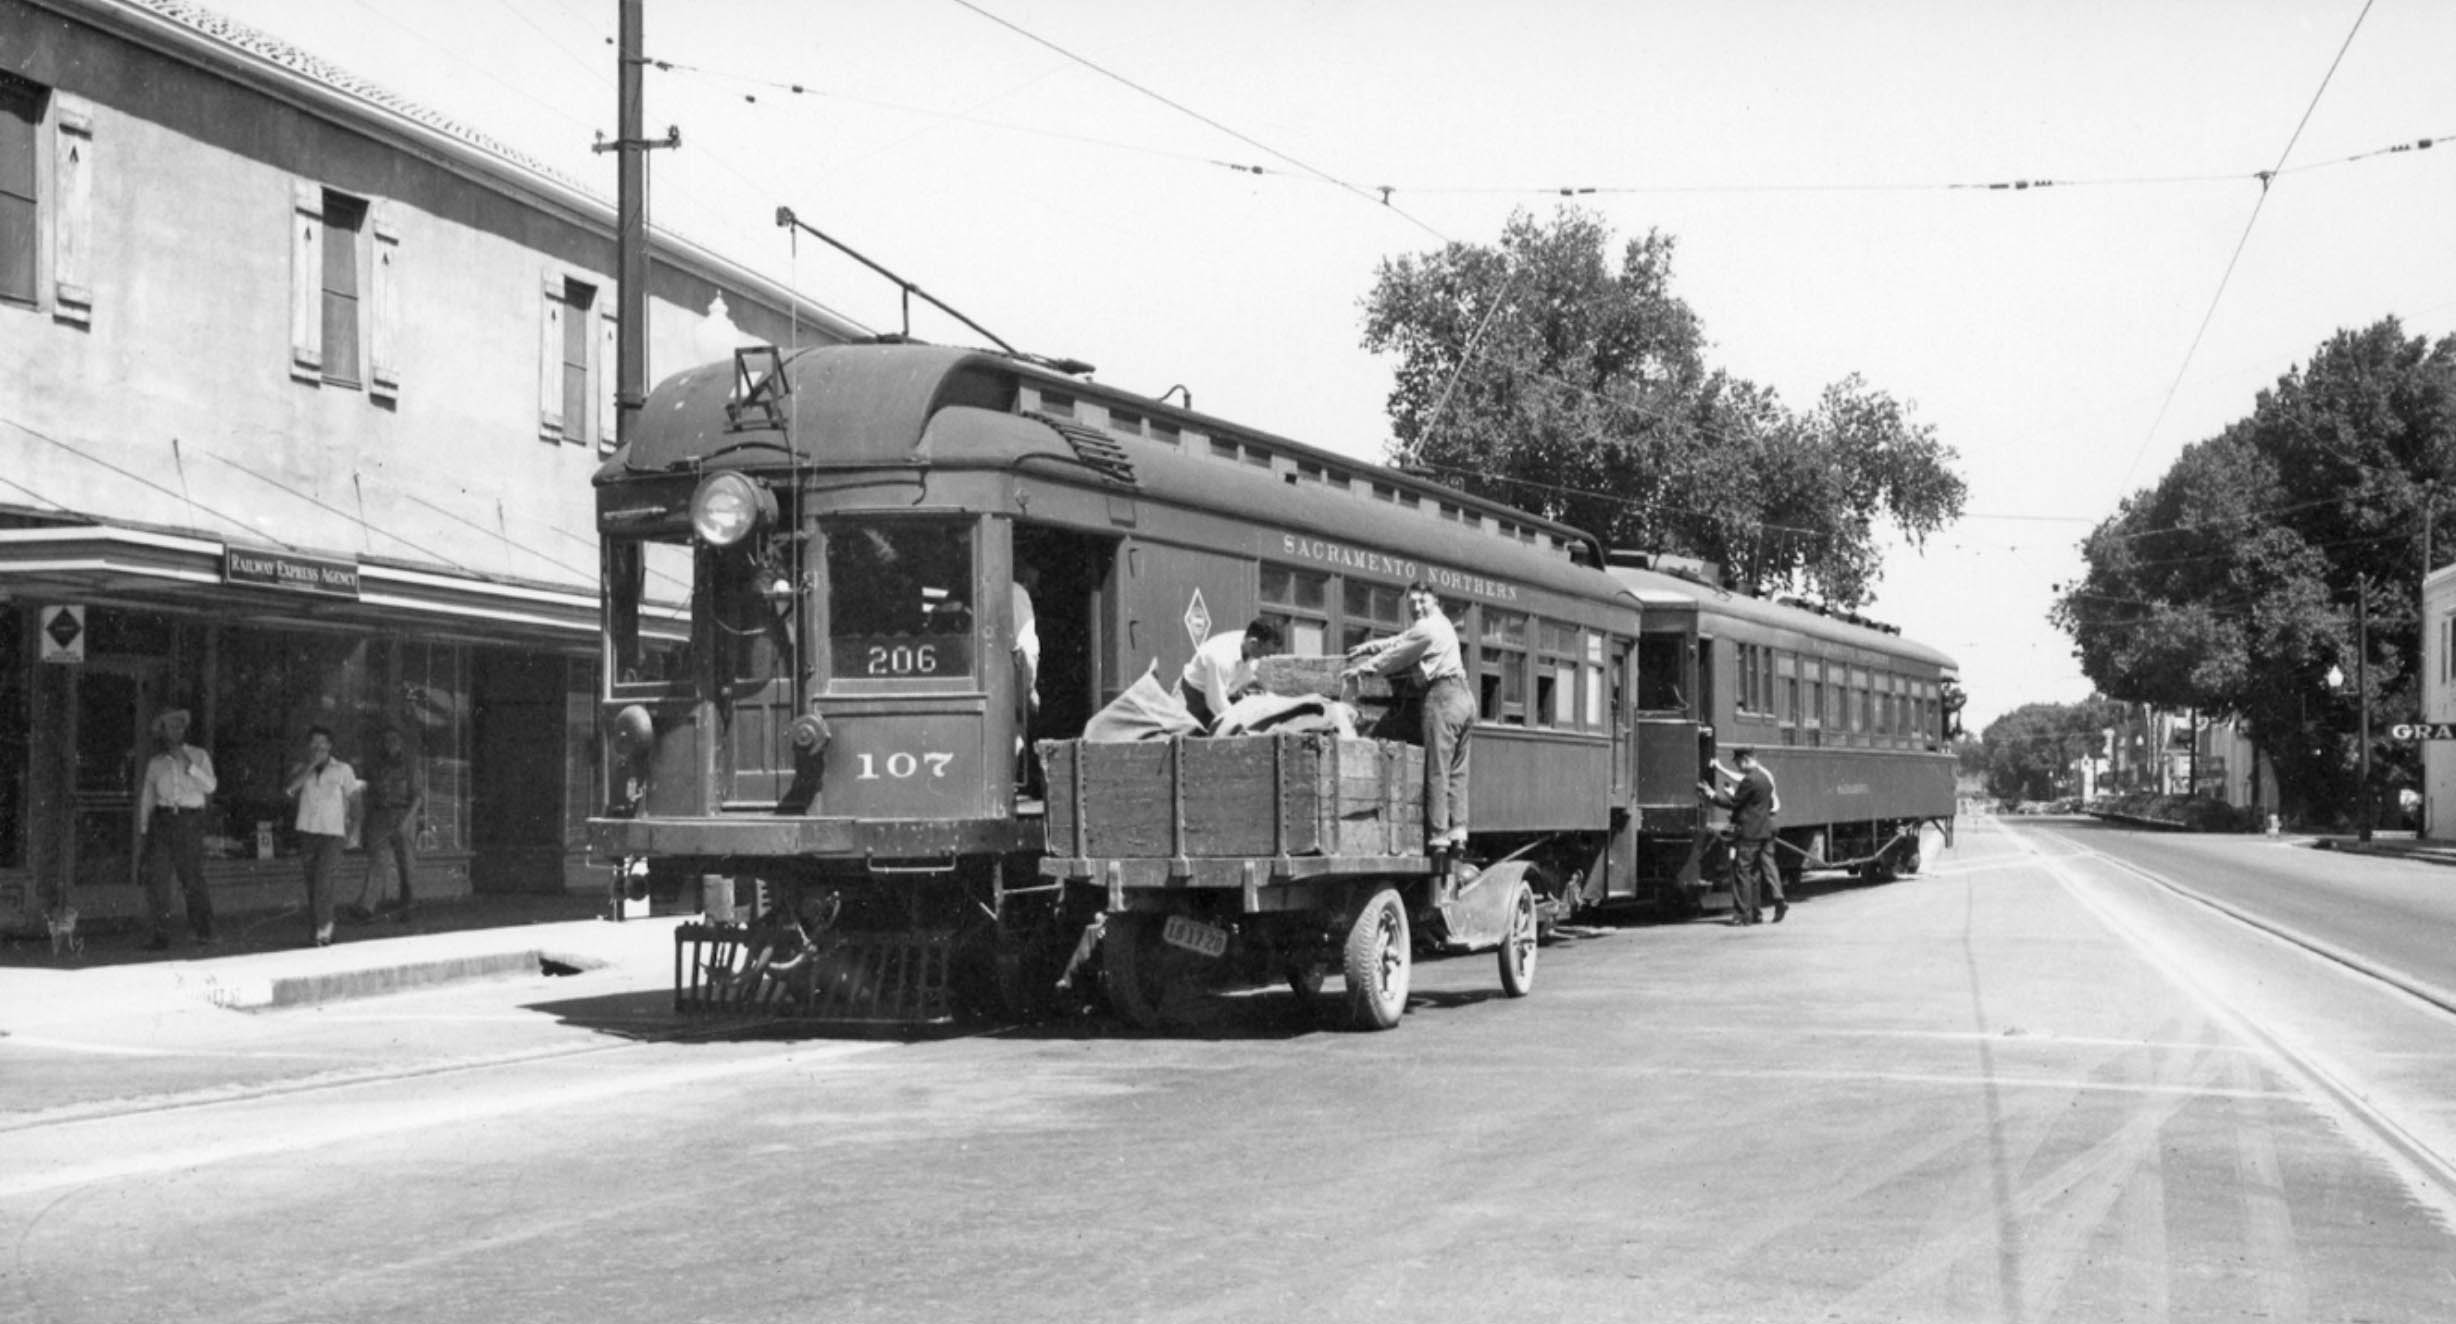
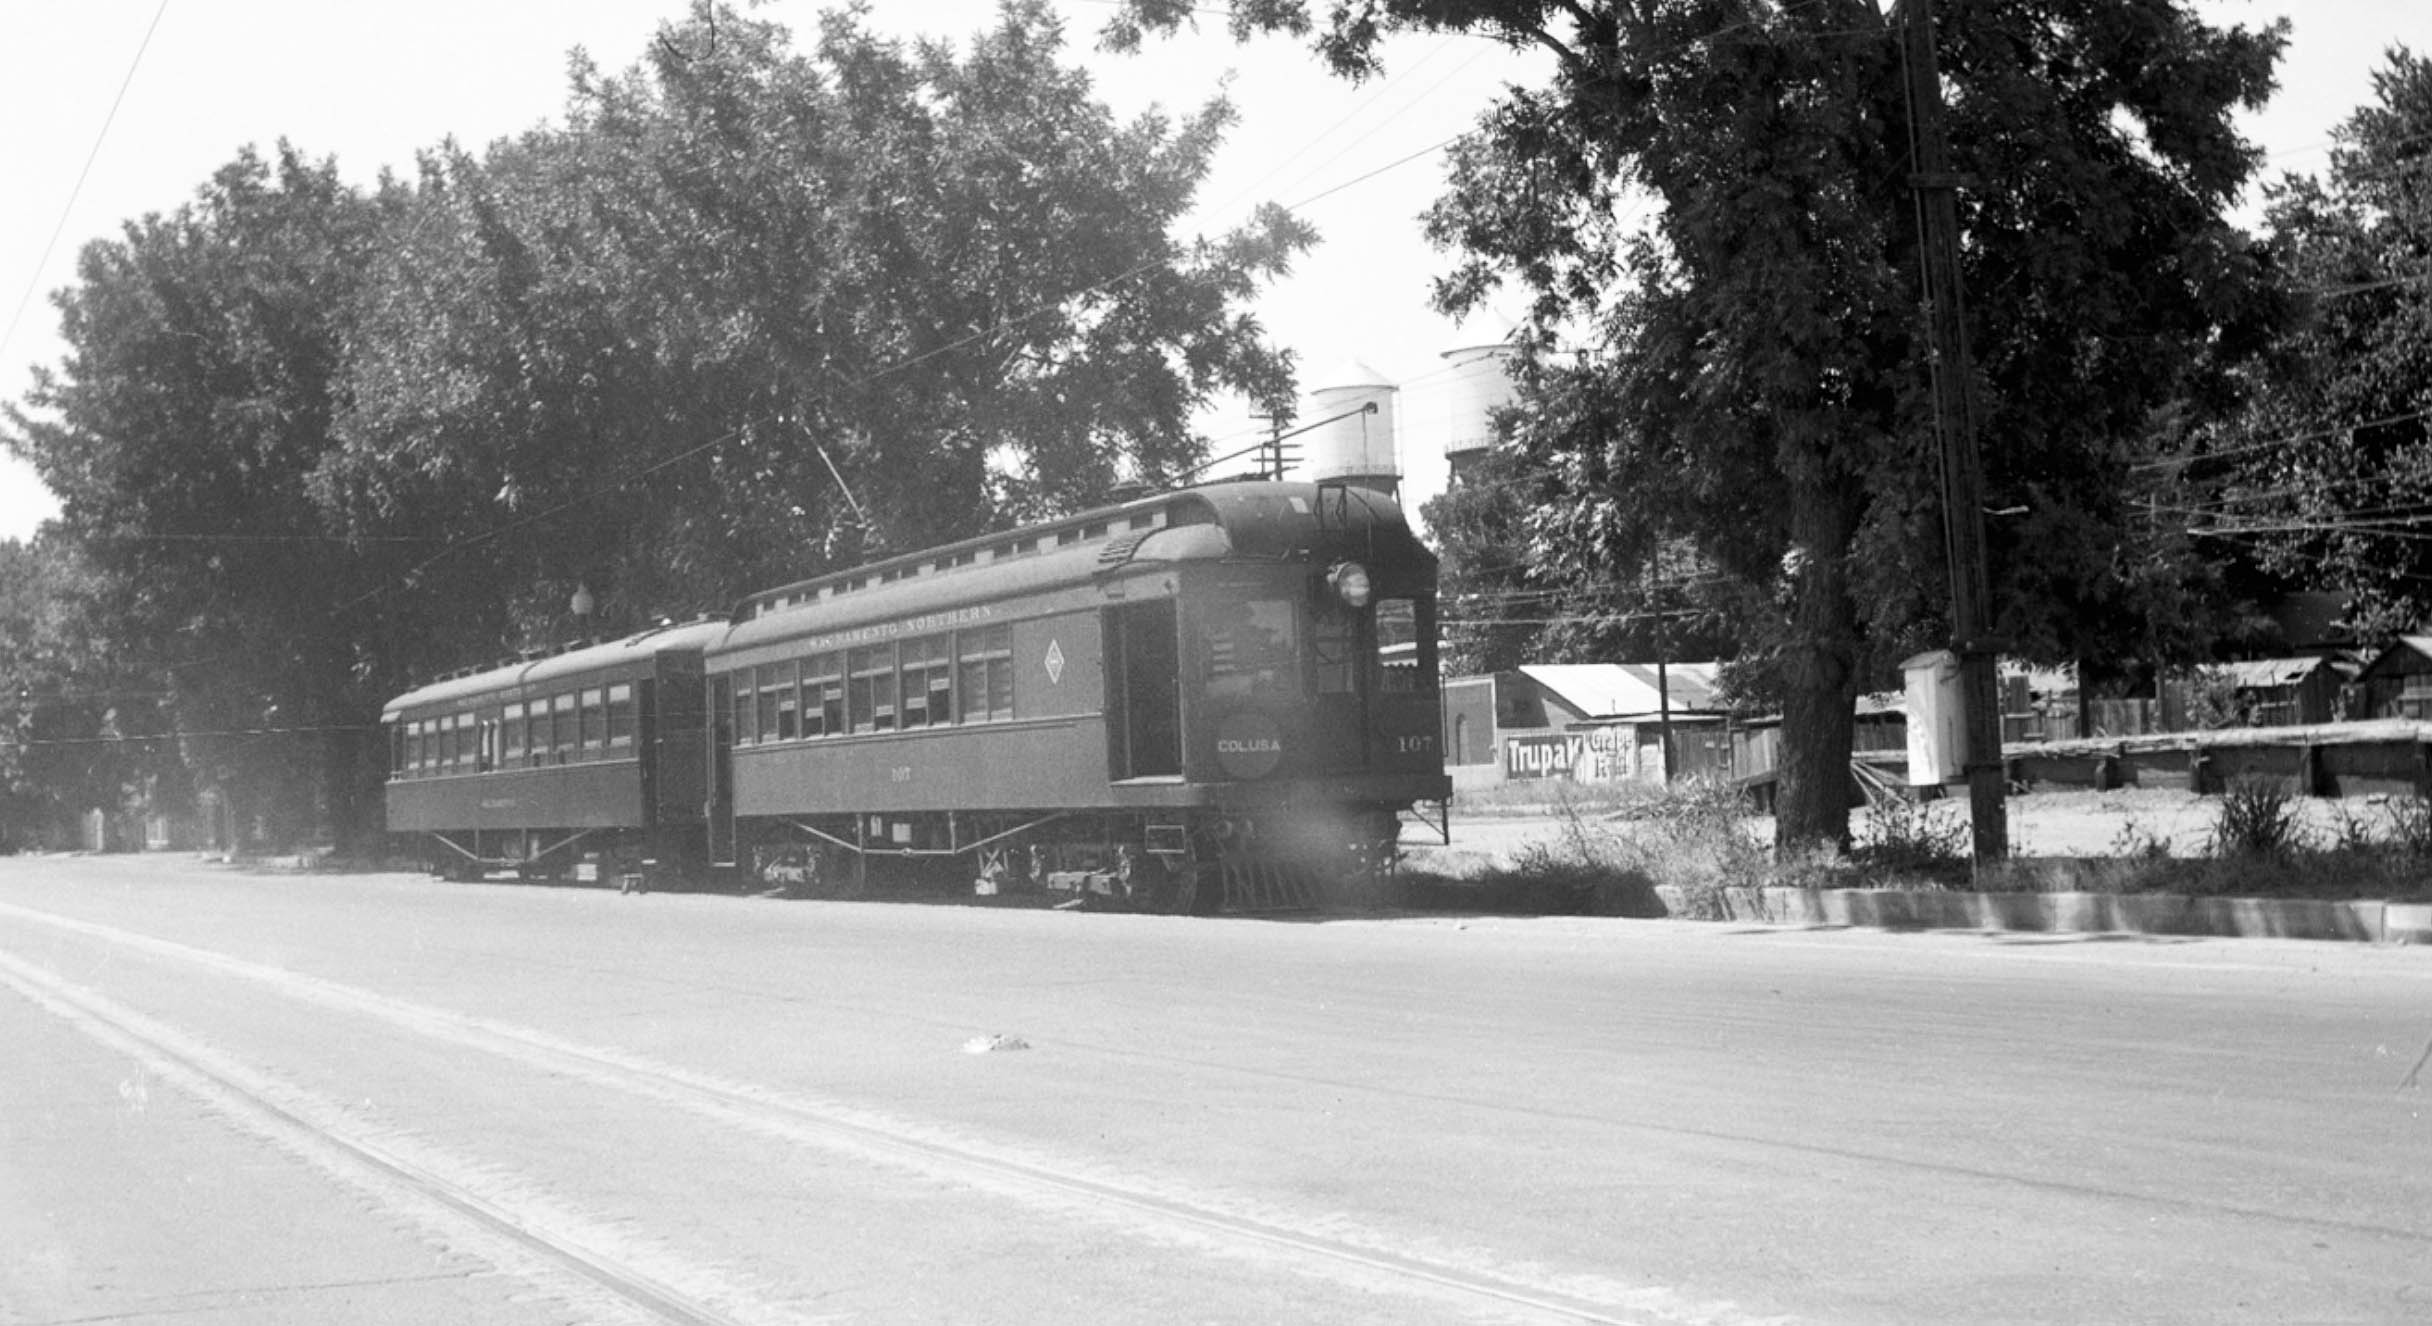
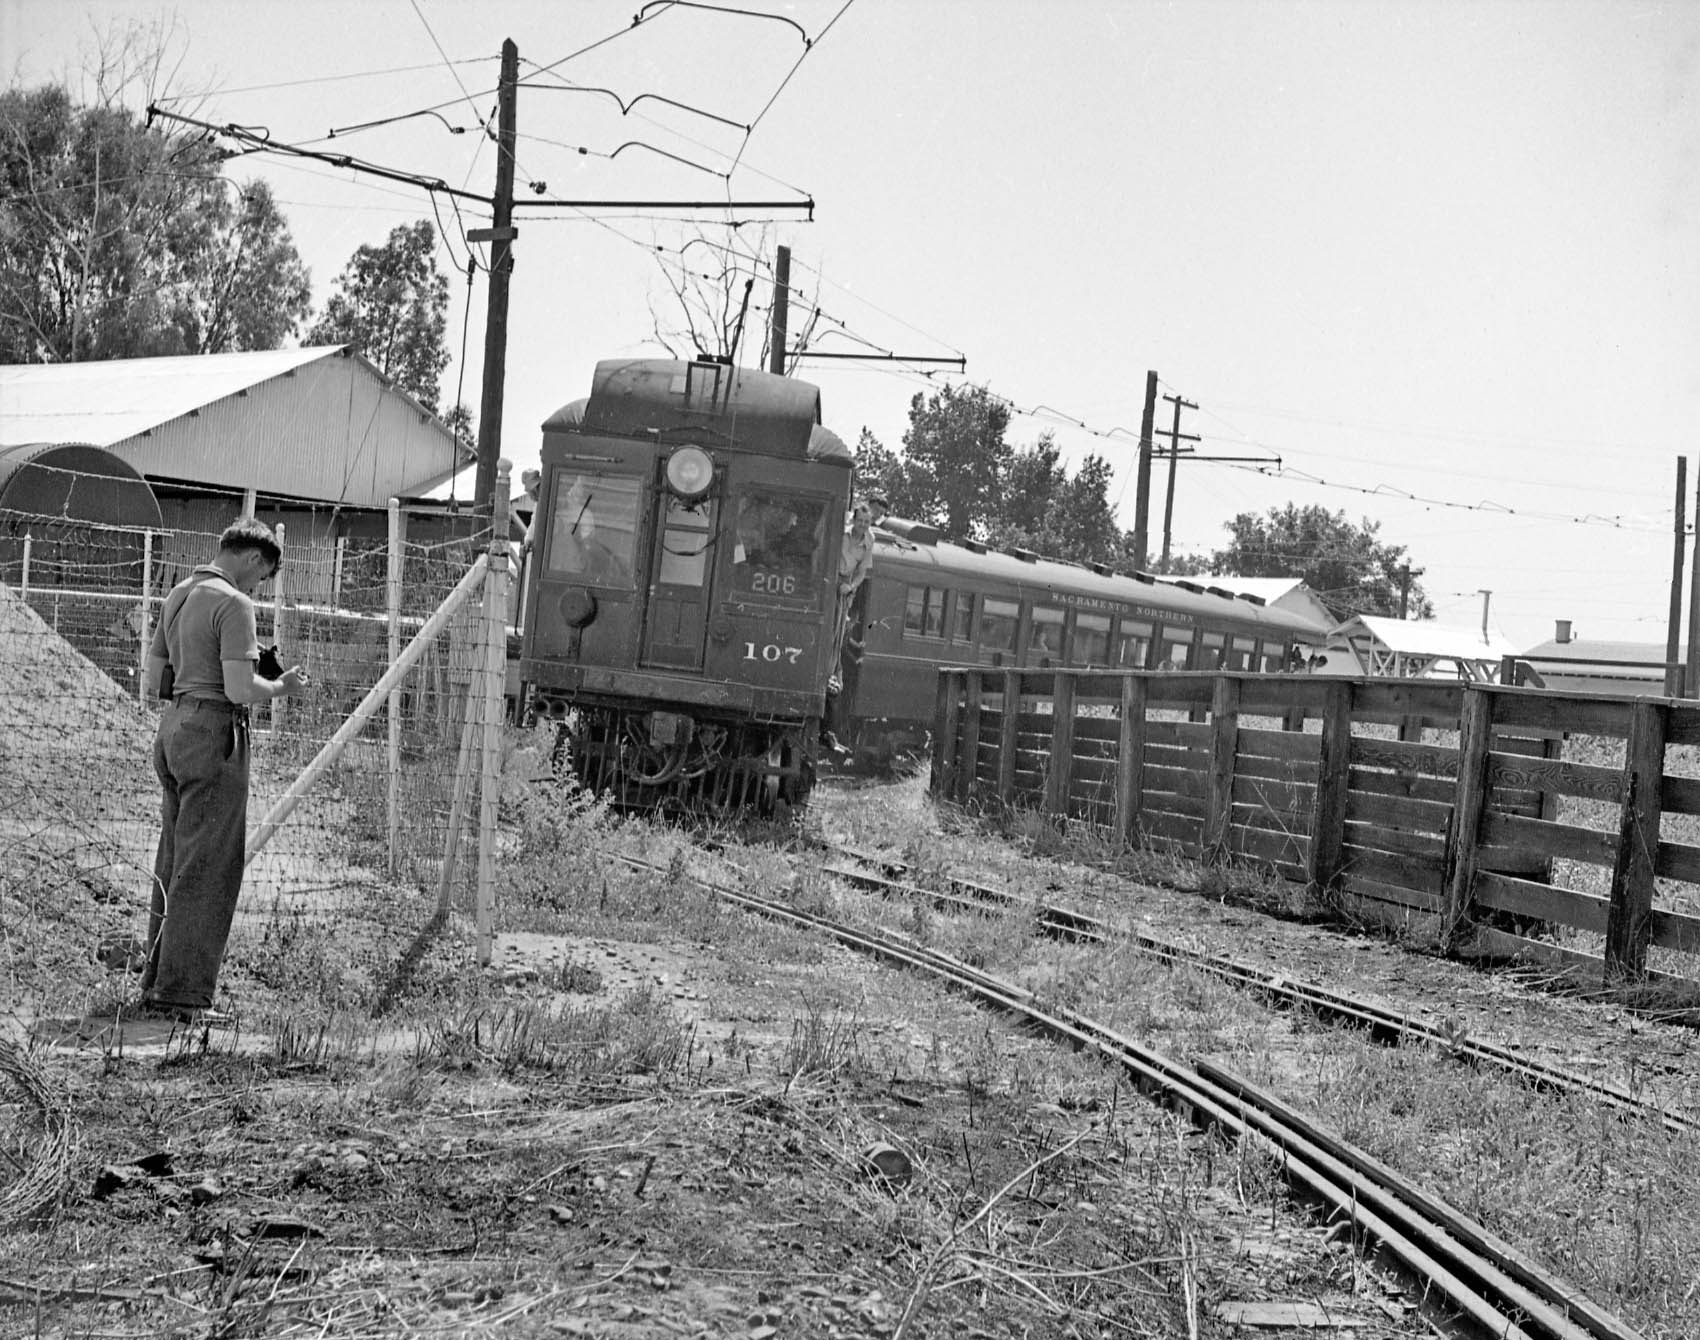
Wil Whittaker also took this east view at the SN ticket office with SN 107 and SN parlor car Sacramento on June 16, 1940. This was a private excursion, substituting SN 107 for SN 109 as train 206, and adding the parlor car as an excursion extra. This would be the last appearance of a SN parlor car in Colusa. This image also confirms the lack of a true station of the SN at Colusa, as the sign indicates a Railway Express Agency office at this site. This would explain the transfer of goods captured in the image.
L338-110-Wilbur C. Whittaker Photo, Courtesy Arnold Menke, (Image 28 of 52)
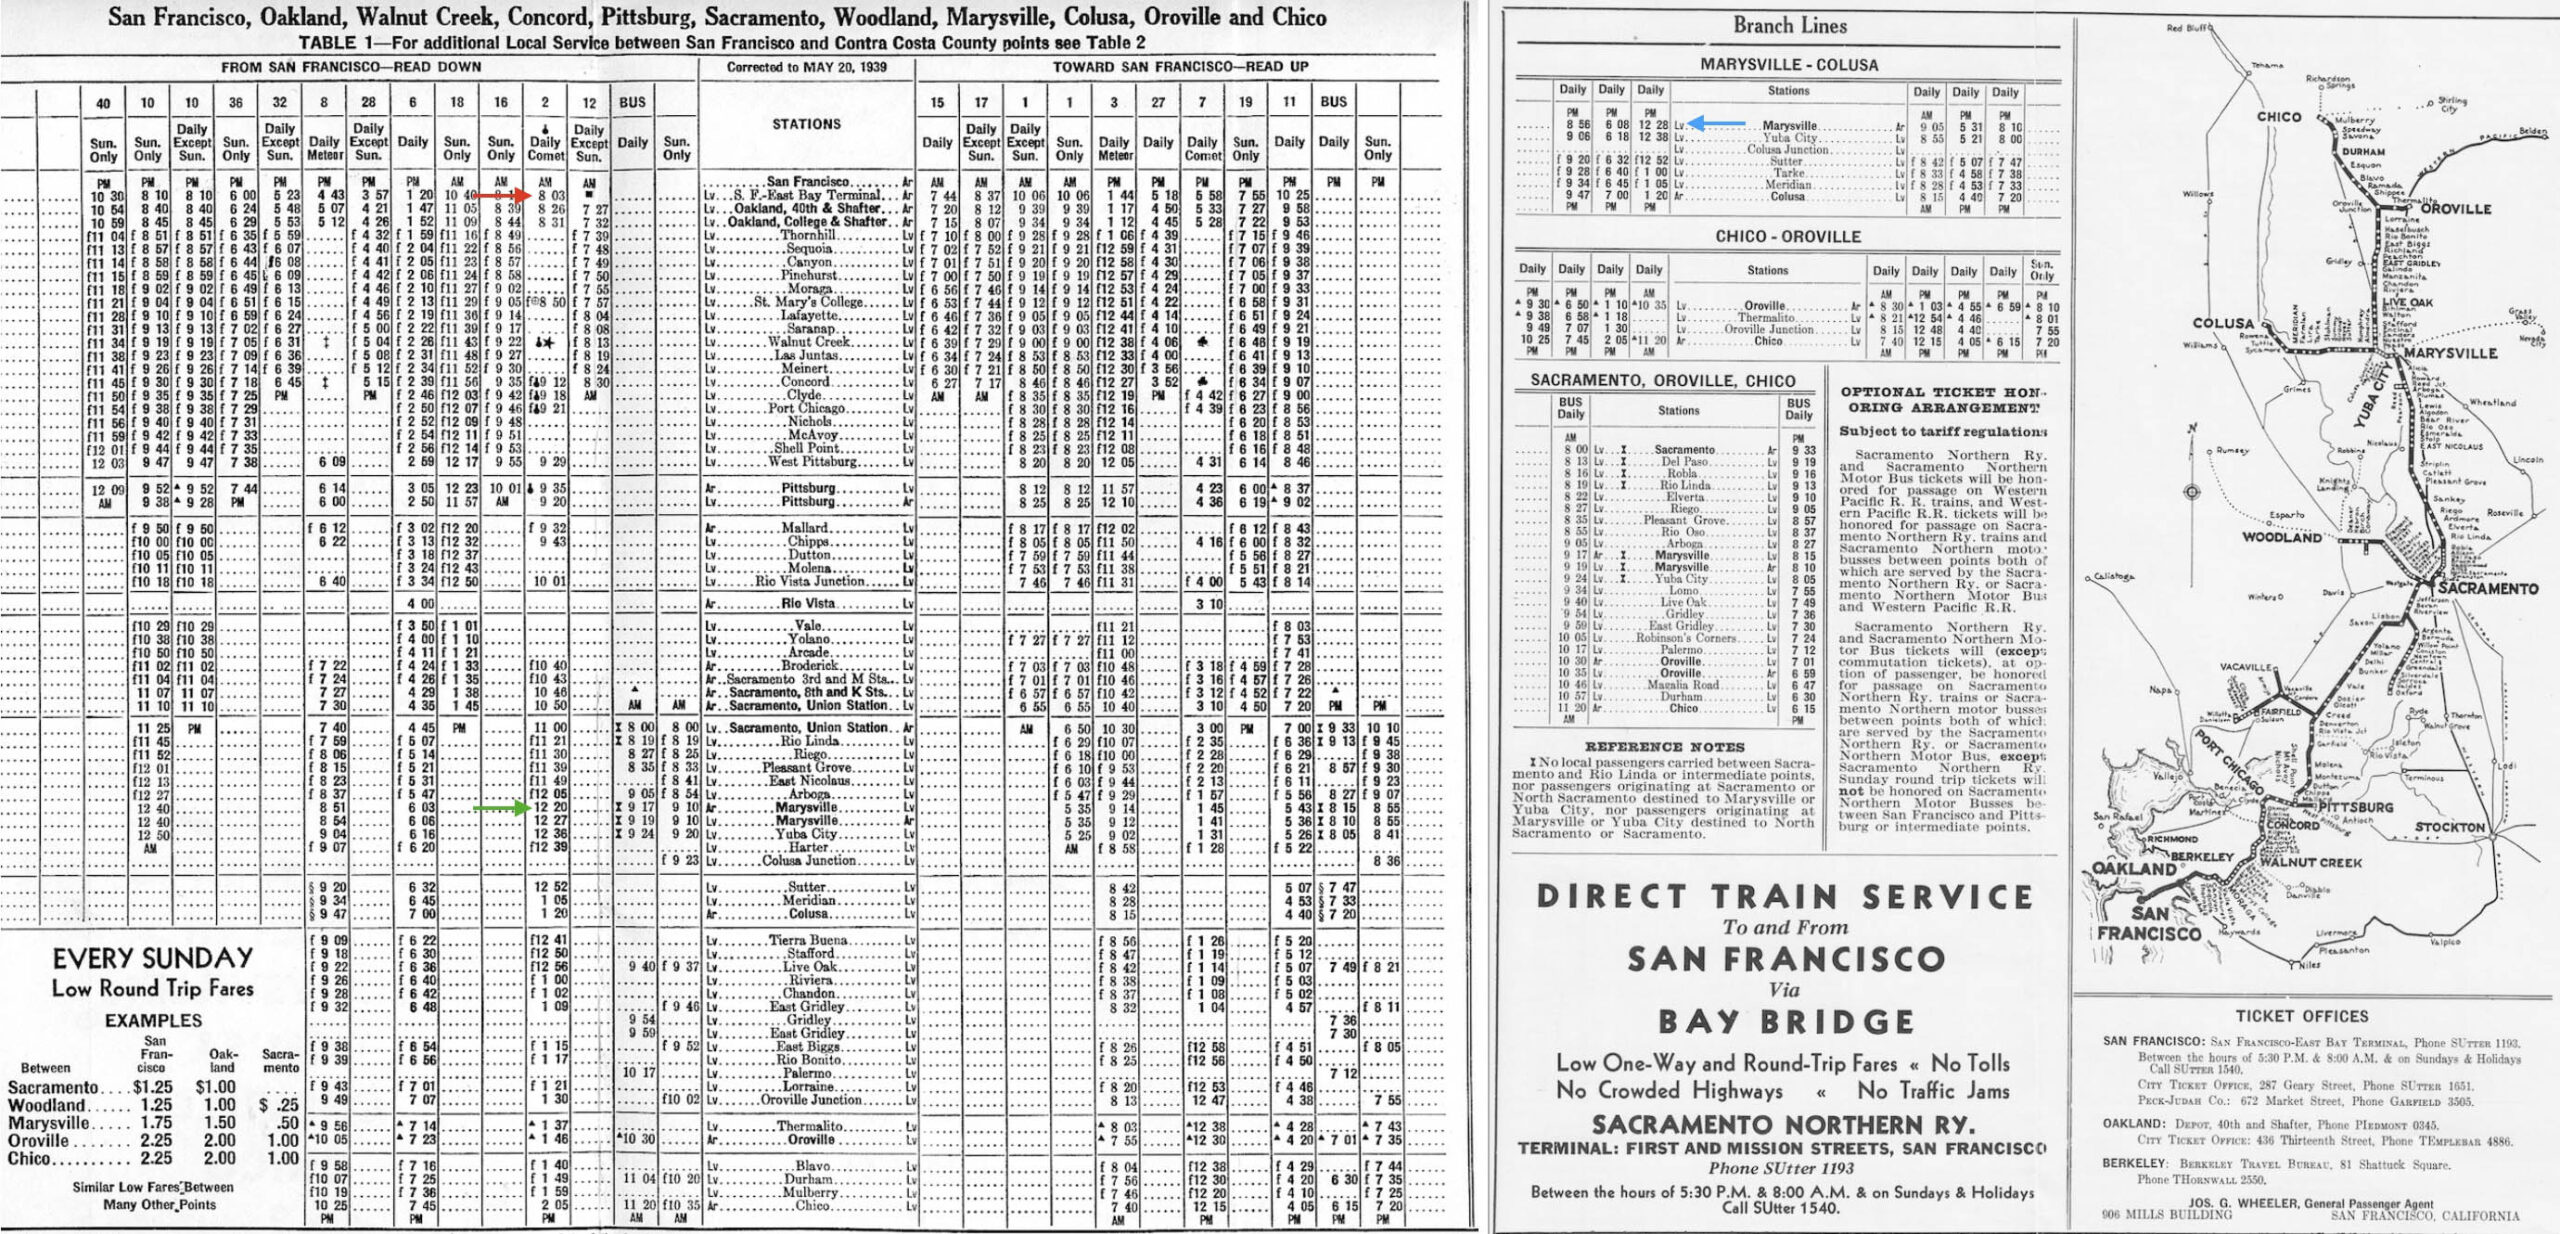
If a railfan caught the SN no. 2 train “The Comet” from San Francisco at 8:03 AM, red arrow, they would arrive at Marysville at 12:20 PM, green arrow, in time to catch the 12:28 PM Colusa Local, blue arrow, arriving at Colusa at 1:20 PM according to the May 20, 1939 passenger timetable shown here. This meant perfect photography conditions in terms of the position of the sun for taking images of the north side of the street where all the SN operations were centered. Unfortunately, the south side was essentially ignored except for a few shots taken under tree cover.
L338-115-Courtesy BAERA, Western Railway Museum Archives, (Image 29 of 52)
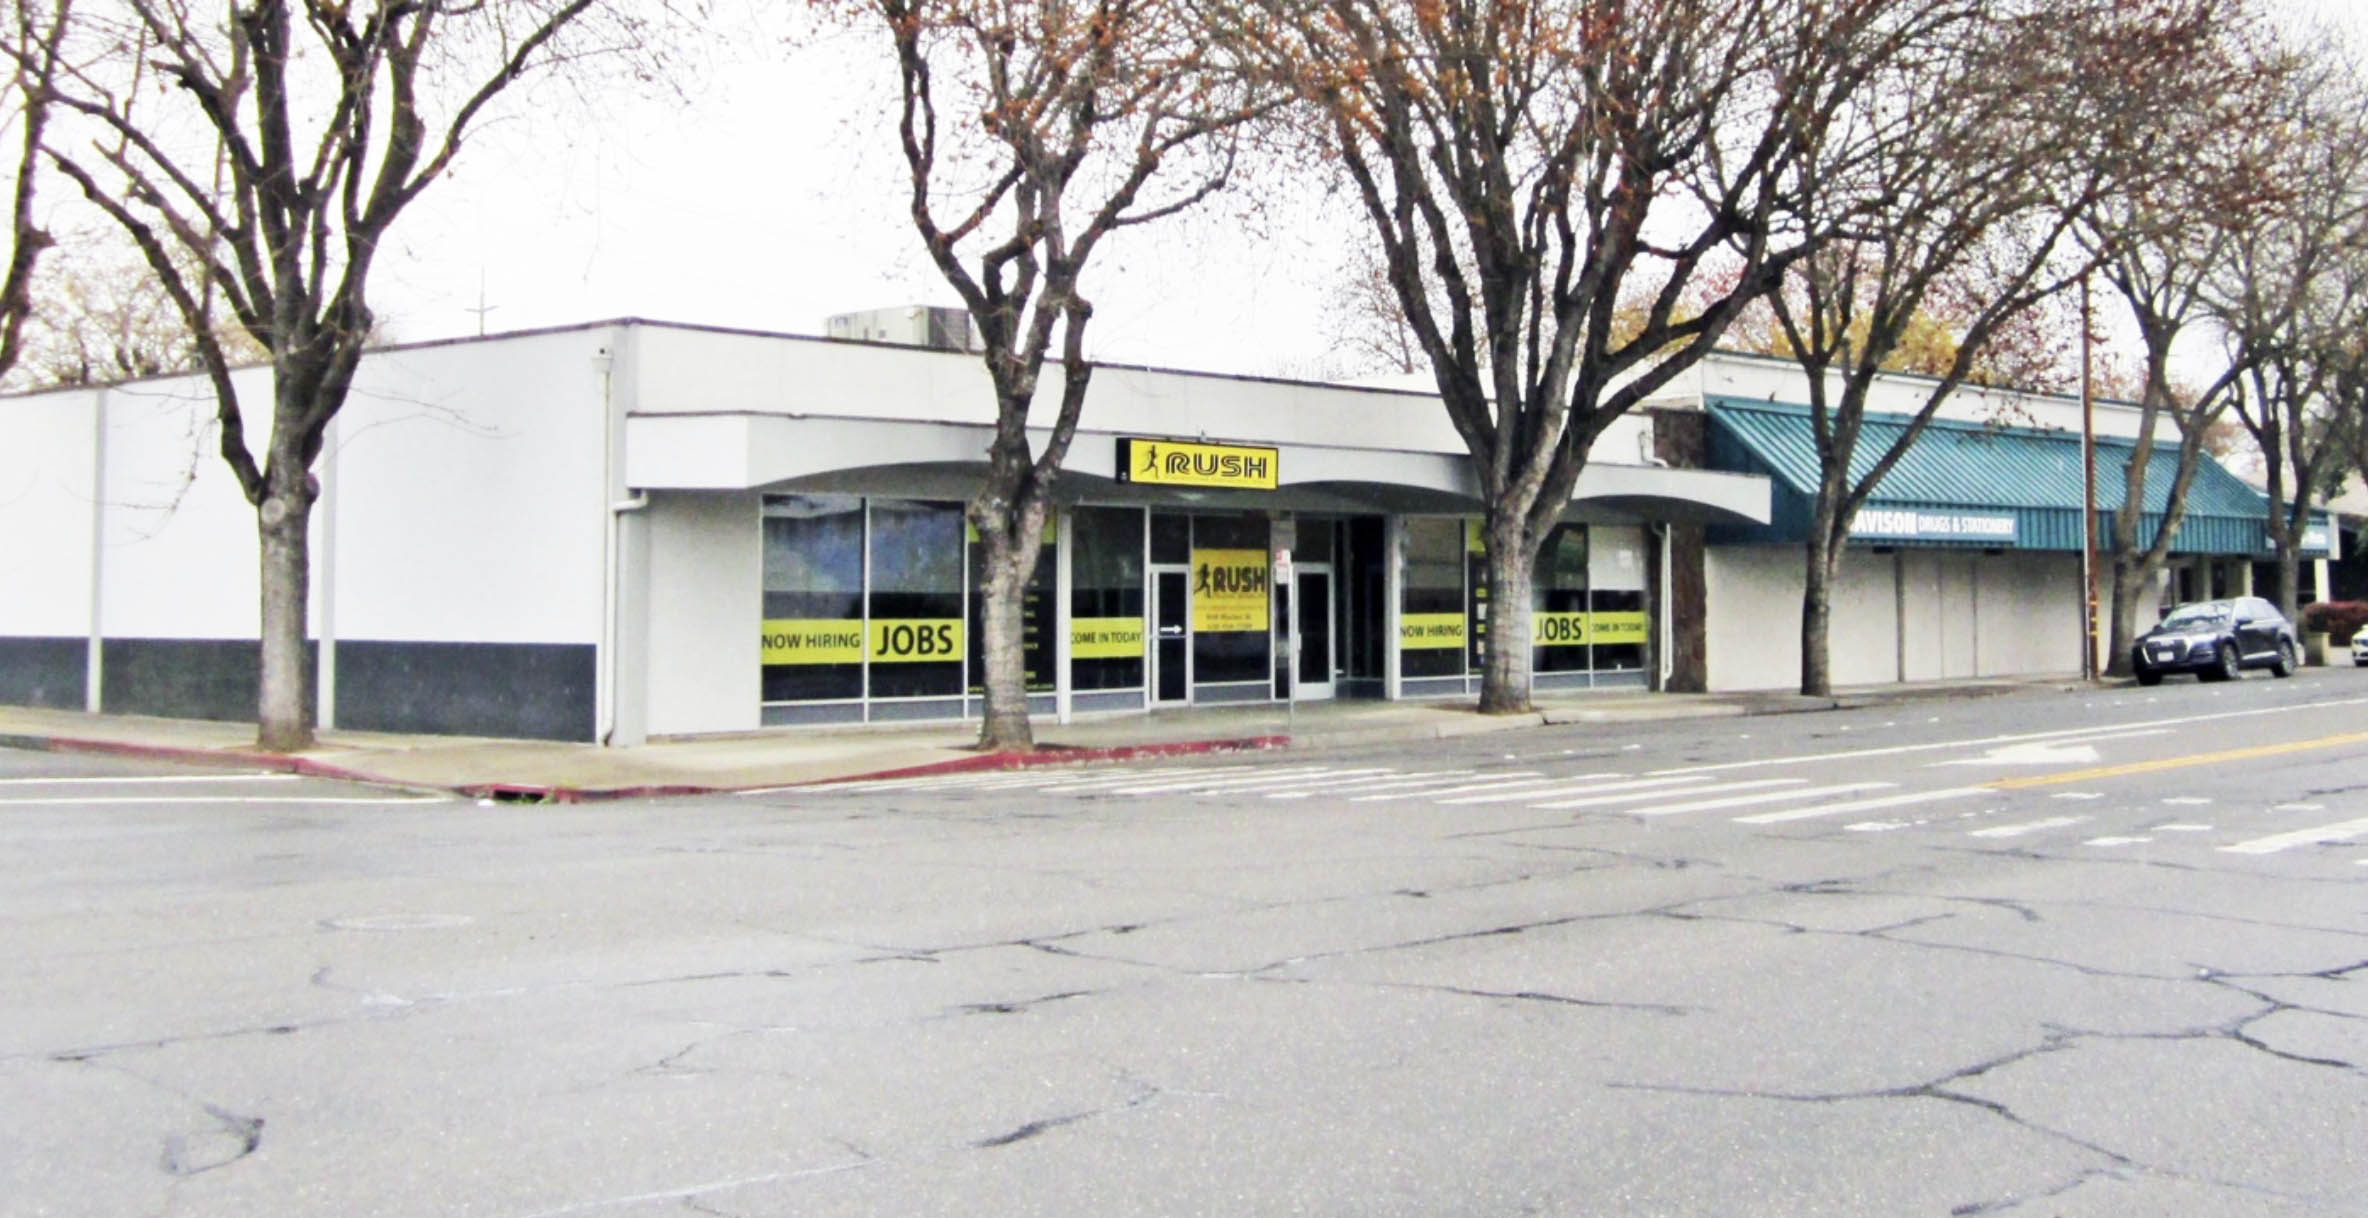
This explains why the northeast corner of 7th St. would become one of the most photographed parts of the town in 1940. A view of this corner in 2018 is provided here, soon to be transformed back in time …
L338-120-Stuart Swiedler Photo, (Image 30 of 52)
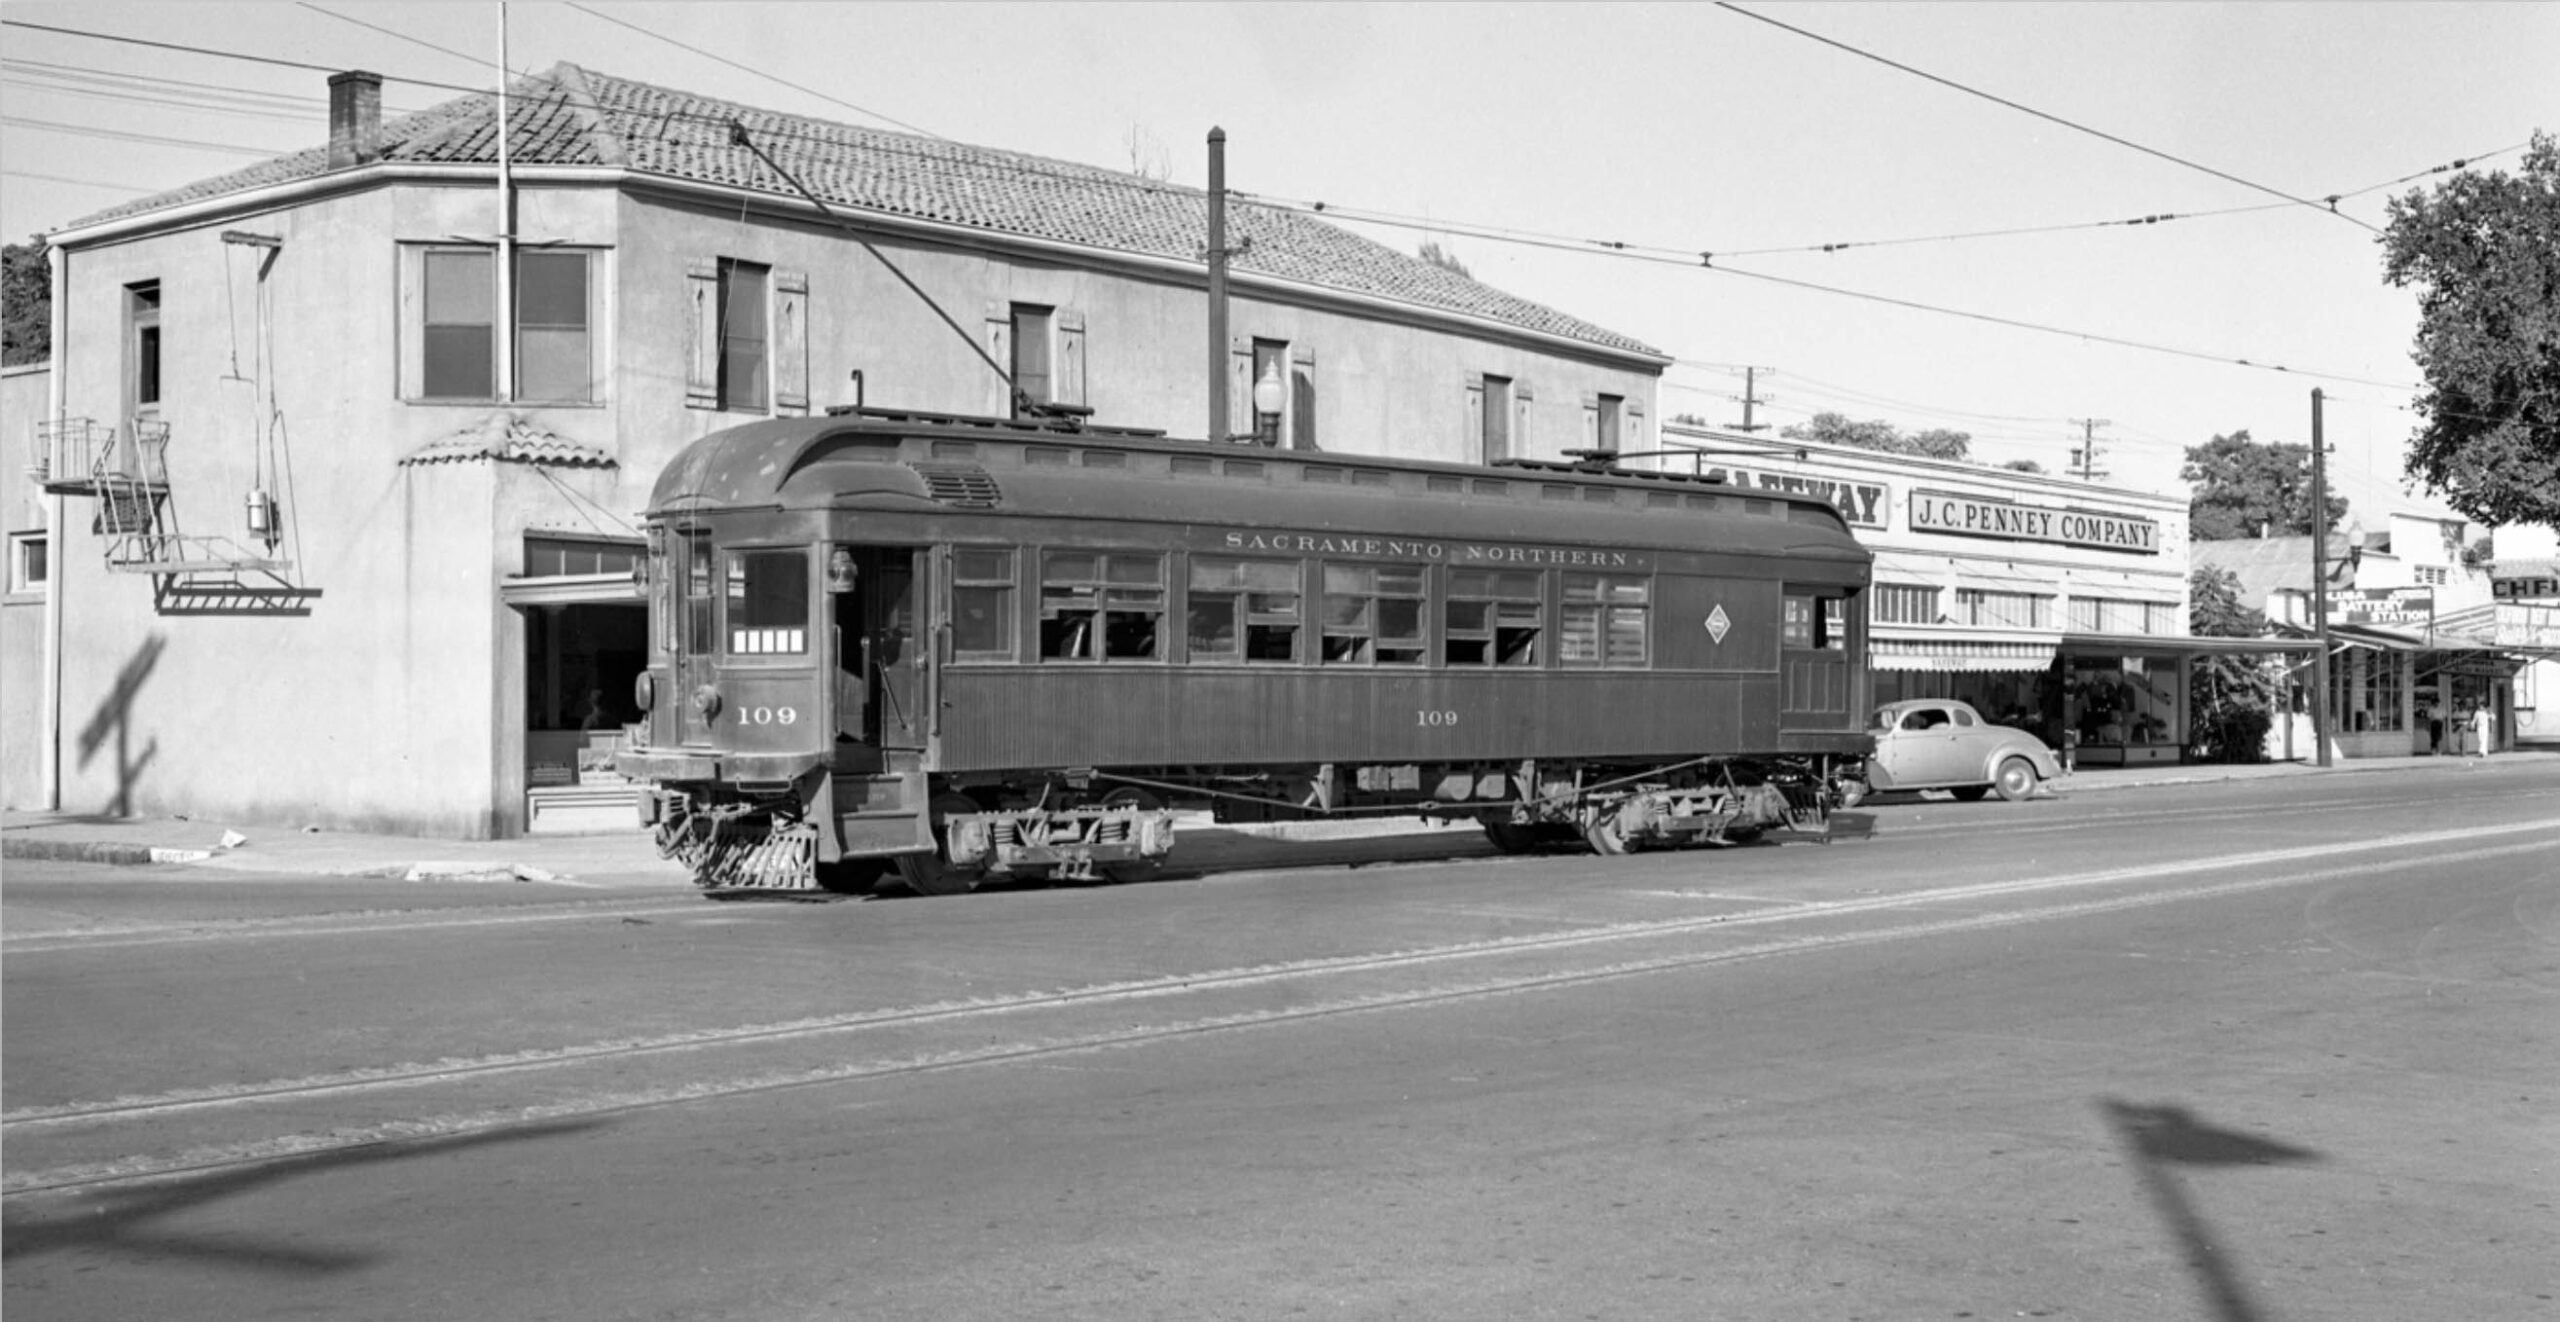
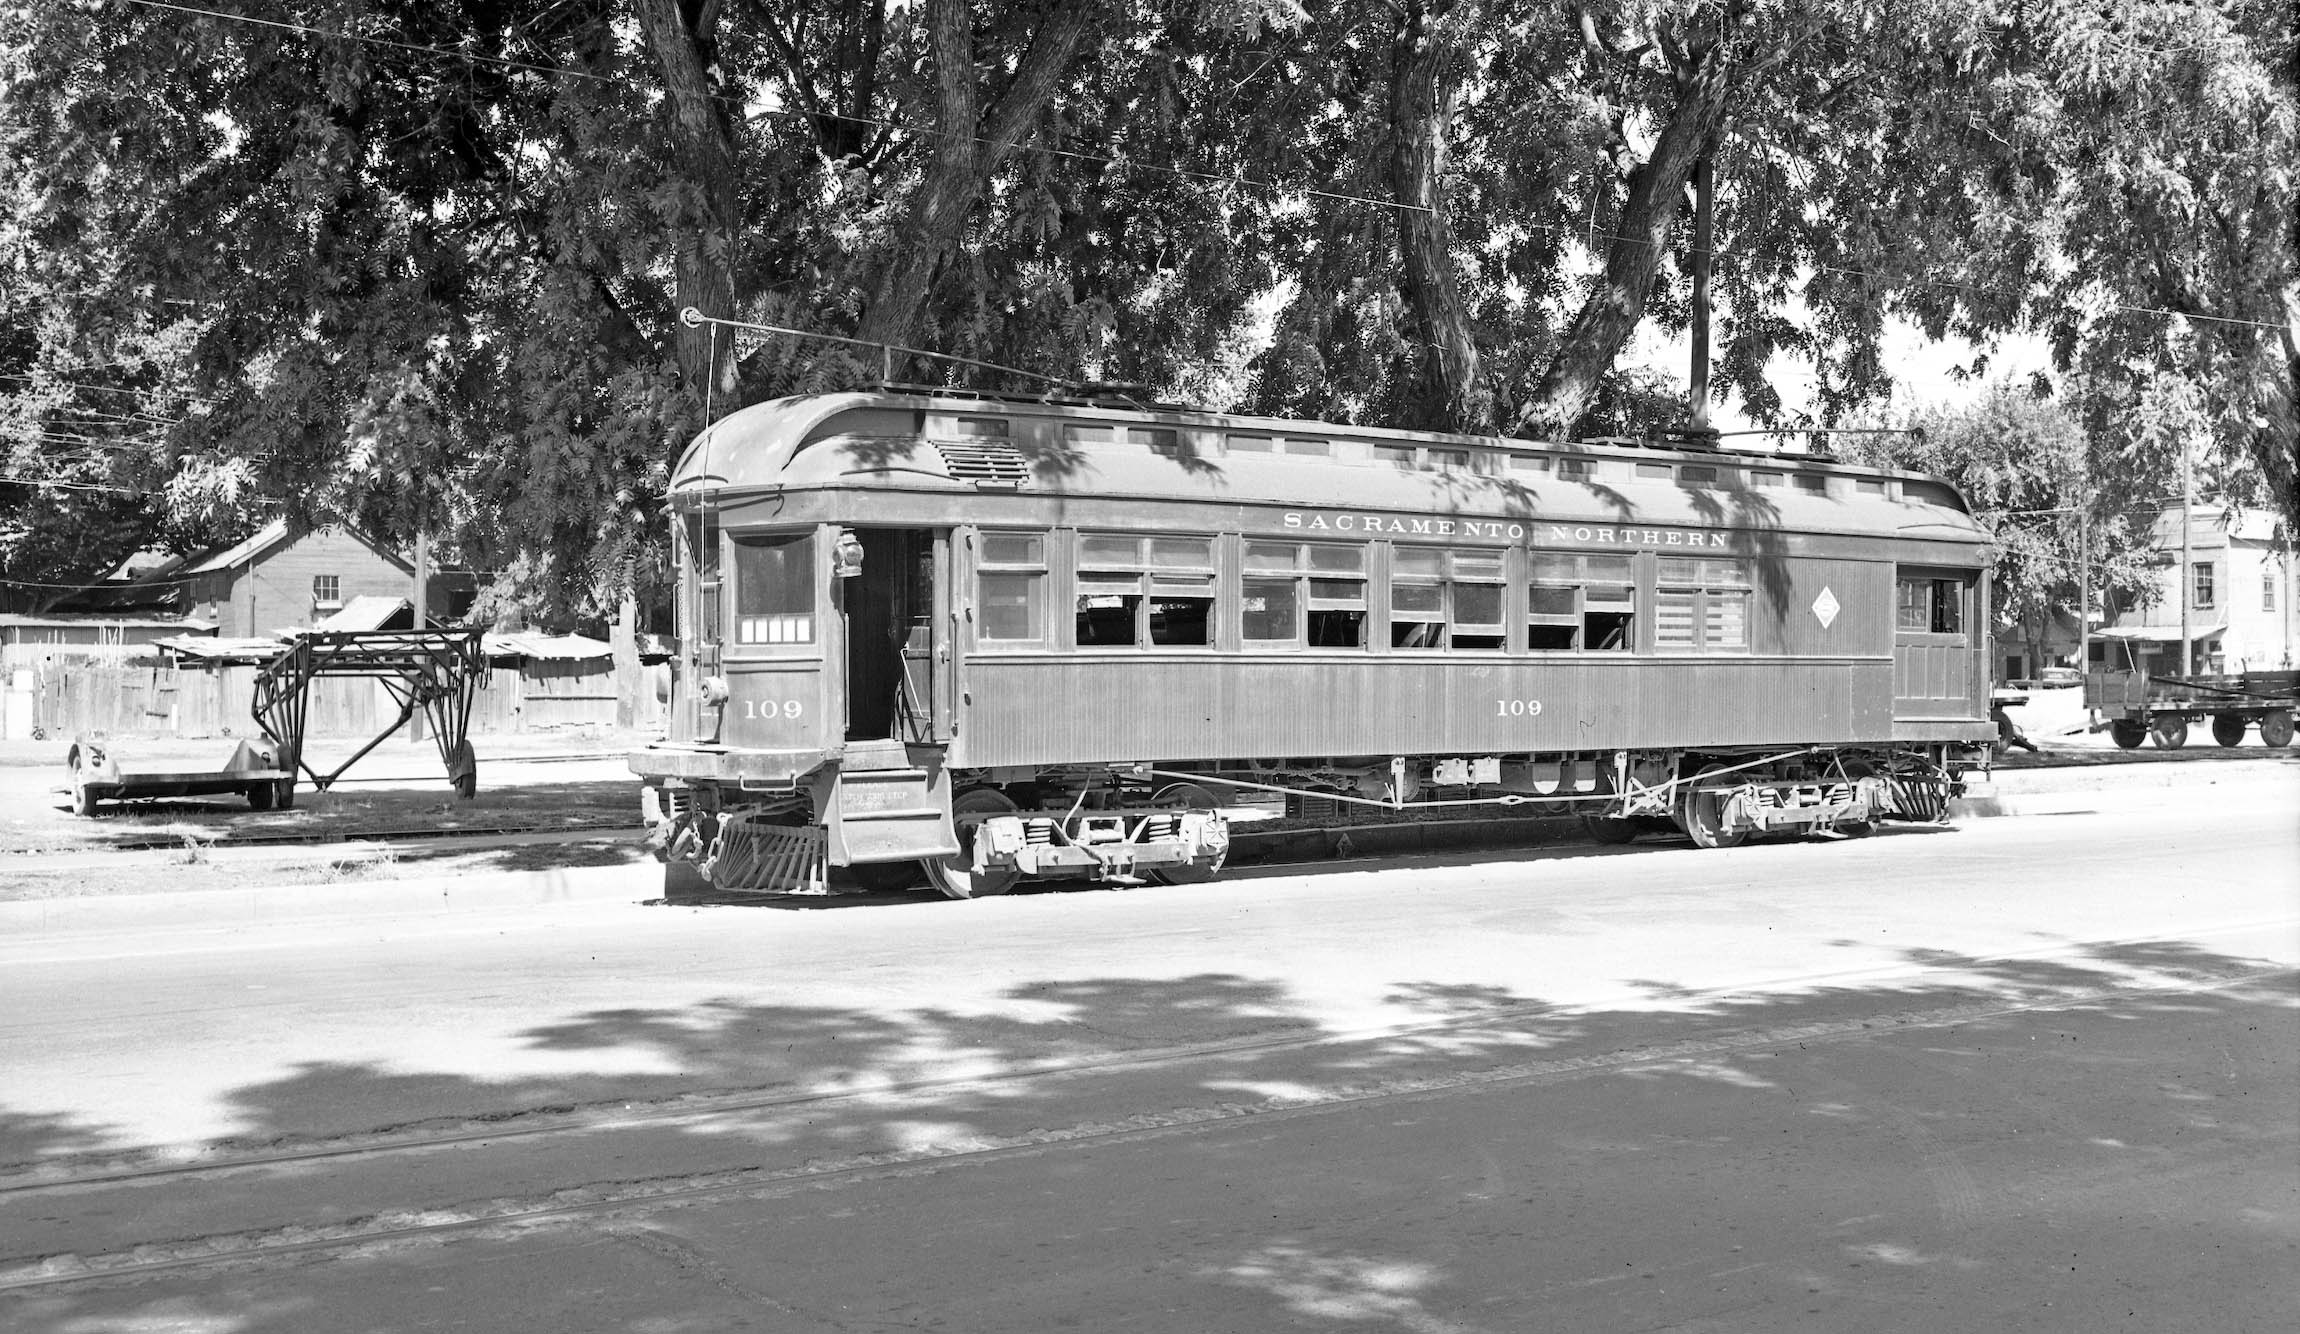
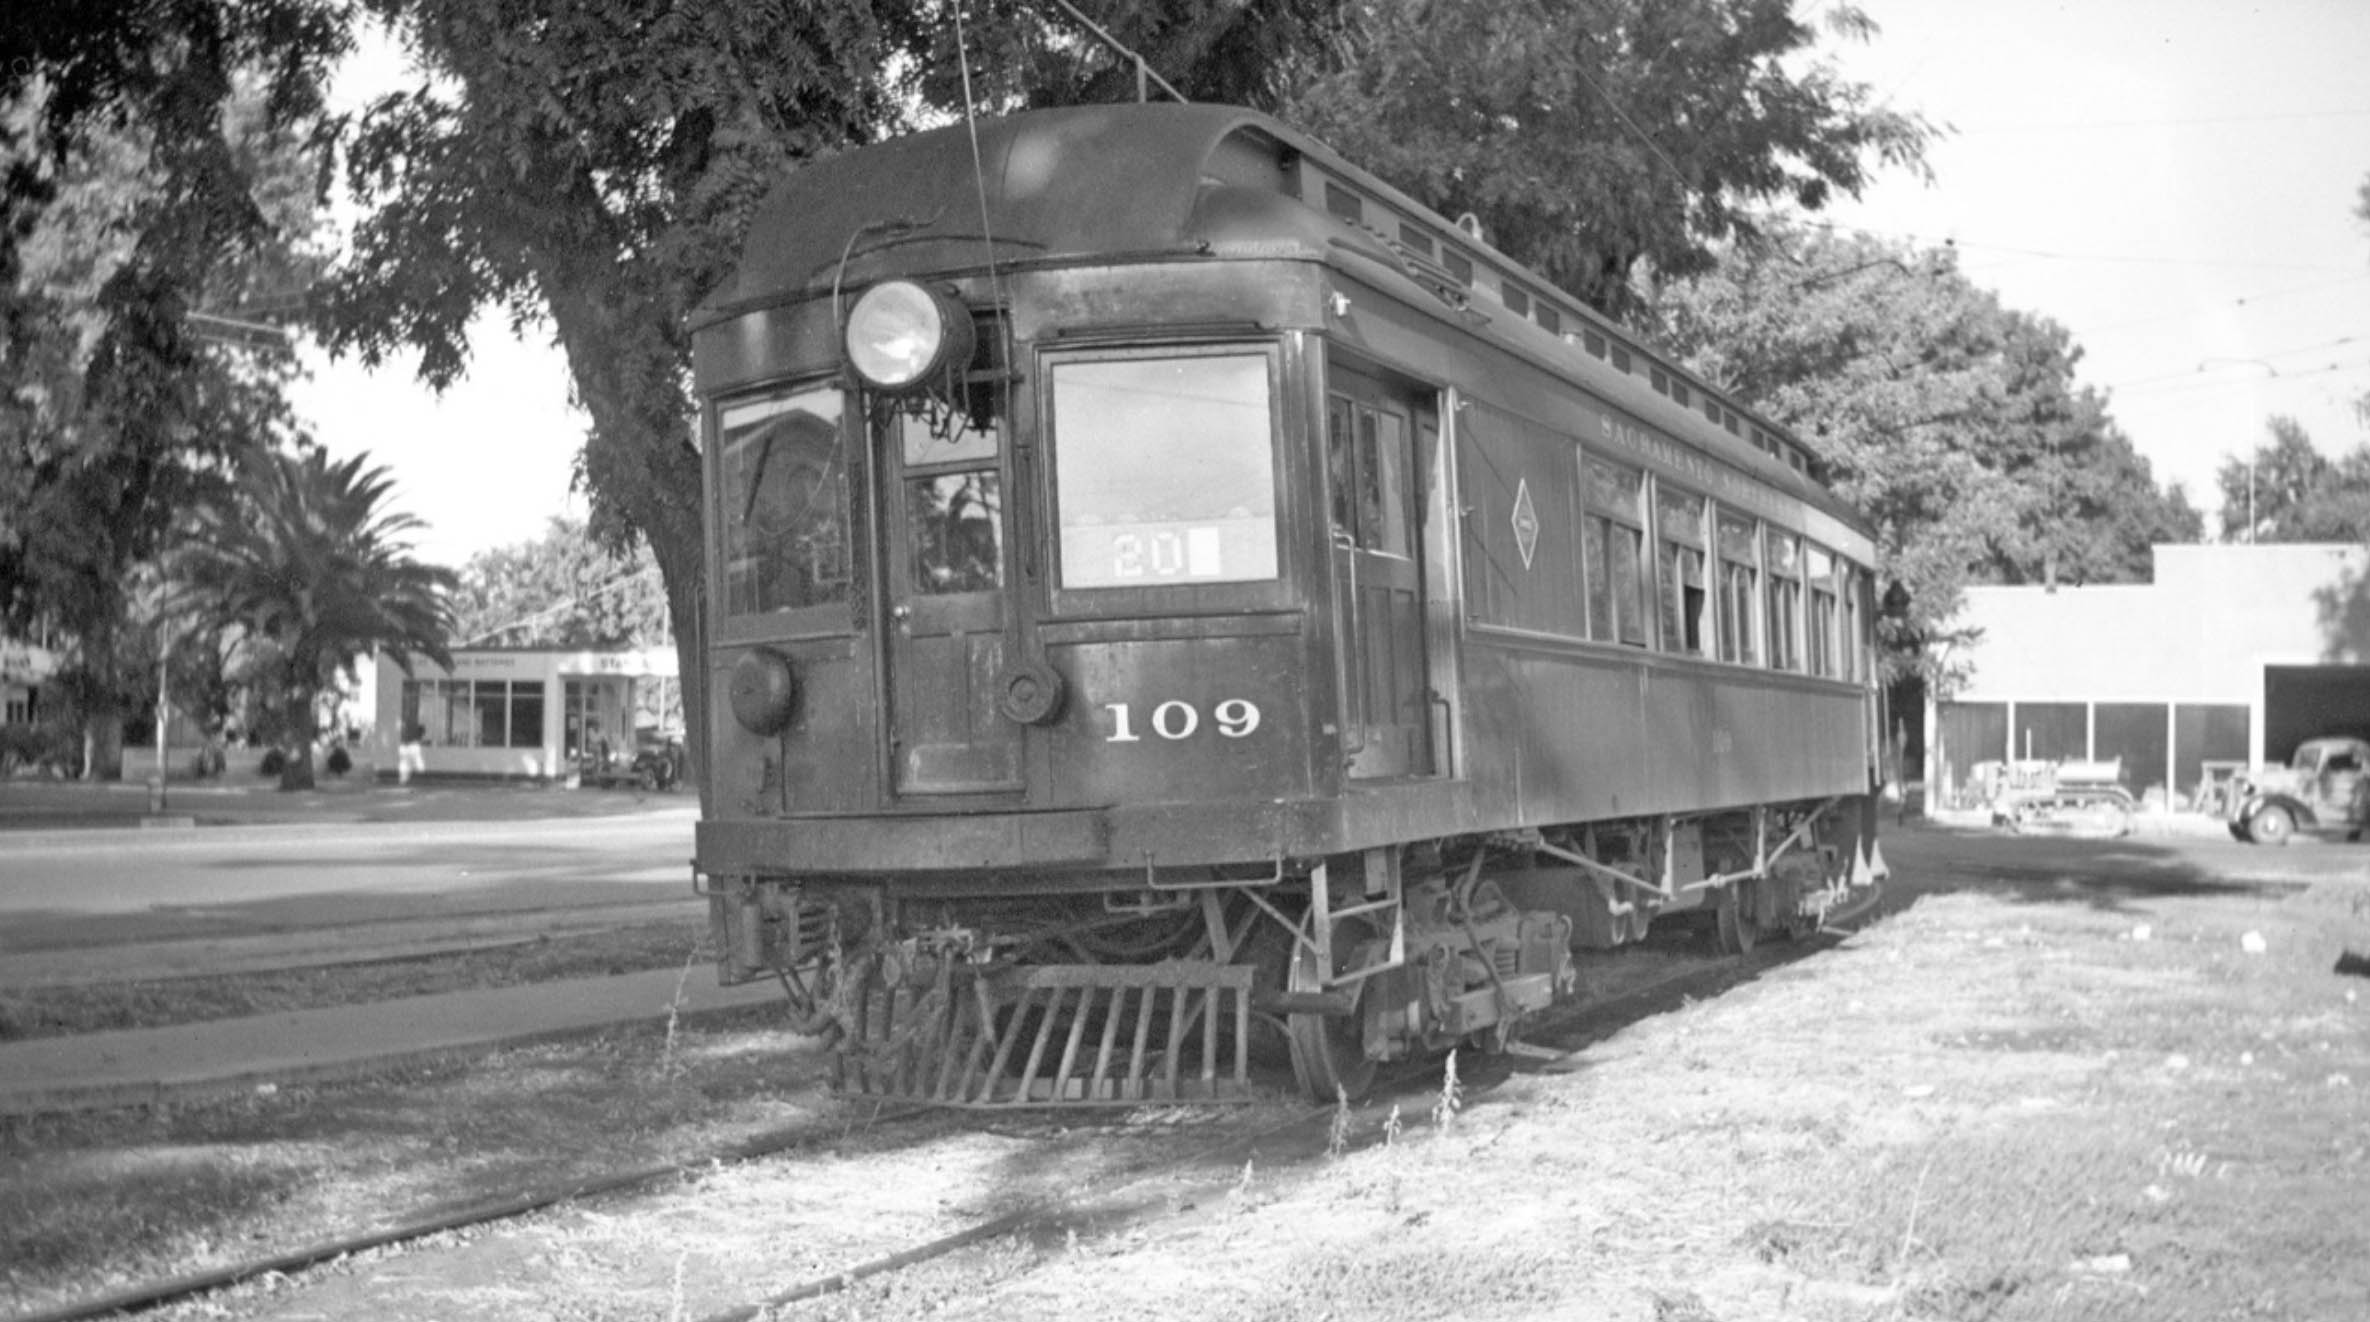
… with Charlie Savage northeast view from 1940 to document SN 109, the car that was best known for serving as the Colusa Local. Note the close proximity of the SN ticket office relative to the Safeway and J. C. Penny stores. The Colusa Battery Station adjacent to the latter will serve as a marker in an image to be shown next.
L338-125-Charles Savage Photo, Courtesy BAERA, Western Railway Museum Archives, 9734sn, (Image 31 of 52)
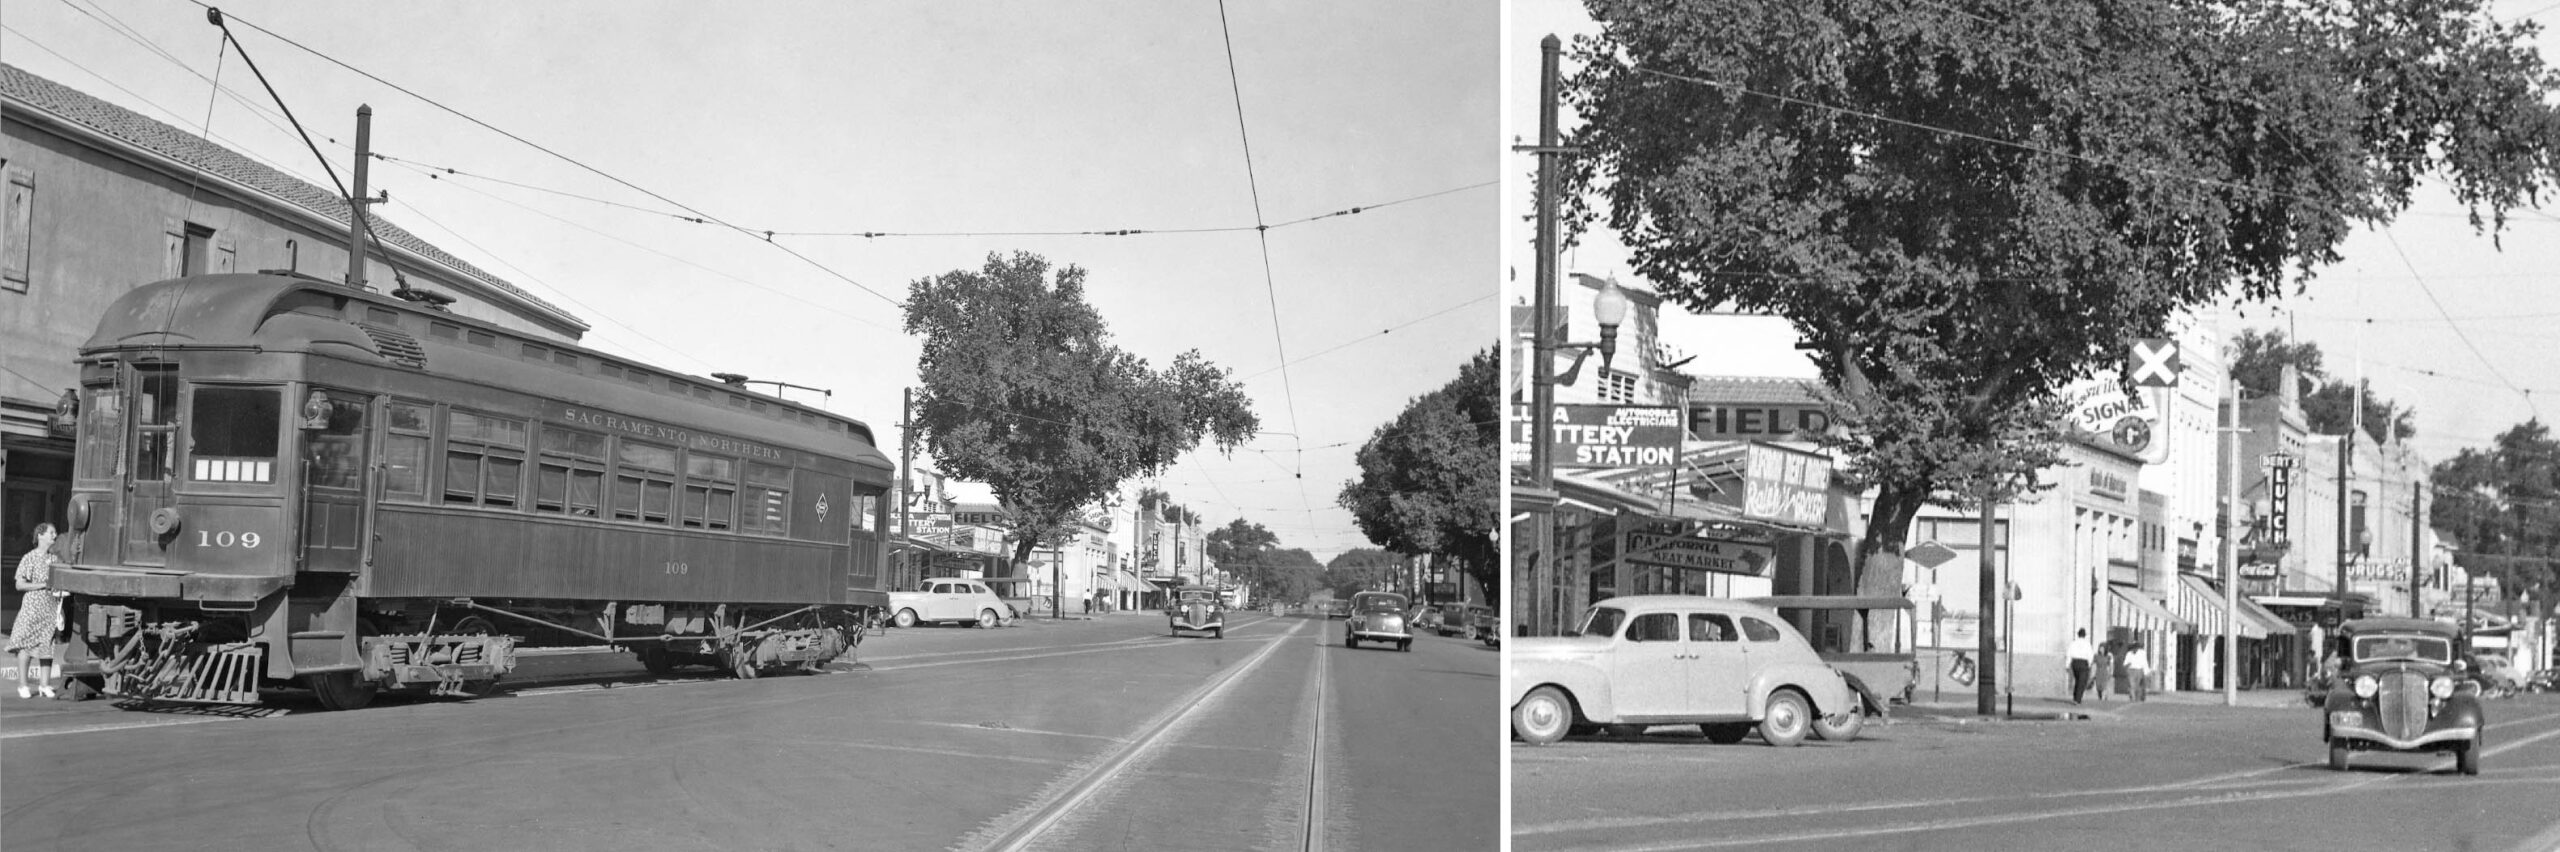
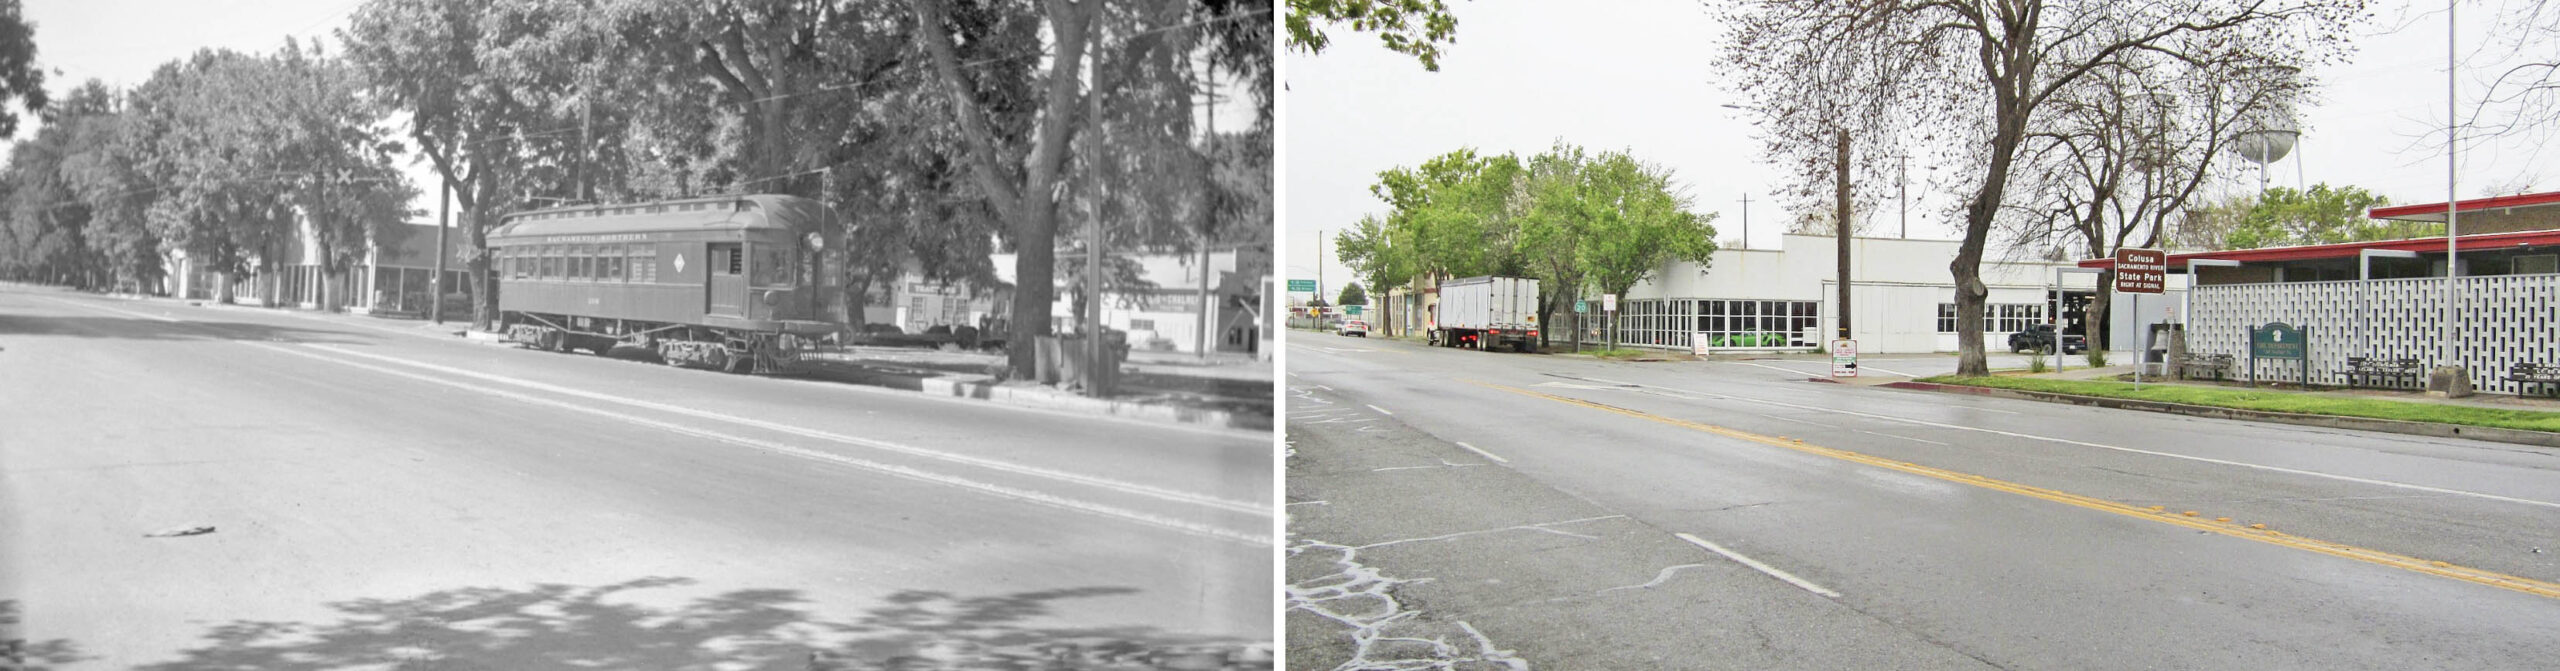
The clarity of this east view down Market St. on the left, east of 7th St. on Aug. 14, 1940 with SN 109, allows for identification of the storefronts east of the Colusa Battery Station, magnified on the right. The architectural trimmings and buildings occupied at that time from the 6th St. corner Bank of America up to Bert’s Lunch can still be viewed in 2025.
L338-131-Vernon Sappers Collection, Courtesy BAERA, Western Railway Museum Archives, 36889sn, (Image 32 of 52)
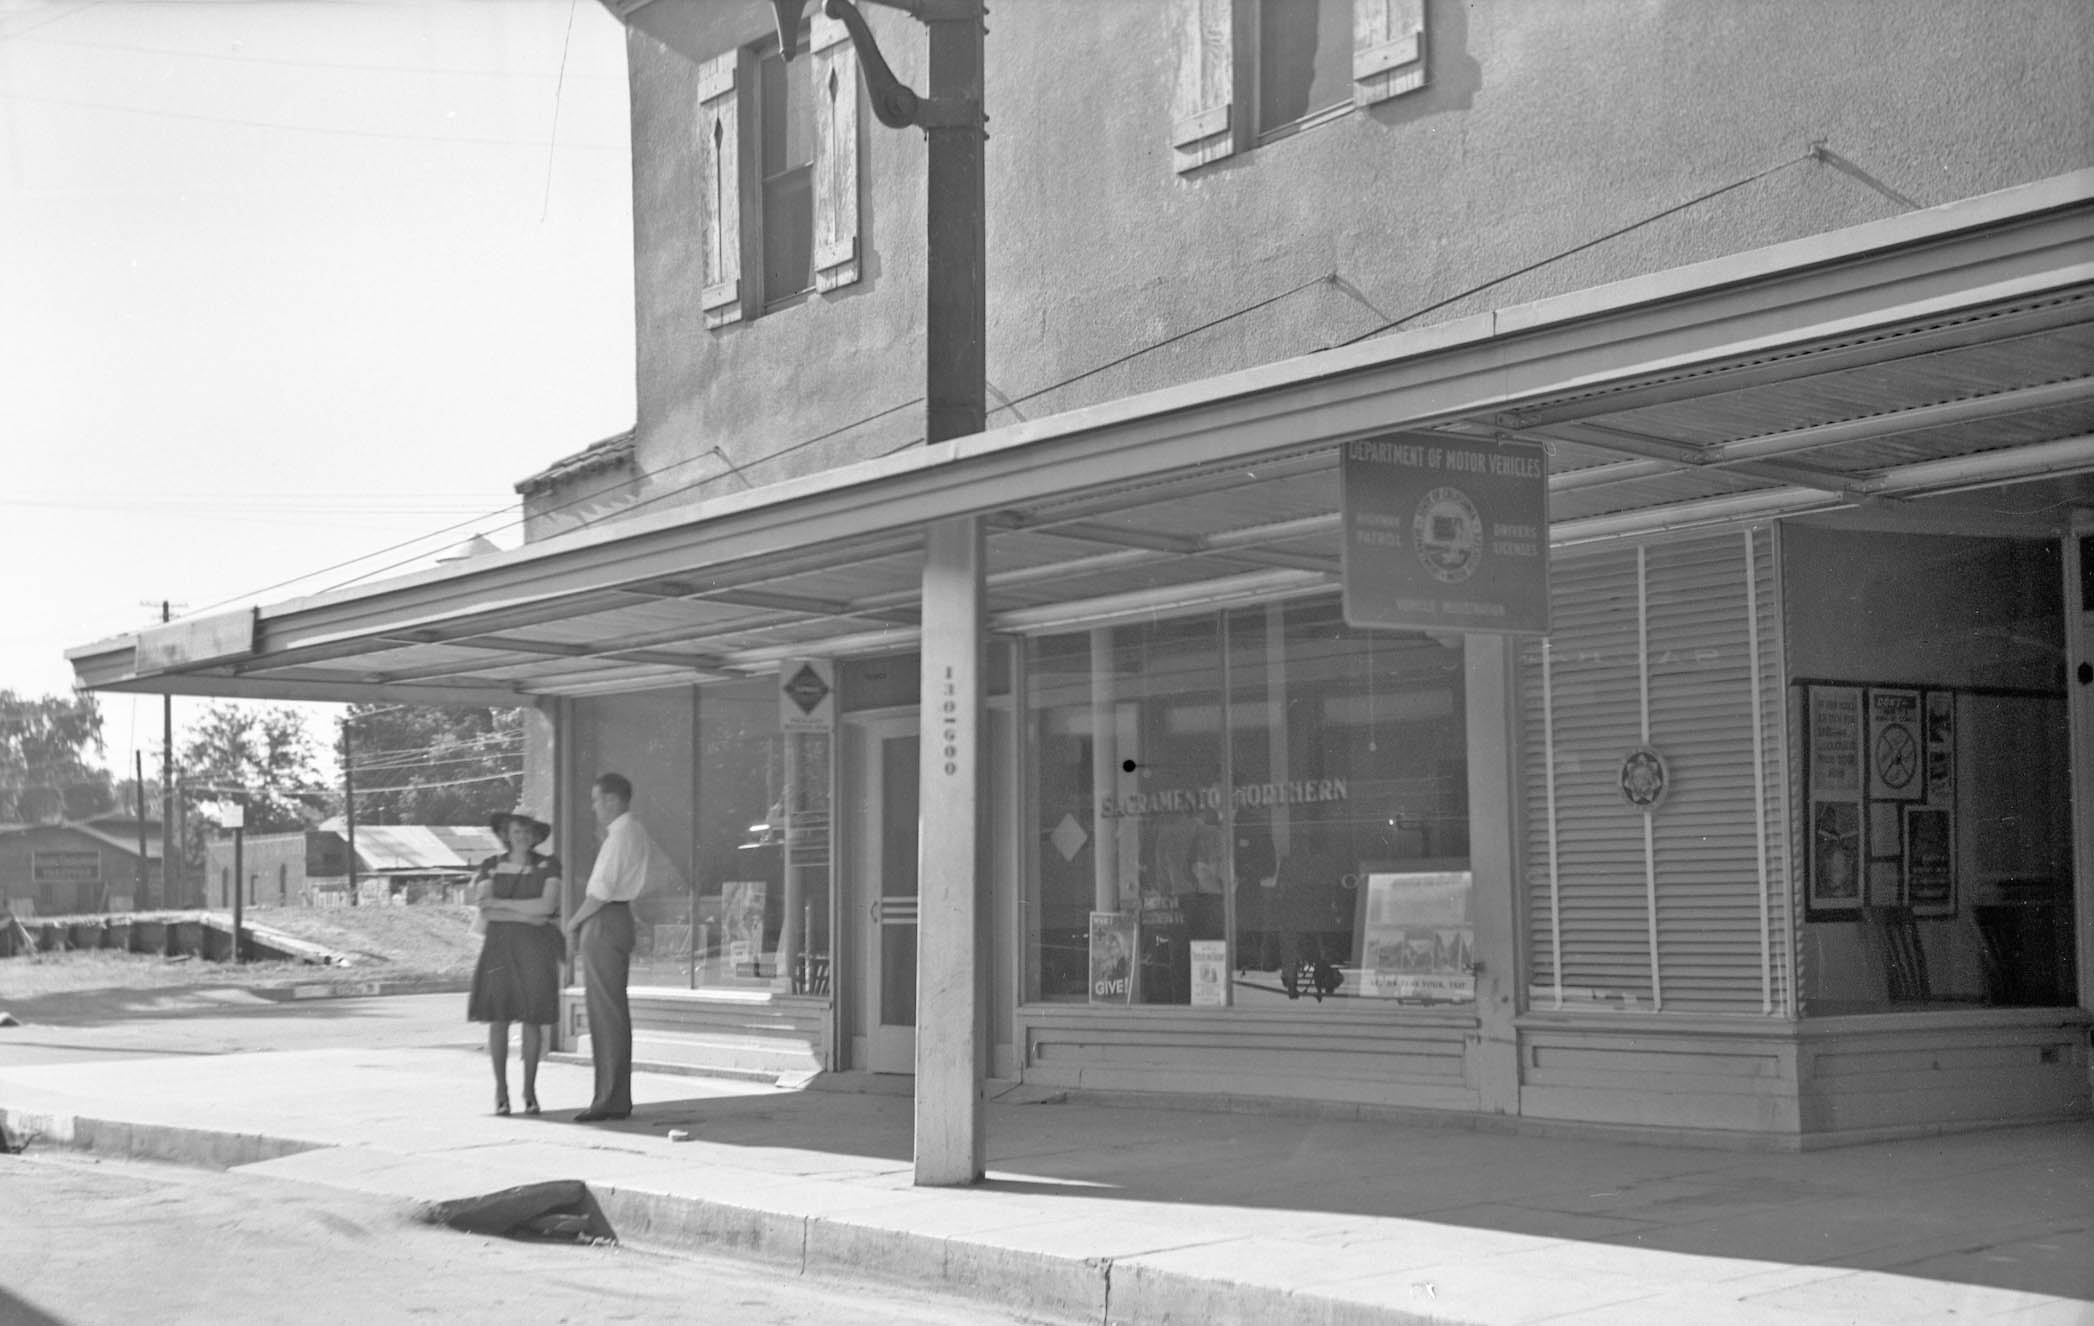
Next to the SN yard between 7th and 8th Sts., seen here in a northwest view from June 16, 1940. The writing on the glass is the only indication that the SN was in the storefront at the 7th St. intersection. The irony in the image is that Wolfe included the Department of Motor Vehicles sign from the adjacent storefront. The view into the yard shows the freight platform, but the writing on the building in the background is not resolvable.
L338-132-Howard T. Wolfe Photo, Courtesy BAERA, Western Railway Museum Archives, 246471sn, (Image 33 of 52)
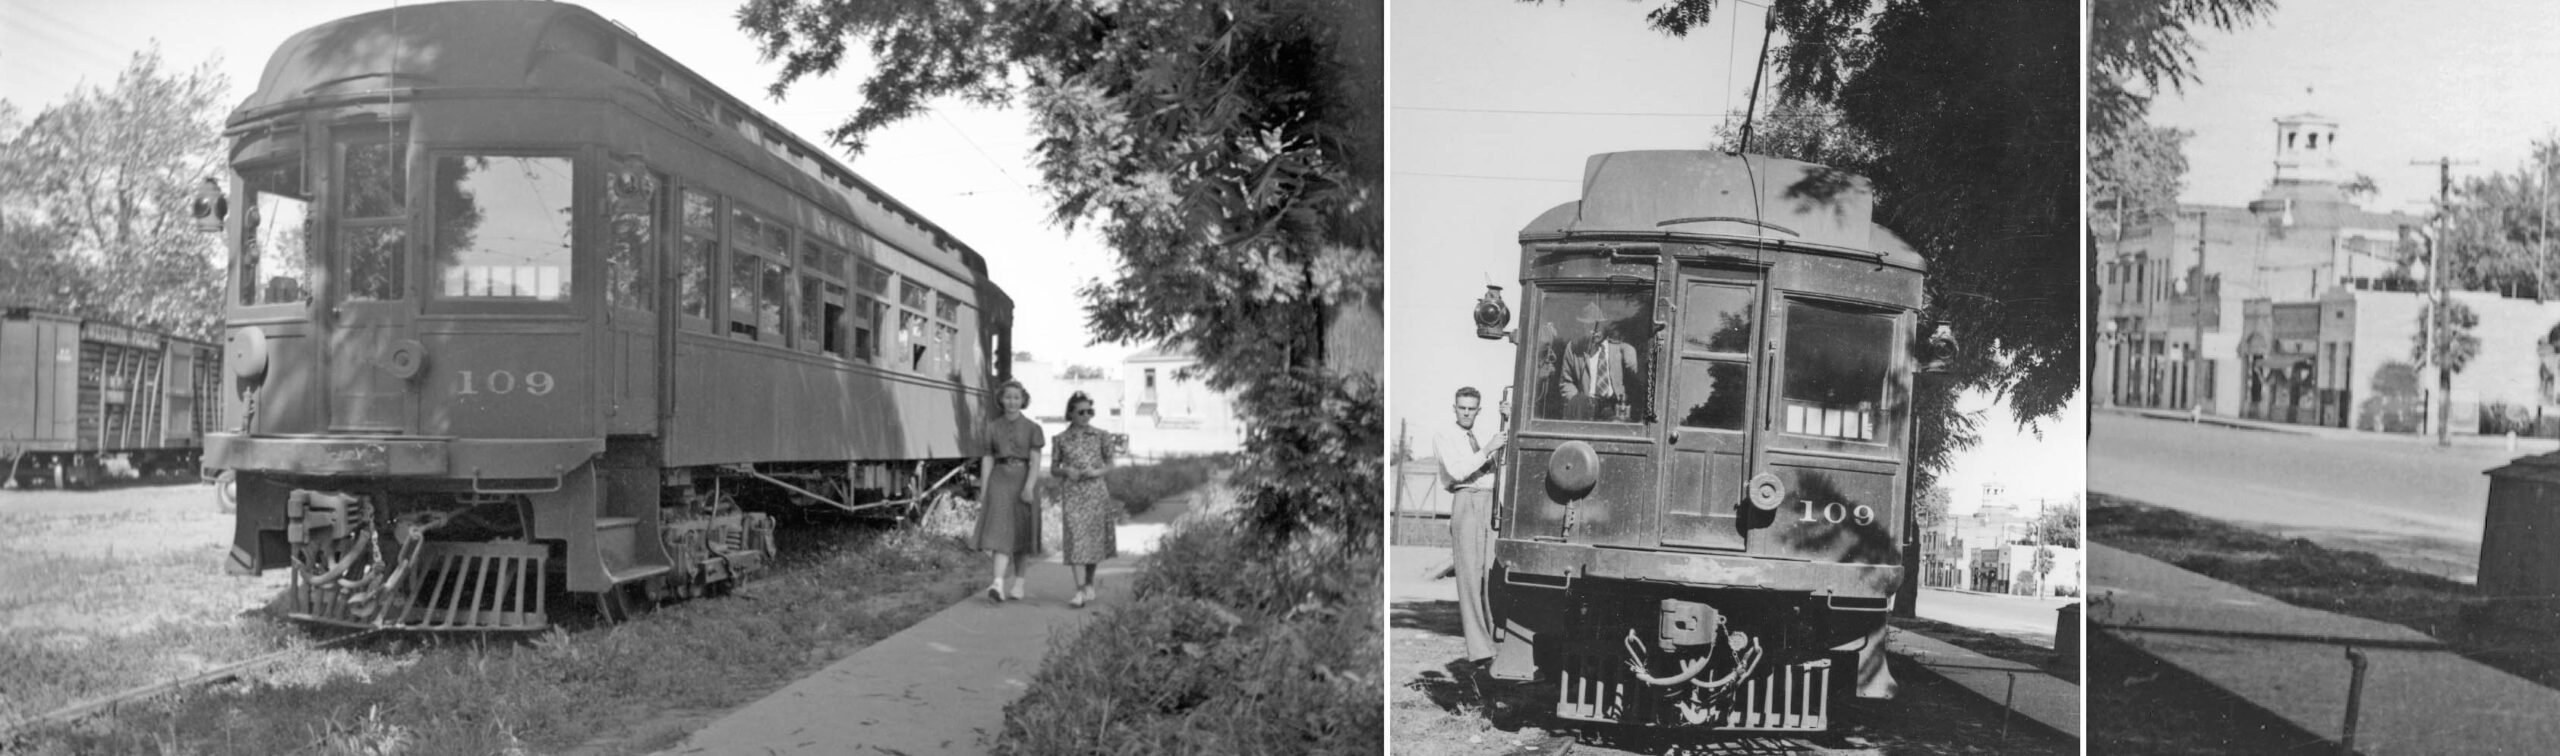
When the Mystery Excursion was taking place on Market St. in May 1938, SN 109 was parked in the yard at the extreme west or 8th St. side. Two east views from that vantage point of the yard show a boxcar and the 7th St. wall of the ticket office, left panel, and a view toward the courthouse, right panel, magnified from the image in the center. The fellow to the outside of SN 109 in the center is one of the Bay Area Electric Railroad Association founding members, Dudley Thickens.
L338-135-Courtesy BAERA, Western Railway Museum Archives, Silleman Bros., Holmes Coll., 138466sn, l, 215216sn, c and r, (Image 34 of 52)
Now heading west, this east view of the SN 107-Sacramento tandem on June 16, 1940 features the best view of the east side of the yard between 7th and 8th Sts. Note the freight loading platform present in the yard.
L338-140-Wilbur C. Whittaker Photo, Courtesy Arnold Menke, (Image 35 of 52)
This north view between 7th and 8th Sts. of SN 109 in 1940 shows more details from the center of the yard and some surrounding buildings.
L338-145-Charles Savage Photo, Courtesy BAERA, Western Railway Museum Archives, 9737sn, (Image 36 of 52)
A view heading further west of the yard is captured in this northwest view of the SN 107-Sacramento tandem on June 16, 1940. Details on the business operation of TrupaK, seen along the back wall of the yard, could not be found, but the word “grape” on the same sign suggests they were an agricultural packaging operation.
L338-150-Sappers Collection, Courtesy BAERA, Western Railway Museum Archives, 136886sn, (Image 37 of 52)
The earliest dated image of a passenger train in the SN yard is shown here, a west view facing the 8th St. side with SN 109 on May 20, 1937. It shows the track entering from Market St. on the right border. The building to the right of the passenger motor is not present in 2025, that area now Veterans Memorial Park.
L338-152-Dudley Thickens Photo, Courtesy BAERA, Western Railway Museum Archives, 60469sn, (Image 38 of 52)
This west view from May 8, 1938 reveals a service station on the south side of Market St. and 8th St. selling Standard Oil Products, a Food Mart with gas pumps taking its place in 2025. The construction of the extension of the Zumwalt Farm Equipment building listed at 850 Market St. is seen at the northwest corner of 8th St. is also evident, and that structure survives in 2025.
L338-155-Wilbur C. Whittaker Photo no. SN-109-A, Marvin Maynard Collection, 258936sn, (Image 39 of 52)
Similar to the previous image with SN 109 parked in the yard, a similar view is captured except here it is 1940. The service station across the street remains, and the extension of the Zumwalt building seen at the northwest corner of 8th St. has been completed by this time. Note the tractor parked alongside the latter building.
L338-160-Sappers Collection, Courtesy BAERA, Western Railway Museum Archives, 136897sn, (Image 40 of 52)
Turned slightly more to the north, this west view of the yard from Market St. featuring SN 107 on the track on the edge of the asphalt on June 16, 1940 shows a truck and some buildings forming the background to a poorly maintained siding.
L338-165-Courtesy BAERA, Western Railway Museum Archives, 182646sn, (Image 41 of 52)
This northwest view of SN 109 in 1940, left, shows that the block north of the yard between 7th-8th Sts. hadn’t changed much compared to the image on the right from 2018. The trees along the north side on the left do resemble what was seen in the images of the Mystery Excursion train purported to be in Colusa in panel L338-105.
L338-170-Sappers Collecton, Courtesy BAERA, Western Railway Museum Archives, 136873sn, l, Stuart Swiedler Photo, r, (Image 42 of 52)
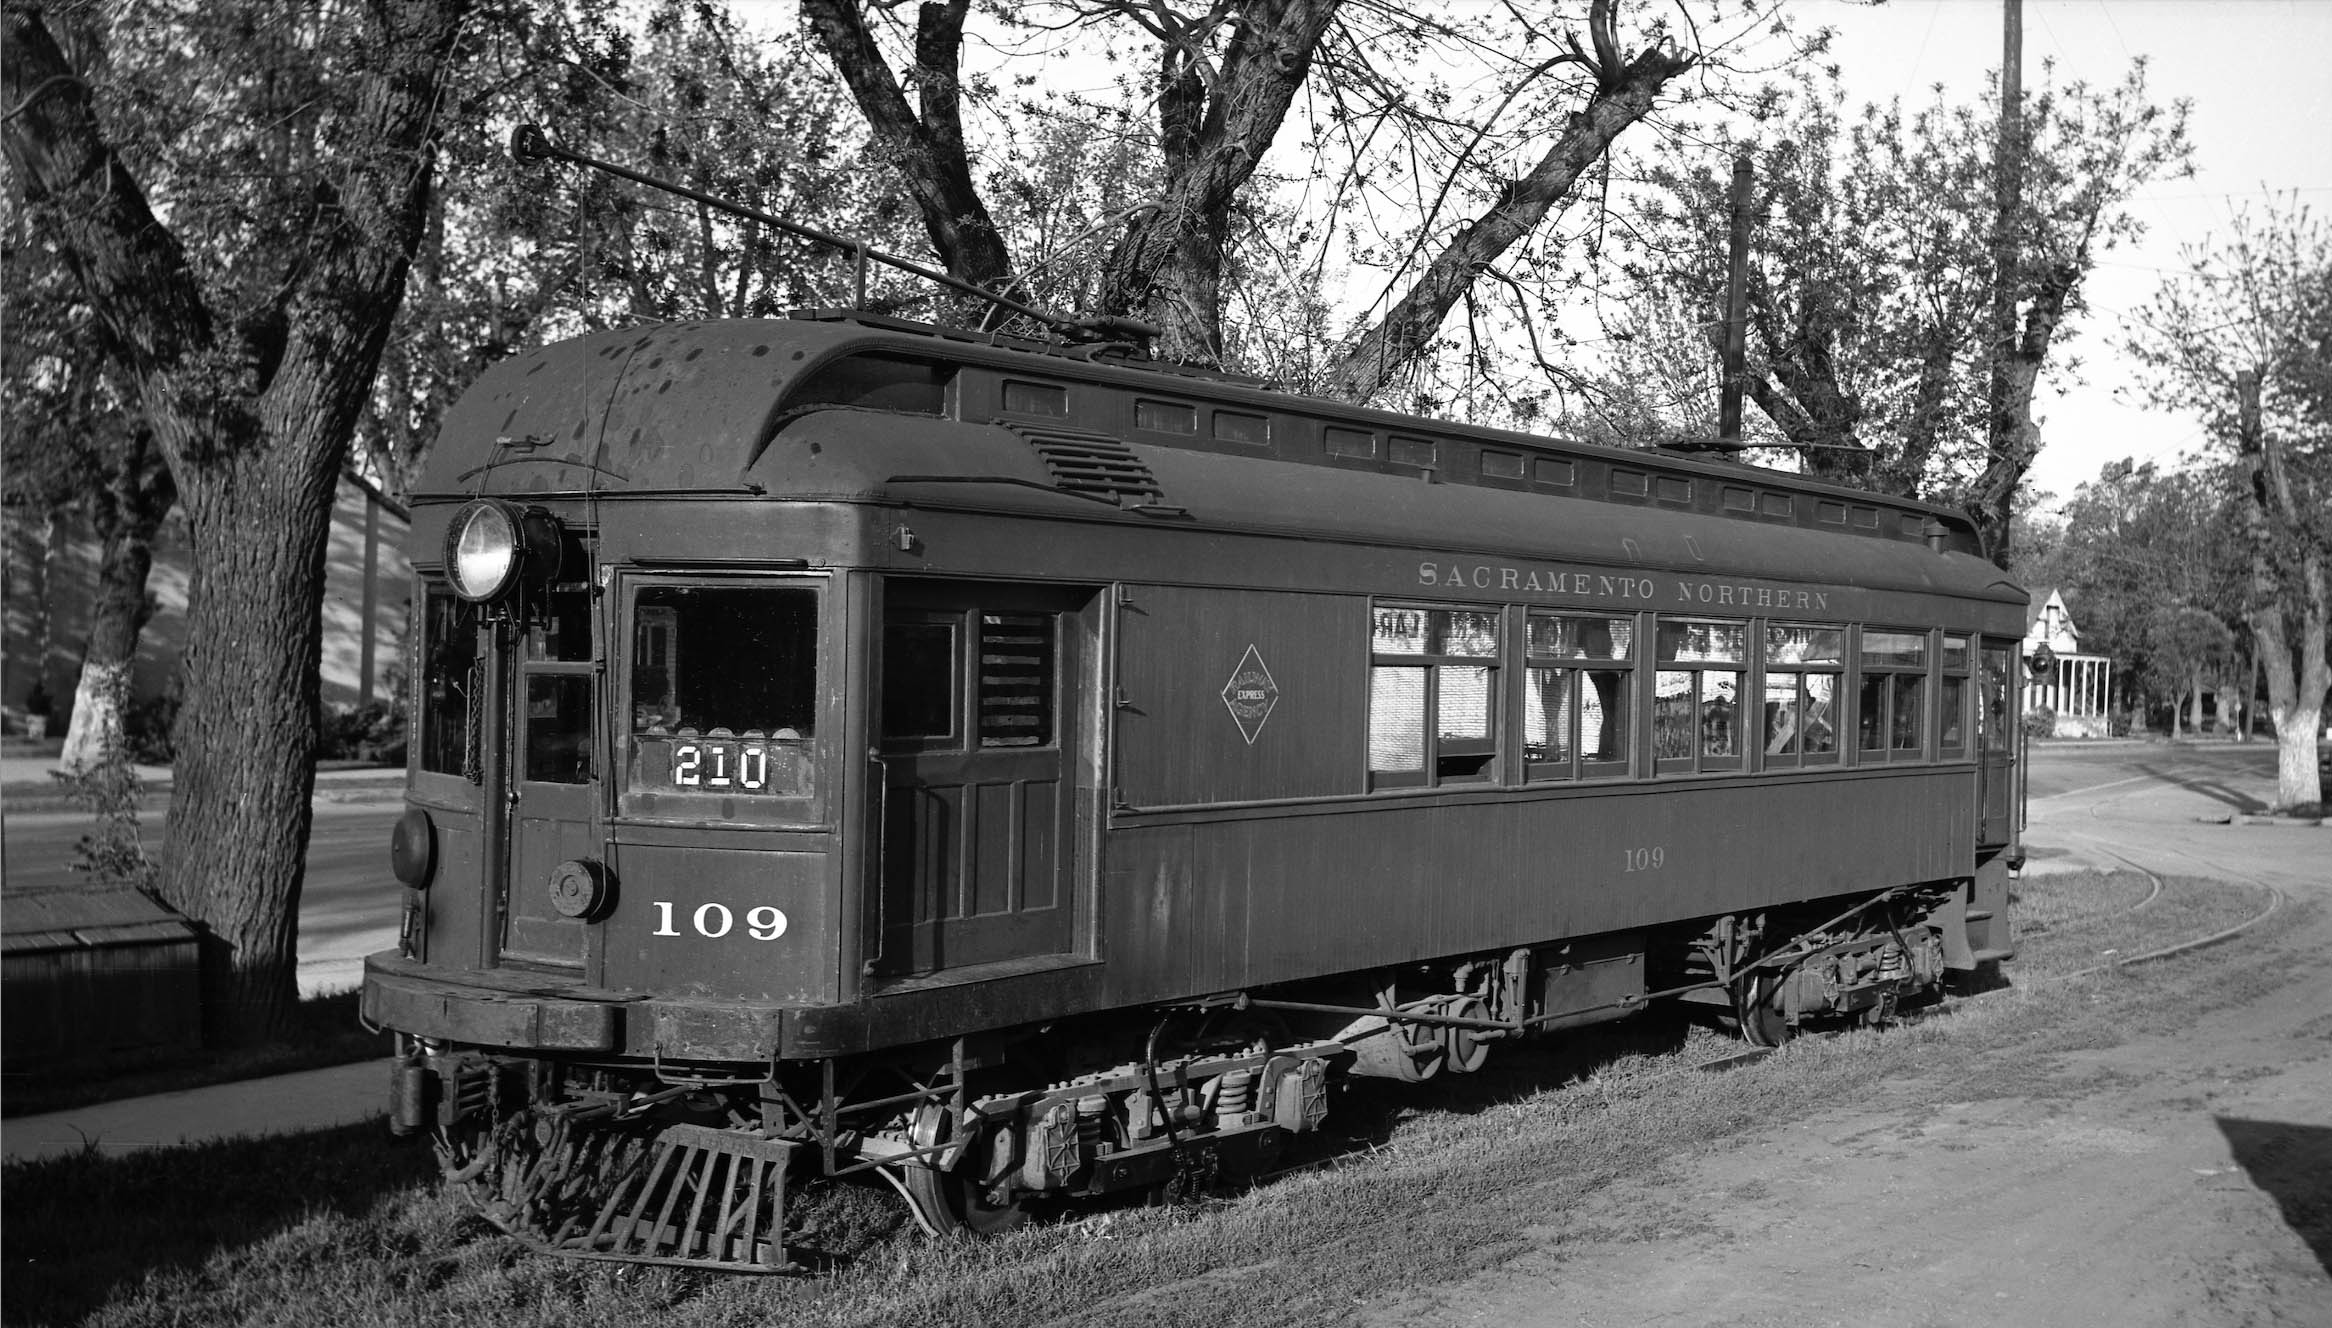
SN 109 is seen in a northeast view west of the 7th St. intersection, its trolly pole up indicating a return to Marysville on Aug. 18, 1940.
L338-175-Sappers Collection, Courtesy BAERA, Western Railway Museum Archives, 136893sn, (Image 43 of 52)
Moments before, SN 109 is seen midway between 8th and 9th Sts. passing the Zumwalt Farm Equipment building in a northwest view, left. The outside shape of these buildings remains intact in 2025, although some of the exterior features have been replaced, right. The store sold Caterpillar and John Deere equipment, evident by the tractor parked outside the store, left. The I.G. Zumwalt Co. will be an important component of the evolution of freight business in Colusa outlined in the next update.
L338-180-Sappers Collecton, Courtesy BAERA, Western Railway Museum Archives, 136887sn, l, Stuart Swiedler Photo, r, (Image 44 of 52)
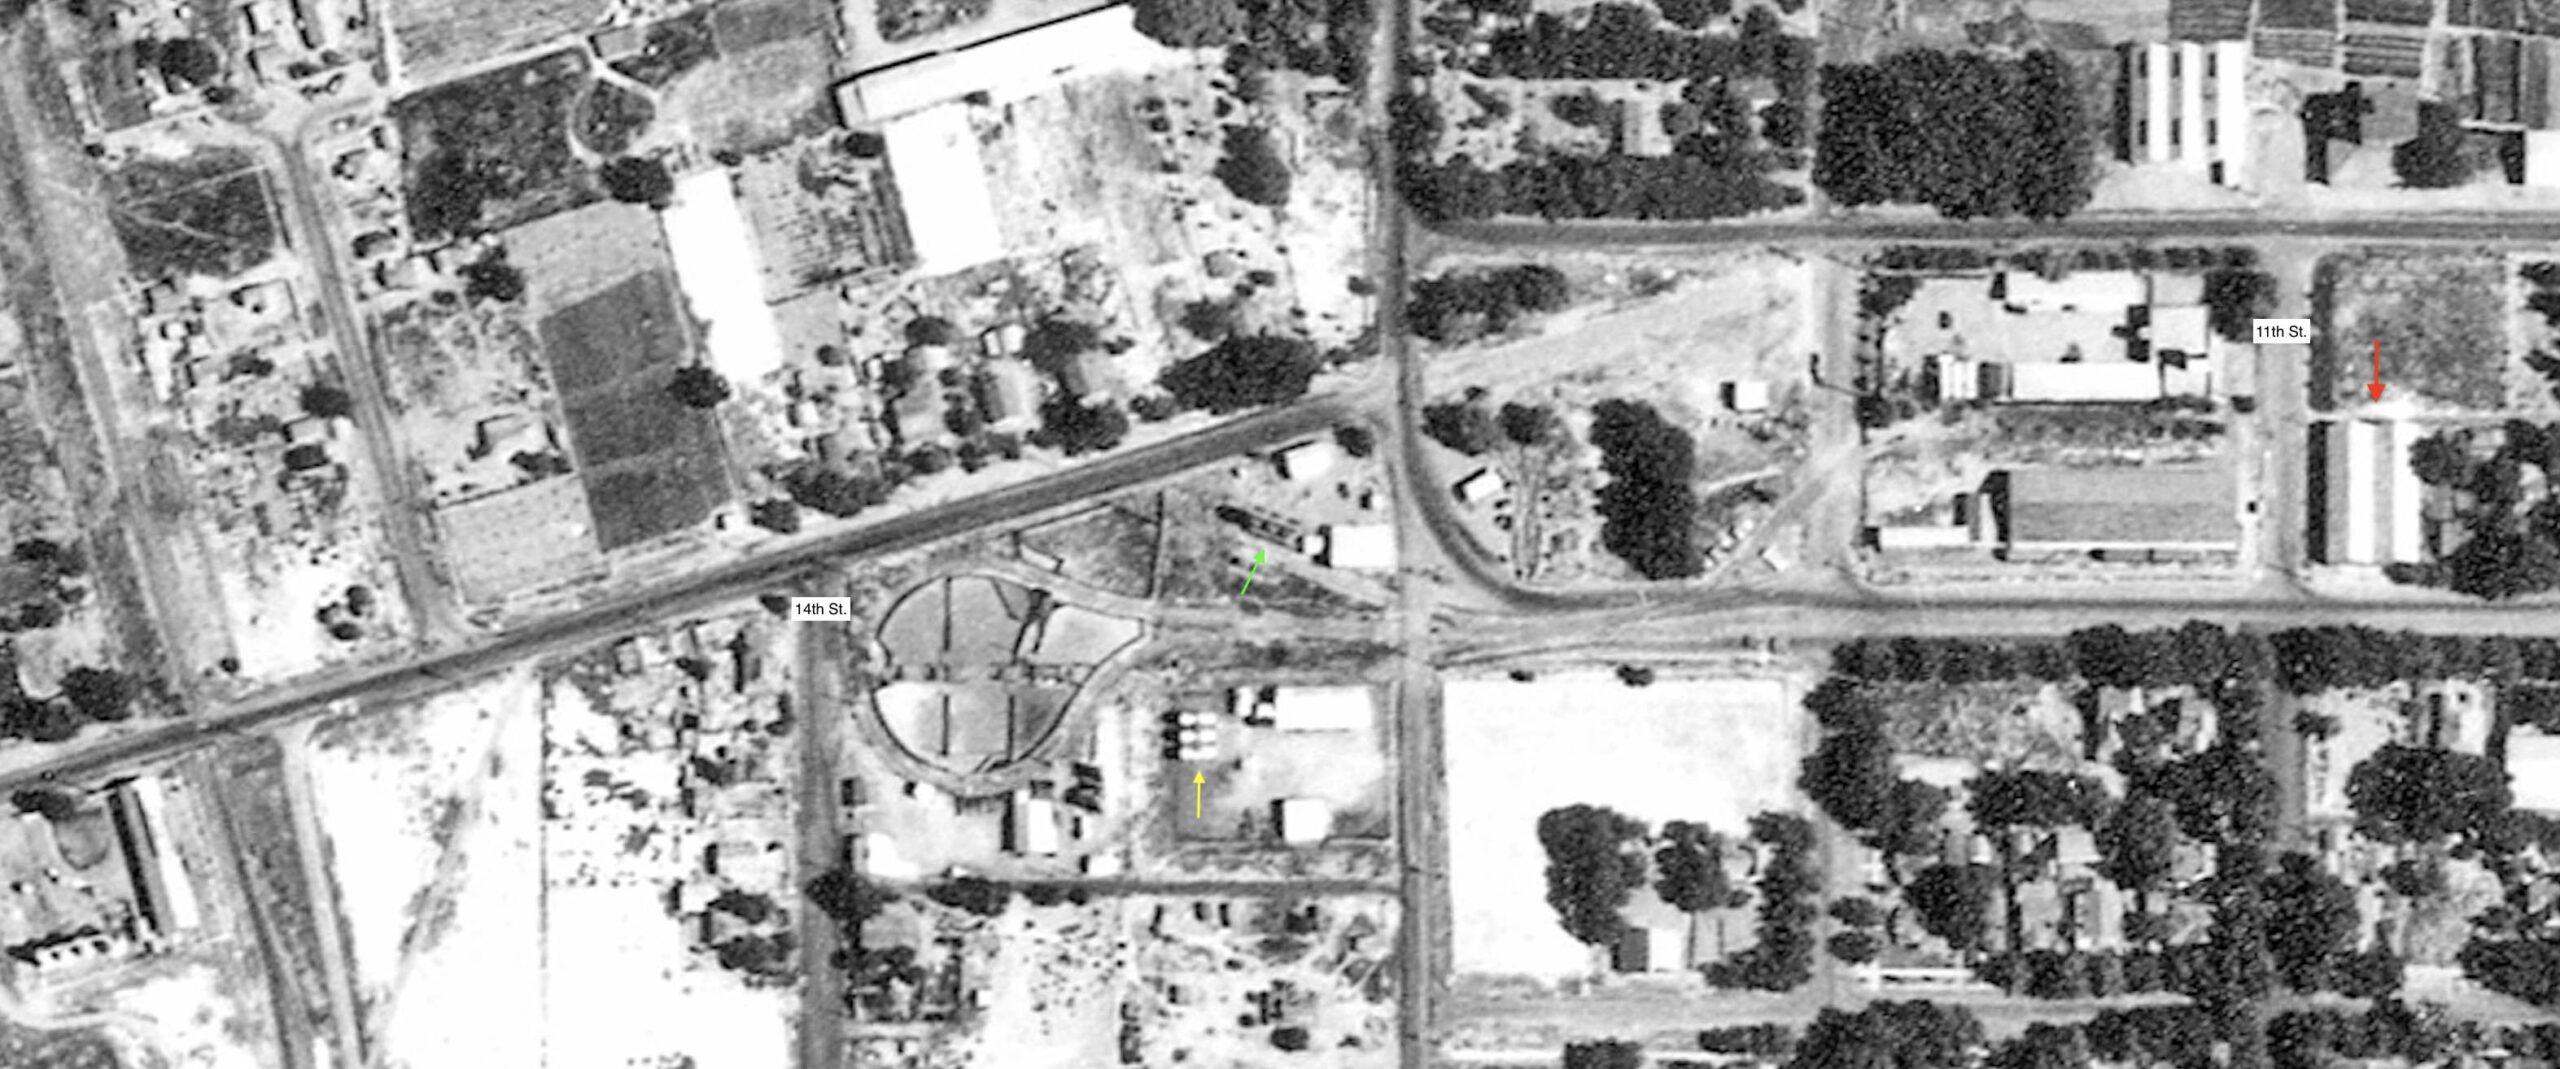
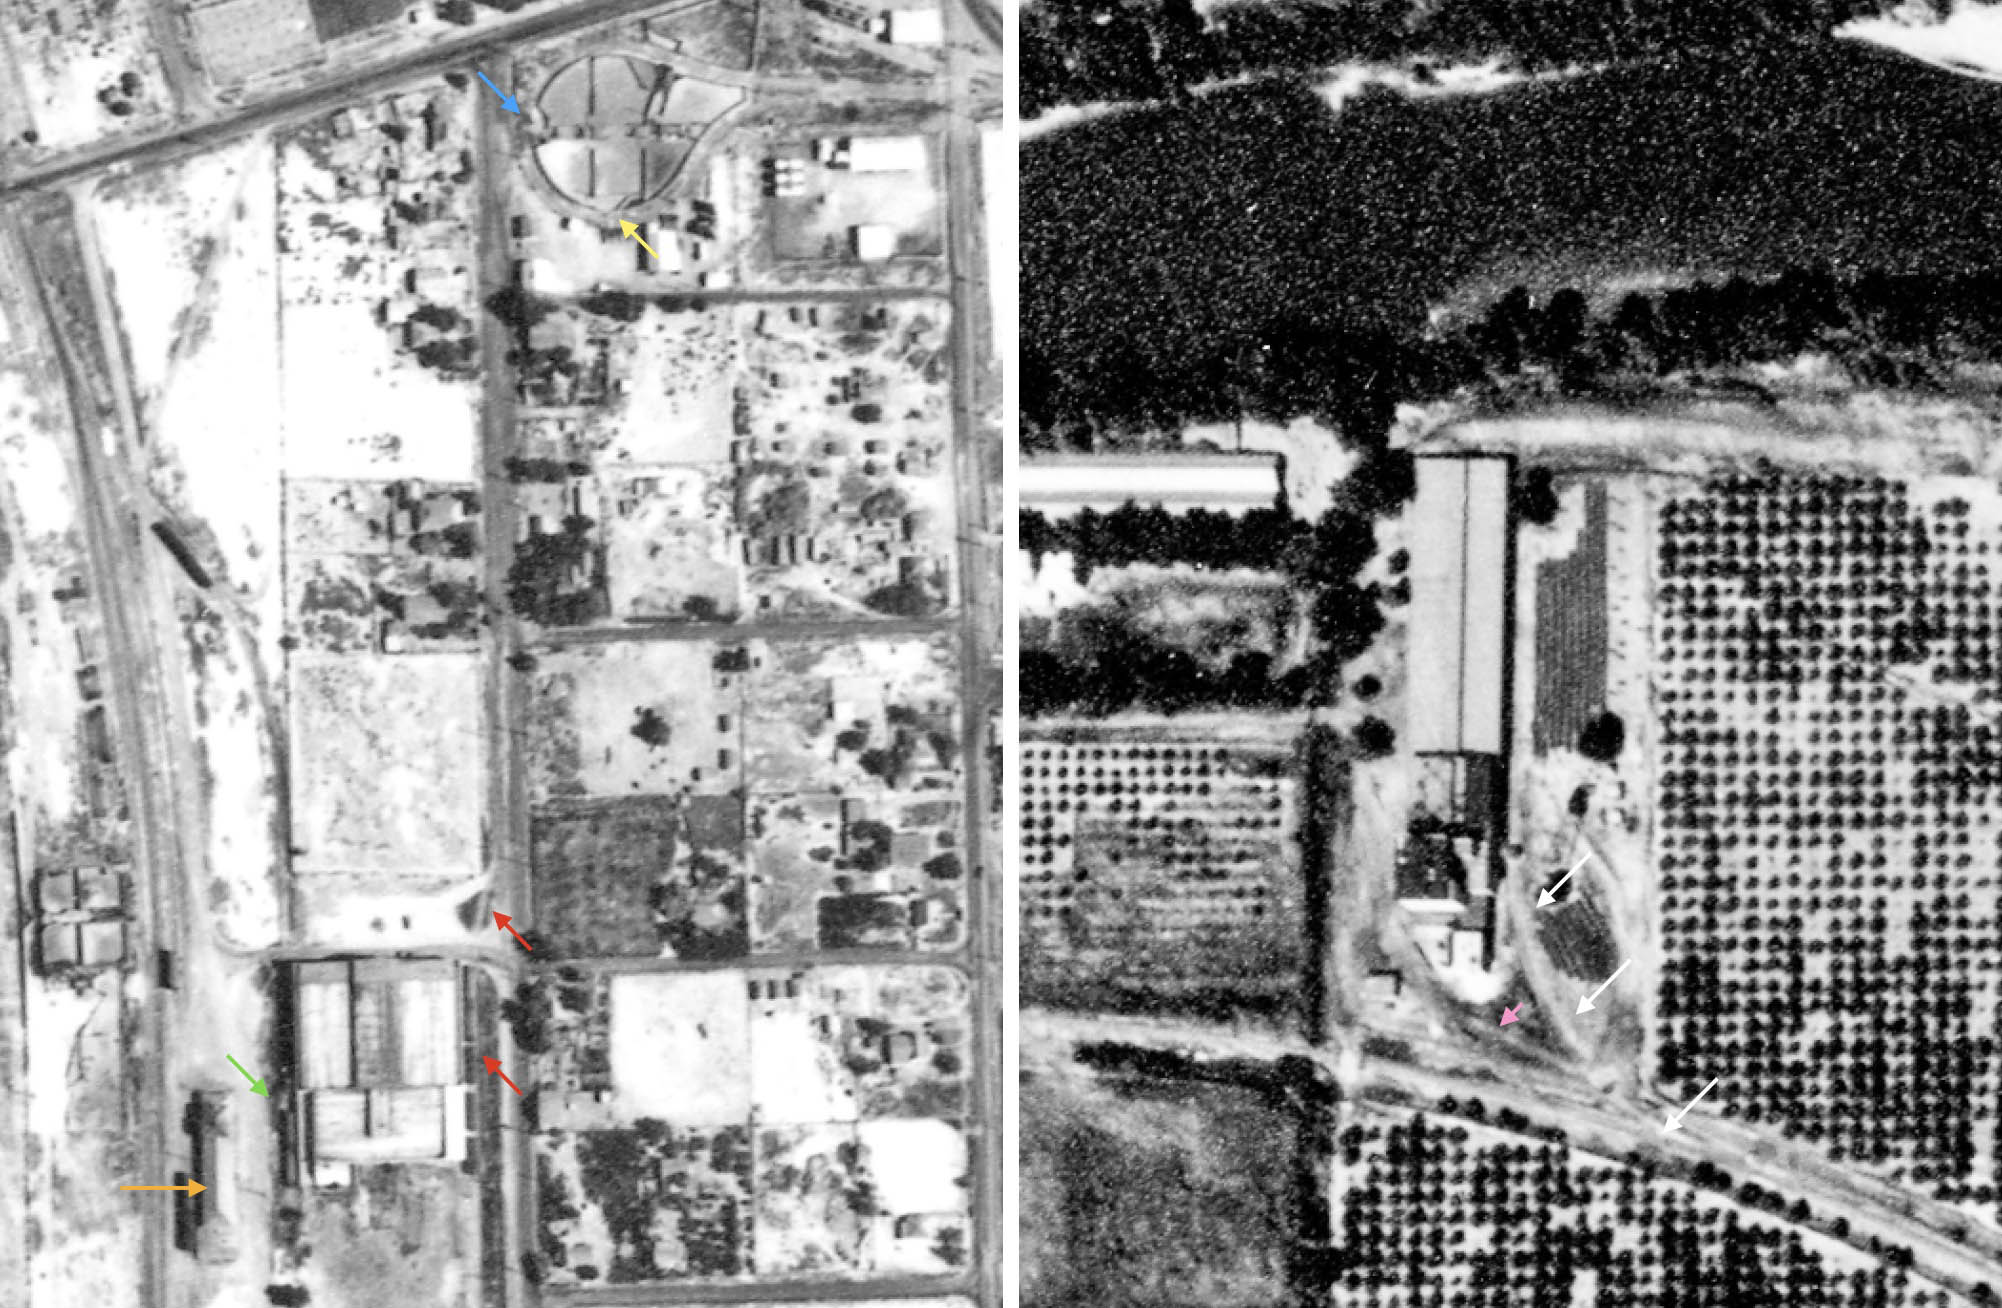
This detail from the aerial from 1937 shows the interval on Market St. between 11th-14th Sts. The warehouse on the northeast corner of 11th St. with Market St., red arrow, is still present in 2025. The corral loop extended to the west to 14th St. This aerial shows the major industrial spurs of the SN to the east or right of the loop. There is no indication of any spurs coming off of the loop or parallel to it. The green arrow points to the large oil tanks of Union Oil, the yellow arrow to those belonging to Standard Oil.
L338-185-USDA Aerial AAY-24-77, Courtesy Map Collection, Shields Library, University of California, Davis, G4363 C5A4 1937 U6, Detail, (Image 45 of 52)
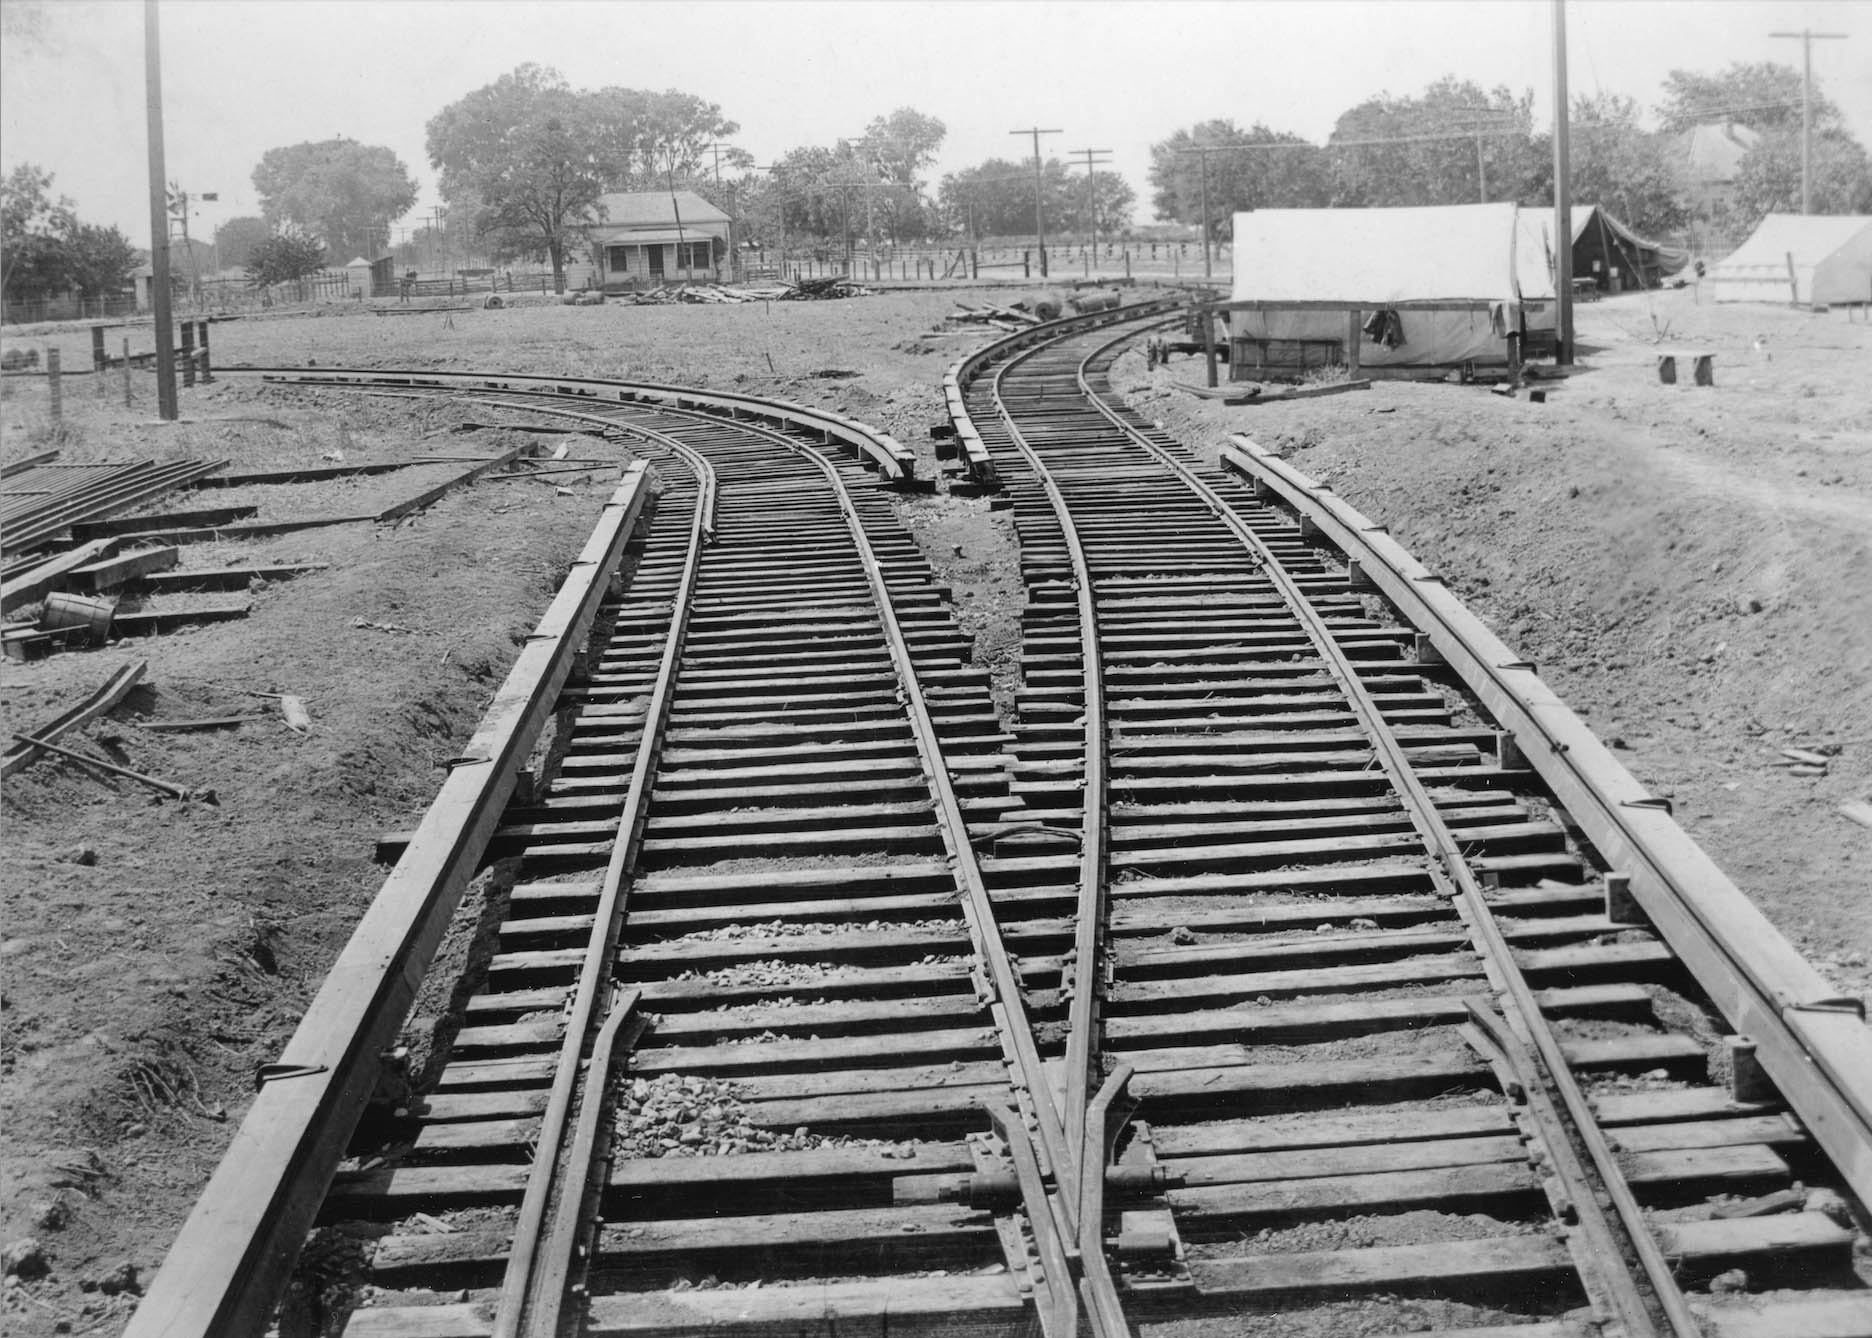
There were no ground images found showing any of the freight spurs on 12th or 13th St. from the electric era. This image is a west view of the corral loop probably before 1920. Ira Swett notes in his book that overhead catenary was added to replace the third rail in the 1920s. That transition will be shown next. From this angle, there are no obvious spurs alongside or coming off the tracks.
L338-190-Robert L. Stein Collection, Courtesy BAERA, Western Railway Museum Archives, 64633sn, (Image 46 of 52)
The corral now with overhead catenary is presented here. This west view from May 8, 1938 shows how the Mystery Excursion Train turned itself around such that SN 1009 was the lead car returning via Market St. in the images in L338-105.
L338-195-Guy L. Dunscomb Photo, Moreau Collection, Courtesy BAERA, Western Railway Museum Archives, 93157sn, (Image 47 of 52)
The participants of the private excursion with SN 107 and SN parlor car Sacramento on June 16, 1940 also got a chance to get a ride around the loop. This is the earliest indication of a spur coming off the loop, the business it was supporting is not known.
L338-200-Courtesy BAERA, Western Railway Museum Archives, 223027sn, (Image 48 of 52)
These details from 1937 provide more about the SN spurs as of 1937. On the left, the corral loop is shown with the yellow arrow pointing to approximately where the spur came off that was shown in the last panel, appreciating that spur may have been added between 1937 and 1940. Note another possible entry-exit section on the 14th St. side, blue arrow. The SN spur to the California Prune and Apricot Growers is in red, leading to the boxcars lining the warehouse. The green arrow shows the SP spur, the orange arrow the SP depot.The panel on the right shows the spur to the Rosenberg Bros. warehouse, white arrow. The pink arrow may indicate a second track, but this interpretation has not been substantiated.
L338-203-USDA Aerial AAY-24-77, Courtesy Map Collection, Shields Library, University of California, Davis, G4363 C5A4 1937 U6, Details, (Image 49 of 52)
This is the only image found of a freight motor in Colusa, taken on Apr. 17, 1937 by Dudley Thickens. Except for the presence of a boxcar in the yard, this is the only ground image of any type of active freight operation in Colusa found for the entire time the SN was in Colusa, that is, up to 1960. Thickens was an SN employee since 1935, and this image was taken on a Saturday. The three other dates noted in this update were all Sundays, and by 1939, freight operations had been cut back to Mon.-Sat.
L338-205-Dudley Thickens Photo, Courtesy BAERA, Western Railway Museum Archives, 60571sn, (Image 50 of 52)
Two days later, Thickens took this image that he indicated was a temporary for a reason not given. The house on the left border is the one on the southwest corner of 7th St. and Market St. seen in the next image.
L338-210-Dudley Thickens Photo, Courtesy BAERA, Western Railway Museum Archives, 59088sn, (Image 51 of 52)
This west view of SN 109 as train no. 205 poised to leave town and head back to Colusa Jct. in 1940 is unique because it was the only one found that shows the service station on the southeast corner of 7th St., the house across 7th St. shown in the previous image, and the row of trees on the south side of the street. With this attempt to piece together Colusa in the SN electric era, all aboard the Local until next time when the diesel era, 1946-1960, is reviewed. Appreciation and acknowledgement to Jeff Asay and R.J. Dial for their review, comments and new information they supplied that was not previously found in published works.
L338-215-Sappers Collection, Courtesy BAERA, Western Railway Museum Archives, 136896sn, (Image 52 of 52)