Colusa Junction to Live Oak
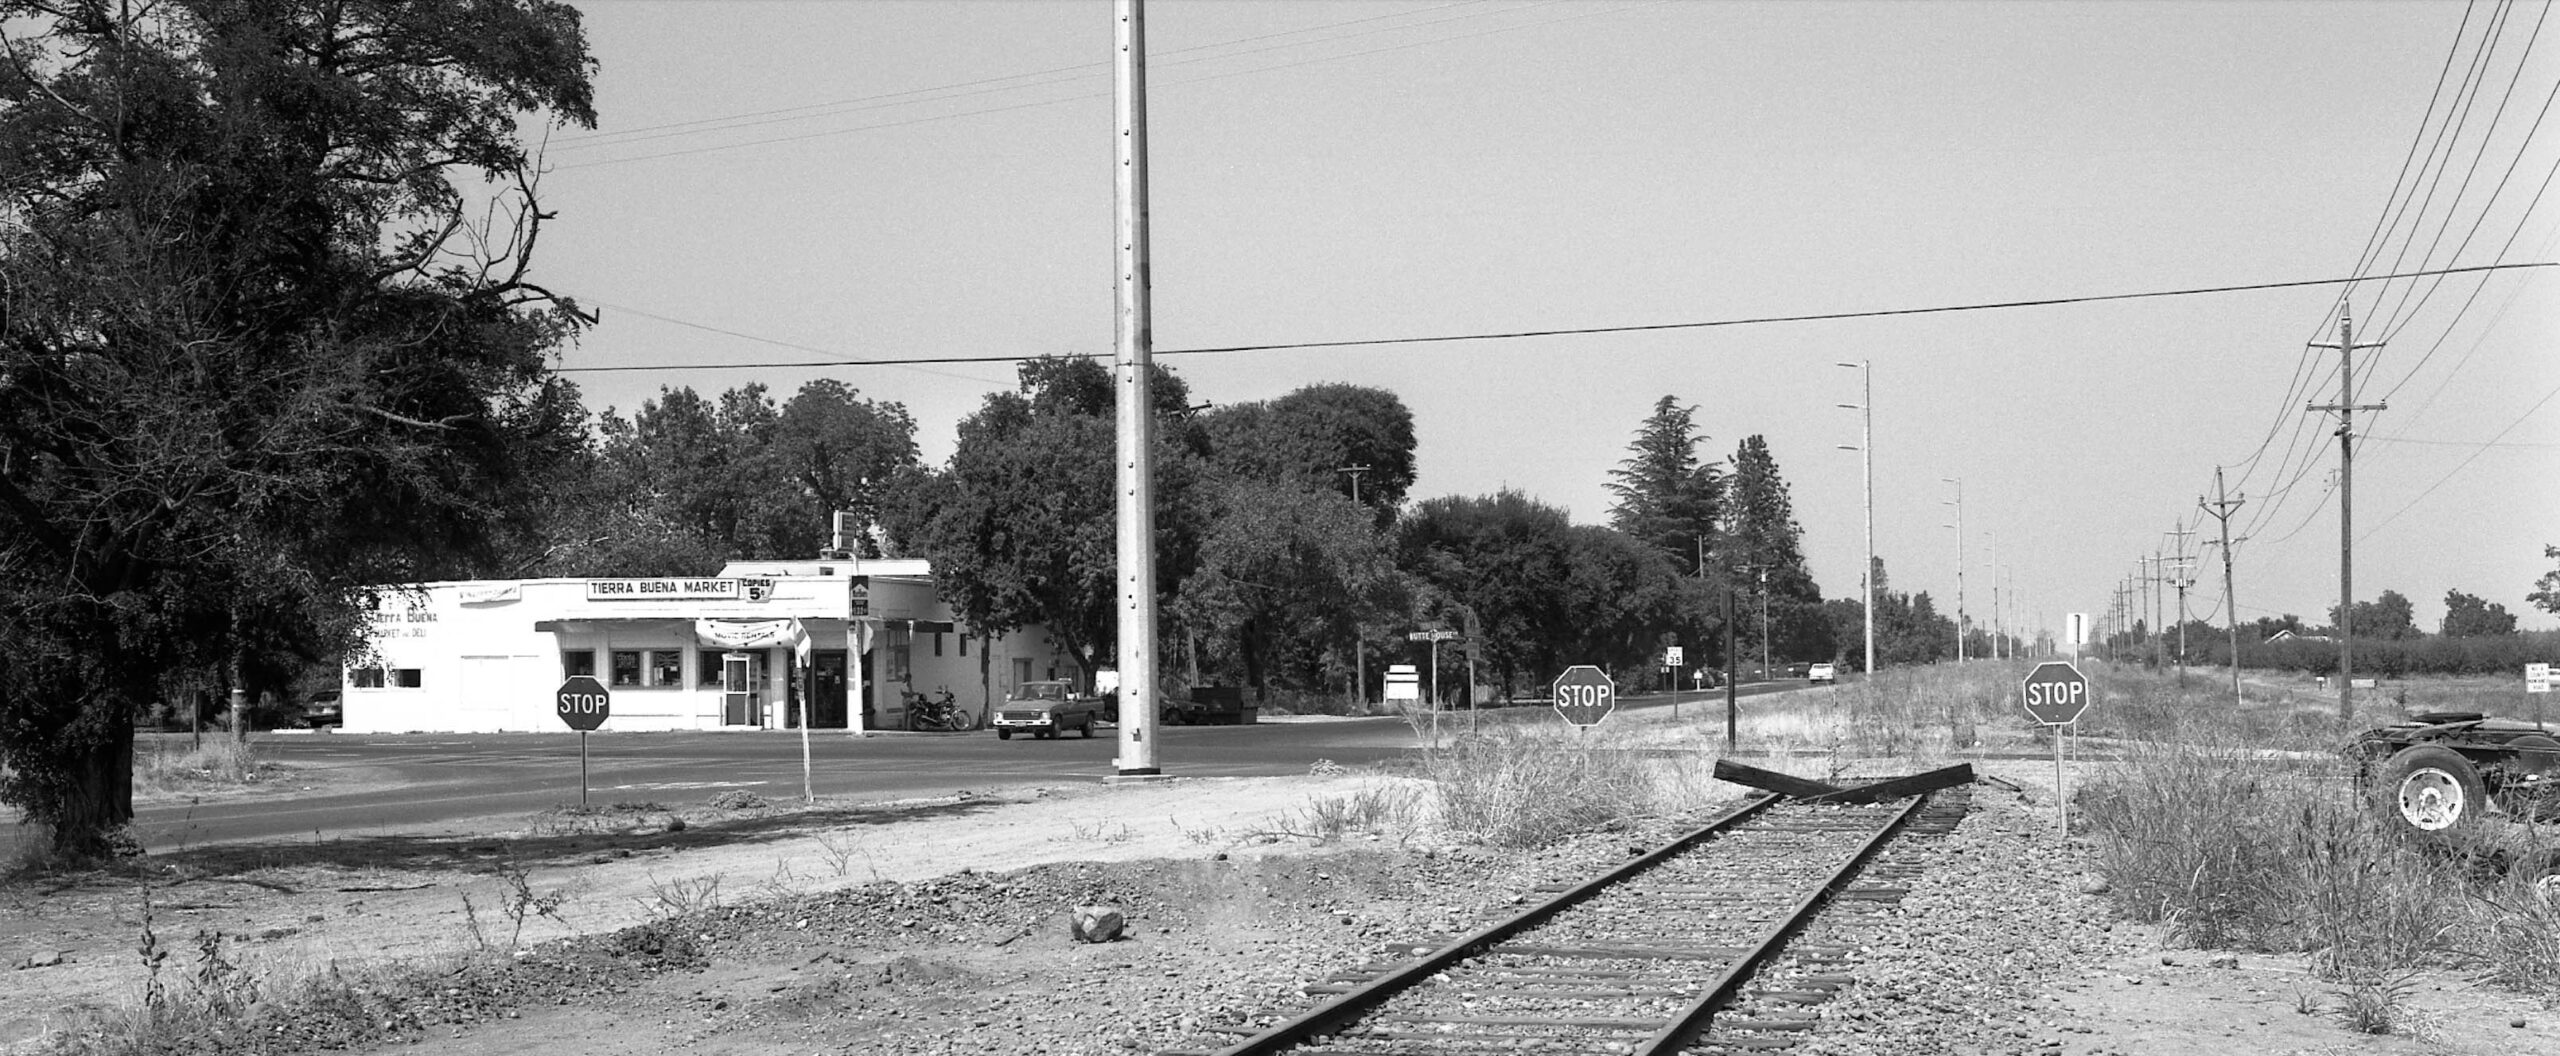
The last image shown in the section of “How the North End of the Sacramento Northern Railway Was Lost” was Harre Demoro’s north view at Butte House Rd. in Tierra Buena from Sept. 15, 1988. The legend noted that a planned attempt to recreate a ride as a passenger between Colusa Jct. and Live Oak in 1940 was in the works. This update will begin that process. First, some background information on the methodology to be used to undertake this project.
L337-05-Harre Demoro Photo, Courtesy John Harder, (Image 1 of 47)

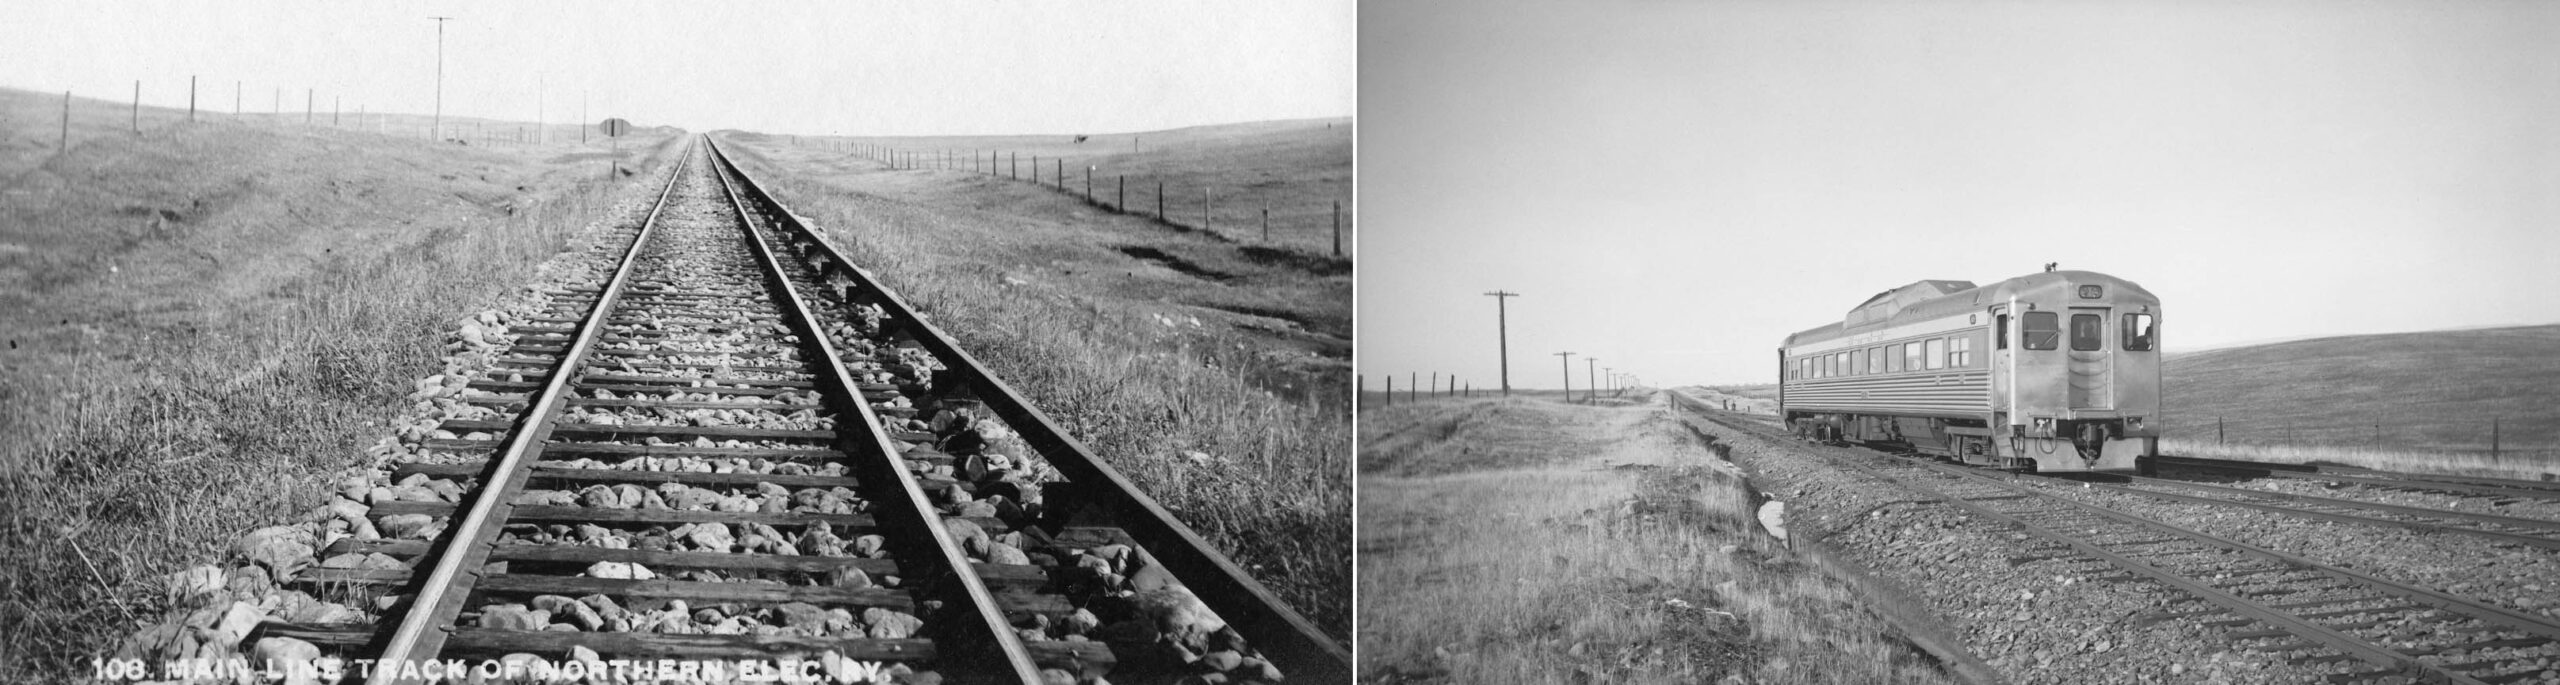
To review the subject chronologically, the Northern Electric Railway, NE, took many photos of the completed route, one example on the left ca. 1910. Unfortunately, most that were taken between town centers such as Sacramento, Marysville-Yuba City and Chico were unlabeled as to location. This one appears to be a north view just north of Tres Vias or what later became the original Oroville Jct., although this cannot be unequivocally proven. However compare this with the image on the right with the Budd RDC car at that location from Jan. 29, 1950.
L337-10-Courtesy BAERA, Western Railway Museum Archives, Northern Electric Railway Photo, l, Sappers Collection, 106485sn, r, (Image 2 of 47)
Relative to Eston Cheney’s striking views of Lake Temescal and the East Bay hills to promote the Oakland, Antioch and Eastern Railway after its completion, it is totally unclear for what purpose the distinguished McCurry Foto Co. based in Sacramento would have taken this publicity photo. The print copy was inscribed on the back “taken somewhere between N. Sacramento and Elverta”, but good luck verifying that having reviewed much of that area on this website.
L337-15-McCurry Foto Co., Courtesy BAERA, Western Railway Museum Archives, 257799sn, (Image 3 of 47)
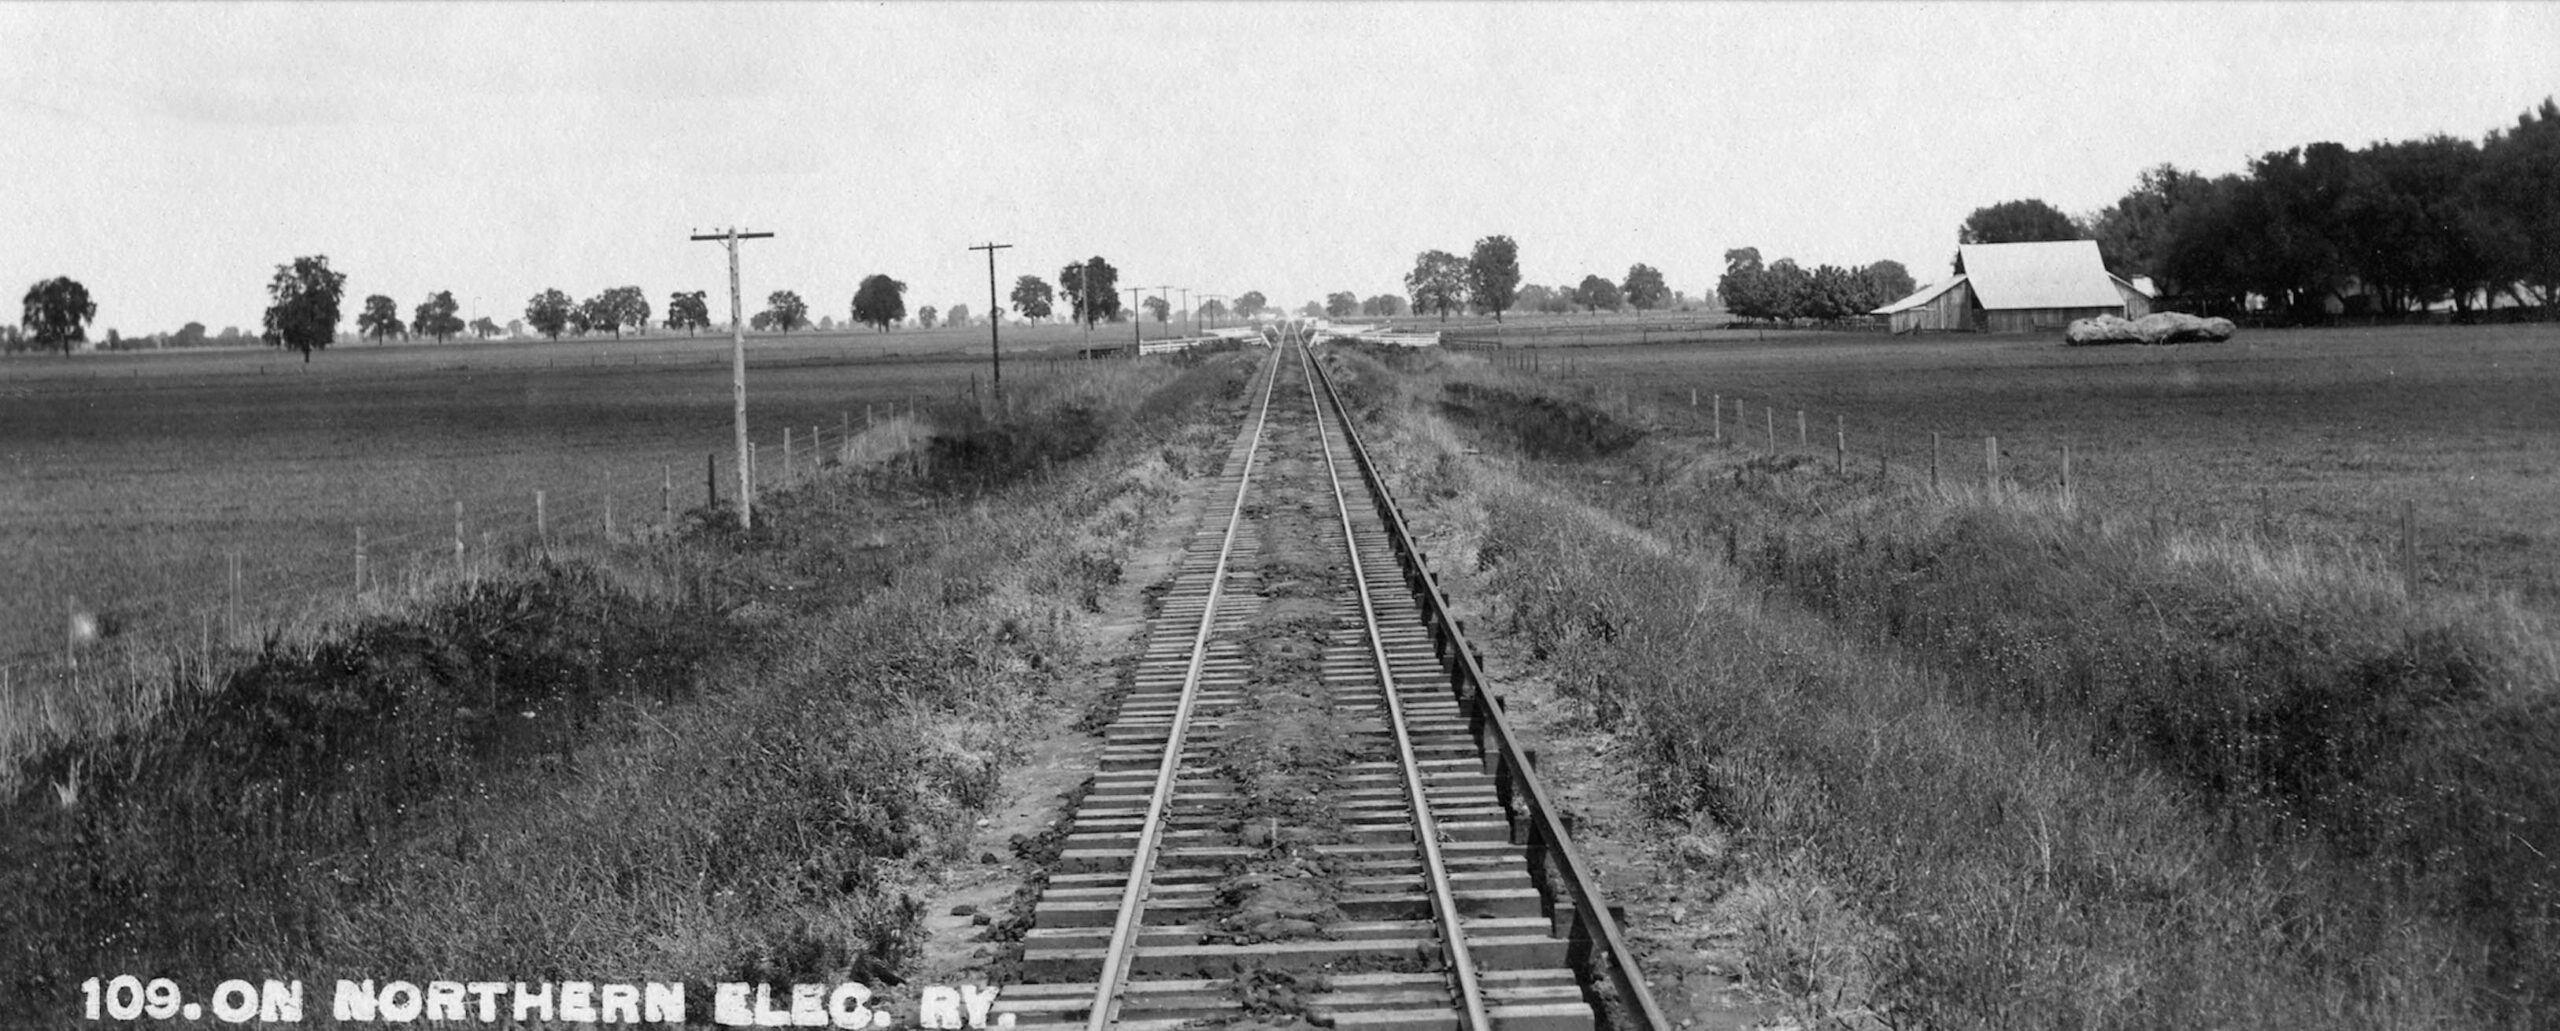
Occasionally the NE images contained adjacent farm-related structures as seen in this north view ca. 1910, or a distinctive pattern of trees in the background. The location of this image has not yet been determined. Go ahead to the next panel with images taken at the same location in 1940.
L337-20-Courtesy BAERA, Western Railway Museum Archives, 258933sn, (Image 4 of 47)
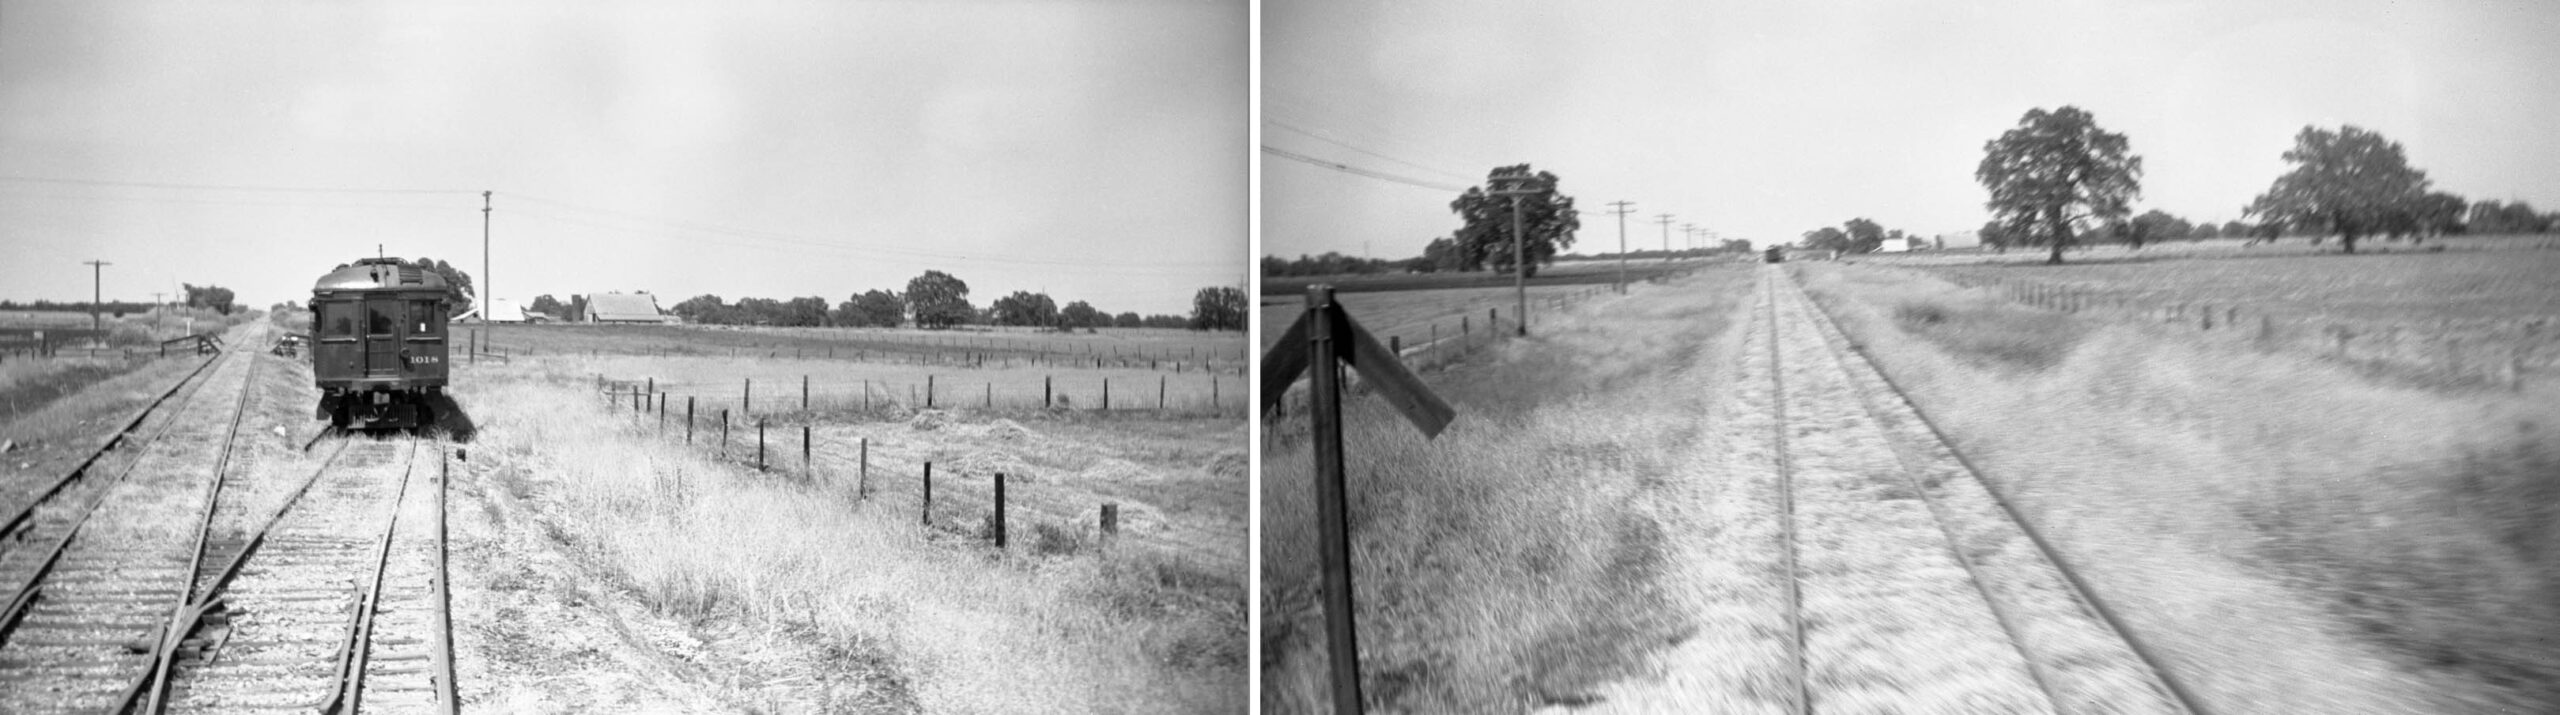
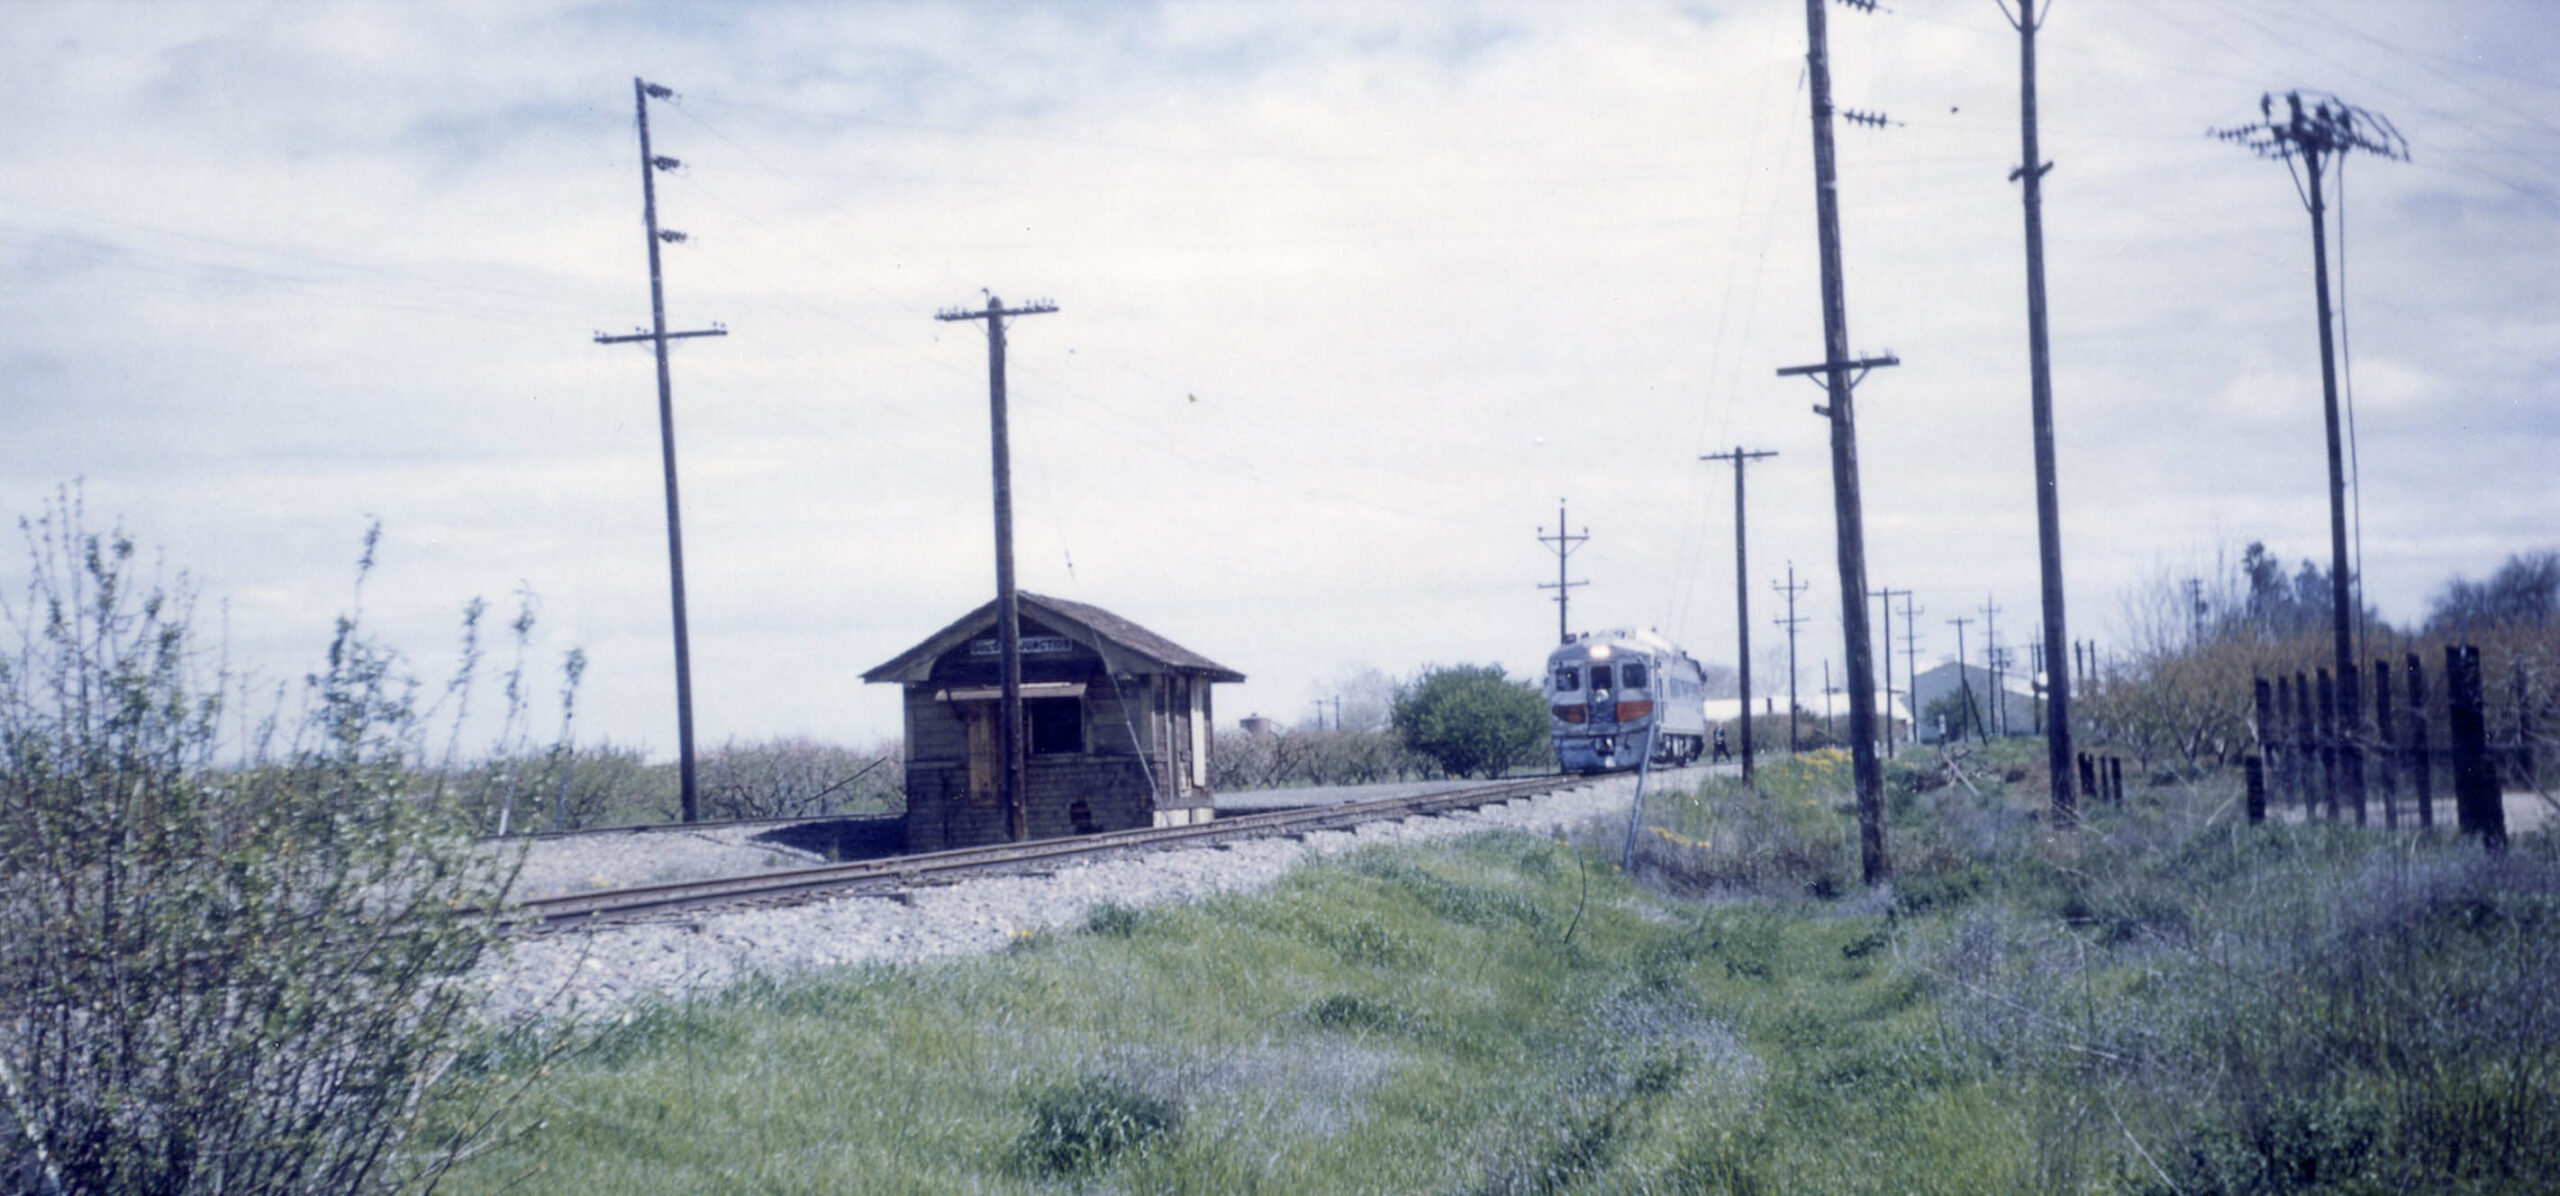
The north view on the left of Sacramento Northern, SN 1018 “in the hole” in 1940 shows more adjacent farm structures added relative to the ca. 1910 image. The view on the right appears to have been taken further south as the train traveled toward Sacramento. Using aerial images from 1941, the site was determined to be the Riviera flag stop in Butte County, one stop north of Live Oak in Sutter County. Now for an example of completing a trip past every flag stop shelter between Colusa Jct. and Live Oak.
L337-25-Sappers Collection, Courtesy BAERA, Western Railway Museum Archives, 136922sn, l, 136920sn, r, (Image 5 of 47)
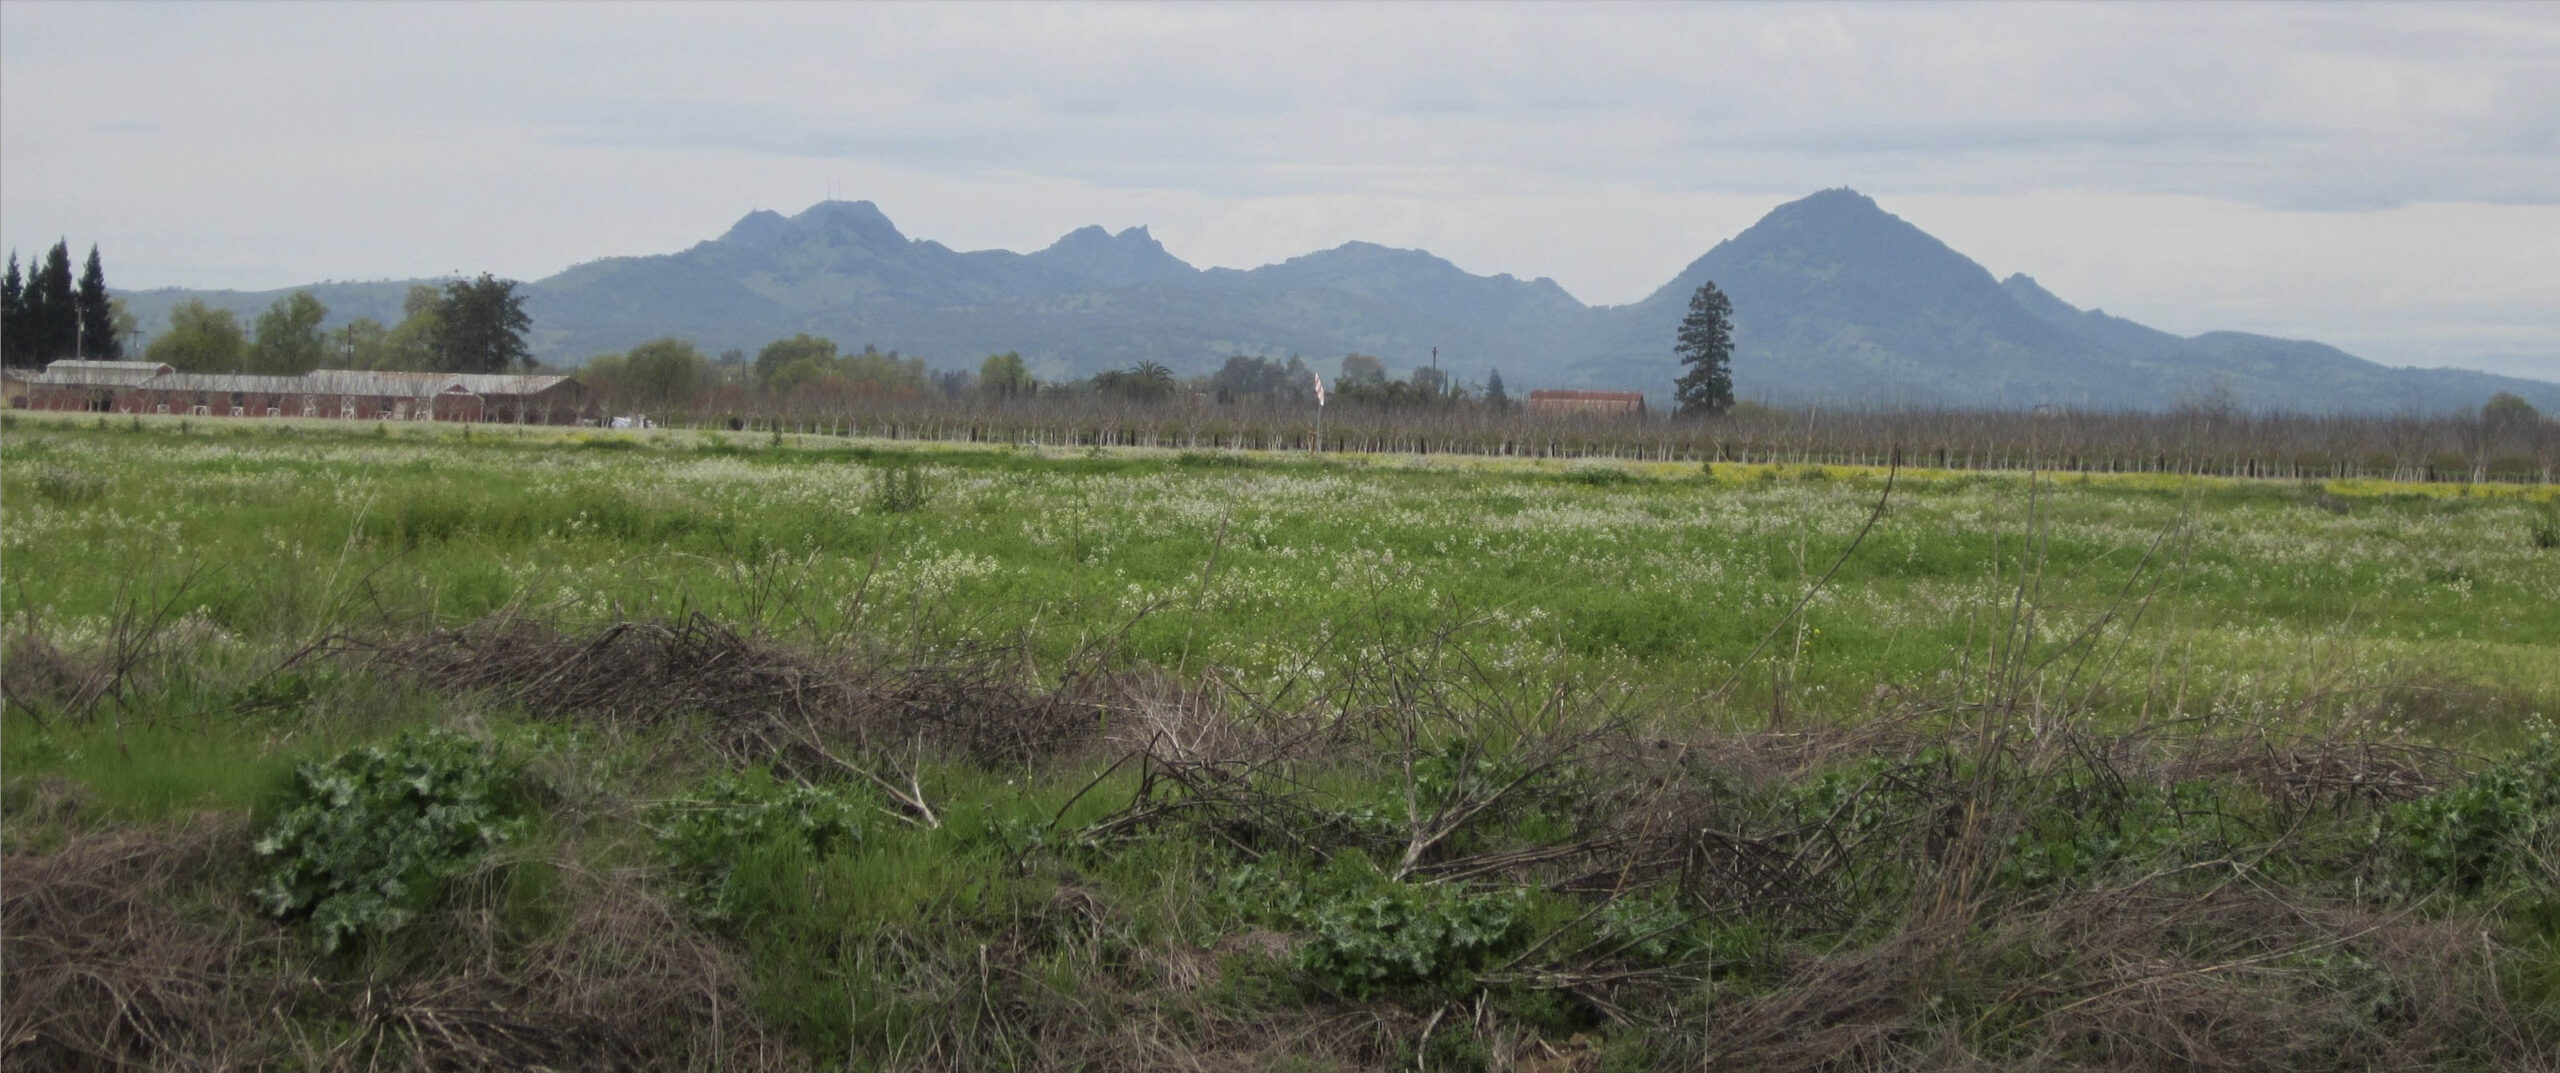
The hypothesis is that most images taken in areas unknown to Bay Area railfans were near station stops. Identifying all of the station stops and substations on the line would provide information about adjacent electric transmission and telephone poles and other physical markings in the intervals, particularly of surrounding buildings and hills. Applying this to the section between Colusa Jct. and Live Oak will follow. We head out there with a west view of the Sutter Buttes taken from Larkin Rd. in 2018 north of Paseo Rd. fairly close to Live Oak.
L337-30-Stuart Swiedler Photo, (Image 6 of 47)
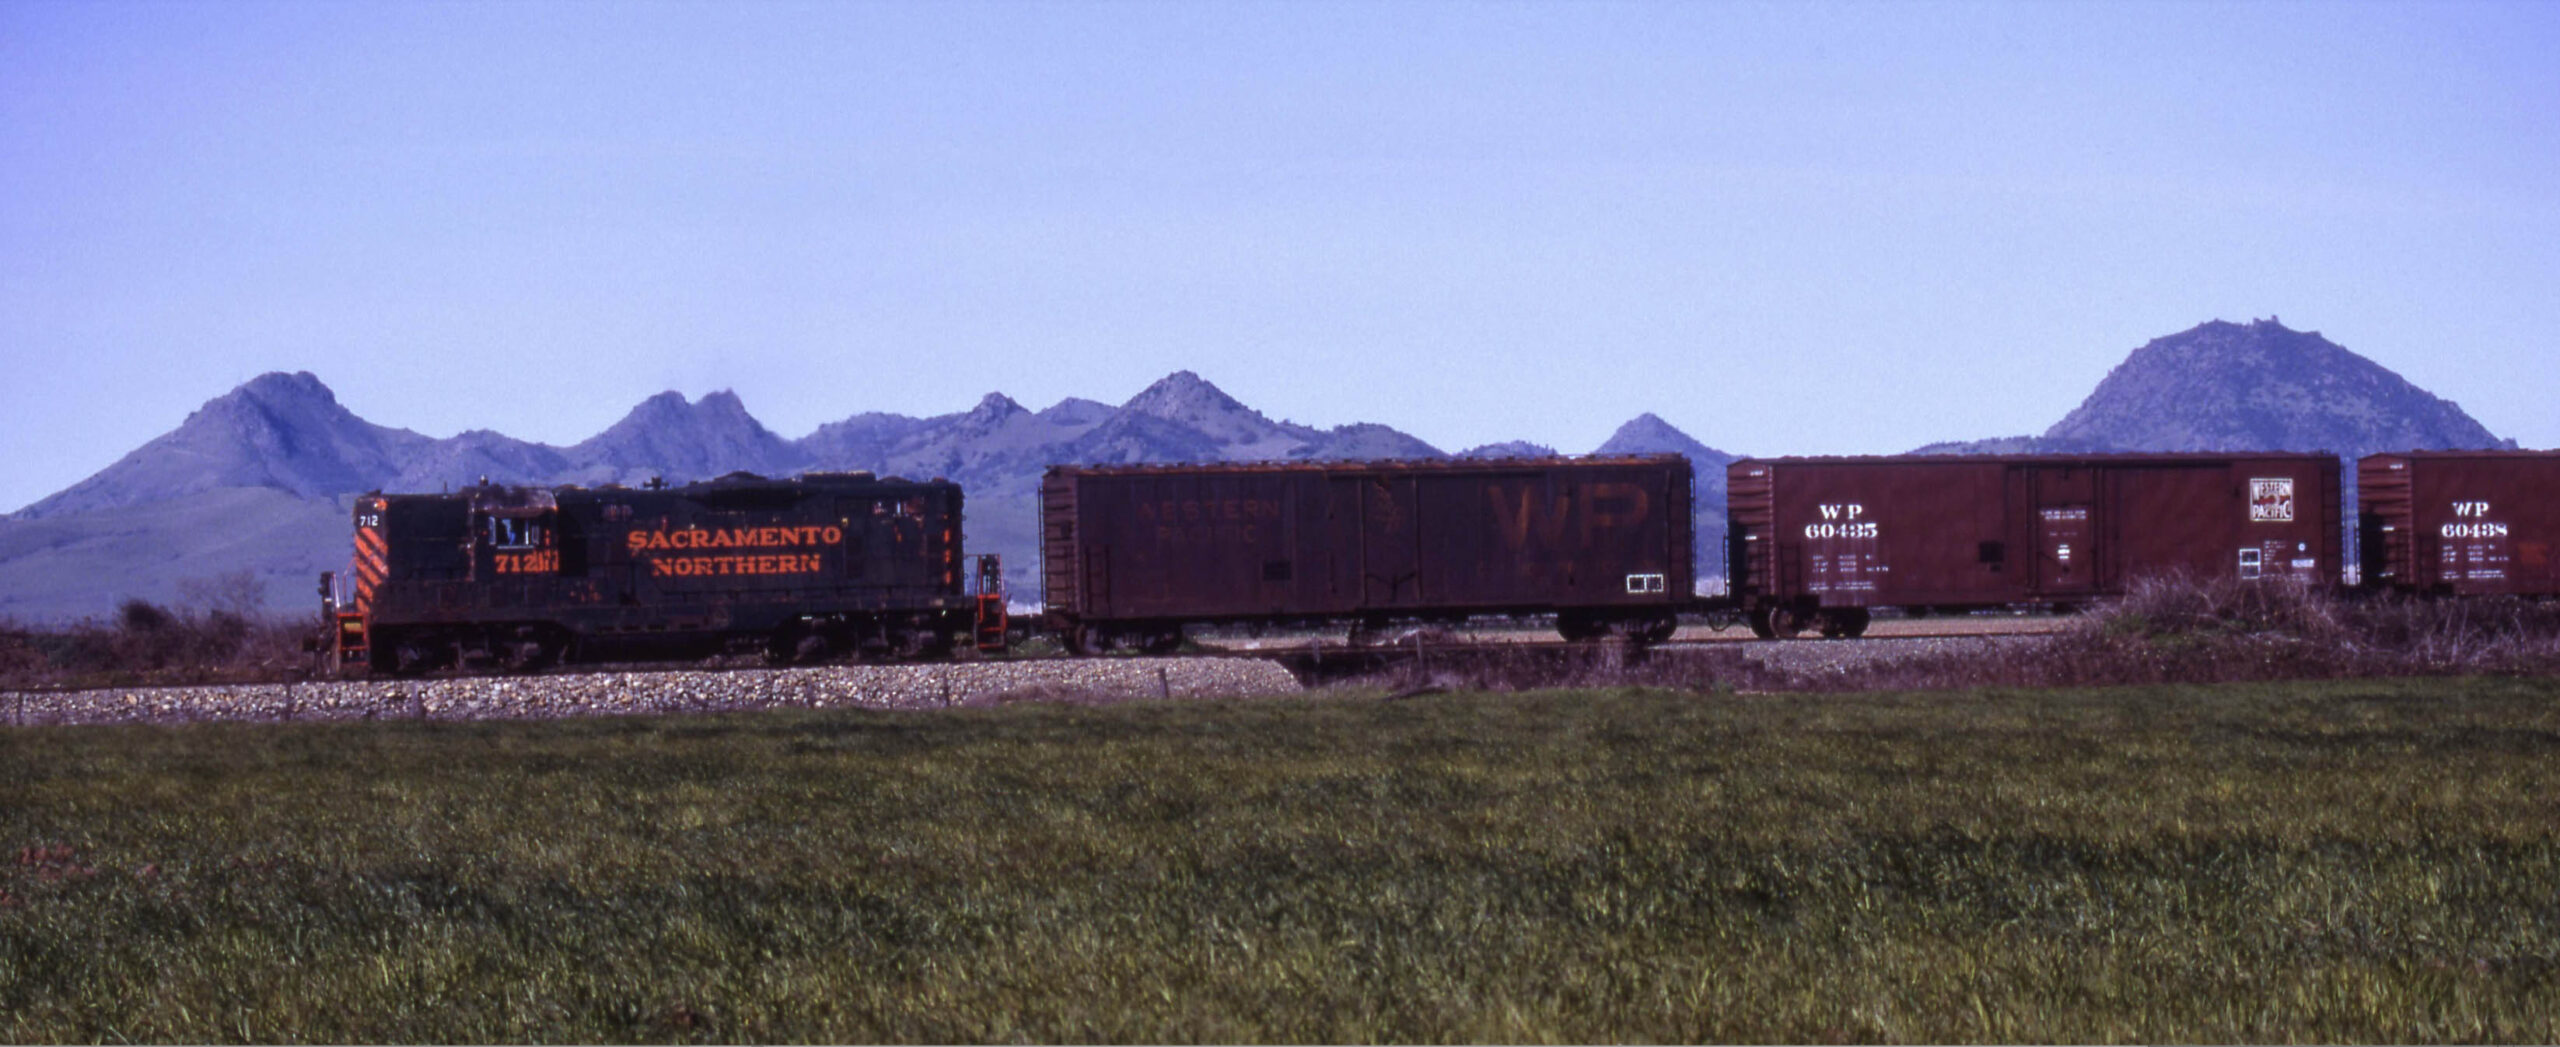
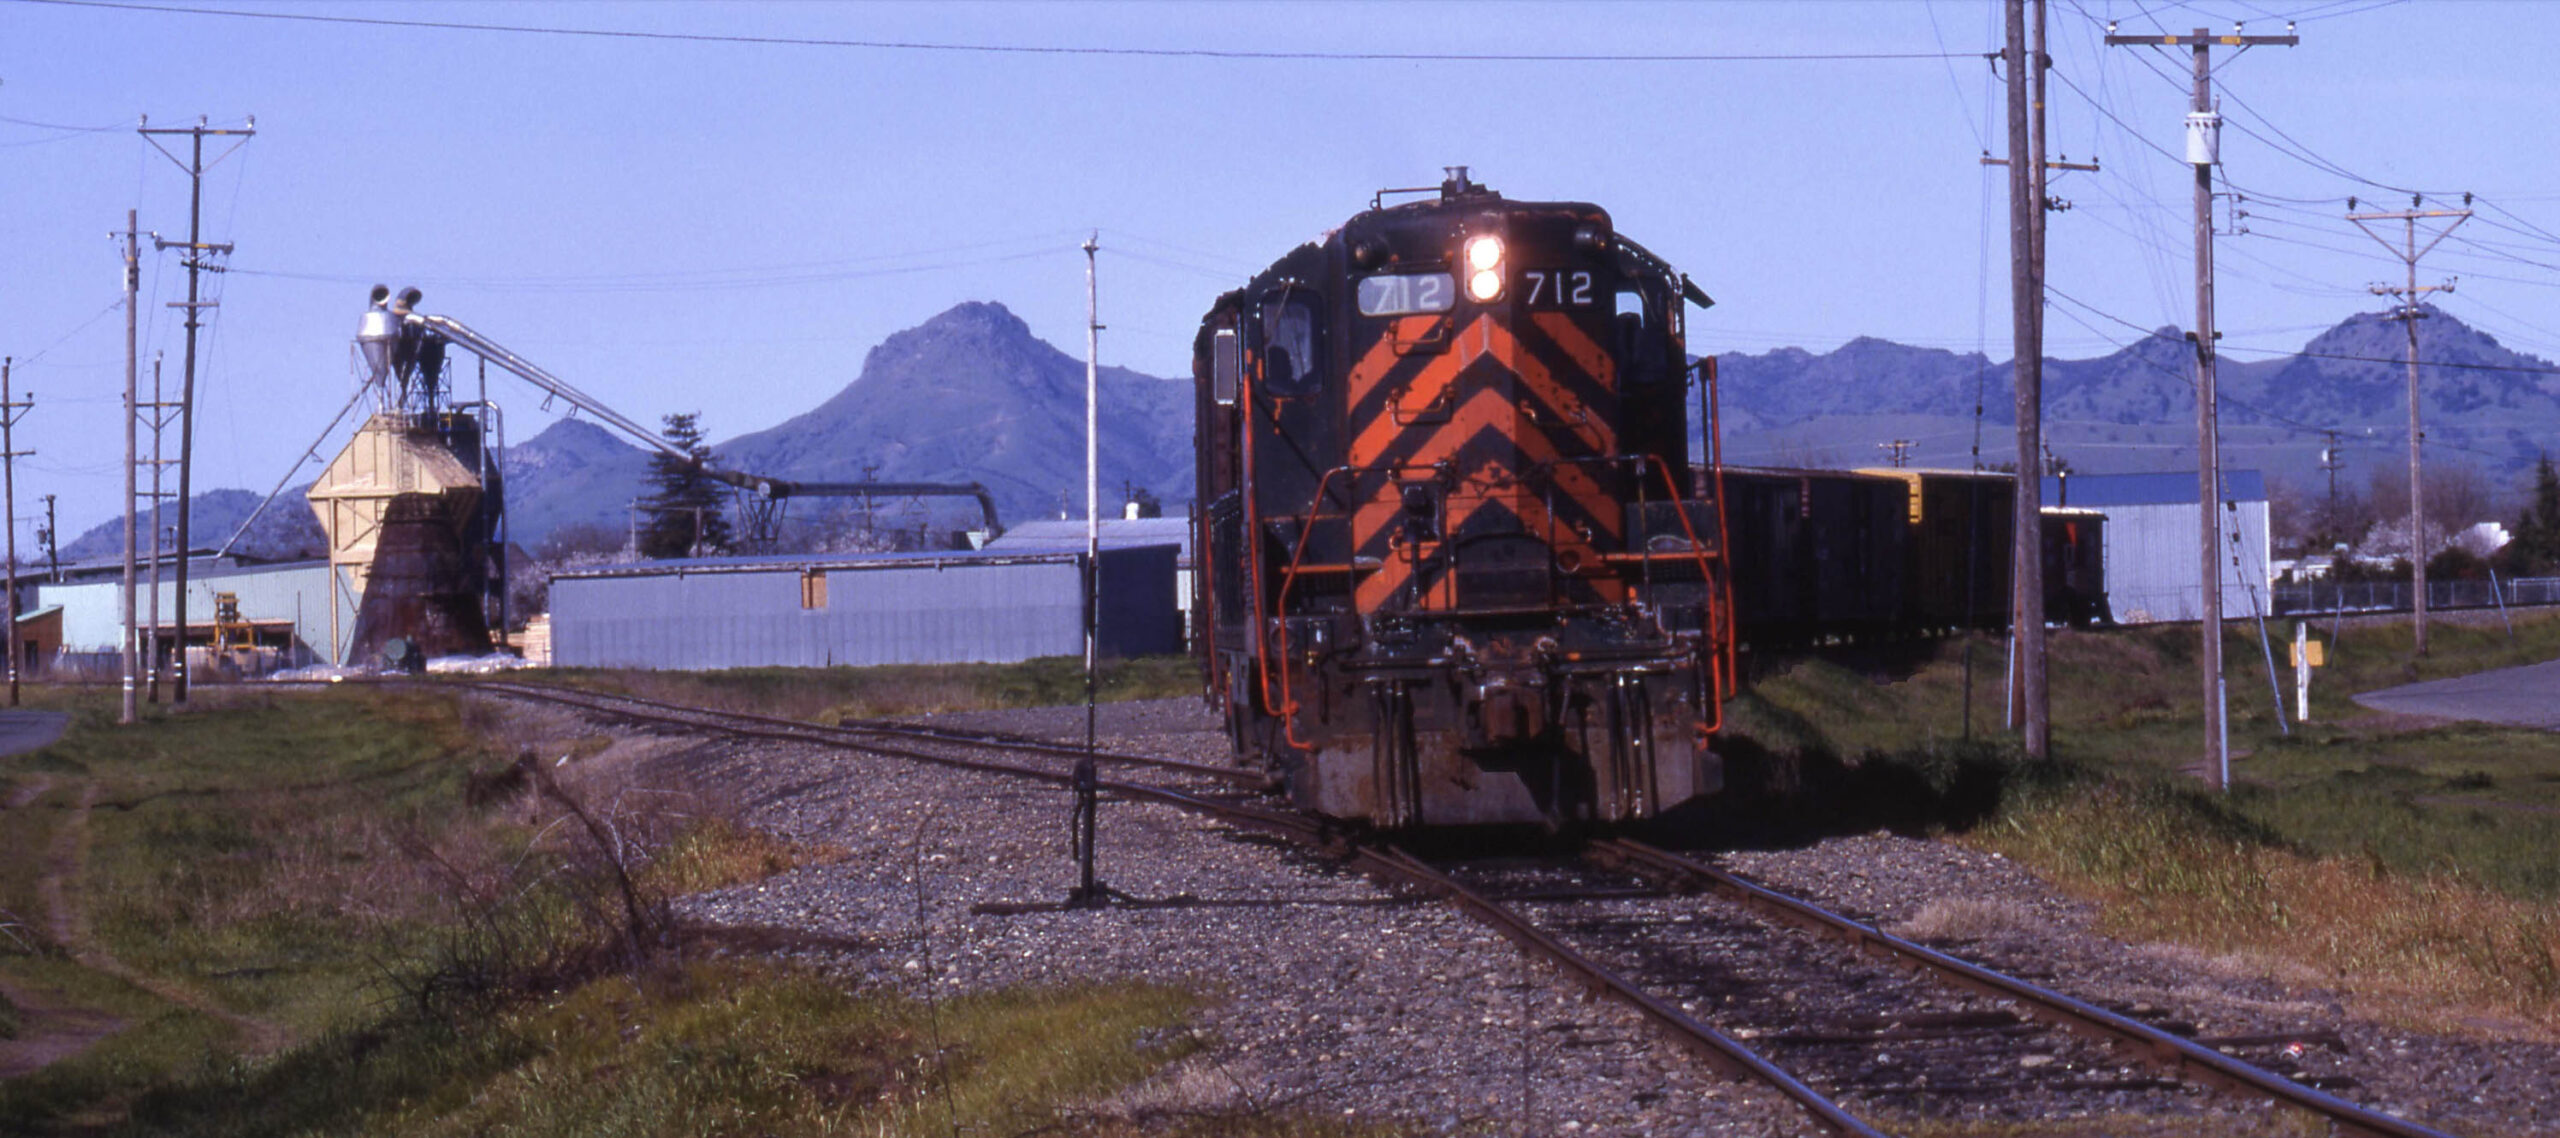
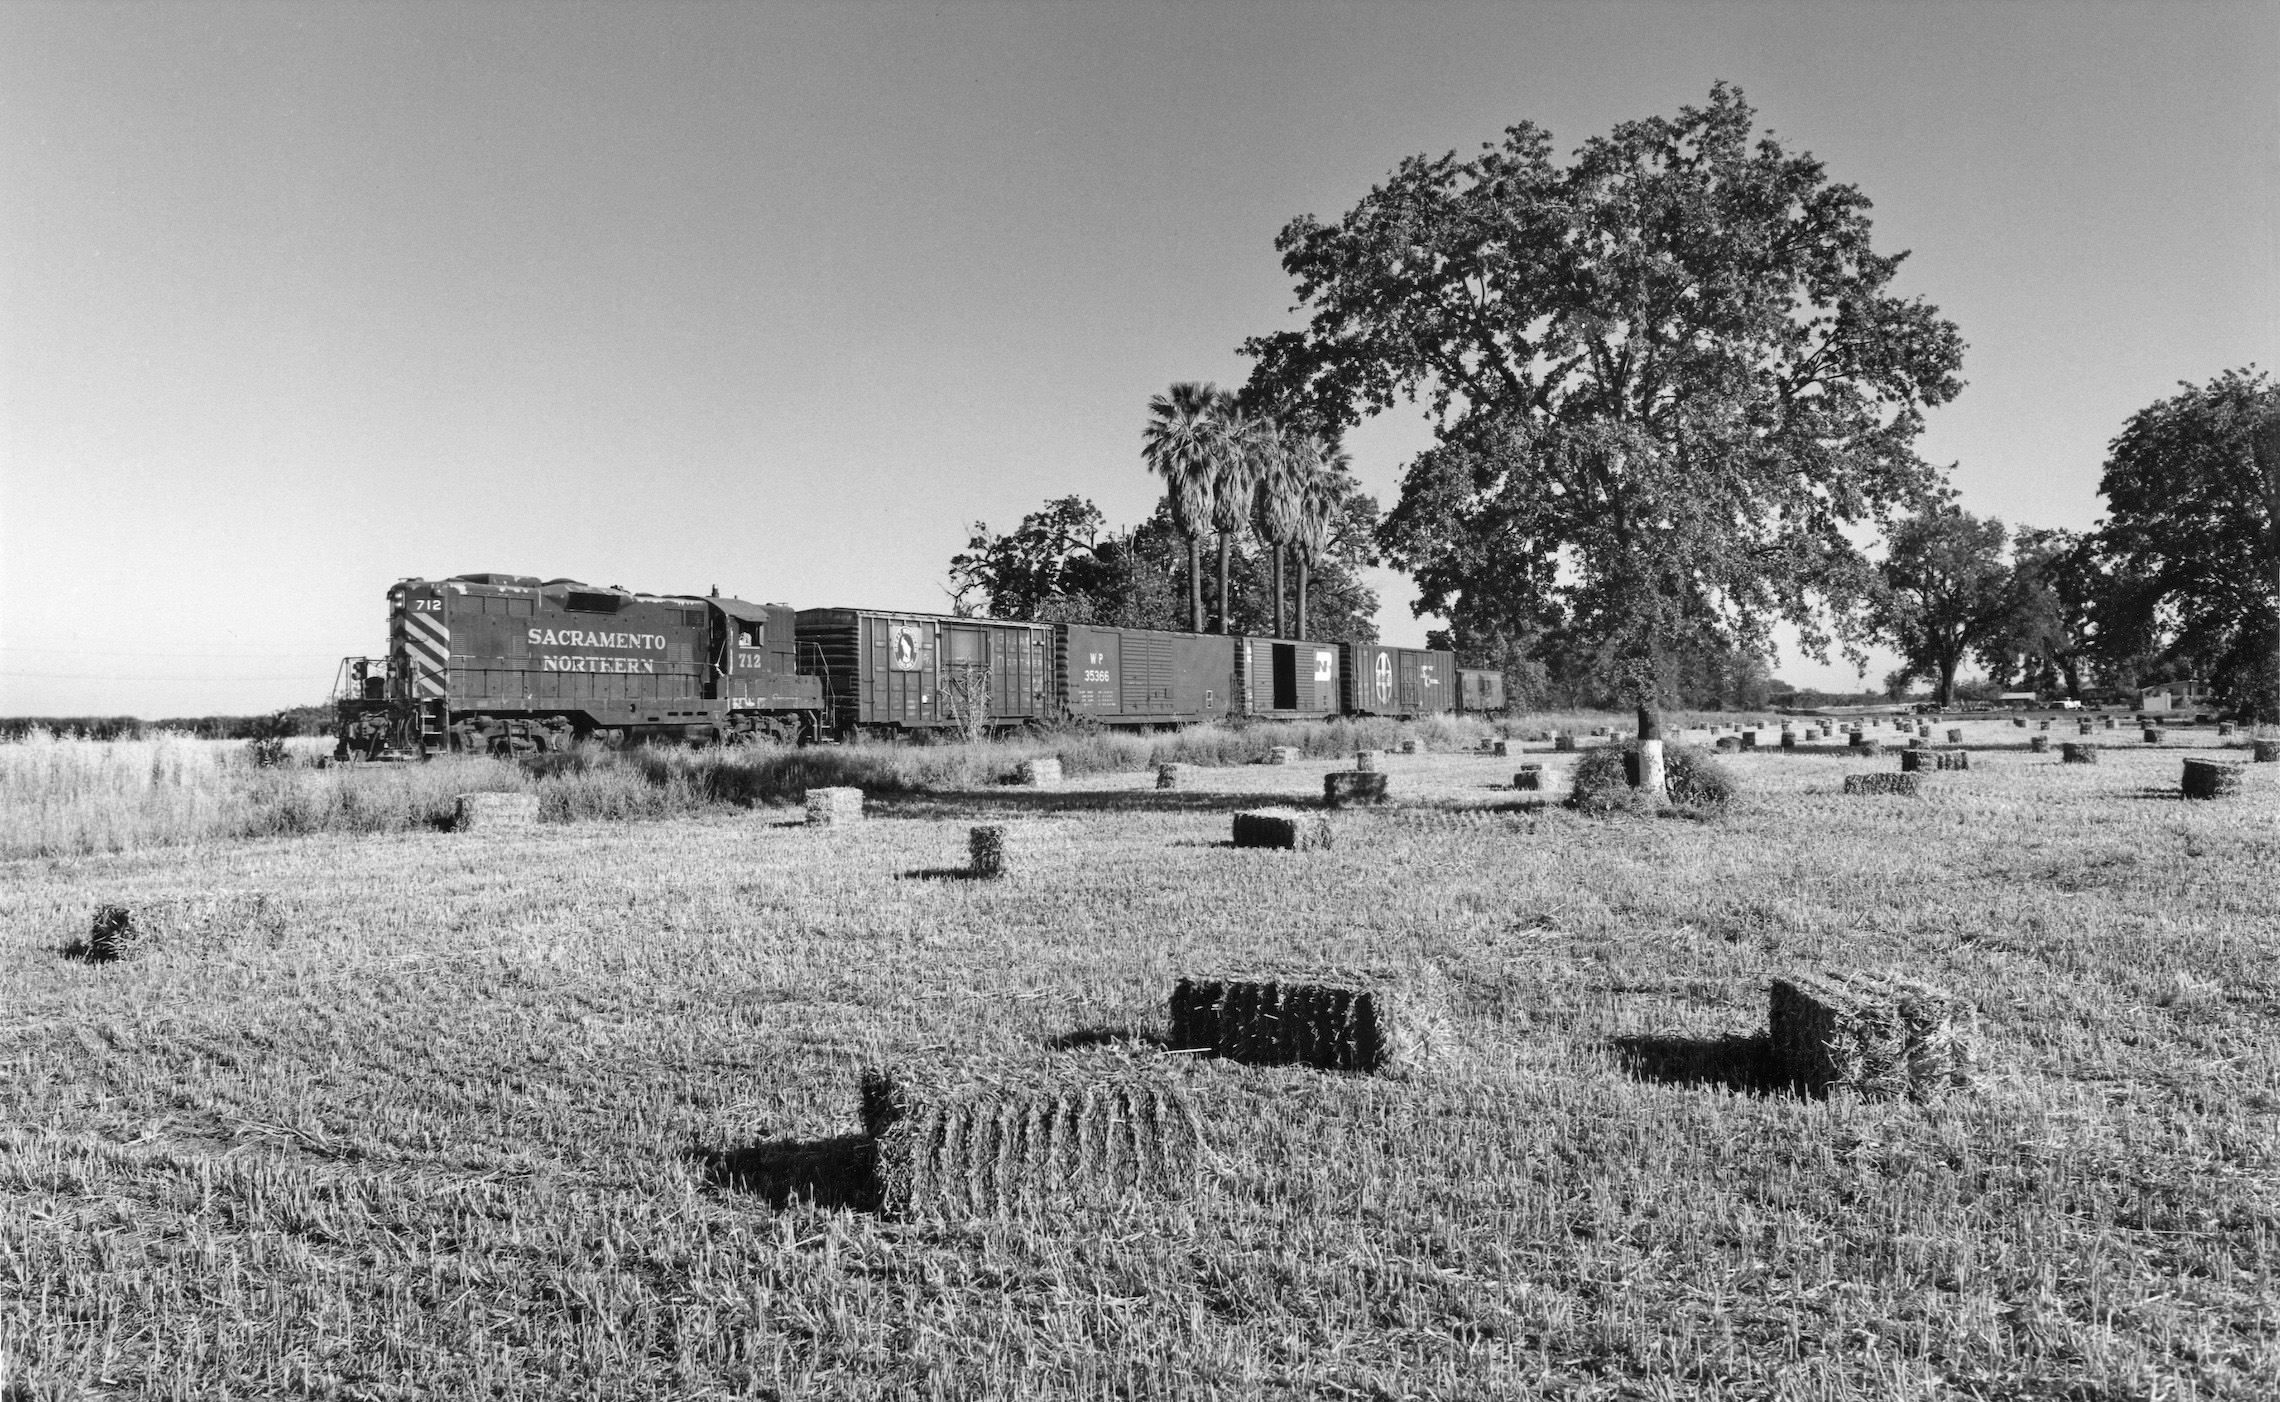
The trackage between Colusa Jct. and Live Oak was a mainstay of the Chico Local up to its abandonment at the end of 1985 by the Union Pacific. This also eliminated tracks between Durham and Chico. By the end of 1985, all that was left of the original mainline rails set by the NE excluding freight lines in Sacramento were between Alicia and Reed Jct., about 2.7 miles, the Feather River Bridge approach in Marysville to Colusa Jct., about 4 miles, and the tiny stub at Sankey. West view with SN 712 ca. 1976.
L337-35-Wayne Monger Photo, Courtesy Wayne Monger, (Image 7 of 47)
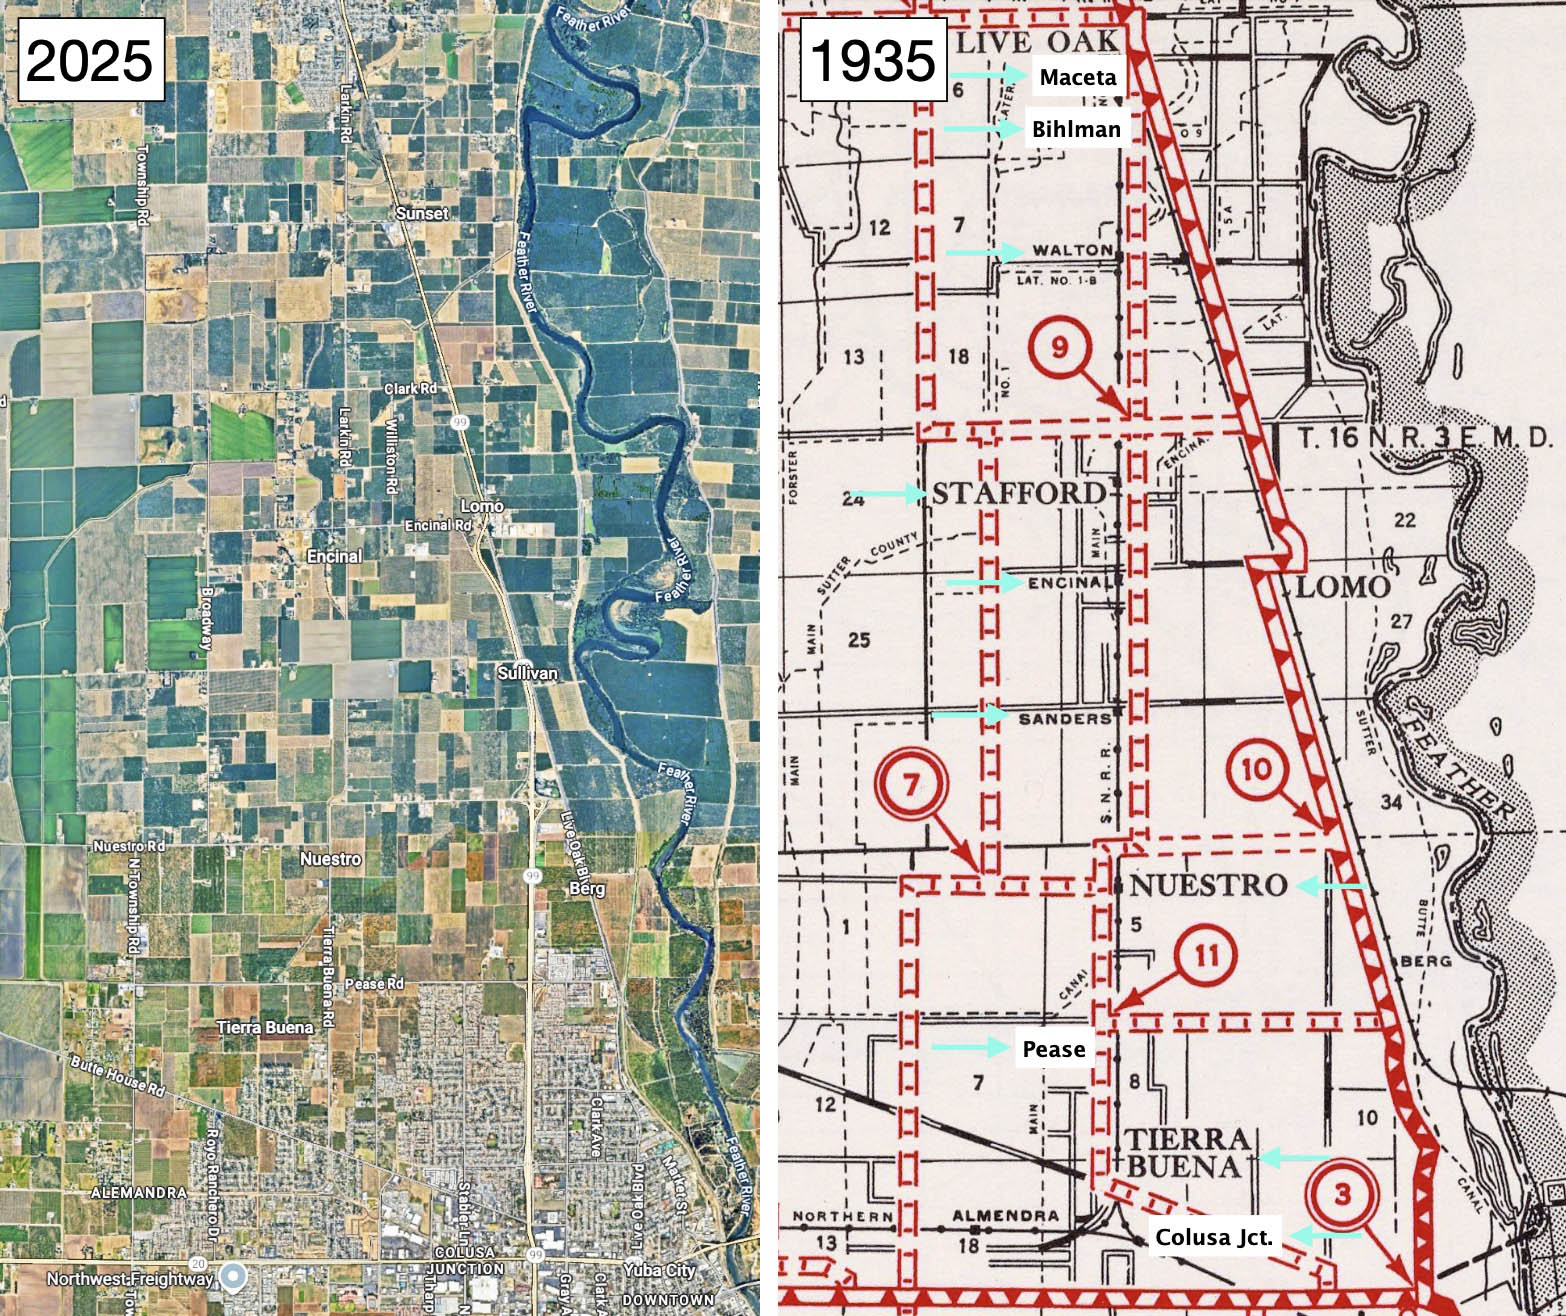
As a reminder of the area of interest, this Sutter aerial from 2025 and 1935 map have been lined up. Note that additional station stops have been added to the 1935 map of Sutter County, with each stop marked by a turquoise arrow. Ref, right, California Division of Highways 1935 Sutter County, from the Institute of Transportation Studies Library, Harmer E. Davis Transportation Library, at the University of California, Berkeley
L337-40-Courtesy Google Maps, l, David Rumsey Map Collection, David Rumsey Map Center, Stanford Libraries, r, (Image 8 of 47)
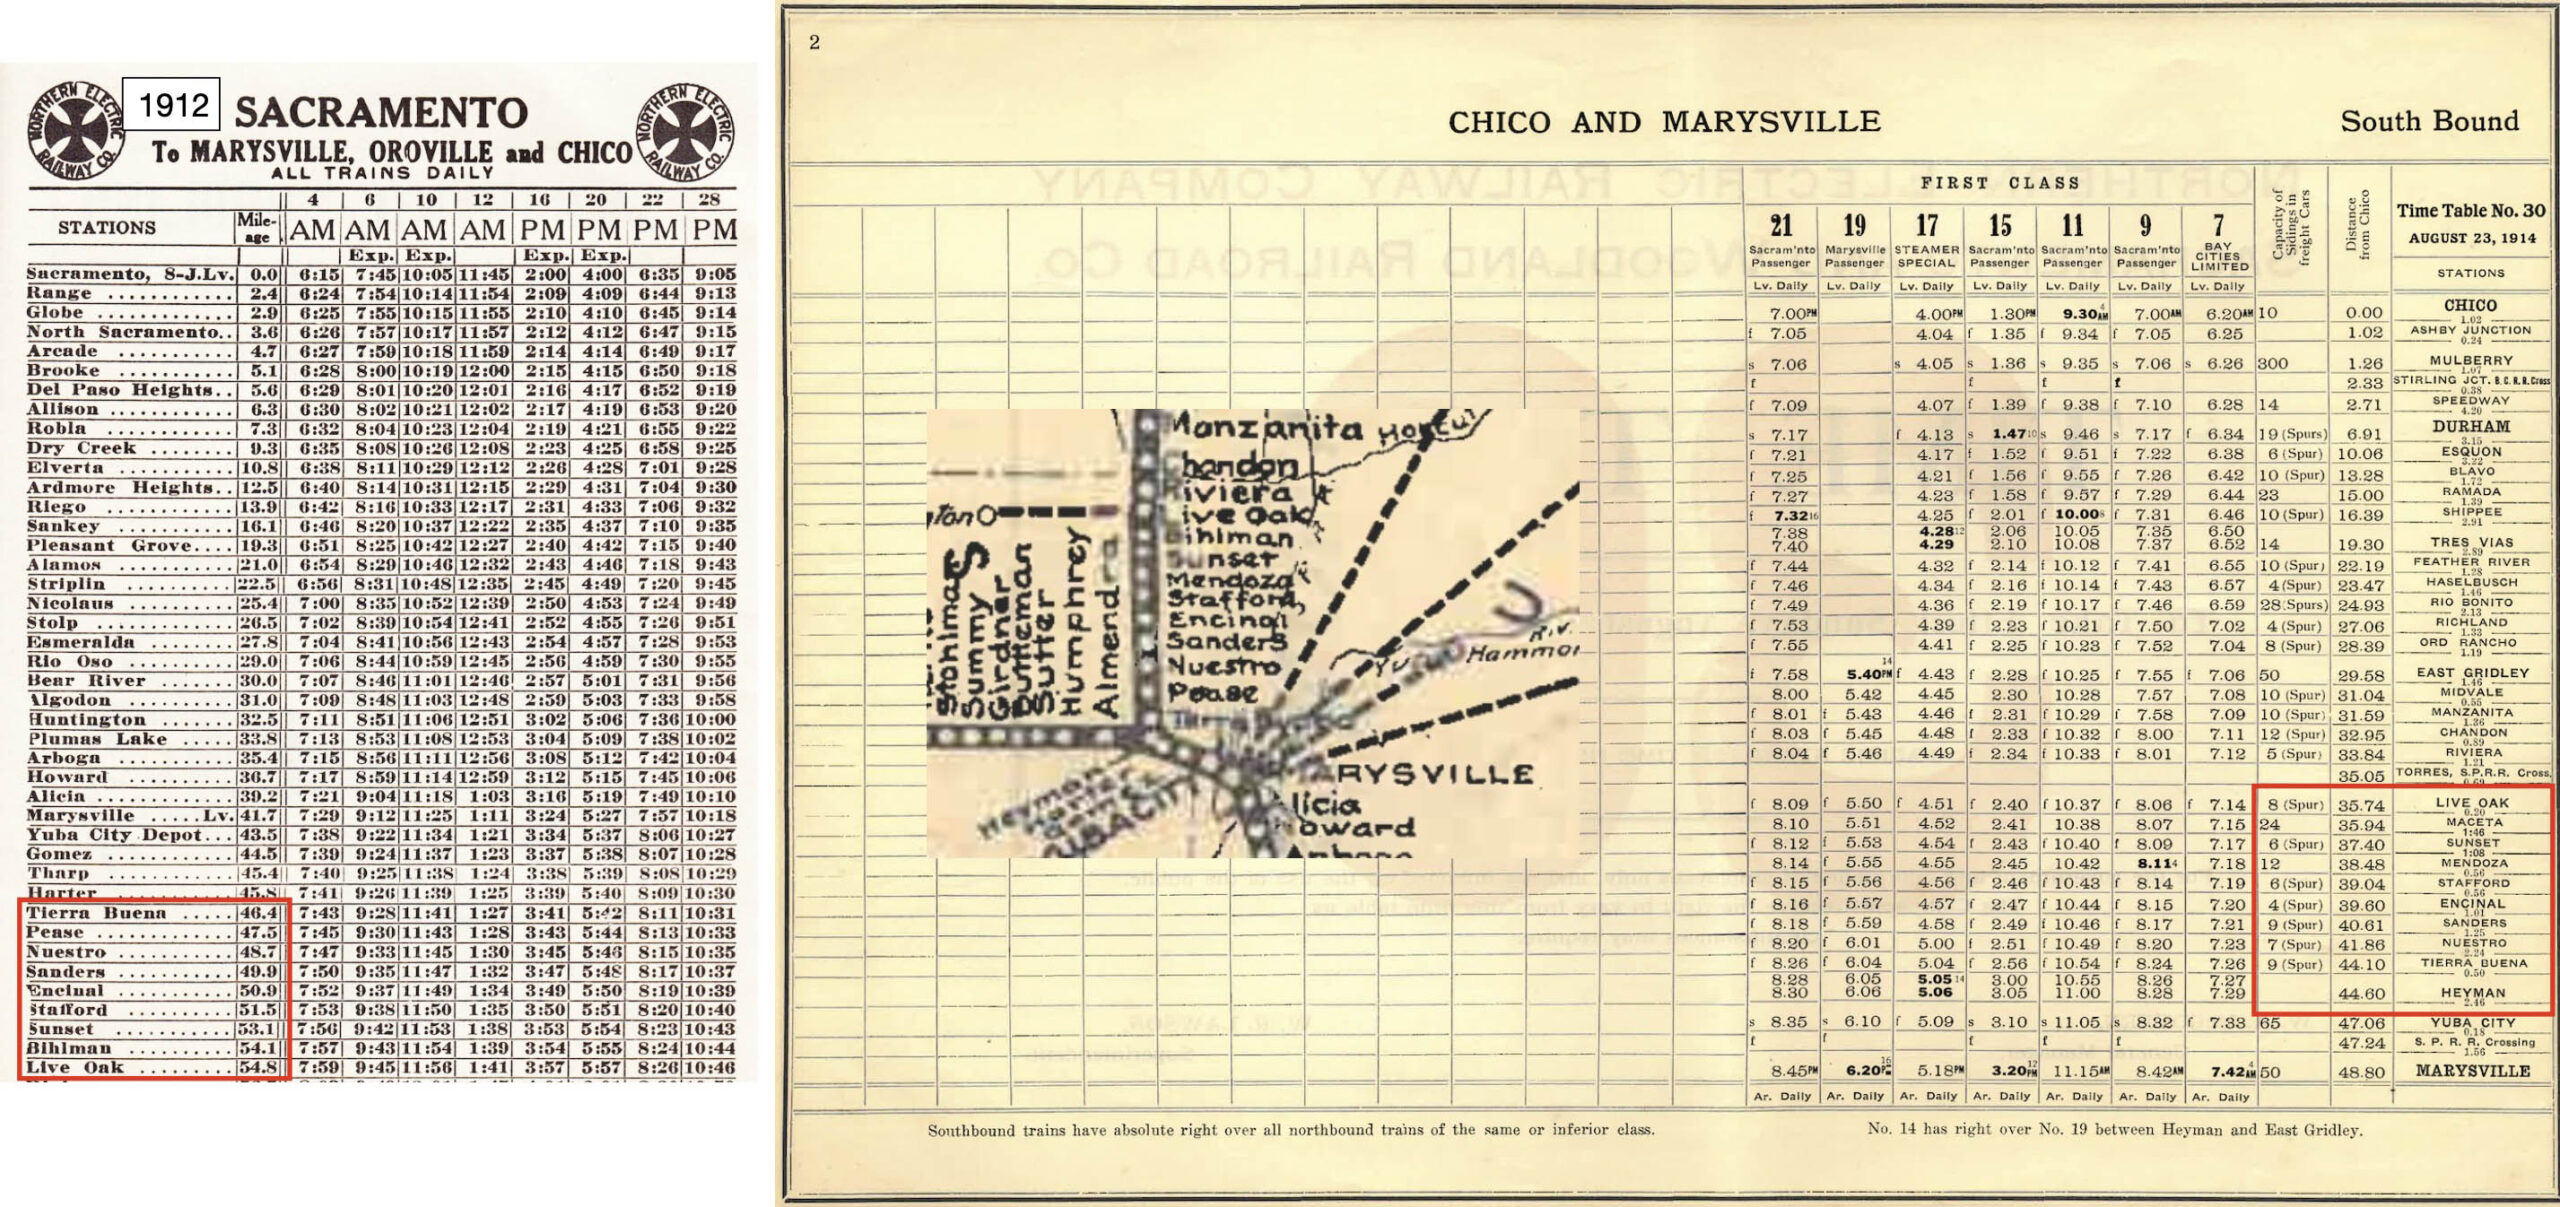
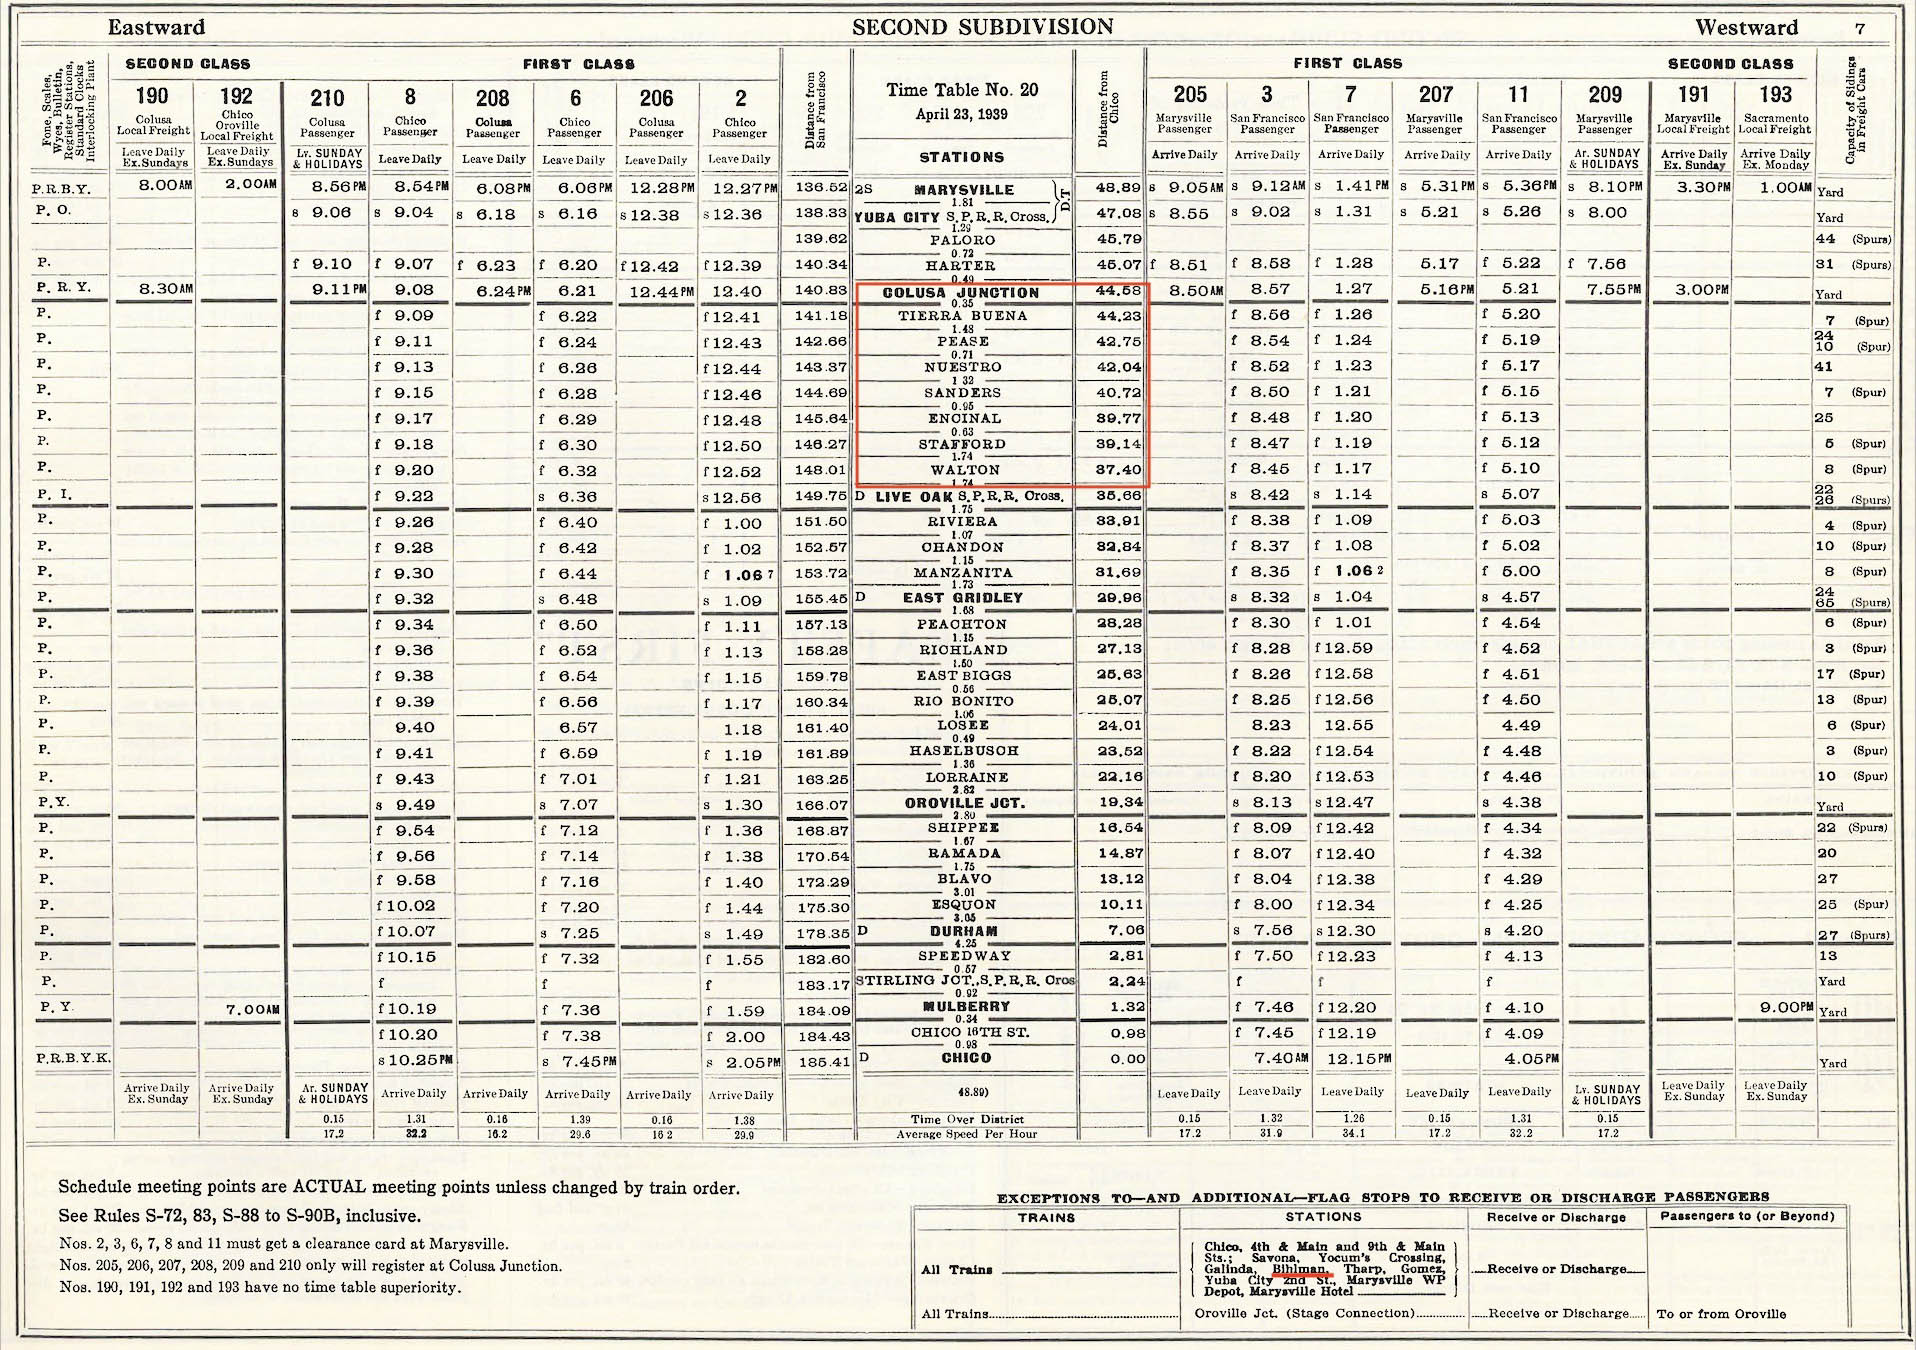
Next to document that the names of some of the station stops changed with time, to indicate the distance between stops, and to document the existence of freight spurs or sidings. Note that in the 1912 and 1914 station roster that Bihlman is present on the 1912 schedule and 1914 map, while Maceta is only listed in the main 1914 station roster for passenger trains and freight service. Looking at mileage distances between stations, it is clear that Maceta was closer to Live Oak than Bihlman. More about this later.
L337-45-Courtesy BAERA, Western Railway Museum Archives, (Image 9 of 47)
Looking ahead to the last issued employee timetable before the cessation of passenger service on the North End, no. 20 from Apr. 23, 1939, Maceta is no longer listed, and Bihlman is listed as a flag stop.Before going on to the next panel, appreciate that the section covering Yuba City to Colusa Jct., click here, or within Live Oak, click here, are presented in “Central Valley Connections” section, and are not included in this presentation.
L337-50-Courtesy BAERA, Western Railway Museum Archives, 13474, (Image 10 of 47)
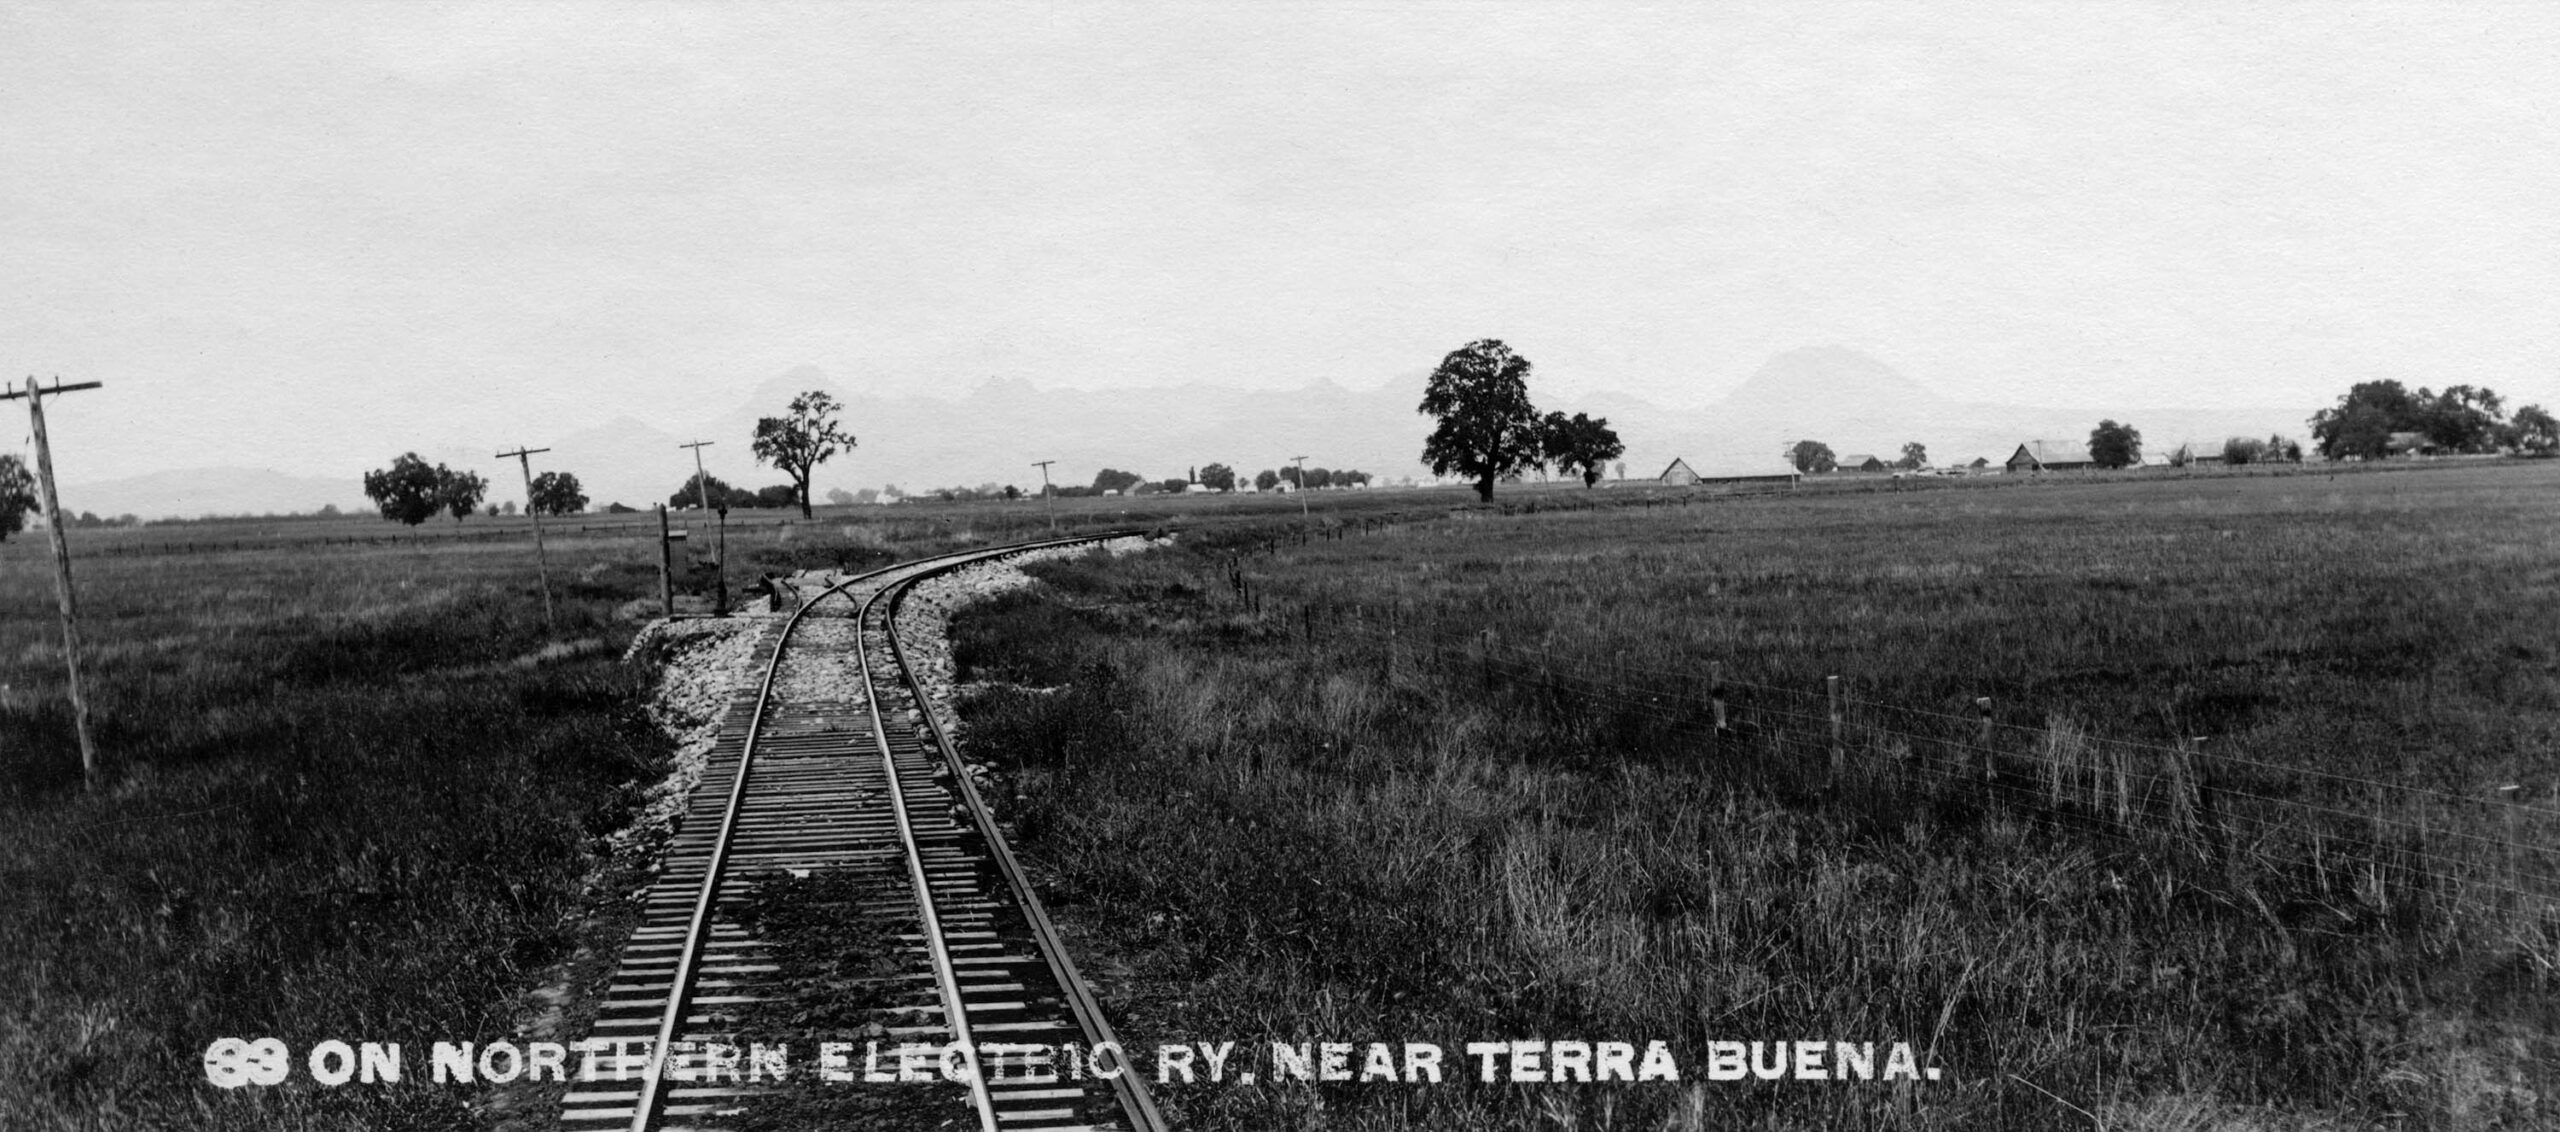
Now to images of the route itself. This west view with the Sutter Buttes was taken at the future site of Colusa Jct. At this point, there was no Colusa Branch, as the Marysville and Colusa Branch did not open until June 13, 1913 according to Demoro’s “Sacramento Northern.” This ca. 1910 view does, however, show a small spur heading toward Colusa. Note as well that the NE used the Latin or Italian spelling of land, “Terra”, rather than the intended Spanish name of this place, “Tierra.”
L337-55-Northern Electric Photo, Courtesy BAERA, Western Railway Museum Archives, 257790sn, (Image 11 of 47)
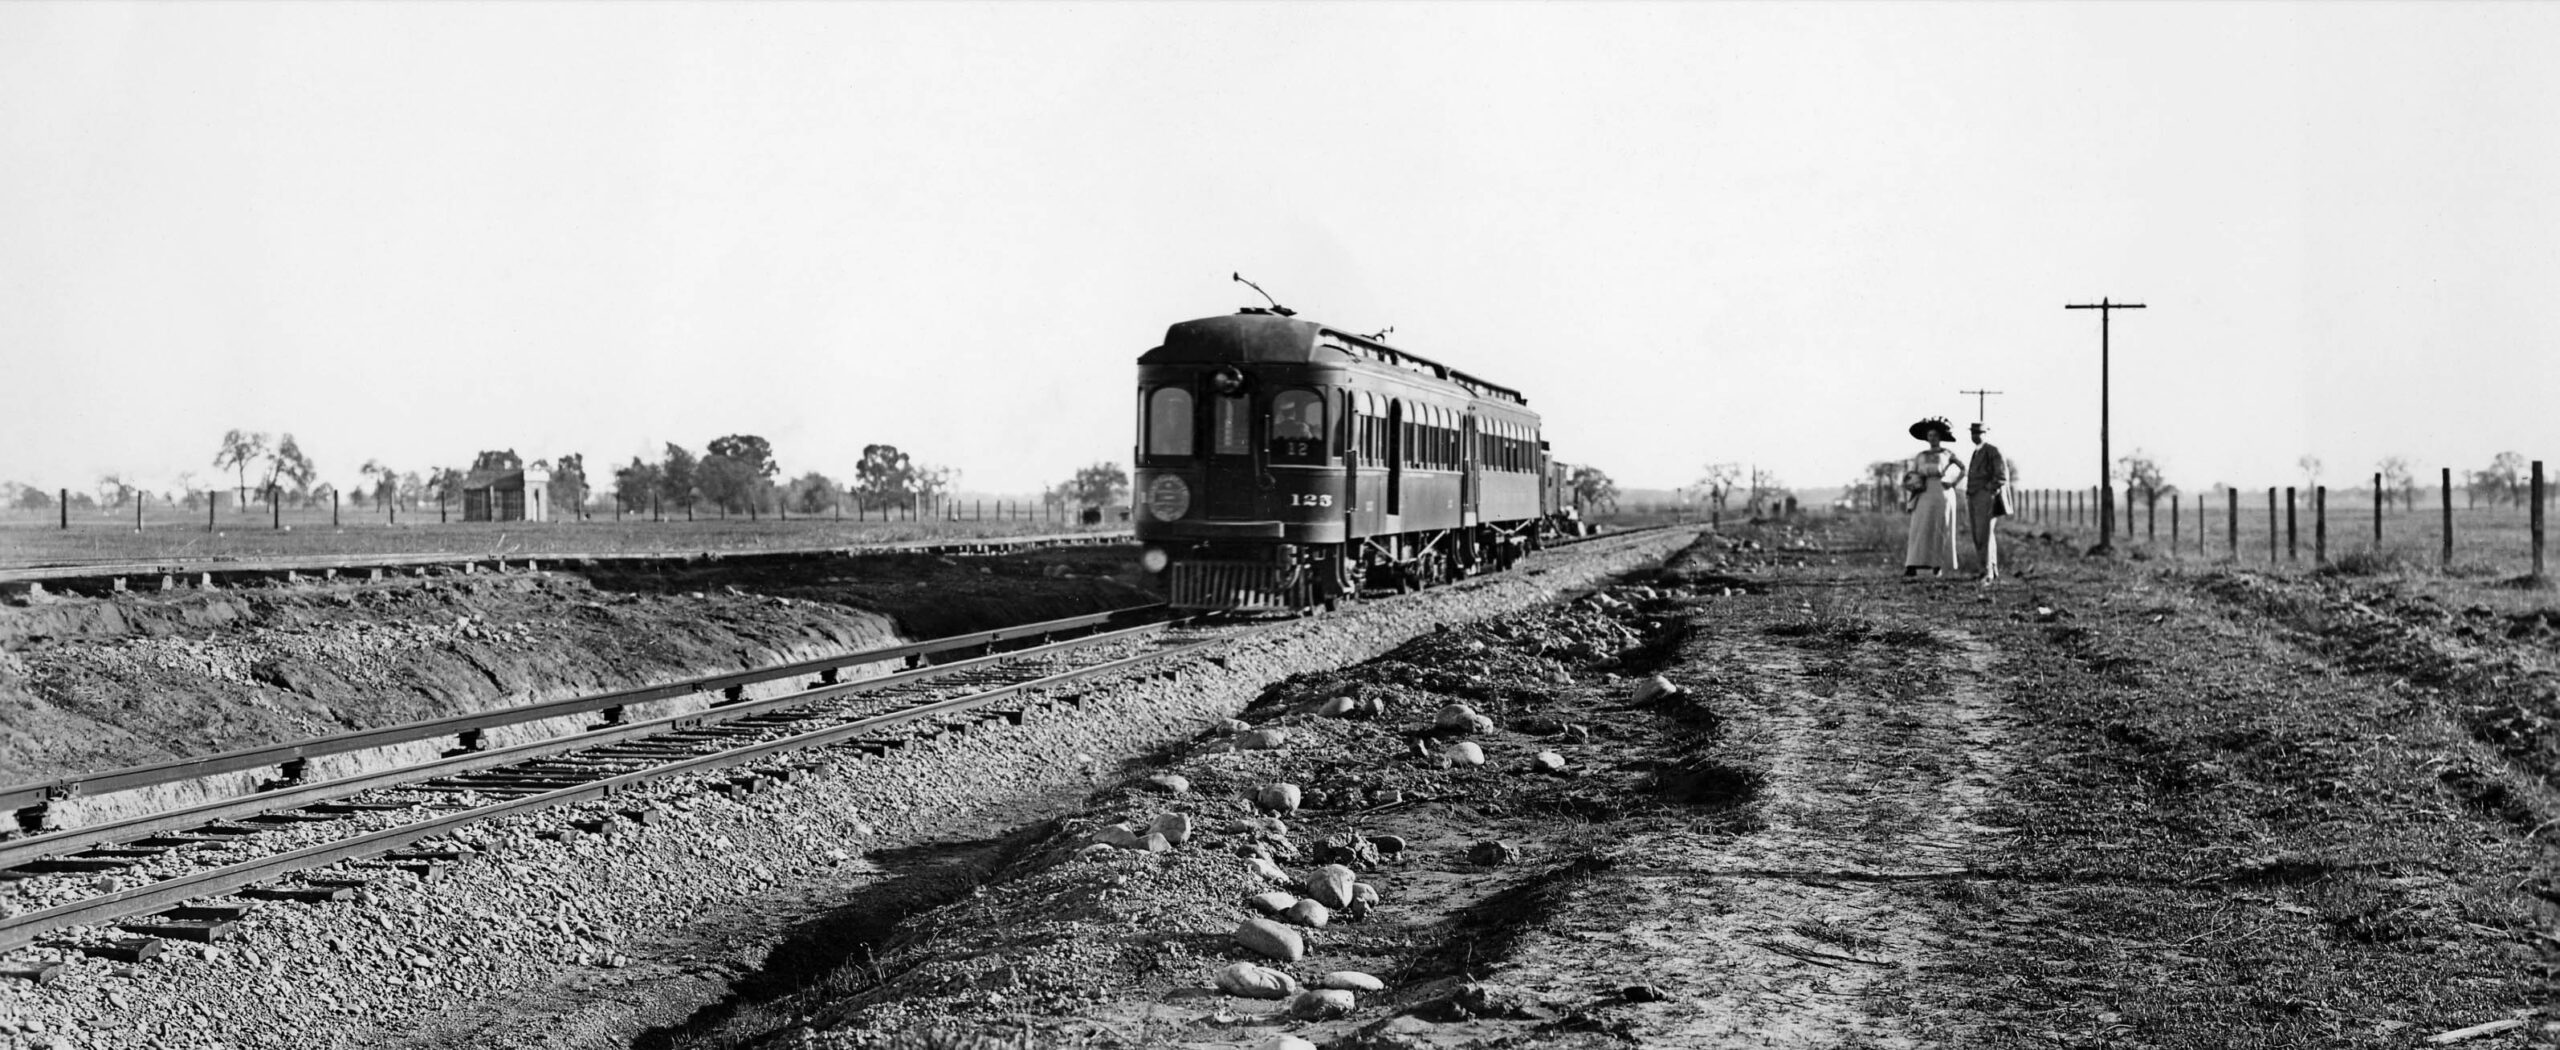
Initially, after the Colusa Branch was operational, Colusa Jct. was named Heyman, the origin of the name not known. Colusa Jct. replaced Heyman in the Sacramento Northern Railroad Time Table no. 1, Sept. 29, 1918. Note the trolley pole is up on car no. 129 despite the fact there was no overhead wire here.
L337-60-American Photo Co. Photo, Robert L. Stein Collection, Courtesy BAERA, Western Railway Museum Archives, 178857sn, (Image 12 of 47)
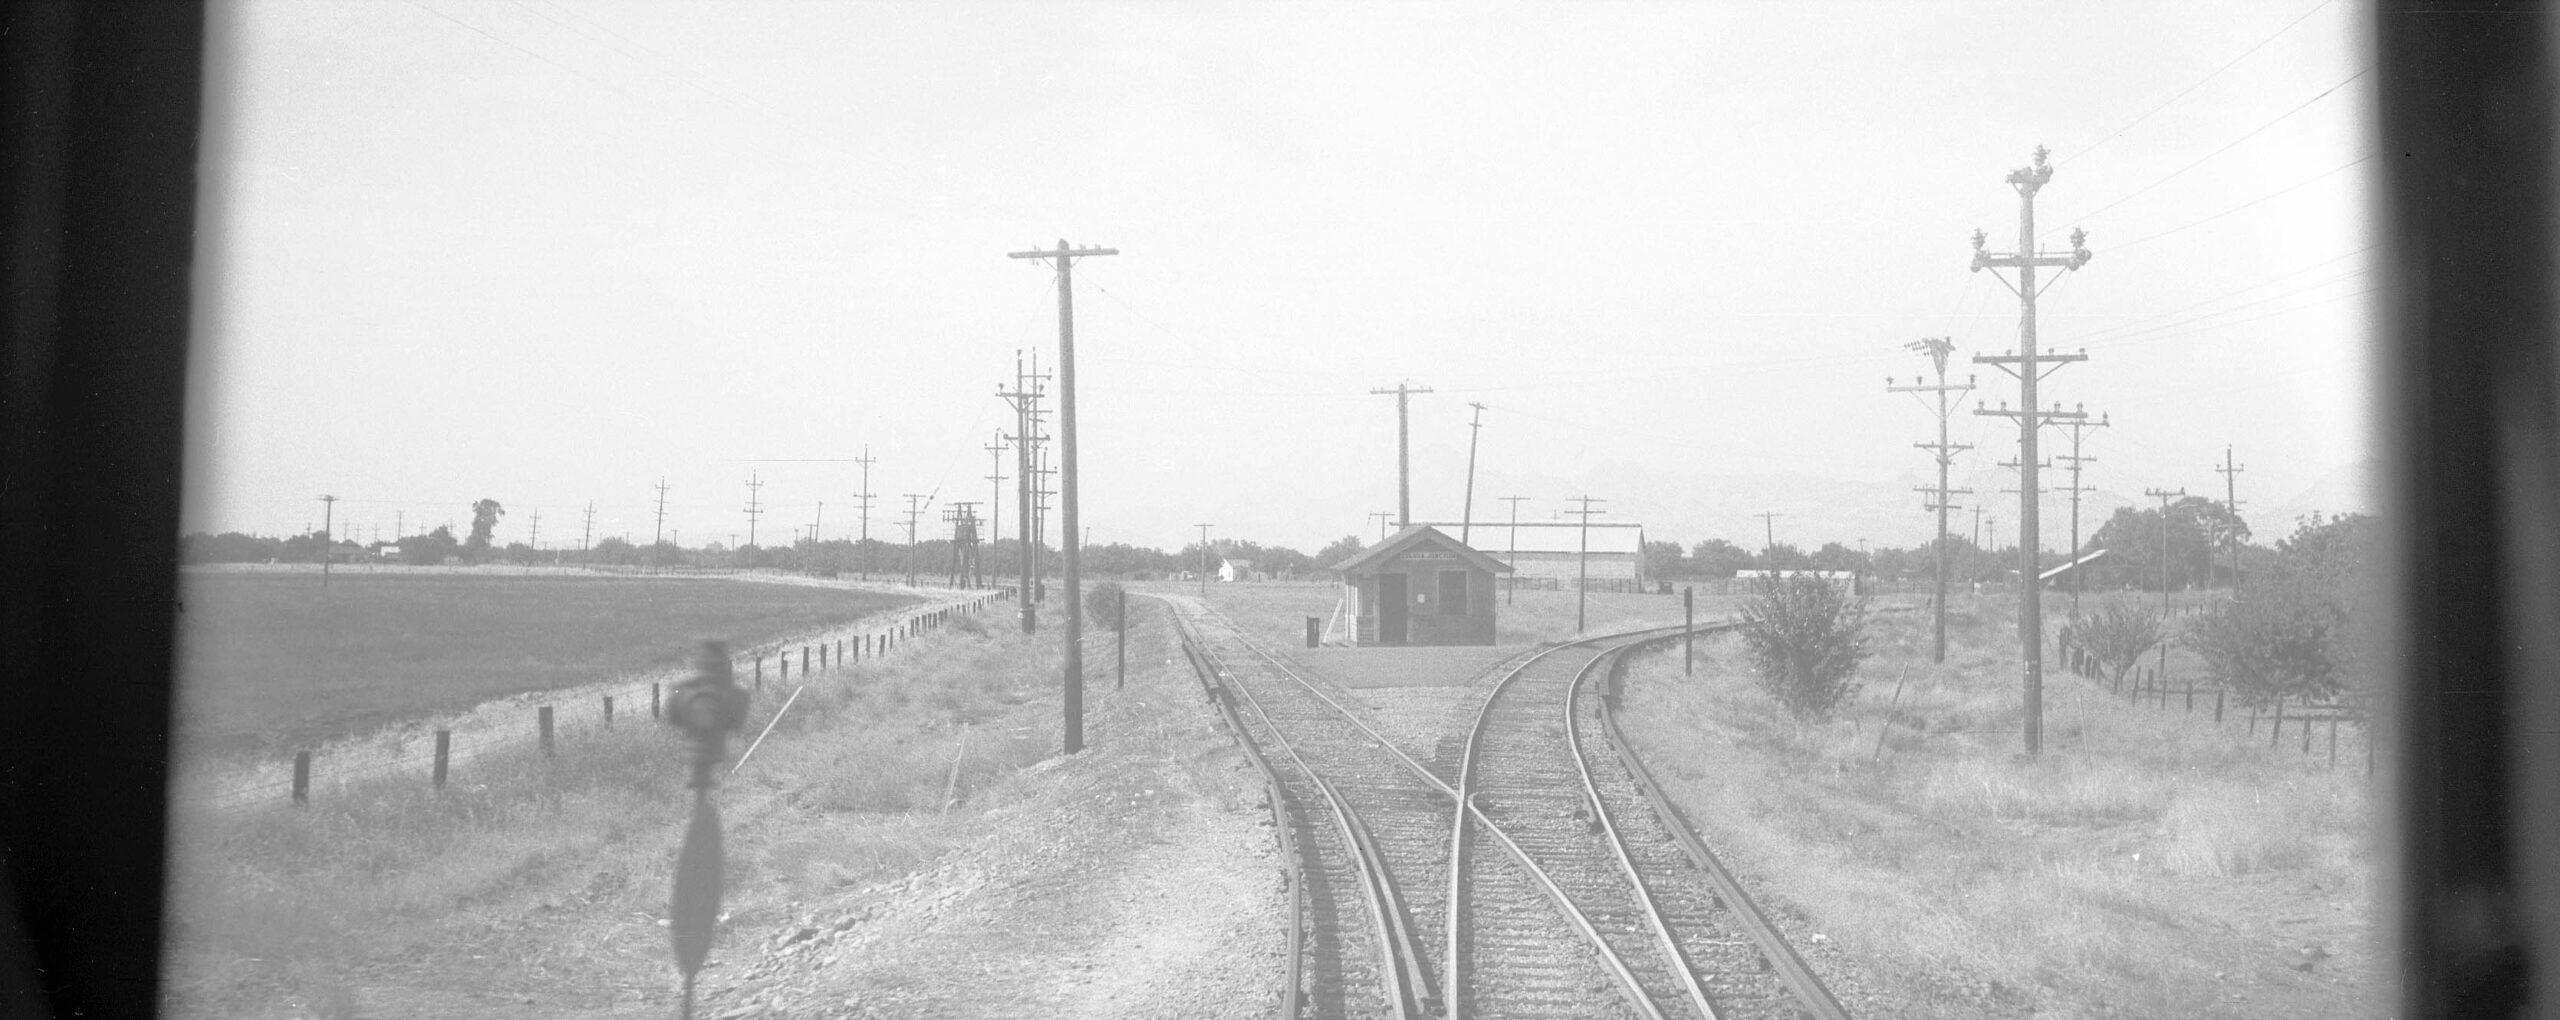
Next to start the journey on an electric passenger train ca. 1940 beginning with this panoramic west view of Colusa Jct. and its shelter taken from our approaching train. The trip will be addressed in the present tense as if the journey is occurring today.
L337-65-Howard T. Wolfe Photo, Courtesy BAERA, Western Railway Museum Archives, 235196sn., (Image 13 of 47)
After passing the small shelter, the southeast view back to it from the open back door of rear SN 225 is made possible from a group that has leased and chartered the car to be added to train 11 on June 2, 1940.
L337-75-Howard T. Wolfe Photo, Courtesy BAERA, Western Railway Museum Archives, 238463sn, (Image 14 of 47)
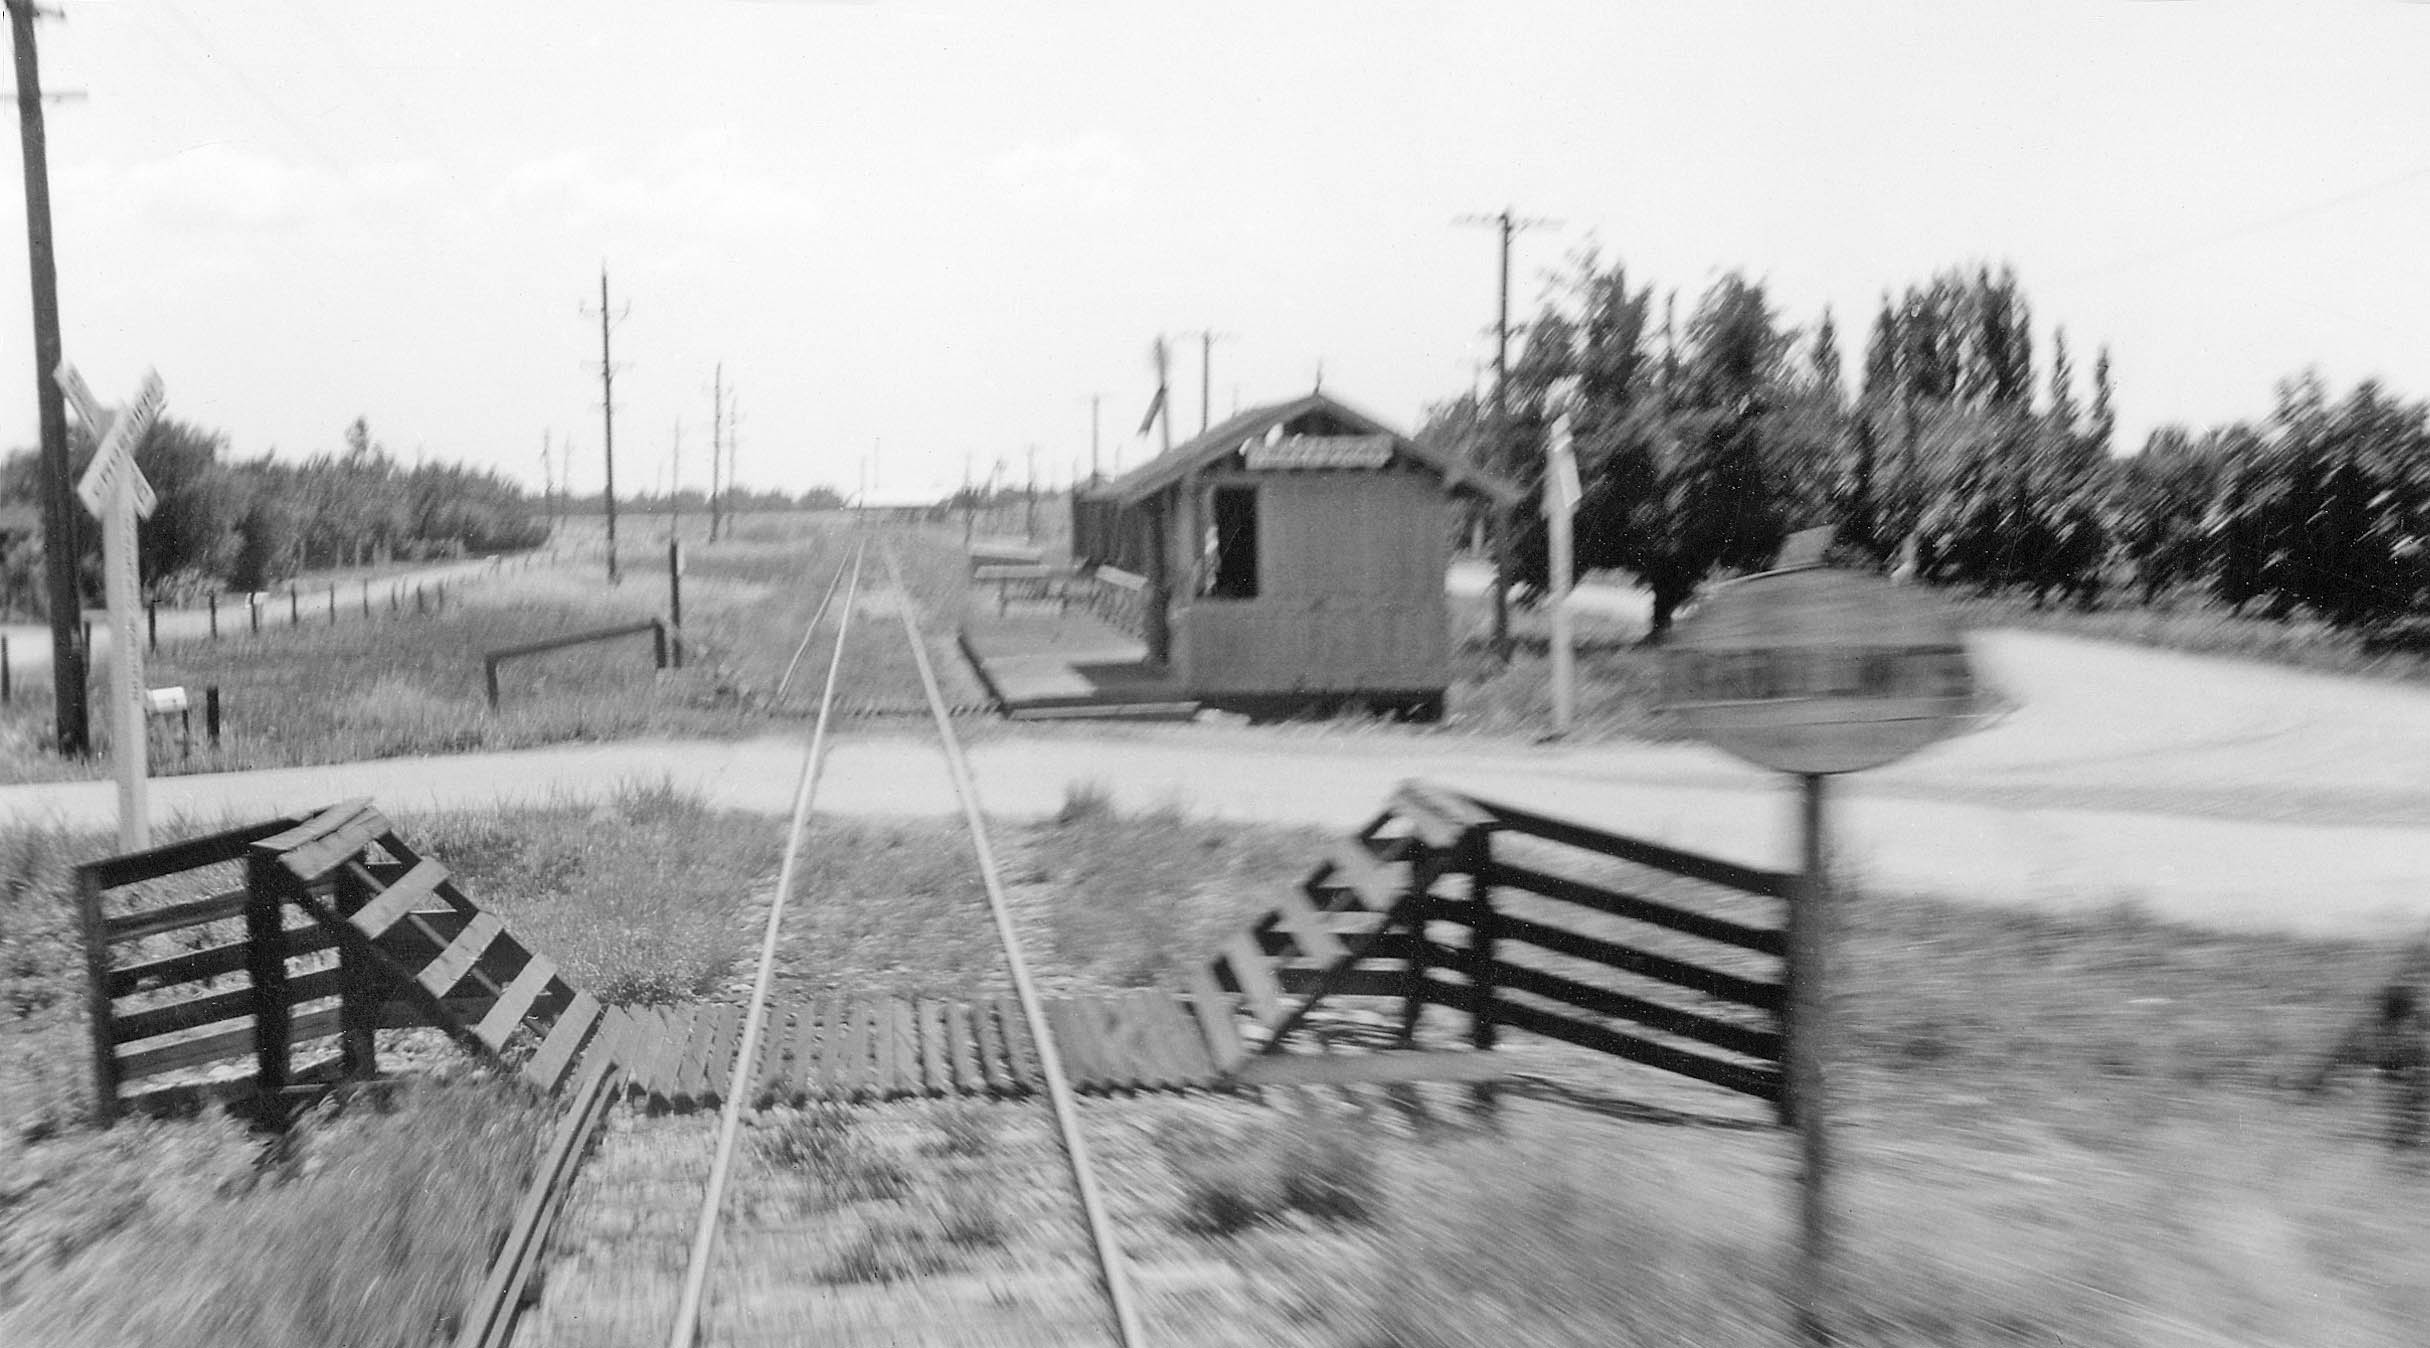
It was Ted Wurm’s turn from the rear of SN 225 on June 2, 1940, and although the station shelter name is unreadable, the poles, the curve in the distance, and the parallel streets along the right-of-way marks this as Tierra Buena.
L337-77-Ted Wurm Photo, Courtesy BAERA, Western Railway Museum, 223052sn, (Image 15 of 47)
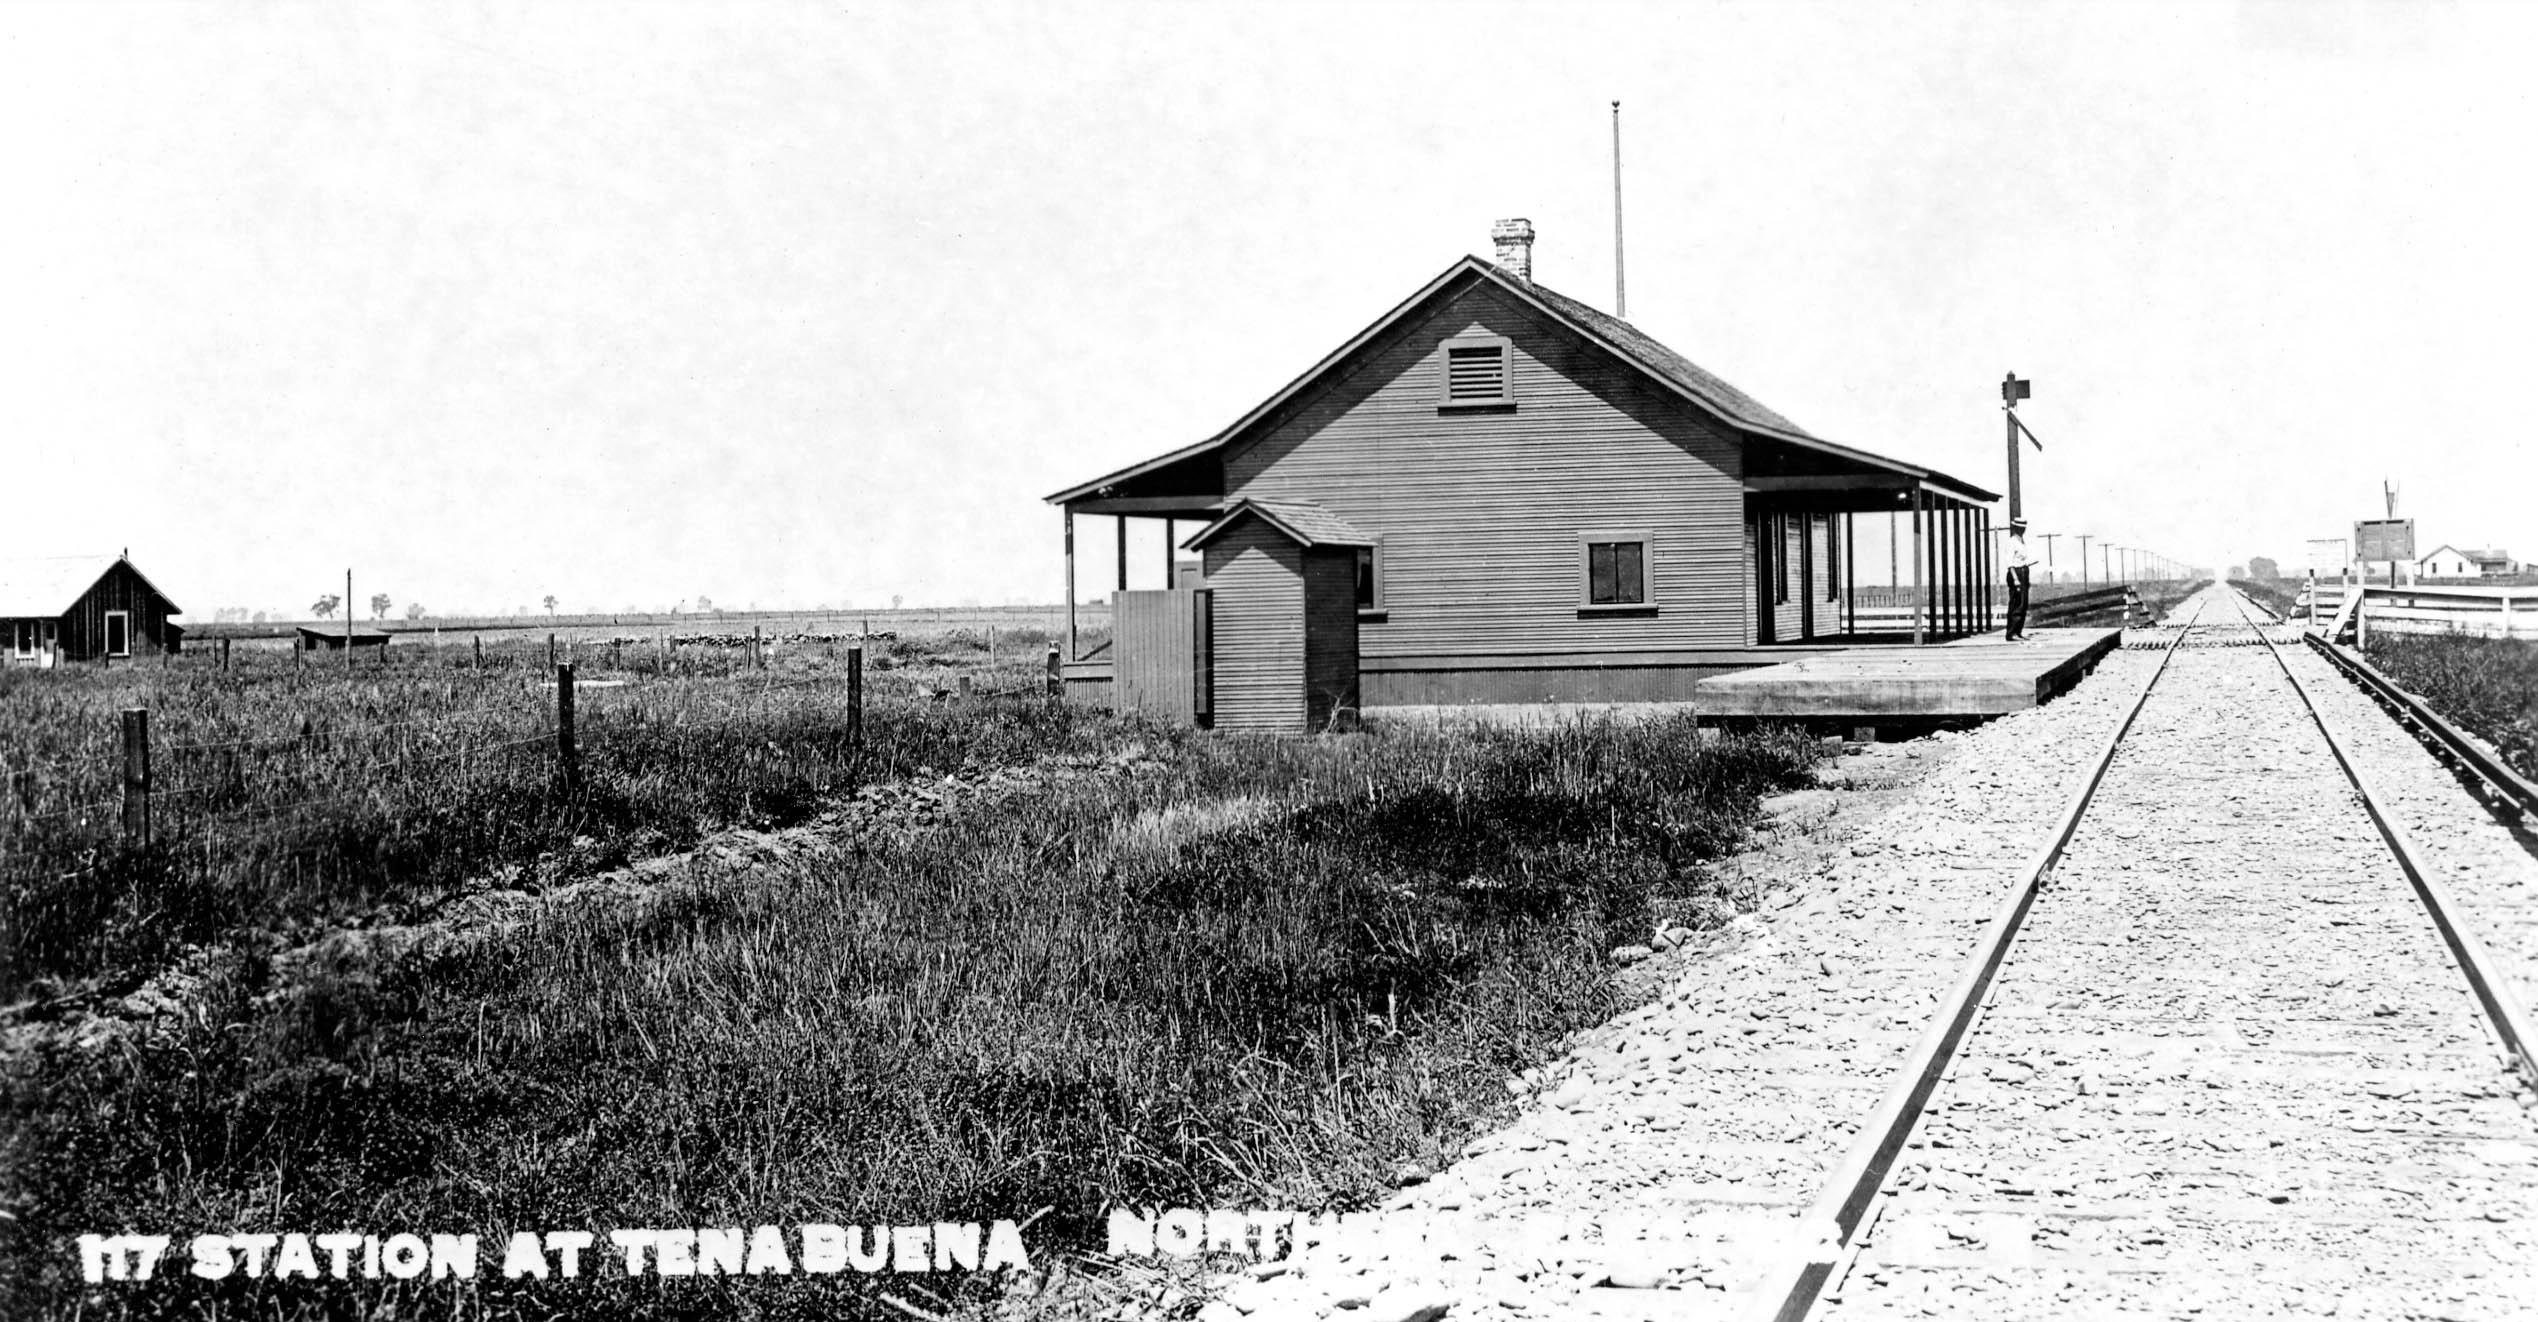
Tierra Buena once had a large station depot as seen in this north view taken by the NE some thirty years earlier. At that point of time there is no spur, and the electric lines typical of this part of Sutter County have not been erected.
L337-80-Northern Electric Photo, Robert L. Stein, Courtesy BAERA, Western Railway Museum Archives, 64646sn, (Image 16 of 47)
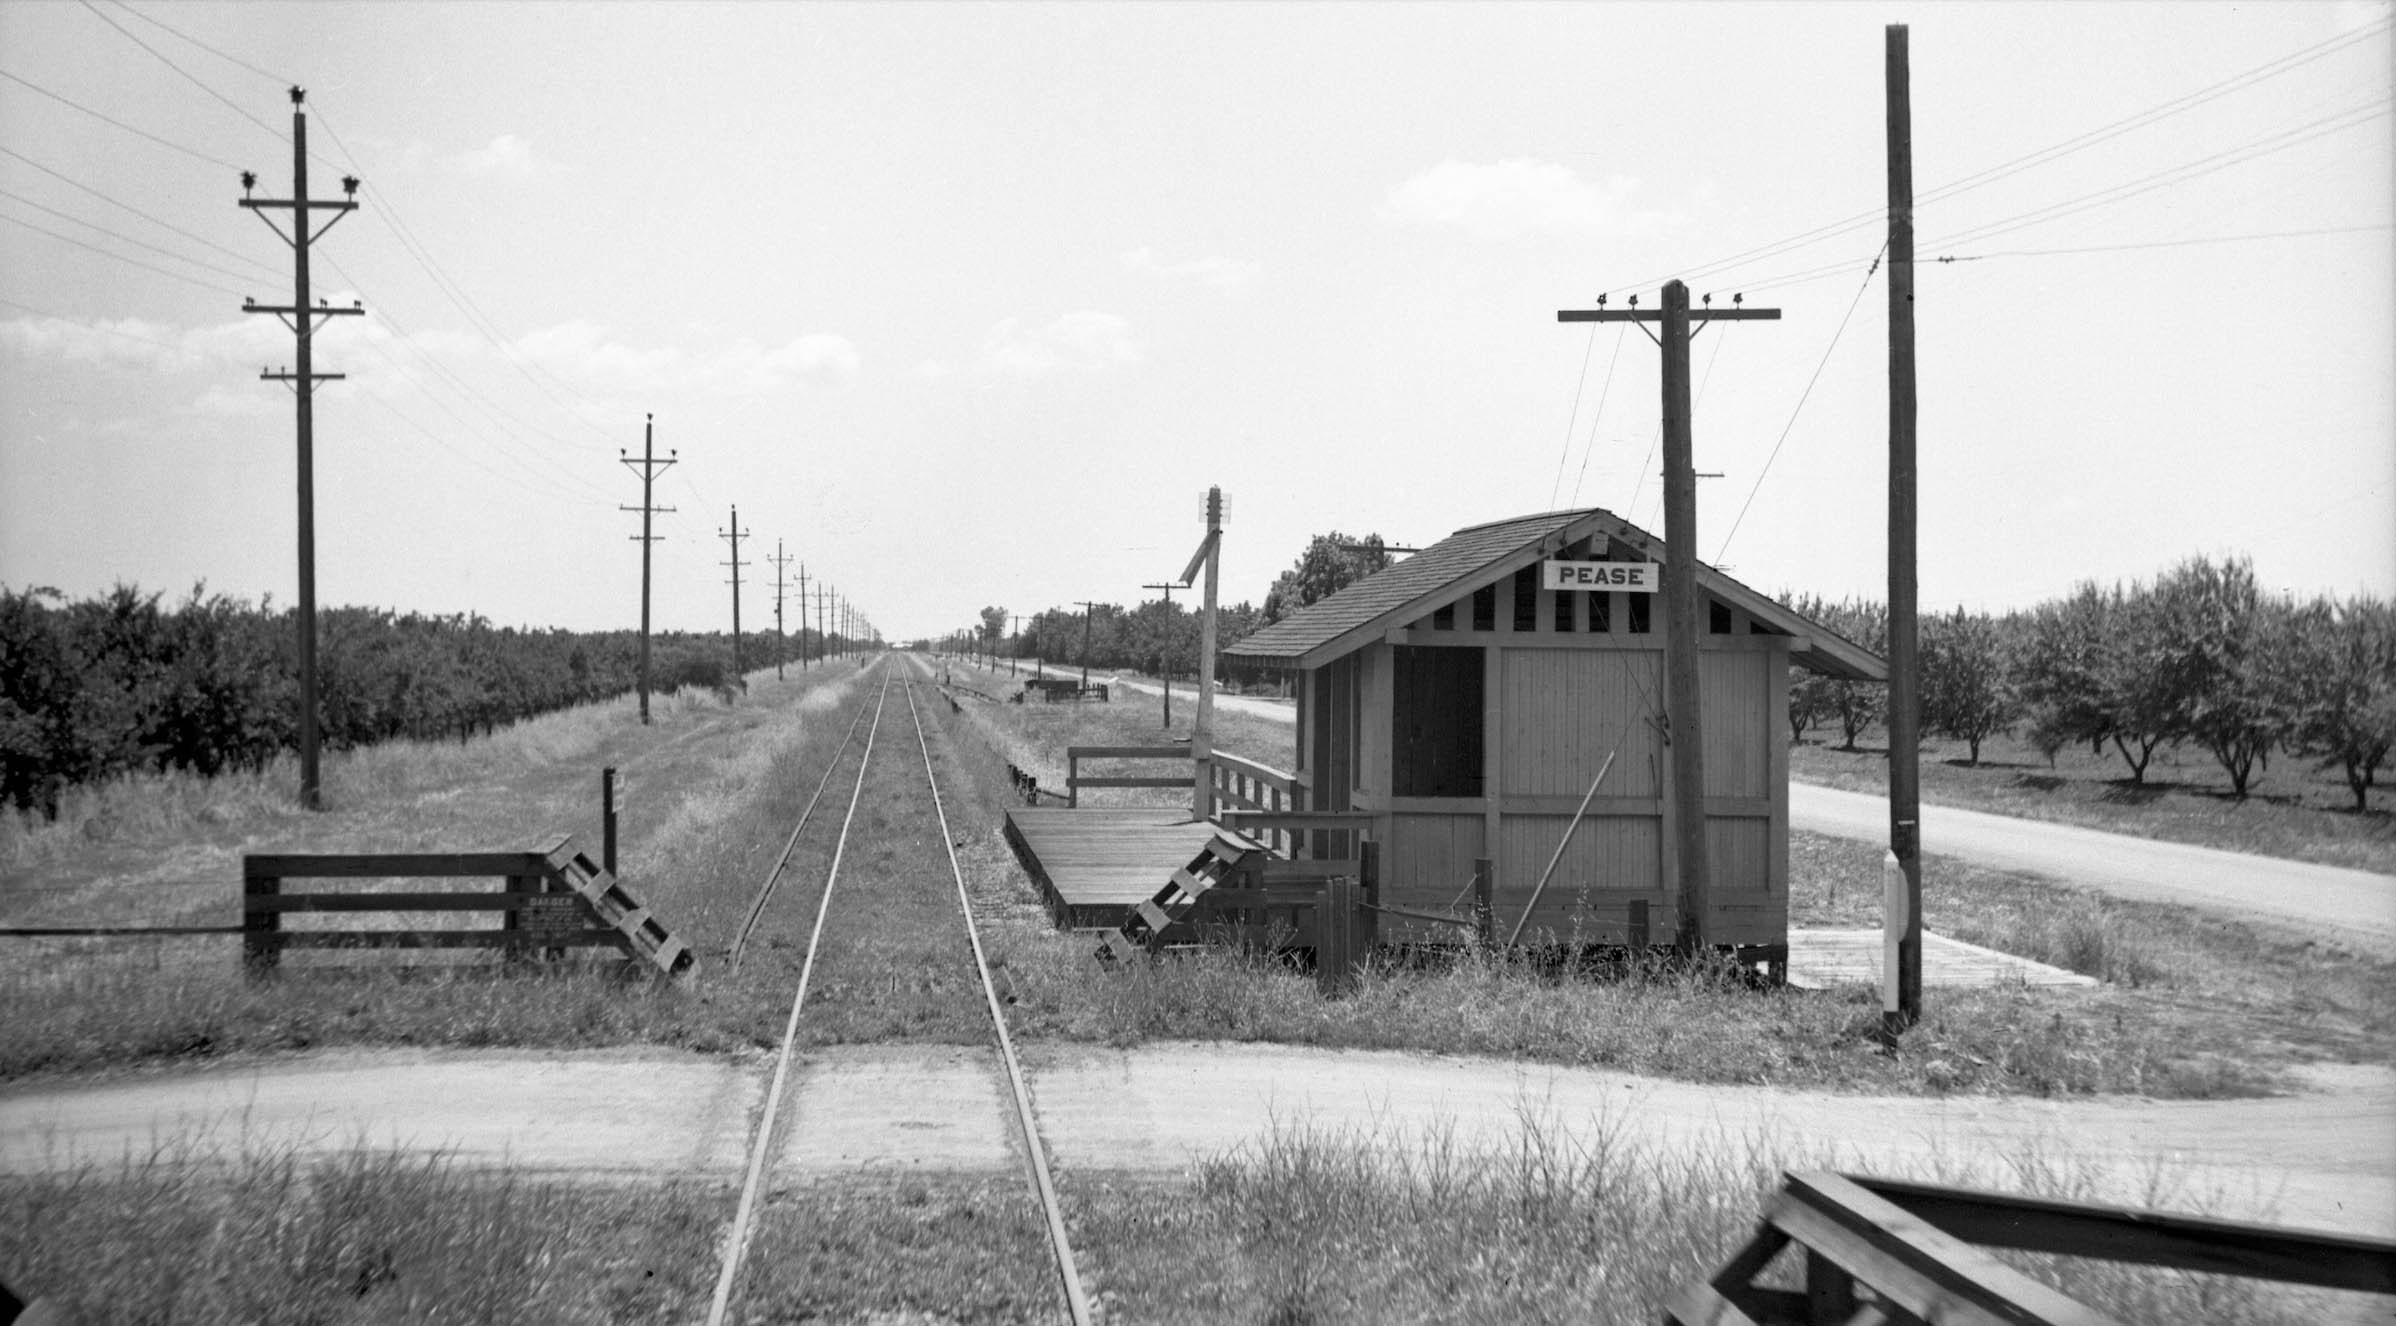
Our train does not stop at Pease, but a south view from the rear of SN 225 on June 2, 1940 shows starting left to right, the distinctive electric transmission poles used in much of Sutter County, the third rail along the east side of the rails, the spur in the distance said to have a capacity of ten freight cars, the wooden shelter typical for this section of SN track, the telephone poles to the west of the tracks, and Tierra Buena Rd. Note the small fence by the spur. The only element that cannot be verified is the siding with a capacity of 24 freight cars noted in the 1939 timetable.
L337-85-Howard T. Wolfe Photo, Courtesy BAERA, Western Railway Museum Archives, 238461sn, (Image 17 of 47)
Staying at Pease for another moment, Jeff Asay pointed out the passenger-activated semaphore arms at each shelter by a manual lever attached to a rod to let the motorman know he should stop and pick up the patron. RJ Dial added the gear-locking mechanism is in the box connected to the rod that went up to the fulcrum eye end on the back of the flag. Lifting up on the handle pulled the rod which raised the flag face. There was a catch pawl in the box that kept the handle up until the conductor released it. The example from Pease is shown in the center, the one from the next stop, Nuestro, on the right. The red arrow shows the connecting rod. Also visible is the writing on the box instructing the passengers how to signal an oncoming train, green arrow.
L337-87-Howard T. Wolfe Photo, Courtesy BAERA, Western Railway Museum Archives, 238461sn, l, 238461sn, c, 238462sn, (Image 18 of 47)
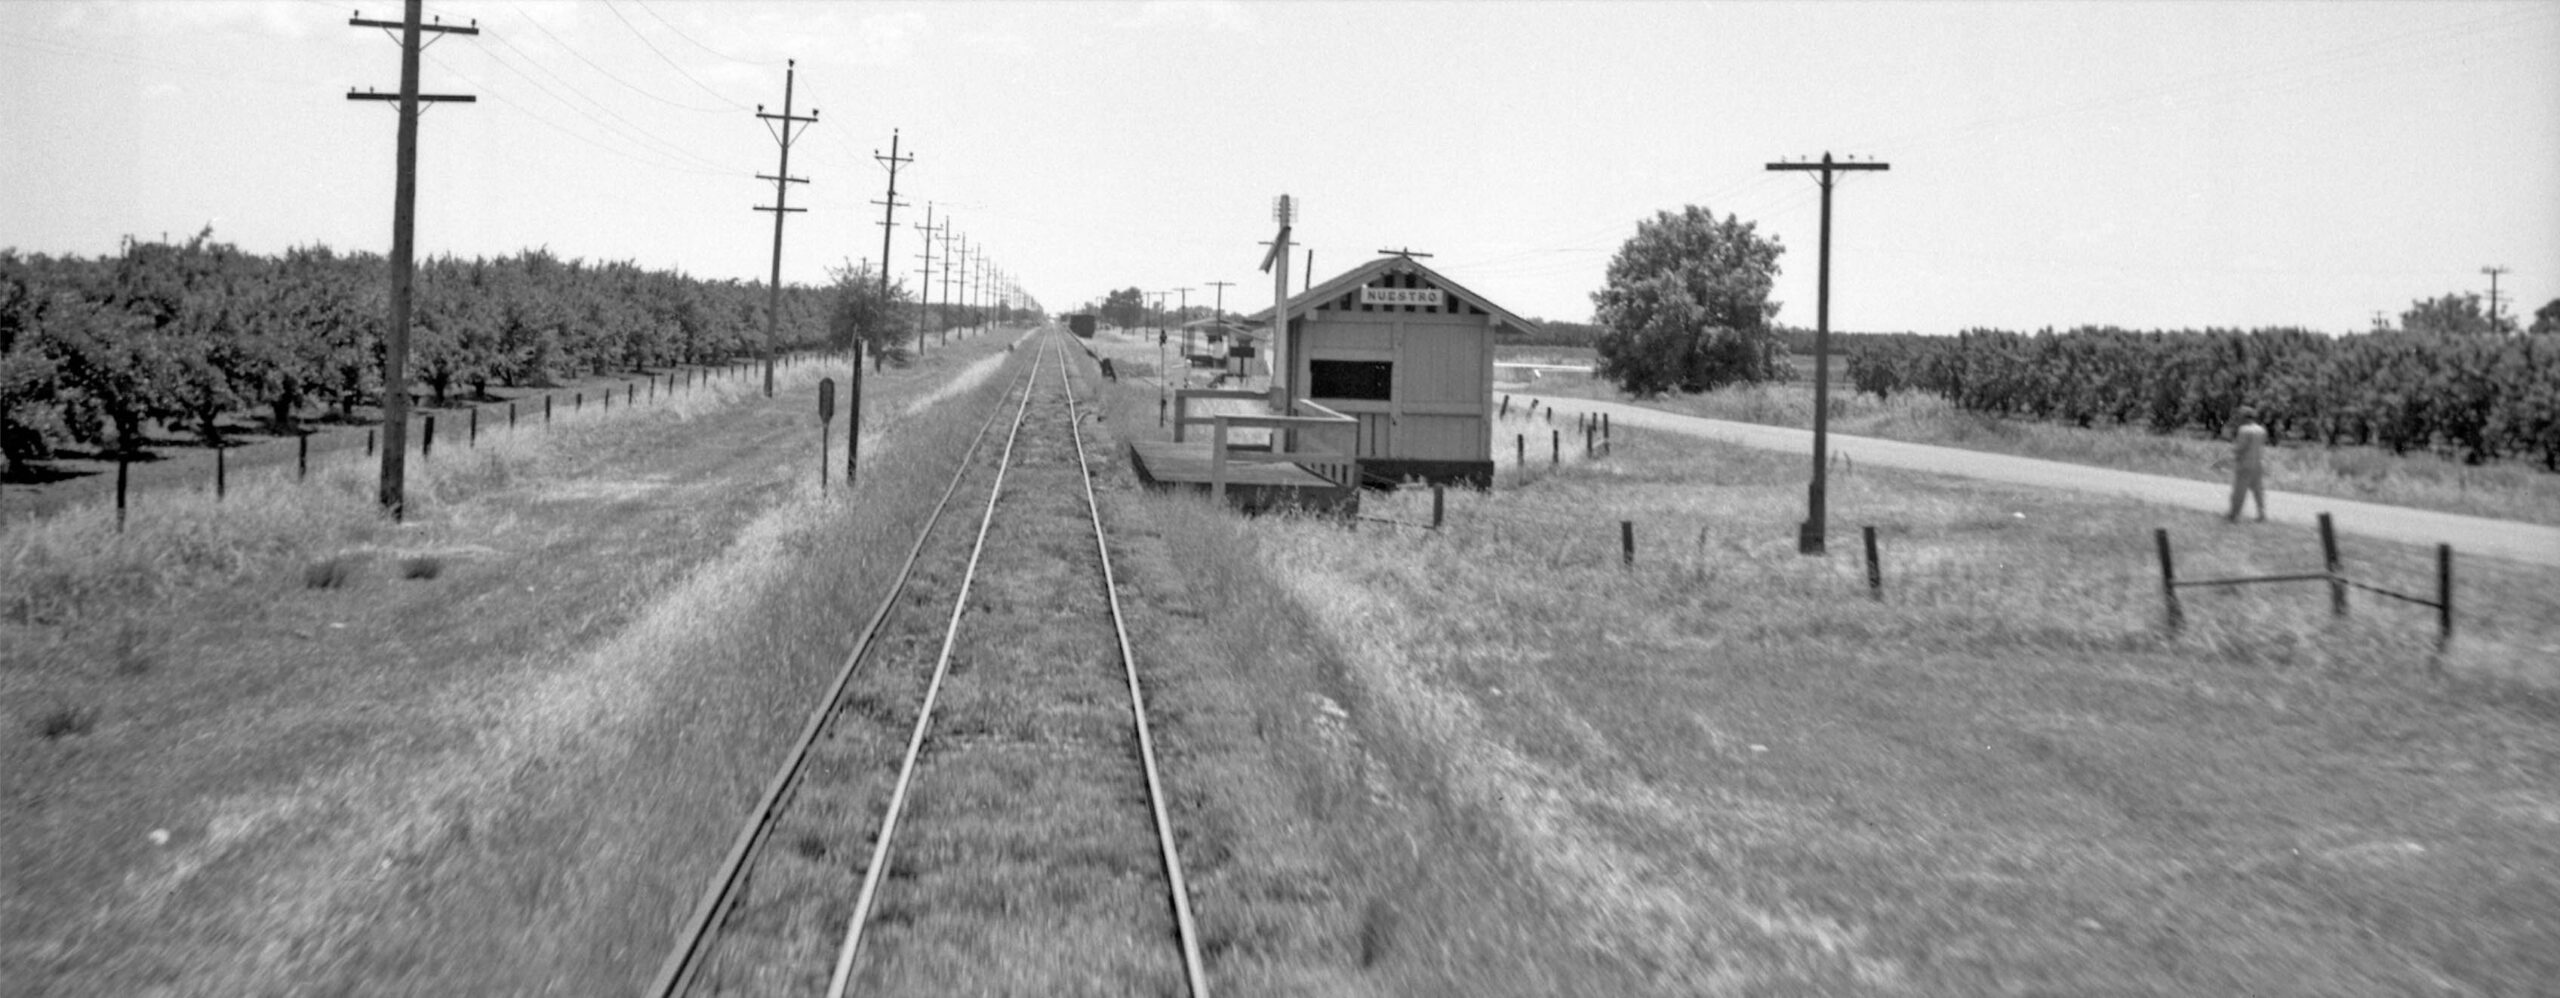
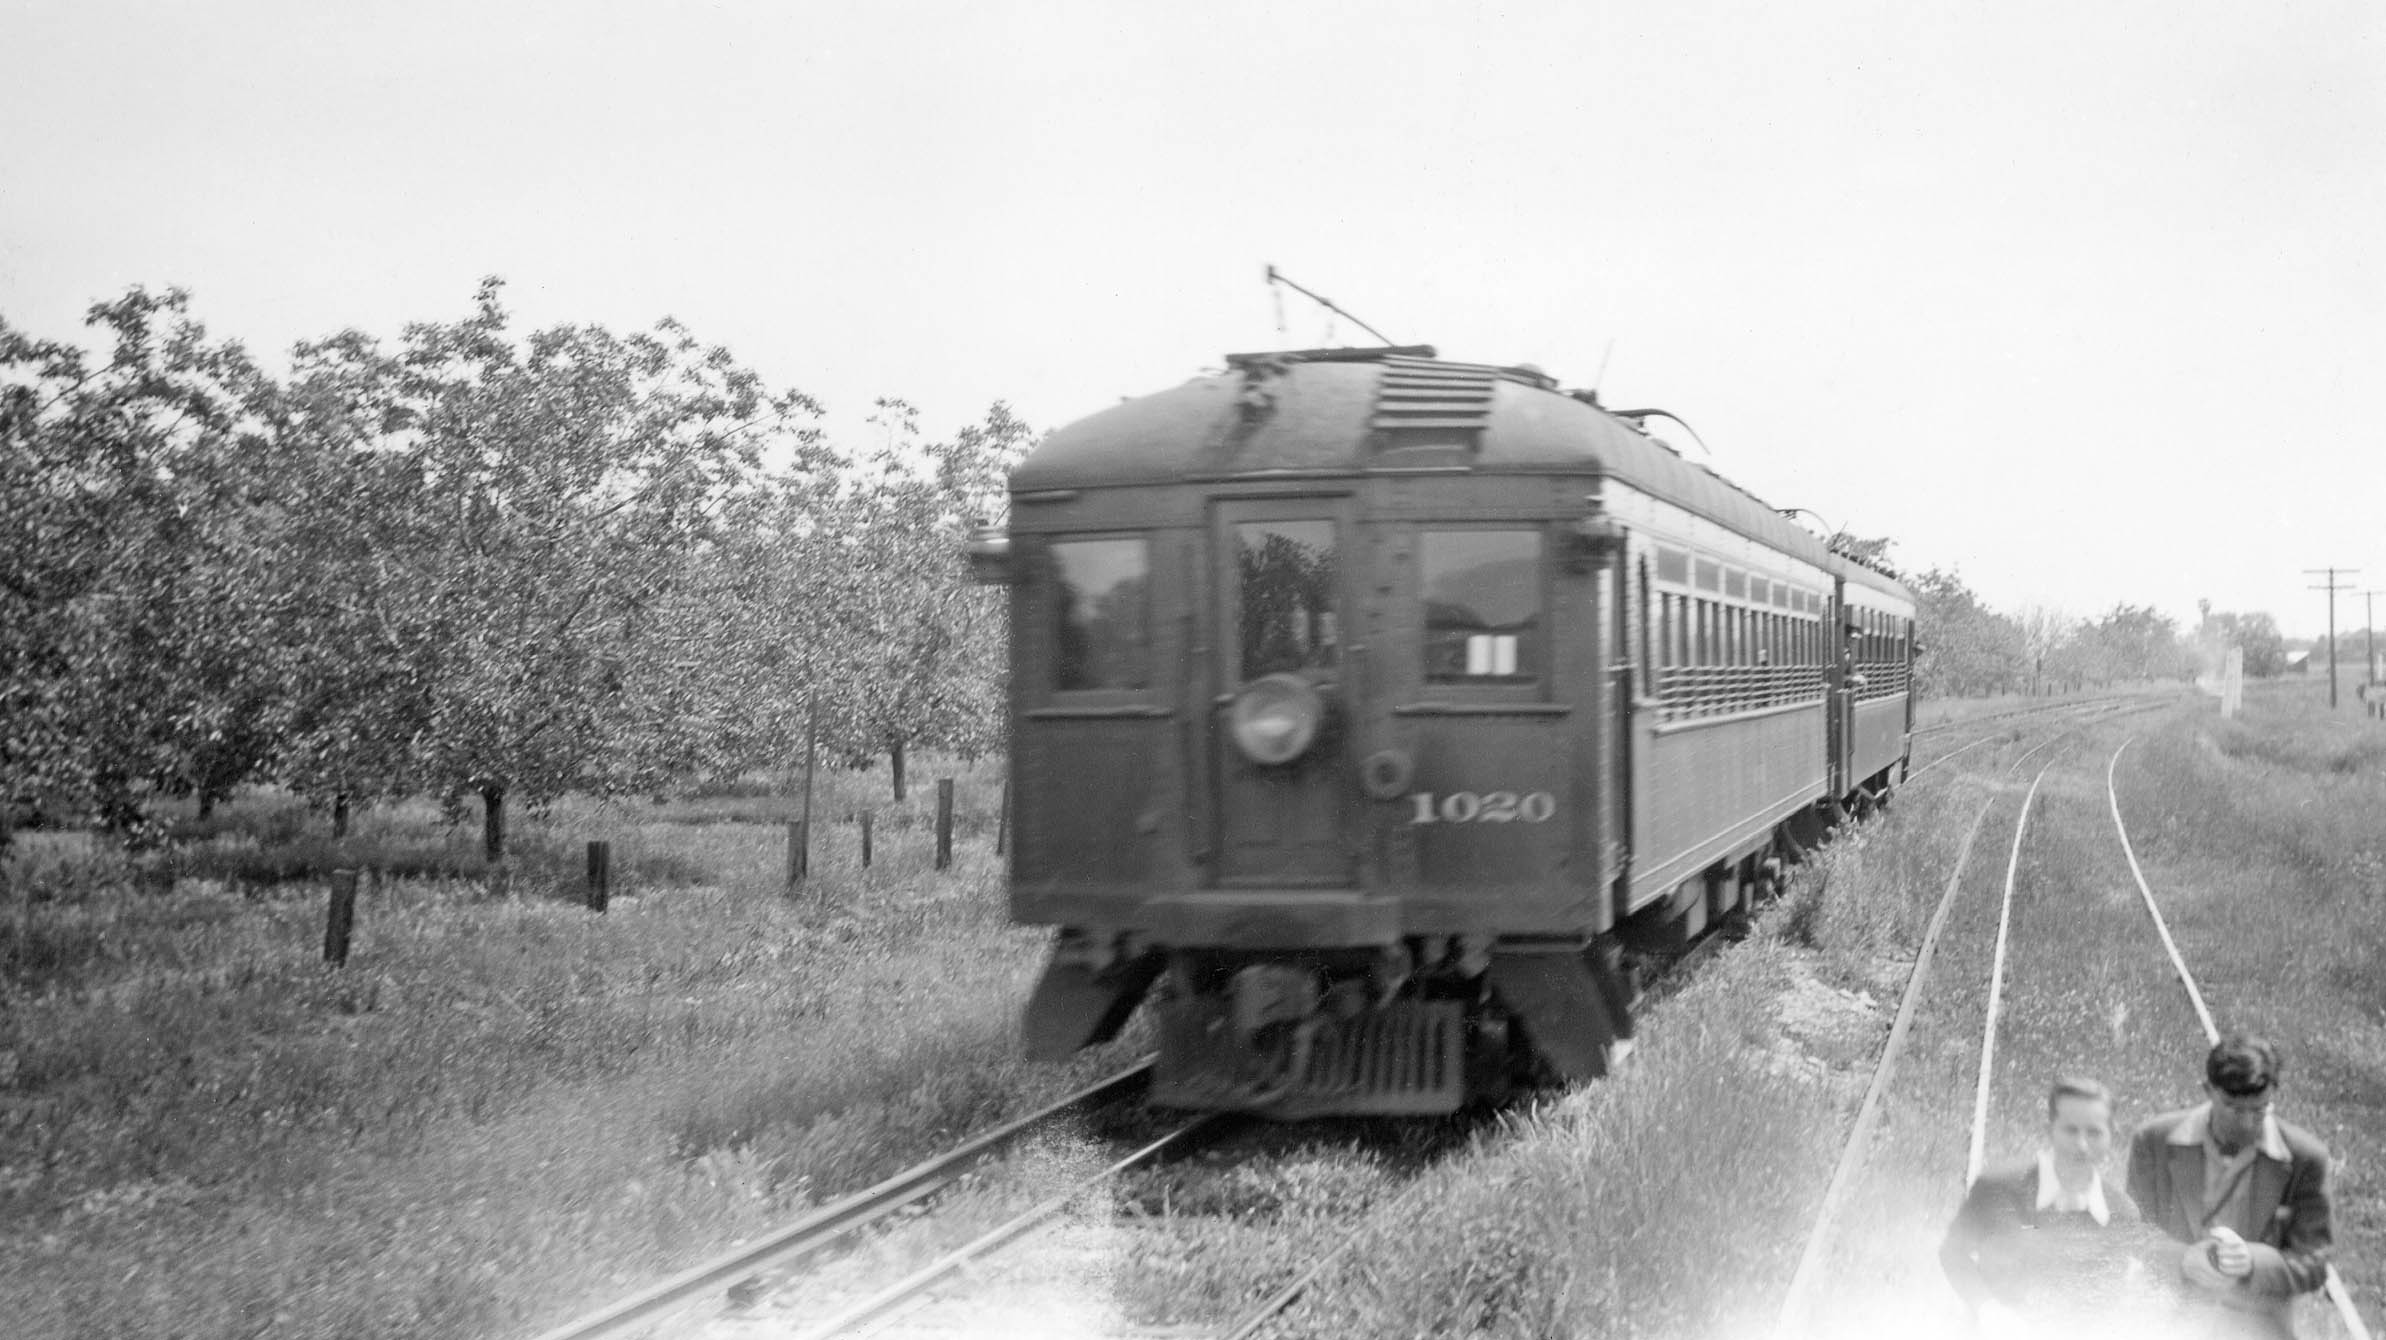
A north view is taken by Ted Wurm from the side of SN 225 just as our train is about to pass the next stop, Nuestro.
L337-90-Ted Wurm Photo, Courtesy BAERA, Western Railway Museum Archives, 223050sn, (Image 19 of 47)
Thanks to Howard Wolfe staying near the open rear door of SN 225, our south view of the Nuestro station looks very similar to the one at Pease, except that there appears to be a smaller structure just to the south of the shelter. As noted in the 1939 timetable, the forty-one car siding can be appreciated by the distance of the boxcars seen in the background. After Nuestro, the train crosses a grade crossing and then Live Oak Canal as the parallel road swings to the east of the tracks and is now named Larkin Rd.
L337-95-Howard T. Wolfe Photo, Courtesy BAERA, Western Railway Museum Archives, 238462sn, (Image 20 of 47)
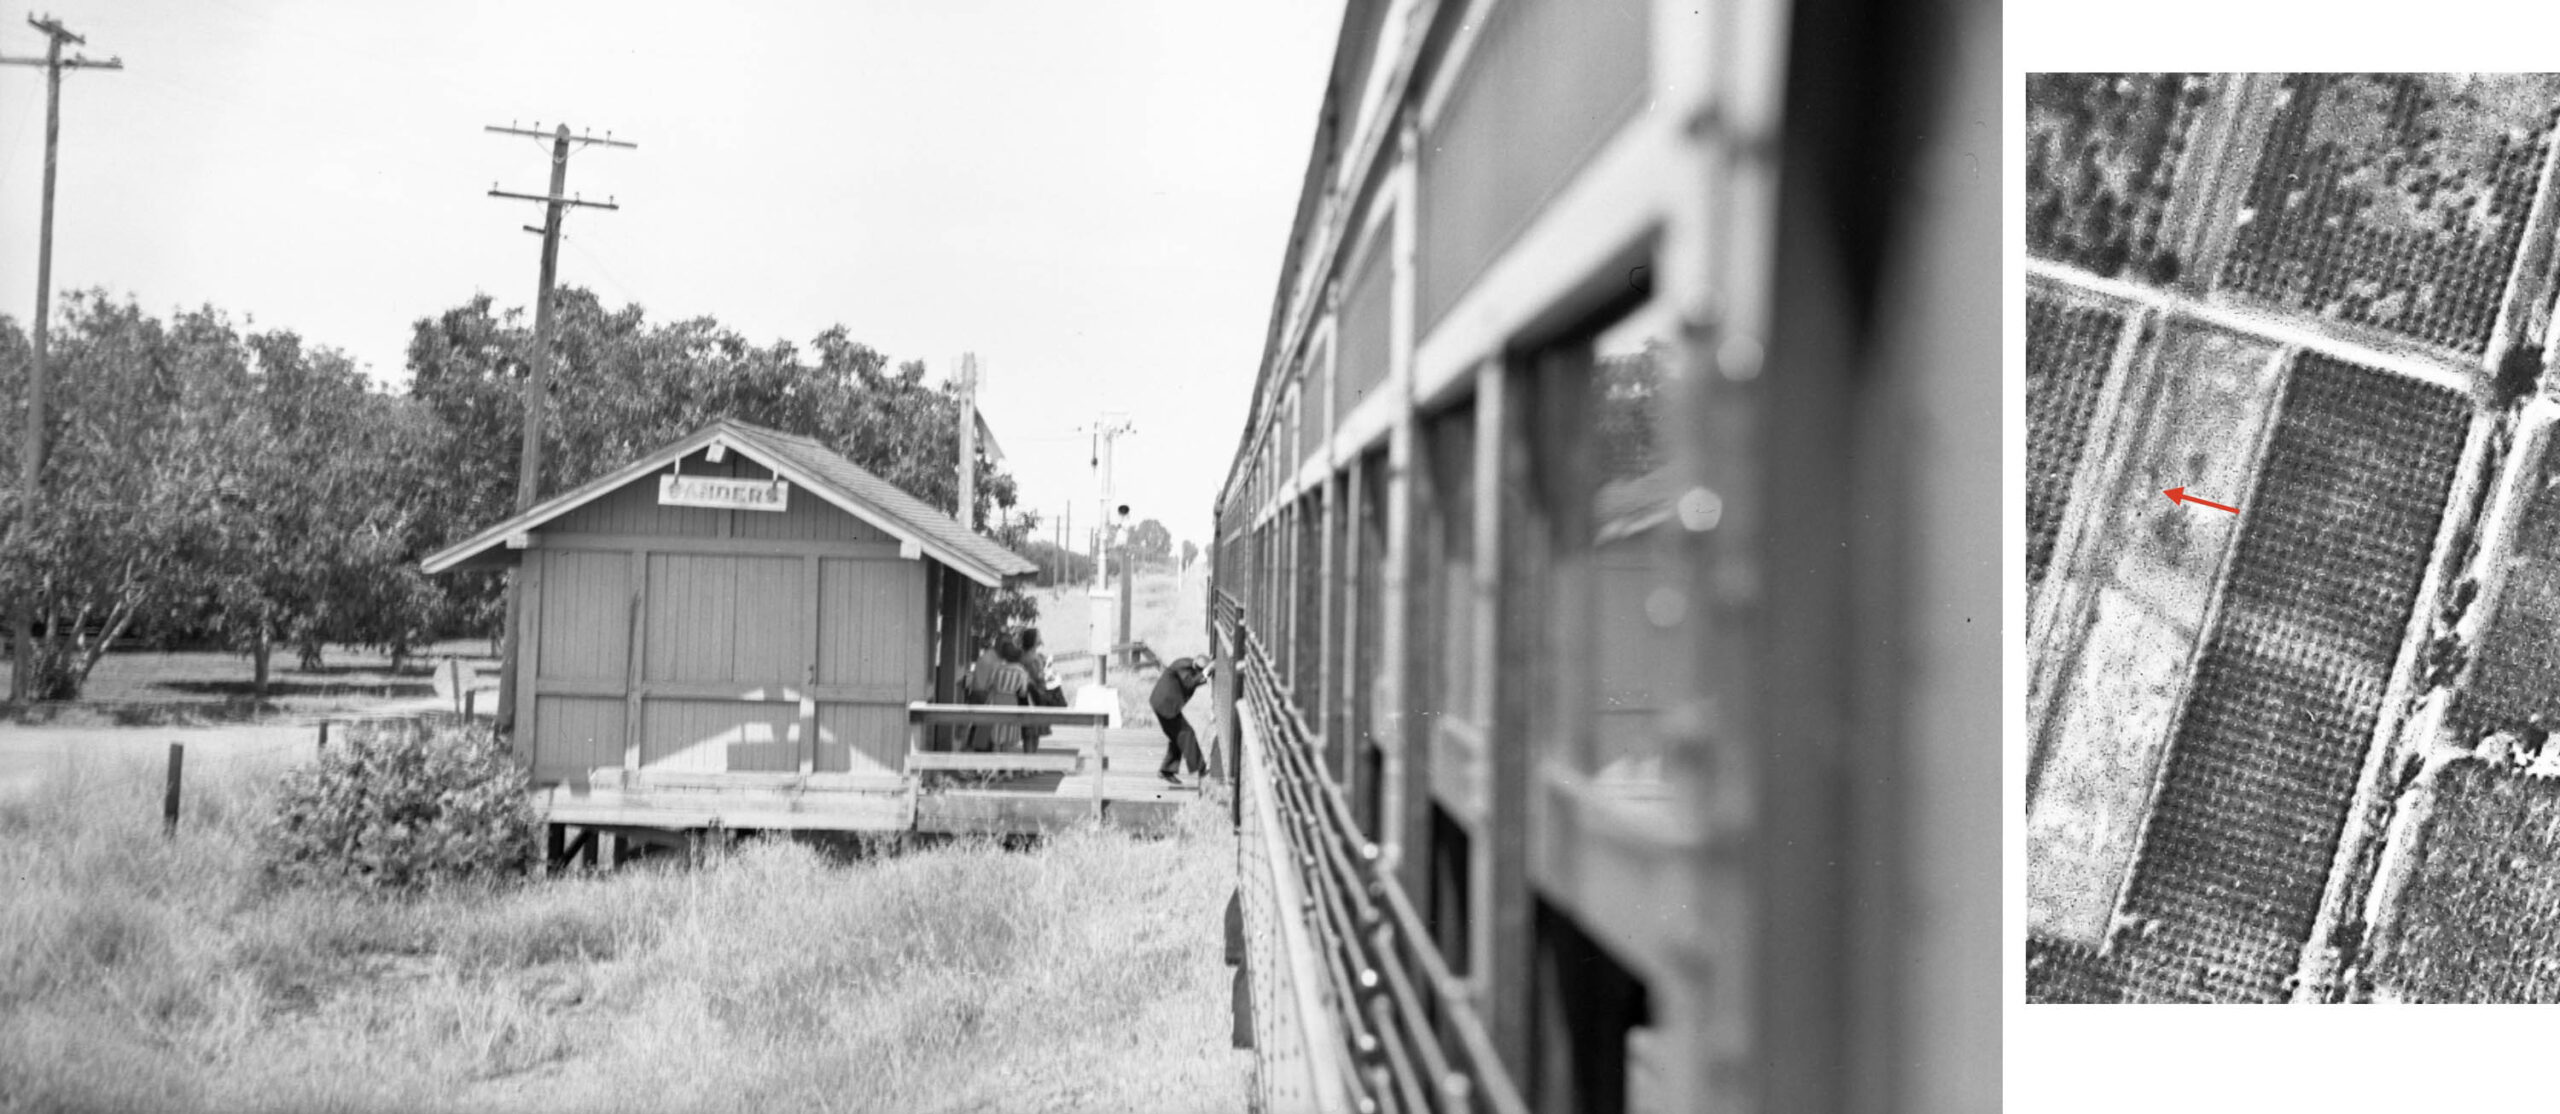
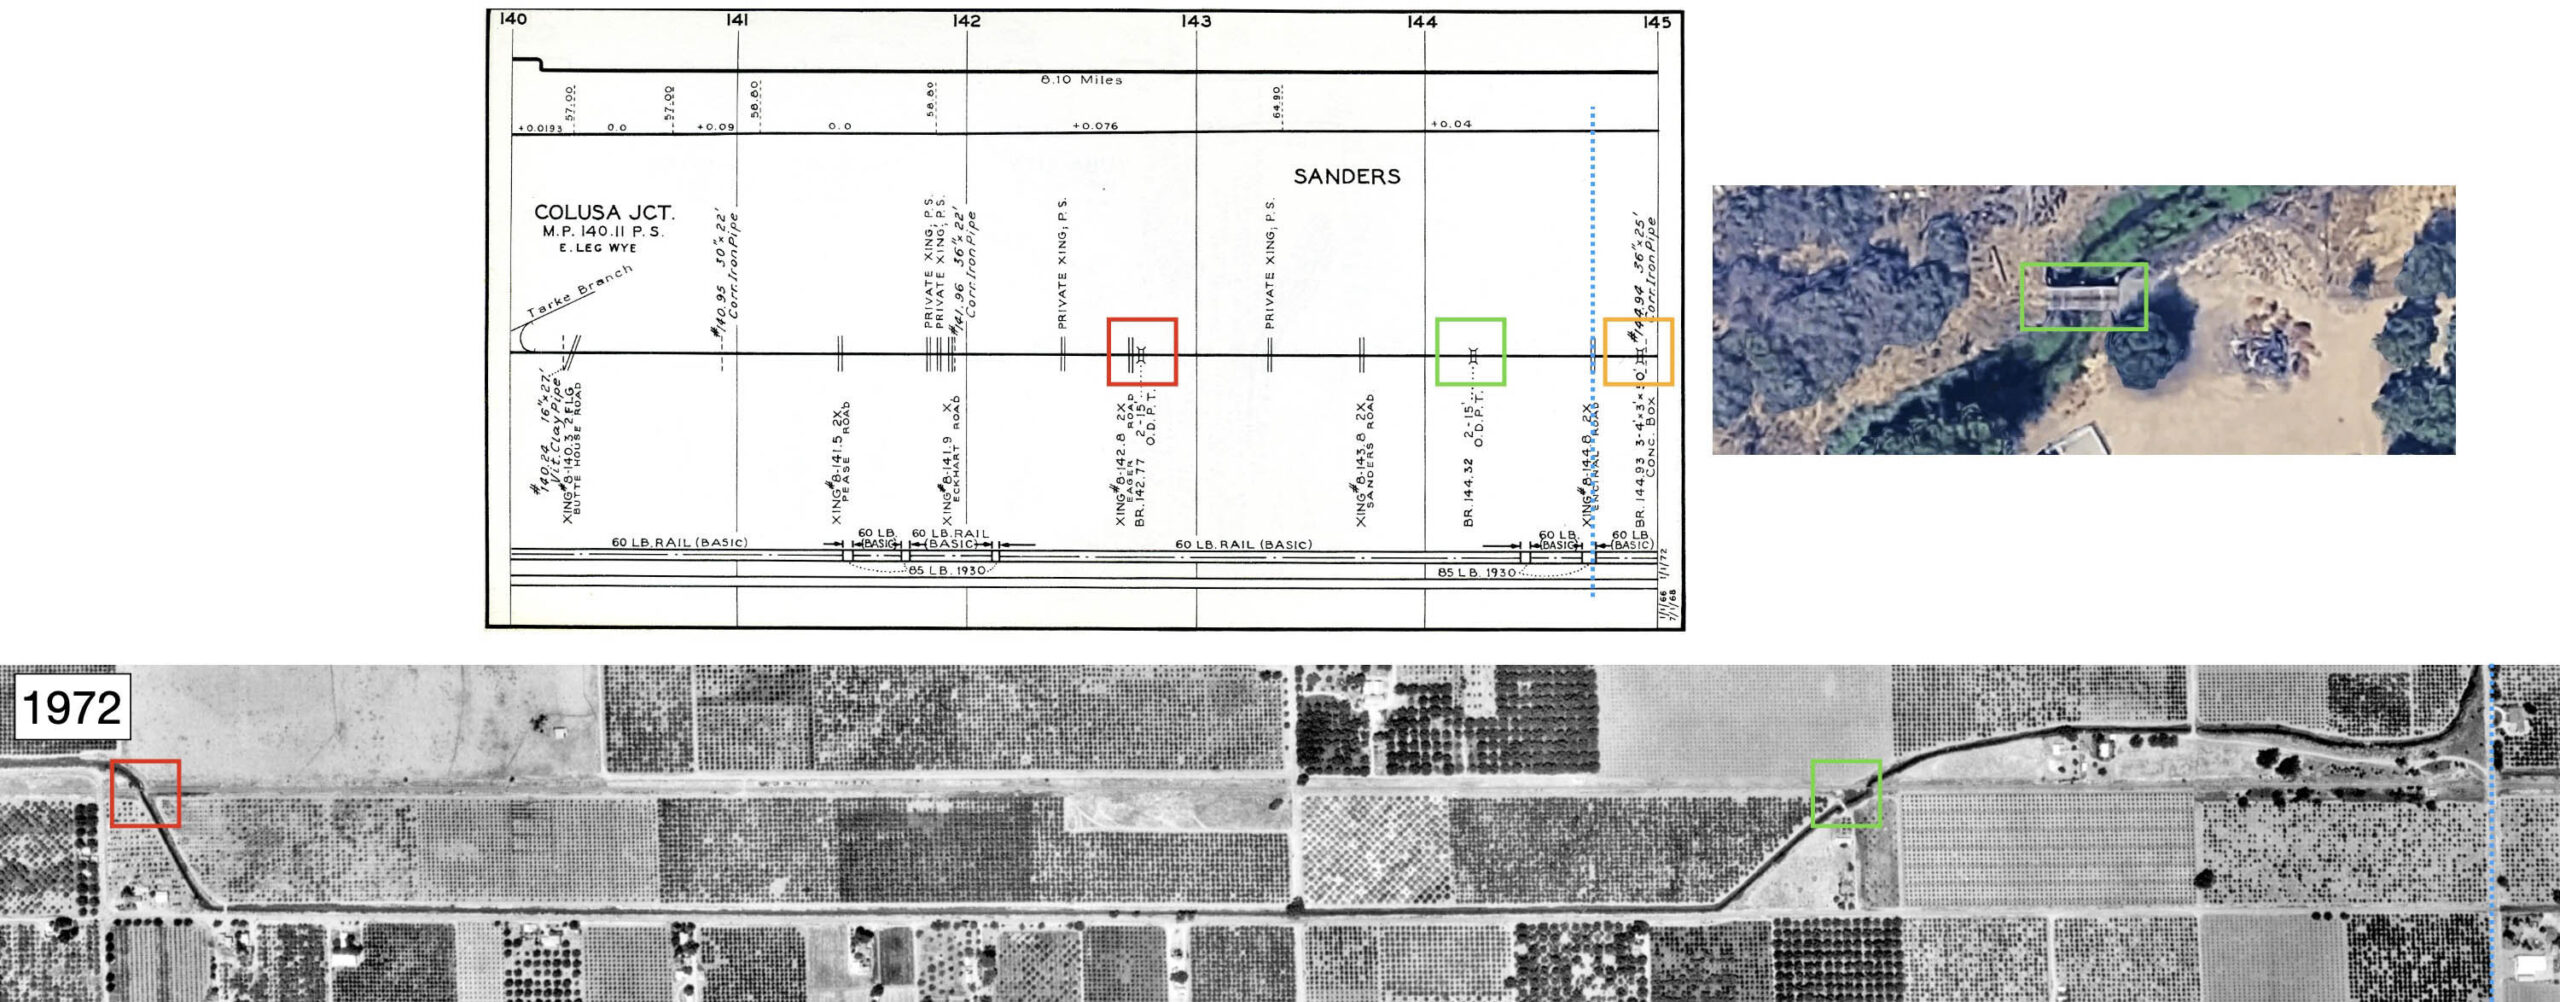
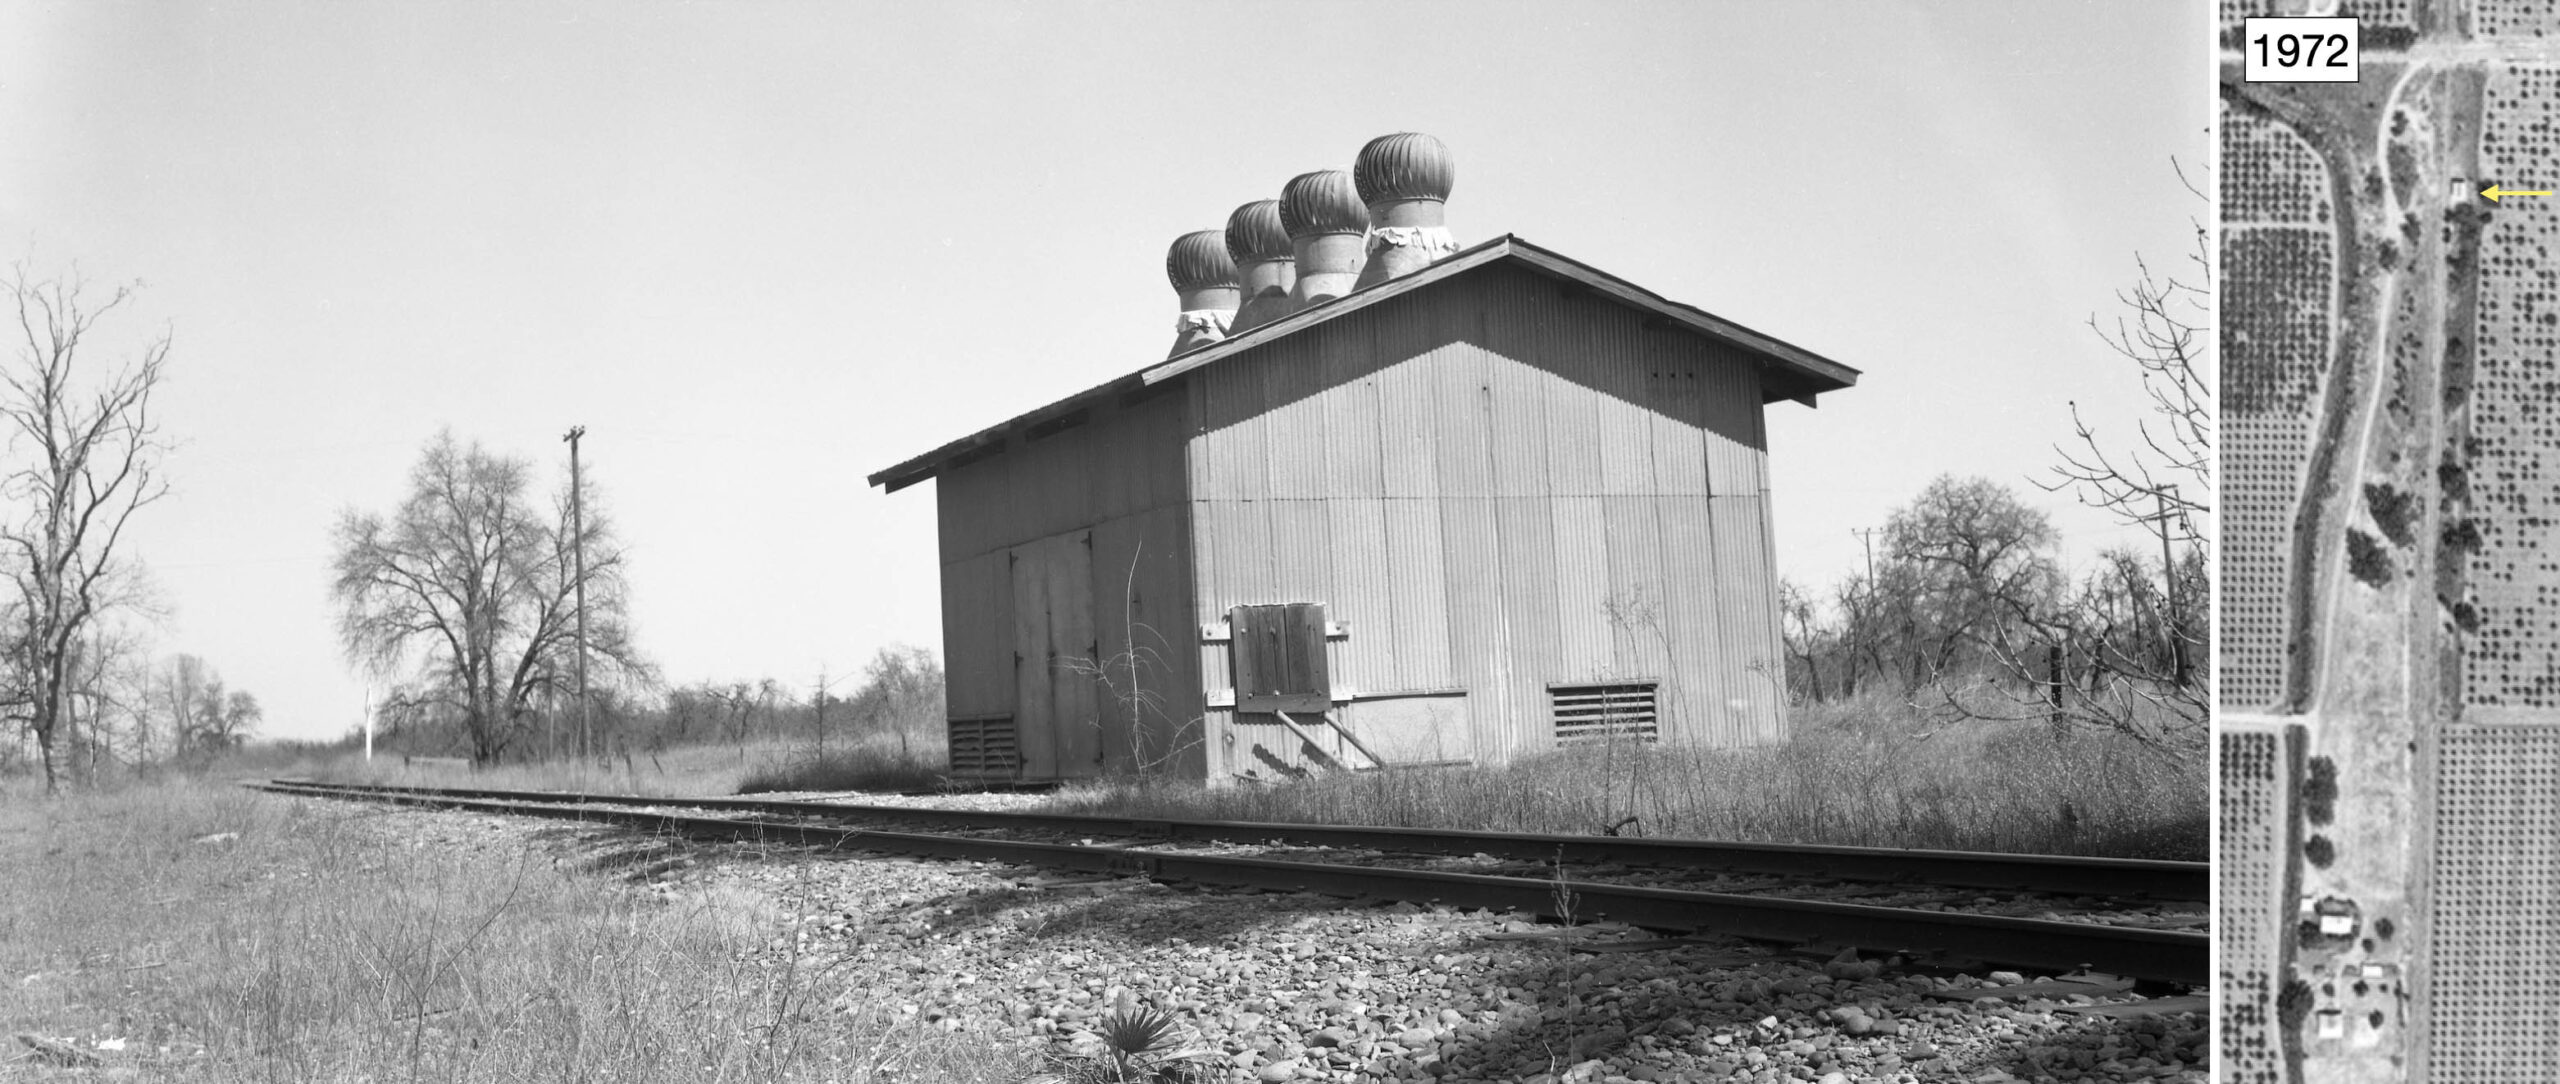
The next stop, Sanders, is seen in this north view that Howard Wolfe captured closer to the Oct. 1940. Unfortunately, this solitary image of Sanders does not allow appreciation of the seven-car freight spur. The insert to the right is the southern-most fragment from a 1941 aerial, noting the business end of the spur-siding area was to the east, the arrow possibly marking a second track. Aerials from 1964 and 1972 showed the space was still clear, but were no more revealing for detail. There is no parallel road on the west side, and a small fence restricts access to the path along the adjacent orchard.
L337-100-Howard T. Wolfe Photo, Courtesy BAERA, Western Railway Museum Archives, 232735sn, l, c-7490_451, Courtesy of UC Santa Barbara Library Geospatial Collection, r, (Image 21 of 47)
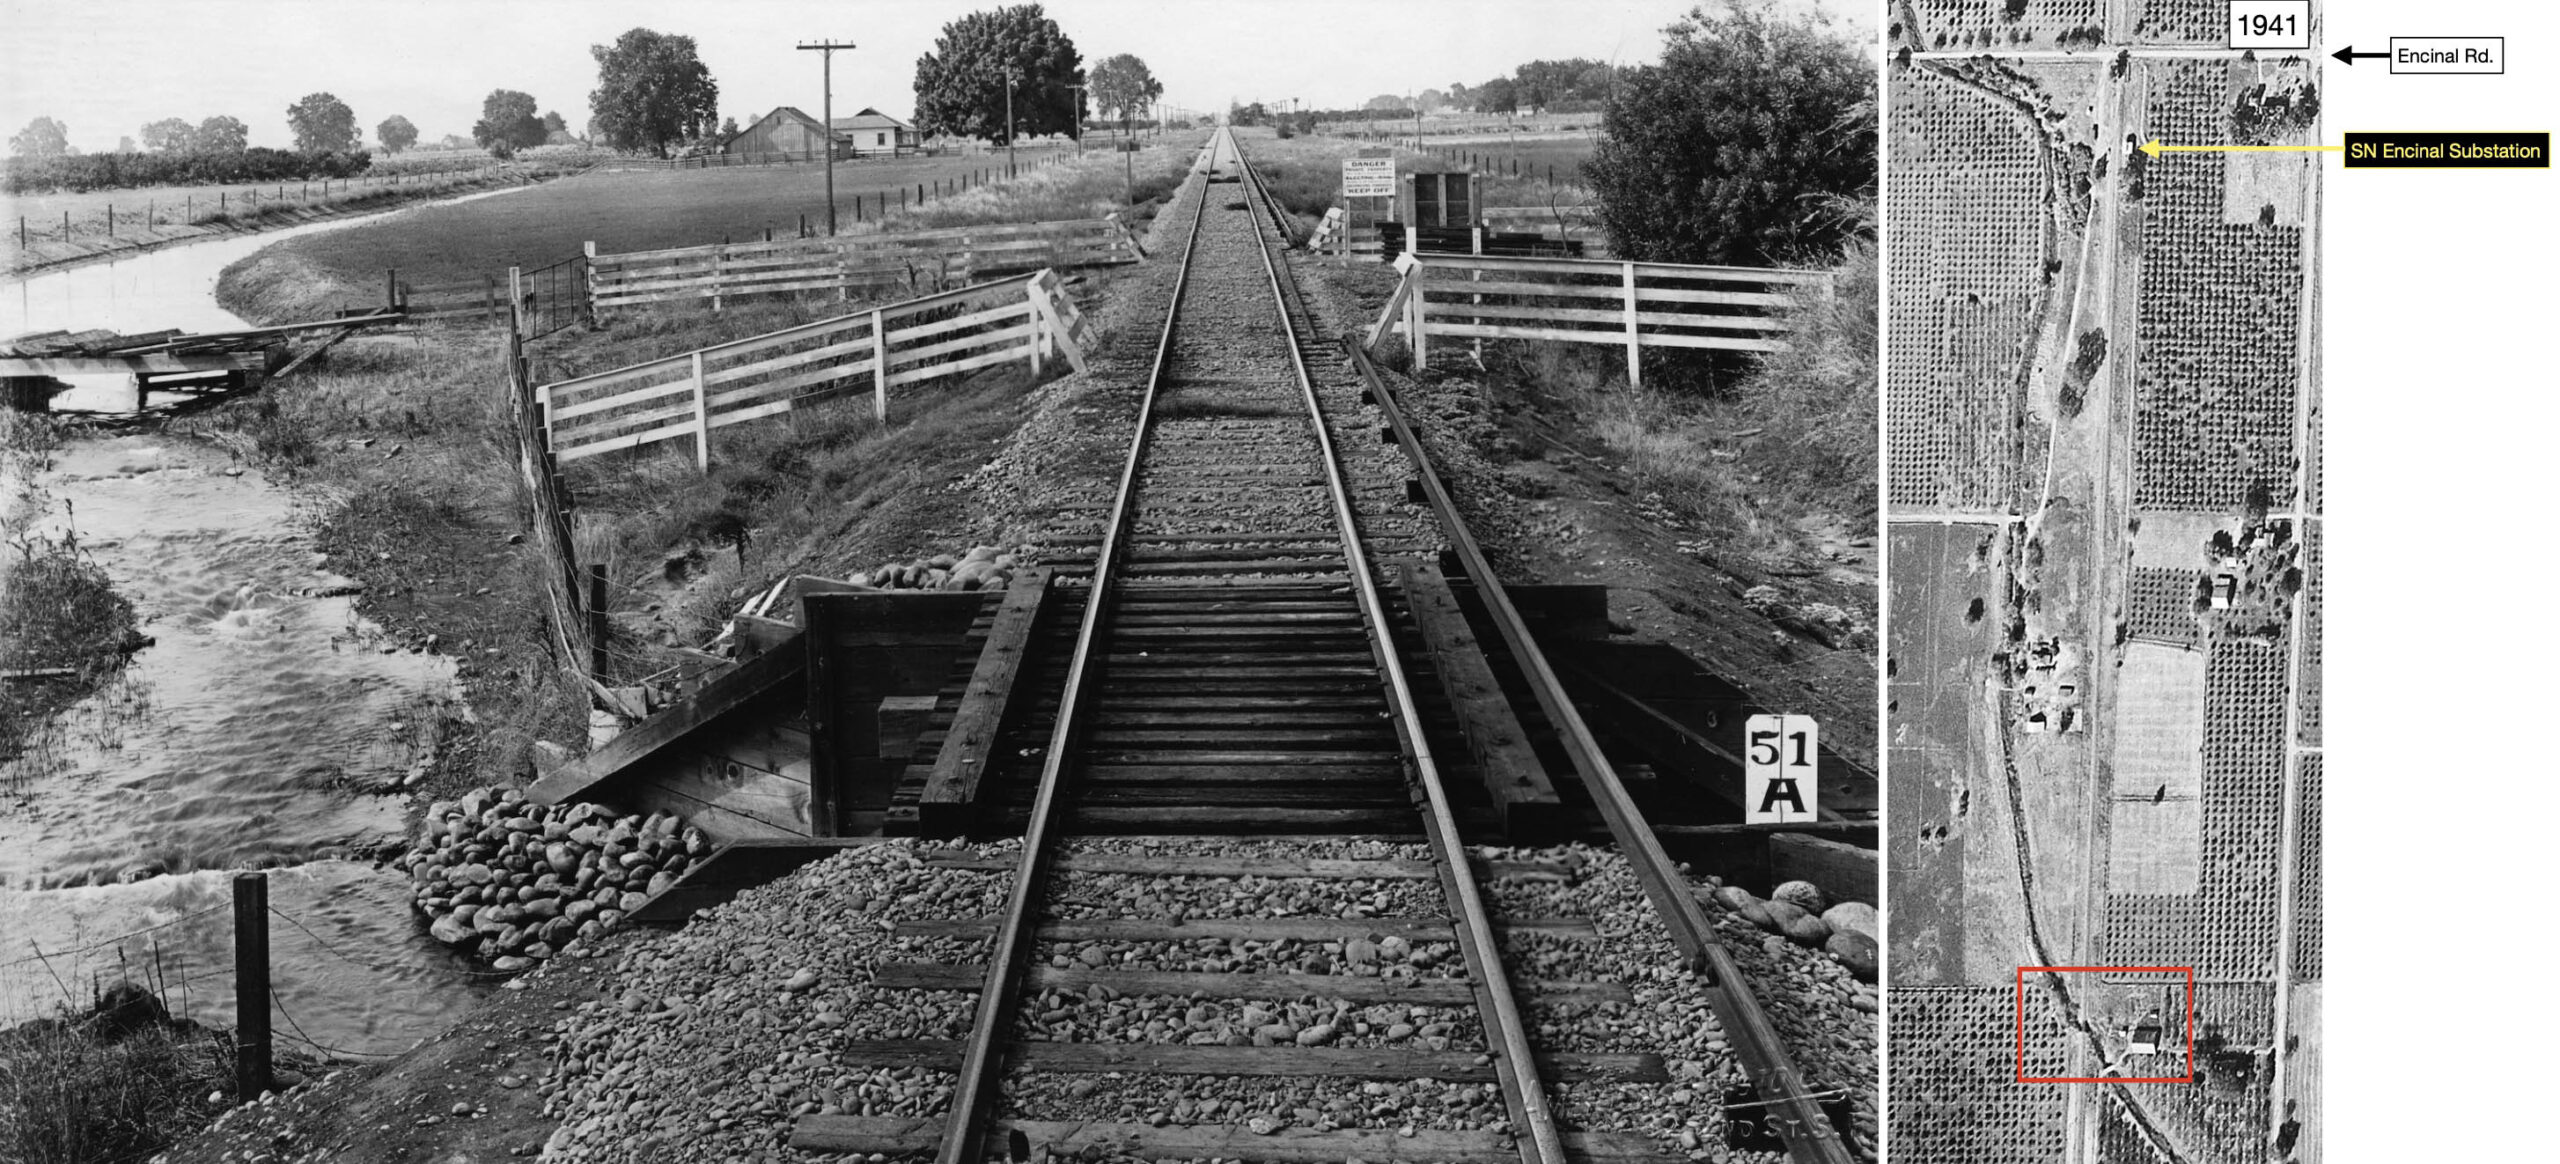
Before arriving at Encinal, our train crosses Live Oak Slough, the north view on the left from the American Photo Co. of San Francisco ca. 1910. They were unable to identify the location, but the “51” sign on the trestle should have alerted them that the scene was 51 miles from Sacramento, at that time downtown at 8th and J Sts., and not from Union Station that did not exist until 1925. This coincides with the slough crossing in question, shown on the aerial from 1941 on the right. The aerial also includes the next landmark, the Enicinal substation.
L337-105-American Photo Co. Photo, Courtesy BAERA, Western Railway Museum, 257787sn, l, c-7490_449, Courtesy of UC Santa Barbara Library Geospatial Collection, r, (Image 22 of 47)
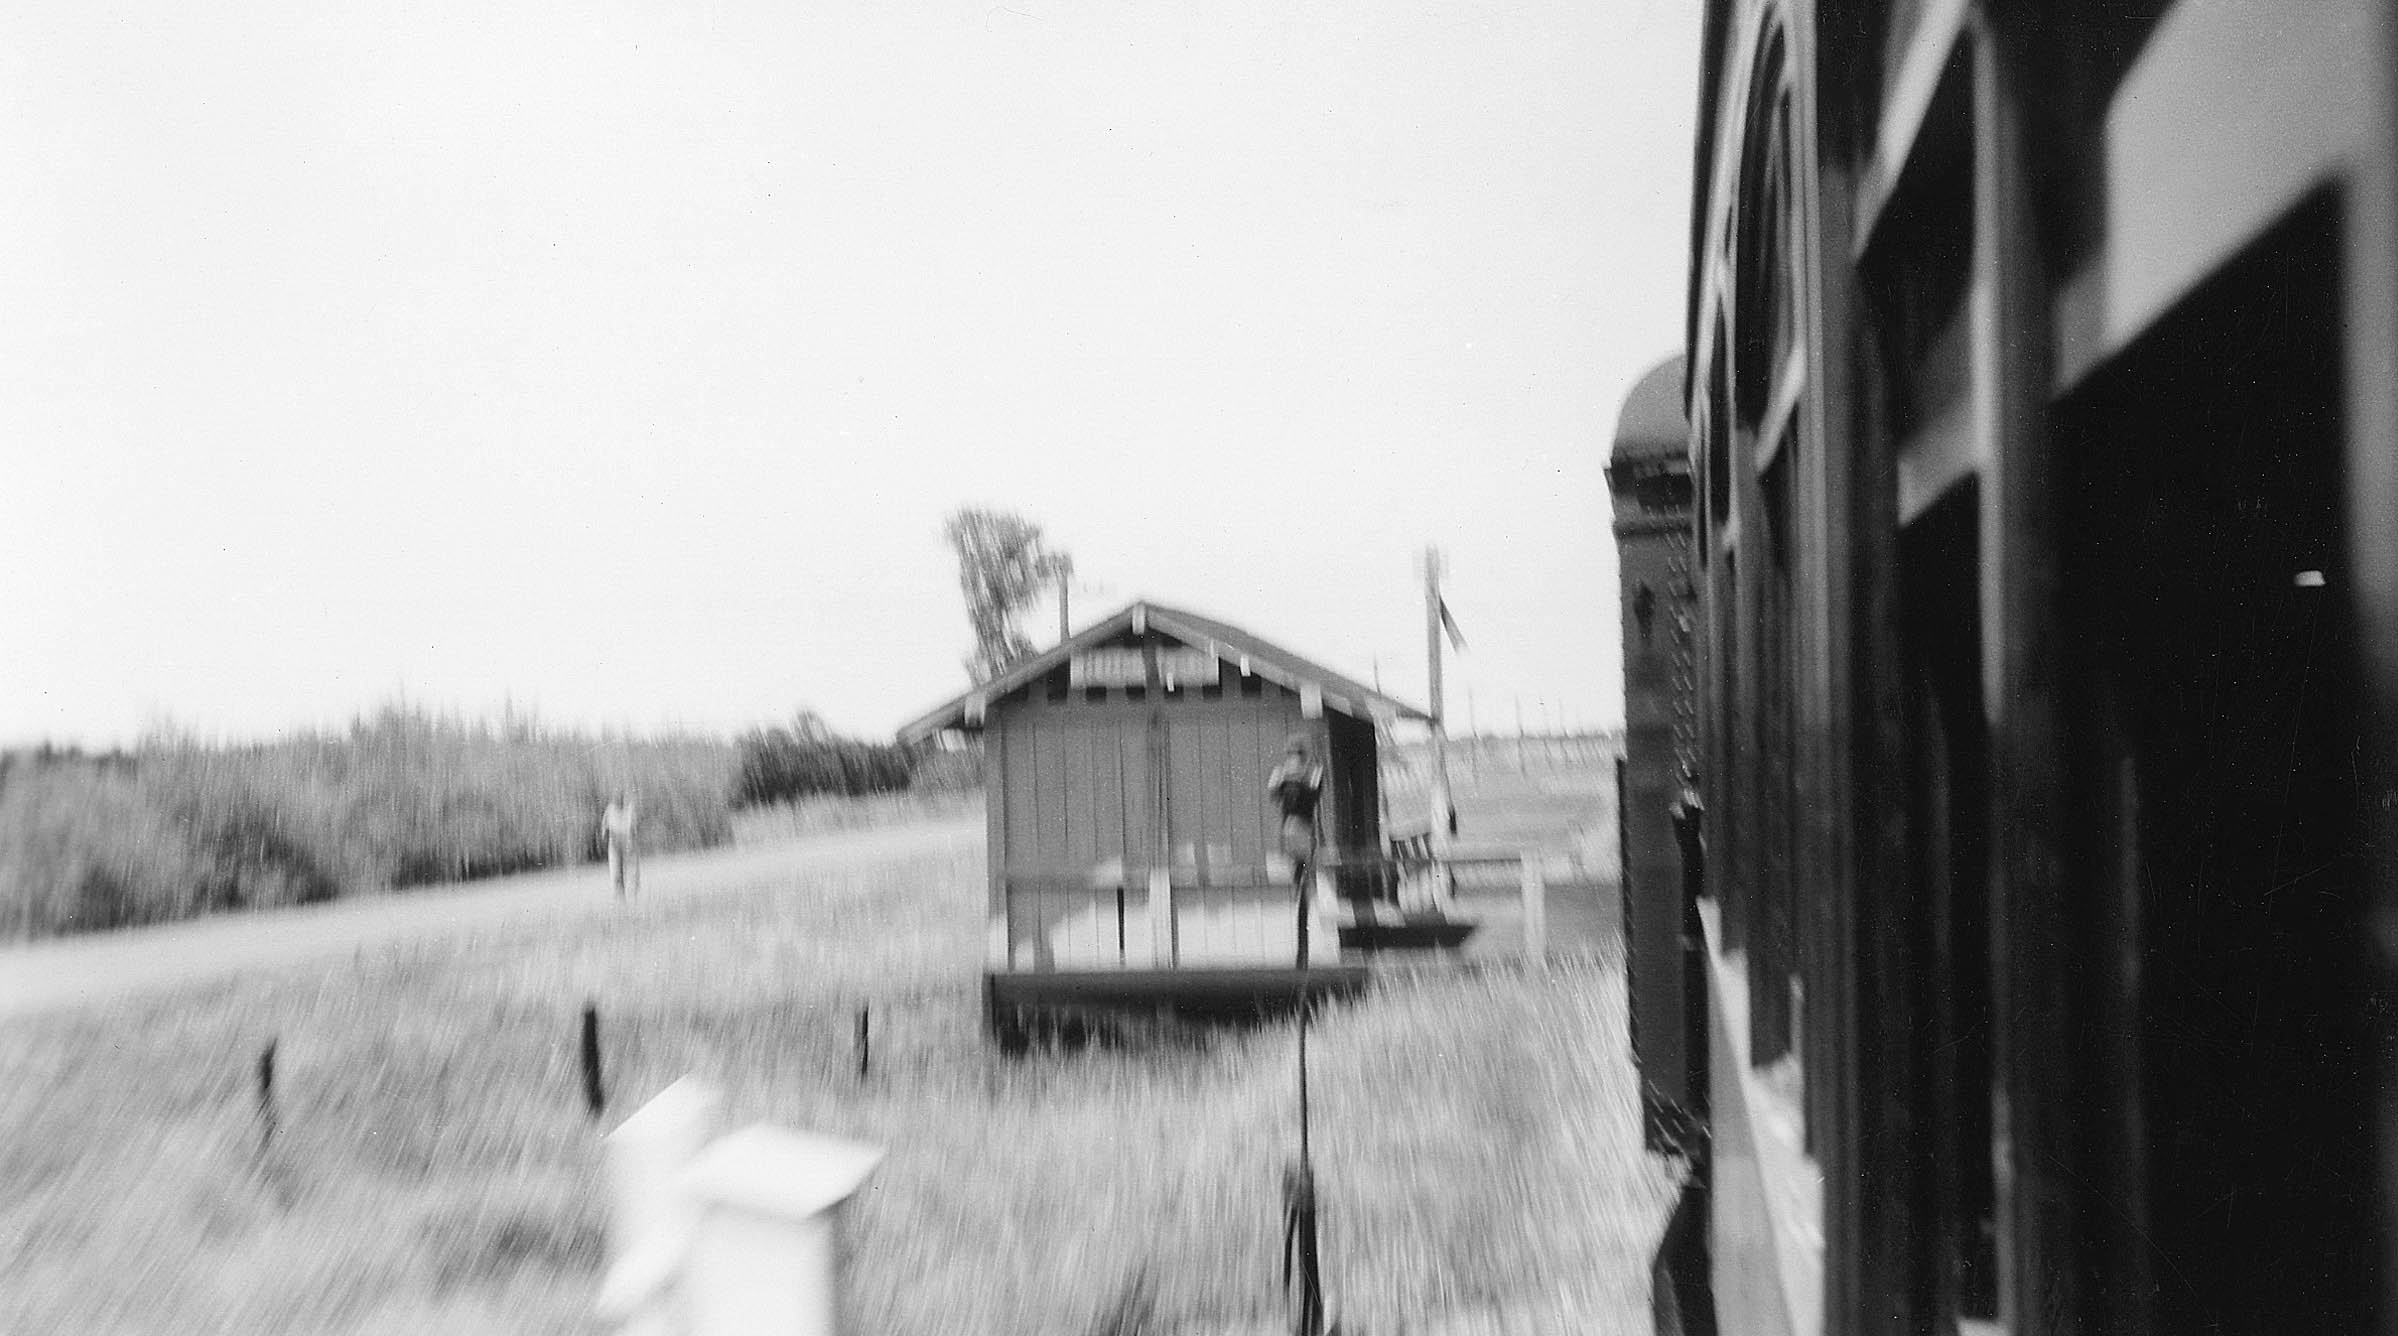
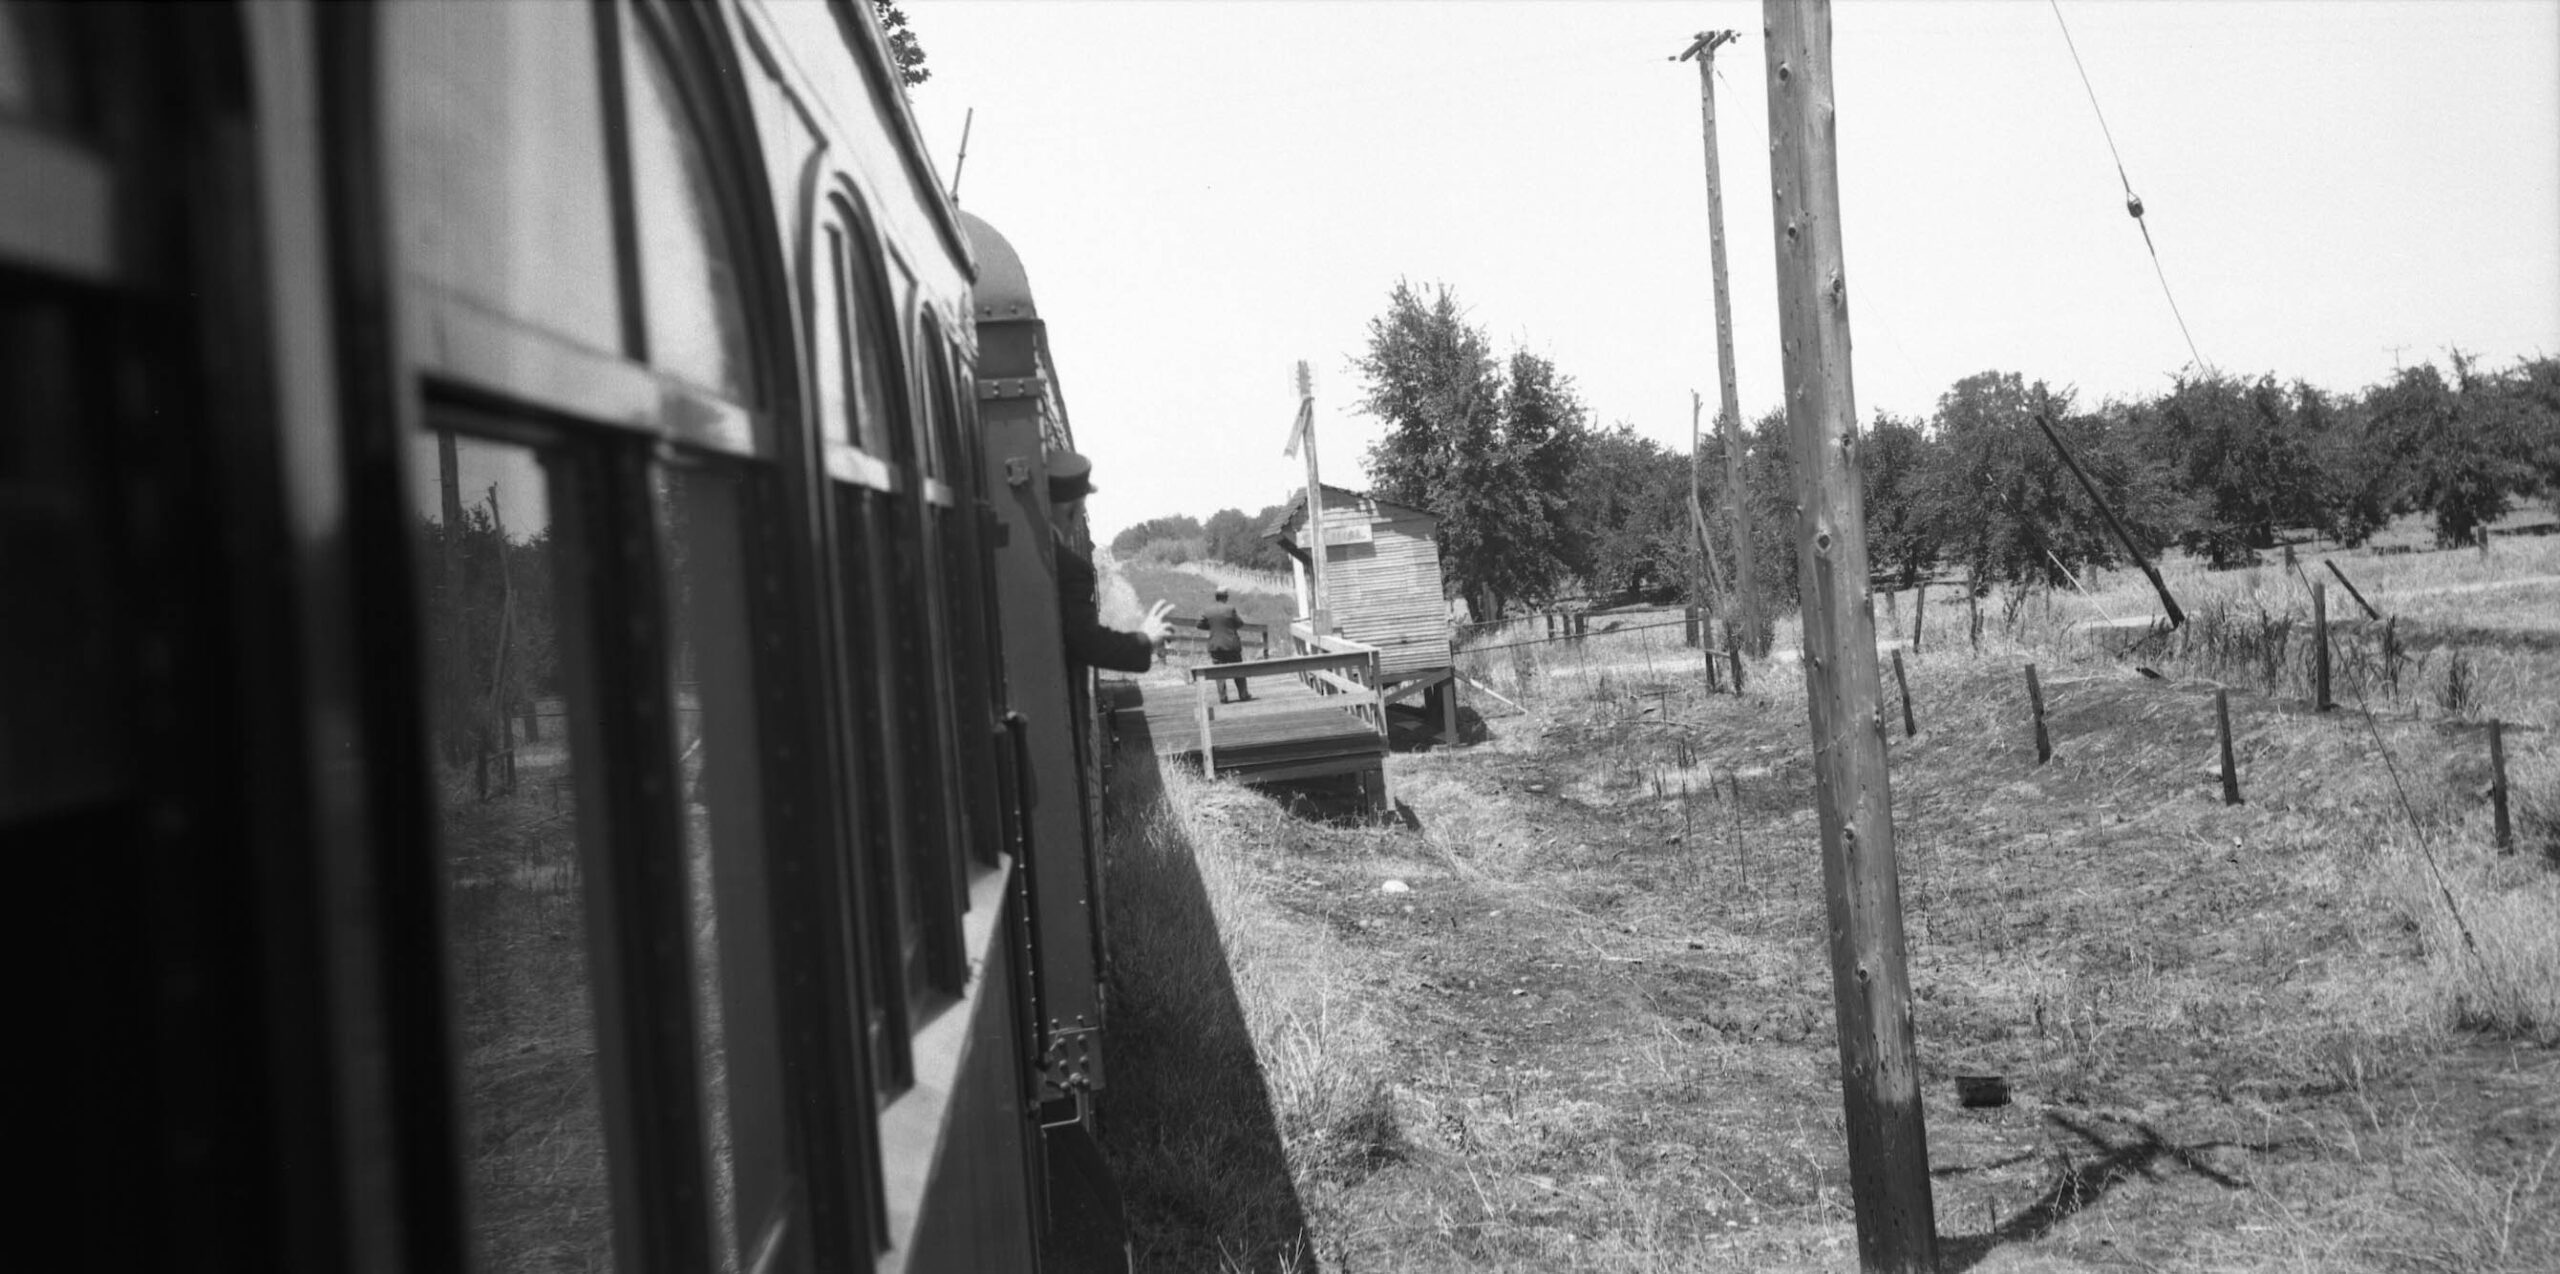
As our train stopped to let off passengers, Ted Wurm stuck his head out of the SN 225 on June 2, 1940 to capture this north view of the Encinal station shelter with the brakeman signaling the impending movement of the train after a single passenger departed. Notice that the electric transmission poles that had been last seen at Nuestro are not no longer present, probably gone when the road became Larkin Rd., but this has not been documented.
L337-110-Ted Wurm Photo, Courtesy BAERA, Western Railway Museum Archives, 33453sn, (Image 23 of 47)
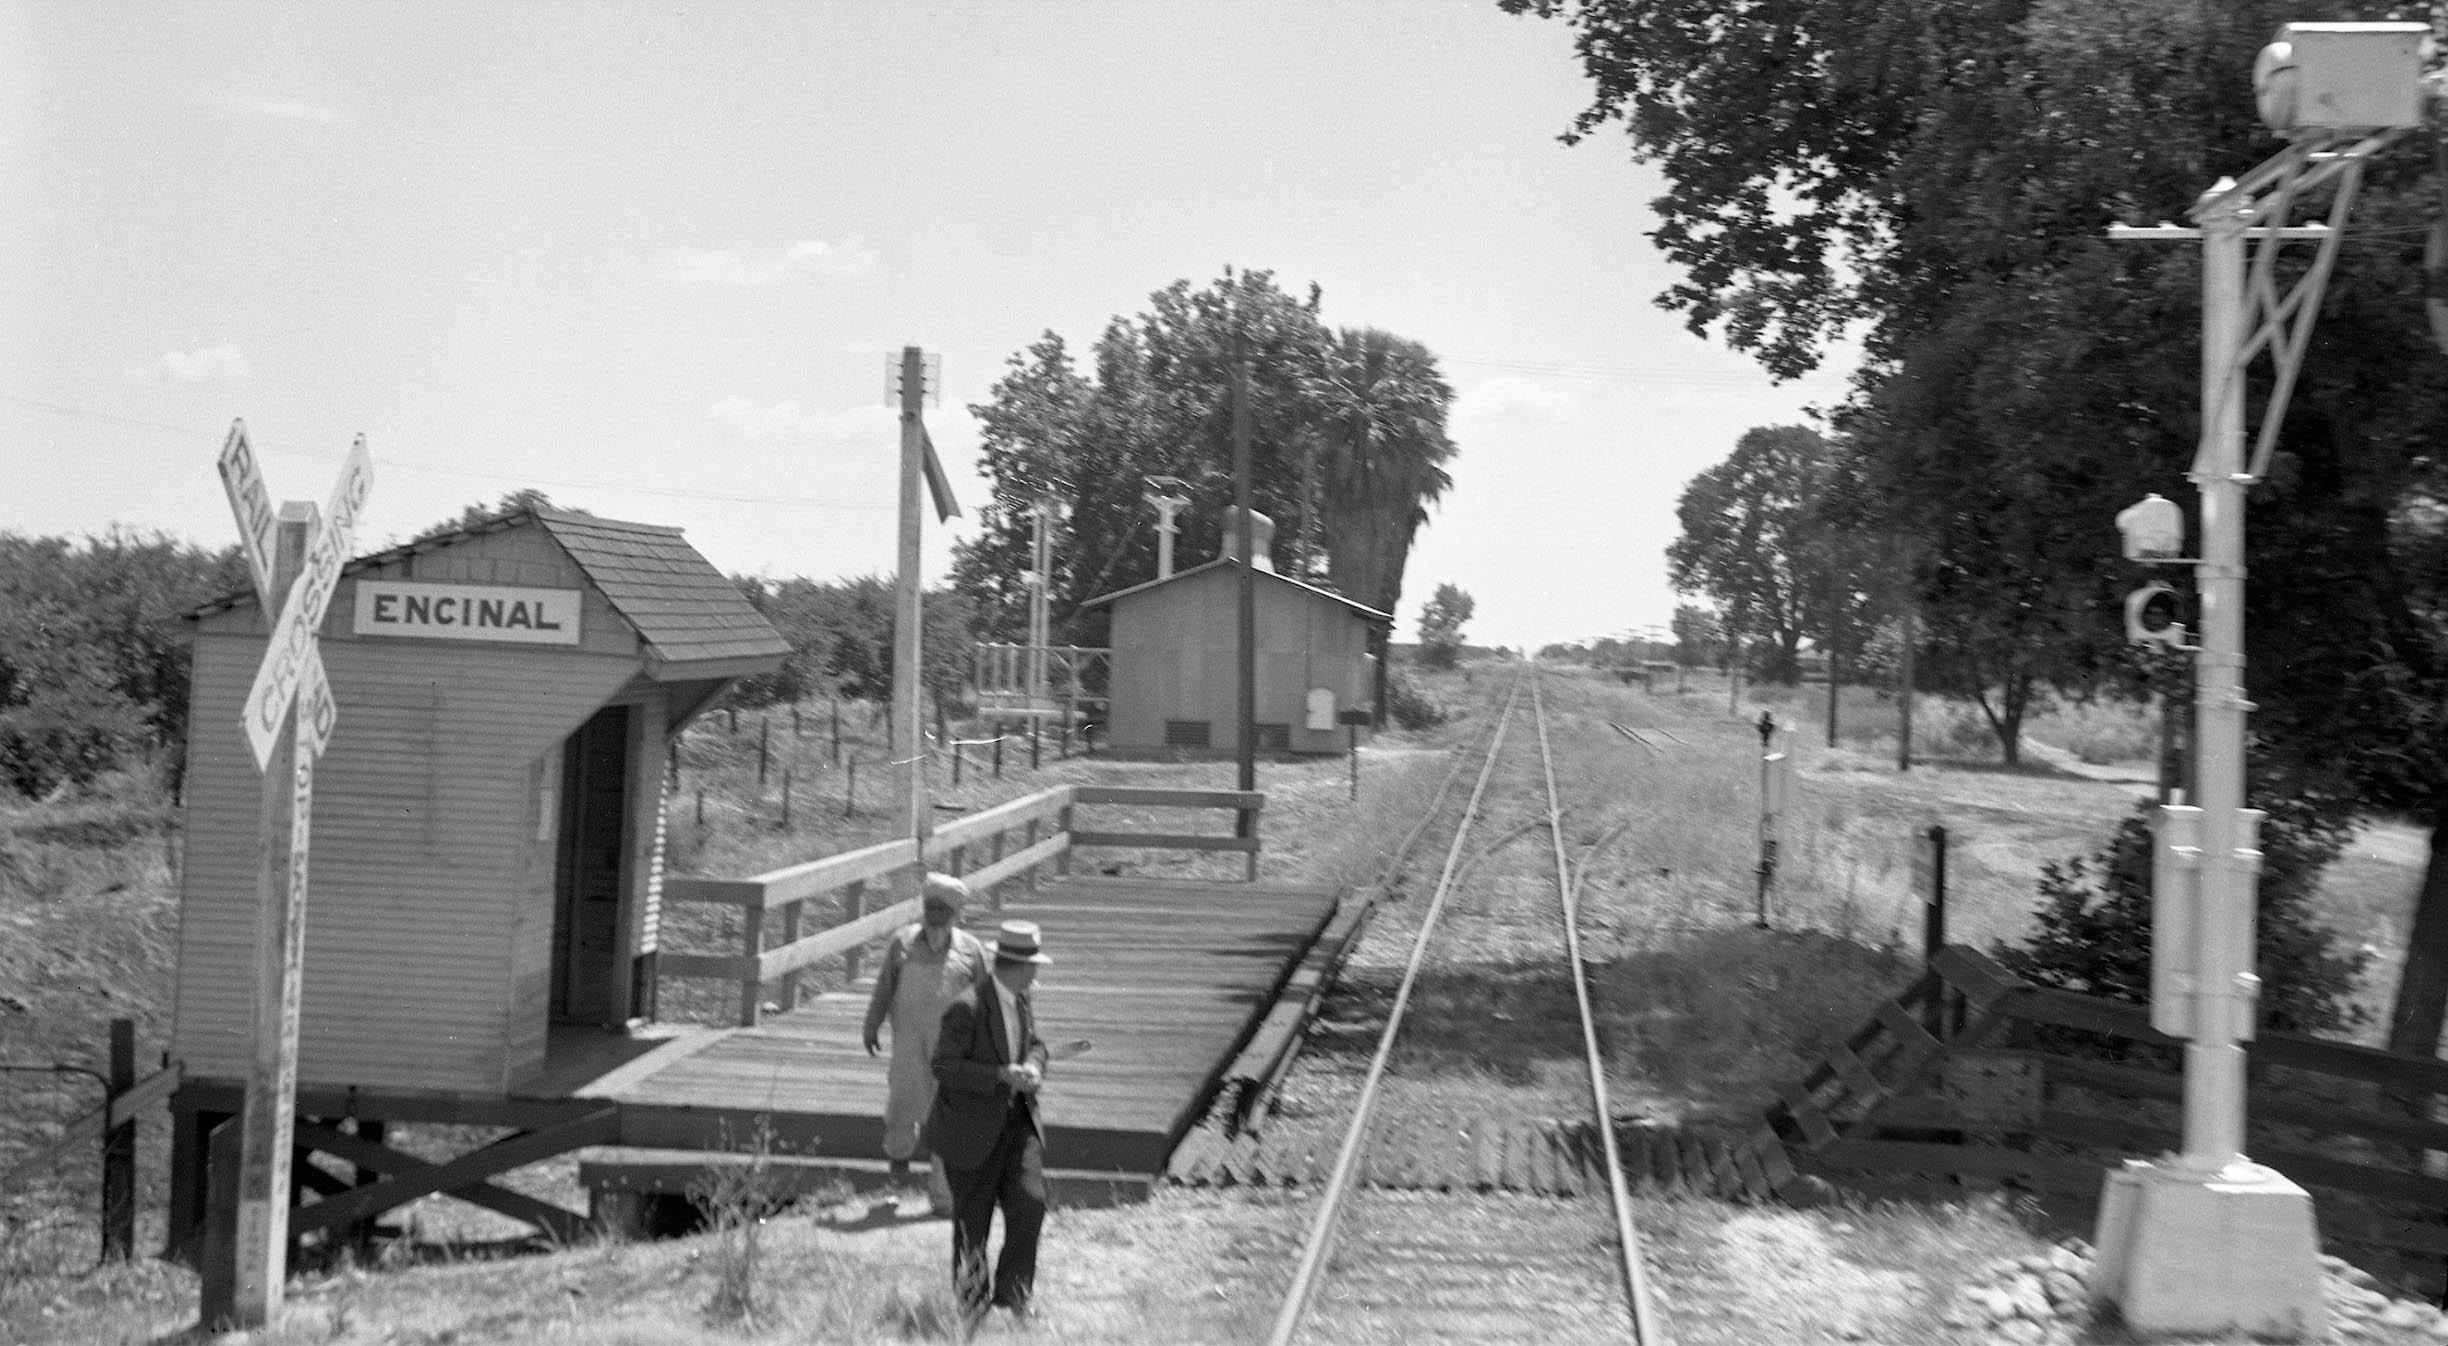
Working as a team, Howard Wolfe stayed near the open rear door of SN 225, and as we pull away we see a panoramic view south view of the Encinal station area, with the substation and adjacent palm trees, the takeoff of the siding capable of handing 25 freight cars, and the wigwag signal at Encinal Rd. The significance of the second passenger leaving the train was noted by RJ Dial. Growing up in the area, the Punjabi Sikhs were a big part of farm life. Extremely hardworking and smart businessmen, it wasn't until 1946 that they bought farmland and made peach and prune history in Sutter County. Click here for a reference he provided. After Encinal, the train crosses a small canal.
L337-115-Howard T. Wolfe Photo, Courtesy BAERA, Western Railway Museum Archives, 238474sn, (Image 24 of 47)
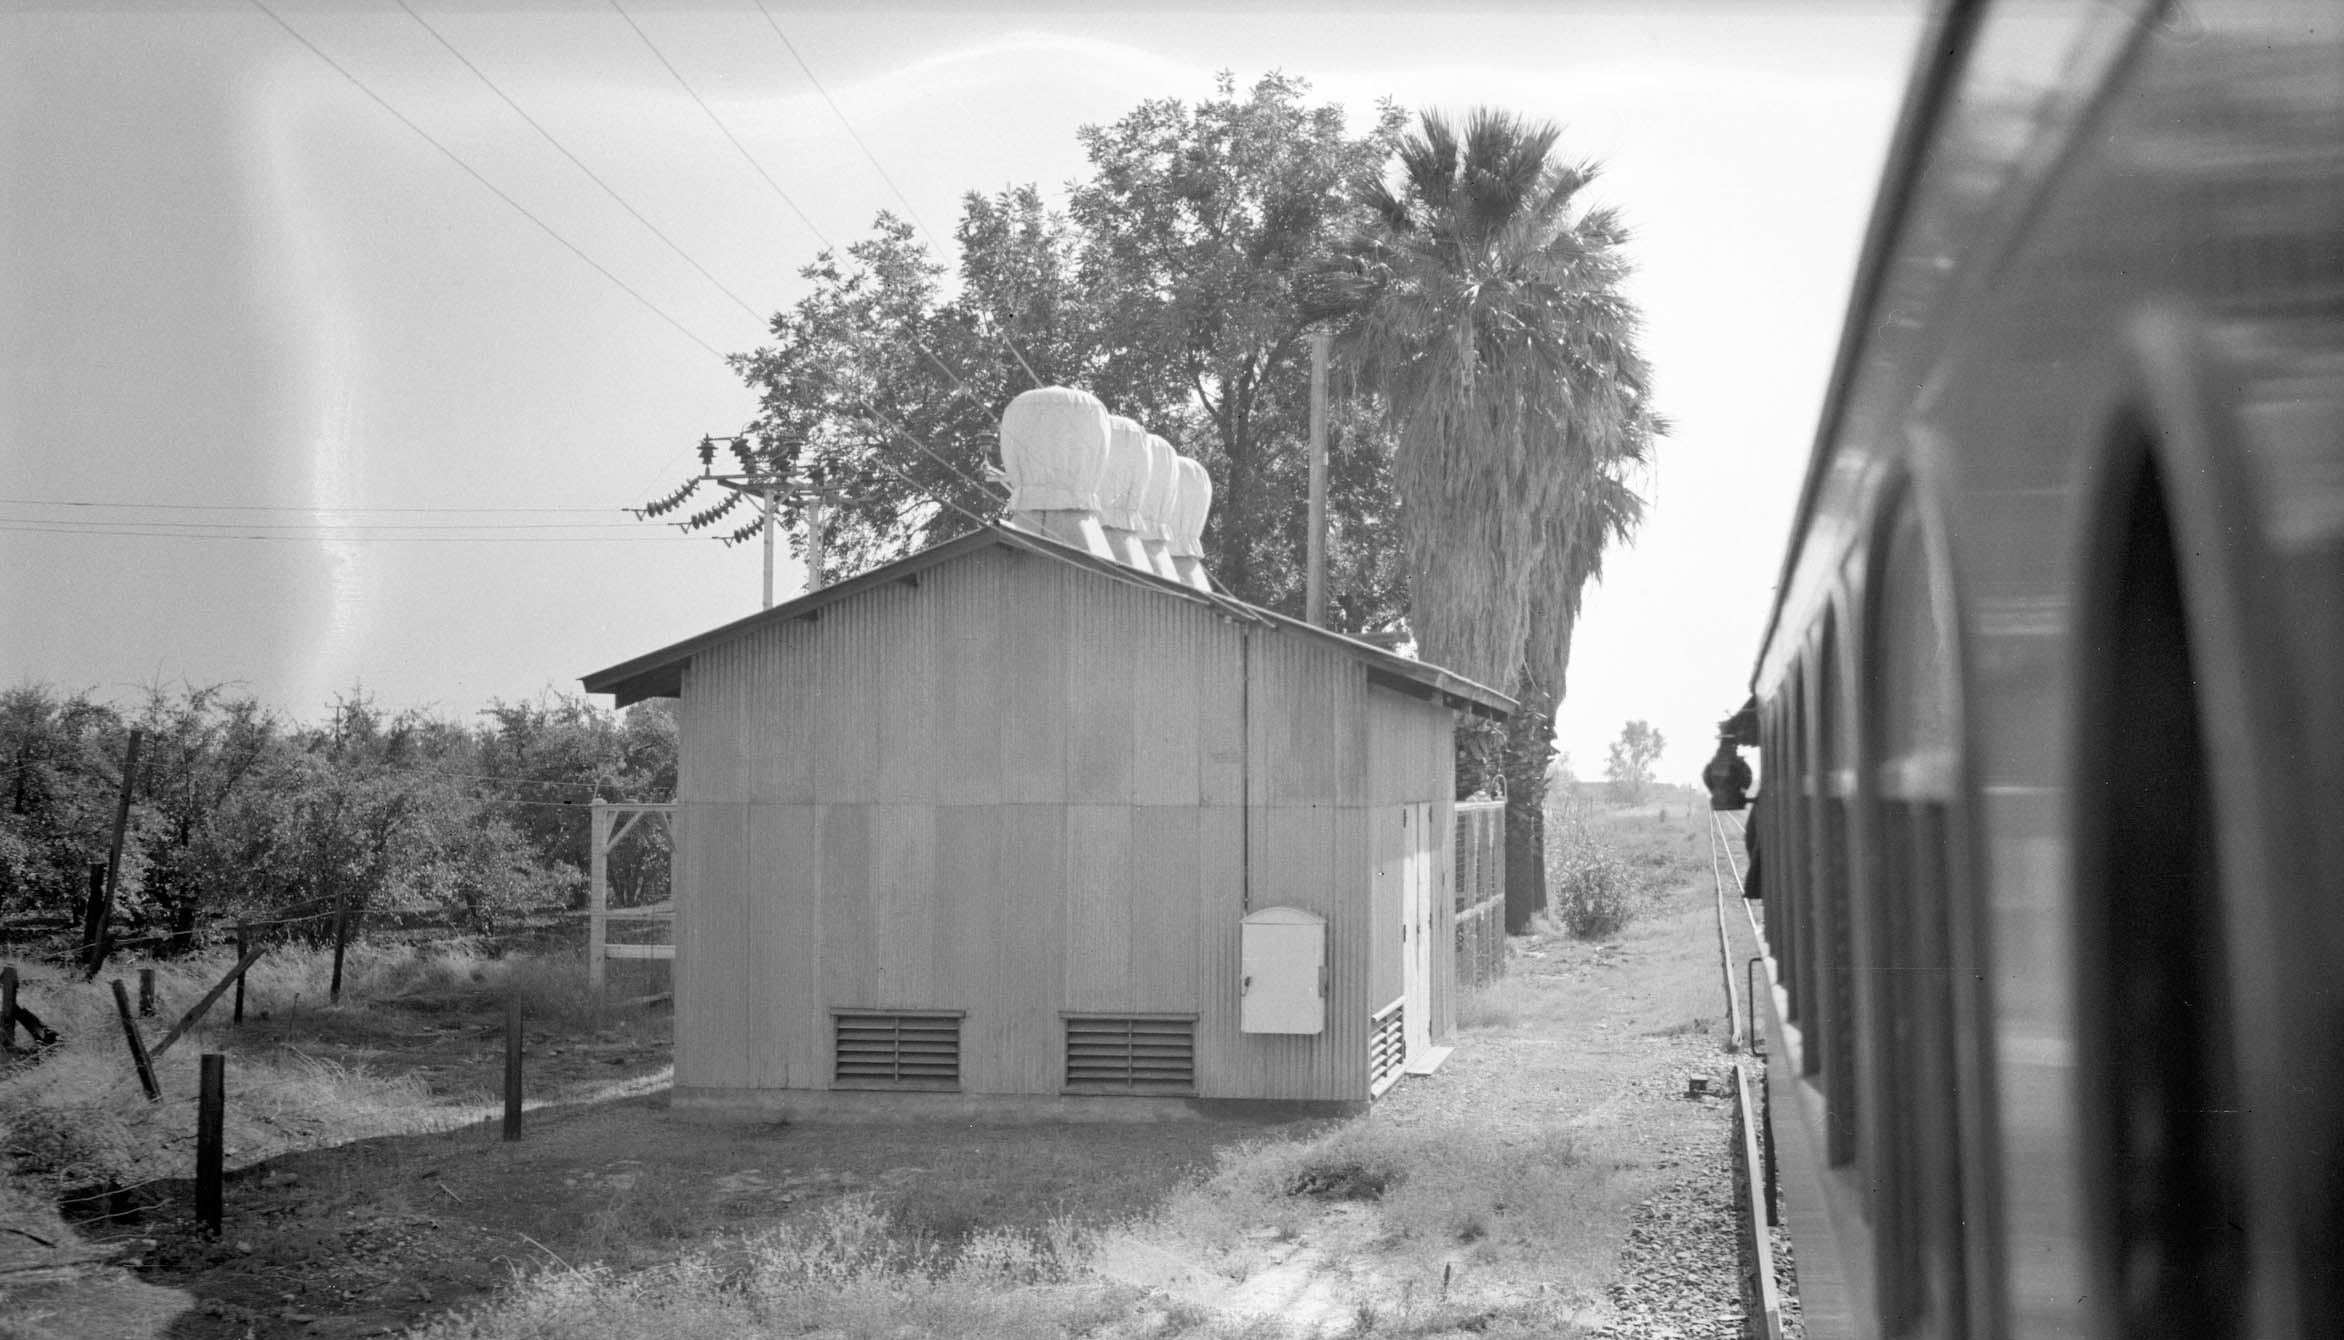
Howard Wolfe would come back before passenger service was stopped in 1940 to get a closer view of the substation and the quartet of landmark palm trees. More about those later.
L337-120-Howard T. Wolfe Photo, Courtesy BAERA, Western Railway Museum Archives, 239438sn, (Image 25 of 47)
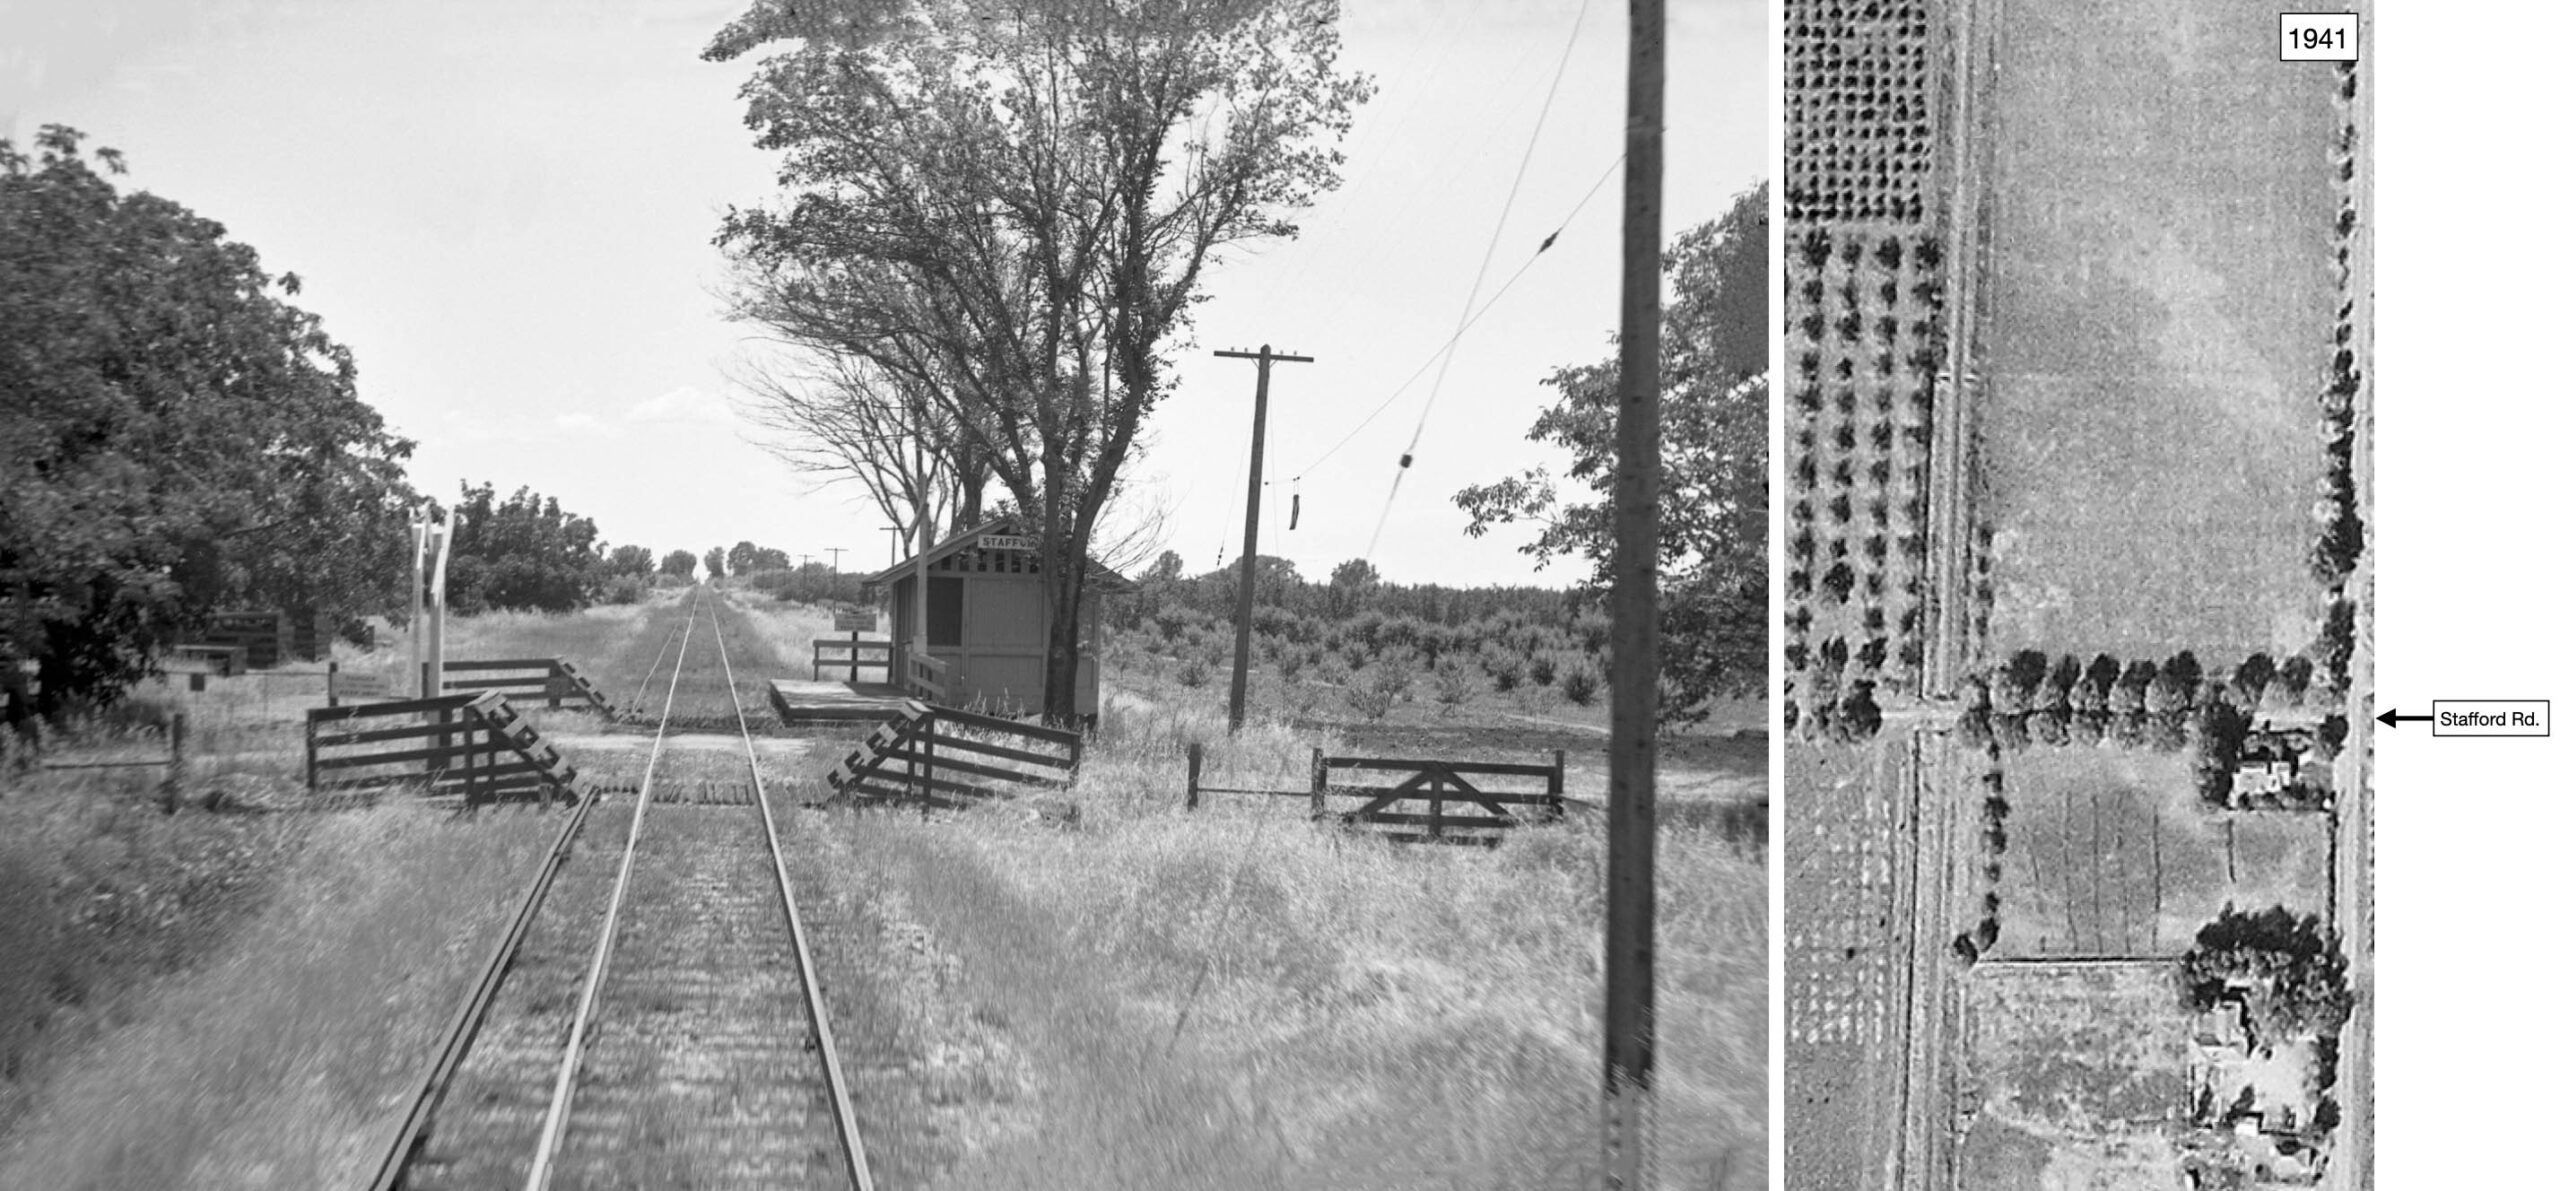
Next, the train passes Stafford station, a south view from the rear of SN 225, left. Stafford was listed in 1939 as having a spur accommodating five cars, but nothing is seen here. Two interesting findings are the discontinuity of the third rail to the south, and the fence close to the right edge. These could indicate either a spur that was removed, or a spur to the north still not passed, respectively. Demoro mentions a siding was used for passing trains. The aerial from 1941, right, is shown for completeness, but really doesn’t provide any clues about a spur to siding.
L337-125-Howard T. Wolfe Photo, Courtesy BAERA, Western Railway Museum Archives, 238475sn, l, c-7490-448, Courtesy of UC Santa Barbara Library Geospatial Collection, r, (Image 26 of 47)
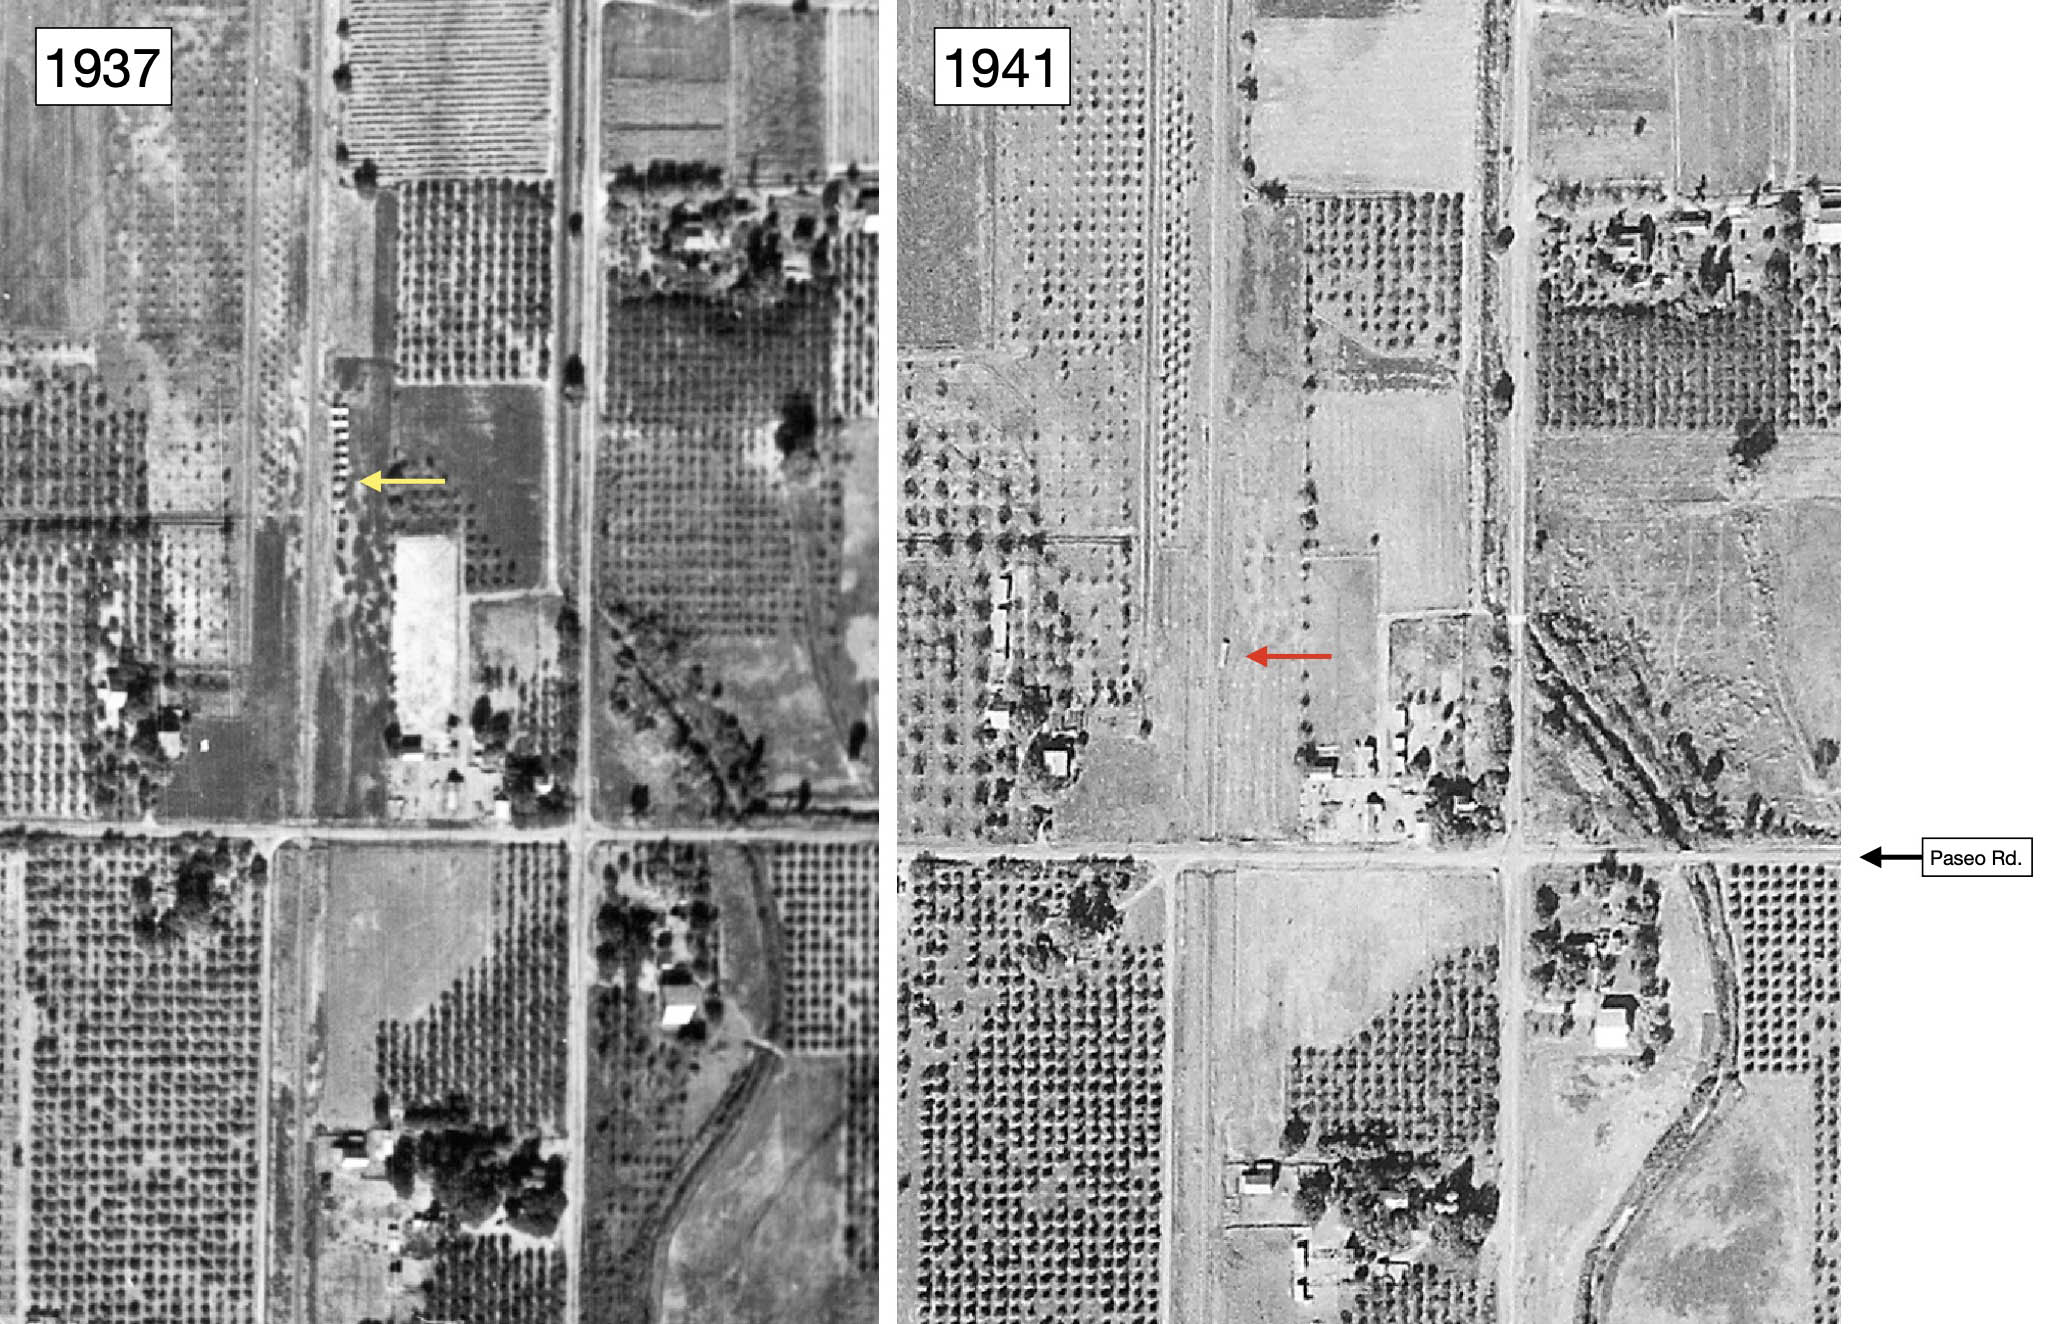
After leaving Stafford, the train crosses two more irrigation canals. No images were found from the next stop, Walton, but the aerials from 1937 and 1941 do show possible evidences for the eight-car spur indicated by the arrows north of Paseo Rd. the was listed in 1939 to be at this location.
L337-130-Courtesy The National Archives, AAZ-127-36, l, c-7490_447, Courtesy of UC Santa Barbara Library Geospatial Collection, r, (Image 27 of 47)
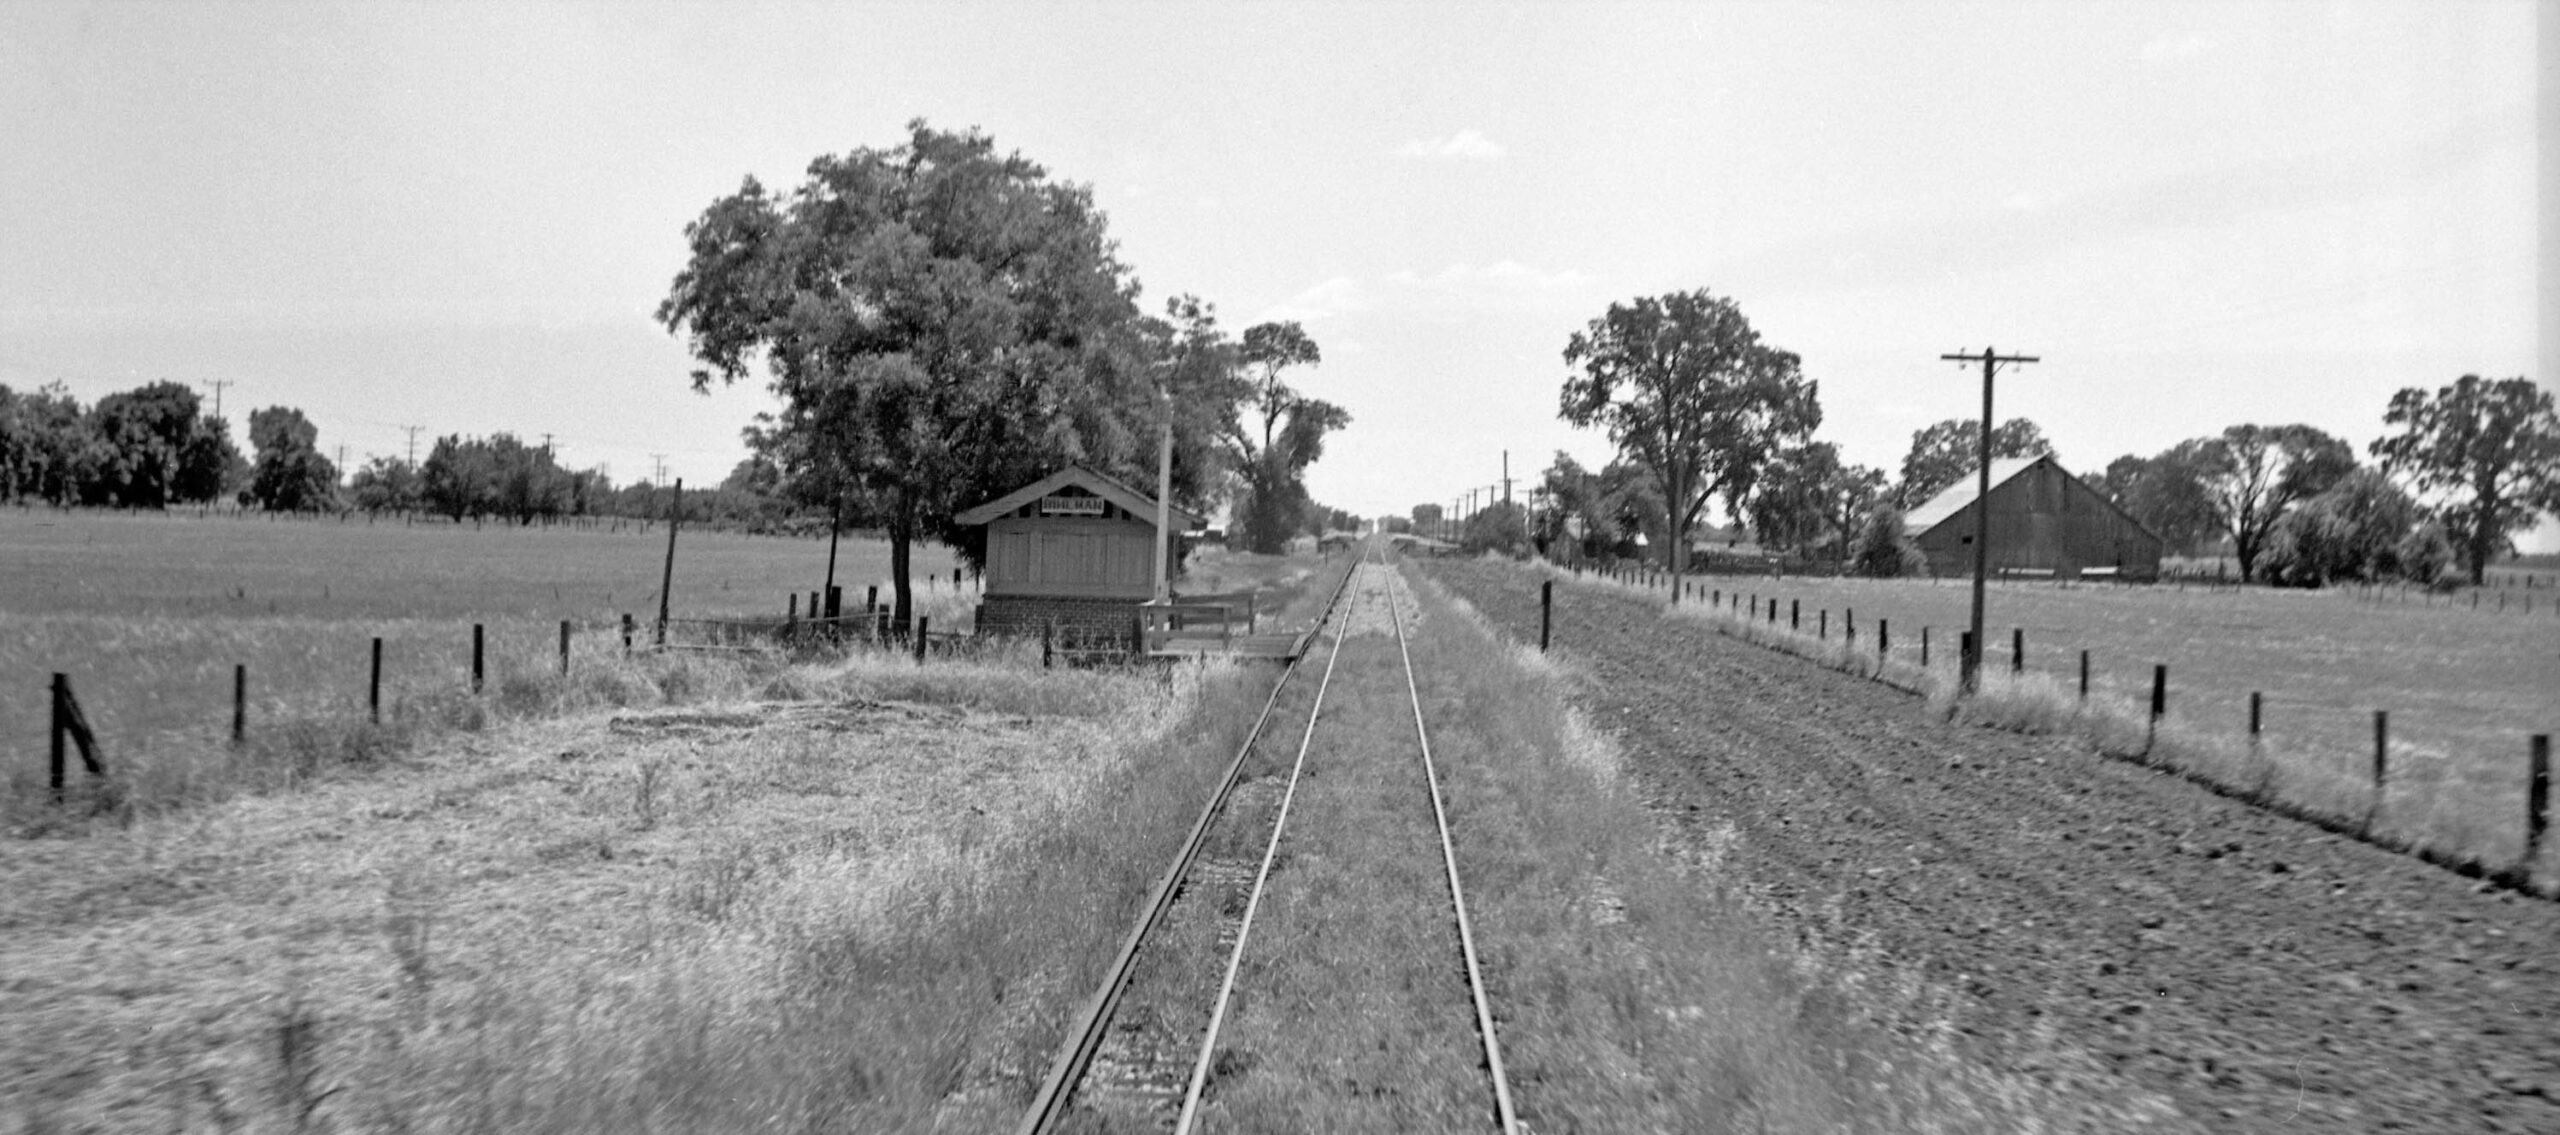
The train passes the shelter at Bihlman as seen in a south view from the rear of SN 225. This stop was never associated with a freight spur or siding.
L337-135-Howard T. Wolfe Photo, Courtesy BAERA, Western Railway Museum Archives, 238472sn, (Image 28 of 47)
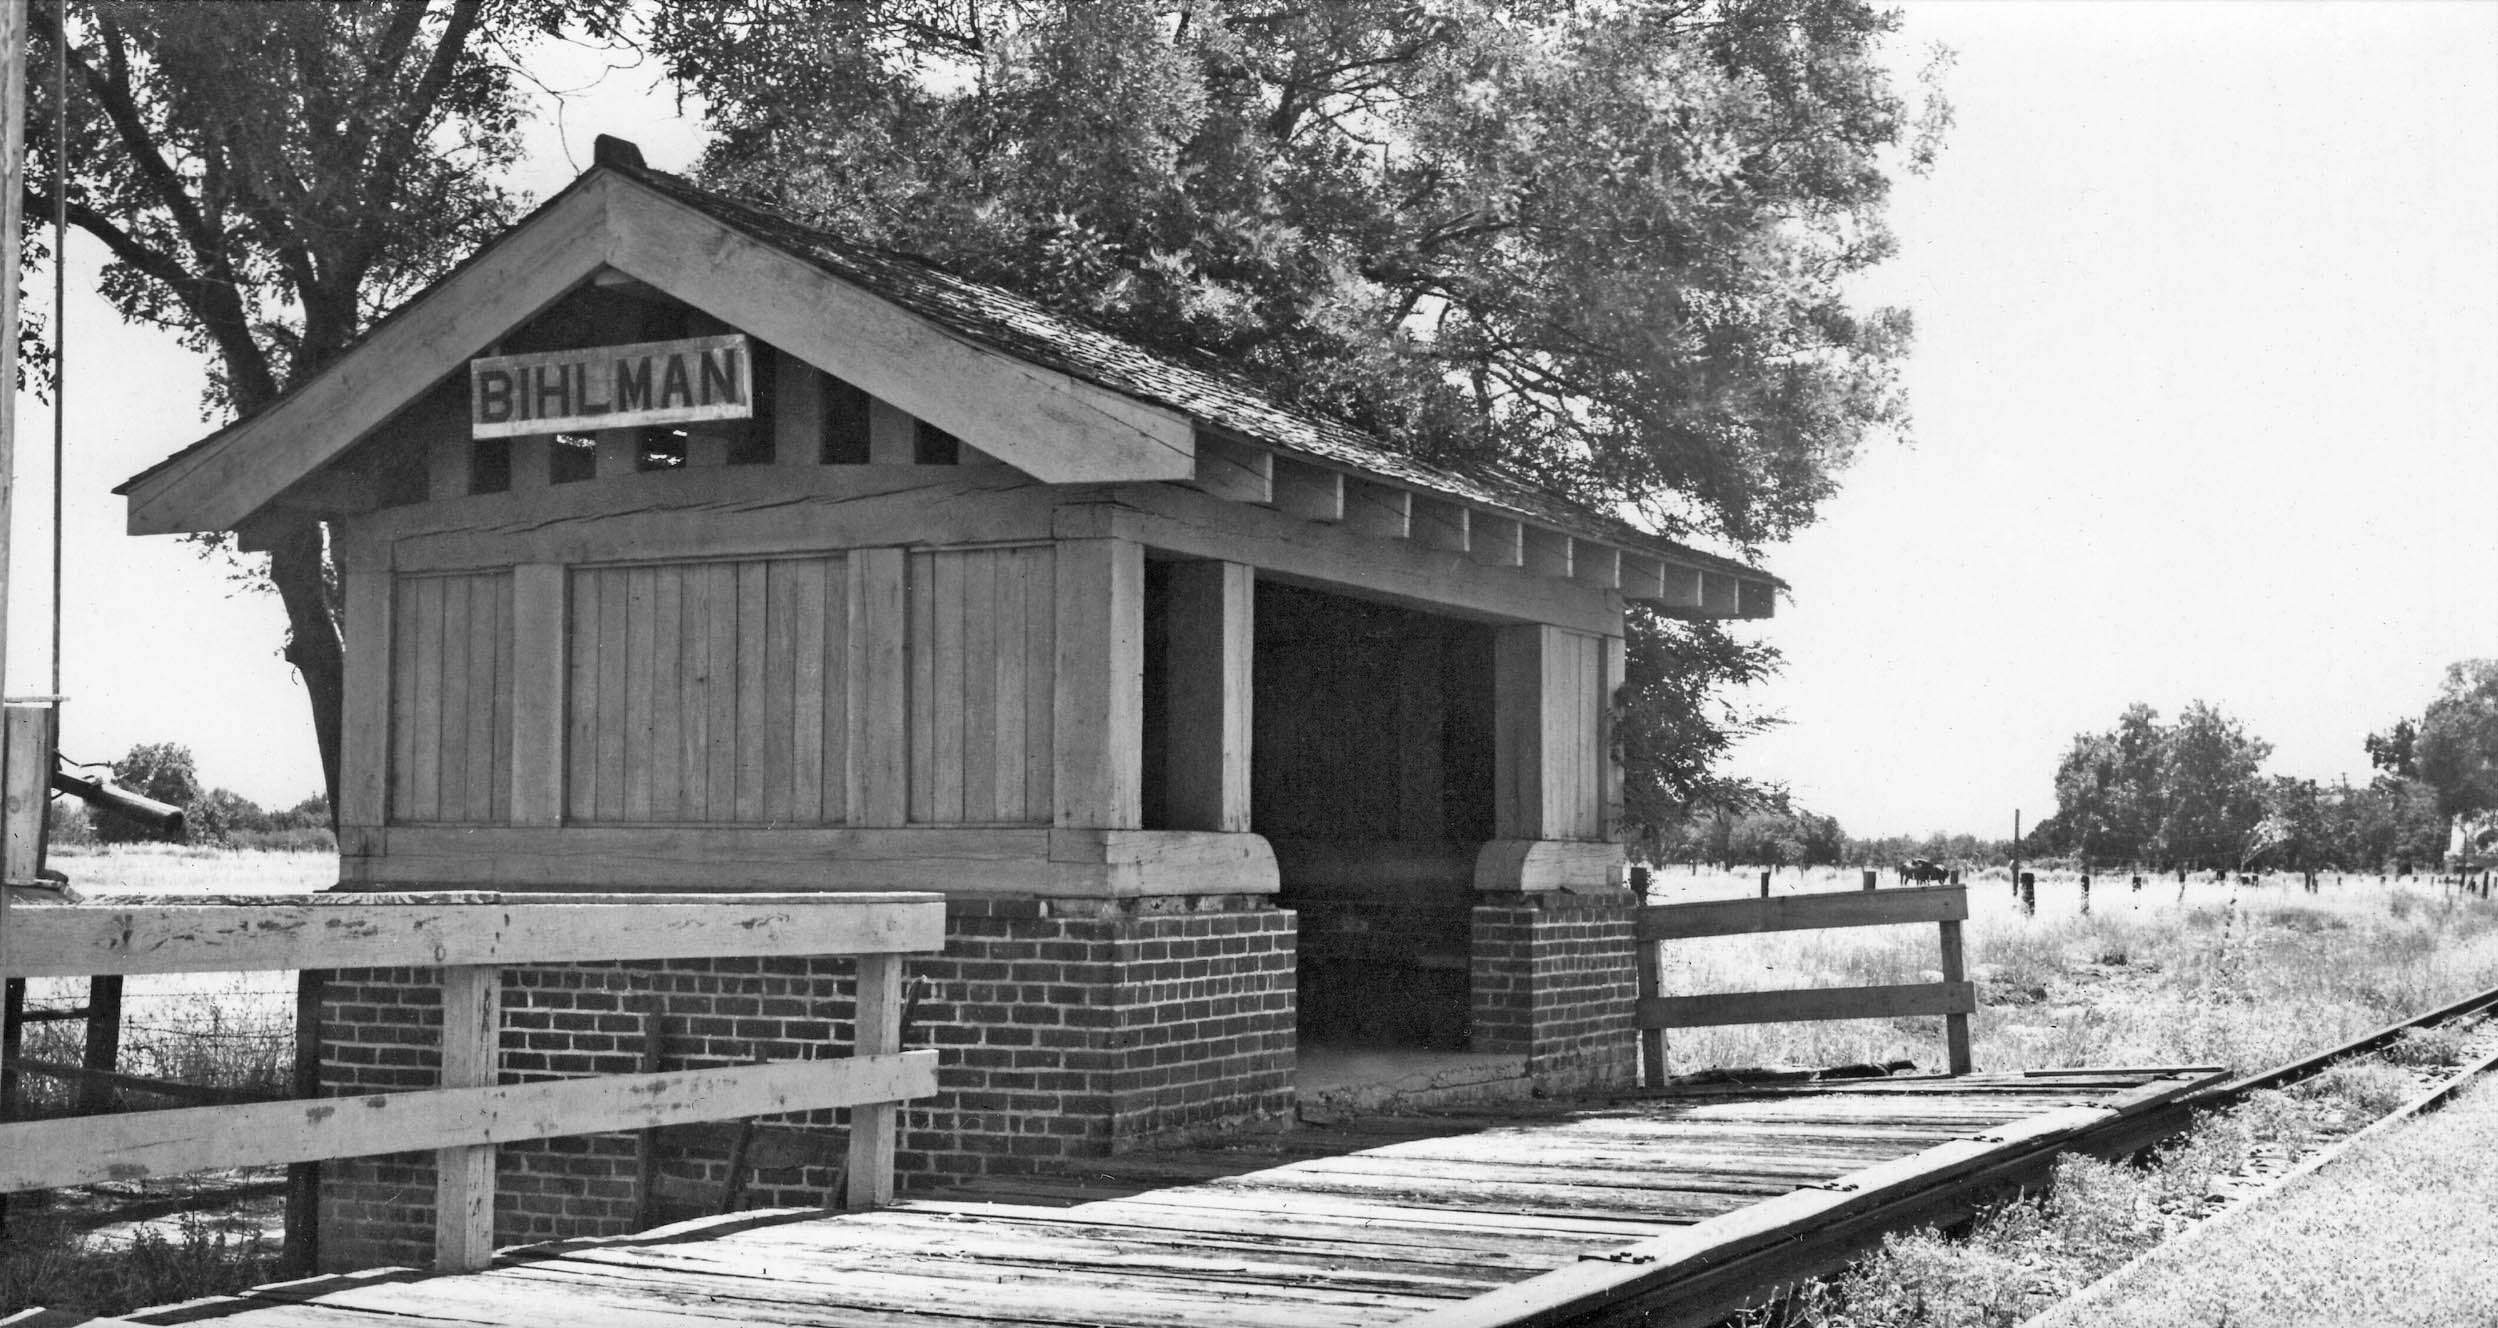
On Aug. 4, 1940, Wil Whittaker composed this closer view of the Bihlman shelter. Note the close proximity to the large tree, and the fact that it had a brick base, seen in no other shelter along this segment so far. Another variation seen here along the left edge is the existence of a large highly visible handle to manually position the semaphore to signal that a passenger was awaiting the next train.
L337-140-Wilbur C. Whittaker Photo, Courtesy Arnold Menke, (Image 29 of 47)
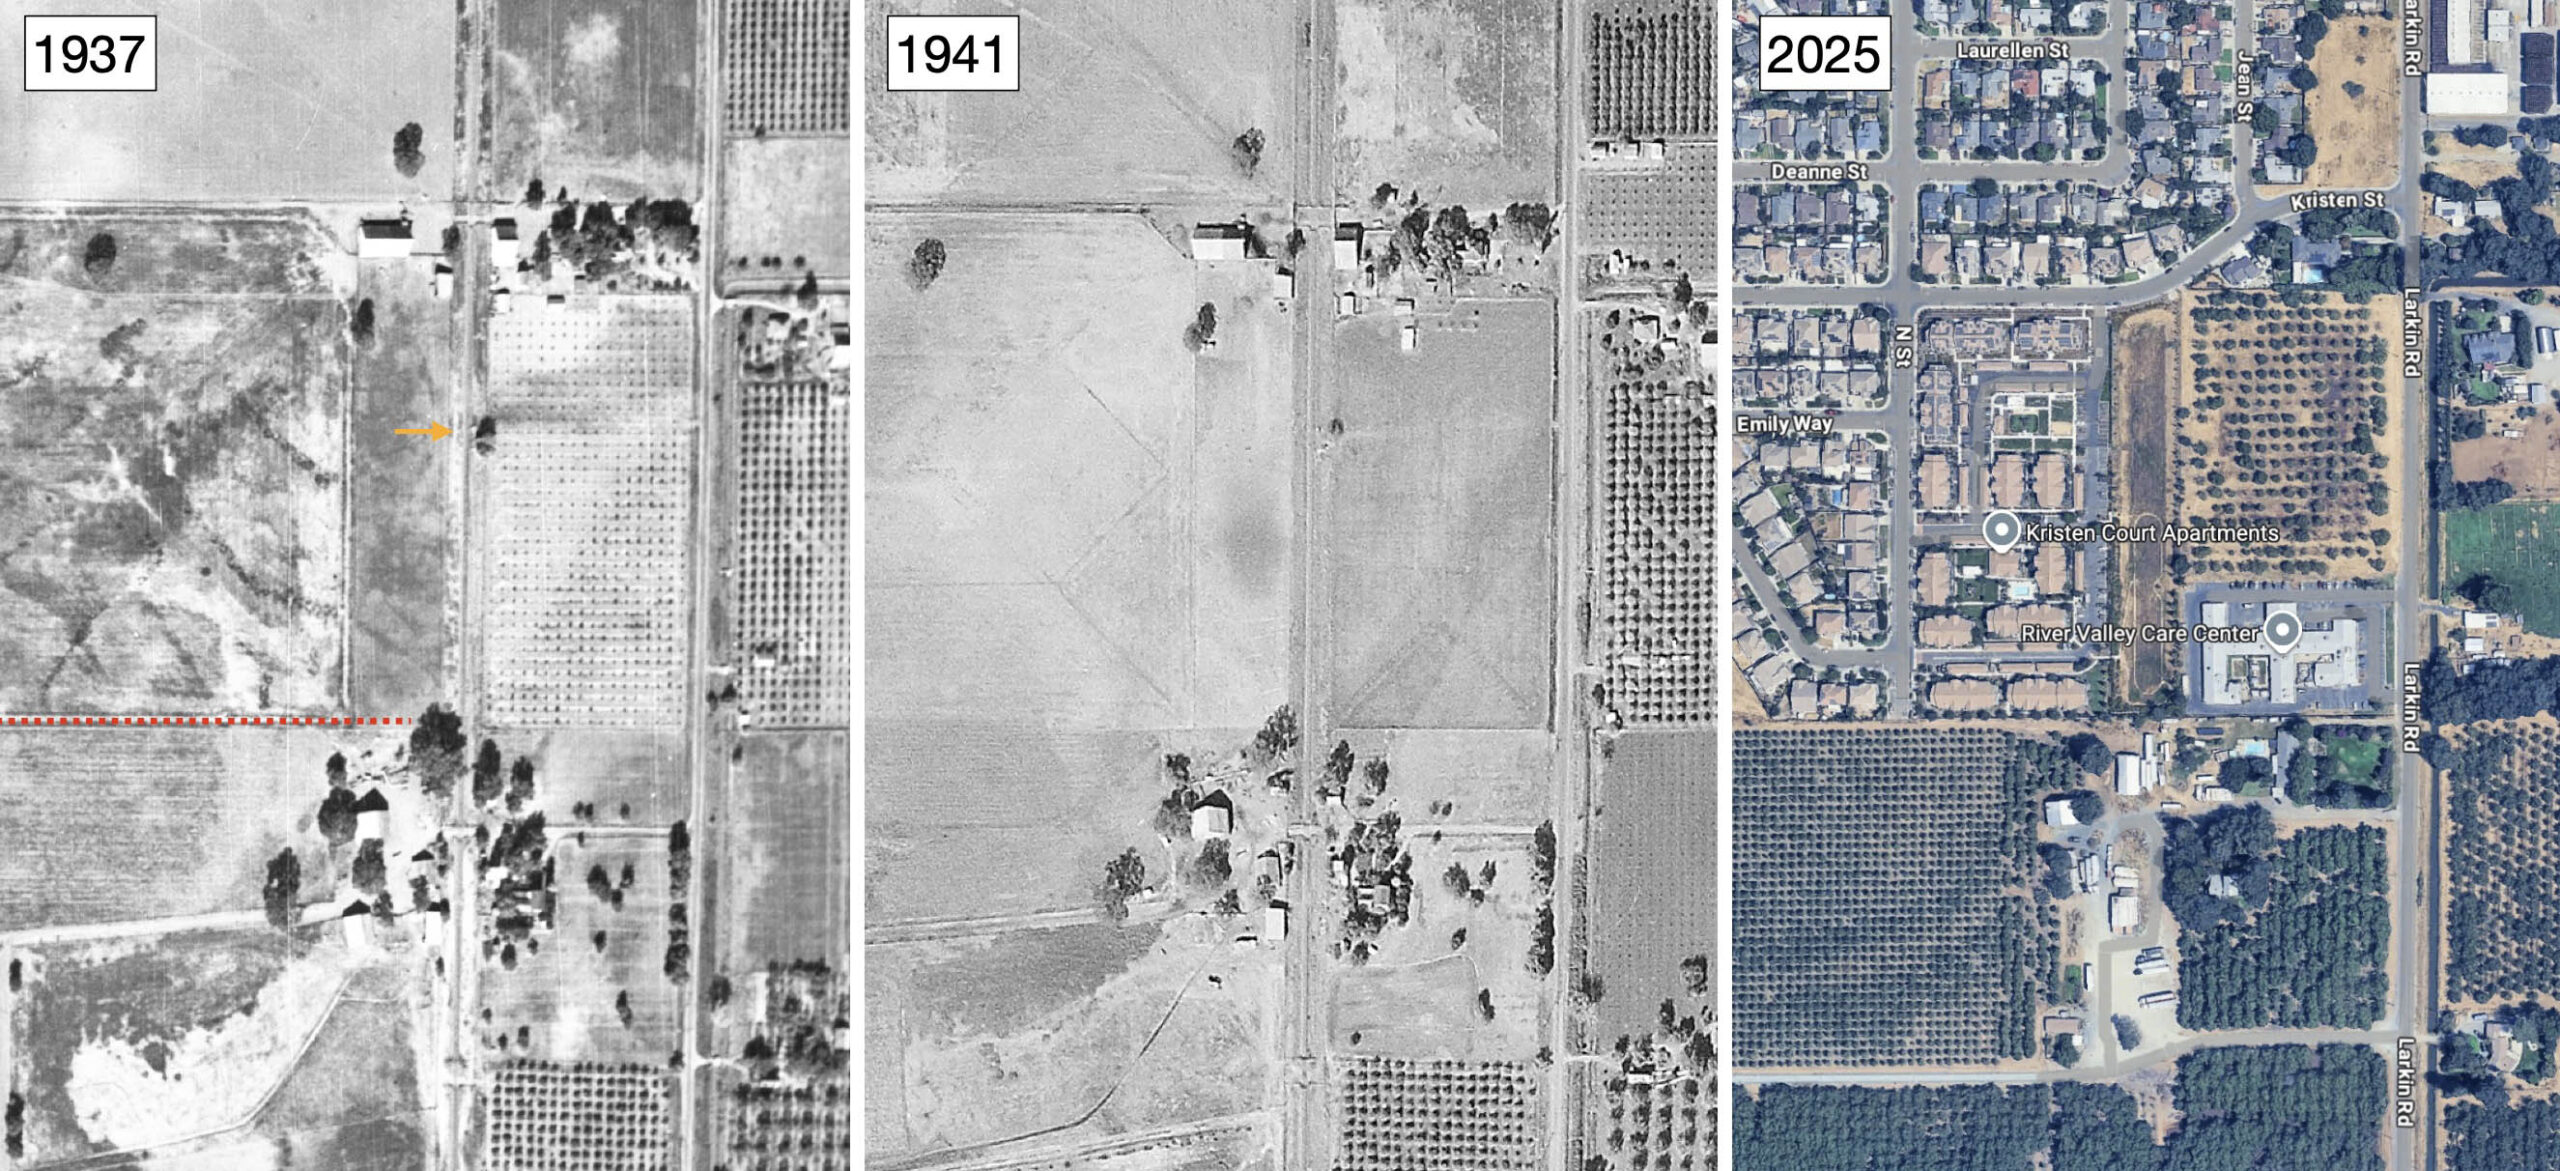
The orange arrow marks the position of the Bihlman shelter in 1937. The aerials suggest the shelter was removed by 1941, and the tree surrounding it was trimmed back. The dotted red line indicates the furthest south that new developments have been built in he southern portion of Live Oak. The spot here the shelter sat is still an orchard, but bordered on the south by River Valley Care Center as seen in the aerial from 2025.
L337-145-Courtesy The National Archives, AAZ-127-36, l, c-7490_447, Courtesy of UC Santa Barbara Library Geospatial Collection, c, Google Maps, r, (Image 30 of 47)
Finally the train has reached the double-track section in Live Oak. Up until at least 1925, this spot was known as Maceta. This south view from Apr. 19, 1940 coincided with a meeting between trains No. 2 and No. 7, this train No. 7 with SN 1022 on the rear.
L337-150-Marvin T. Maynard Photo, Courtesy BAERA, Western Railway Museum Archives, (Image 31 of 47)
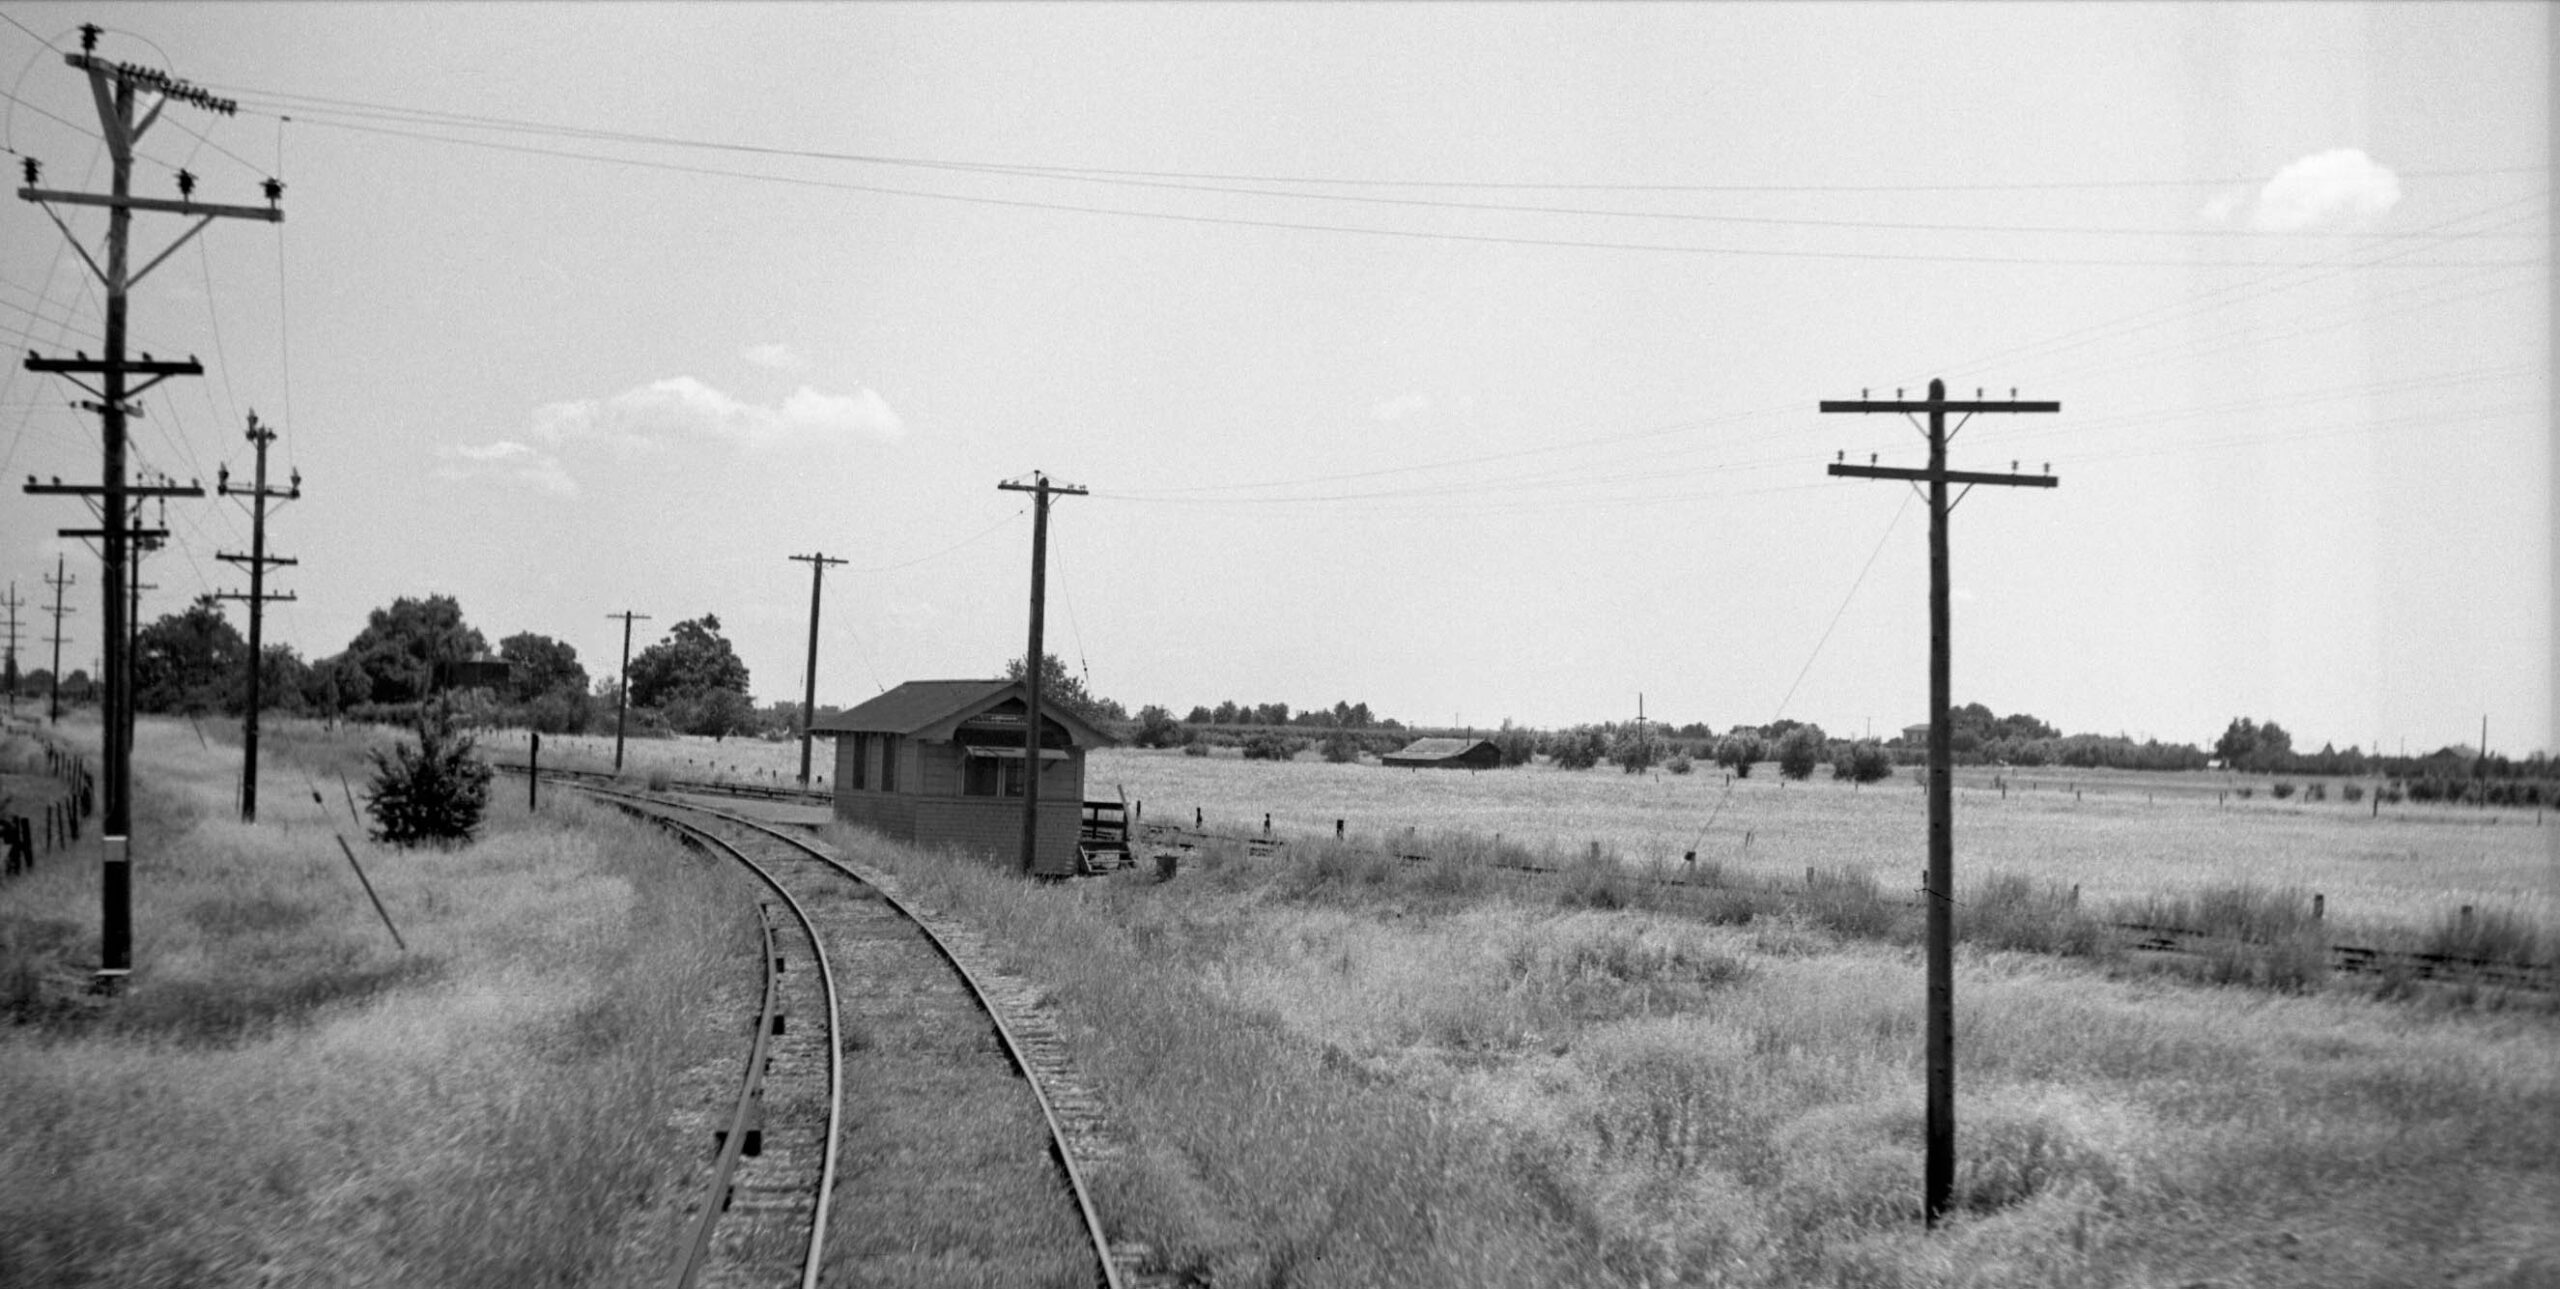
Since this section was not reviewed in “How the North End of the Sacramento Northern Railway Was Lost”, some highlights from the post-electric era will be presented next. First, as for the shelter at Colusa Jct., this northeast view of Western Pacific, WP, Budd RDC car on excursion shows that the shelter survived at least until this date, Mar. 26, 1960. Aerial views from 1964 and 1968 were equivocal as to the shelters continued existence.
L337-155-Jack Shekell Photo, Courtesy BAERA, Western Railway Museum Archives, 132196sn, (Image 32 of 47)
This west view ca. 1976 of SN 712 and the Chico Local fails to show the shelter.
L337-160-Wayne Monger Photo, Courtesy Wayne Monger, (Image 33 of 47)
The SN crossed sloughs or canals five times between Colusa Jct. and Live Oak, and all are intact in 2025. This diagram of the first part of the route between Colusa Jct. and just beyond Encinal Rd., broken blue line, shows three of them, color coded for identification versus the 1972 map presented south to north, left to right. A ground based image of the crossing of Live Oak Slough, green box, seen in L337-105 just south of Encinal station, was not taken, but the upper left image from Google Maps provides for its presence. Next for the crossing marked by the red box. Diagram Ref: WP-SN-TS Condensed Track Chart dated Jan. 1, 1974
L337-162-Wayne Monger Photo, Courtesy Wayne Monger, tl, Google Maps, tr, cas-3311_63, Courtesy of UC Santa Barbara Library Geospatial Collection, bottom, (Image 34 of 47)
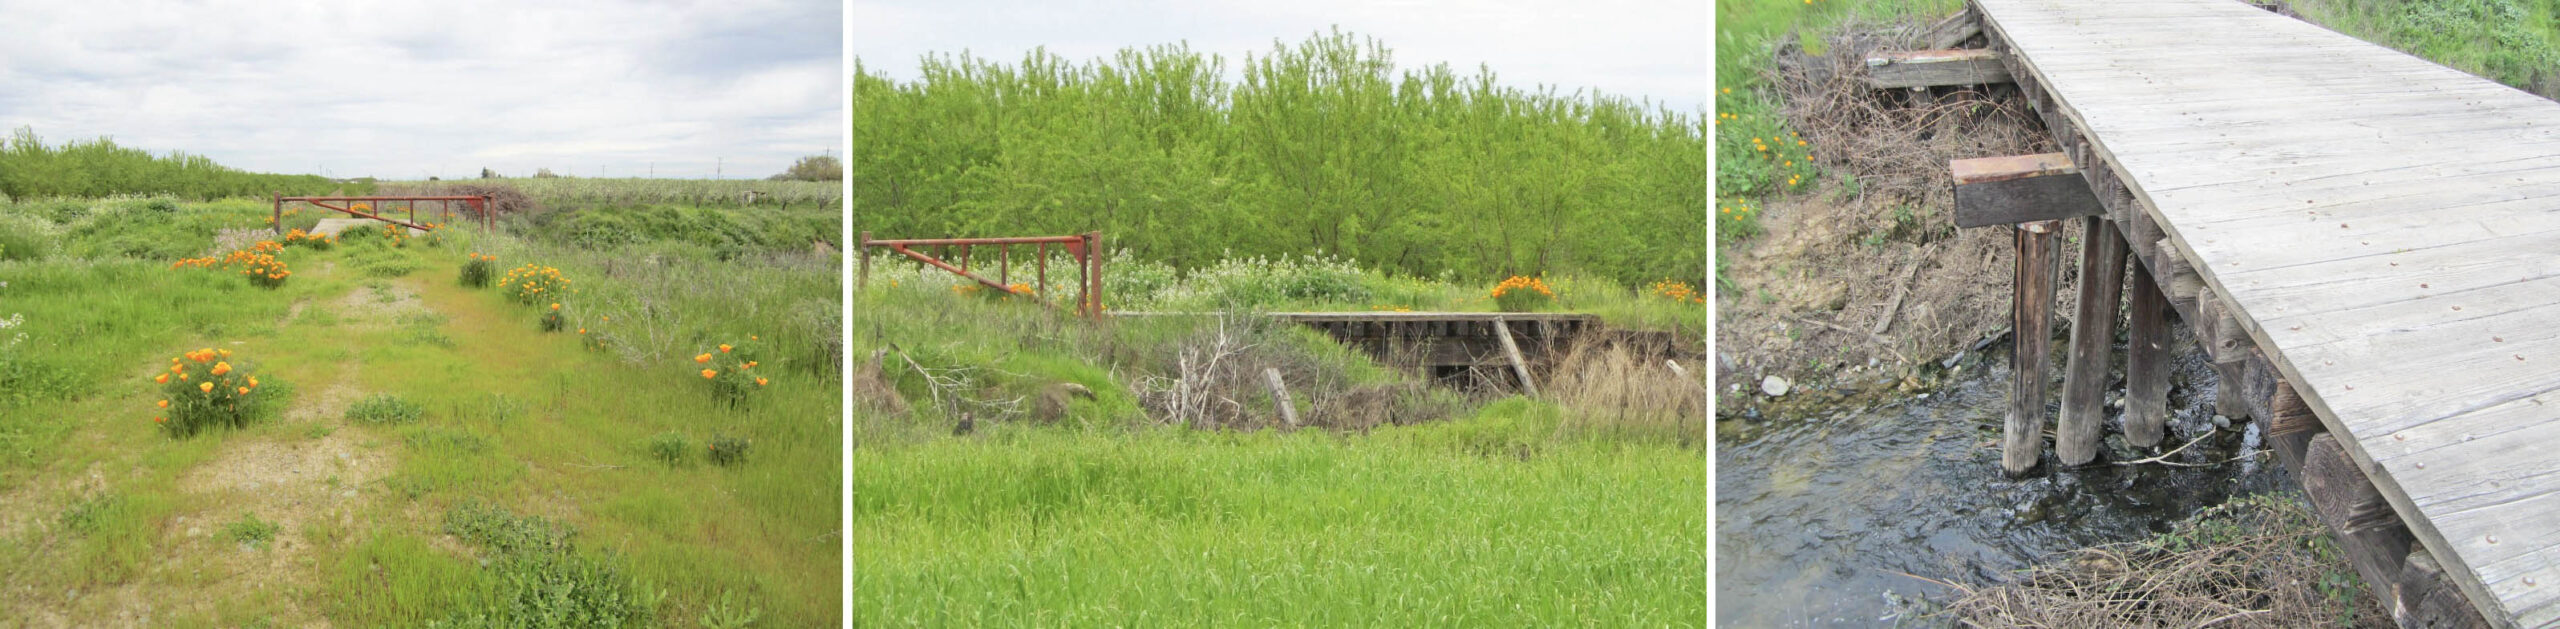
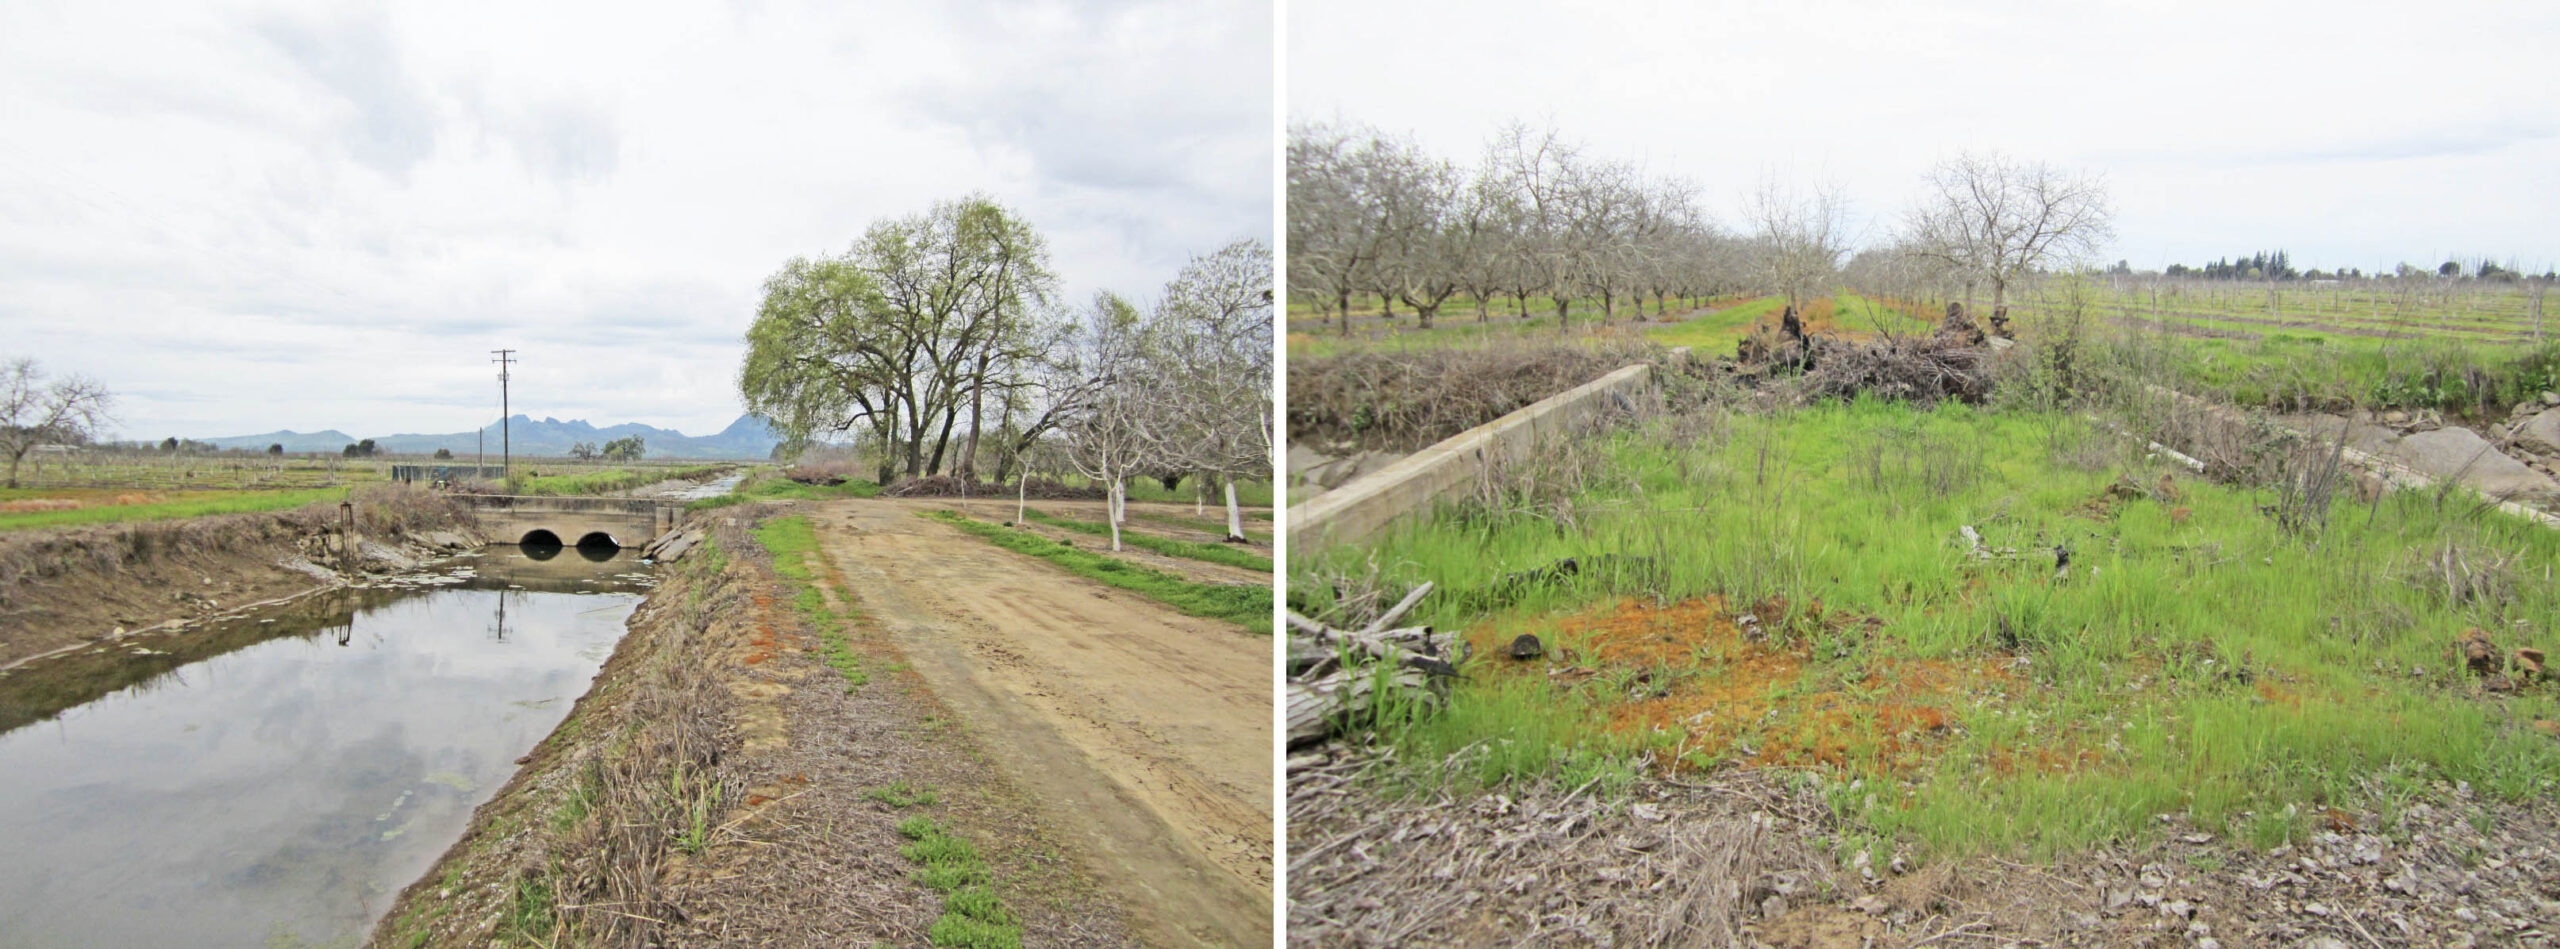
The southernmost crossing was just north of the grade crossing at Eager Rd. where Tierra Buena Rd. transitions to Larkin Rd. A north view from the Live Oak Canal crossing is shown in the left image from Apr. 1, 2018, with two details to the center and right.
L337-165-Stuart Swiedler Photos, (Image 35 of 47)
The substation at Encinal like several others on the North End survived long after the electric era. On the left, a northeast view from 1960 shows the abandoned substation.The aerial from 1972 on the right shows that the substation was still present.
L337-170-Sappers Collection, Courtesy BAERA, Western Railway Museum Archives,136923sn, l, Courtesy of UC Santa Barbara Library Geospatial Collection, cas-3311_62, r, (Image 36 of 47)
Ted Benson visited Encinal in May 1976 and timed it perfectly to catch SN 712 and the Chico Local passing the palm trees without its companion substation, southeast view.
L337-175-Ted Benson Photo, Courtesy Ted Benson, (Image 37 of 47)
The palm trees are still there in 2025. Shown here is a south view on Apr. 1, 2018 from Encinal Rd. up Garden St., that road replacing the right-of-way.
L337-180-Stuart Swiedler Photo, (Image 38 of 47)
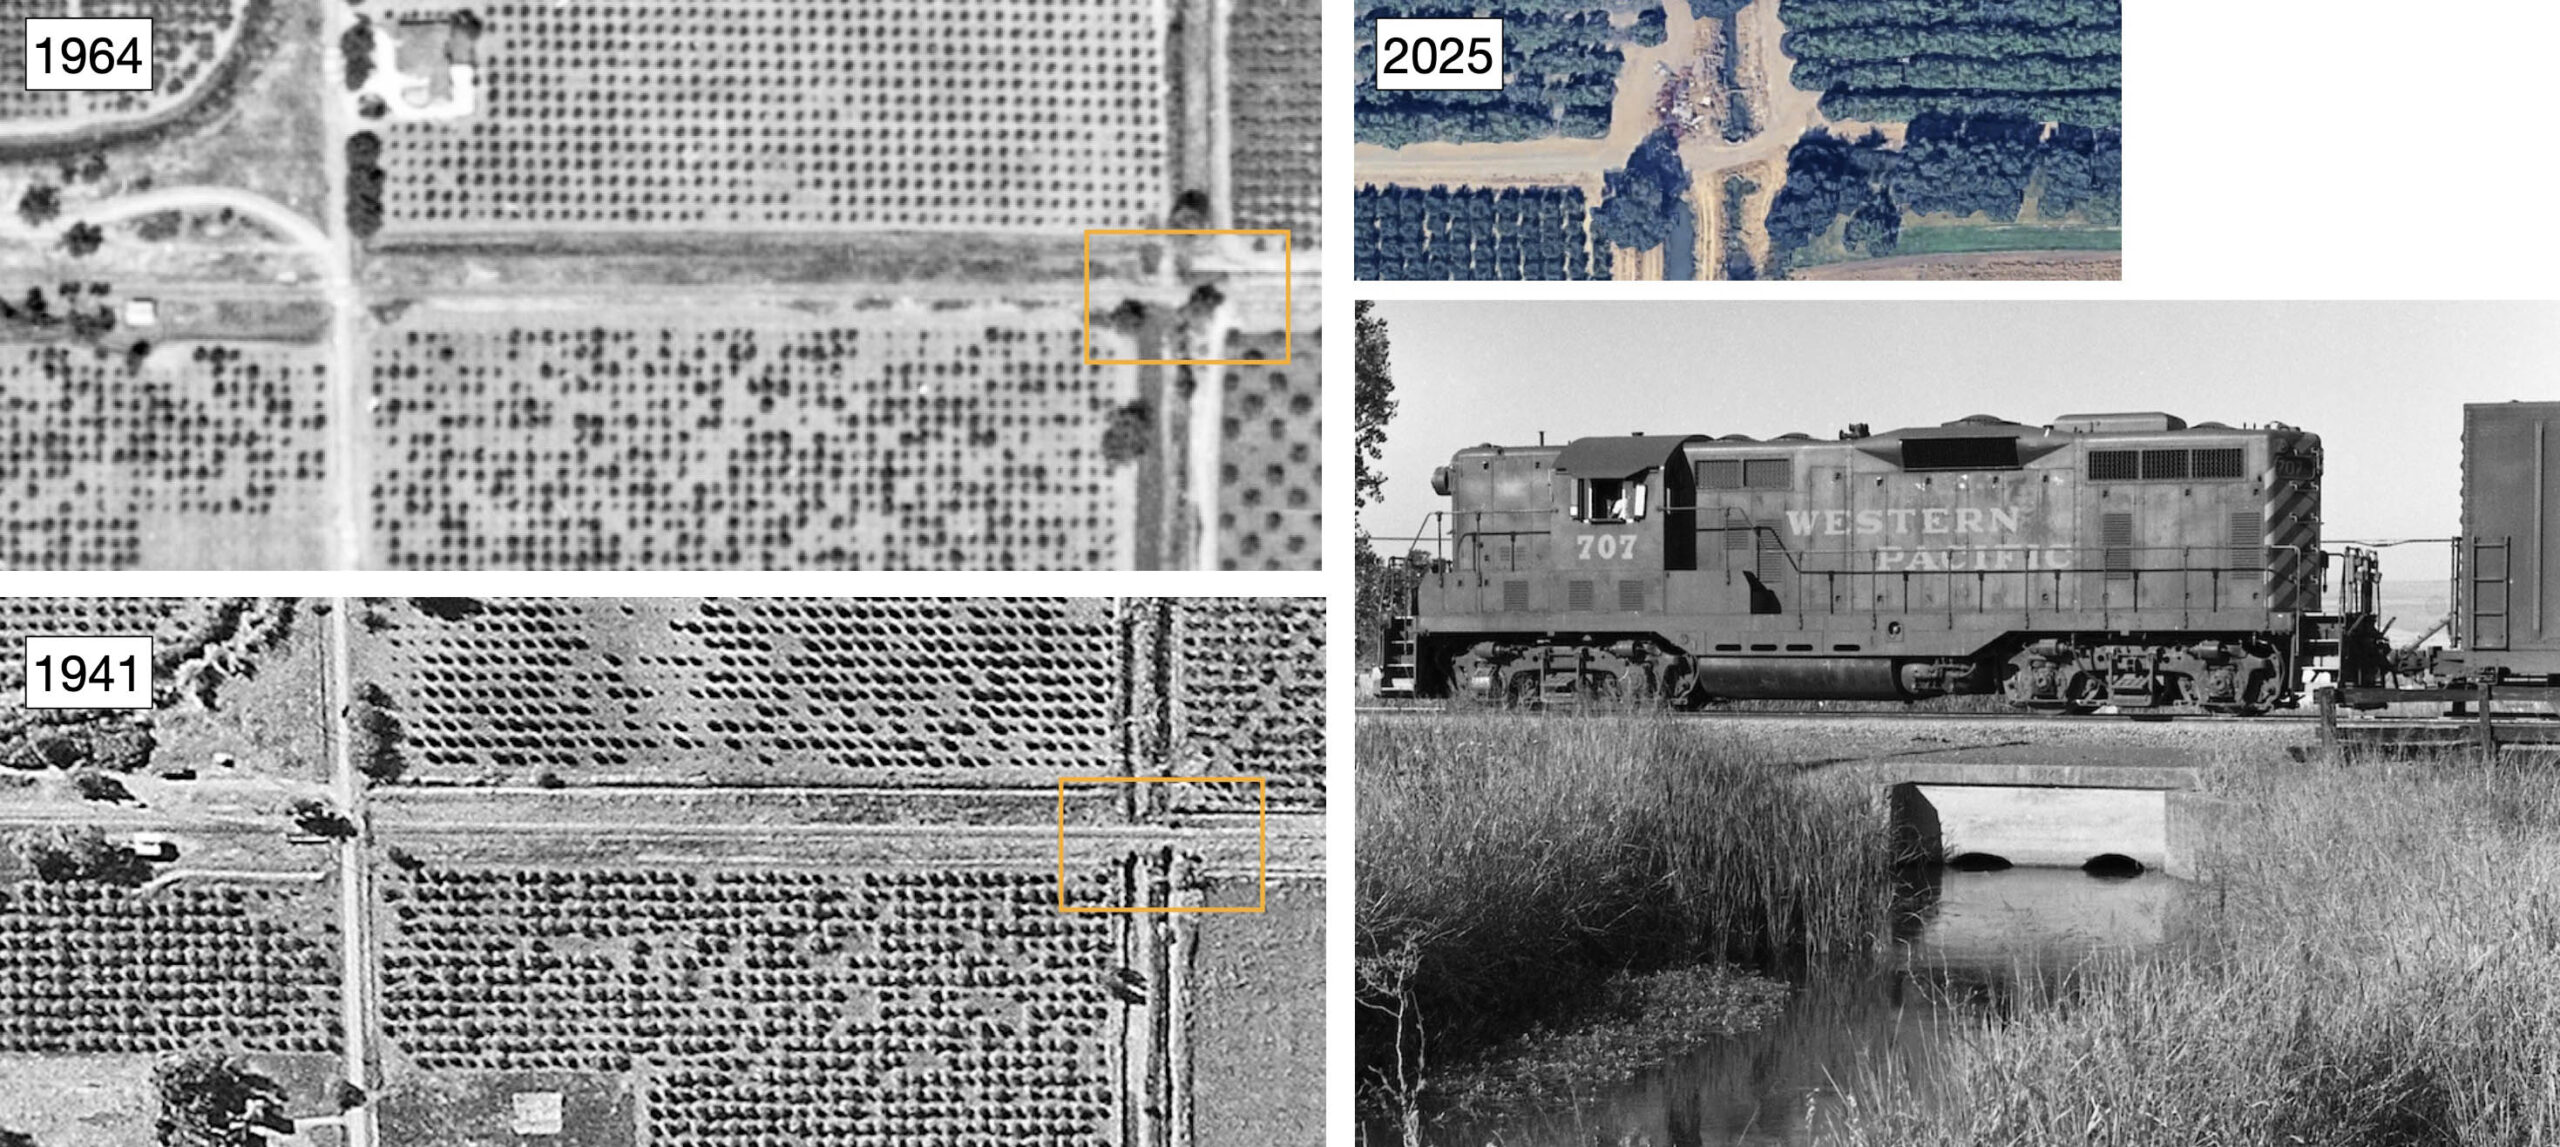
The canal crossing marked by the brown box in L337-162 just to the north of Encinal Rd. is shown how it appeared in 1964, 1941 and 2025. It almost appears as if the canal was modified to be offset between 1941 and 1964, and in 2025 there is no evidence of a trestle. The image taken by Wayne Monger ca. 1980 with WP 707 in the lower right might show part of a concrete base that made up part of it. There will be an additional crossing where the structure is also made of concrete, but it looks somewhat different and will be shown soon.
L337-182-cas-sut_1-78, tl, c-7490_449, bl, both Courtesy of UC Santa Barbara Library Geospatial Collection, Google Maps, tr, Wayne Monger Photo, Courtesy Wayne Monger, br, (Image 39 of 47)
Continuing to the next SN right-of-way diagram, two more crossings are marked by blue and pink boxes were present between Clark and Paseo Rds. That existed in 1941 and are present in 2025. The one marked in blue will be discussed first.
L337-185-Courtesy Wayne Monger, l, Google Maps, tr, c-7490_448, Courtesy of UC Santa Barbara Library Geospatial Collection, br, (Image 40 of 47)
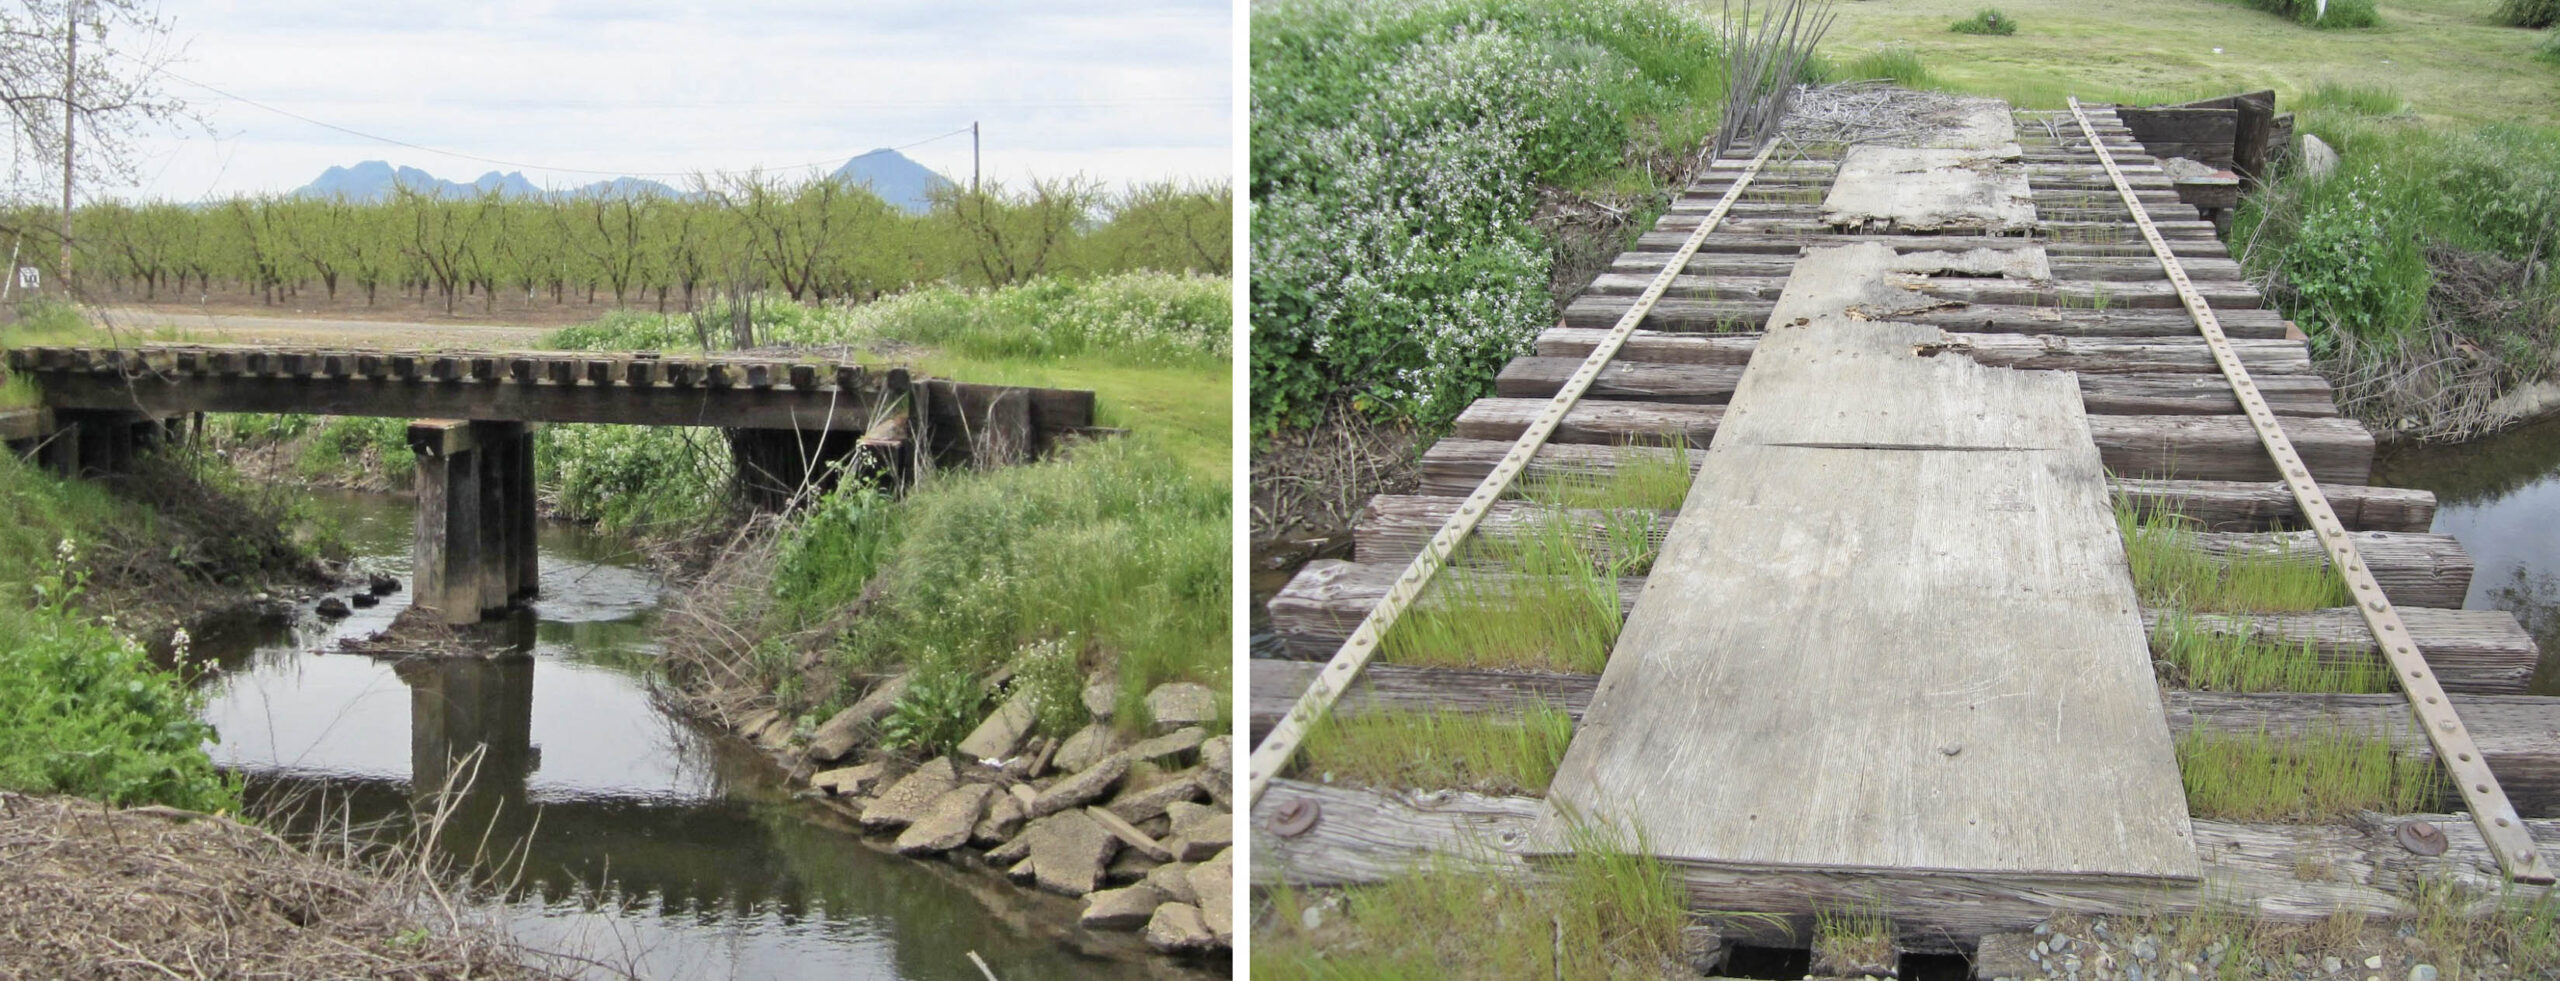
The image on the left is a west view of the crossing marked by the blue box taken halfway between Larkin Rd. and the crossing on Apr. 1, 2018. The image on the right is a north view across the concrete slab.
L337-187-Stuart Swiedler Photos, (Image 41 of 47)
Heading north, the final canal crossing is a trestle just south of Paseo Rd., shown here on the left in a west view from Apr. 1, 2018. The north view above the trestle is shown on the right. Tilting the camera any more skyward would have revealed a house built right on the right-of-way.
L337-190-Stuart Swiedler Photos, (Image 42 of 47)
A south aerial view on the left from 1958, with the detail boxed in red on the right, shows the location of the three northern-most stops before Live Oak that have been summarized in this update. For more images in and about Maceta, click here.
L337-195-Copyright California Department of Transportation, 5884-1, (Image 43 of 47)
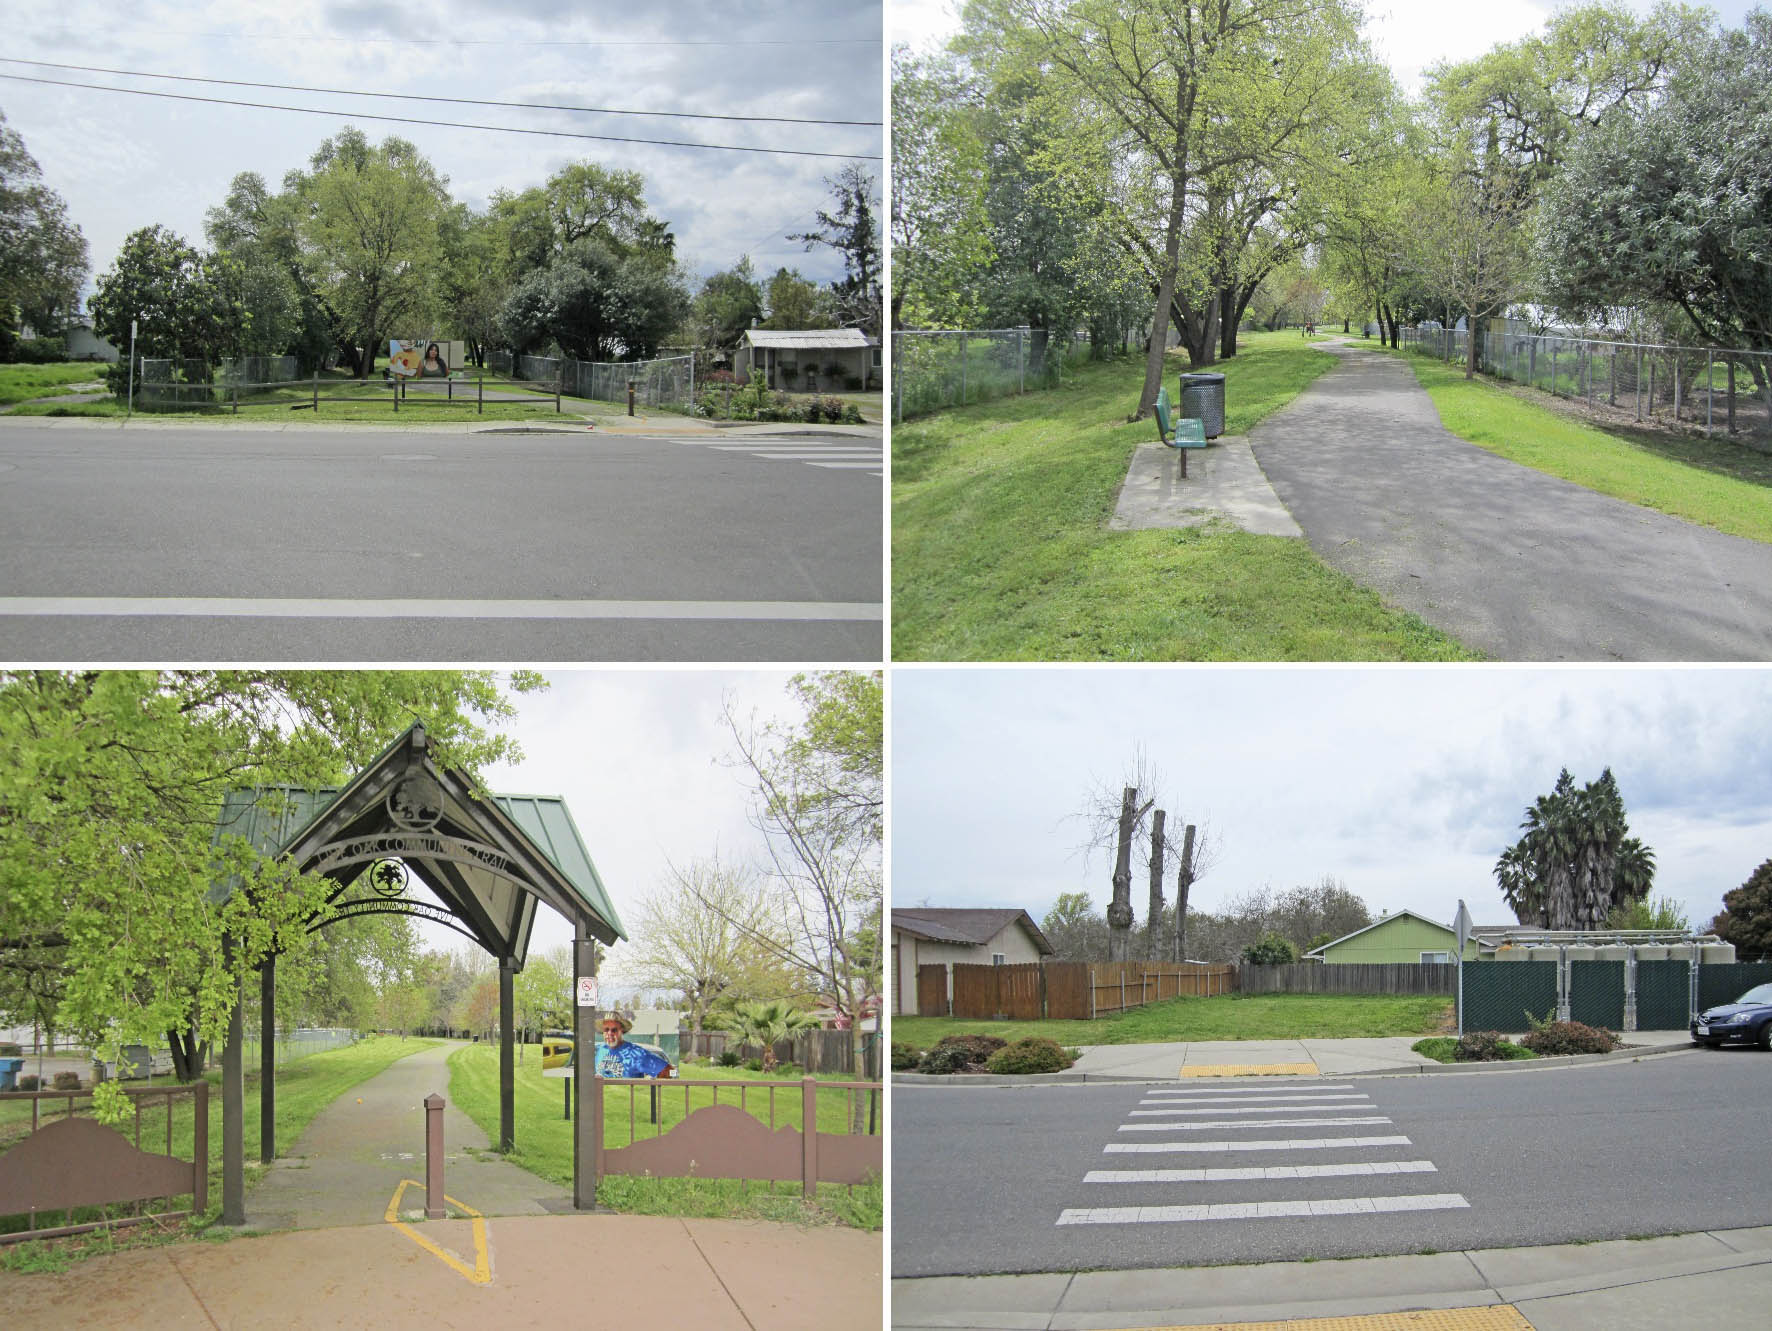
You can still enjoy a walk through the double-track section of Maceta between Elm St. and Apricot St. as the abandoned right-of-way was transformed to the Live Oak Community Trail. The entry from Elm St. is in the upper left, within the trail viewed to the south is seen in the upper right. he entry from the southern end at Apricot St. viewed to the north is shown in the bottom left, and the development built on the right-of-way across Apricot St. viewed to the south is seen in the bottom right.
L337-200-Stuart Swiedler Photos, (Image 44 of 47)
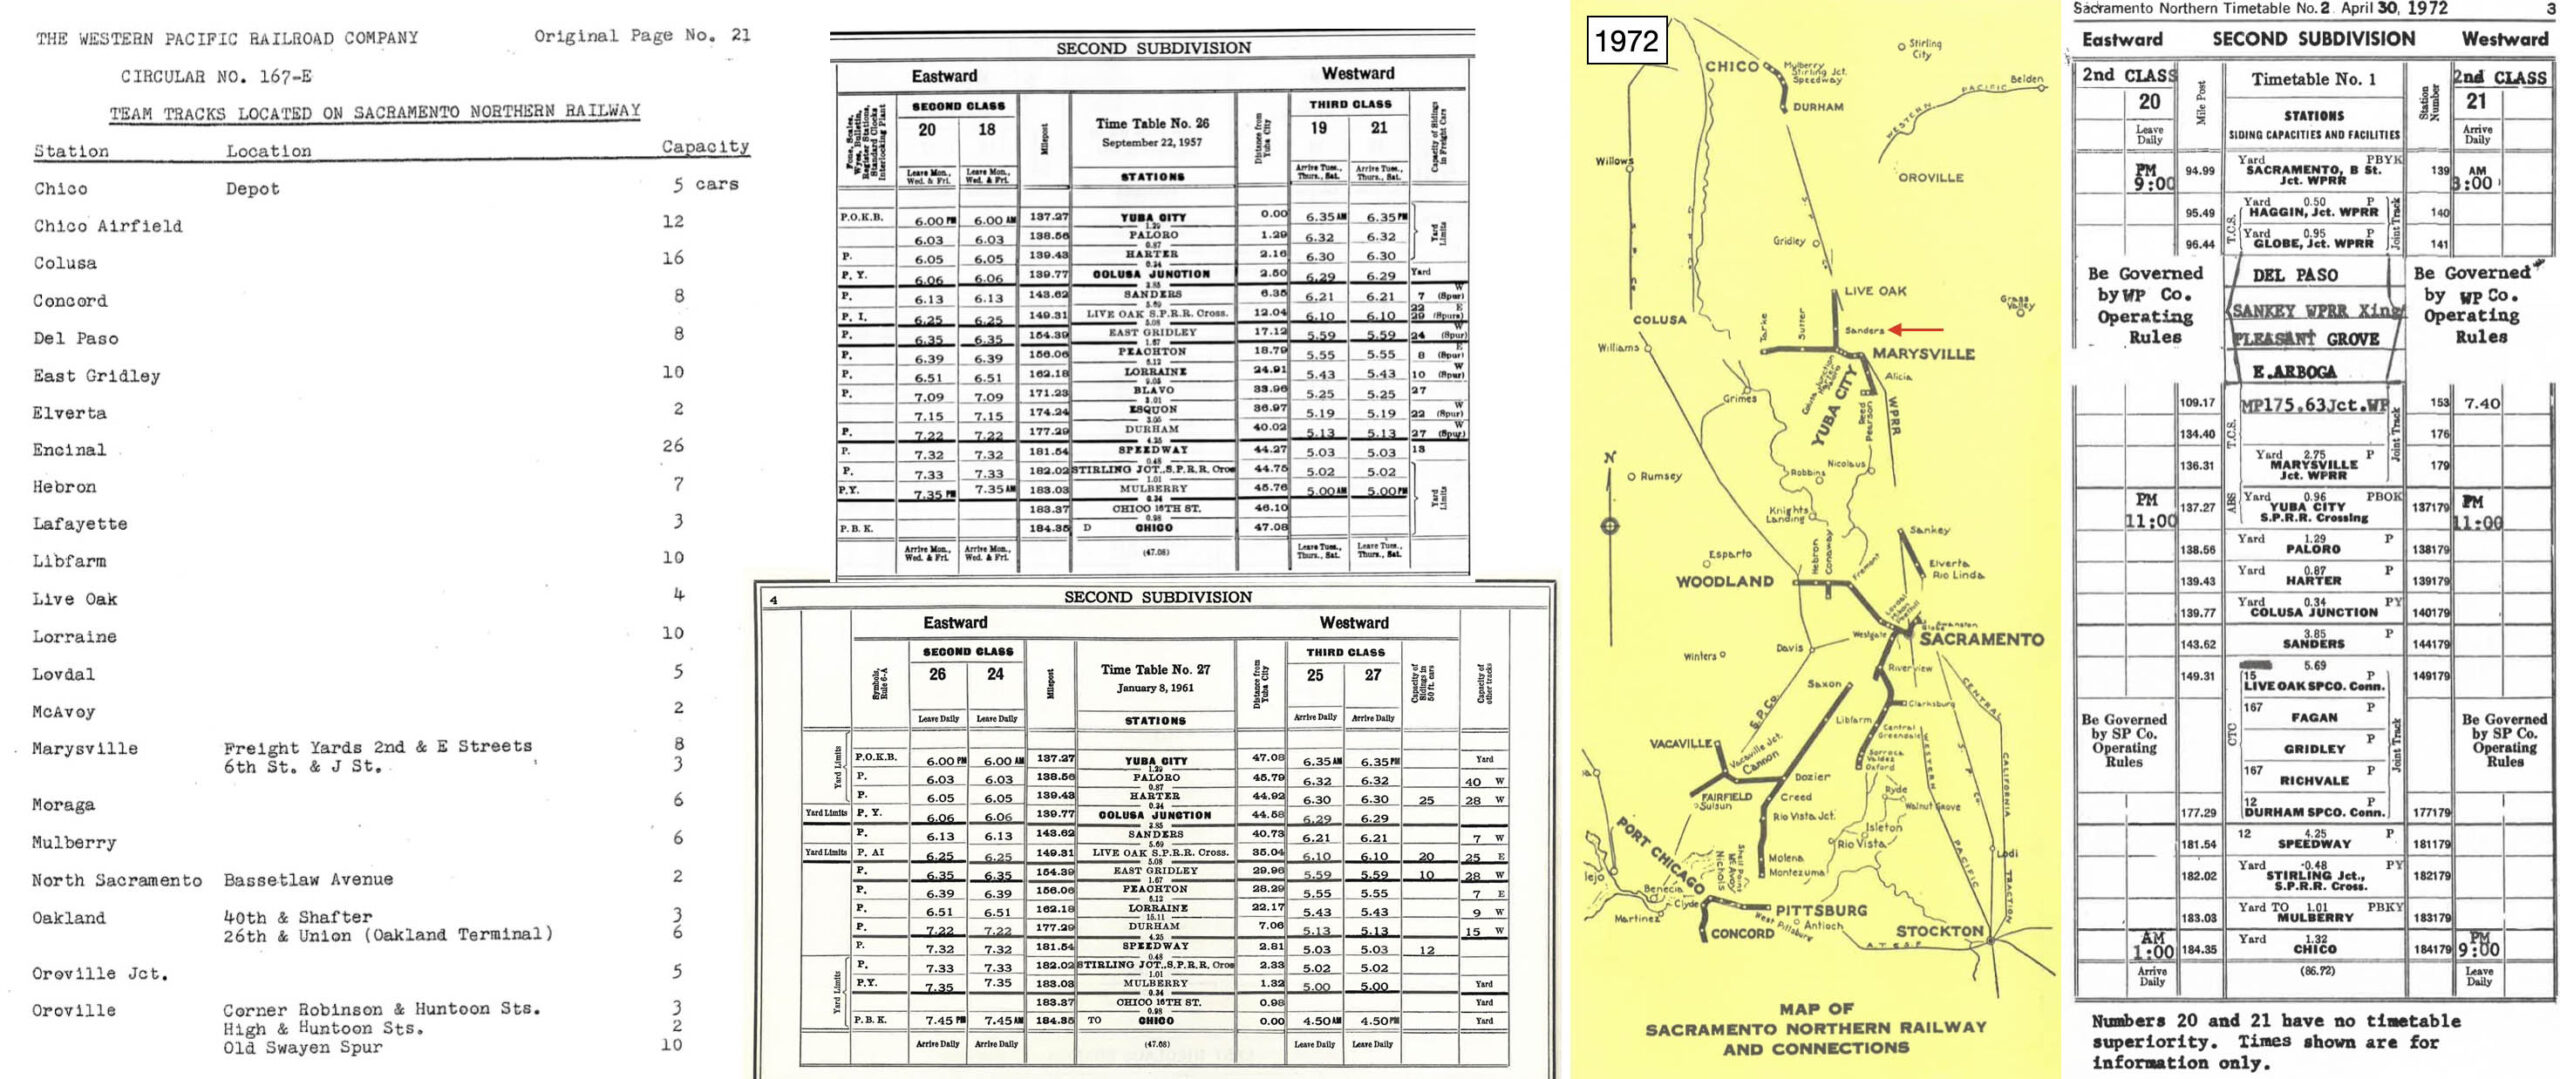
Demoro notes in his chapter “A Ride on the Sacramento Northern” that the area between Colusa Jct. and Live Oak was a prosperous agricultural country, the Thompson seedless grape and Philip cling peach originating there. The WP Circular No. 167-E ca. 1957, left, only lists the Encinal team track as a SN customer between and excluding Colusa Jct. and Live Oak, yet the 1957 employee timetable, top center, indicates only Sanders seven-car spur as a stop. The map and 1972 employee timetable also only list Sanders.
L337-205-Courtesy Bruce Eldridge, l, wx4.org, top lc, and BAERA, Western Railway Museum Archives, 13488, lower lc, 13492, rc and r, (Image 45 of 47)
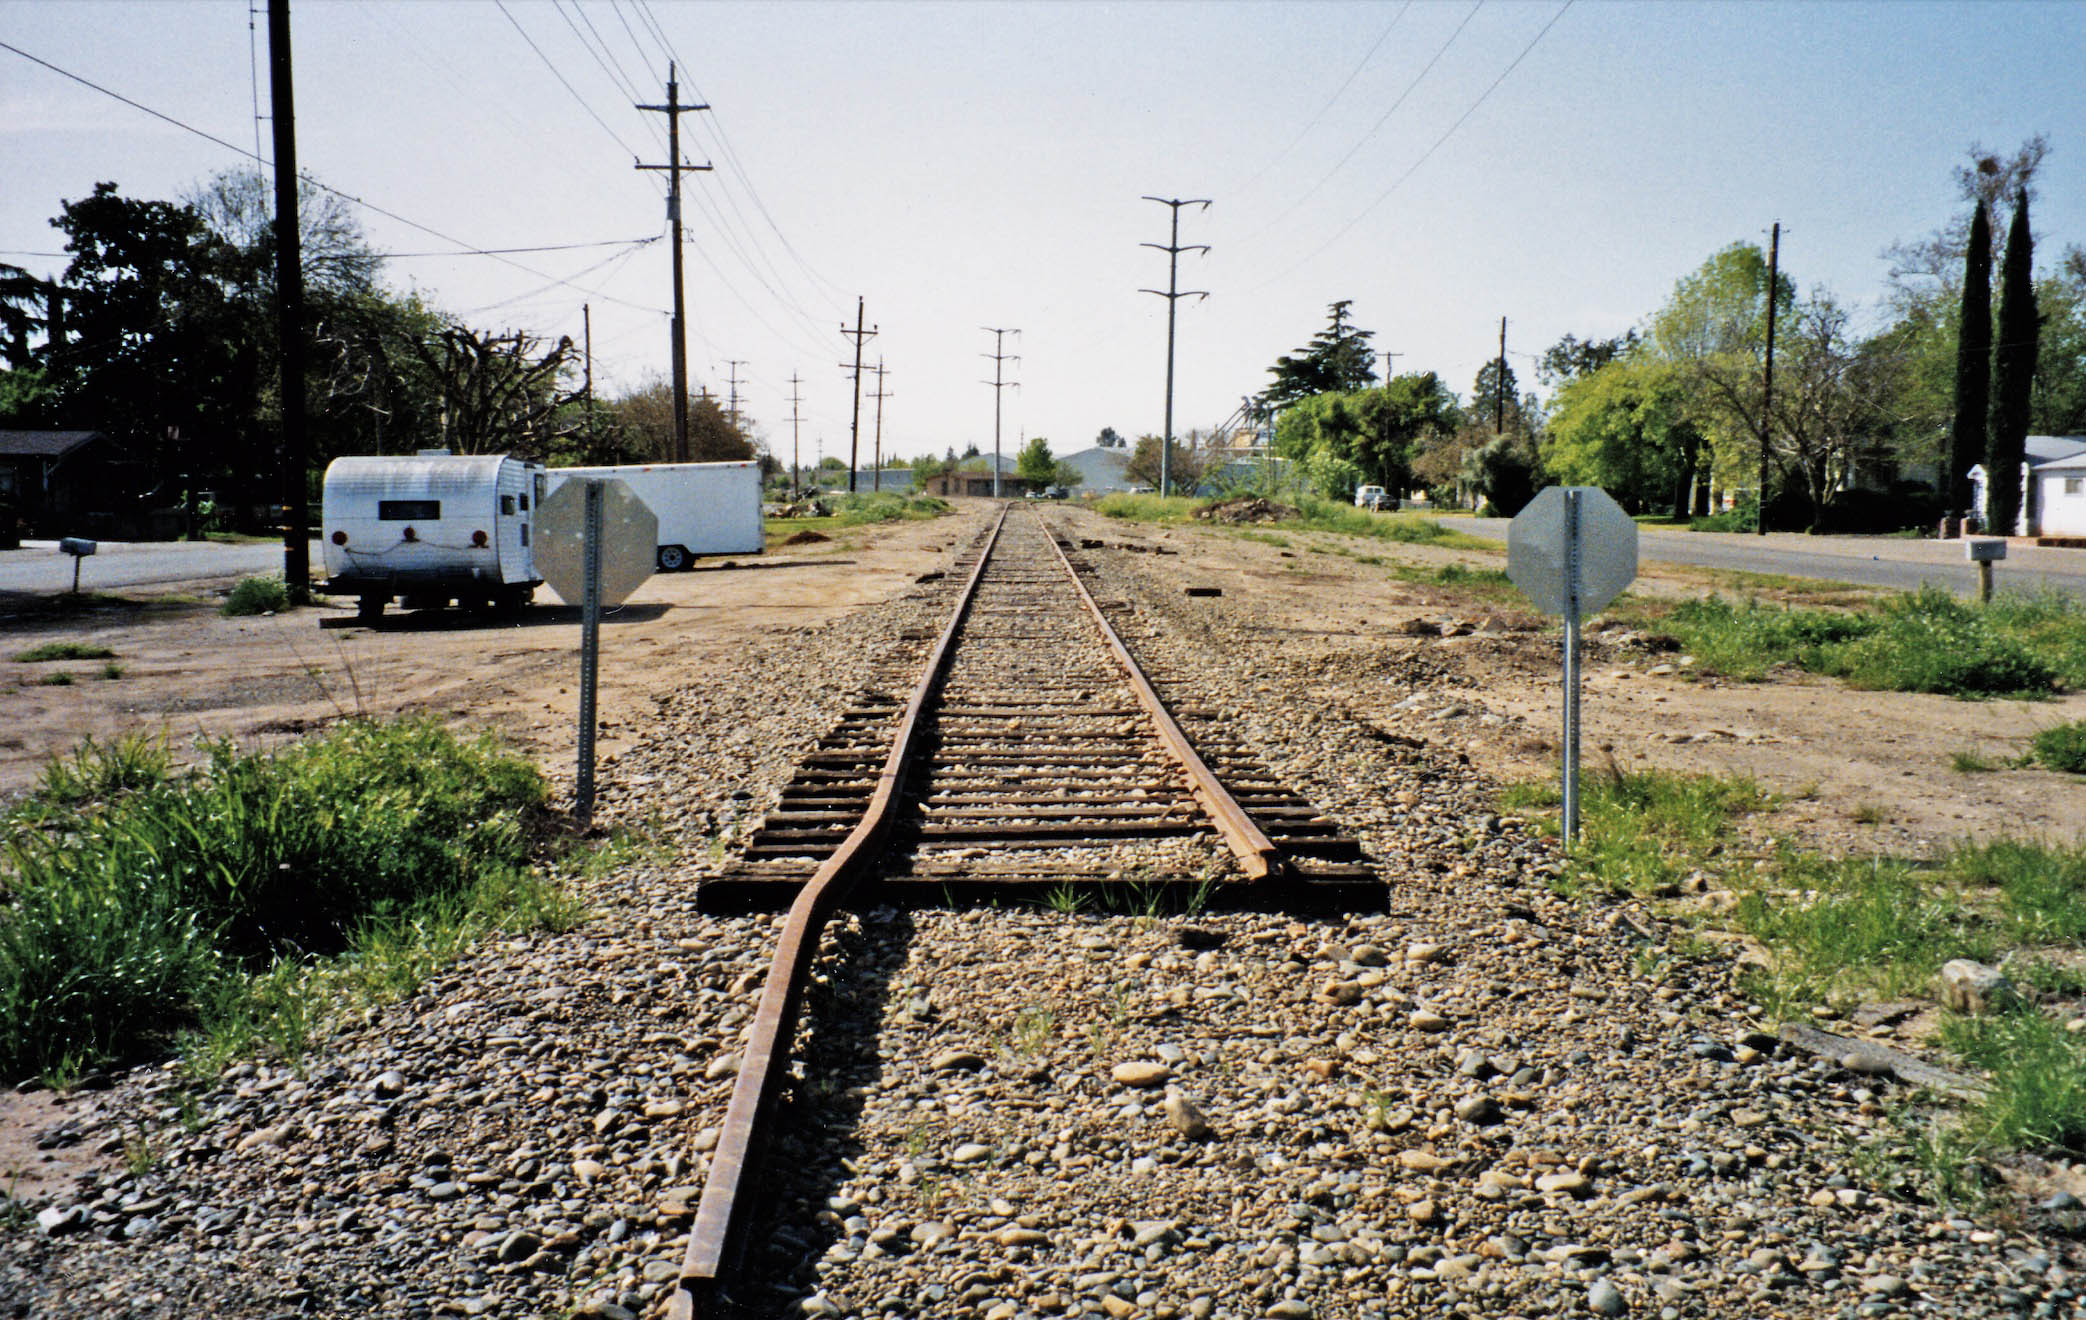
This update began with a north view of Butte House Rd. to show the end of the track in 1988, and presented here a complimentary south view from the end of the track on May 4, 1993.
L337-207-Wilbur C. Whittaker Photo, Courtesy Arnold Menke, (Image 46 of 47)
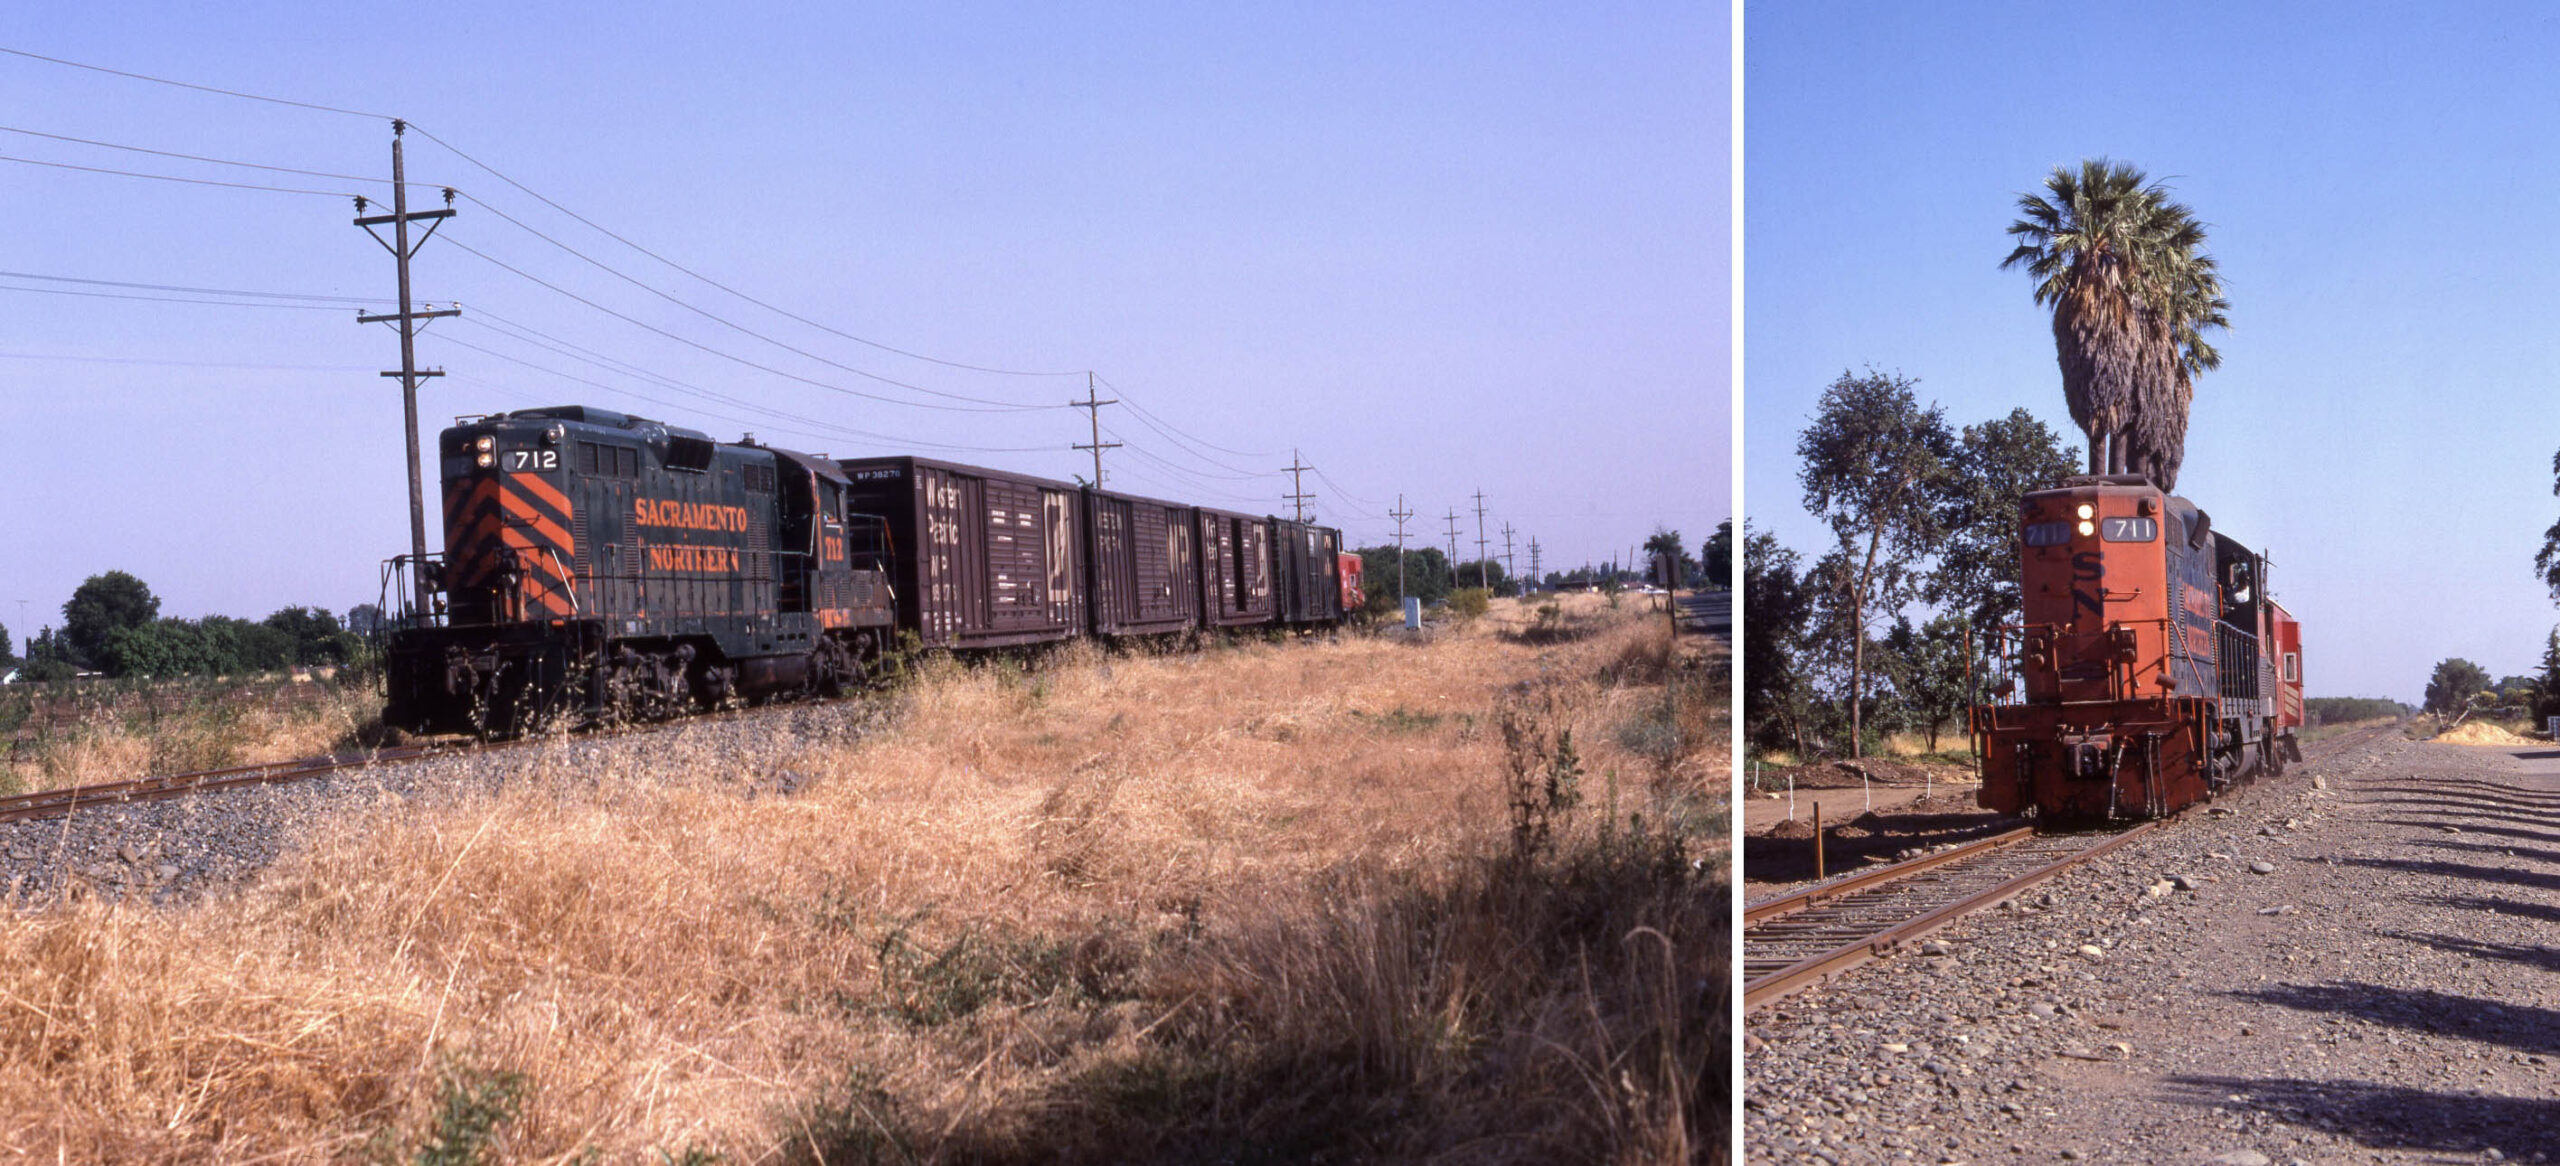
This completes this update at the first crack to compose a ride on the SN between Colusa Jct. and Live Oak ca. 1940. All stations-shelter structures have been documented in this section recalling that aerials from 1937 and 1941 at Walton confirm that no building structures existed there in that interval of time. At least these two images of SN 711 and 712 ca. late 1970s will be easy to recognize based on this effort. Appreciation to Wayne Monger and Tom Messer for providing images that they took of the line, and to Jeff Asay and RJ Dial for their review and insights.
L337-210-Tom Messer Photos, Courtesy Tom Messer, (Image 47 of 47)