Constructing the Southern Pacific to Thousand Oaks and Albany

In the last update, images documenting the construction of the Key Route electric railway lines to Northbrae and Westbrae in Berkeley in 1911 were presented. In this update, construction of the Southern Pacific, SP, Oakland, Alameda & Berkeley, OA&B, electric lines to compete with those entities will be documented. The three lines went further north relative to the Key by encompassing Albany and the southern border of the Thousand Oaks neighborhood in Berkeley, areas almost completely devoid of houses in 1911.
L345-05-Courtesy BAERA, Western Railway Museum Archives, (Image 1 of 42)

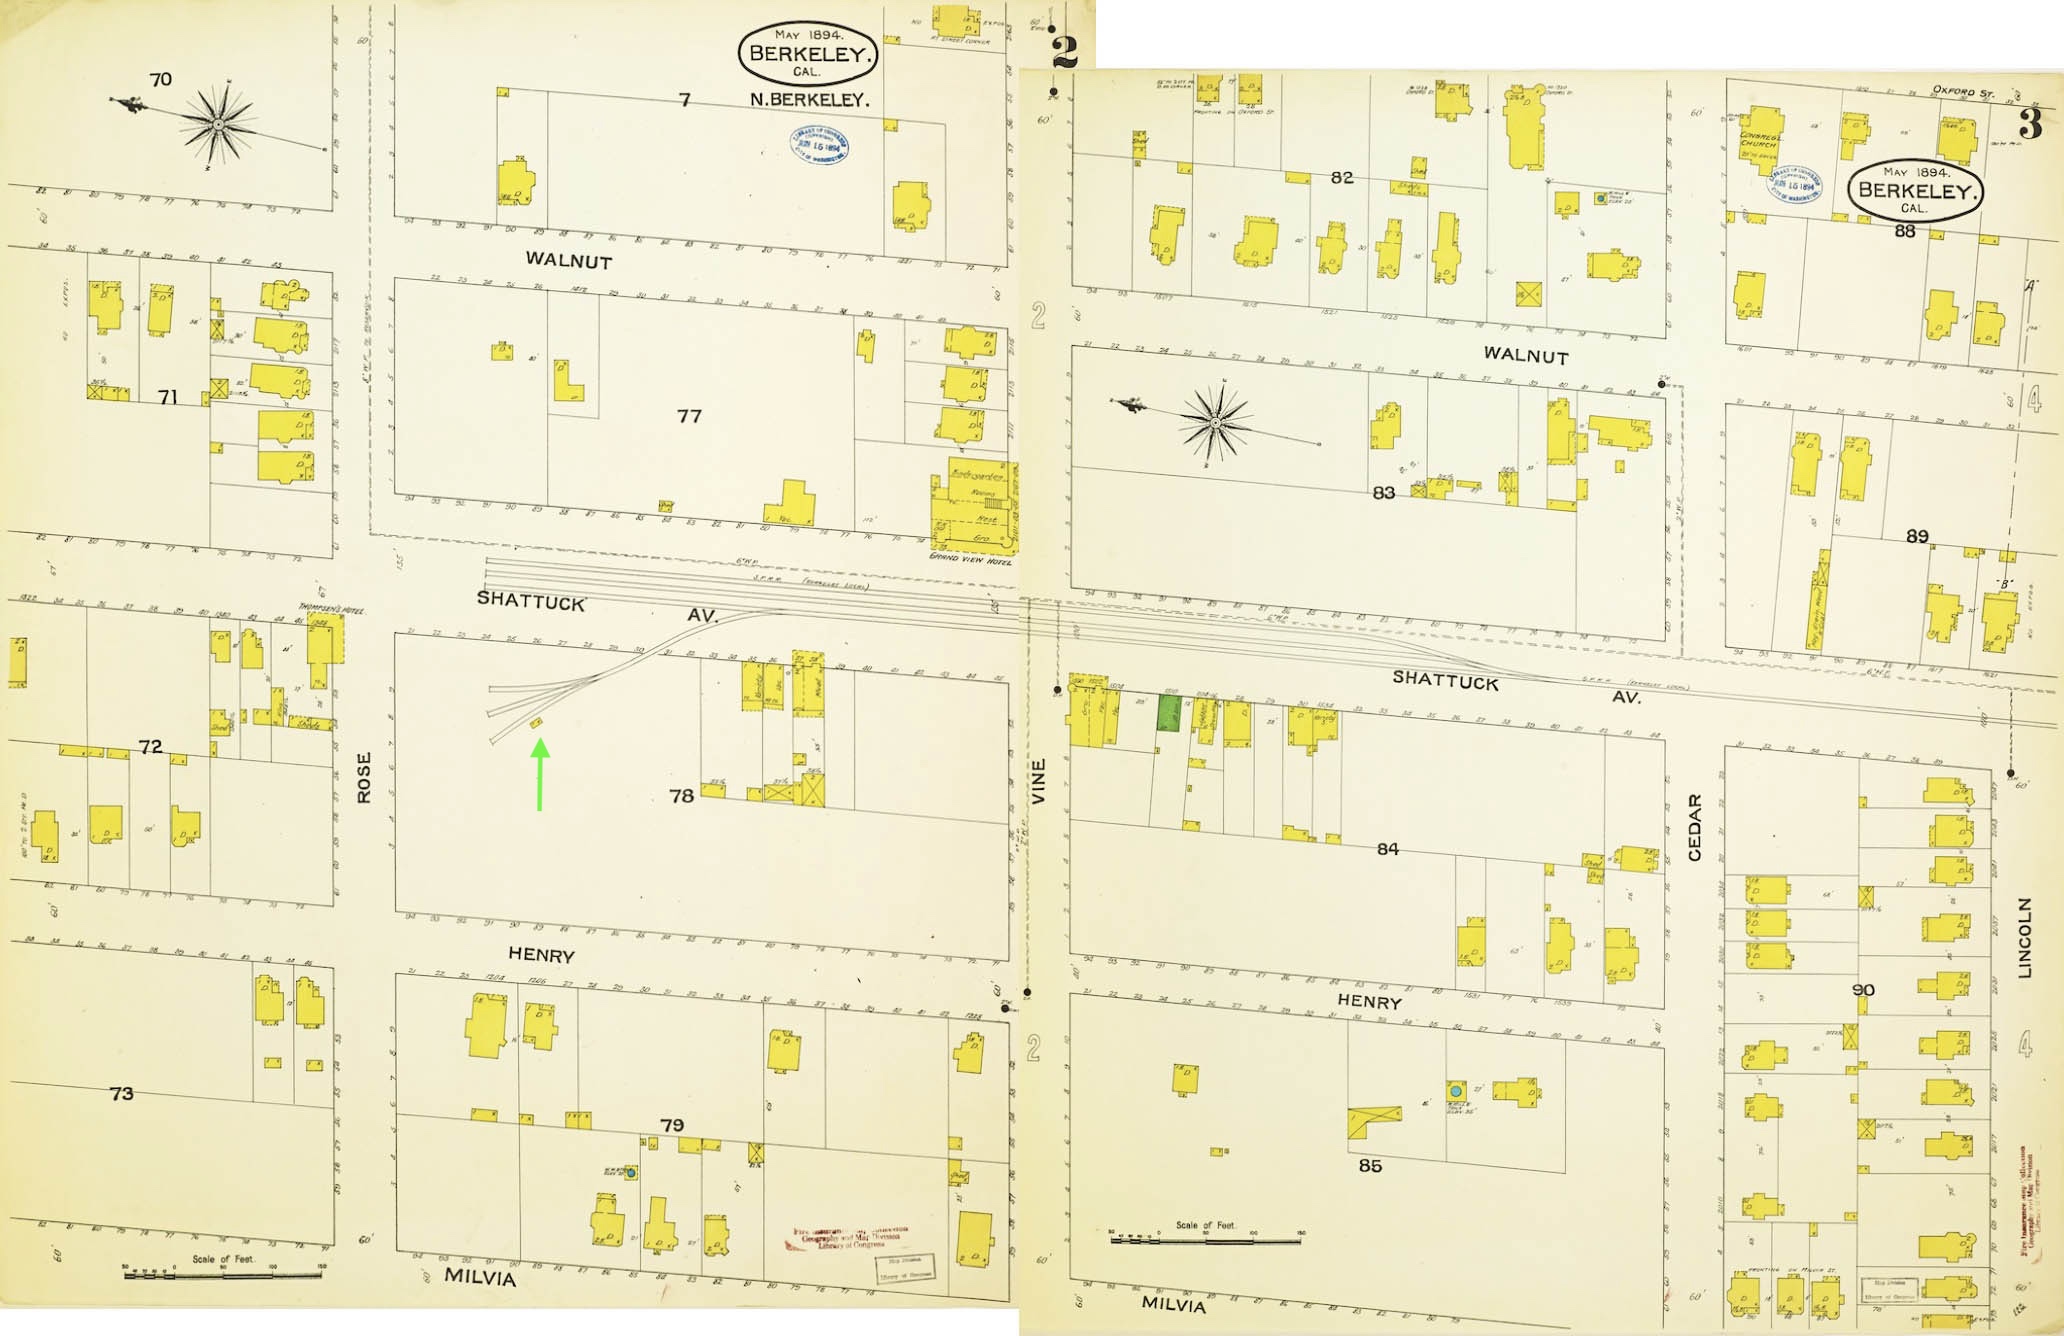
In the first update in this series, the SP was shown to have a mainline into Berkeley via Shattuck Ave. originating as The Berkeley Branch Railroad, a subsidiary of the Central Pacific Railroad, CP, that eventually terminated at Shattuck Ave and Vine St. in 1878. No image of the terminus was found, so this 1894 Sanborn map will serves as a surrogate to show the street and track layout during the railroad steam era. In addition to track veering off Shattuck Ave. toward Henry St., the green arrow points to a small structure that will become an important landmark shortly.
L345-10-Courtesy Library of Congress, Geography and Map Division, Sanborn Maps Collection, Sanborn Map Company, May 1894, Panels 2and 3, (Image 2 of 42)
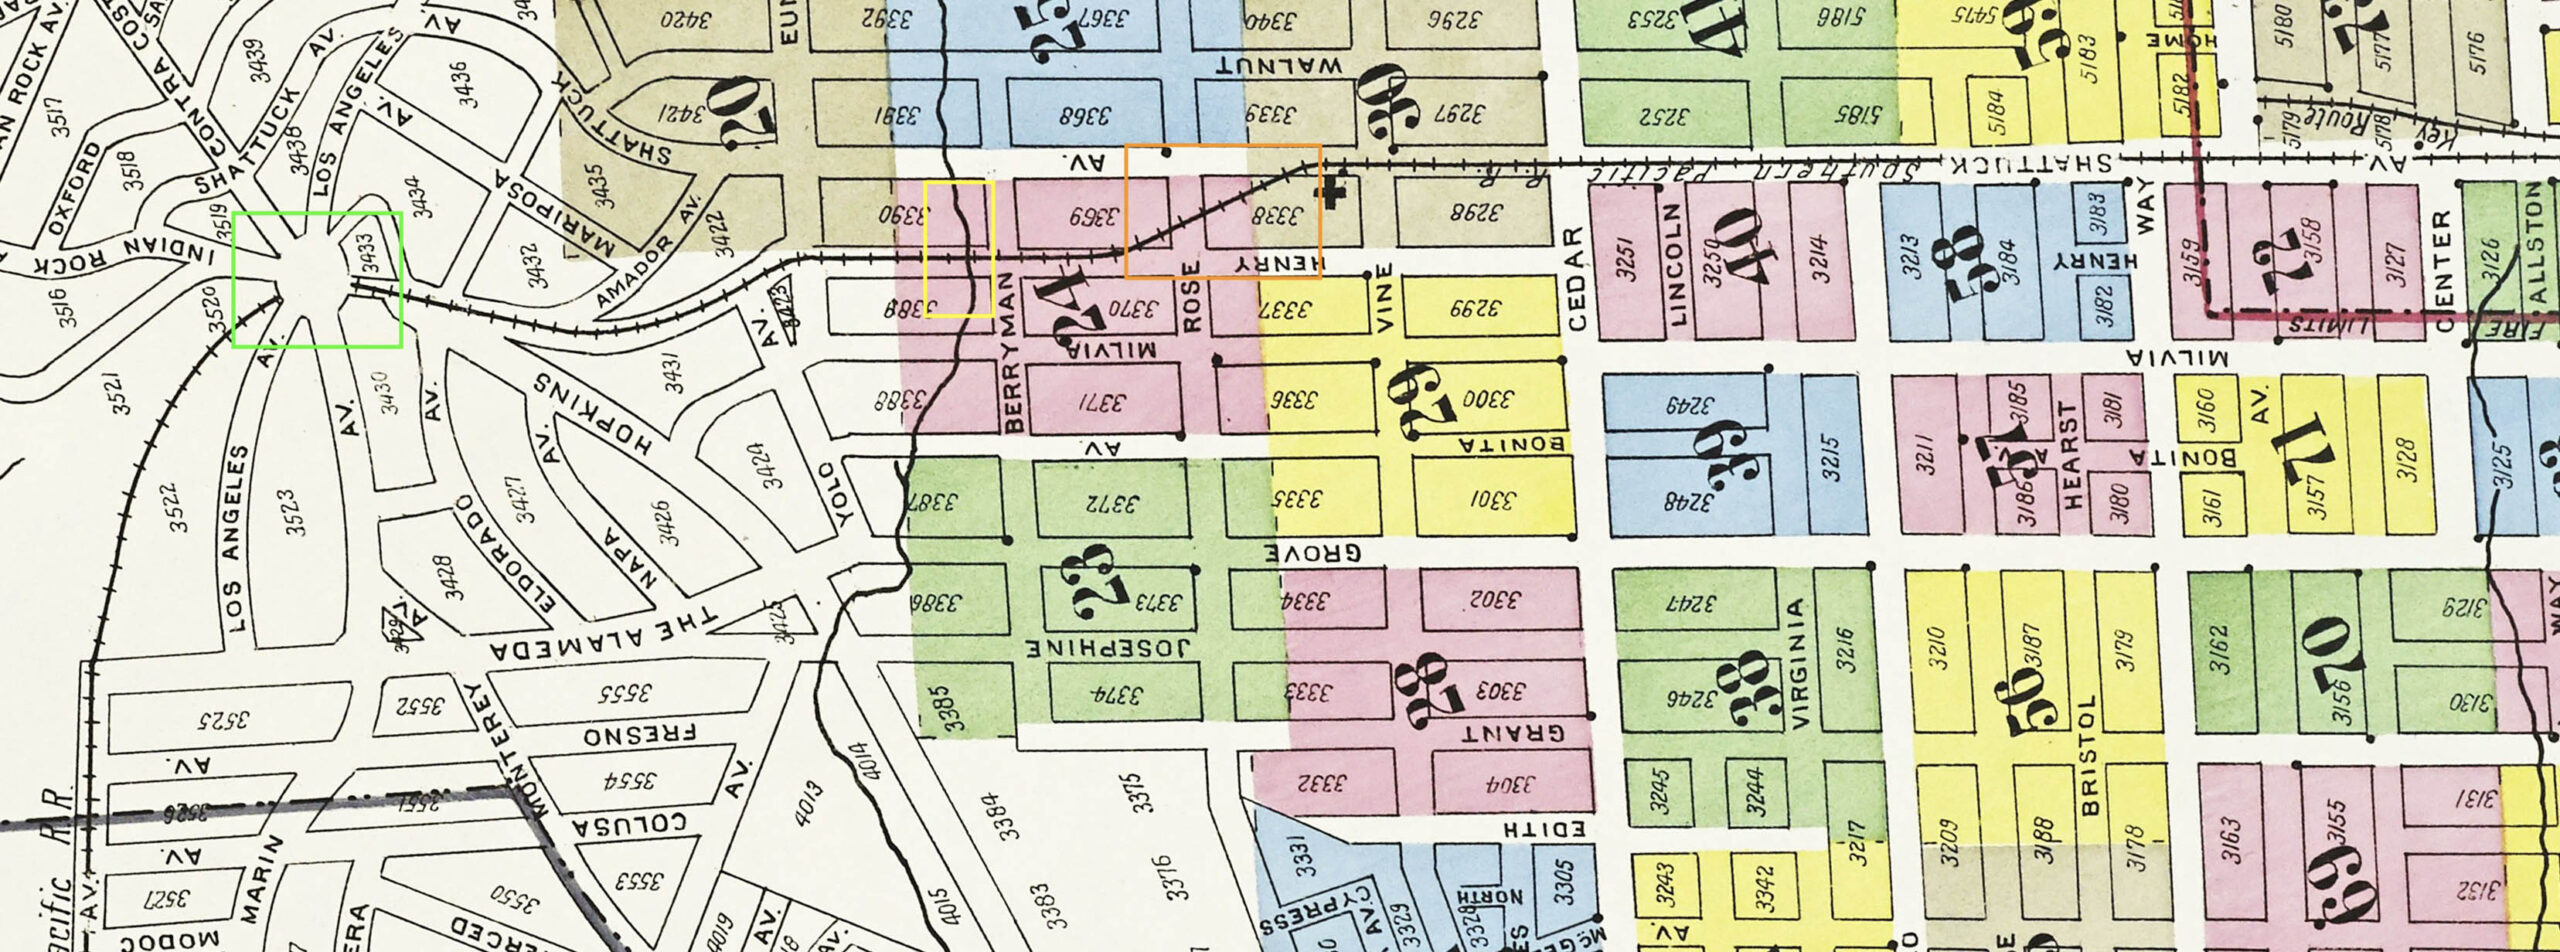
Lacking an aerial view from this time period, this mosaic from the 1911 Sanborn map flipped such that north is to the left margin indicates the new railway would cross over to Henry St., yellow box, cross Codornices Creek, orange box, and tunnel under the future Circle in Northbrae, green box, making the turn west to head down Solano Ave. to the Colusa Ave. stop the SP called Thousand Oaks. The shift to Henry St. follows the track noted in the previous panel.
L345-15-Courtesy Library of Congress, Geography and Map Division, Sanborn Maps Collection, Sanborn Map Company, 1911, Vol.1, (Image 3 of 42)
The curve from Shattuck Ave. to Henry St. seen in the 1894 Sanborn map is captured in this northwest view from Apr. 27, 1910. The curved cut would soon get another track for the mainline, while all the other tracks and yard from the steam era along Shattuck Ave. would not survive the new electrified extension. This cut in 2026 is called Shattuck Pl., the Safeway store occupying the south end of this land. Note the large Victorian at no. 1404 Henry St., and to the right, behind the tree, no. 2016 Rose St., both still in place in 2026. The small shed alongside the track was the one depicted in the 1894 Sanborn map.
L345-20-S.P. Official Photo, Louis L. Stein Collection, Courtesy BAERA, Western Railway Museum Archives, 177749oa&b, (Image 4 of 42)
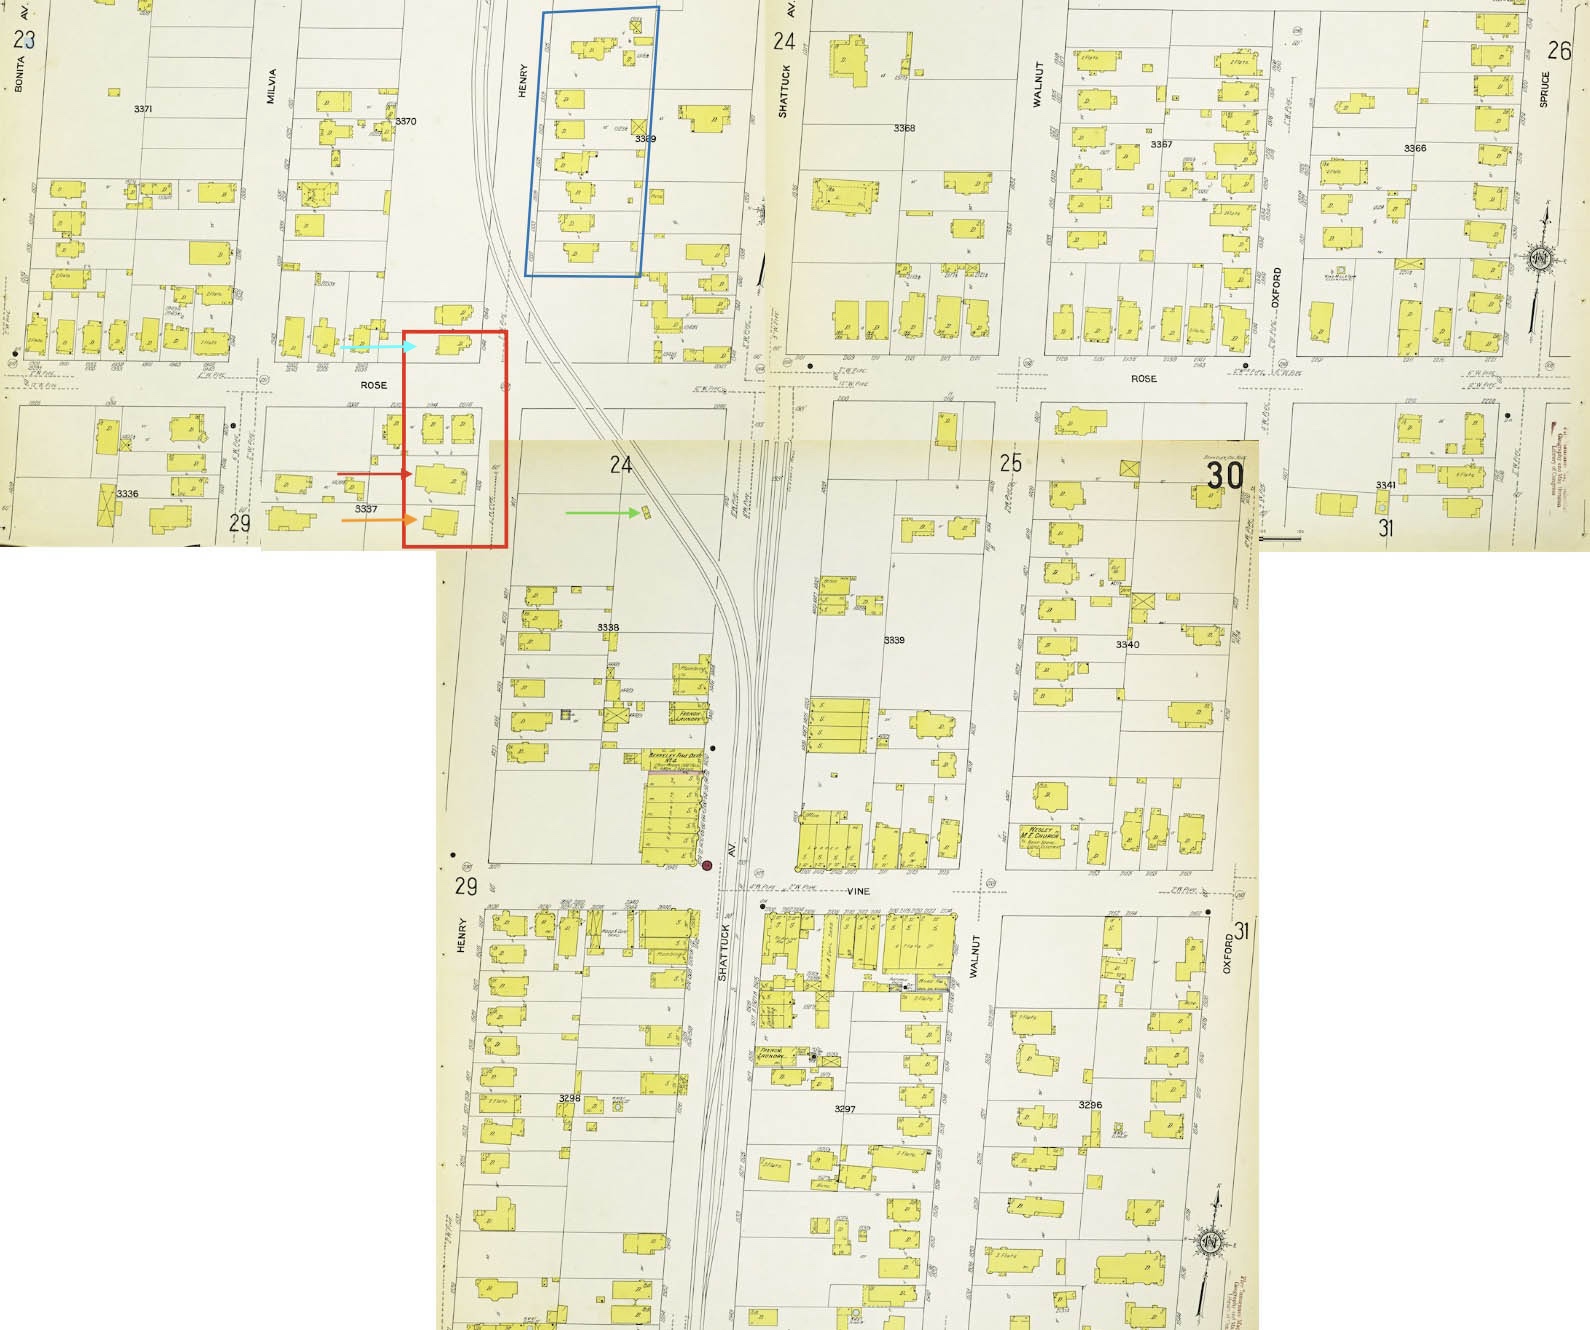
This combination of several Sanborn maps from 1911 shows the shed from the previous image, green arrow, the houses along Henry St. also seen in the previous image, red box, with the red arrow pointing at 1404 Henry St. In the 1894 Sanborn map shown previously, it was no. 1204, and the house to the south no. 1206. The turquoise arrow points to a house in the 1894 Sanborn map that did not yet have the no. 1348 address it had by 1911. The houses boxed in blue are nos. 1337-1315 Henry St, south to north. Proceed to the next panel.
L345-25-Courtesy Library of Congress, Geography and Map Division, Sanborn Map Company, 1911; Vol. 1, Panels 24, 25 and 30, (Image 5 of 42)
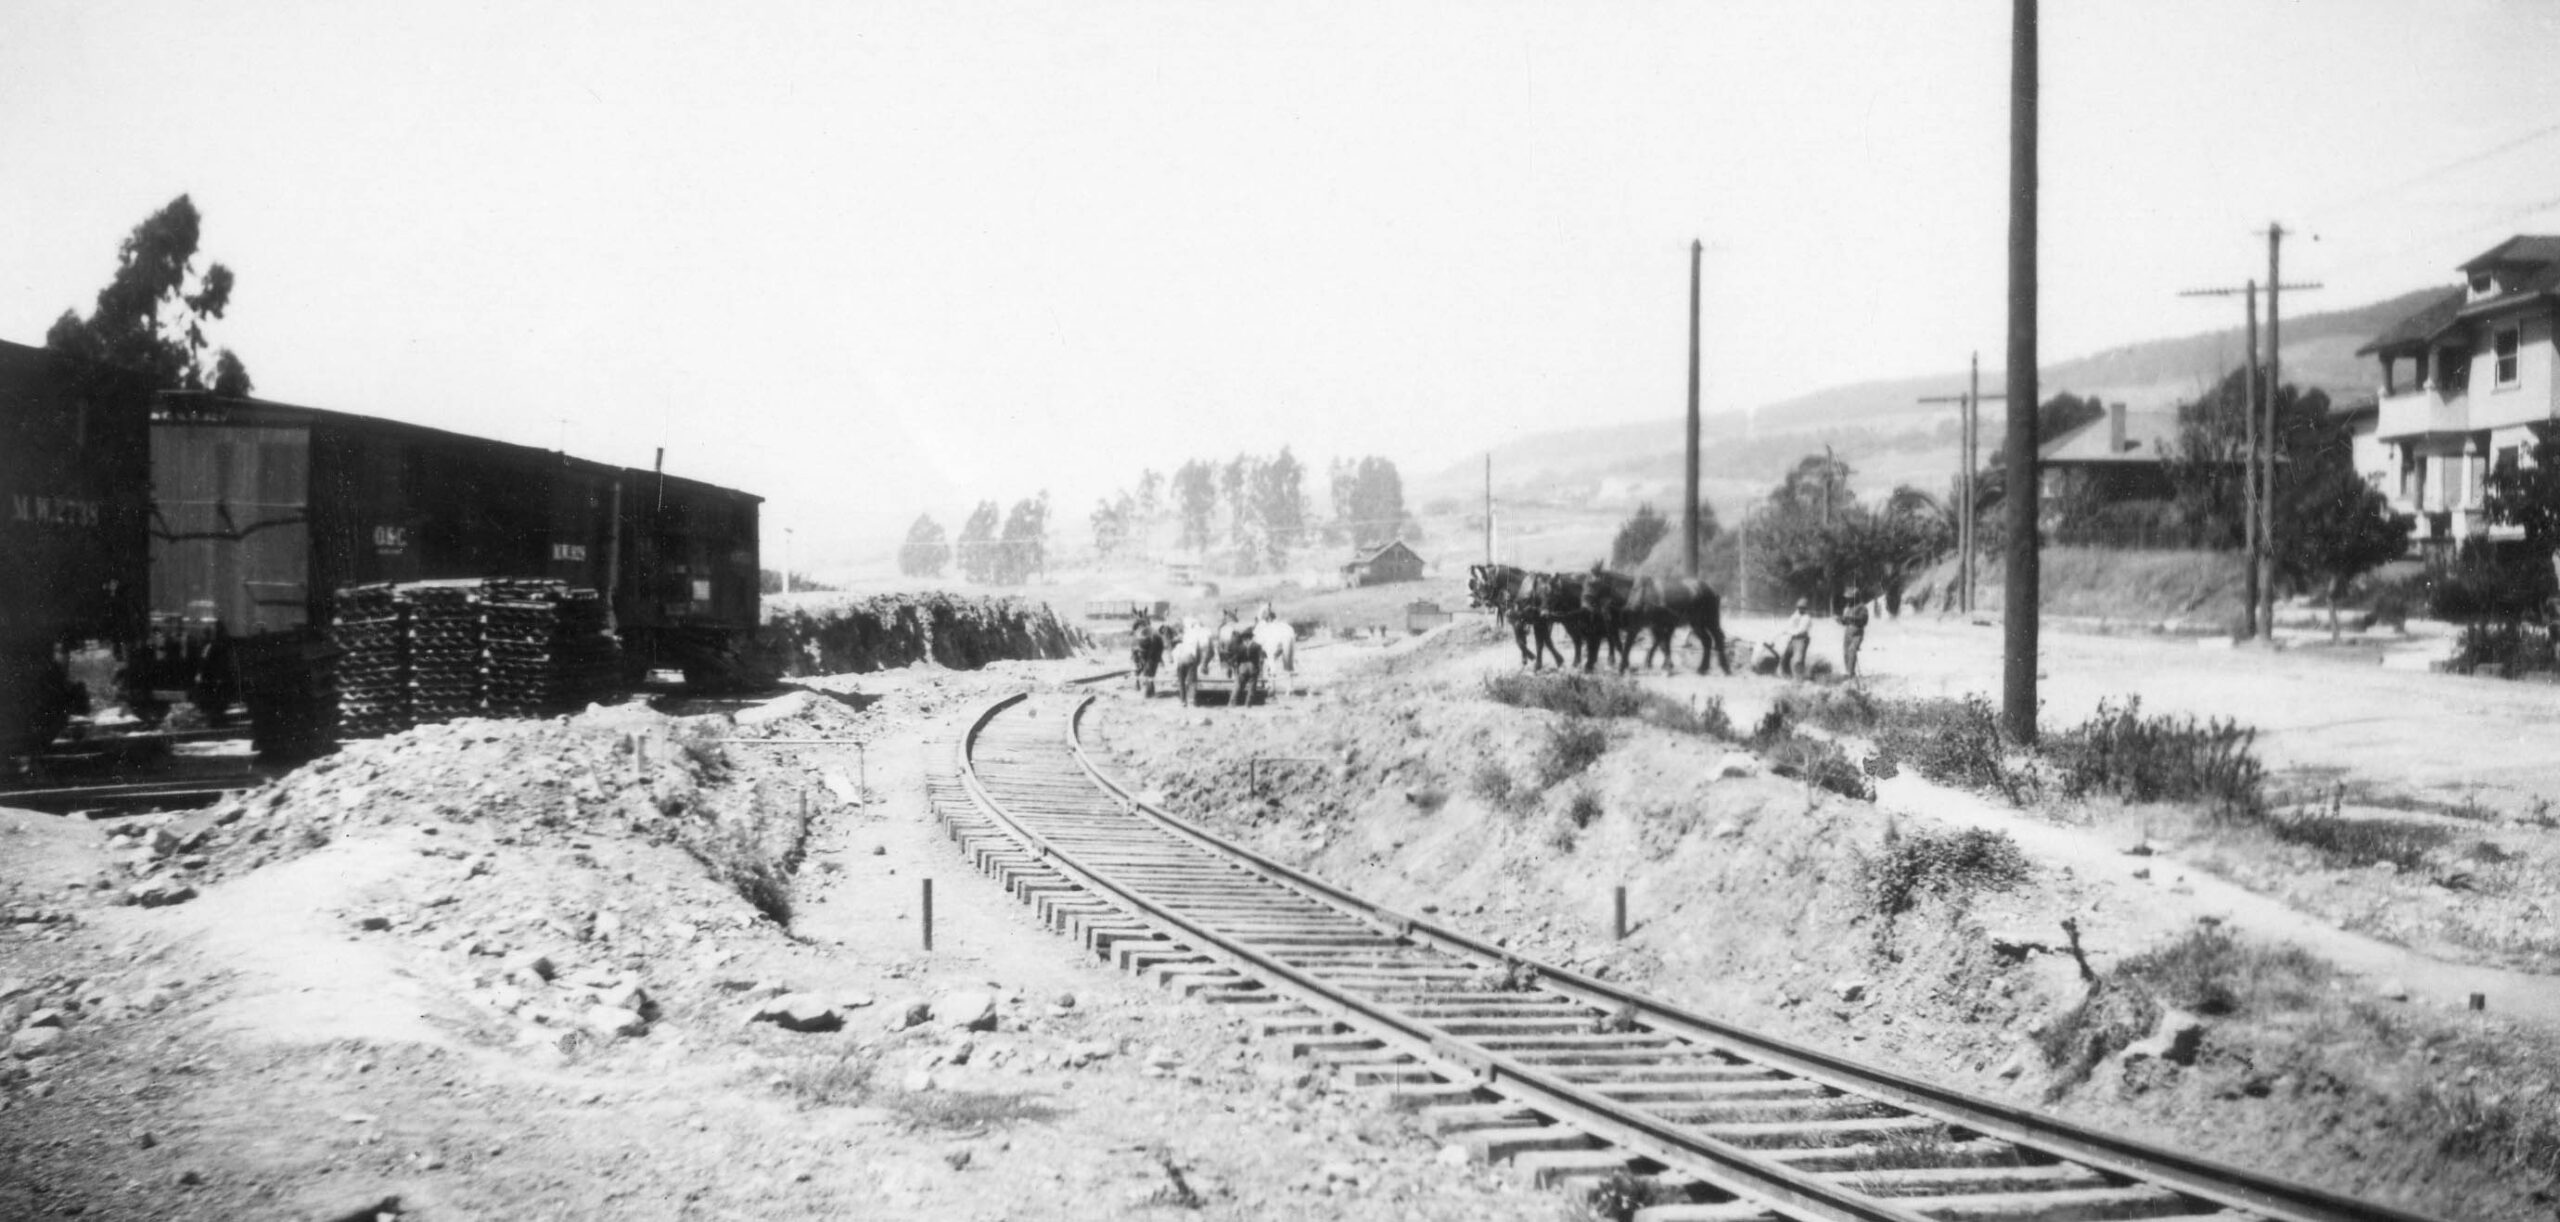
This northwest view from Aug. 20, 1910 completes the curve onto Henry St. past Rose St. The new OA&B Berryman yard to store cars for the electric railway will begin on the north side of Rose St. where the boxcars are seen in this image. Reviewing this image, the Sanborn map from the previous image showing nos. 1337-1315 Henry St., and what remains in 2026, it does not appear the two houses in the image shown here exist in 2026, certainly not the one on the right margin.
L345-30-S.P. Official Photo, Louis L. Stein Collection, Courtesy BAERA, Western Railway Museum Archives, 177782oa&b, (Image 6 of 42)
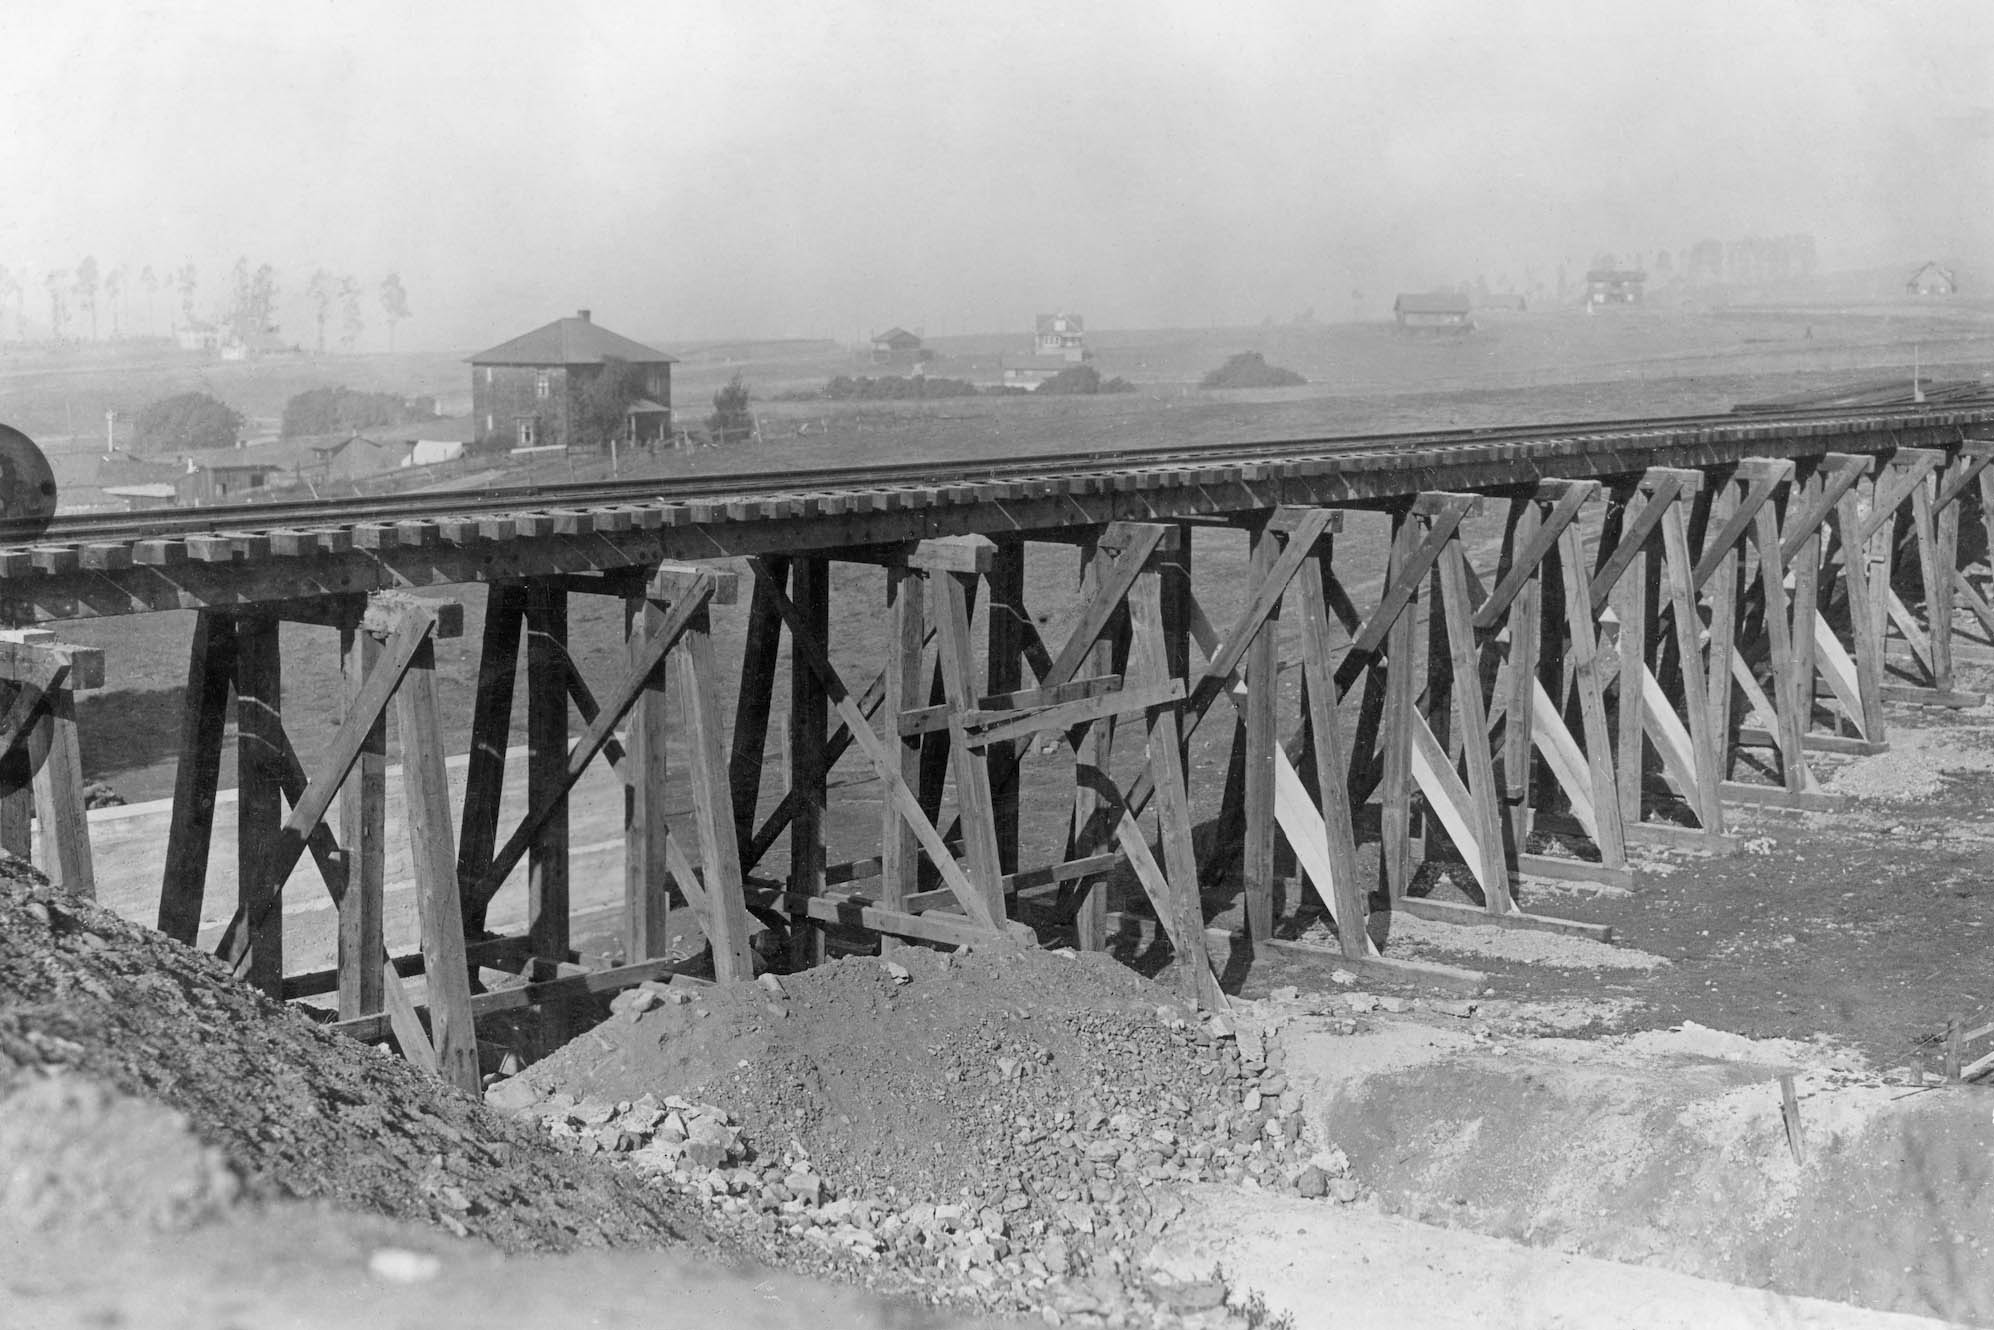
Further north, this northwest view from early 1910 at Henry St. between Berryman St. and Eunice St. shows the southern takeoff of the trestle spanning Cordonices Creek, culverted just below. The prominent house behind or to the west of the trestle is no. 1220 Milvia St., unchanged in 2026.
L345-35-S.P. Official Photo, Louis L. Stein Collection, Courtesy BAERA, Western Railway Museum Archives, 177815oa&b, (Image 7 of 42)
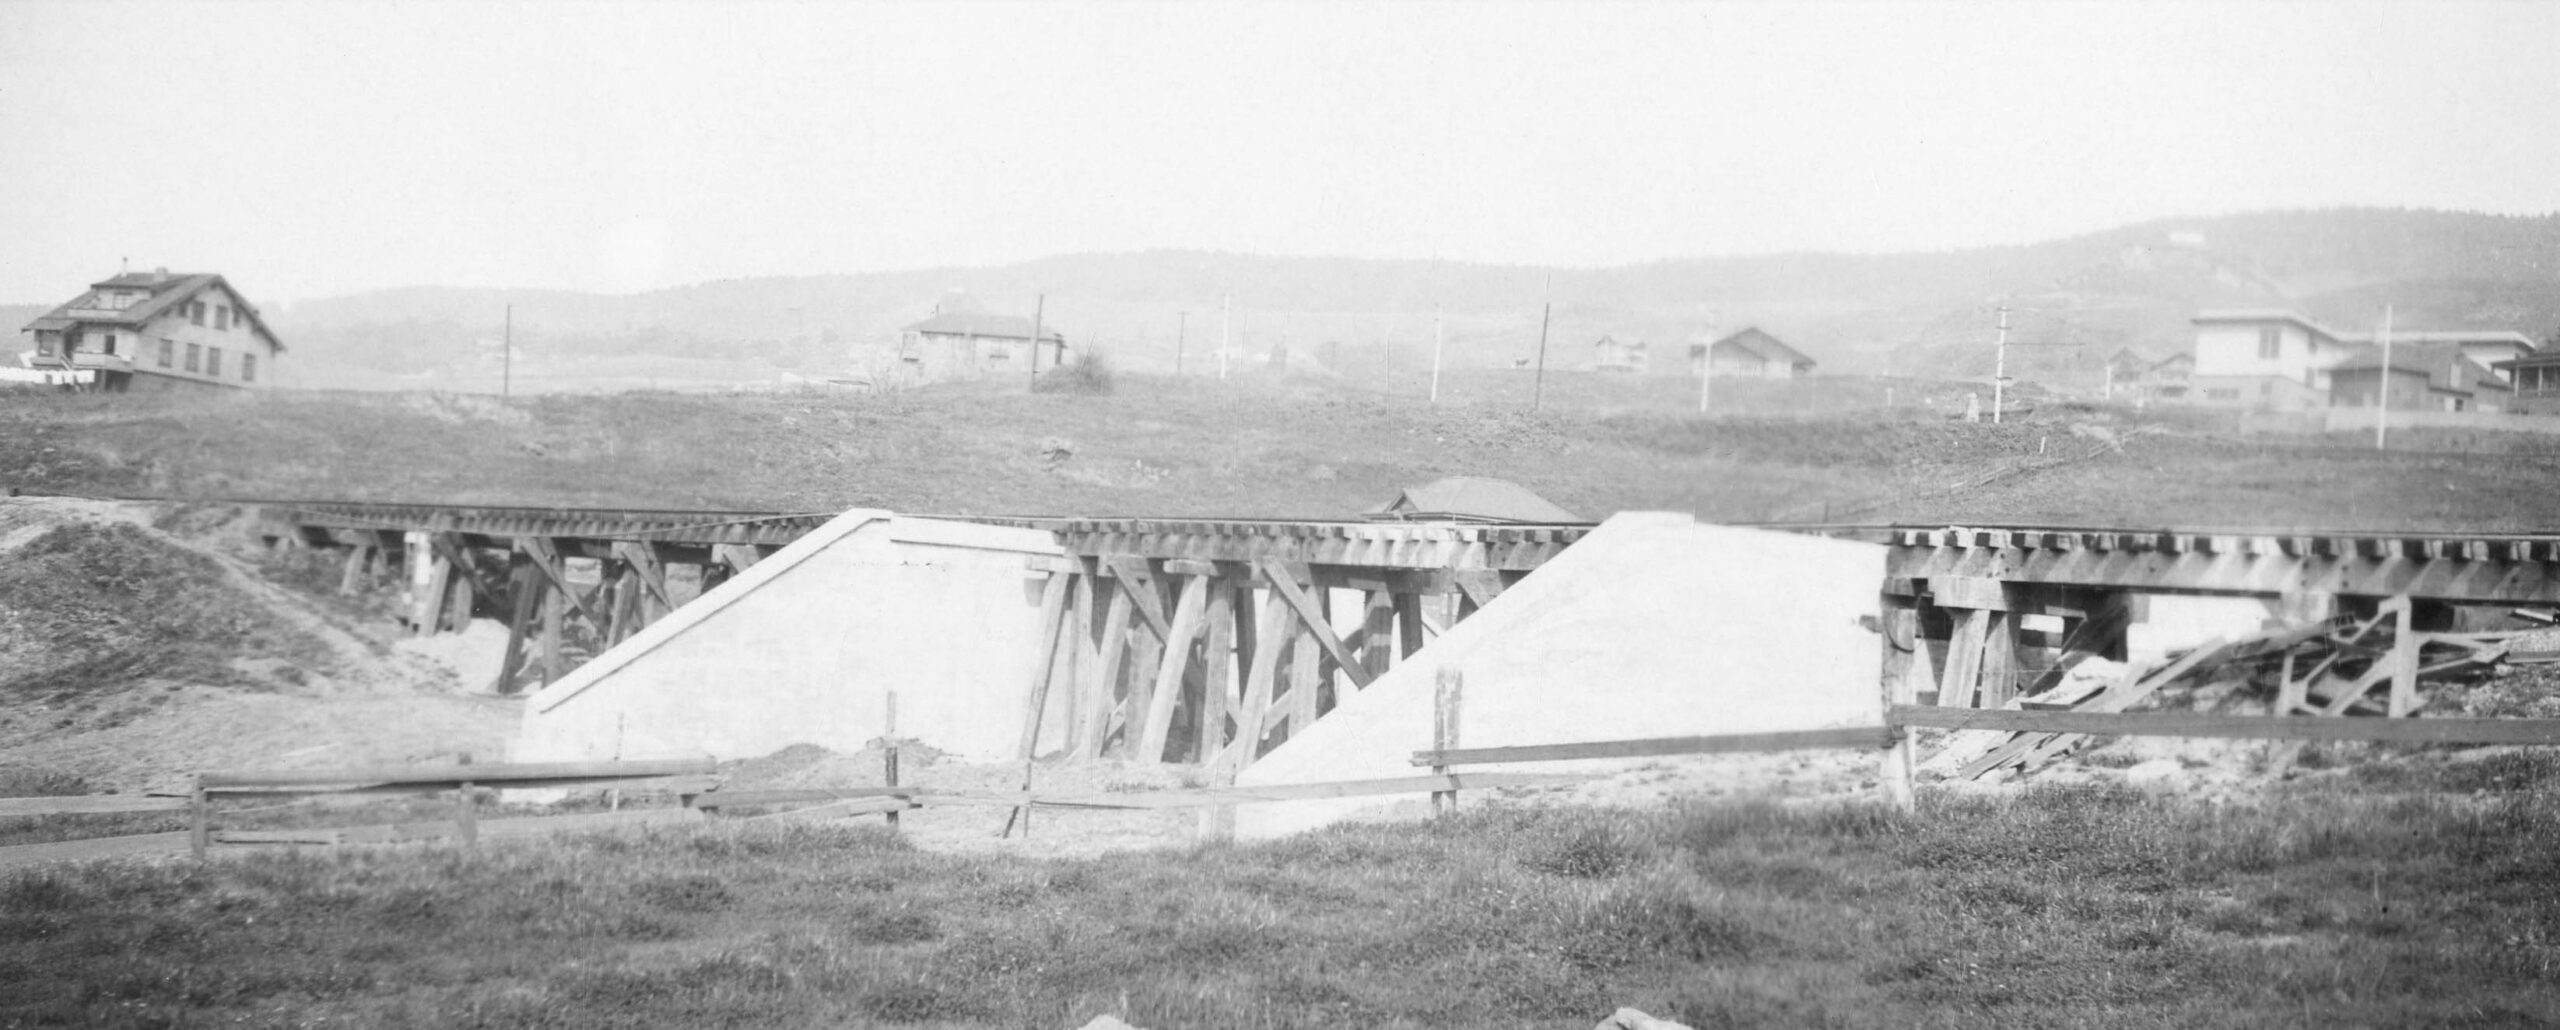
Later in 1910 in this northeast view, the concrete supports for the northern takeoff of the trestle are now in place to support a bridge over Eunice St. Information about the houses seen in this image will require more research.
L345-40-S.P. Official Photo, Louis L. Stein Collection, Courtesy BAERA, Western Railway Museum Archives, 177767oa&b, (Image 8 of 42)
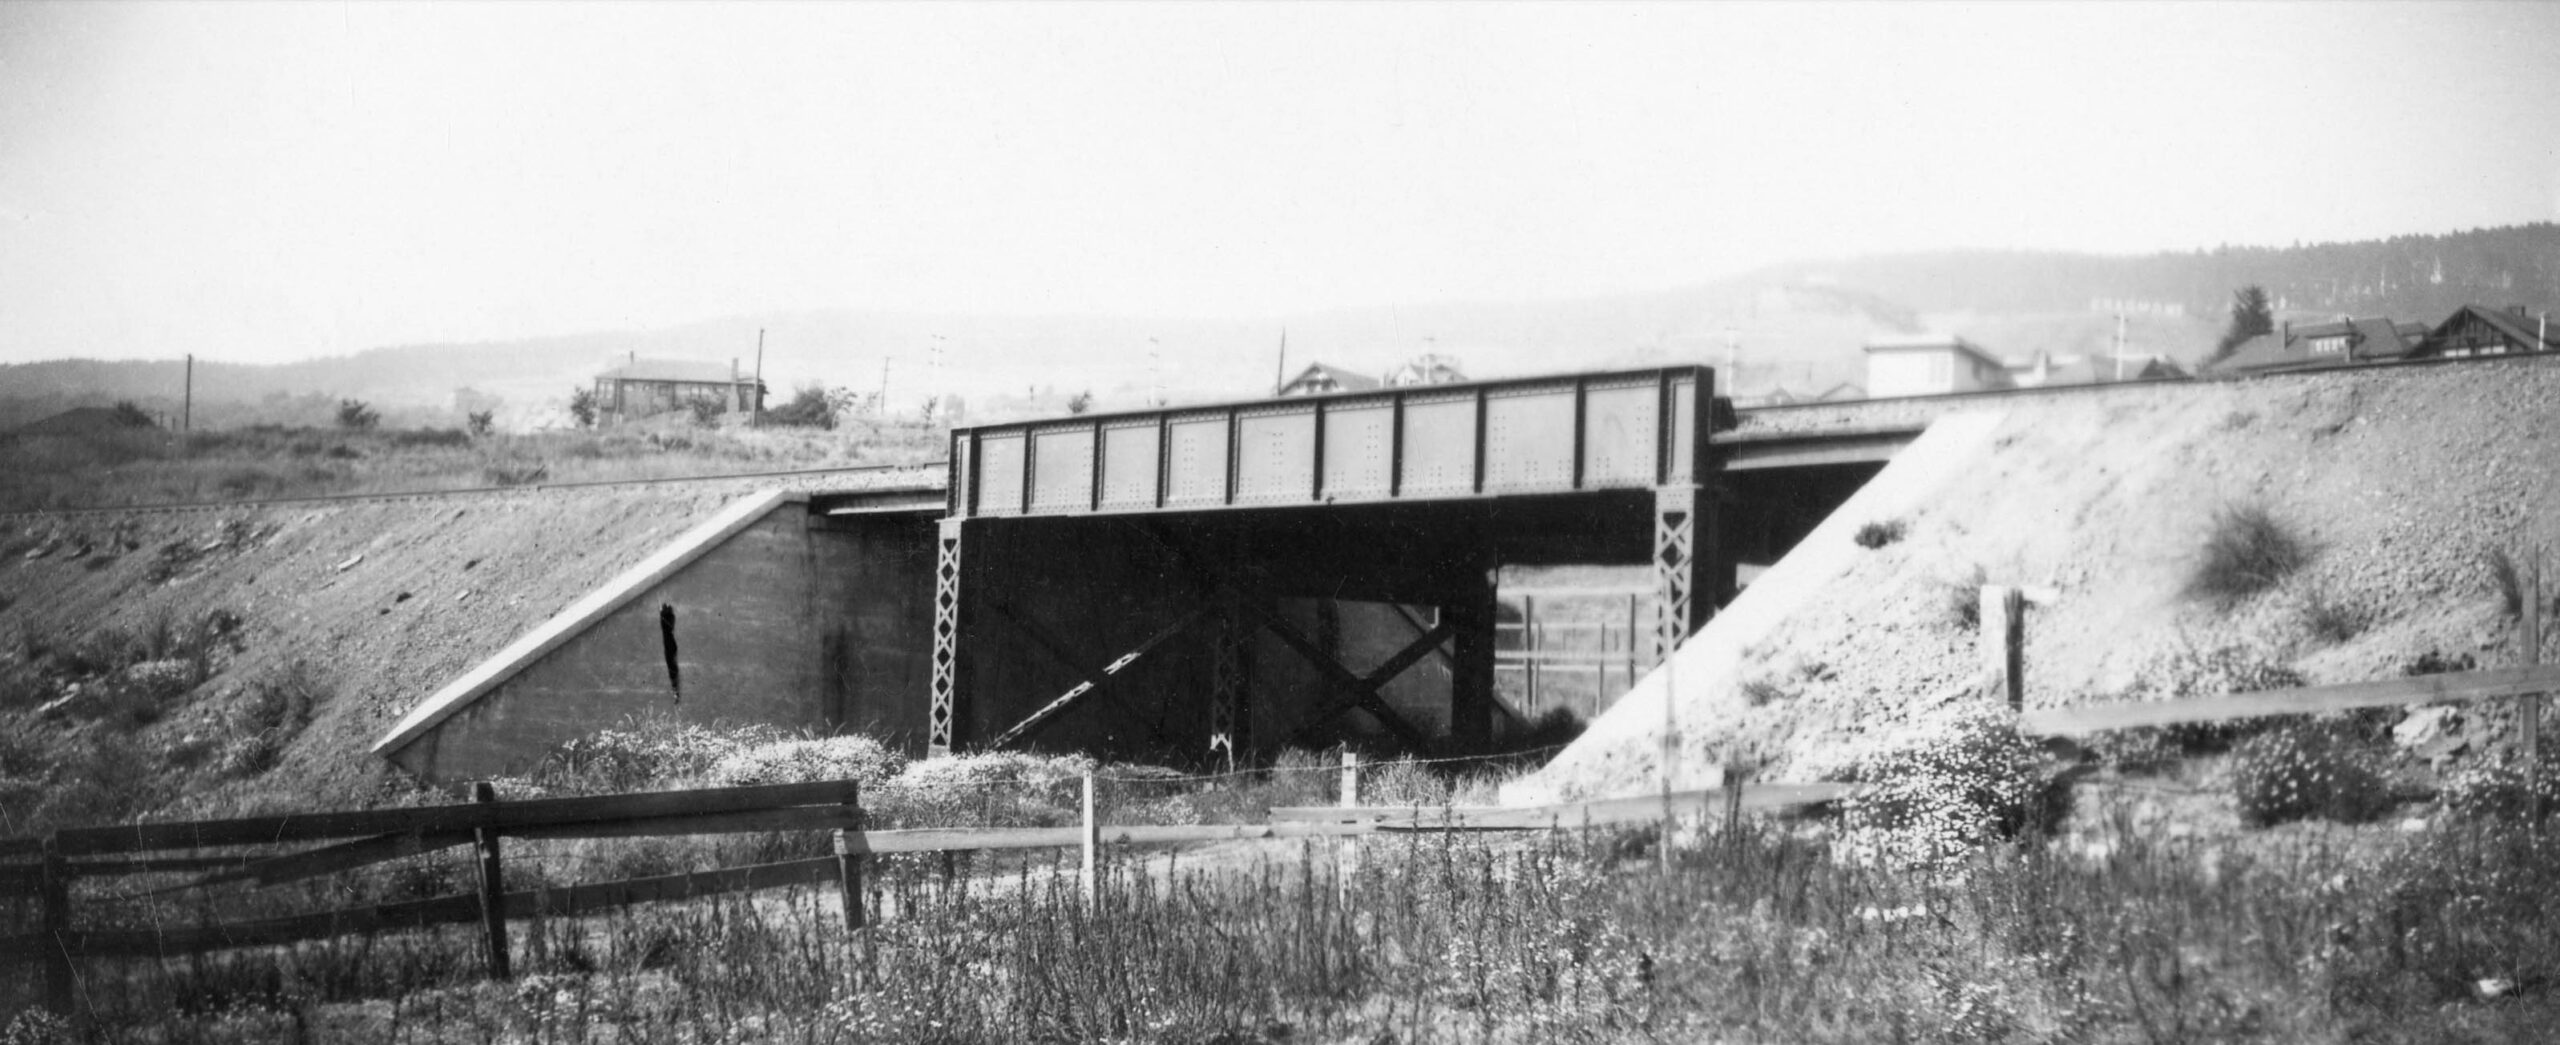
The final Eunice Street overpass is seen in this northeast view from Apr. 27, 1910.
L345-45-S.P. Official Photo, Louis L. Stein Collection, Courtesy BAERA, Western Railway Museum Archives, 177768oa&b, (Image 9 of 42)
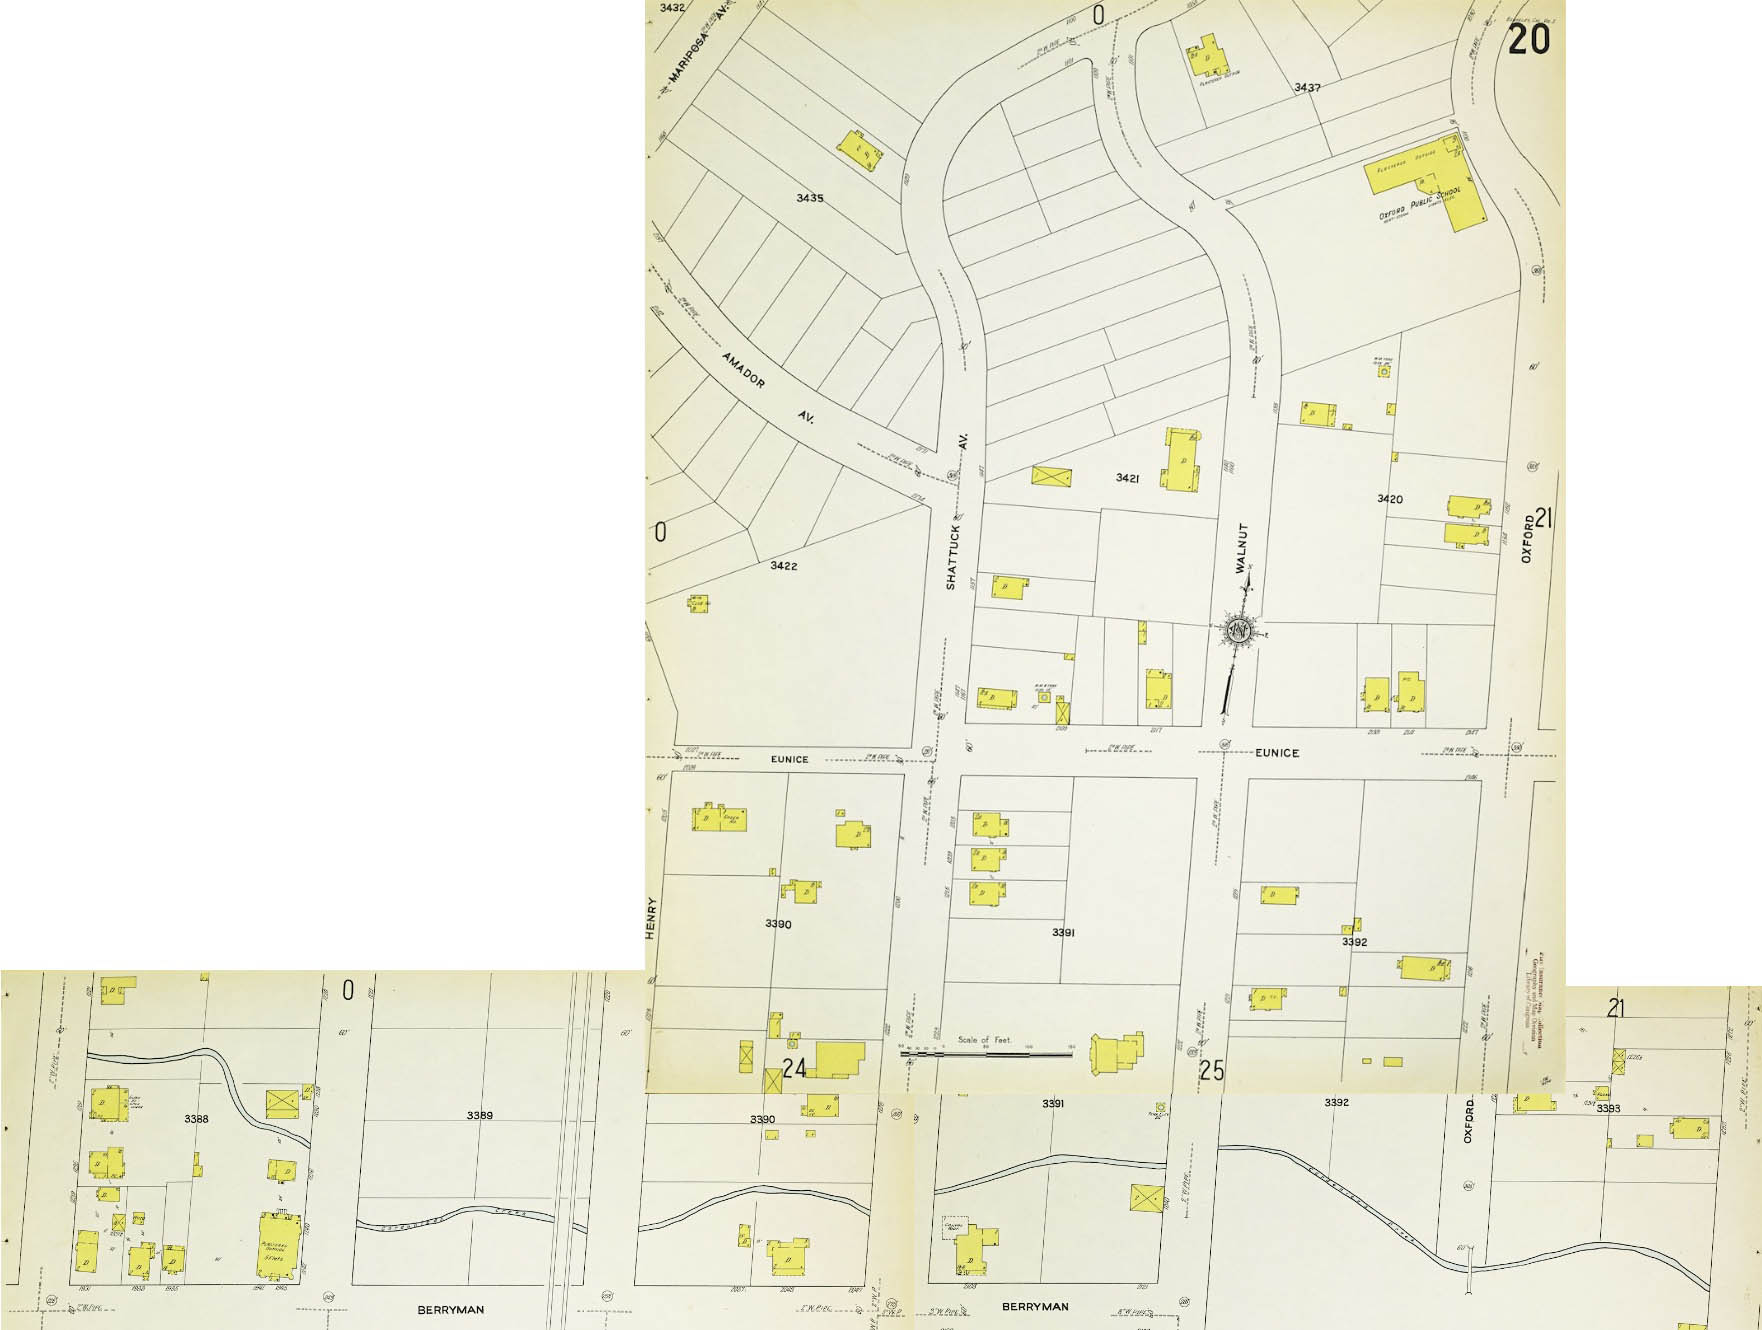
The final portions covering the railway route from the 1911 Sanborn map are presented here for completeness showing the structures on the east flank of the Henry St. to Sutter St. transition at Eunice St. to complement the previous two northeast views Eunice St.
L345-50-Courtesy Library of Congress, Geography and Map Division, Sanborn Map Company, 1911; Vol. 1, Panels 20, 24 and 25, (Image 10 of 42)
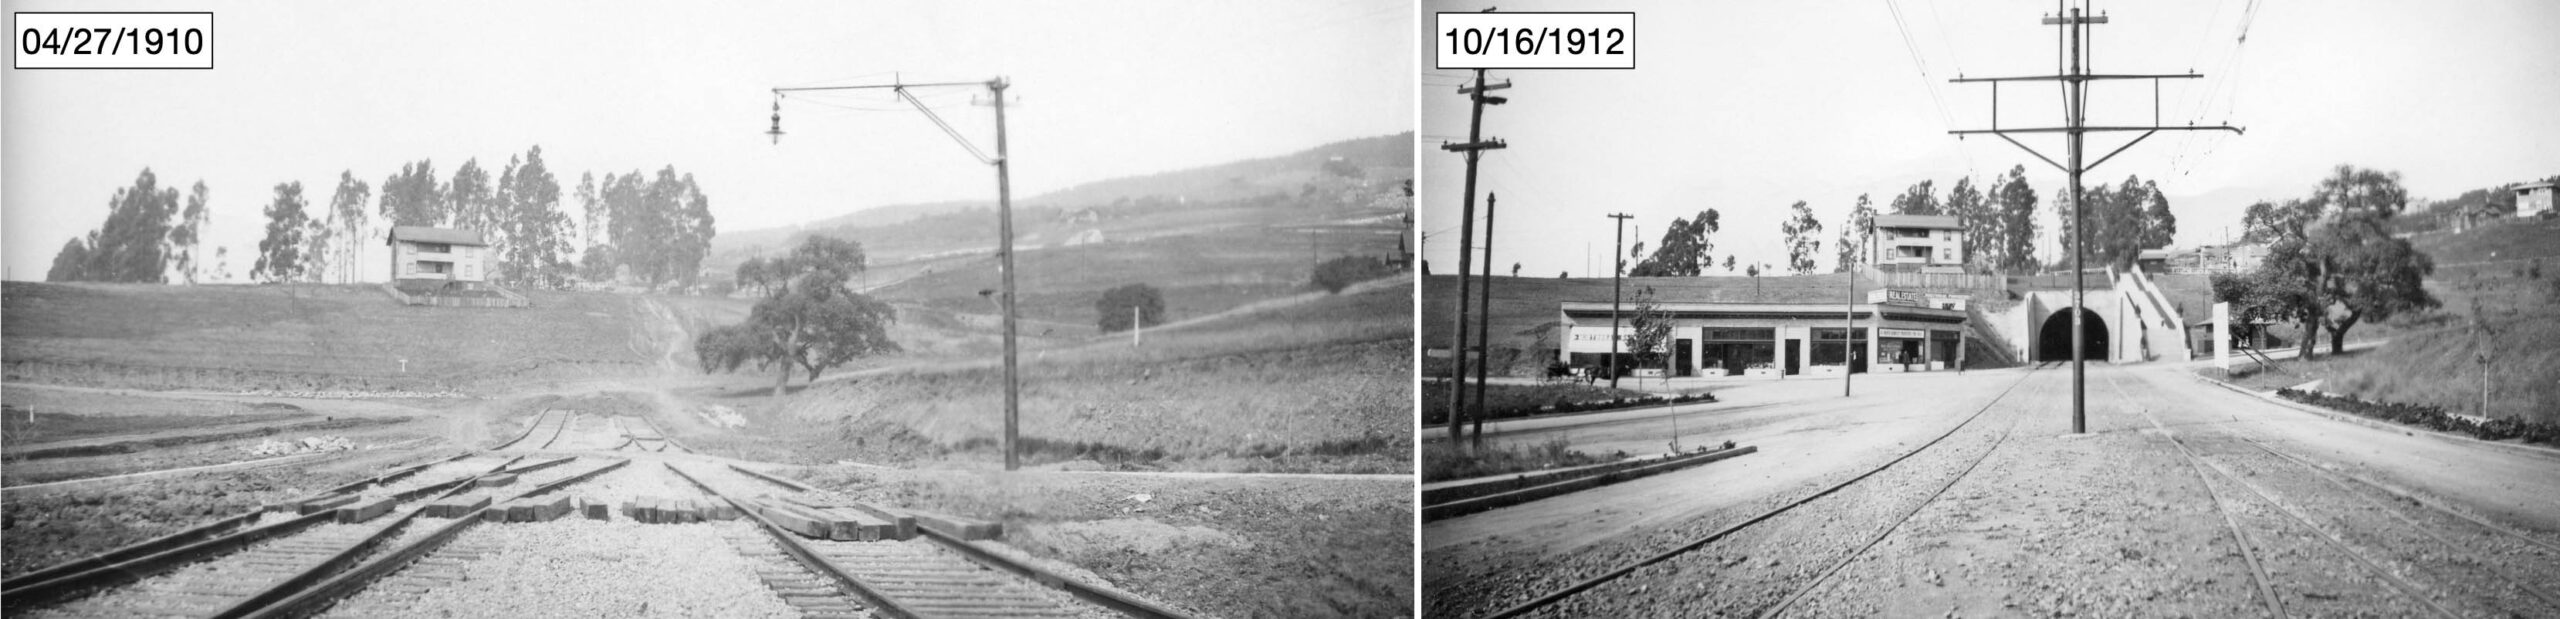
Once on Sutter St, the next and largest obstacle to the extension of the SP Shattuck line was a 60 ft. high hill requiring a tunnel under the future Circle, shown before and after in these north views left and right, respectively. The house seen to the left or west of the tunnel is no. 1994 Marin Ave. as will be seen in the images that follow. This house miraculously survived the tunnel construction and is still present in 2026. You may ask, why a tunnel? The answer is explained by Robert Ford in his book. “Red Trains in the East Bay”, Interurbans, 1977.
L345-55-S.P. Official Photos, Vernon Sappers Collection, Courtesy BAERA, Western Railway Museum Archives, 25644, l, 58644, r, (Image 11 of 42)
From the Solano Ave. side, the other tunnel portal is shown after construction had already started, left, to the recently completed version sans overhead wires, right, both southeast views. As with these images, most of the photos taken by the S.P. are numbered, the ones that are not may reflect editing at an earlier time to create copy negatives. Back to the requirement for a tunnel, Ford explained that the SP had hoped to approach Solano Ave. starting parallel to El Dorado Ave., over to Marin Ave., and then to The Alameda, but Berkeley Board of Trustees and local residents had no interest allowing a second set of tracks in addition to those of the Oakland Traction streetcar line.
L345-60-S.P. Official Photos, Vernon Sappers Collection, l, Robert S. Ford Collection, r, Courtesy BAERA, Western Railway Museum Archives, 25643 oa&b, l, 167632oa&b,r, (Image 12 of 42)
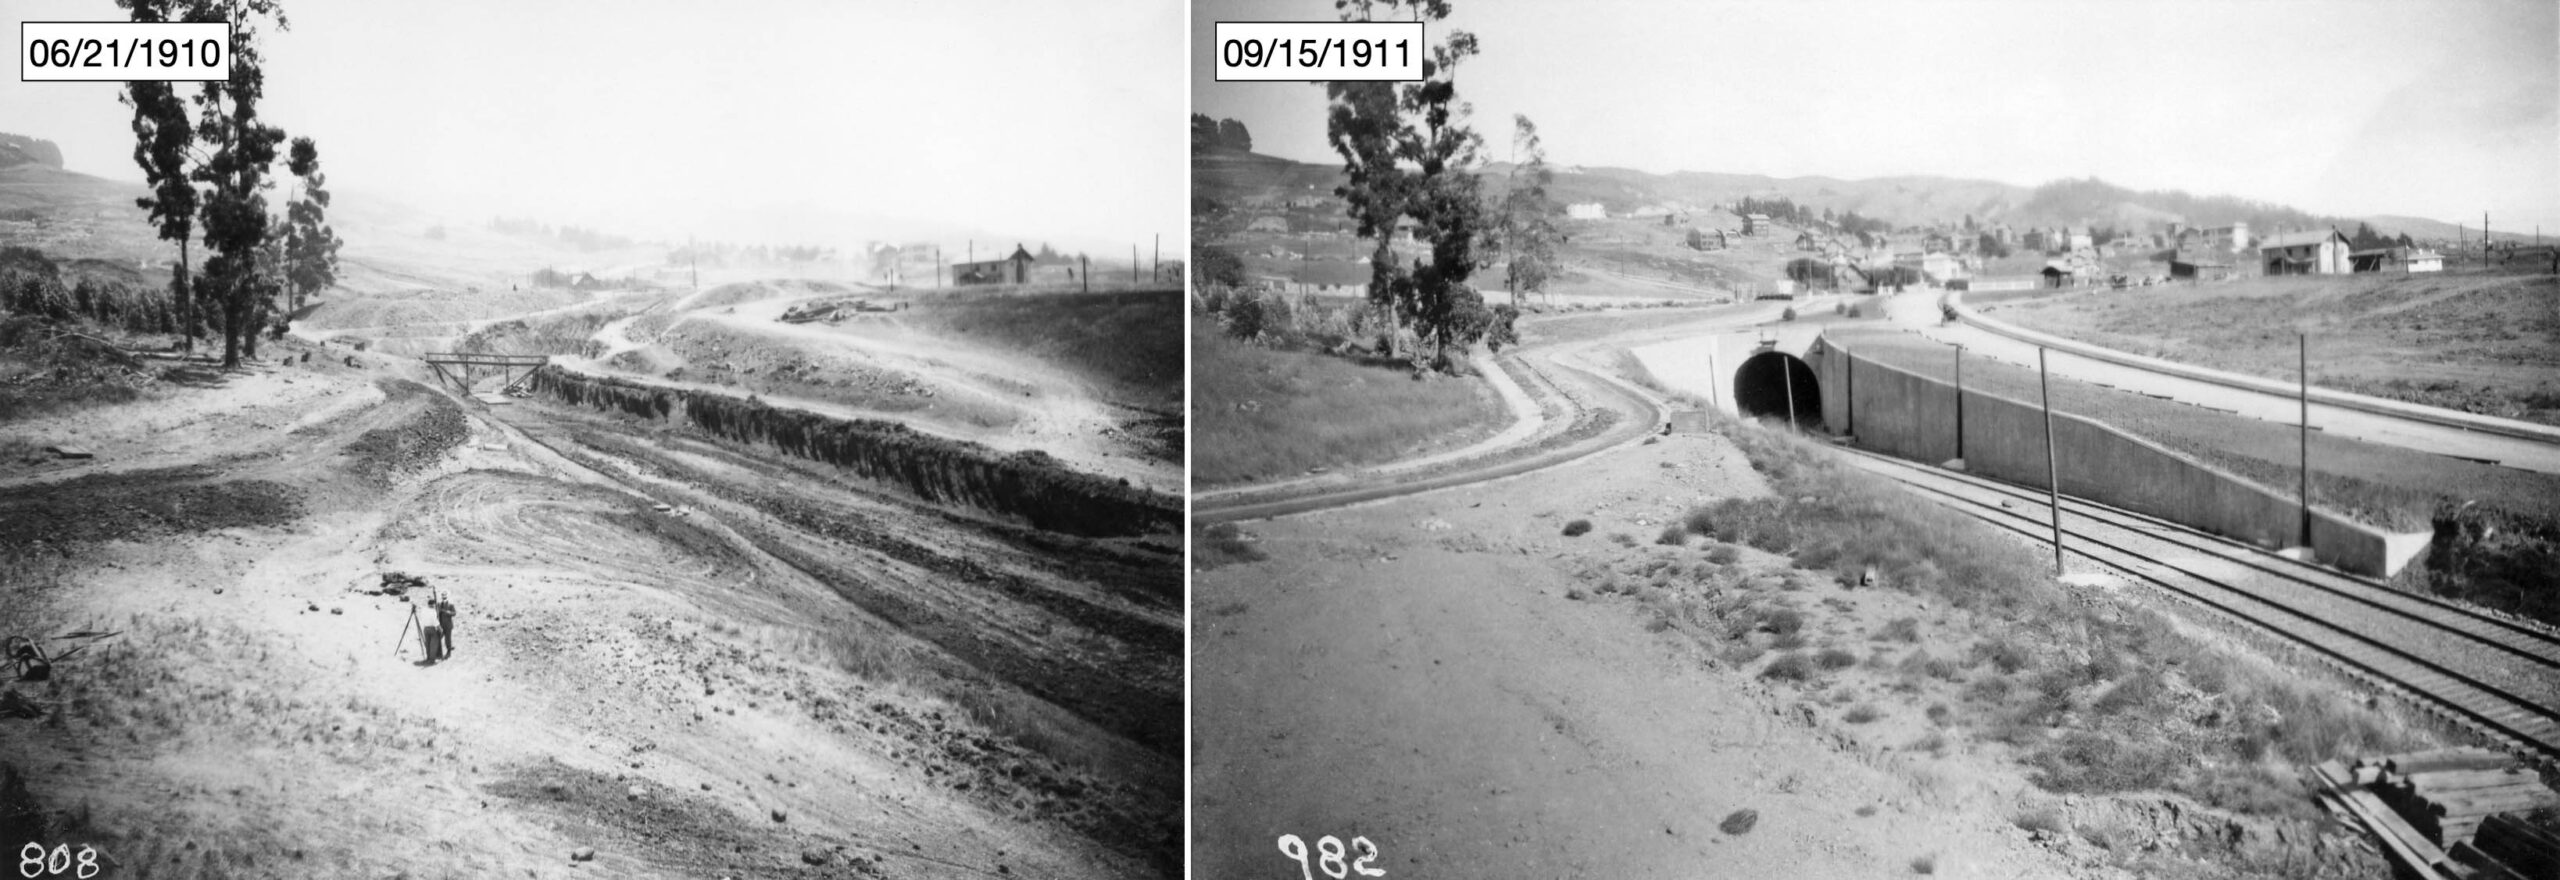
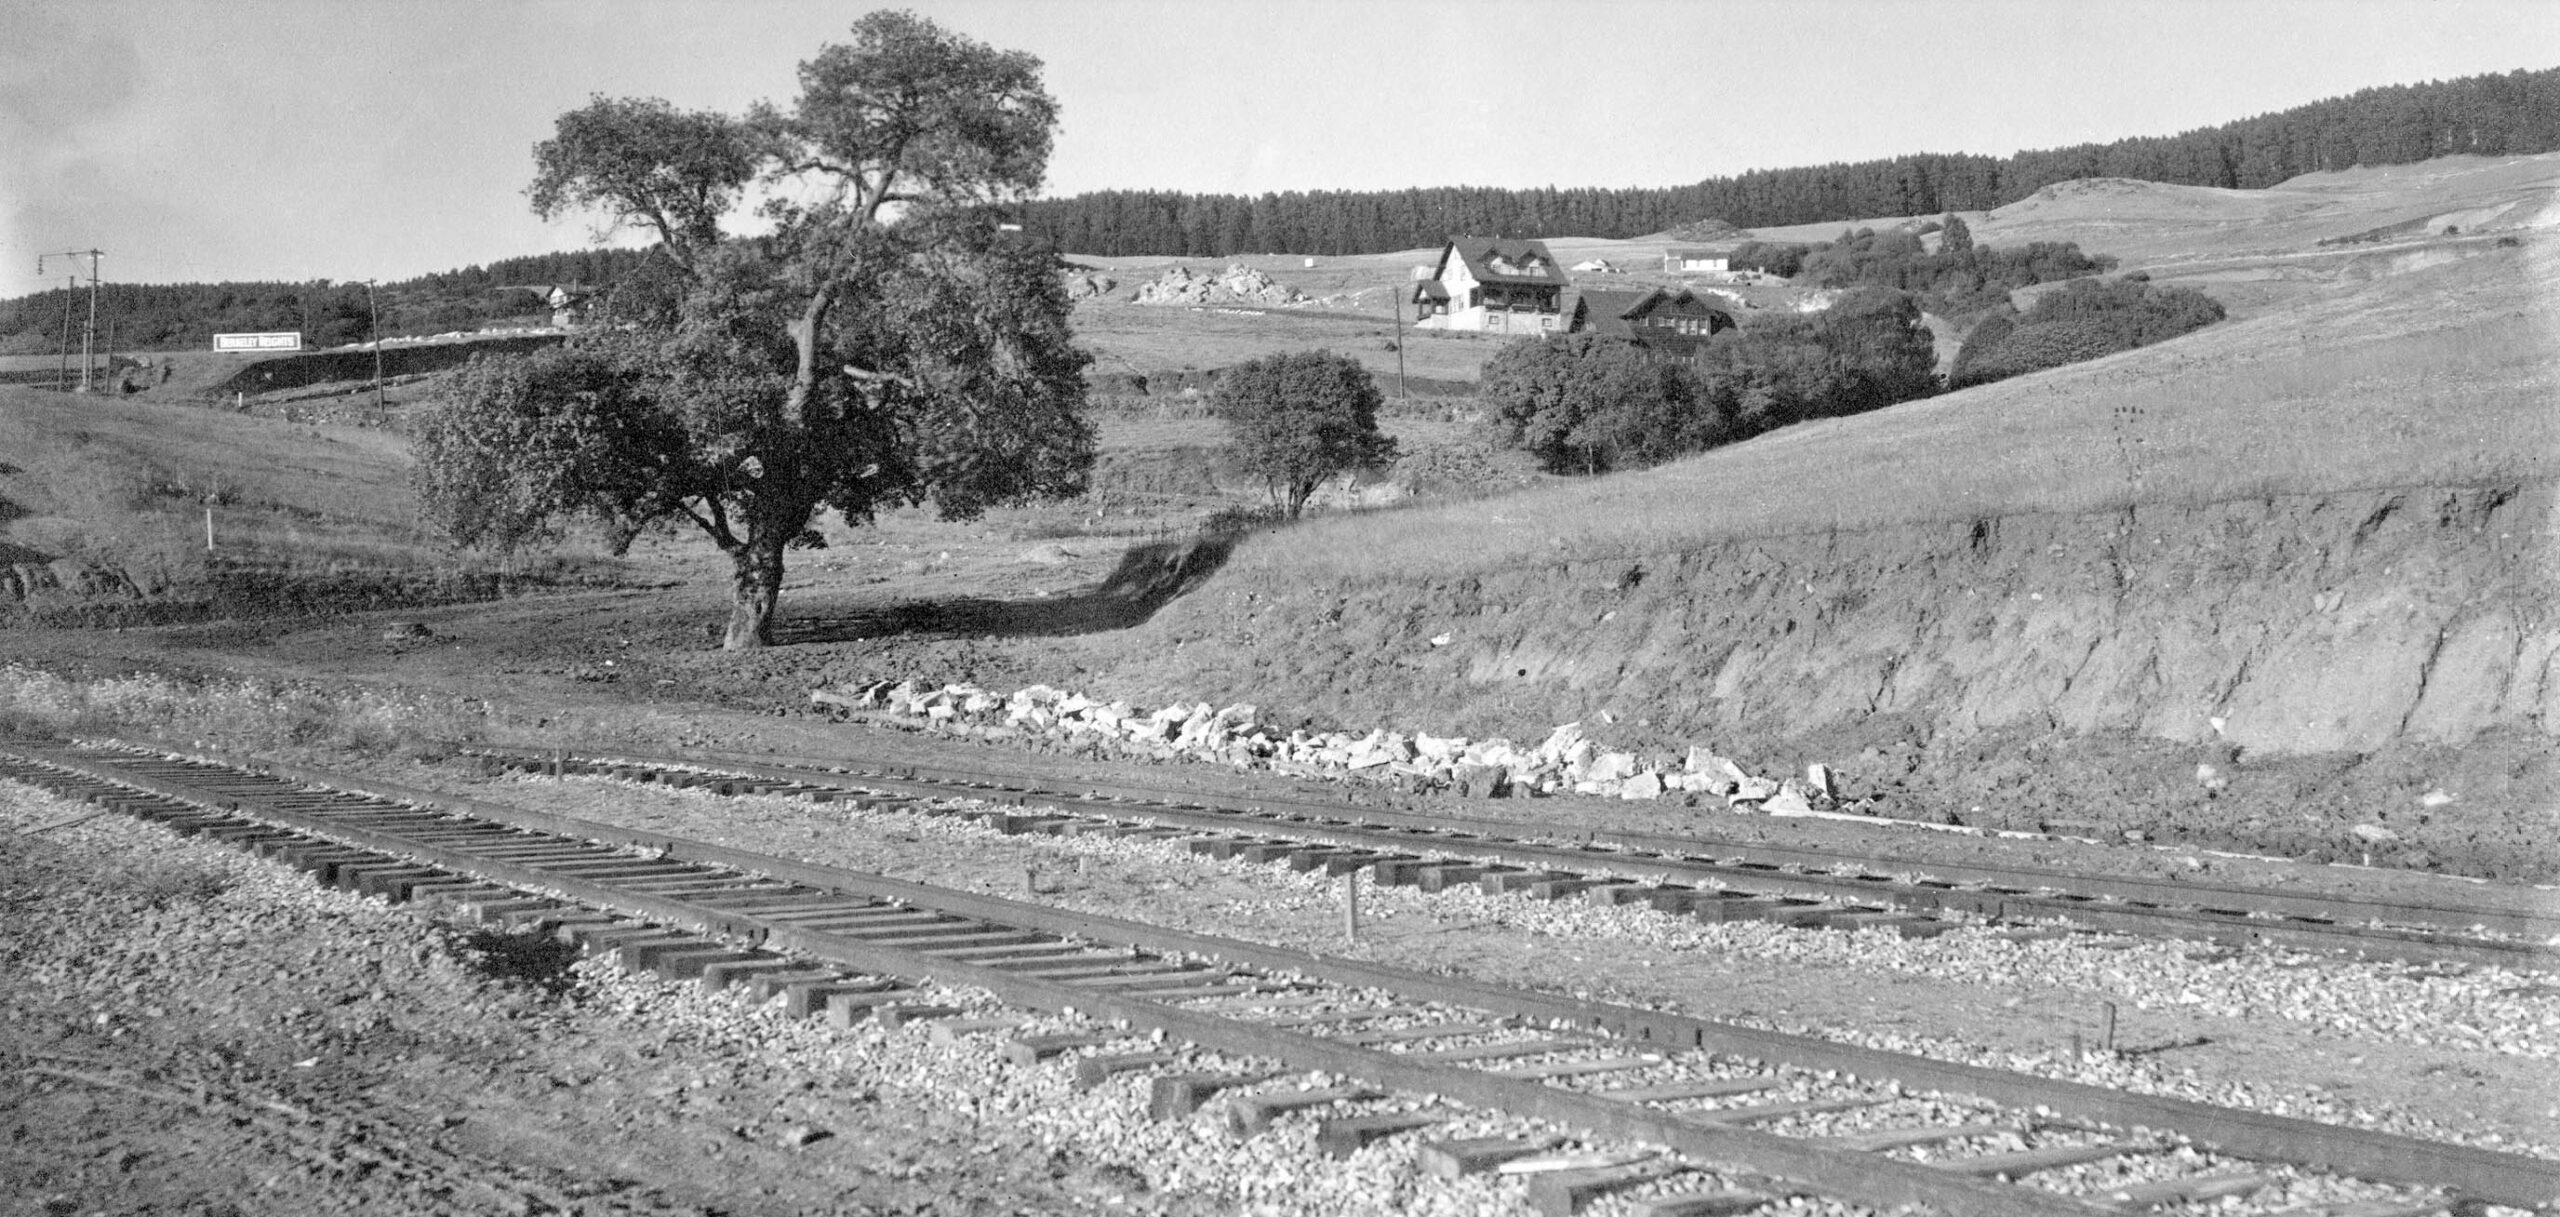
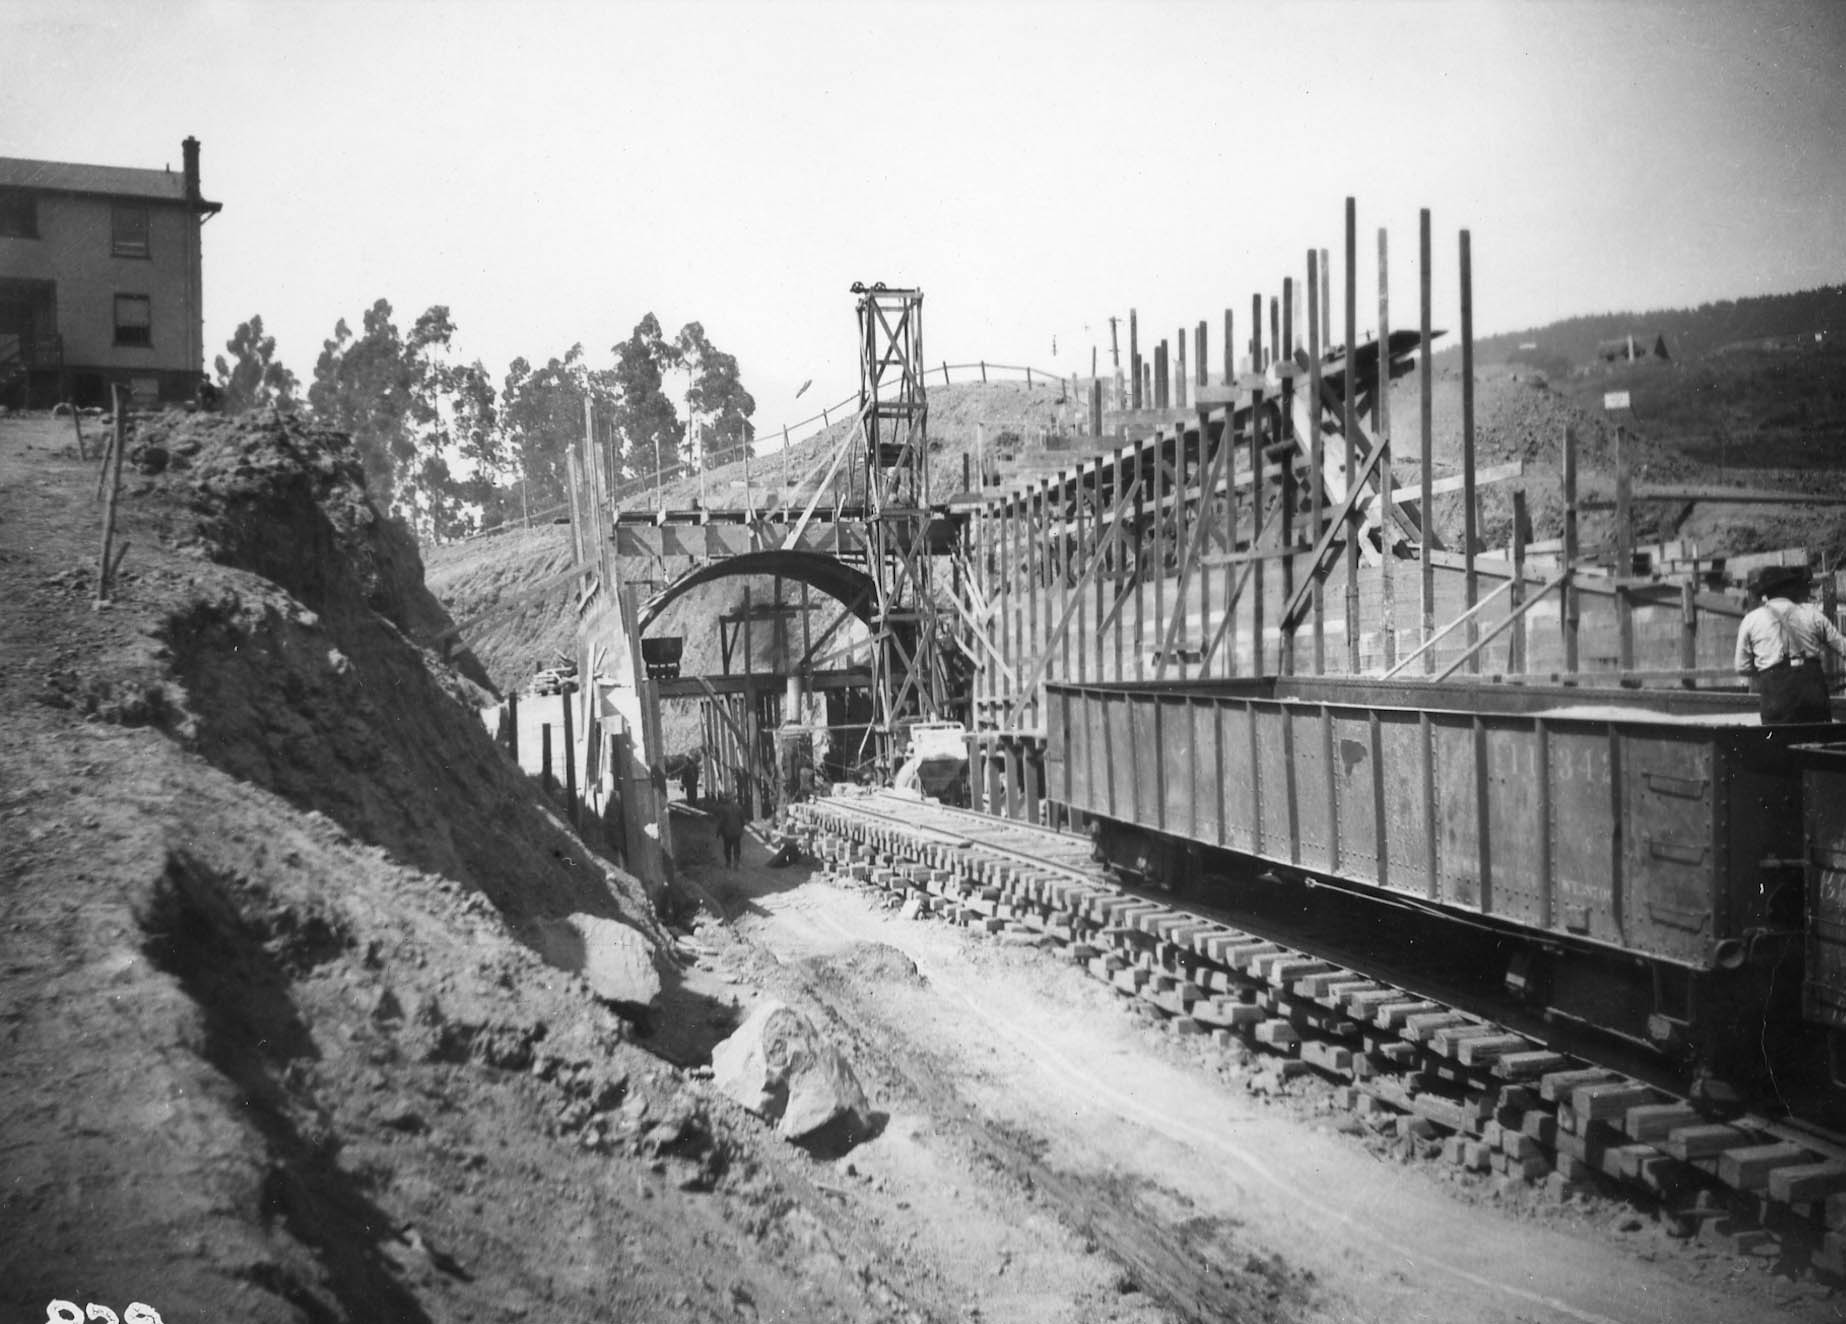
Next to follow highlights from the construction process. From the Sutter St. side, a northeast view depicts the eastern flank of the area as construction began in early 1910. The Oak tree is just short of the location of the future Del Norte St. The tree will be right beside the SP Northbrae station shelter once it is constructed. The tunnel became a viable option when Mason-McDuffie offered a path under the hill as long as it was to be a tunnel and not an open cut, a tunnel to be 465 ft. in length.
L345-65-S.P. Official Photo, Louis L. Stein Collection, Courtesy BAERA, Western Railway Museum Archives, 177789oa&b, (Image 13 of 42)
The first order of business was to dig and create a path for the tracks. The steam shovel that appears to be on a piece of train track loads a cart pulled by oxen at the Sutter St. end of construction, north view in 1910.
L345-70-S.P. Official Photo, Louis L. Stein Collection, Courtesy BAERA, Western Railway Museum Archives, 144351oa&b, (Image 14 of 42)
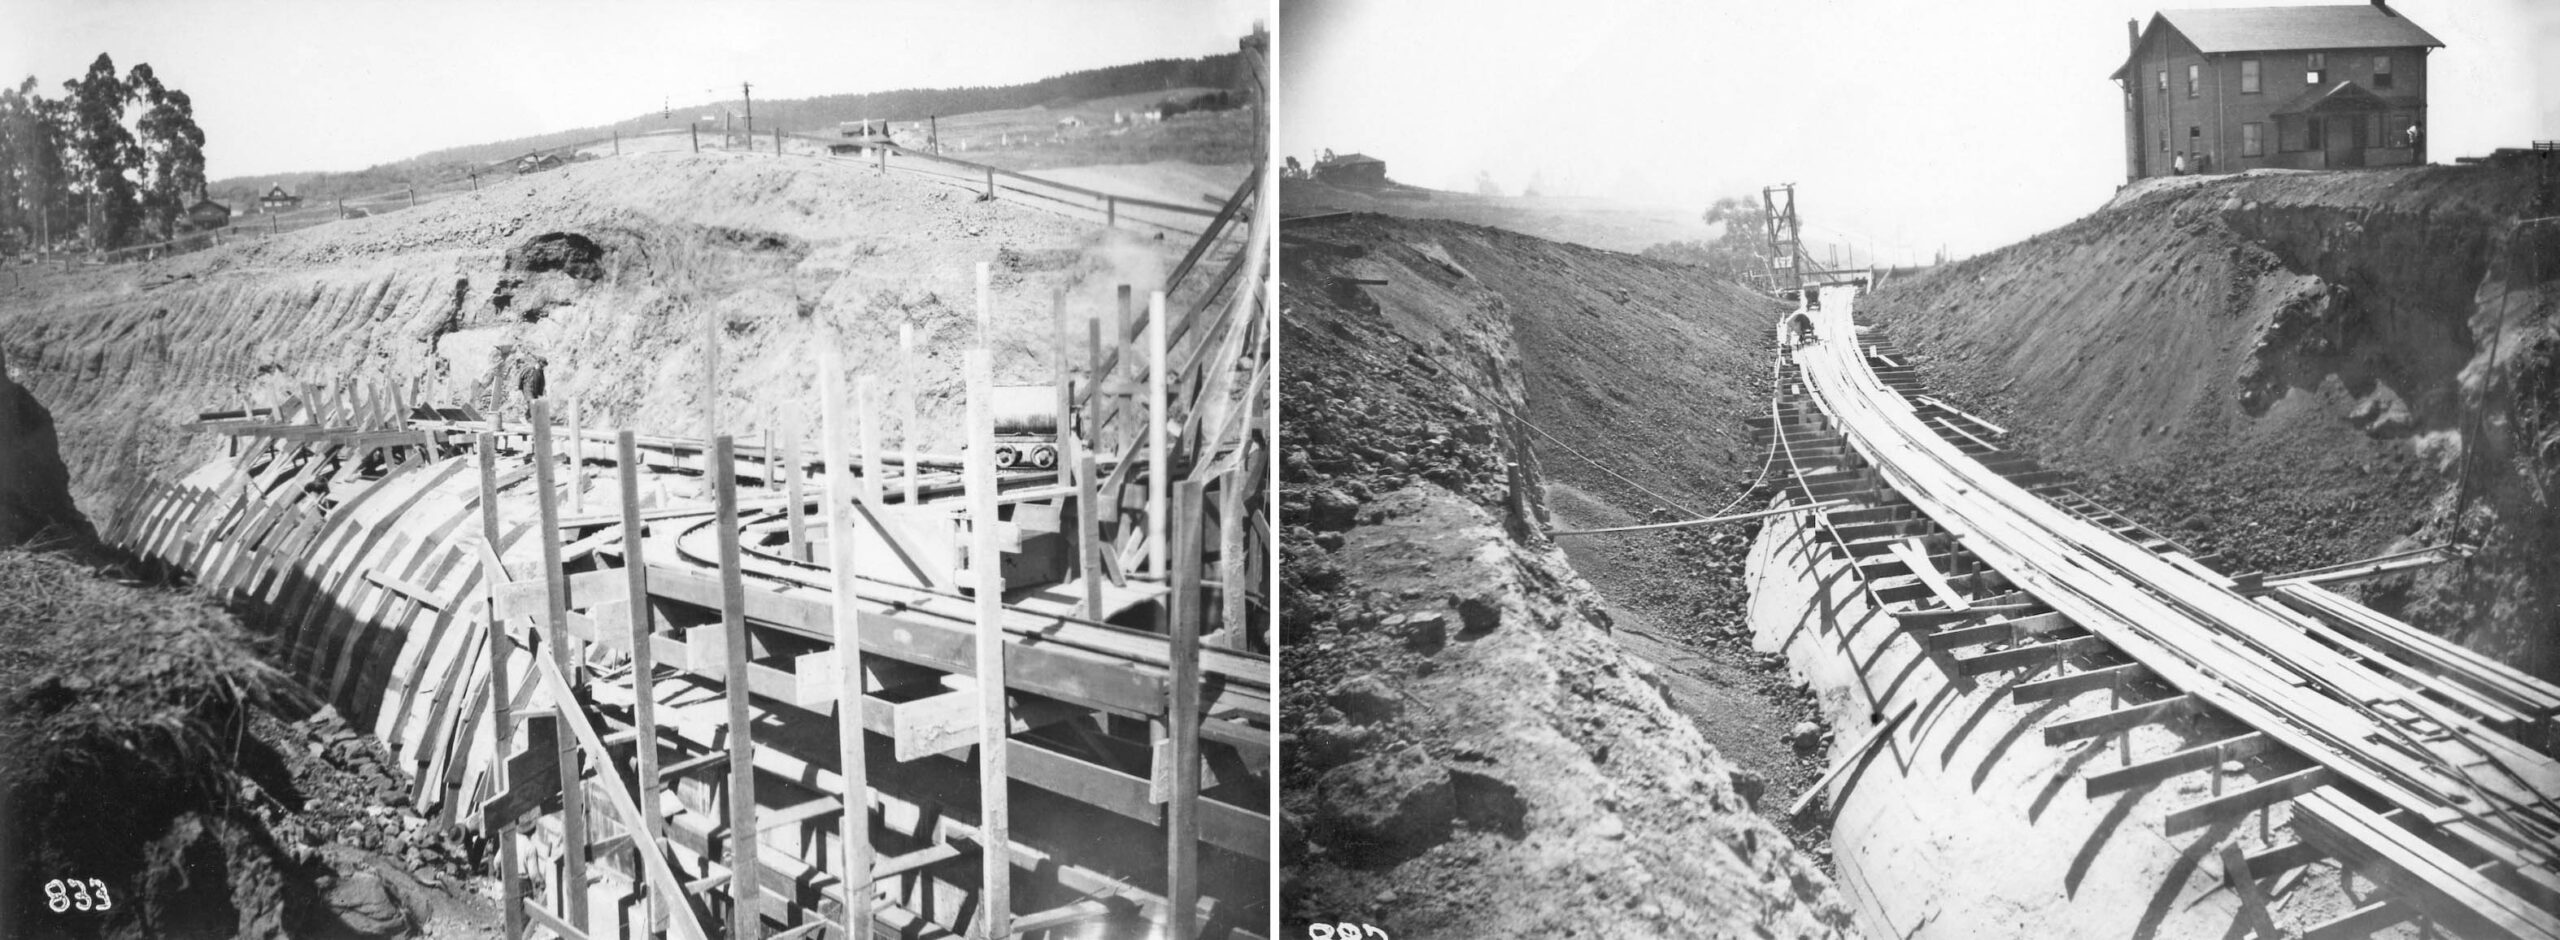
Two views from May 22, 1910, left and June 10, 1910, right, looking south and northwest, respectively, at the Sutter St. end of construction are presented. The crane appears to have been moved on train track that has also moved with time based on the imprints left on the ground. Note the two women watching from the house above. The path created on the right will serve an important function as will be seen next.
L345-75-S.P. Official Photos, Louis L. Stein Collection, Courtesy BAERA, Western Railway Museum Archives, 177781oa&b, l, 177778oa&b, r, (Image 15 of 42)
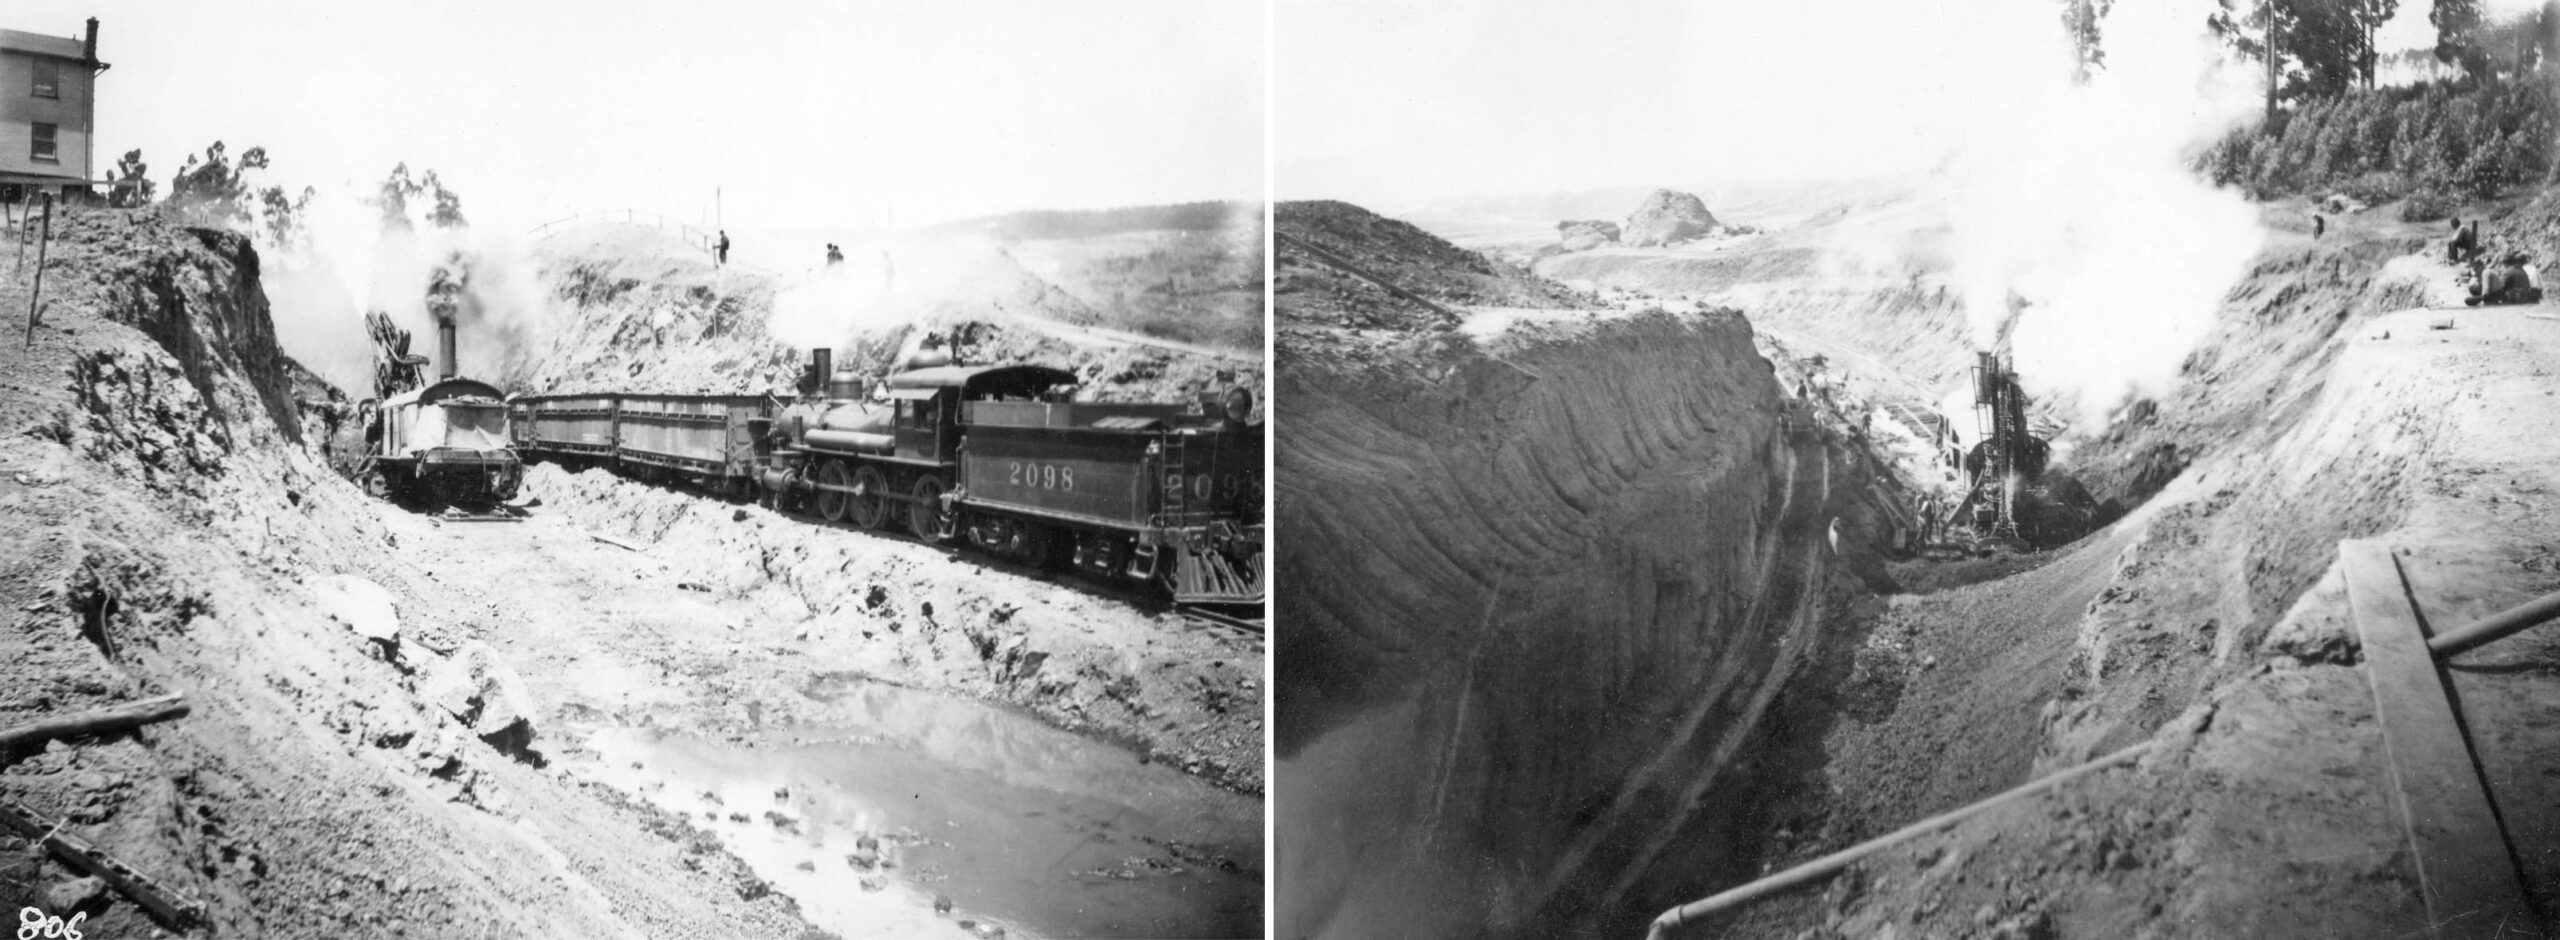
The north view from the Sutter St. side, left, shows the path from the previous panel now occupied by steam engine 2098 with greater capacity to assist moving out the dirt created by the steam shovel later on June 17, 1910. The northwest view on the right shows the stream shovel at work on the Solano Ave. side in 1910.
L345-80-S.P. Official Photos, Sappers Collection, l, Louis L. Stein Collection, r, Courtesy BAERA, Western Railway Museum Archives, 25640oa&b, l, 144348oa&b, r, (Image 16 of 42)
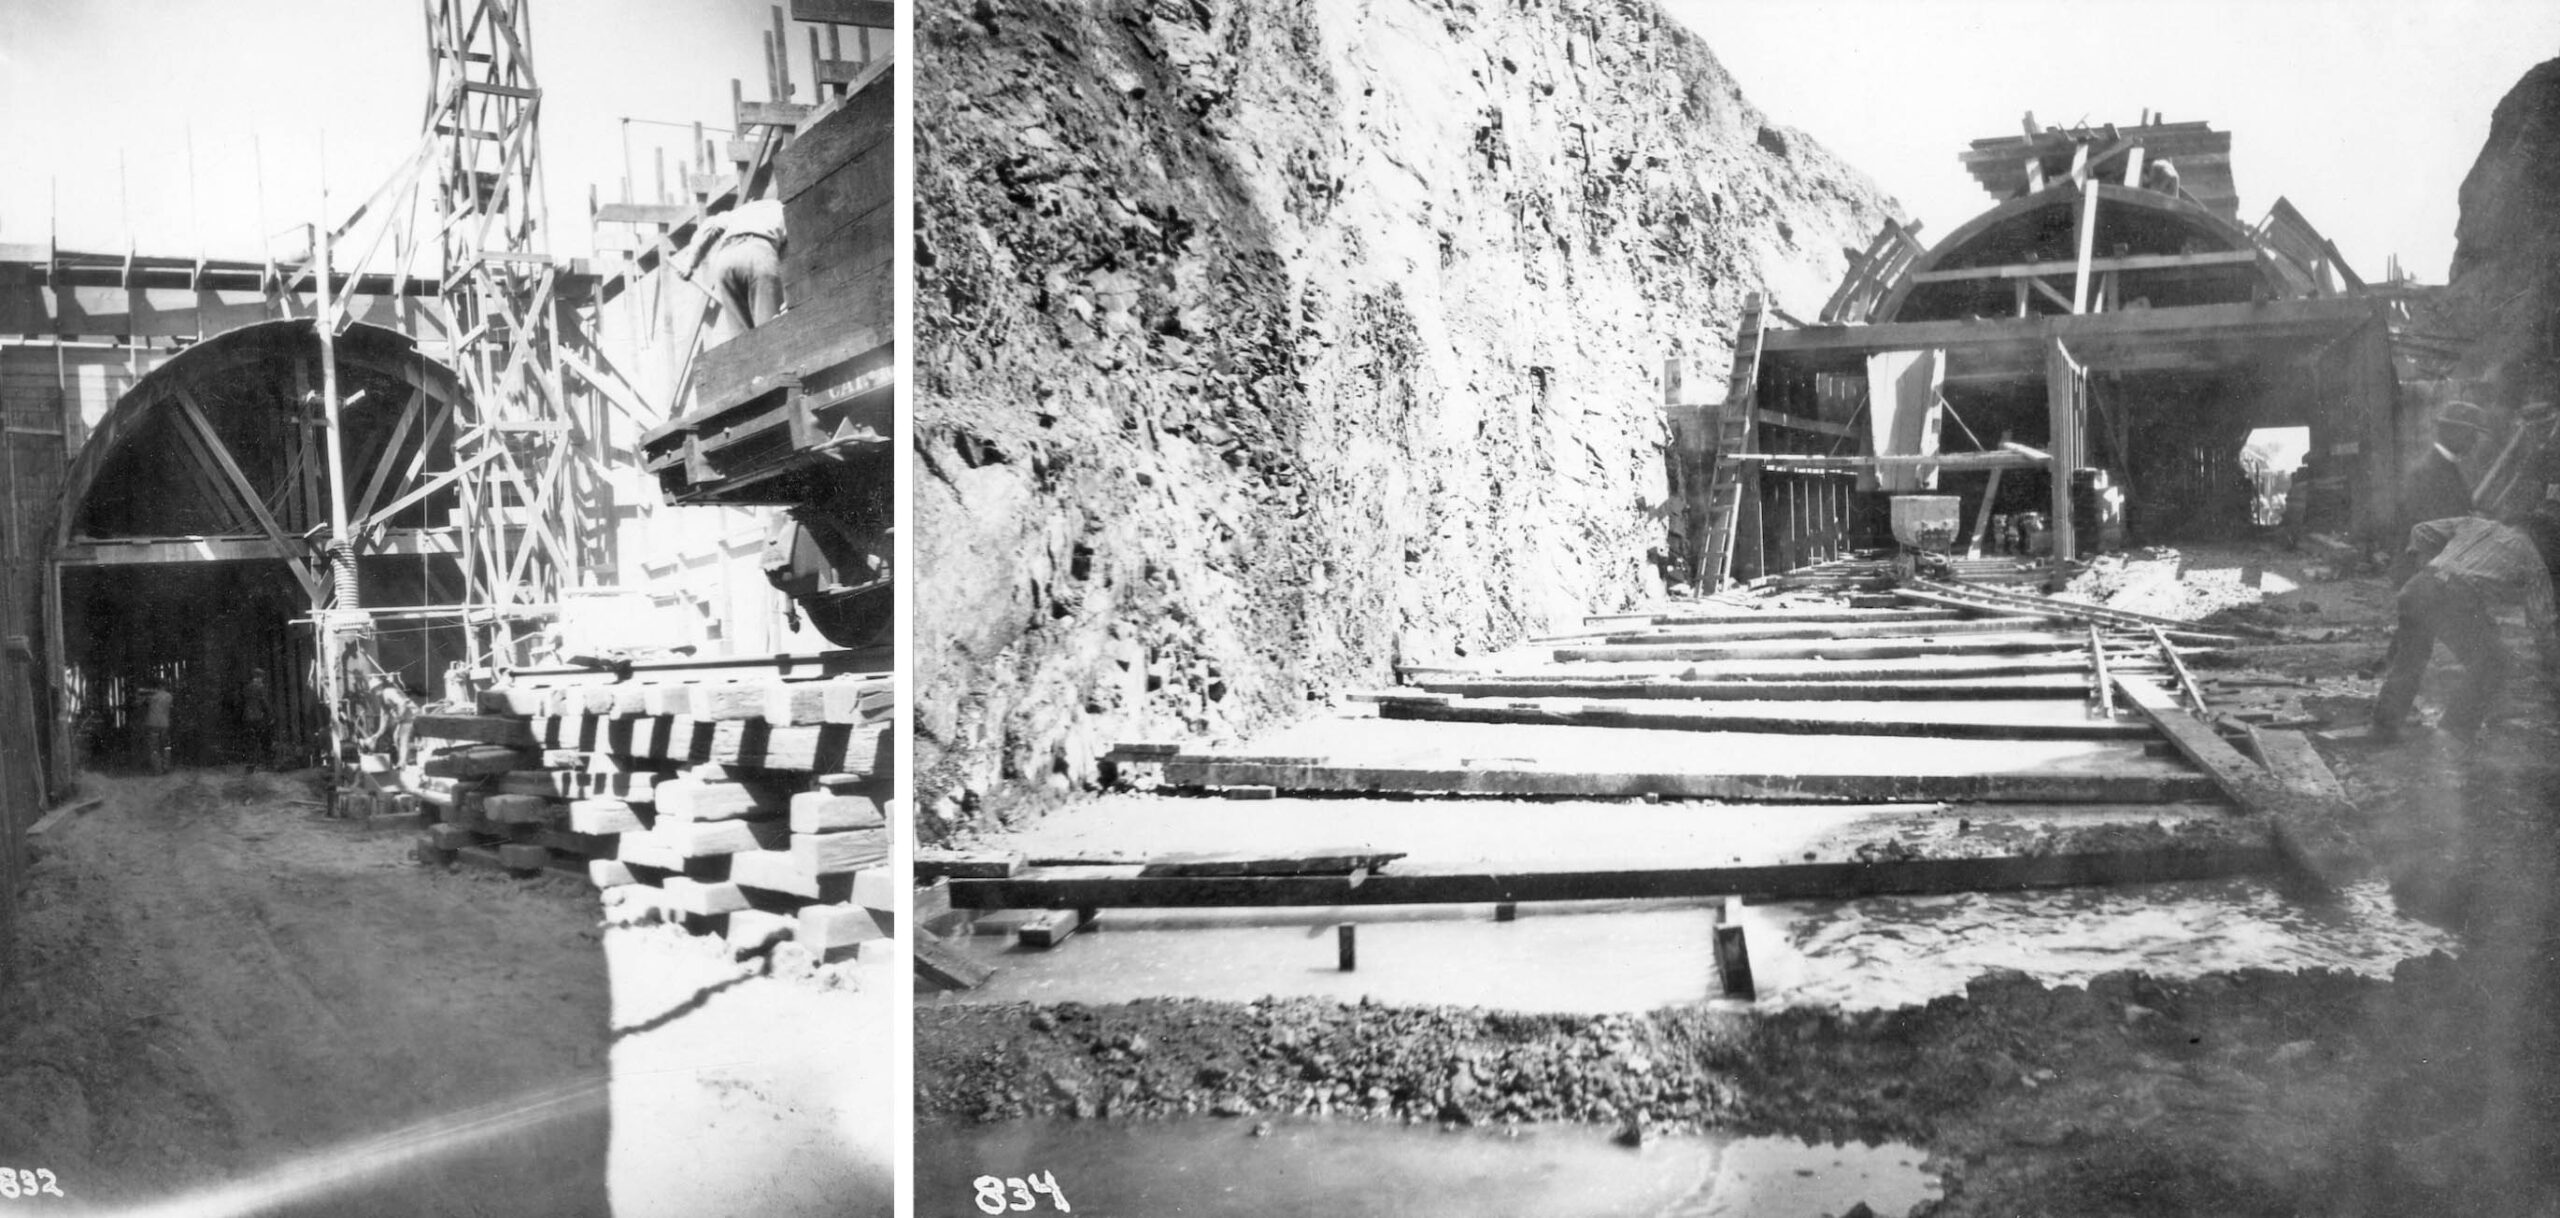
Next, the framing of the southern-most portion of the tunnel on the Sutter St. side is seen in this north view from Aug. 6, 1910. The gondola on the right appears to contain a granular material, possibly to prepare the concrete for the tunnel walls.
L345-85-S.P. Official Photo, Sappers Collection, Courtesy BAERA, Western Railway Museum Archives, 25646oa&b, (Image 17 of 42)
North, left, and south, right, views from Aug. 20, 1910 show concrete being mixed and applied to the tunnel frame.
L345-90-S.P. Official Photos, Louis L. Stein Collection, Courtesy BAERA, Western Railway Museum Archives, 177783oa&b, l, 177785oa&b, r, (Image 18 of 42)
The north view on the left continues the sequence from Aug. 20, 1910 as concrete is ready to be added to the frame. Note the narrow gauge track on top of the supports used to transport materials. On the right, a west view of the tunnel wall now formed by concrete ready to be covered in dirt on Oct 10, 1910.
L345-95-S.P. Official Photos, Louis L. Stein Collection, l, Sappers Collection, r, Courtesy BAERA, Western Railway Museum Archives, 177784oa&b, l, 25642oa&b, r, (Image 19 of 42)
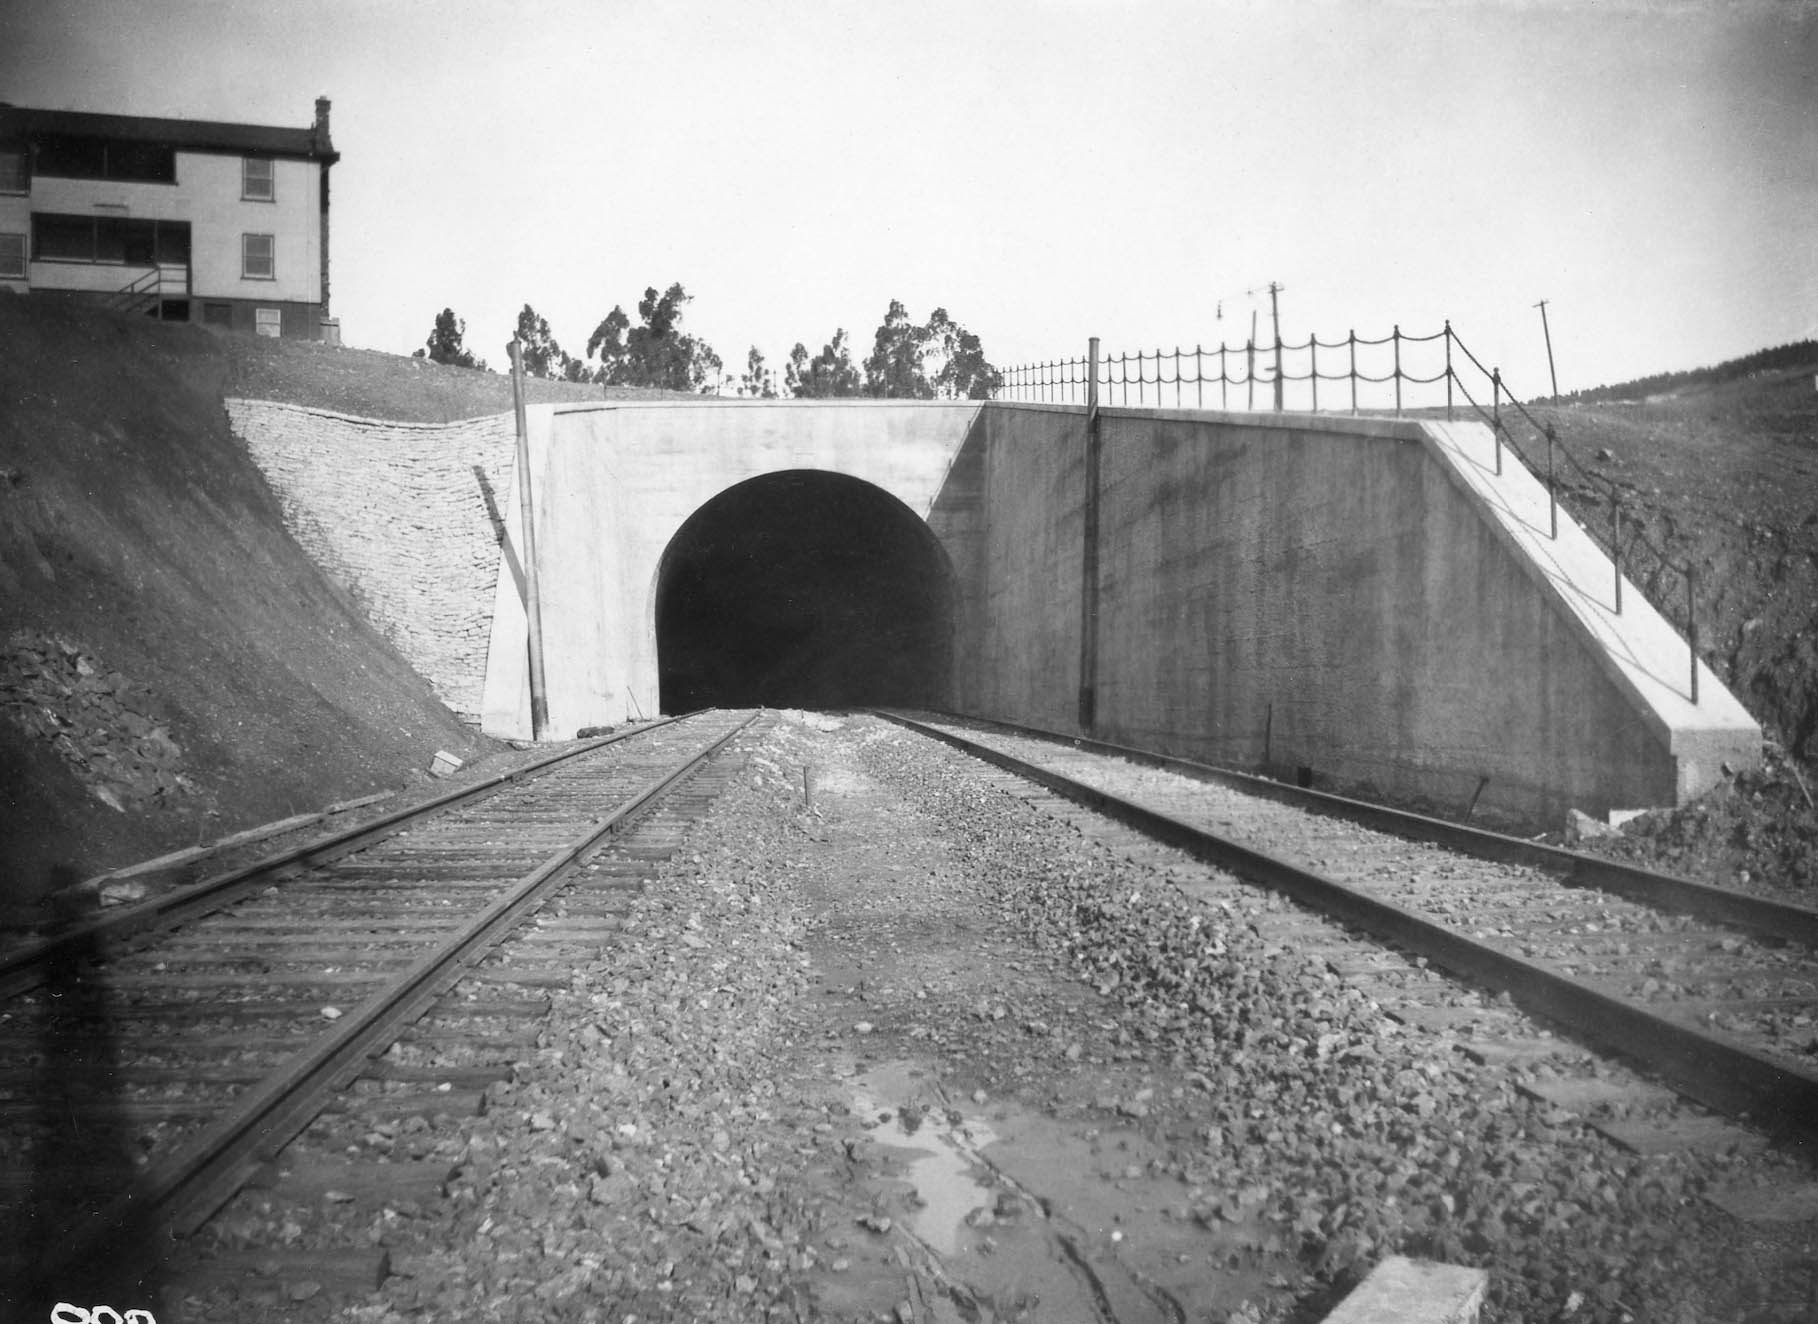
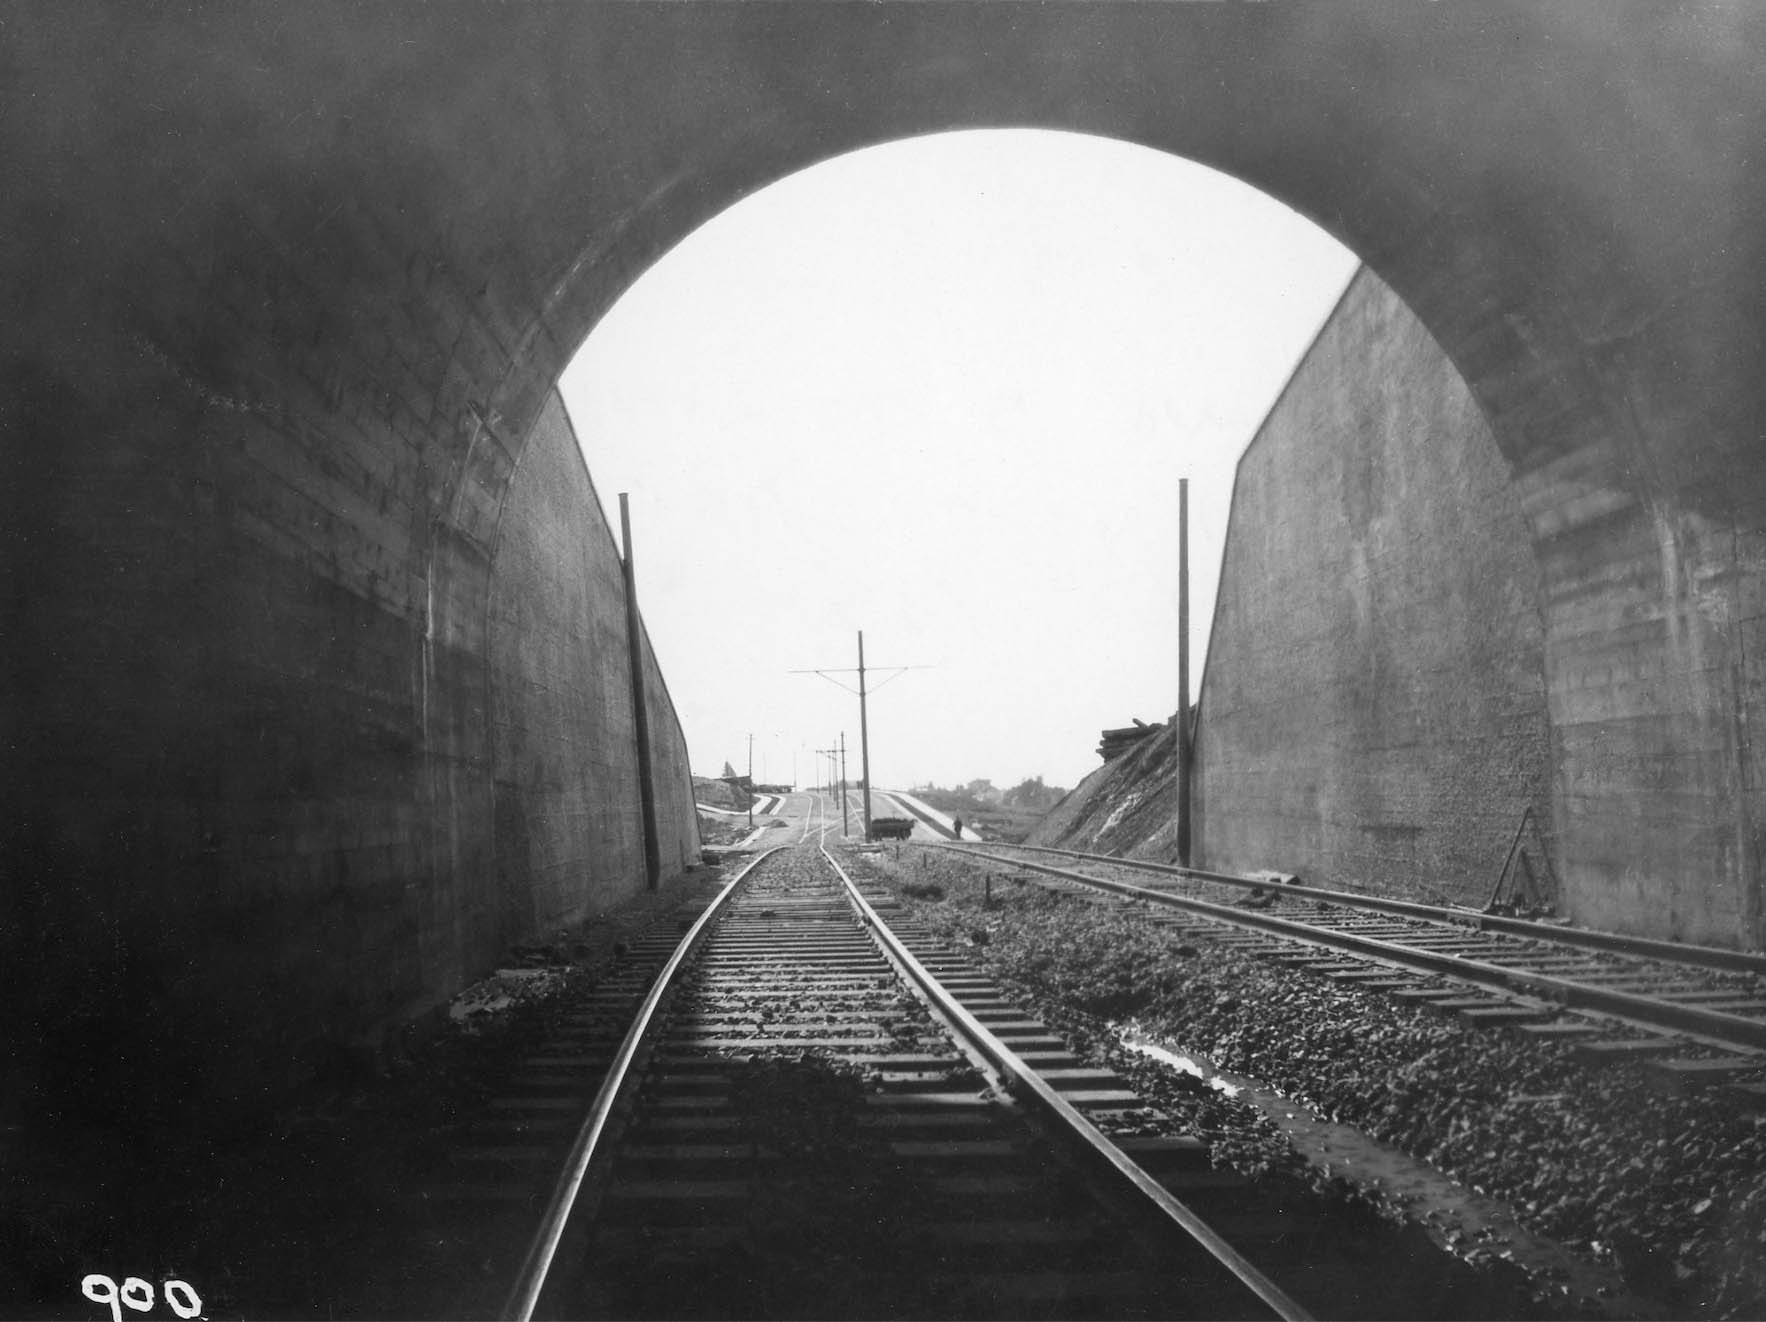
This north view from the Sutter St. portal shows the completed tunnel with tracks, but no overhead wires, the date Jan. 22, 1911.
L345-100-S.P. Official Photo, Sappers Collection, Courtesy BAERA, Western Railway Museum Archives, 25638oa&b, (Image 20 of 42)
Same date, looking south from the Sutter St. side of the tunnel interior and the track heading toward the Hopkins St. intersection
L345-105-S.P. Official Photo, Sappers Collection, Courtesy BAERA, Western Railway Museum Archives, 25636oa&b, (Image 21 of 42)
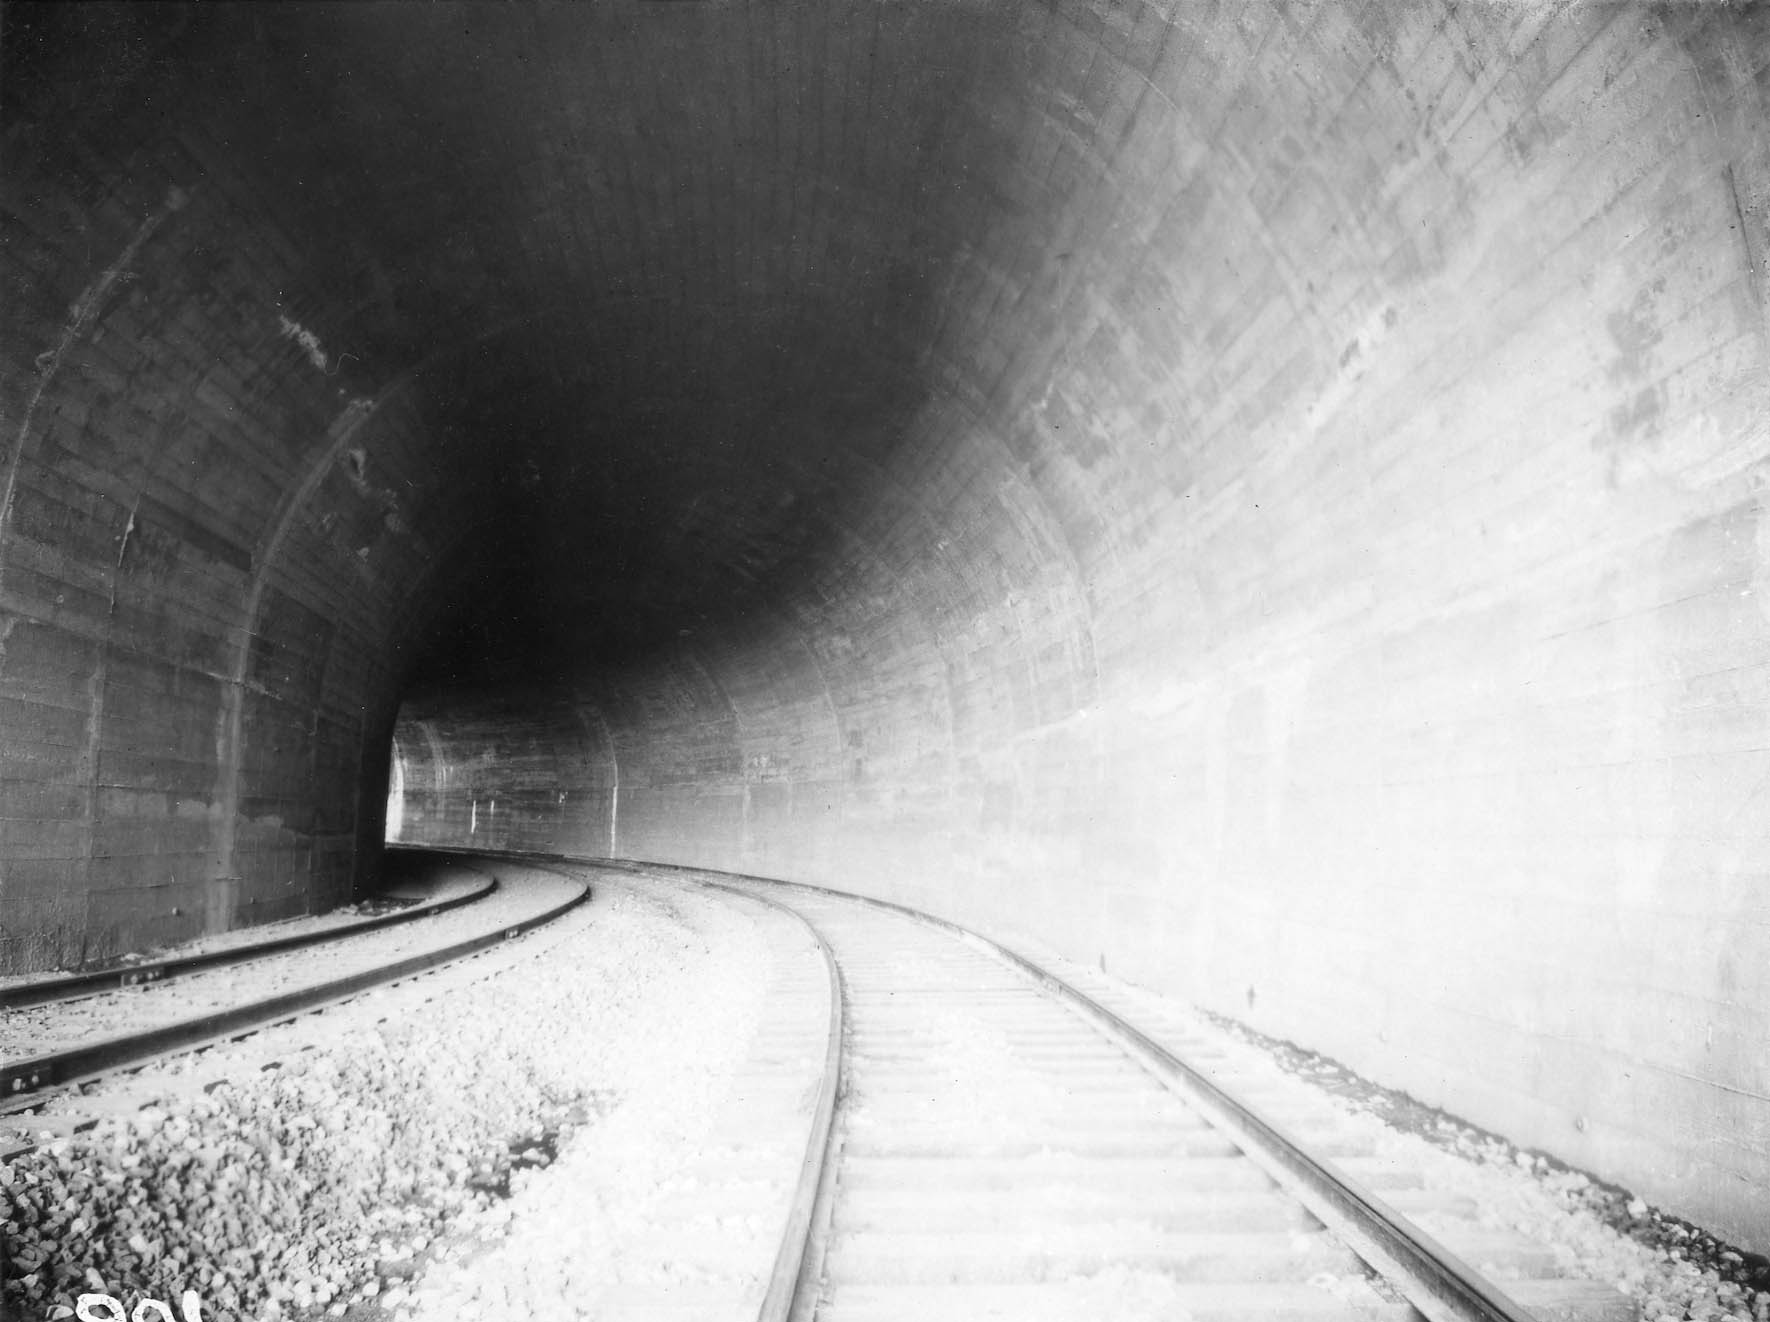
Continuing on the same date, a northwest view from within the tunnel toward the Solano Ave. side.
L345-110-S.P. Official Photo, Louis L. Stein Collection, Courtesy BAERA, Western Railway Museum Archives, 144350oa&b, (Image 22 of 42)
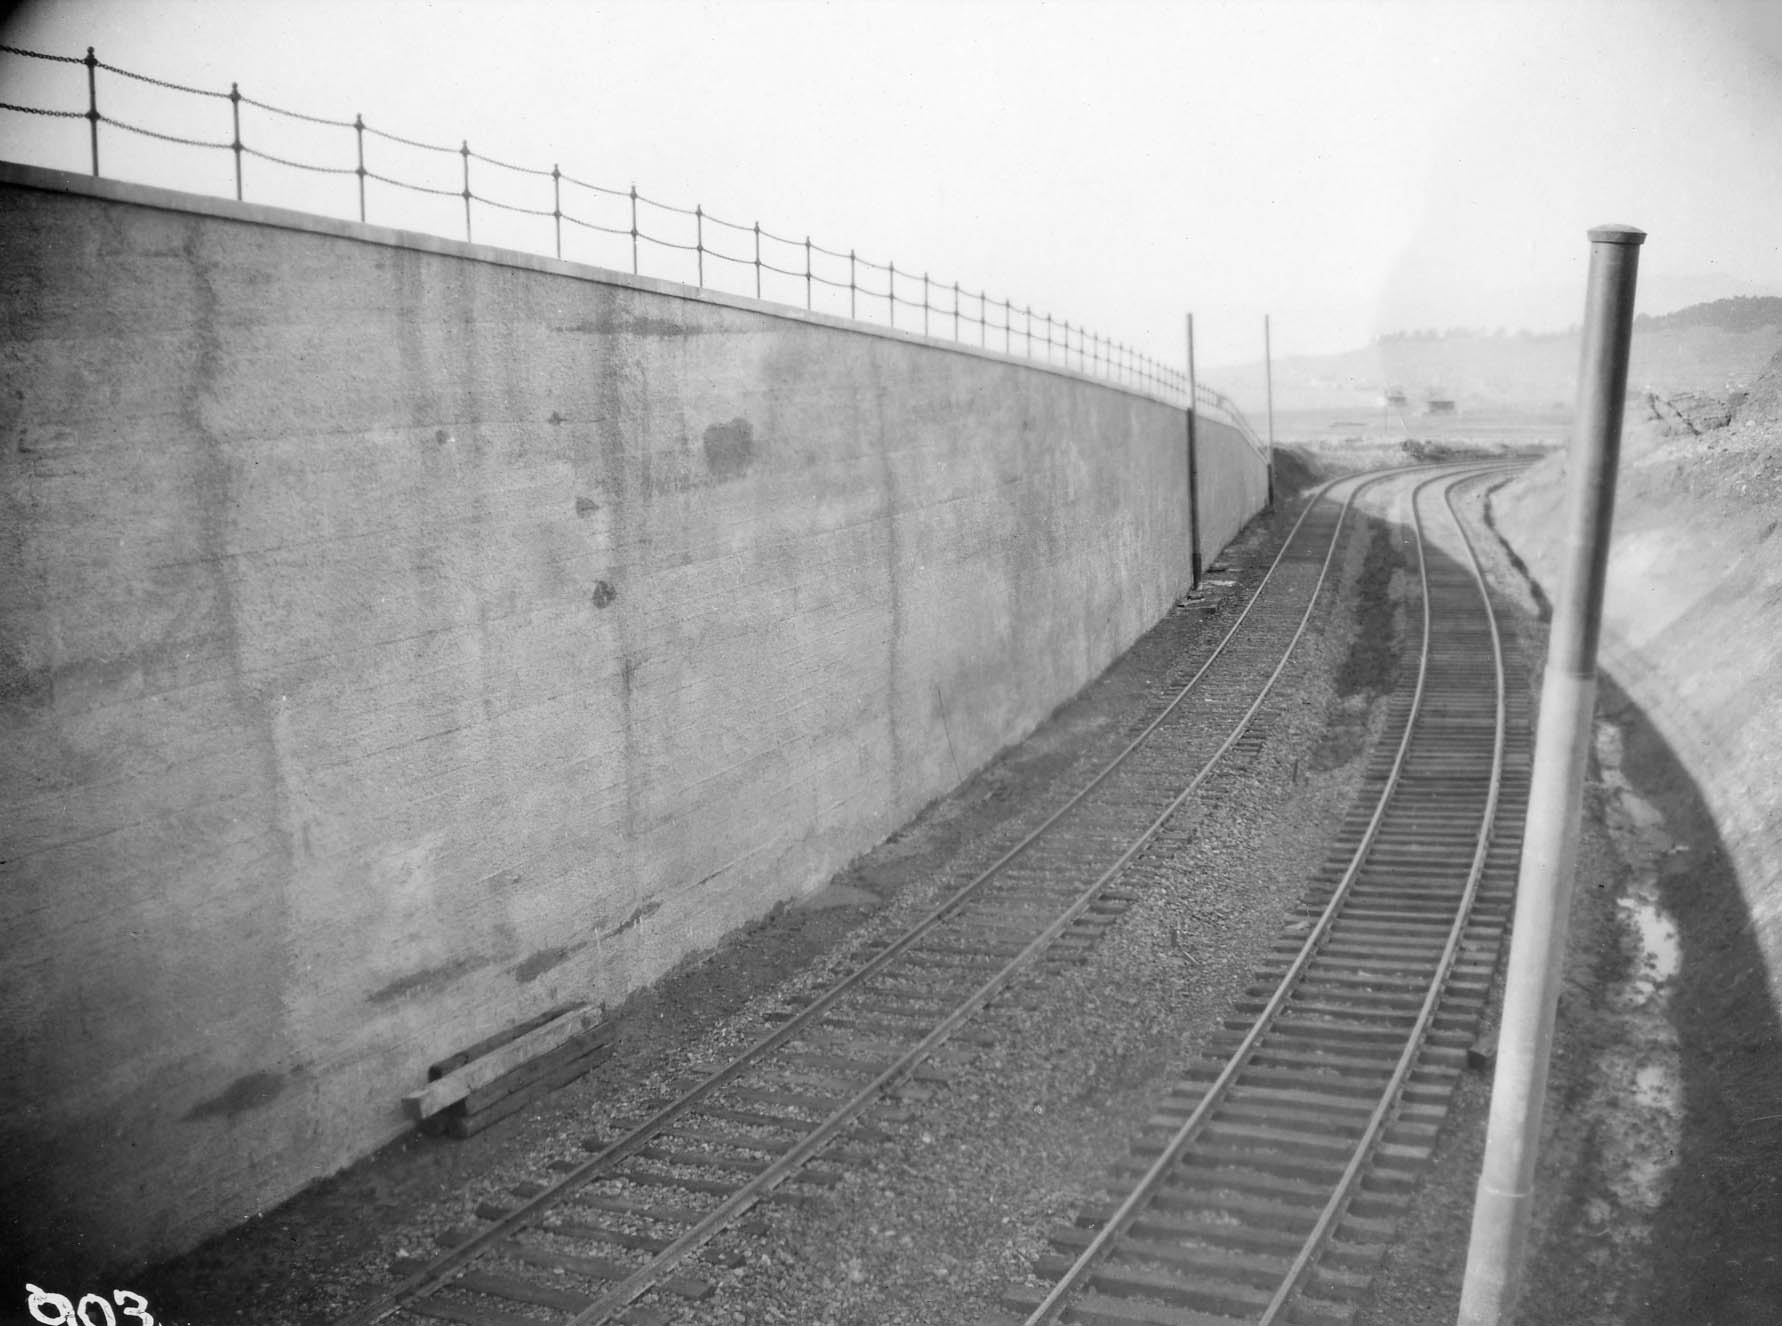
Next, to Jan 27, 1911, this west view shows the section leading out of the portal to Solano Ave.
L345-115-S.P. Official Photo, Sappers Collection, Courtesy BAERA, Western Railway Museum Archives, 177787oa&b, (Image 23 of 42)
A repeat of the southeast view from Sept. 15, 1911 serves to complement the previous image.
L345-120-S.P. Official Photo, Robert S. Ford Collection, Courtesy BAERA, Western Railway Museum Archives, 167632oa&b, (Image 24 of 42)
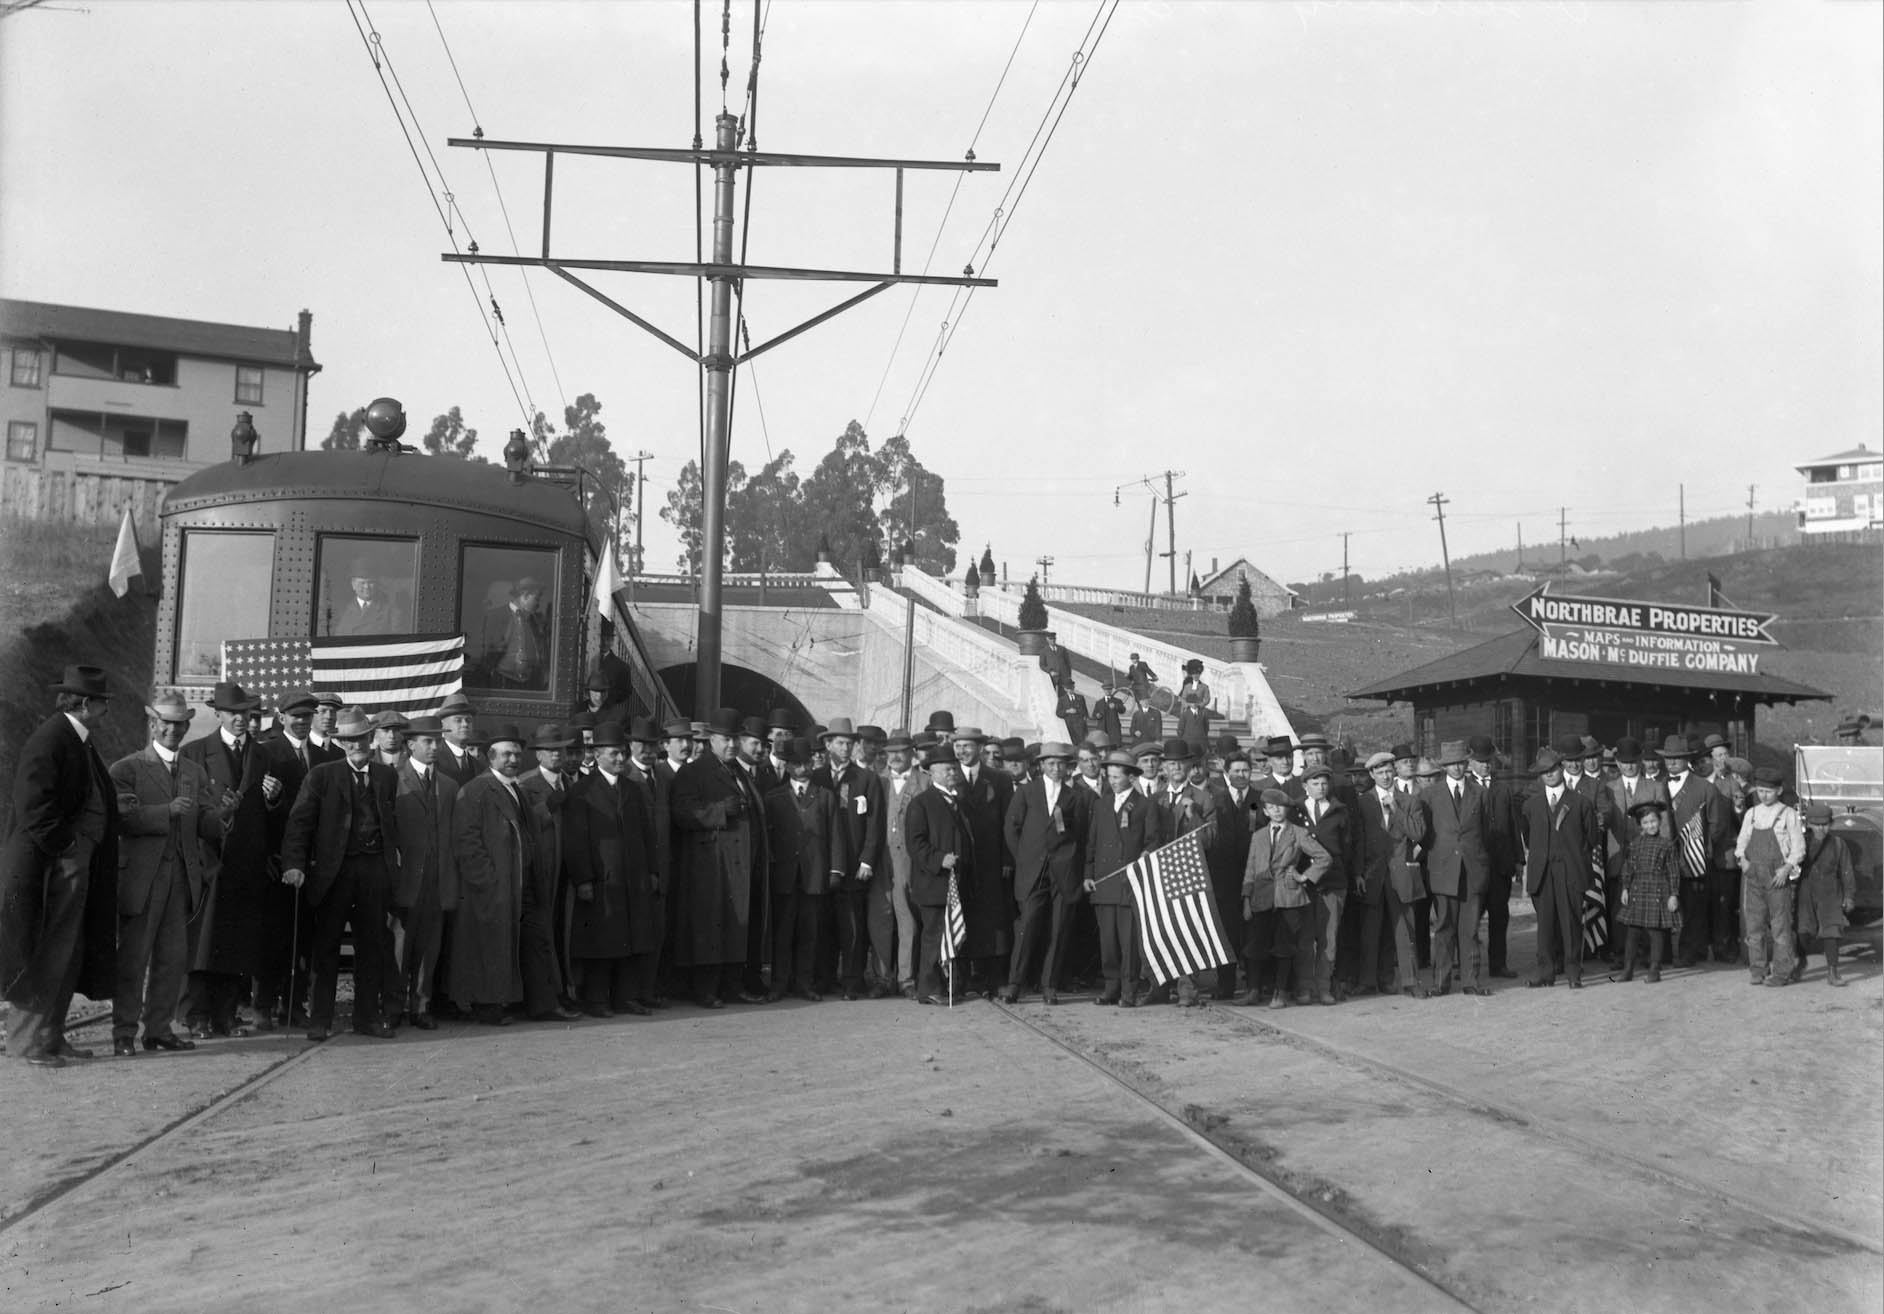
A celebration is in progress at the Sutter St. tunnel portal of the new extension from Berryman. The first train to pass through the tunnel is seen by the public on Dec. 22, 1911. Electric trains would begin running during the day from the Oakland Pier to Berryman the next day, and full service to Thousand Oaks was to begin on the 31st according to Ford.
L345-125-S.P. Official Photo, Sappers Collection, Courtesy BAERA, Western Railway Museum Archives, 25351oa&b, (Image 25 of 42)
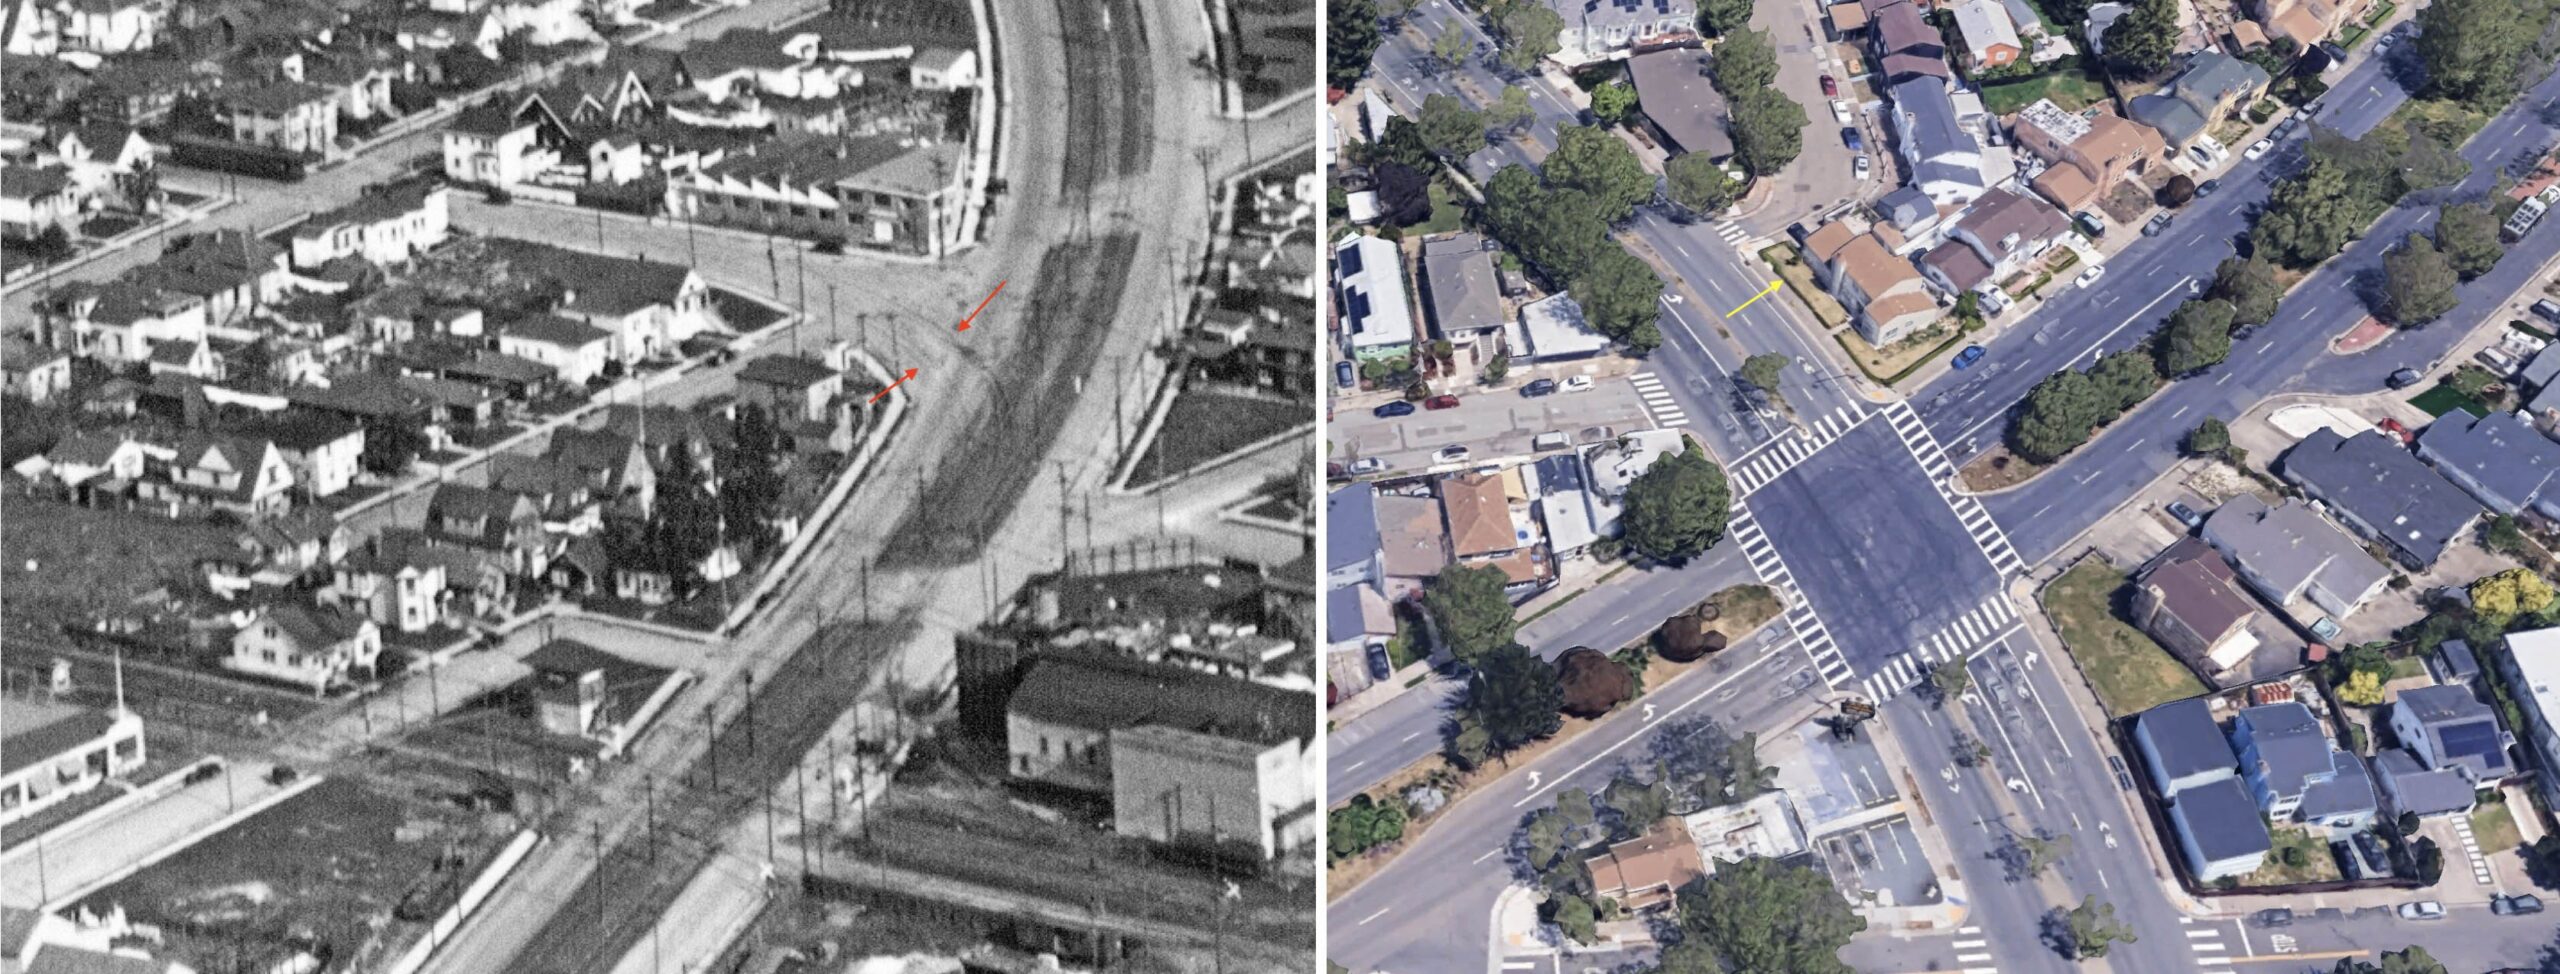
Lagging a couple weeks behind the opening of the extension of the Shattuck Ave. line was the opening of the California St. line. Very few images of the construction of this line were found, so these two aerials are included here to document where the line began on its out-bound trips from the Oakland Pier. The northeast aerial on the left ca. mid-1920s shows the two tracks, red arrows, emanating from the mainline on Stanford Ave. onto California St. On the right, a similar view from 2026 showing that the redesign of Market St. ca. 1950 that added a house, yellow arrow, where the track takeoffs had been previously located.
L345-130-George Russell Photo, Courtesy California State Lands Commission, SLC_644_NoDate_23, l, Courtesy Google Maps, r, (Image 26 of 42)
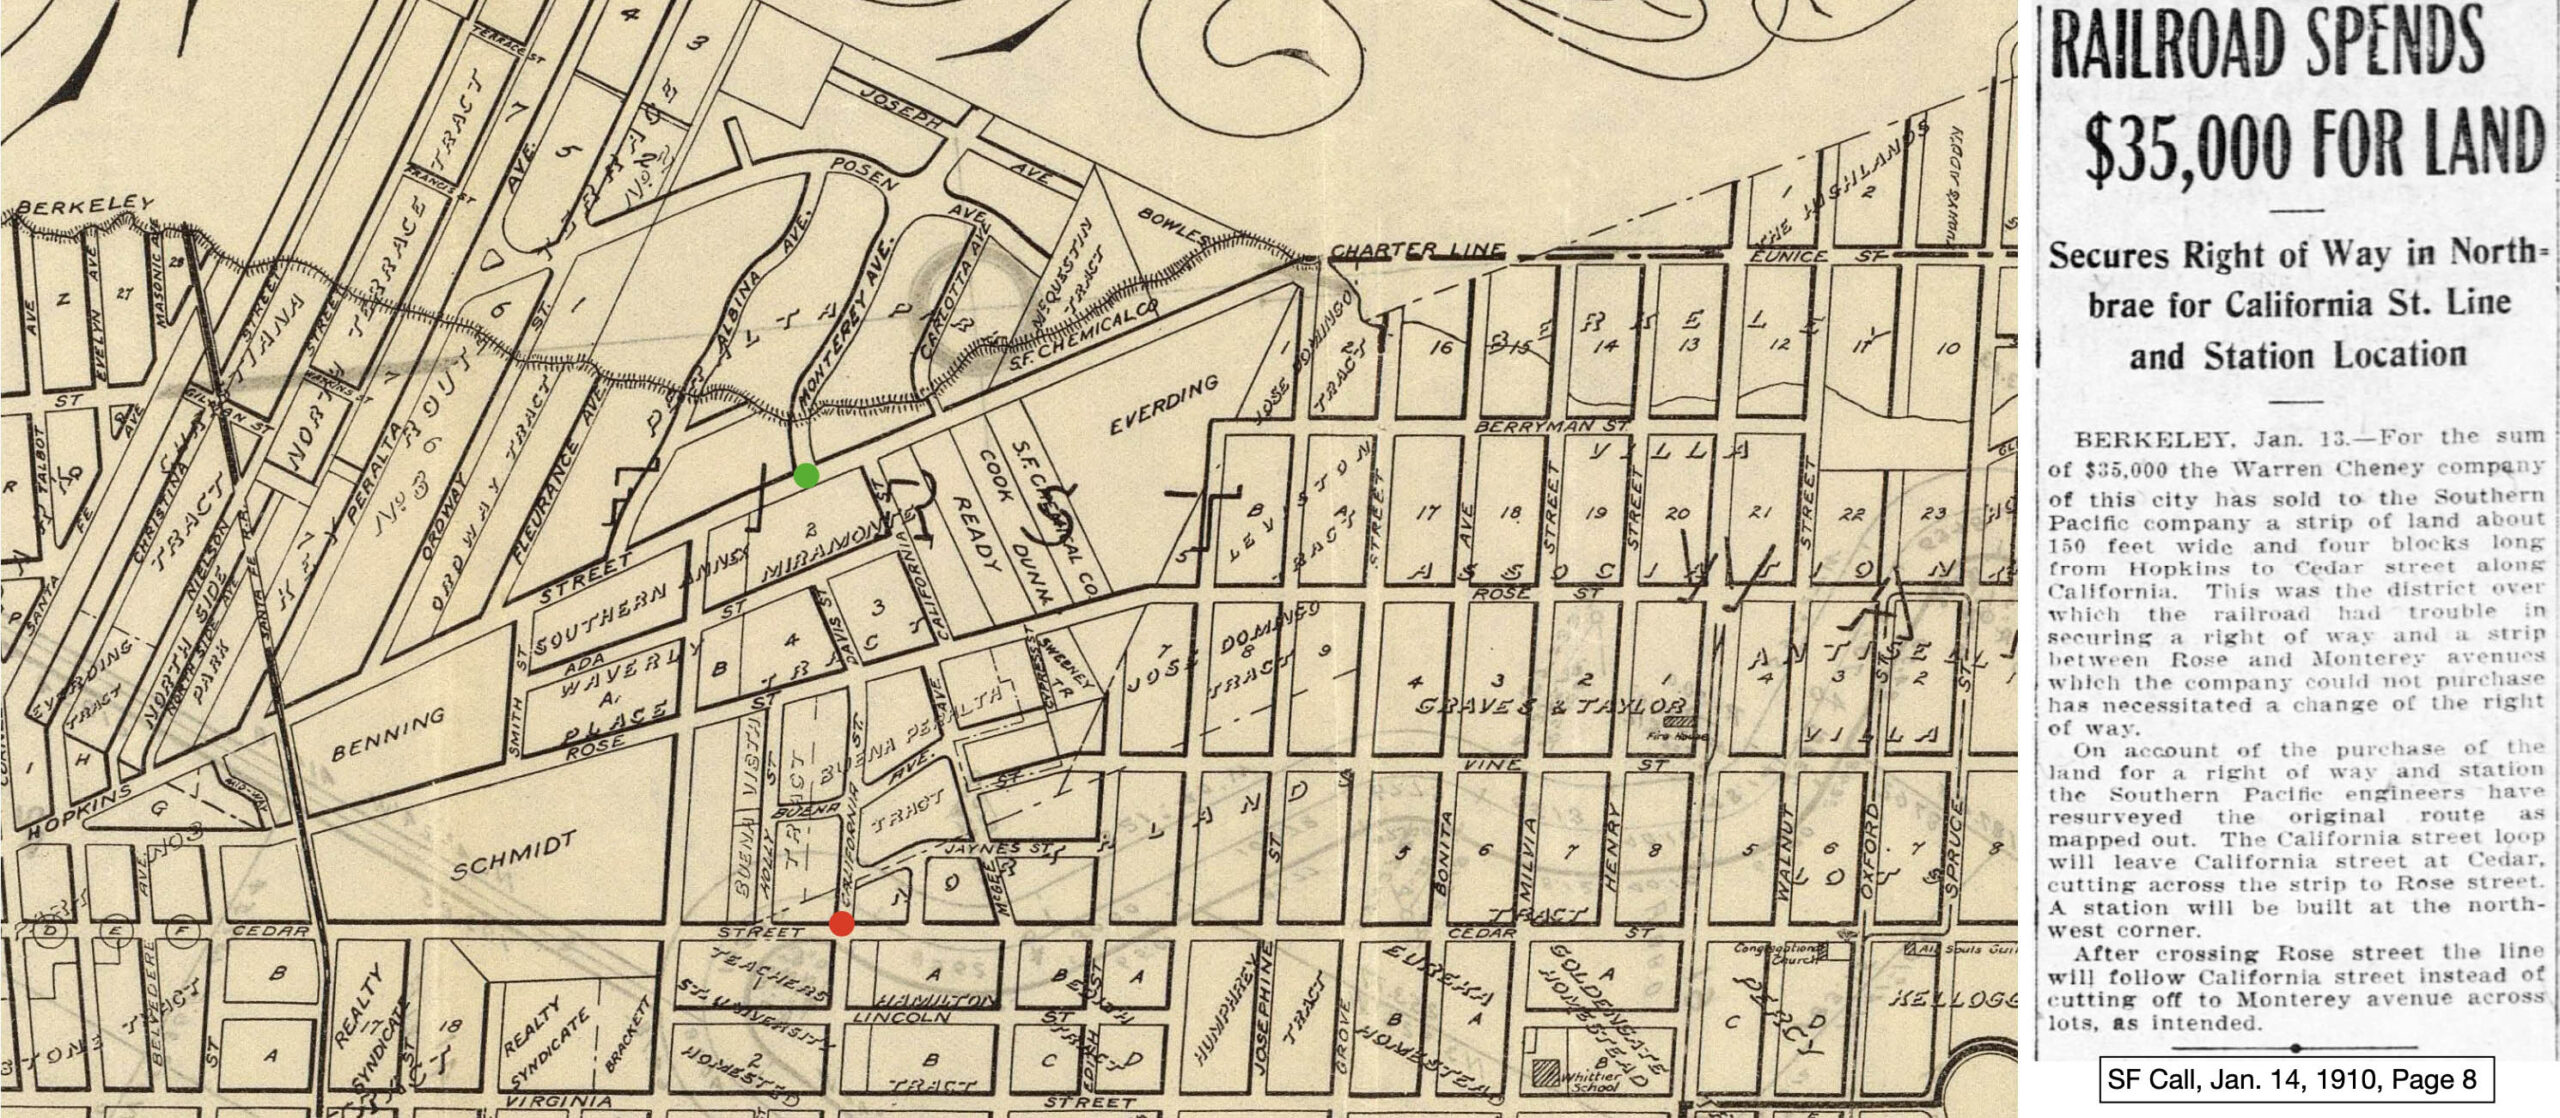
As the article on the right explains, the SP was unable to secure a right-of-way, ROW, between Cedar St. and Hopkins St., indicated by the colored circles on the map from ca. 1910, but were able to obtain a parallel route from Warren Cheney. Appreciation to Daniela Thompson for finding this article, which, it turns out, was part of the basis of a historical account of Cheney and his wife May that she authored. A very interesting story to read about two influential Berkeley residents who lived on the UC Berkeley campus and the final destinations of houses they owned. Click here for the article.
L345-135-W.F. McClure, City Engineer. Patterson, Smith & Co., Inc., David Rumsey Map Collection, David Rumsey Map Center, Stanford Libraries, l, Courtesy California Digital Collection, r, (Image 27 of 42)
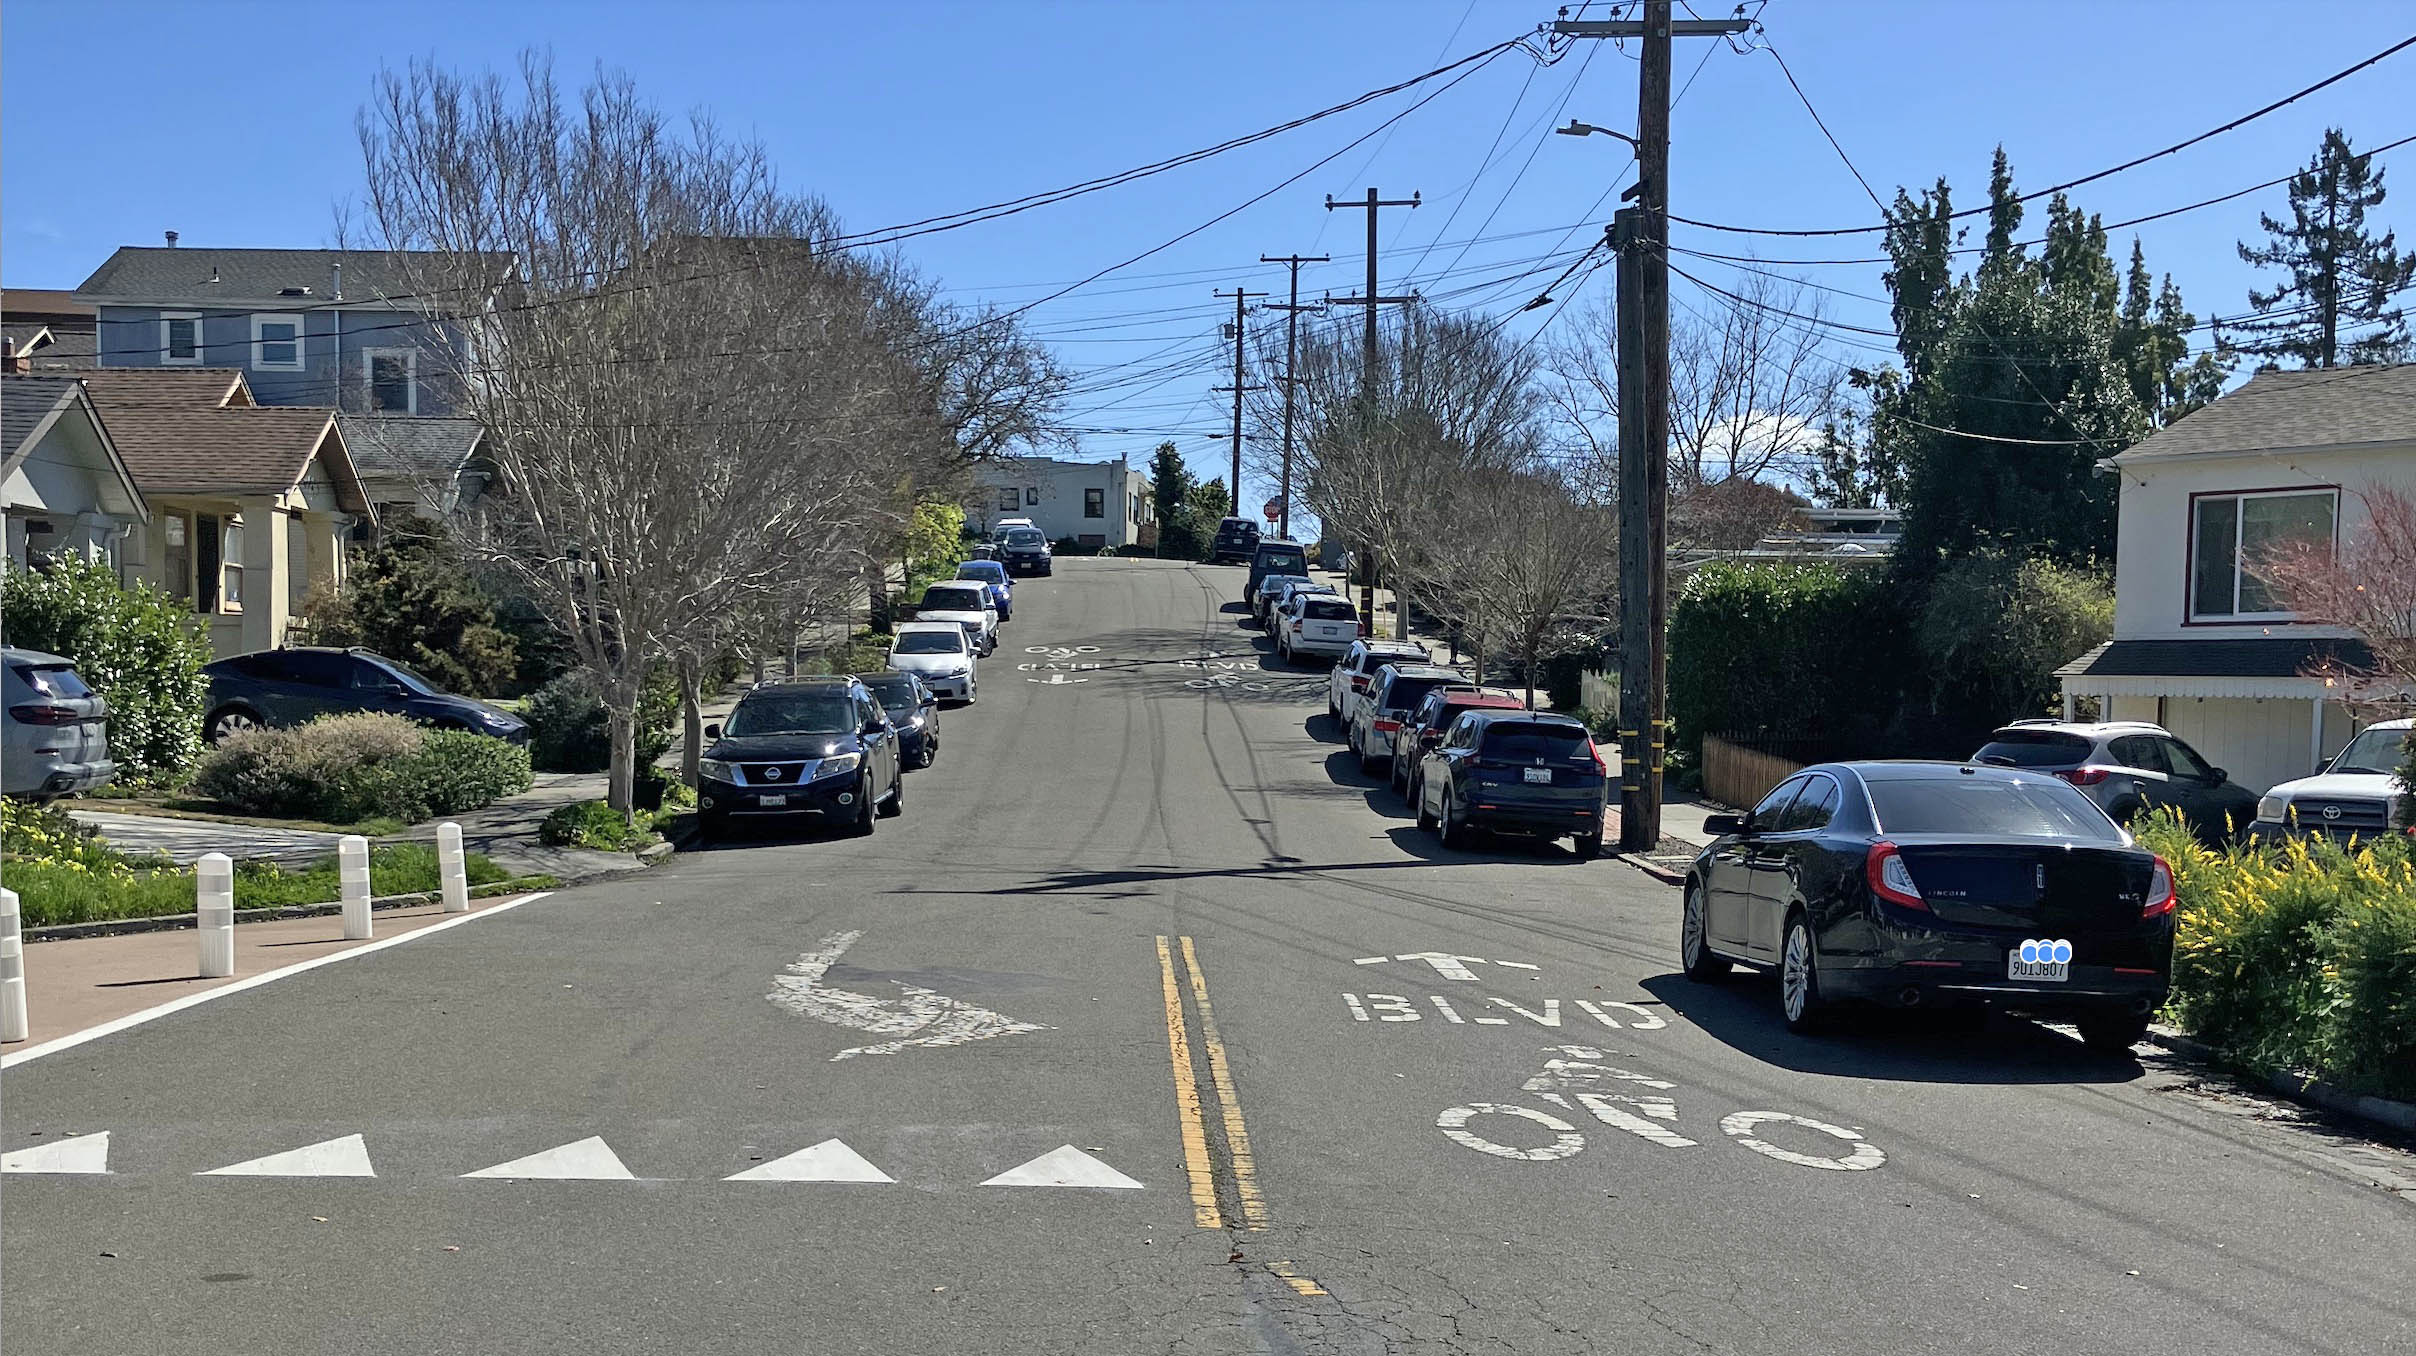
The description of the ROW the SP obtained to complete the California St. line left out one very important characteristic, that is, the relatively steep grade between Rose St. and Ada St. as shown in this south view up California St. from Ada St. in 2026. You may recall in the previous update, the Key had to tackle this grade, which they did by cutting across it at a 45 degree gentle slope from Sacramento St. and Rose St.
L345-140-Stuart Swiedler Photo, (Image 28 of 42)
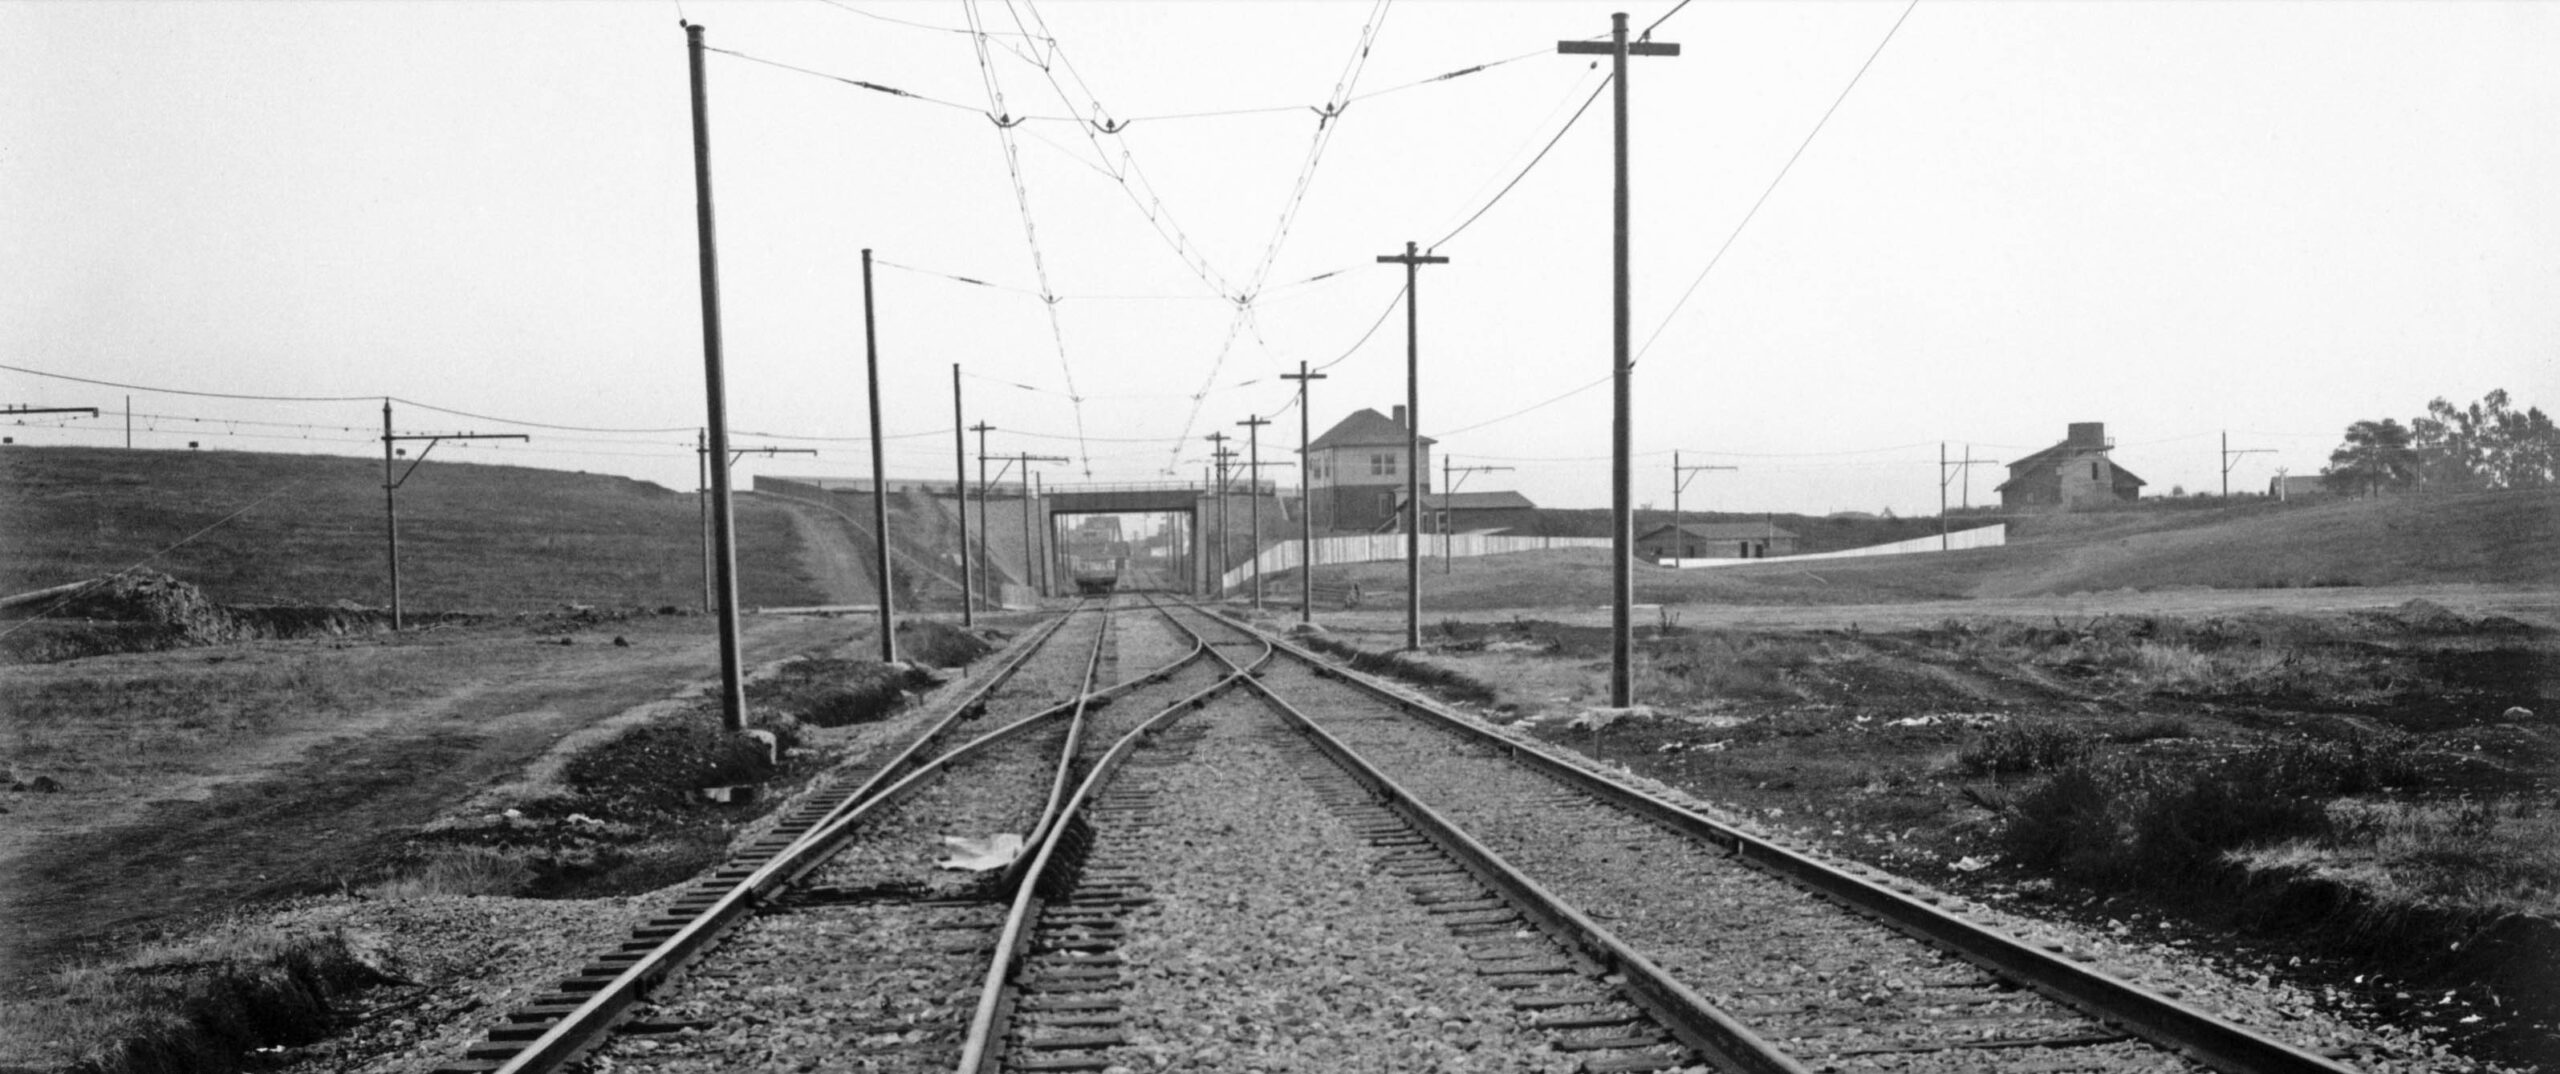
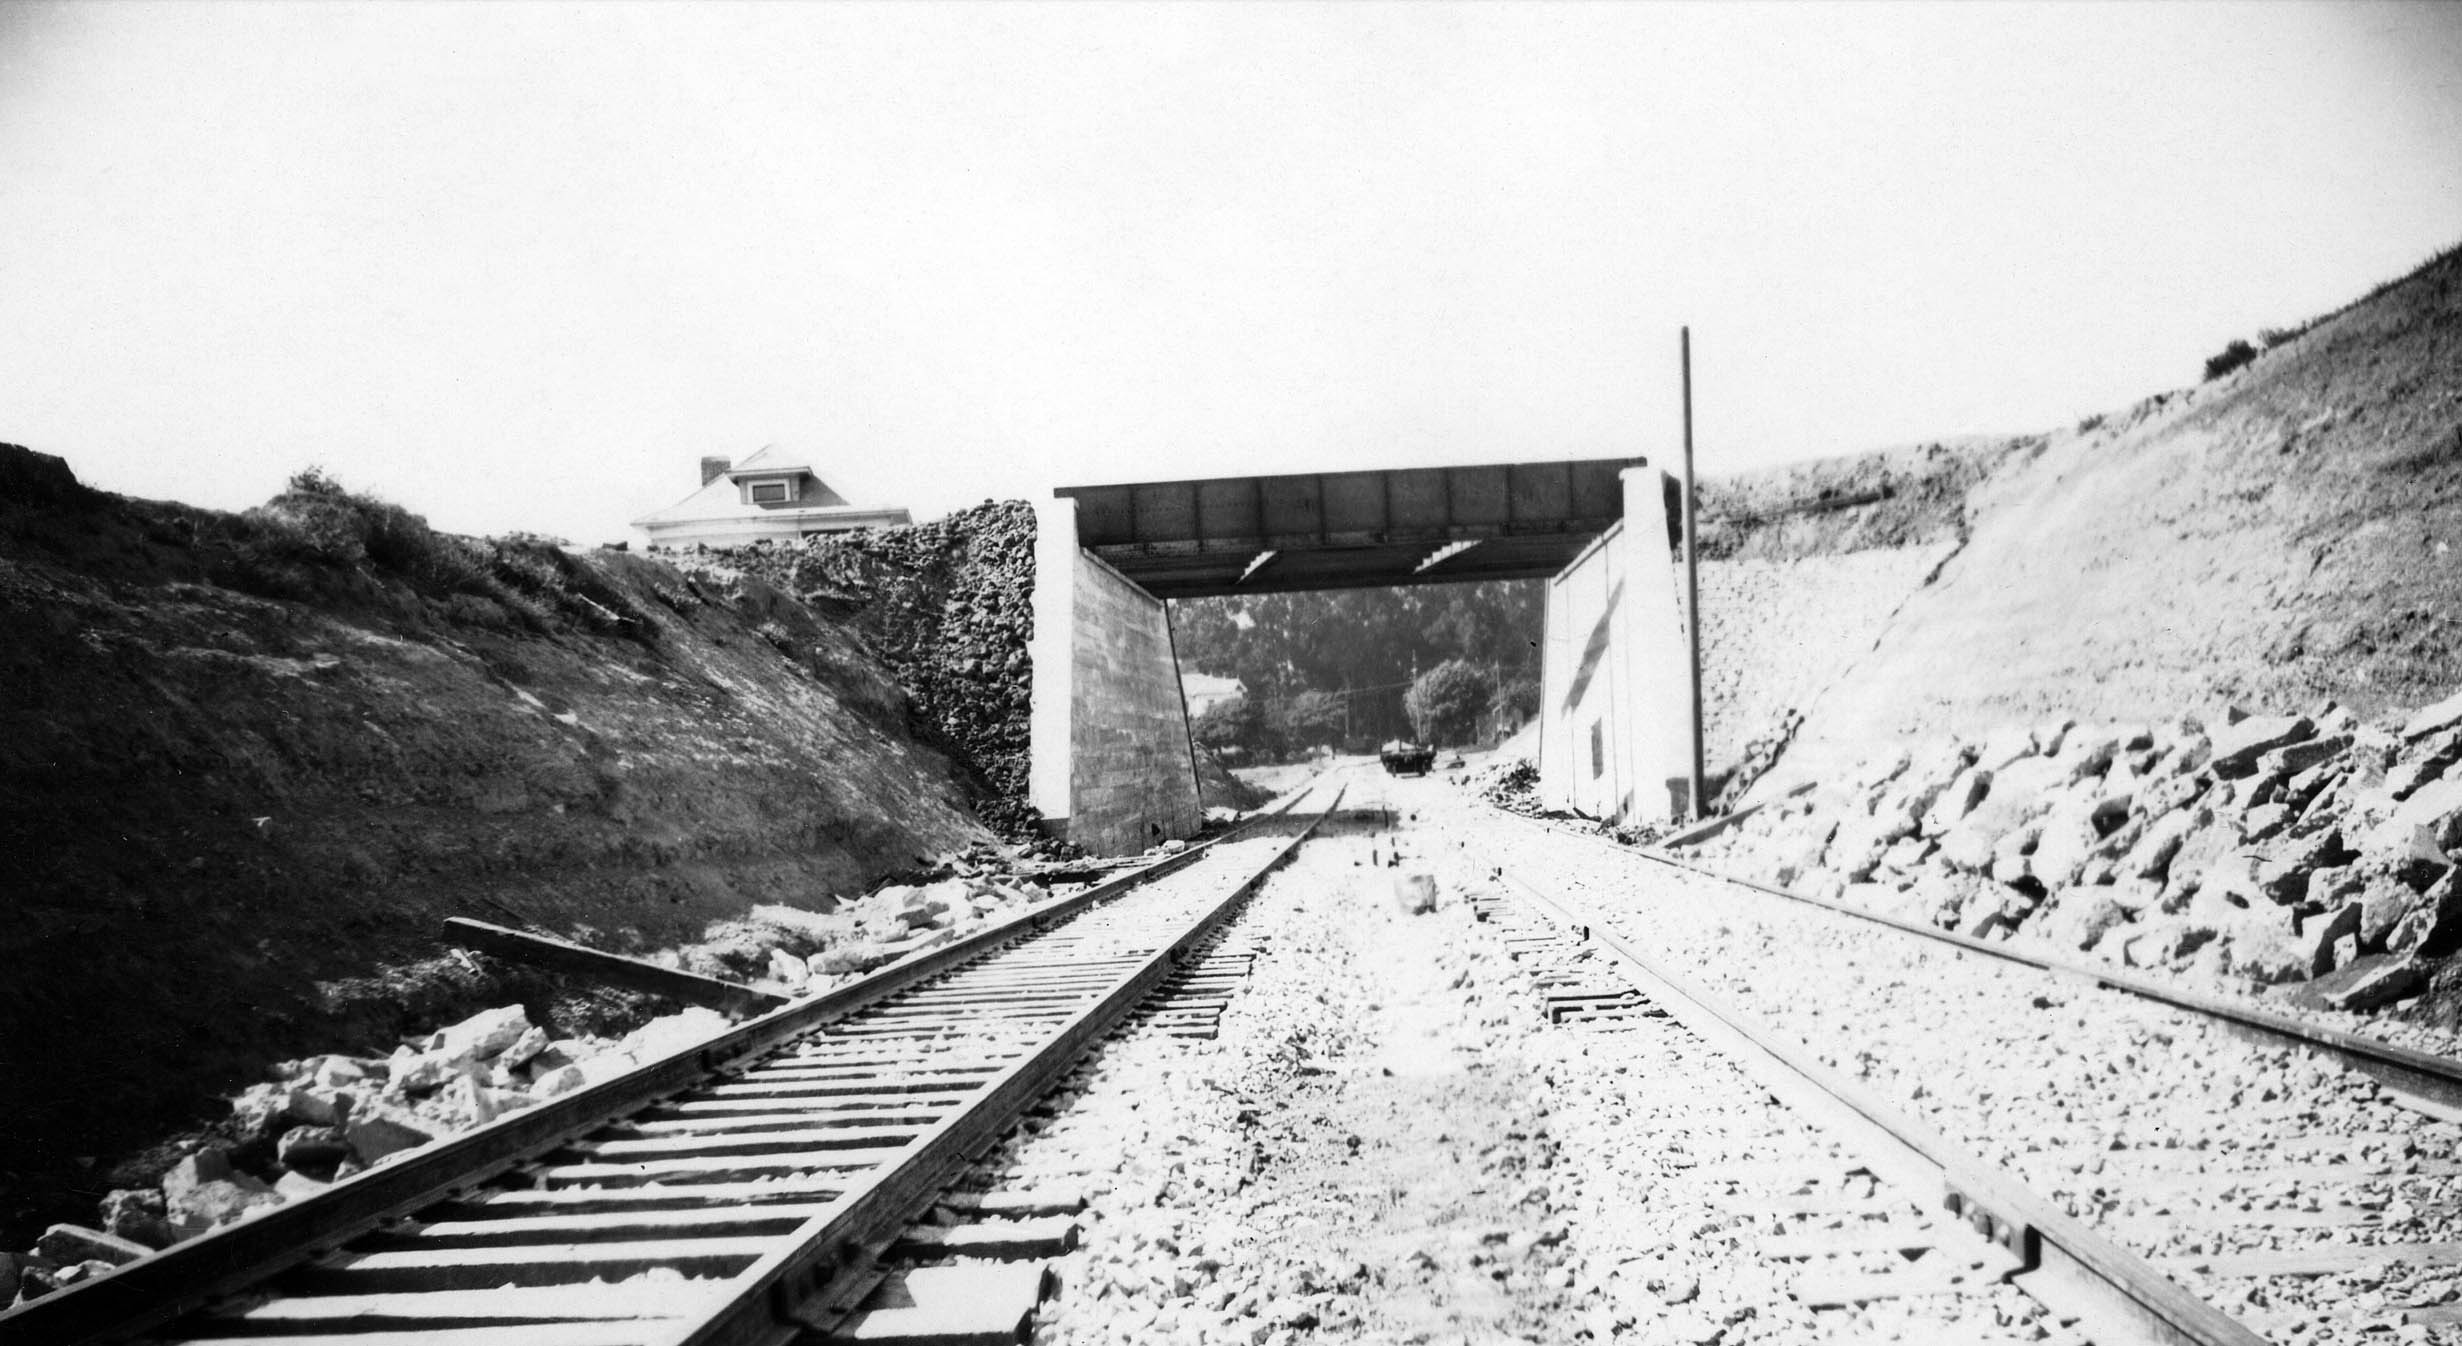
This south view from Nov. 6, 1911, approximately two months before the line’s opening, shows the solution to the lack of an acceptable ROW and the grade issue. After leaving California St. between Buena Ave. and Jaynes St., the track entered a cut that went below Rose St. and crossed the Key Northbrae line on level ground just south of Ada St., as shown here. California St. ended at Rose St., the unpaved road to the east was later reconfigured as California St. after the ROWs were abandoned. Also seen and encountered in the last update are no. 1577 Rose St. next to the Rose St. overpass, and to the right or west, no. 1410 Holly St.
L345-145-S.P. Official Photo, Sappers Collection, Courtesy BAERA, Western Railway Museum Archives, 25715oa&b, (Image 29 of 42)
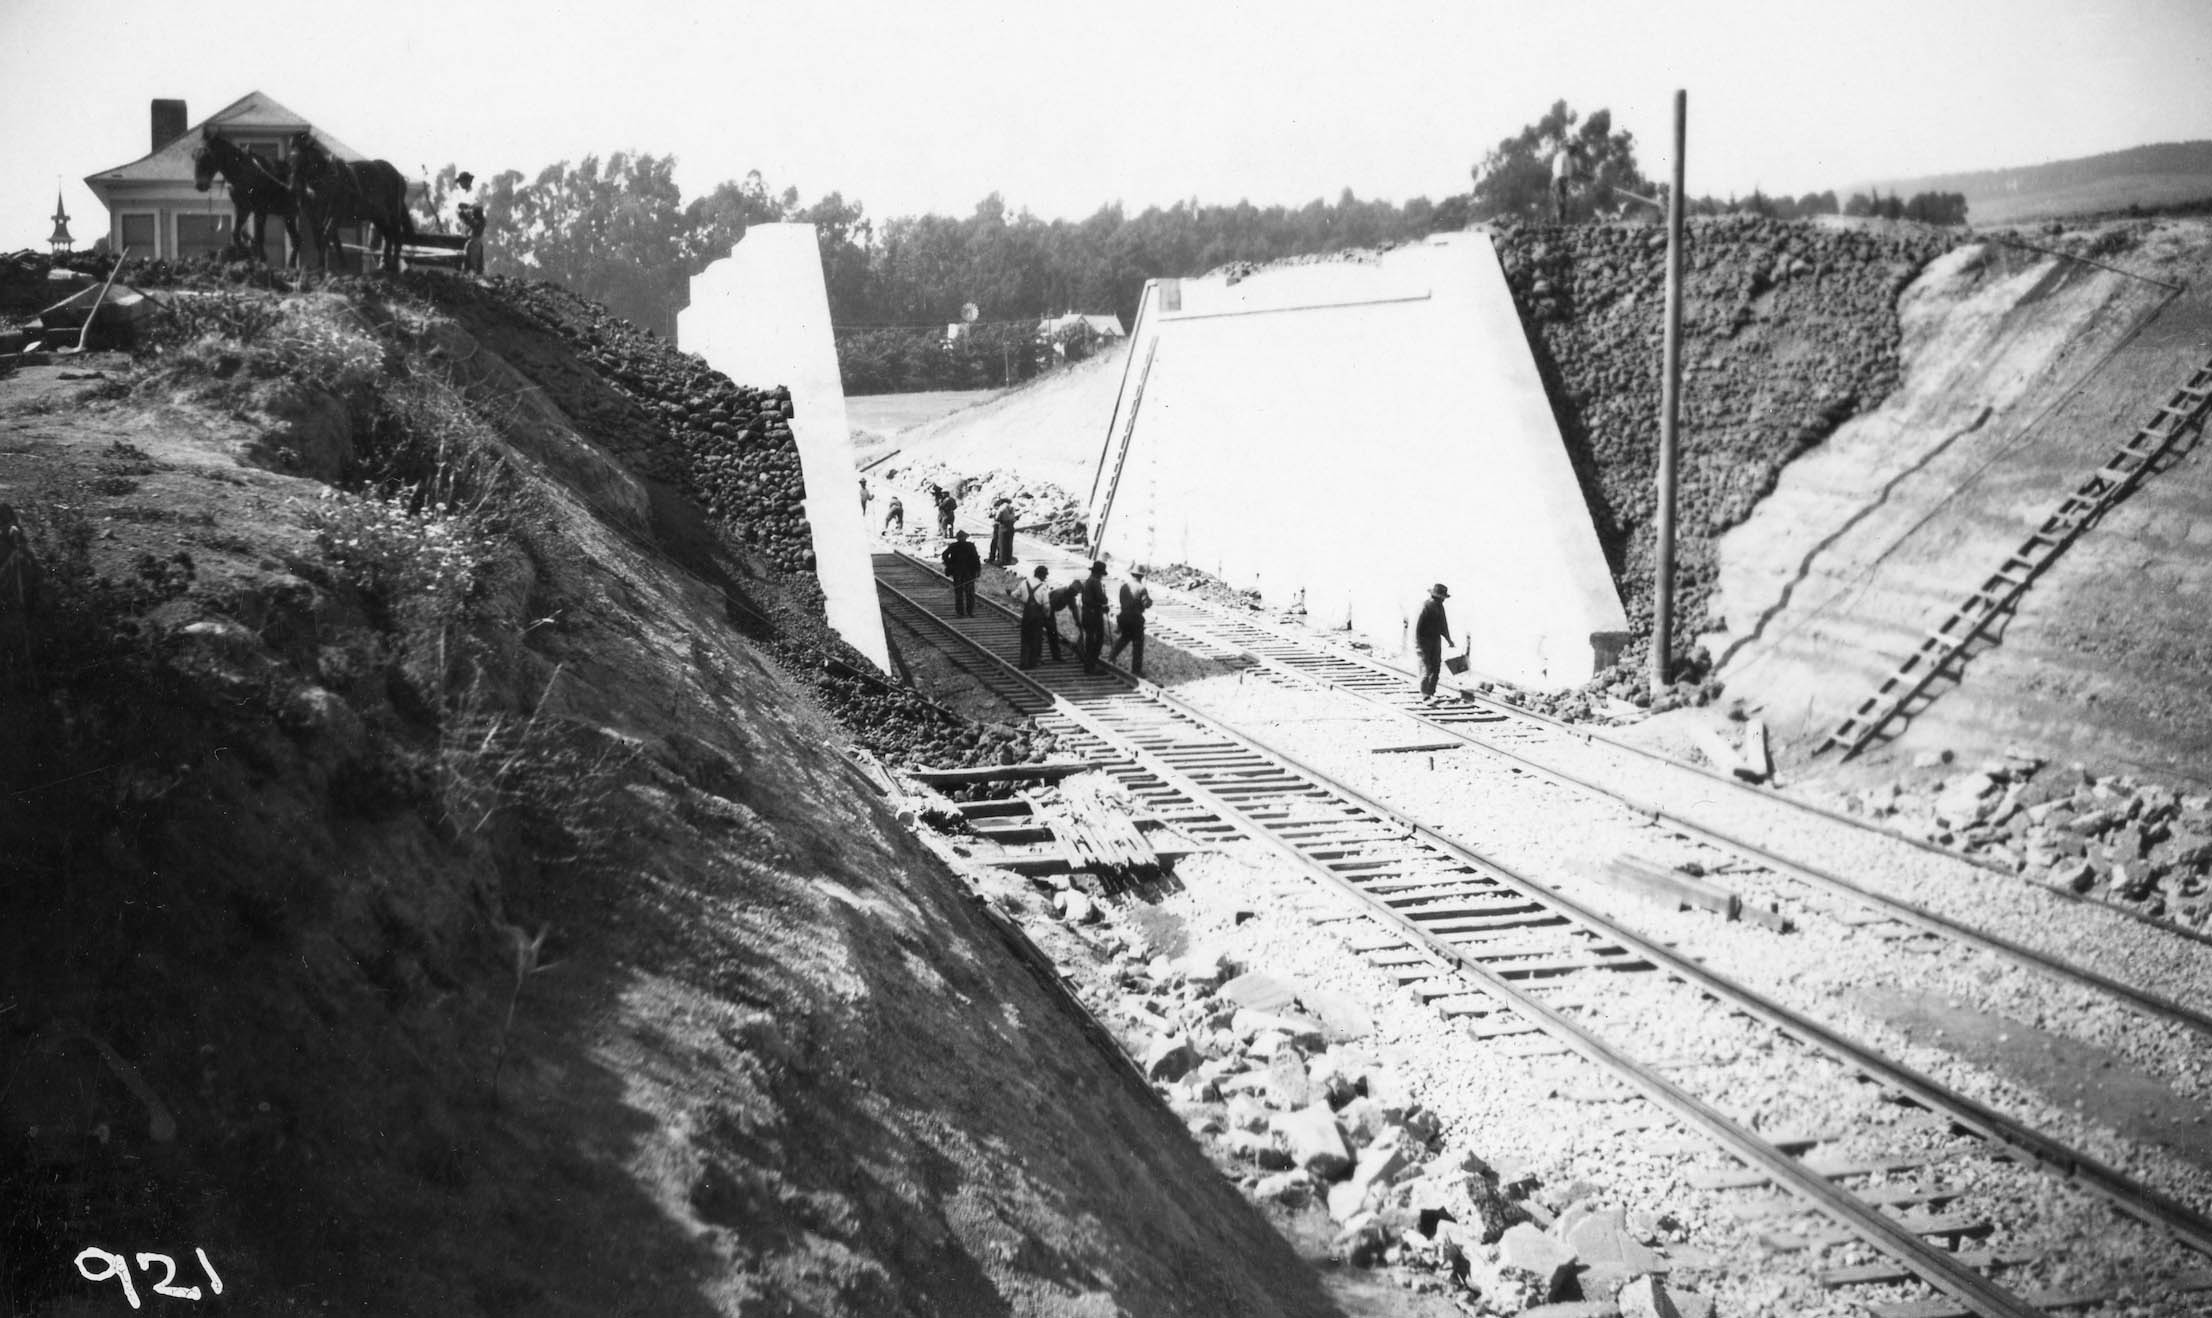
For the California St. line, the big construction obstacle was leveling the ROW and building the Rose St. overpass. This north view from July 15, 1911 shows the supports for the overpass have been completed.
L345-150-S.P. Official Photo, Louis L. Stein Collection, Courtesy BAERA, Western Railway Museum Archives, 179026oa&b, (Image 30 of 42)
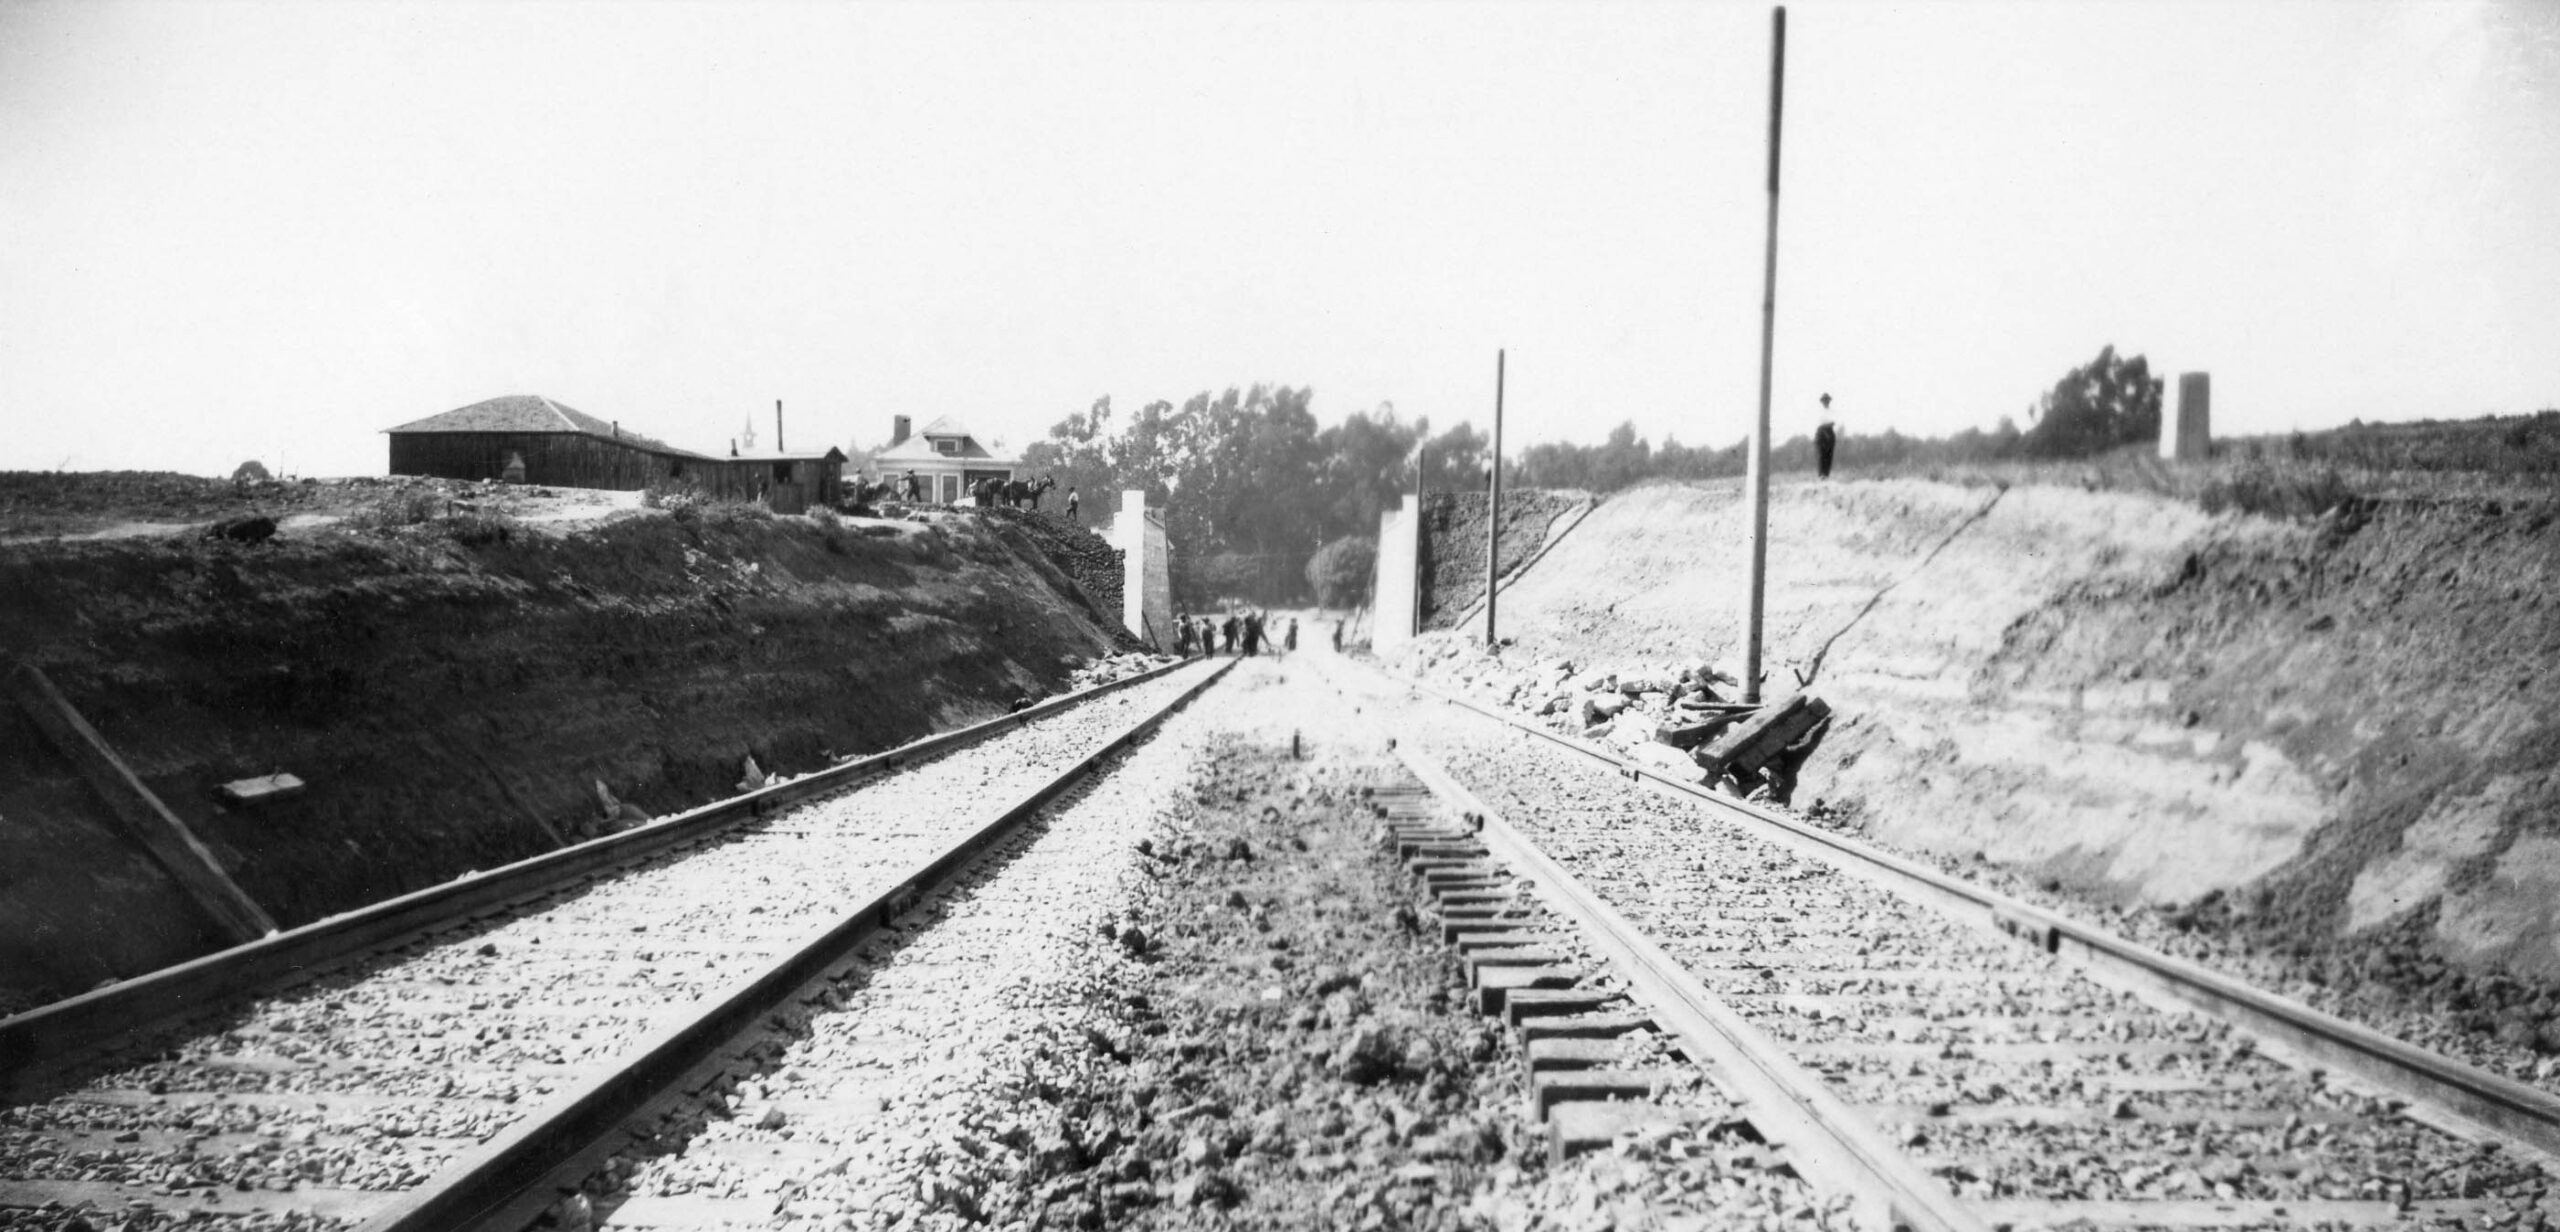
A closer northeast view provides a second example in this update of the SP living dangerously by creating a very steep cliff right against an existing house. The spire close to the left edge of the image from July 15, 1911 is from the former Peralta Park Hotel in Albany, here housing St. Joseph’s Academy Grammar School since 1903. St. Mary’s College HS moved to the park grounds in 1927, and the building was razed in 1959.
L345-155-S.P. Official Photo, Louis L. Stein Collection, Courtesy BAERA, Western Railway Museum Archives, 179027oa&b, (Image 31 of 42)
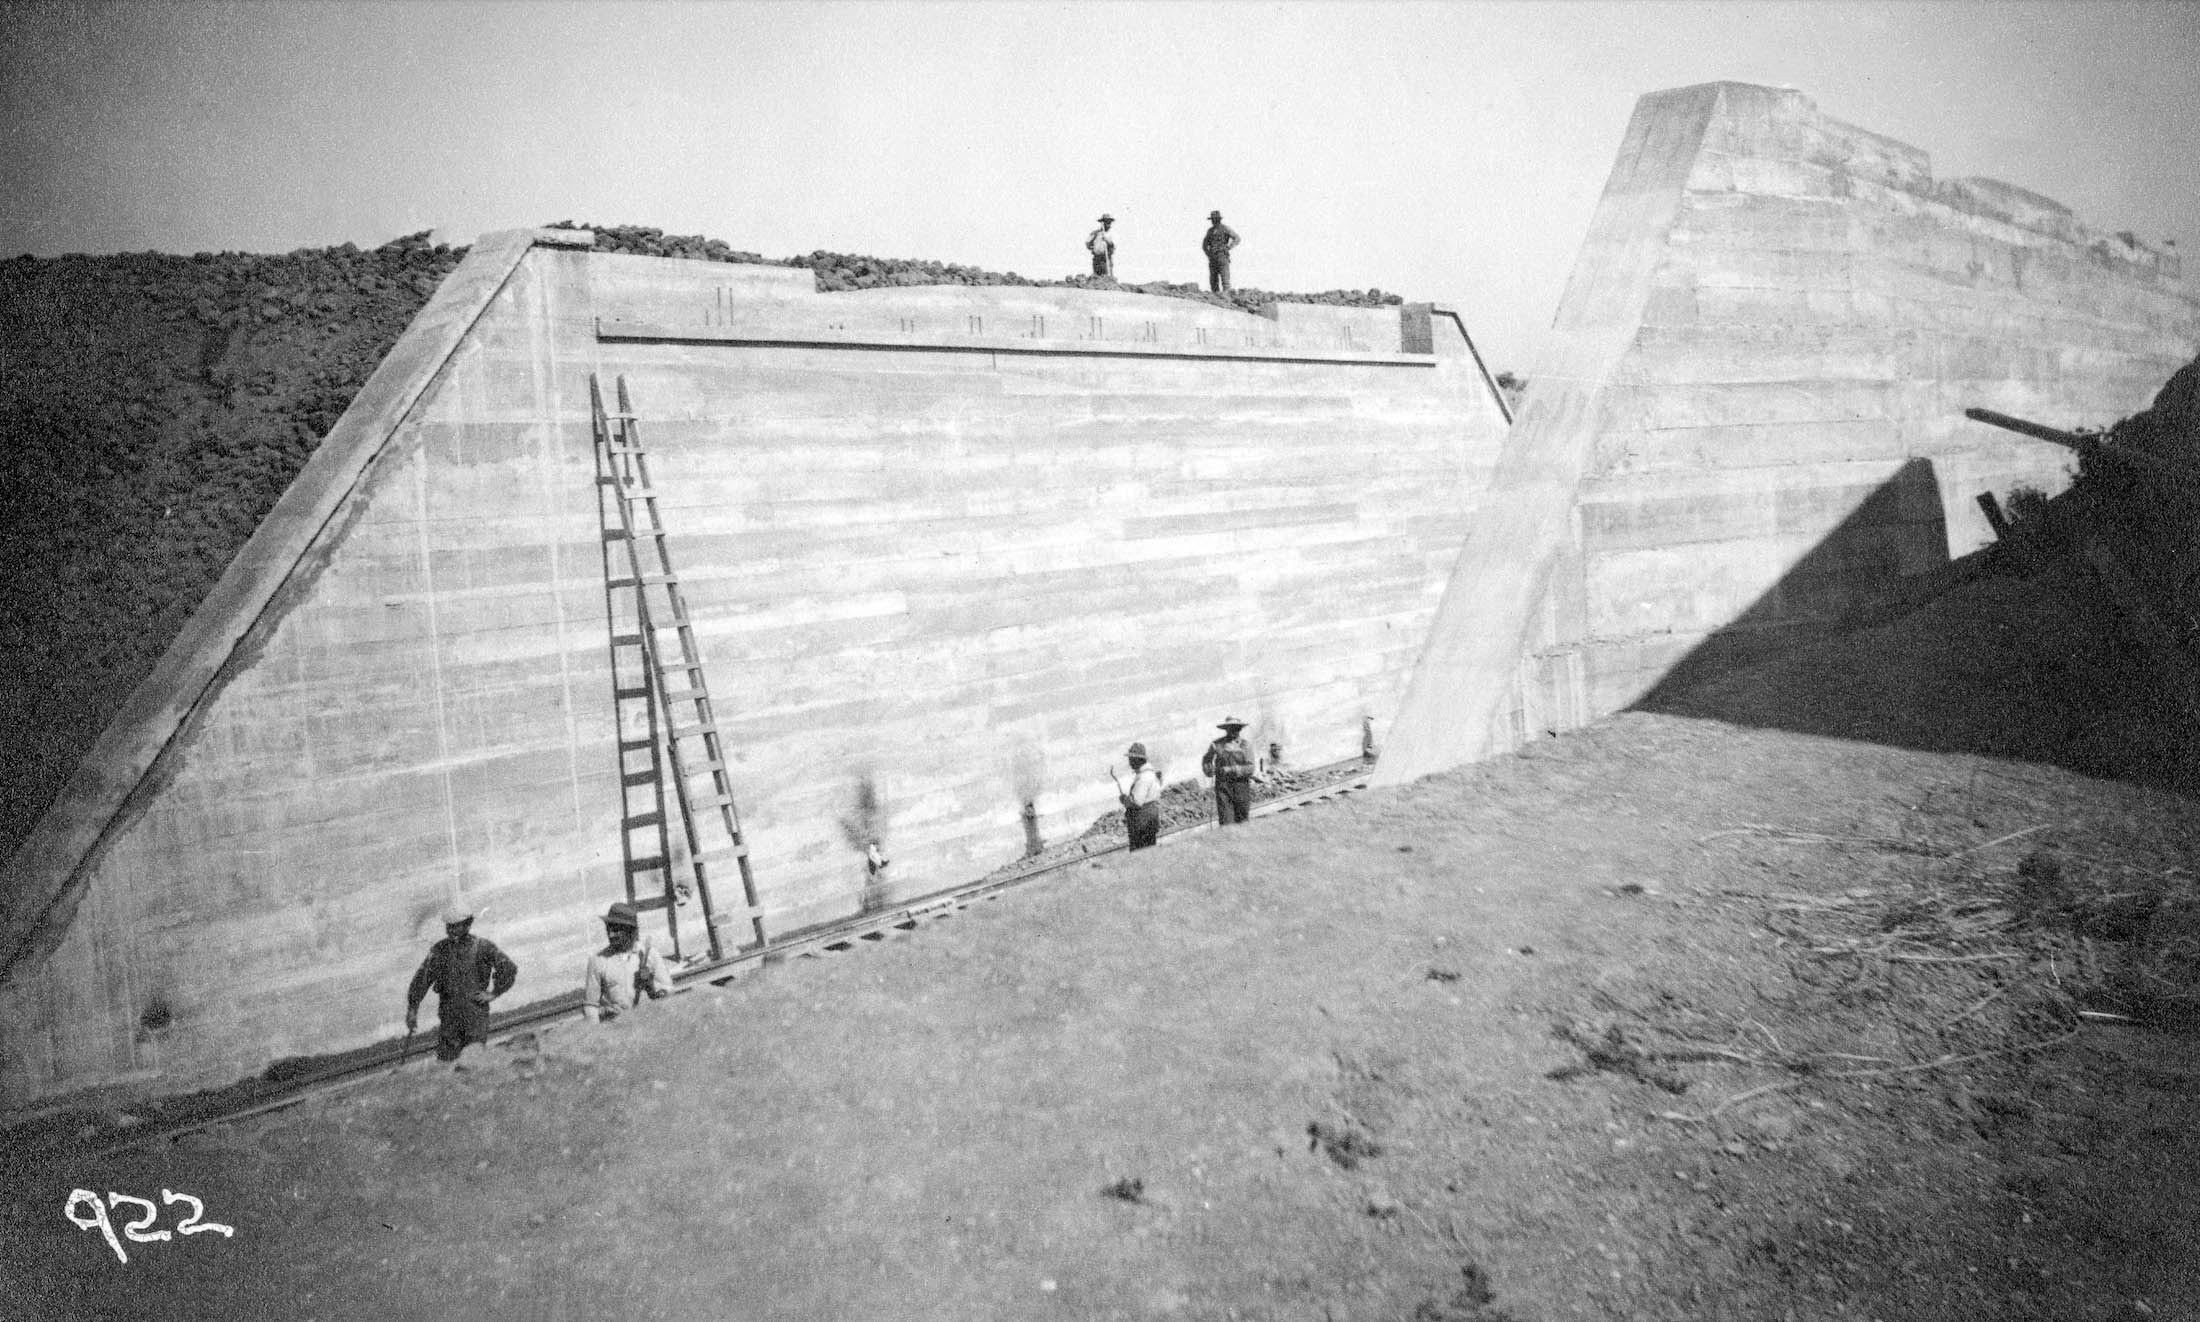
This southeast view of the overpass walls from July 15, 1911 is an impressive sight, and is a reminder that the S.P. never built anything on the cheap.
L345-160-S.P. Official Photo, Louis L. Stein Collection, Courtesy BAERA, Western Railway Museum Archives, 179028oa&b, (Image 32 of 42)
This north view closer to the overpass anticipates very few structures north of the it and the Key crossing. The lack of structures will be documented next.
L345-165-S.P. Official Photo, Ralph Demoro Collection, Courtesy John Harder, (Image 33 of 42)
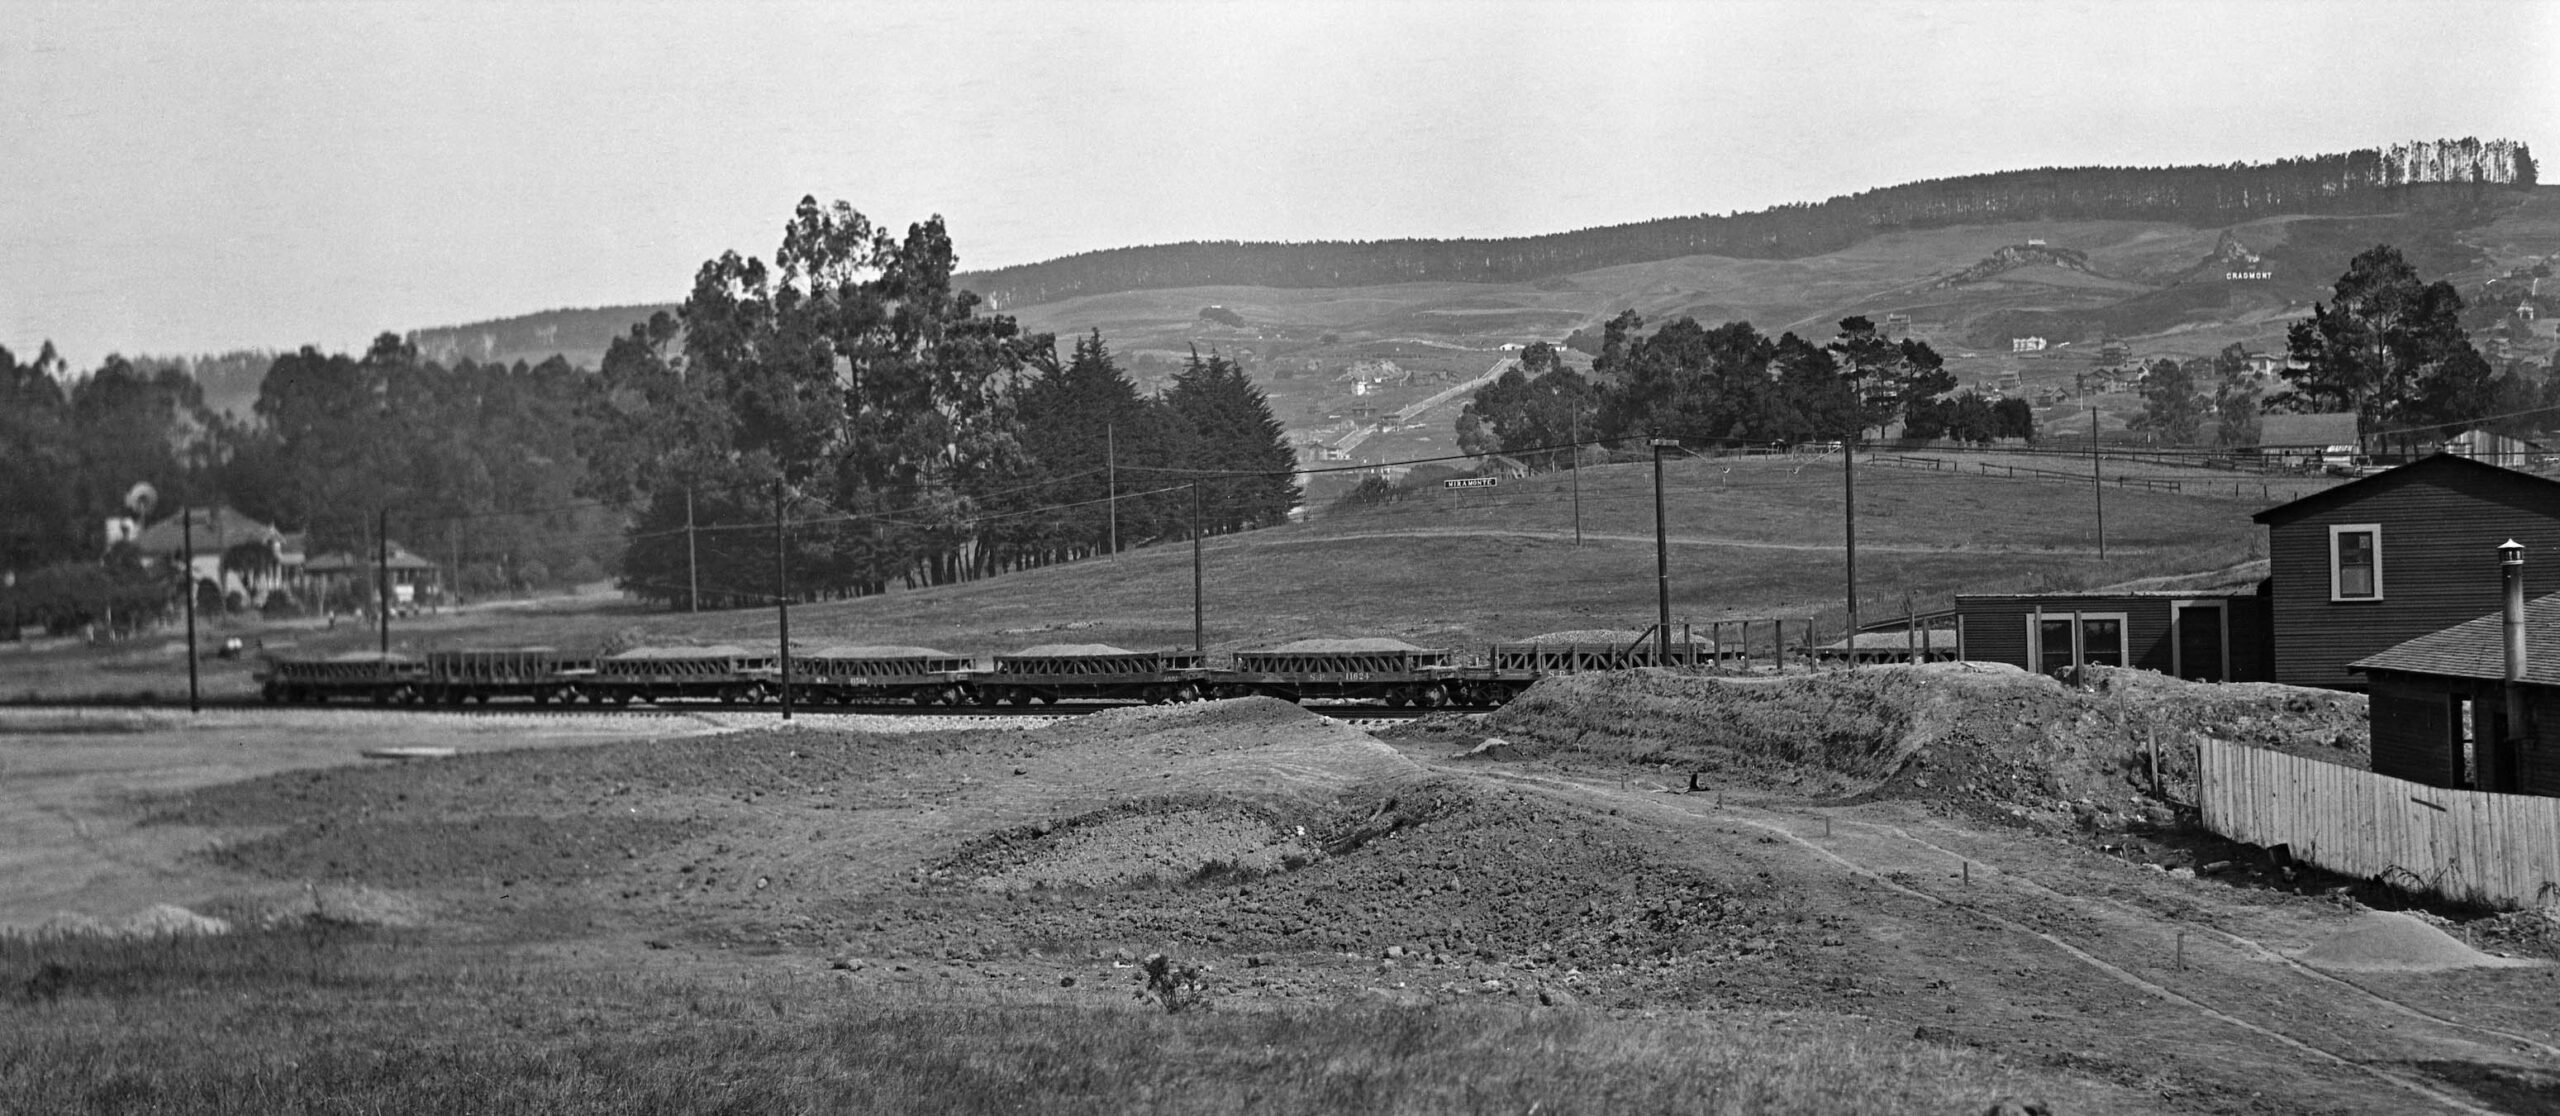
Above and just south of the future Ada St. where the S.P. and Key Route would cross, This northeast view from Oct. 16, 1911 shows a string of loaded ballast cars is on the SP California Street line, while the Key Northbrae line is only a marked off path. Note the lack of houses on the ridge to the east, with prominent signs advertising for developments for Miramonte and Cragmont visible.
L345-167-Key VPO Photo, Sappers Collection, Courtesy BAERA, Western Railway Museum Archives, 55513ks, (Image 34 of 42)
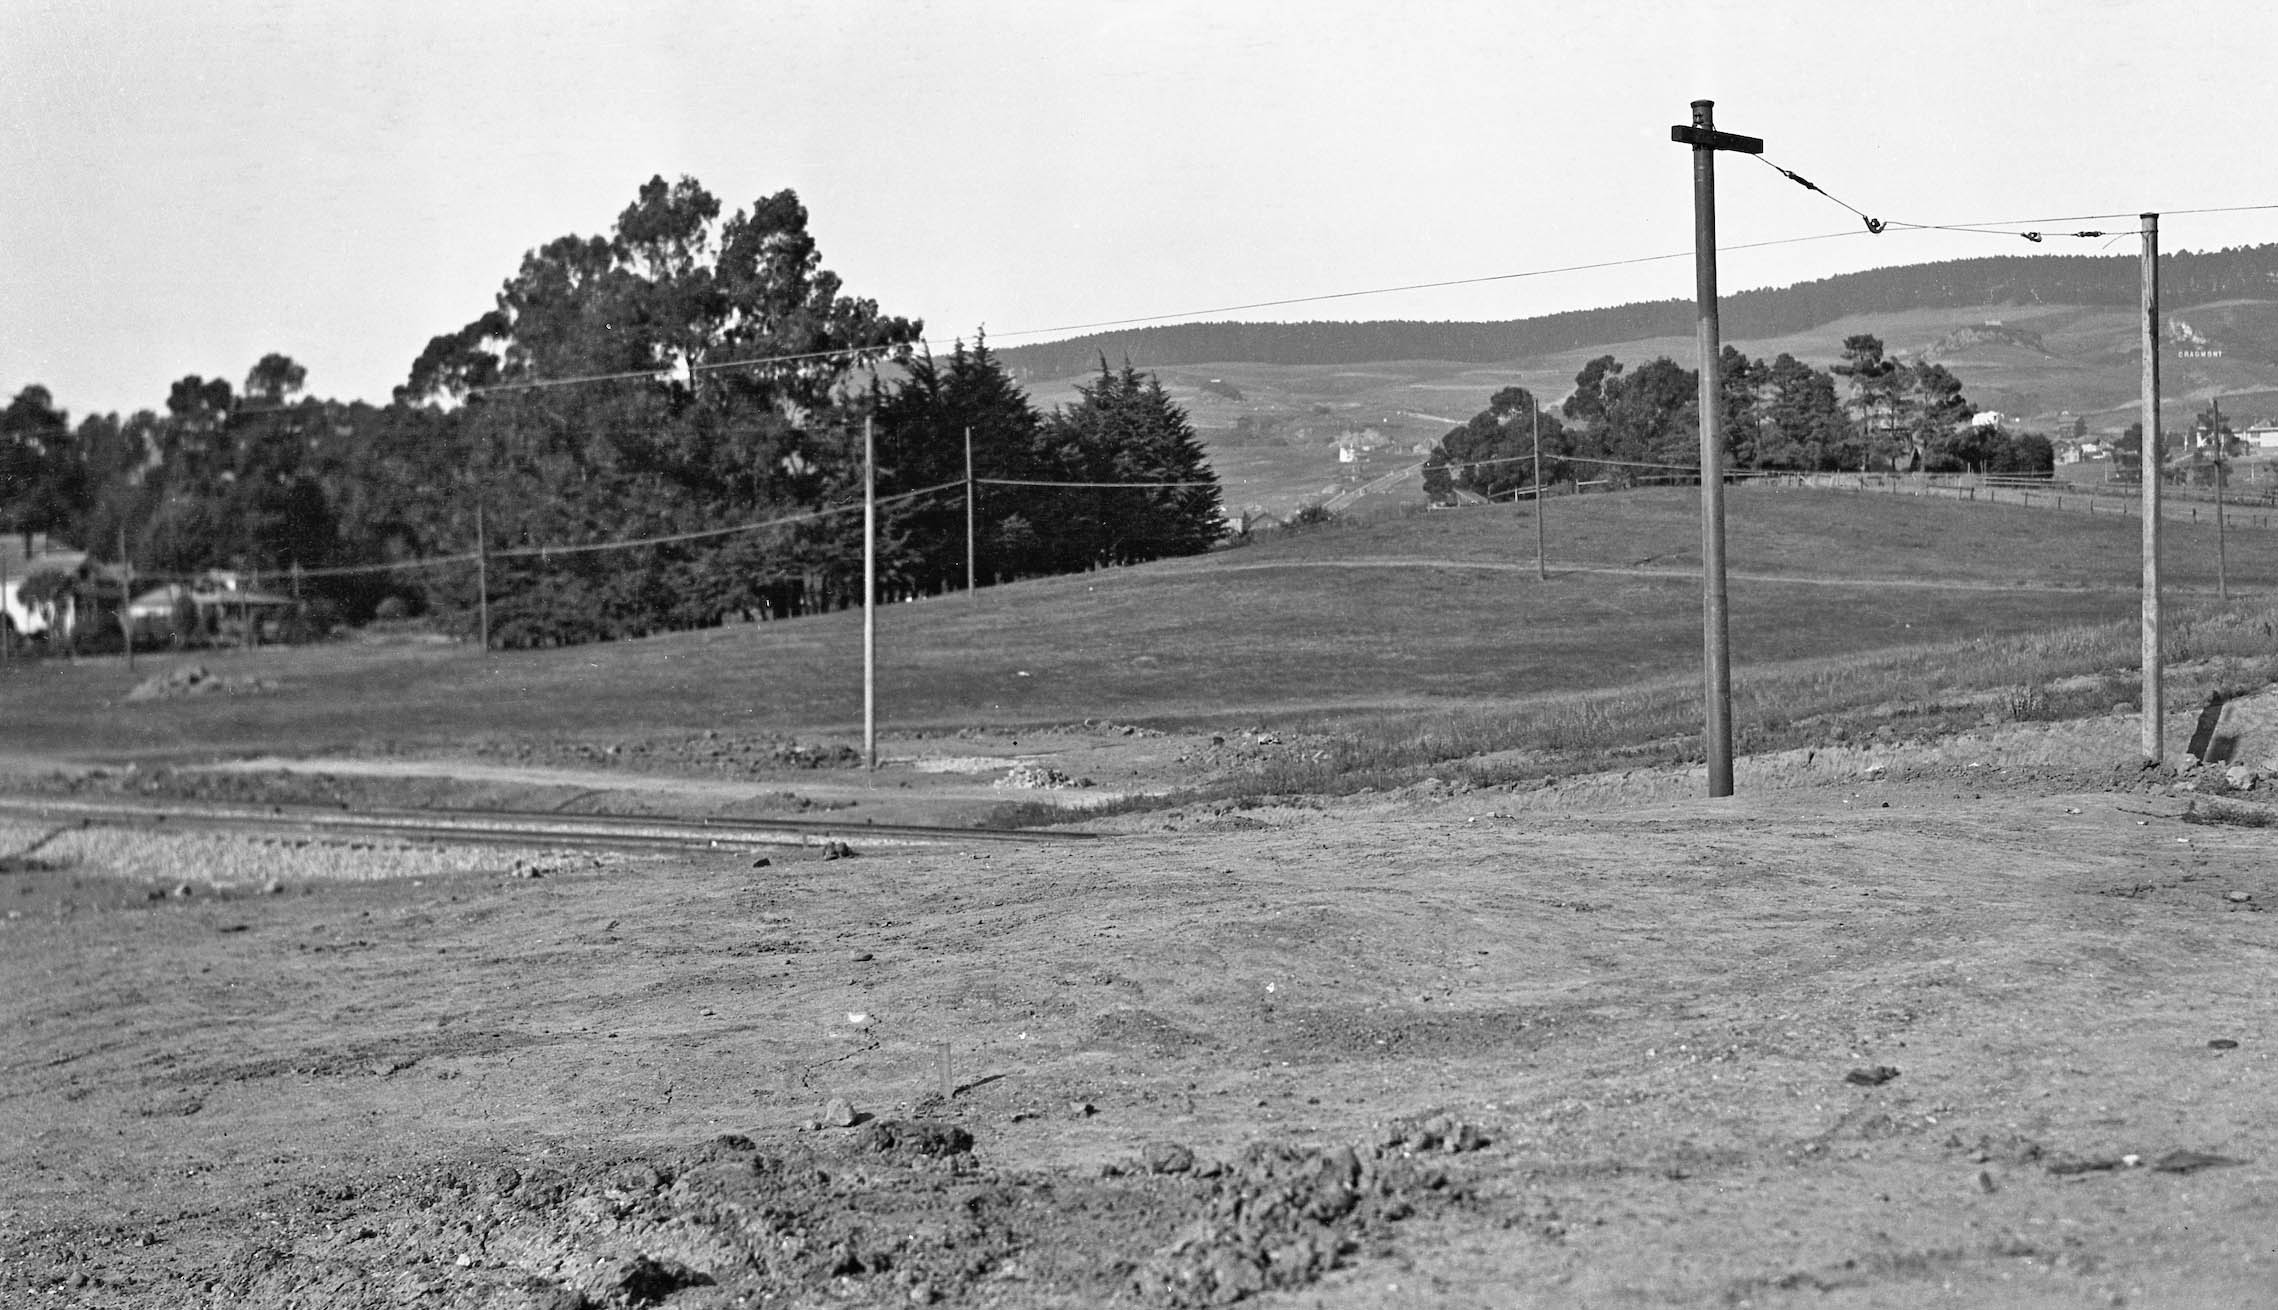
Moving closer to the future site of the crossing in a similar timeframe from the previous image, the double track of the SP line is supported with very preliminary poles carrying only a single overhead wire. The shiny pole in the center of the image is most likely for the Key Northbrae line, the pole being to the east of what is at this time a dirt path. That would position the photographer very close to Ada St. in terms of present day streets.
L345-170-Key Official Photo, Sappers Collection, Courtesy BAERA, Western Railway Museum Archives, 85237ks, (Image 35 of 42)
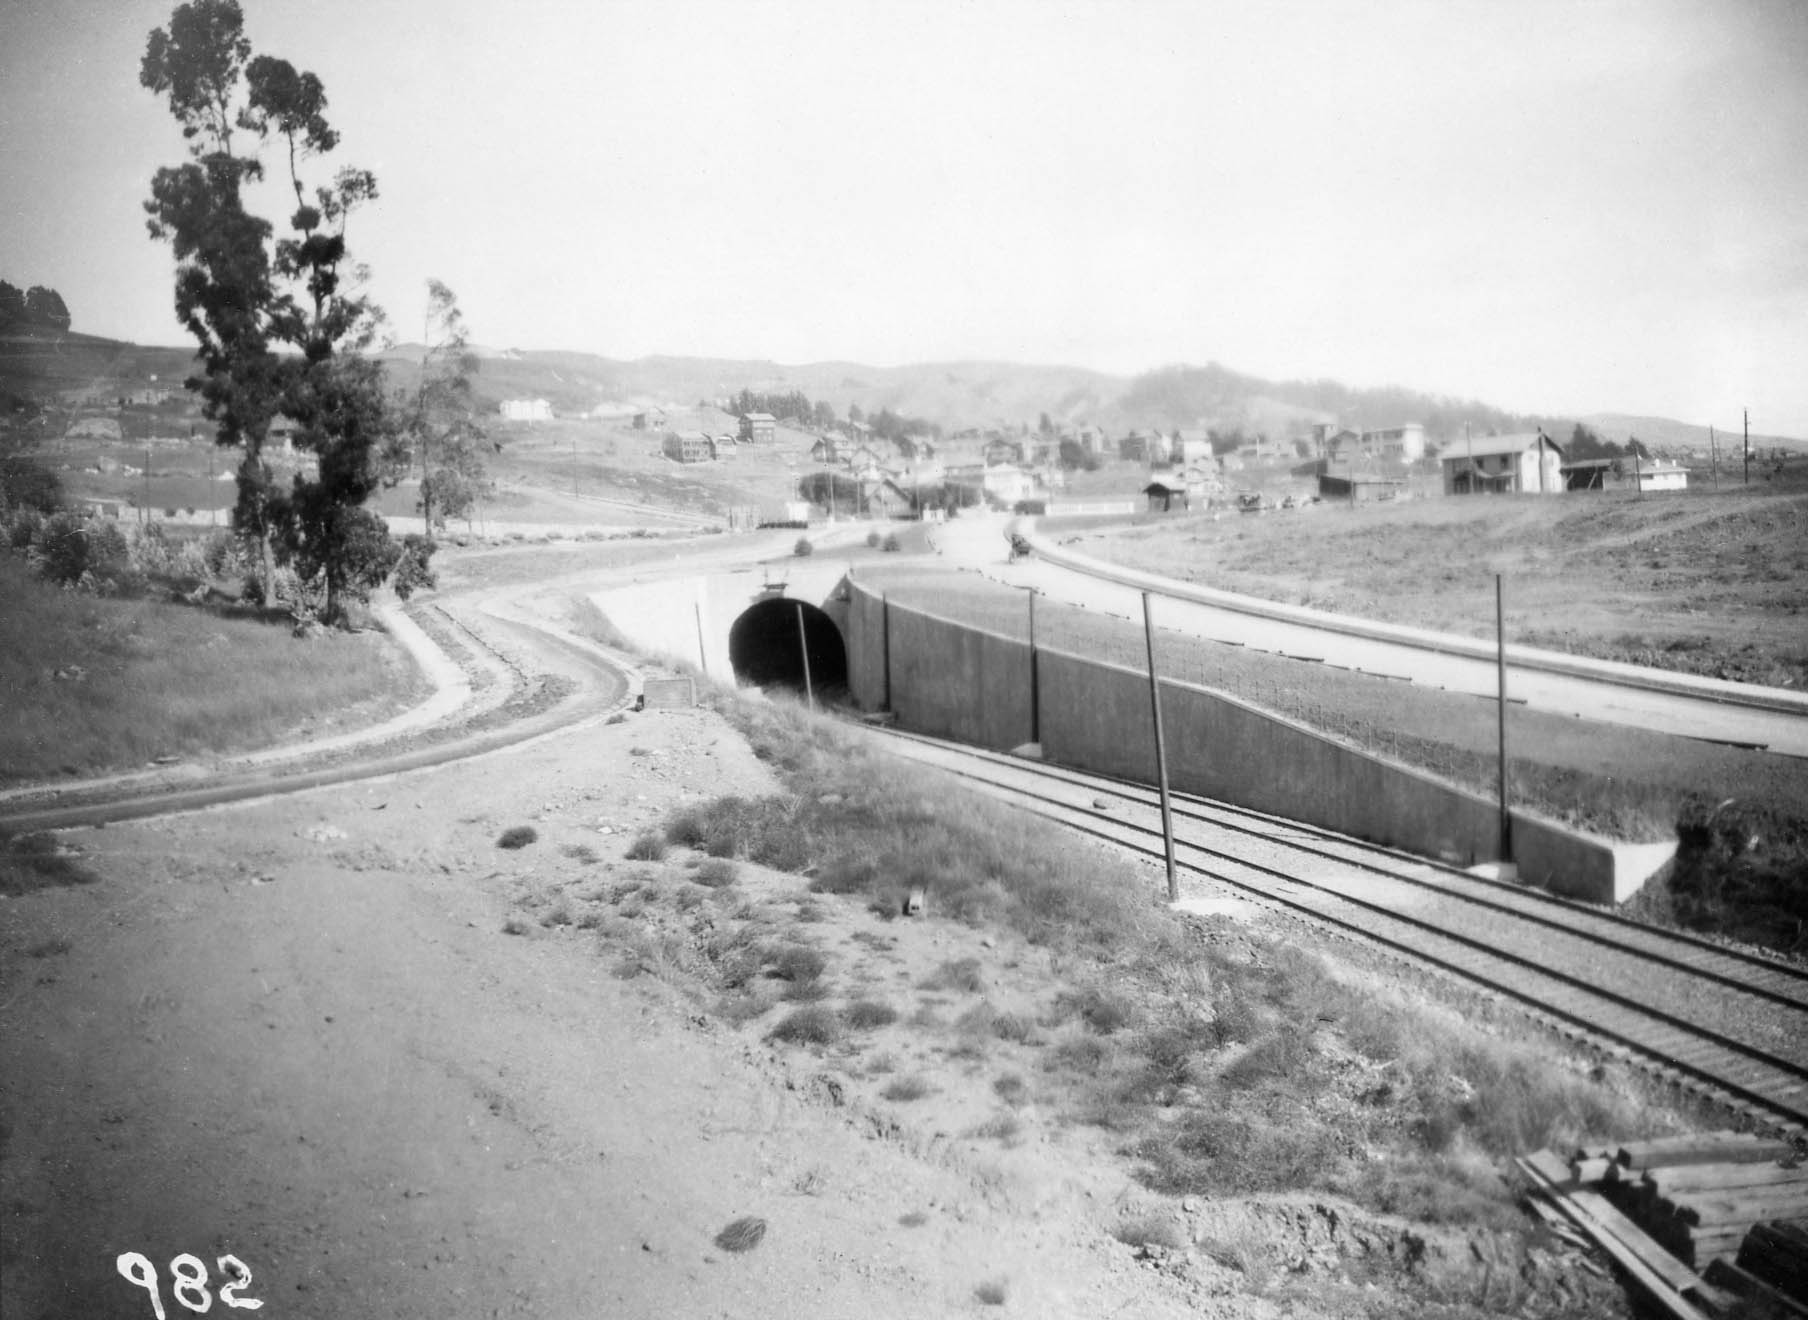
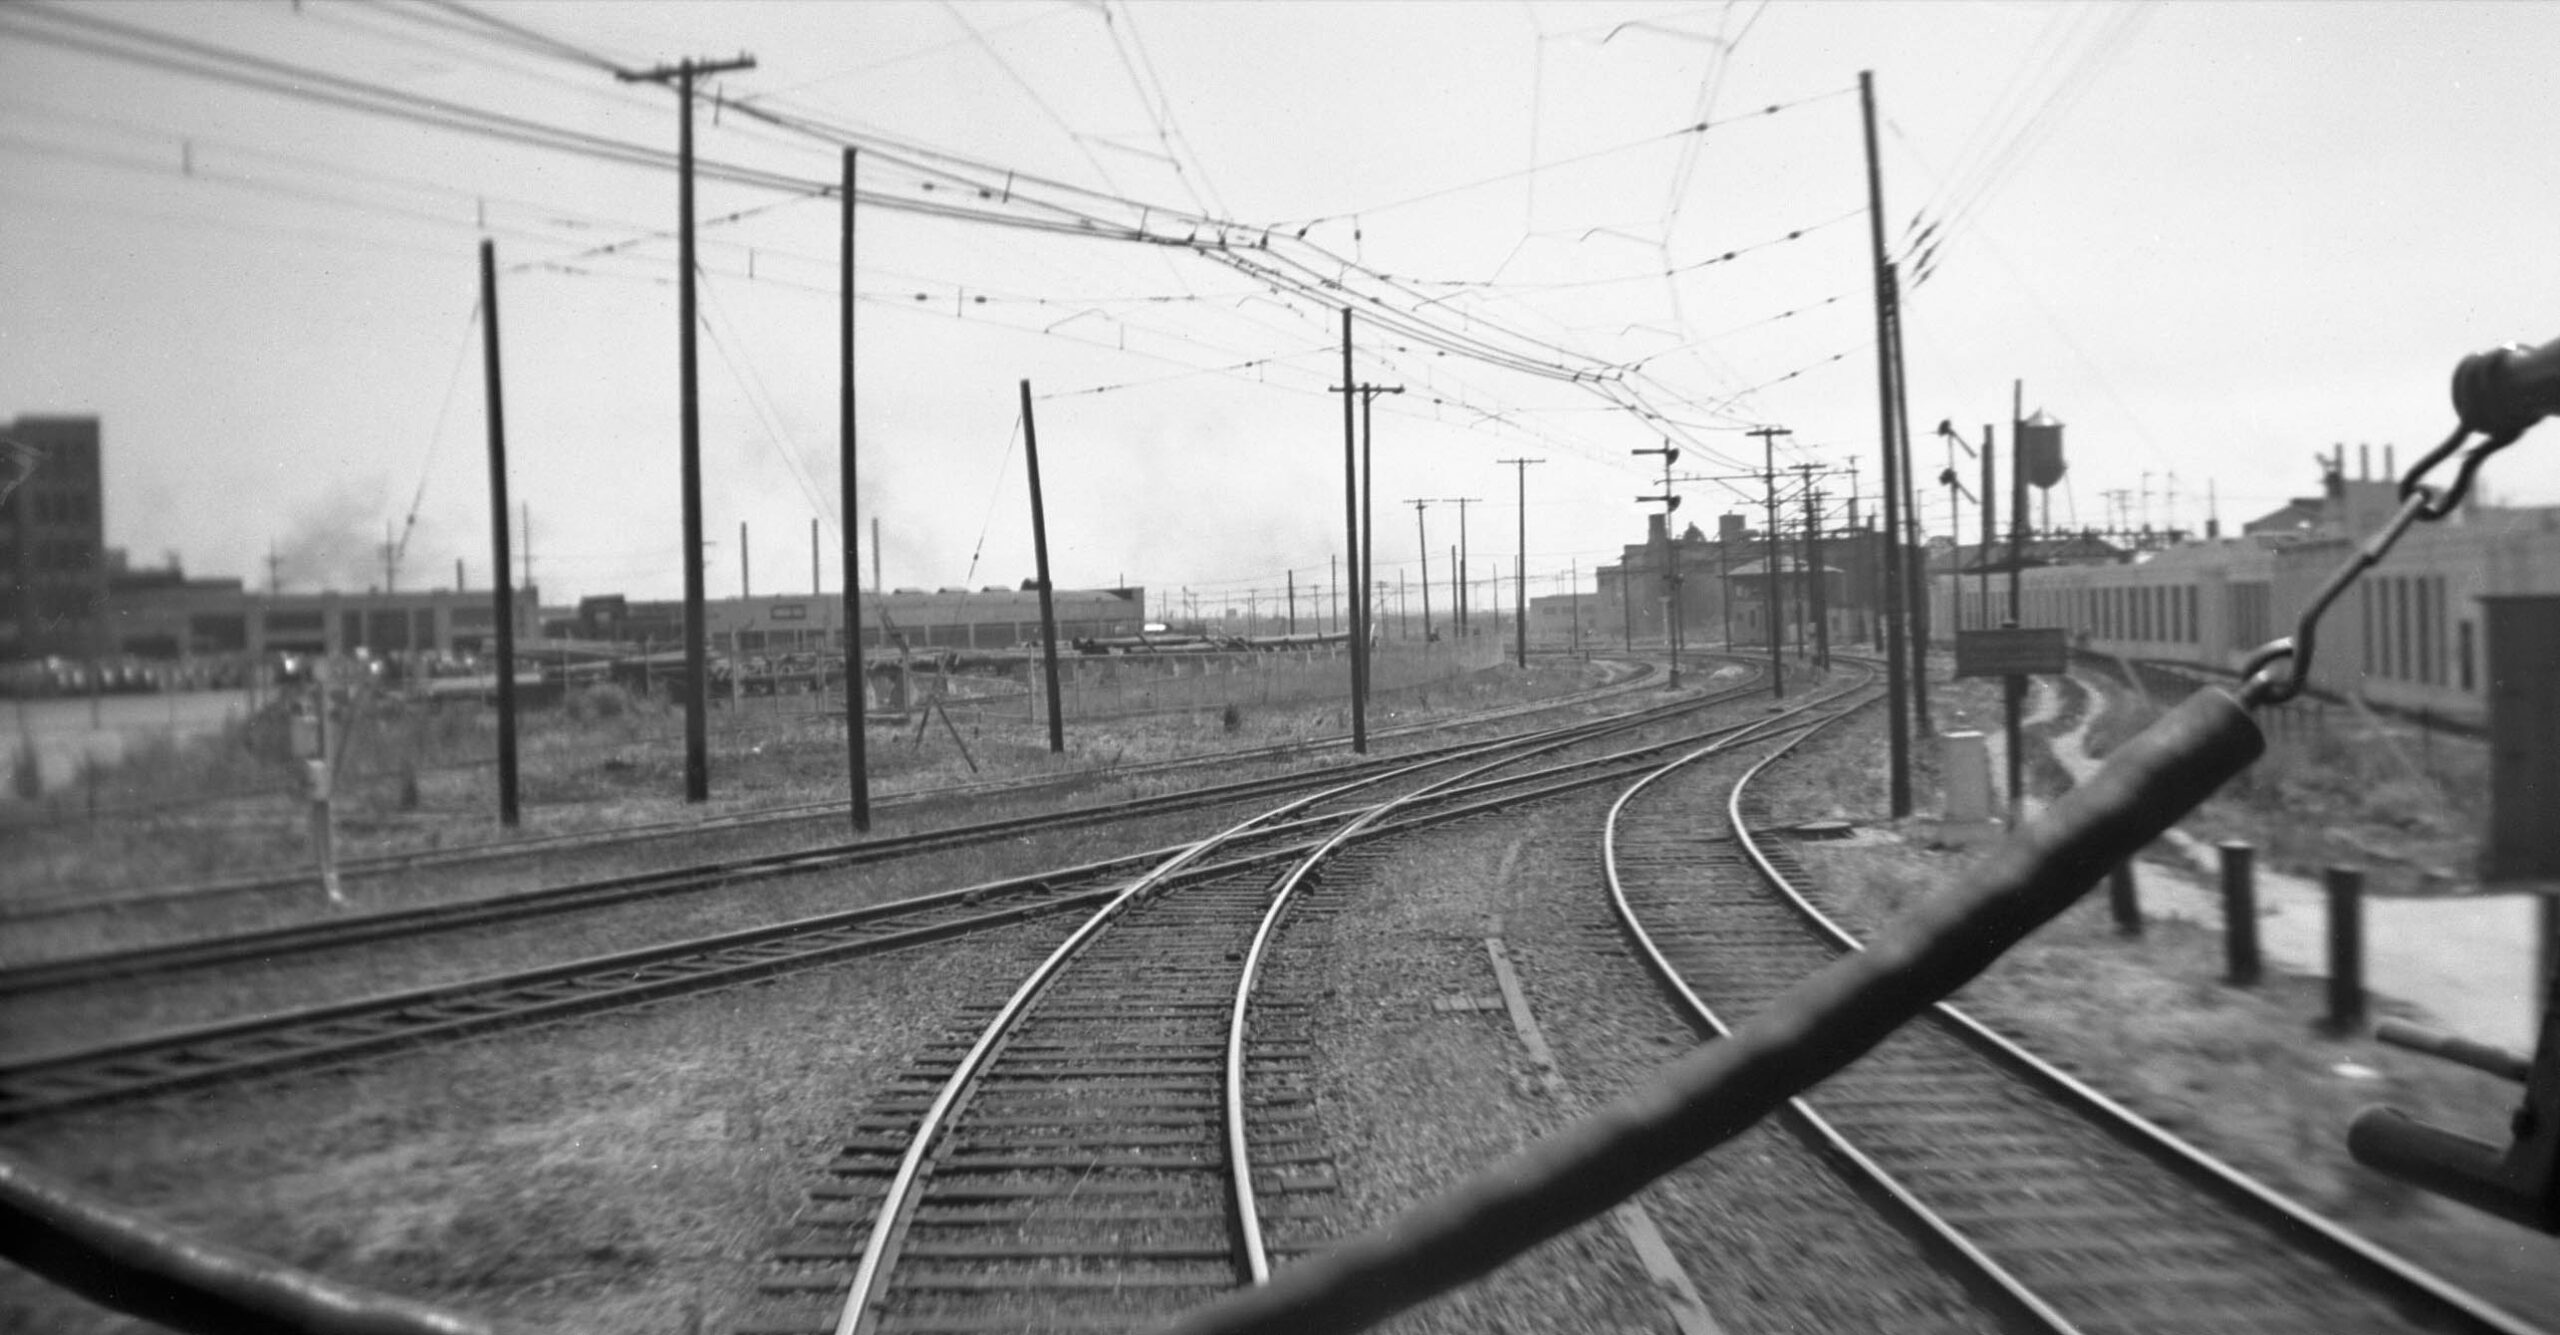
The last of the three lines meeting in Thousand Oaks near Colusa Ave. and opened last was the Ninth St. line. No construction images could be found for that line. This southwest view from July 6, 1941 is shown here for orientation purposes. The line came off the main electric line close to where the SP had its main steam line that ran along the Bay, evident in the distance by the presence of the Shellmound tower that overlooked the train traffic in that area. In 2026 terms, the photographer taking this image would be at the intersection of Stanford Ave. and Peladeau St. in Emeryville, with their back to the start of the Emeryville Greenway bike path.
L345-175-Moreau Collection, Courtesy BAERA, Western Railway Museum Archives, 122317ier, (Image 36 of 42)
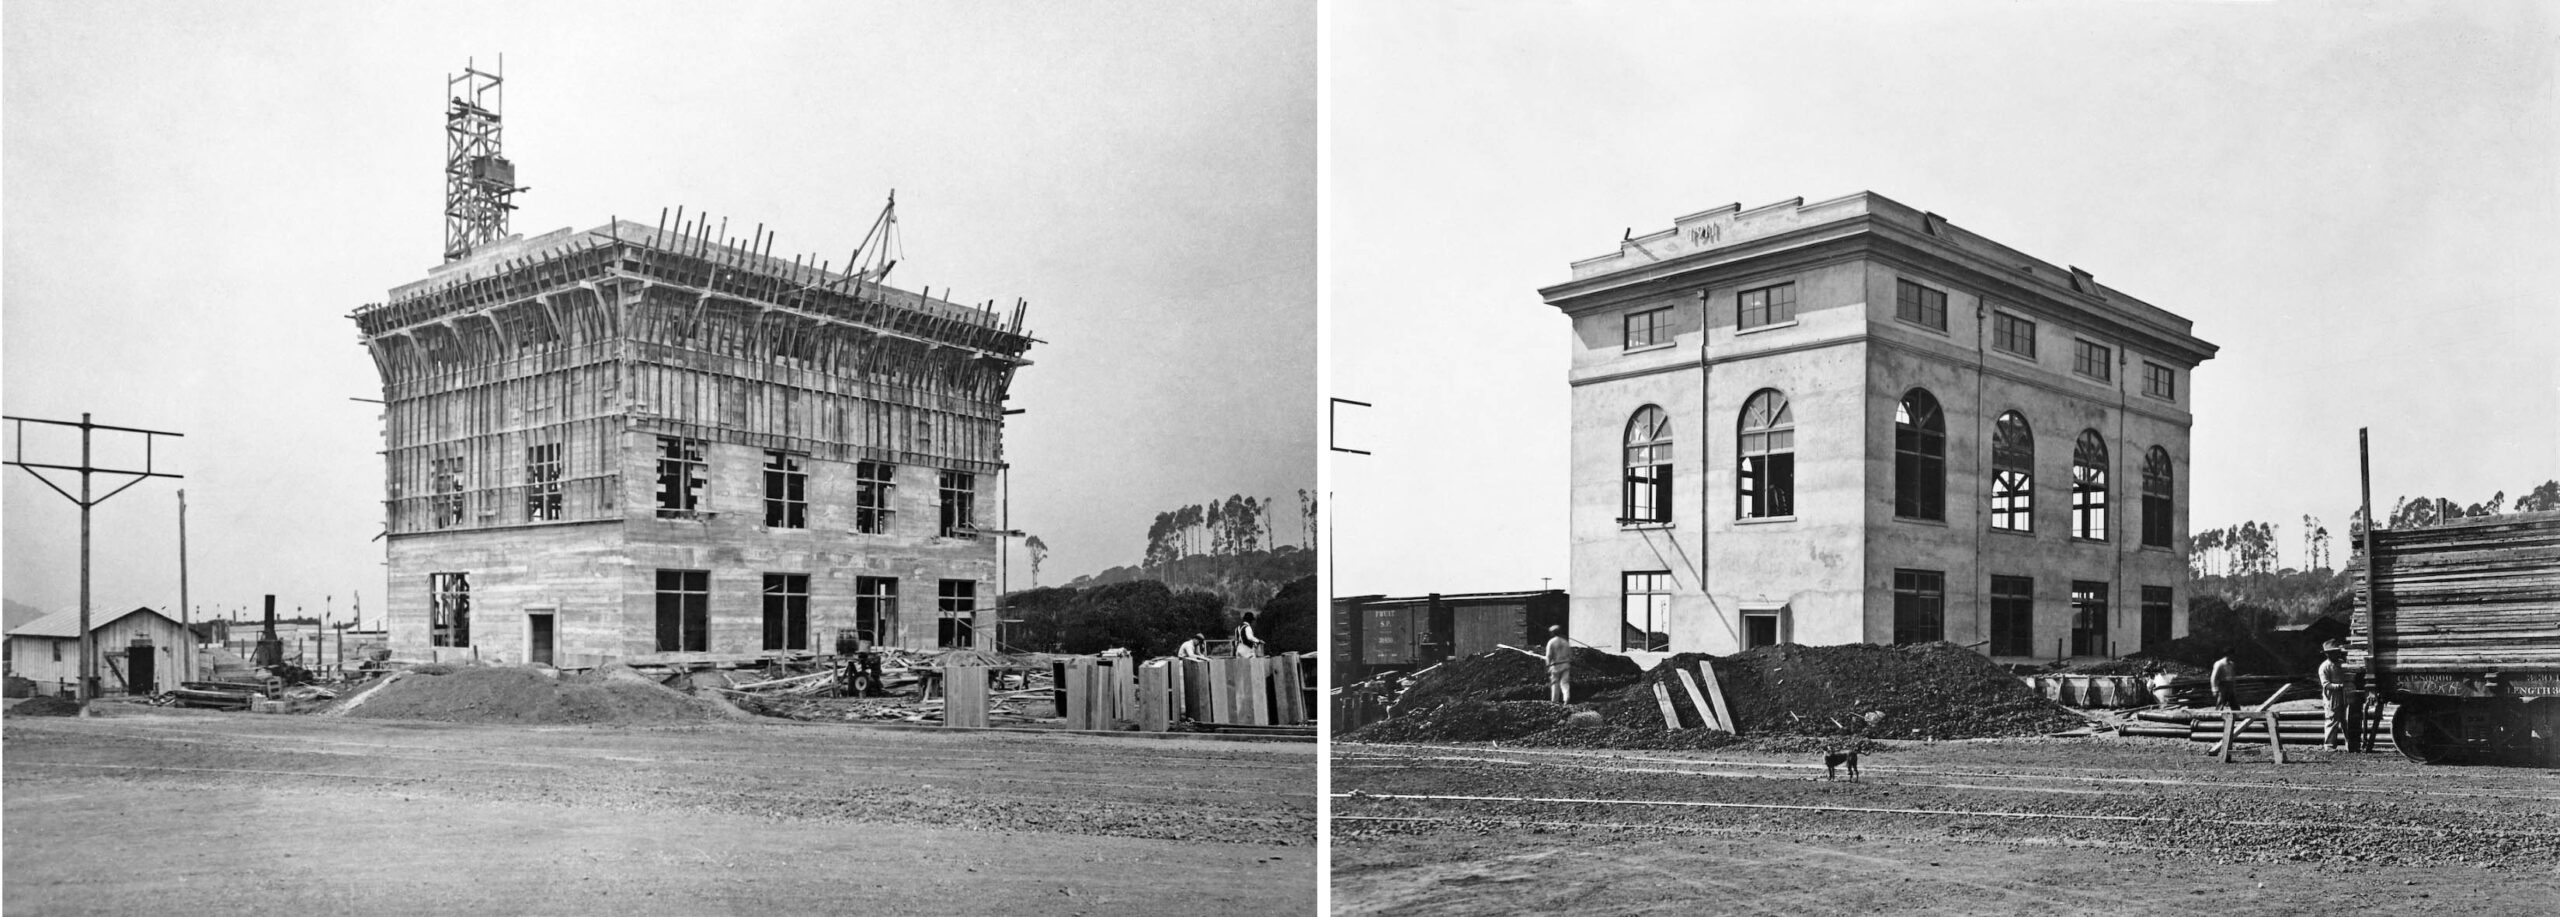
Before electric operation could commence to Thousand Oaks, a power substation had to be built on Solano Ave., to be located between Fresno and Colusa Aves. On the left, a northwest view of the partially completed exterior of the substation taken on June 30, 1911. On the right, the exterior is now complete, the date Sept. 12, 1911. Note the street is not yet paved in either image.
L345-180-S.P. Official Photo, Sappers Collection, Courtesy BAERA, Western Railway Museum Archives, 25704oab, l, 25716oa&b, r, (Image 37 of 42)
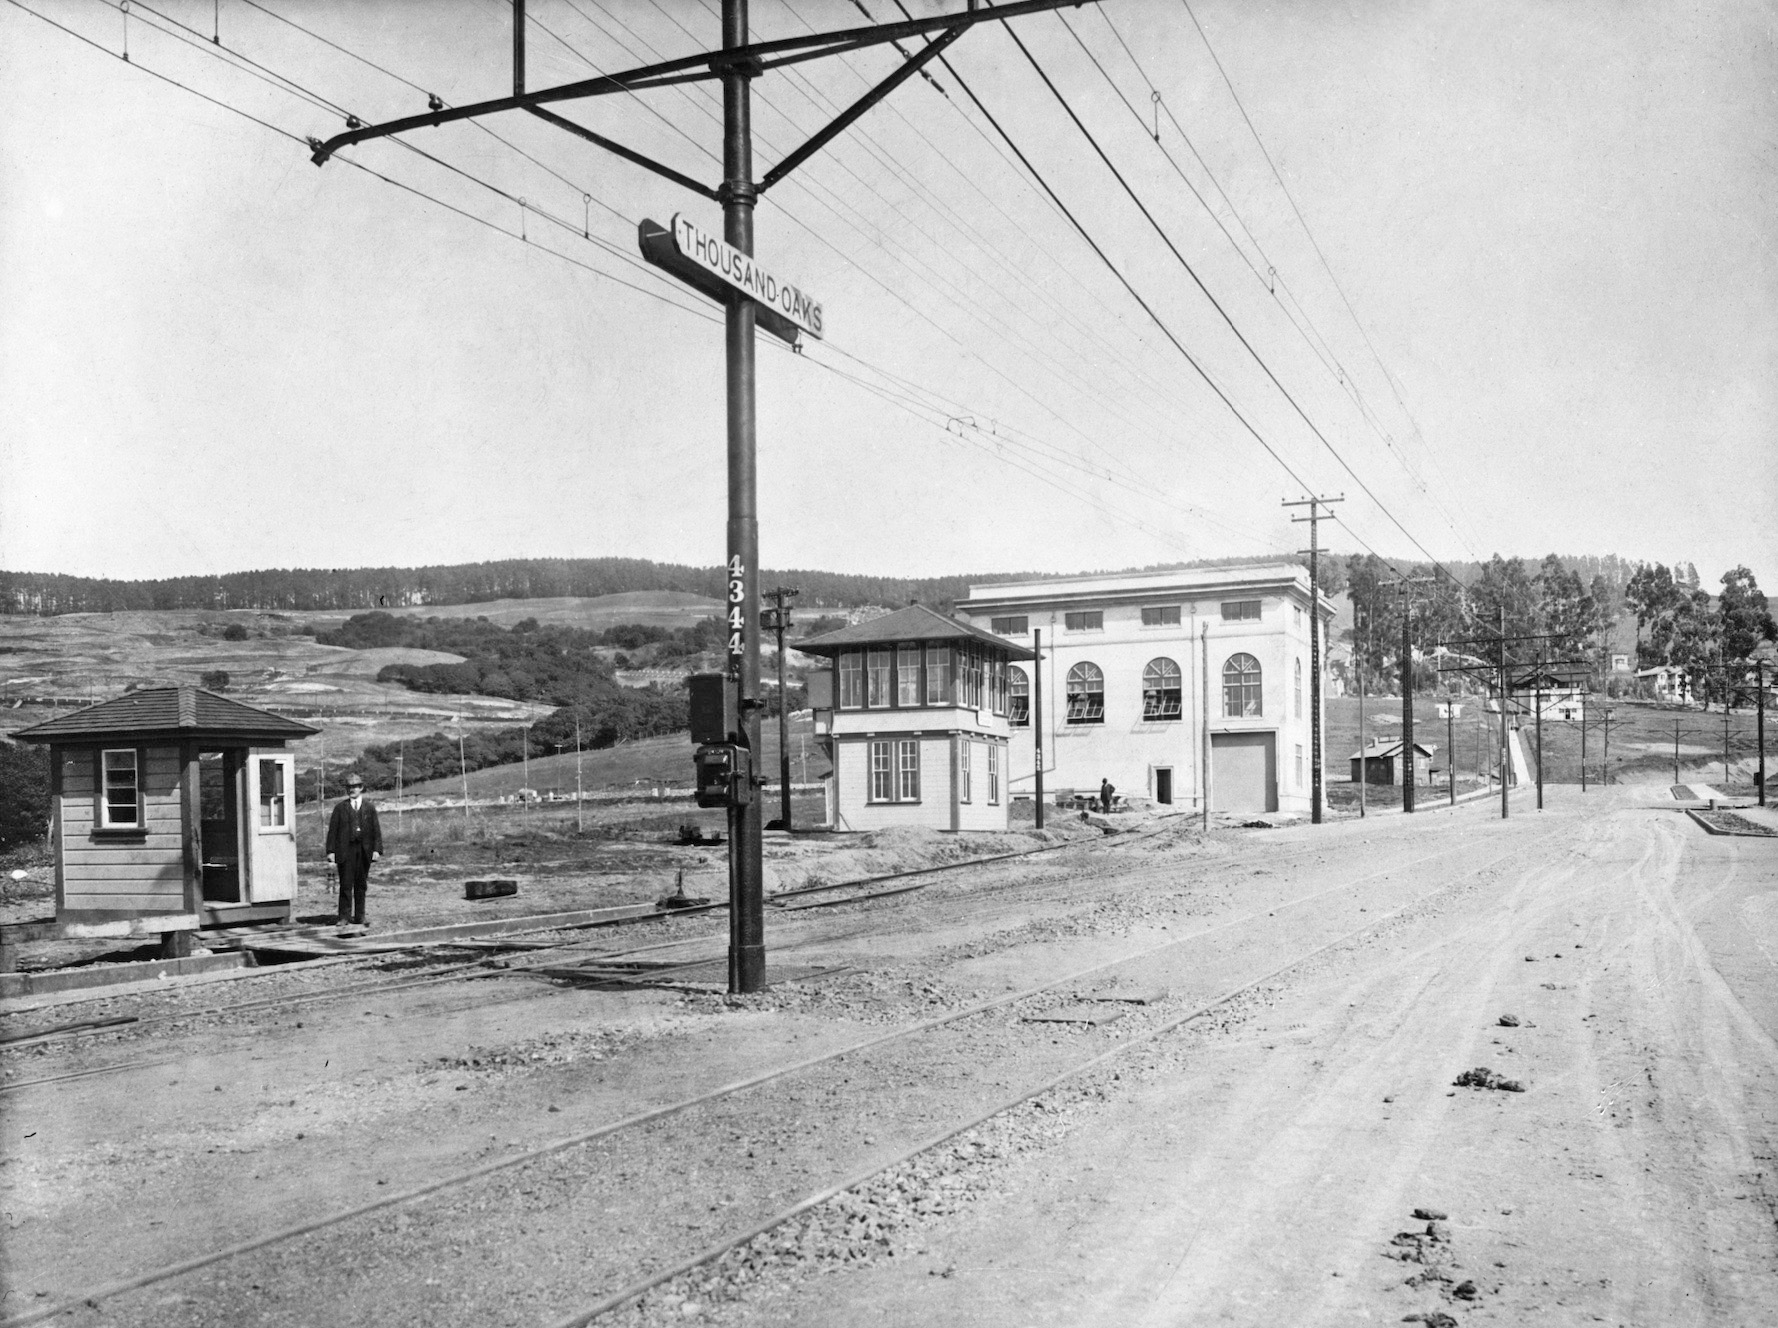
Ahead to Dec. 1, 1911, with electric operation to begin at the end of the month, three functions needed to be in place. In this east view, this consisted of the completed substation in the distance, the interlocking tower, and in the foreground, the switch tender’s shanty near Colusa Ave. Incidentally, note the steps of Indian Rock Path all the way in the distance, leading to Indian Rock Park on Indian Rock Ave.
L345-185-S.P. Official Photo, Sappers Collection, Courtesy BAERA, Western Railway Museum Archives, 25716oa&b, (Image 38 of 42)
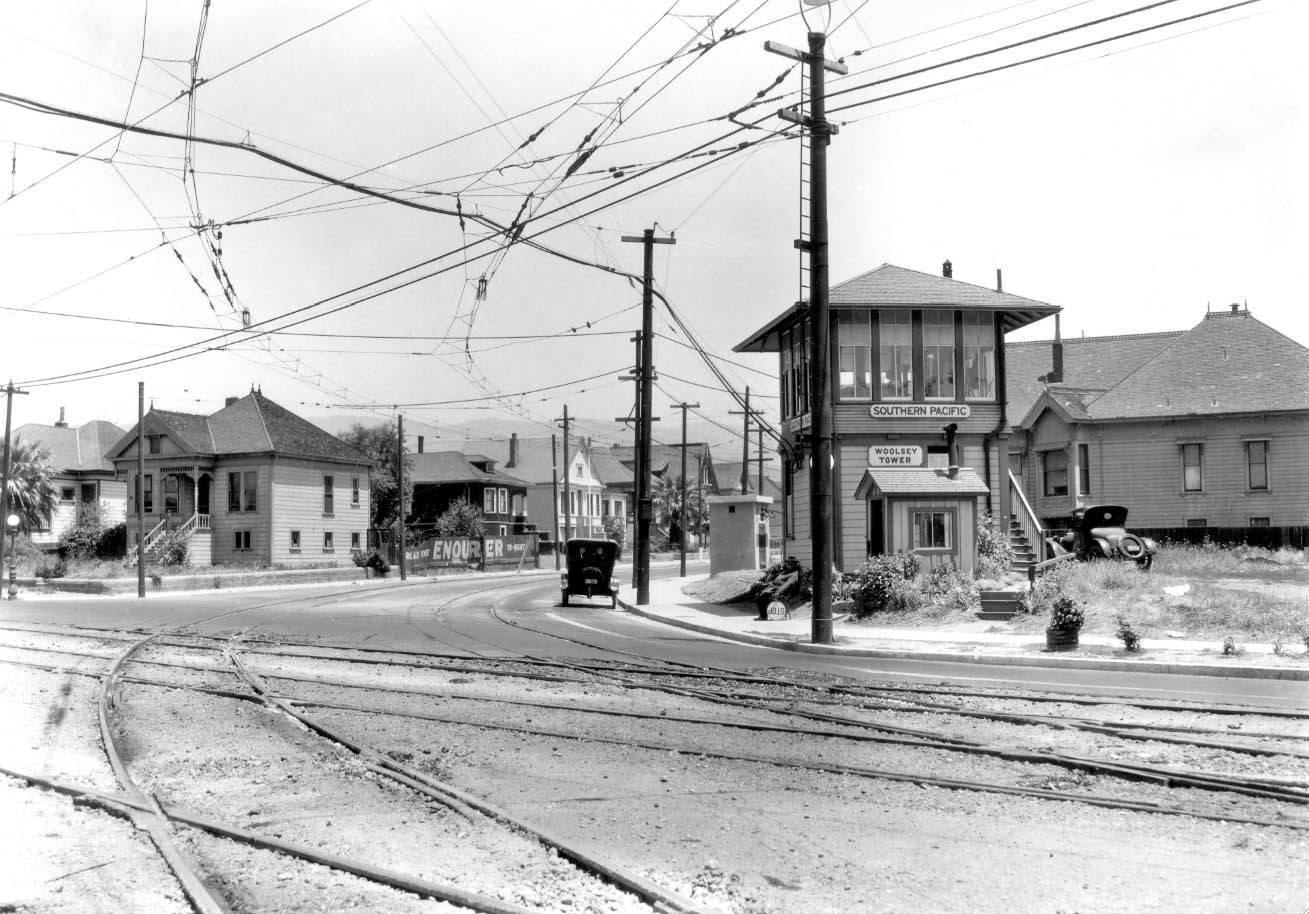
Finally, the SP Ellsworth St. might be considered as part of the challenge to the Key’s operation into Berkeley. No images of the construction of the Ellsworth St. could be found, but this northeast view from 1920 shows the tracks of the new line after they have come off the SP Shattuck line and are seen crossing the Key Route tracks to Woolsey St. and the tower in place to monitor that crossing.
L345-190-Courtesy BAERA, Western Railway Museum Archives, 162081oa&b, (Image 39 of 42)
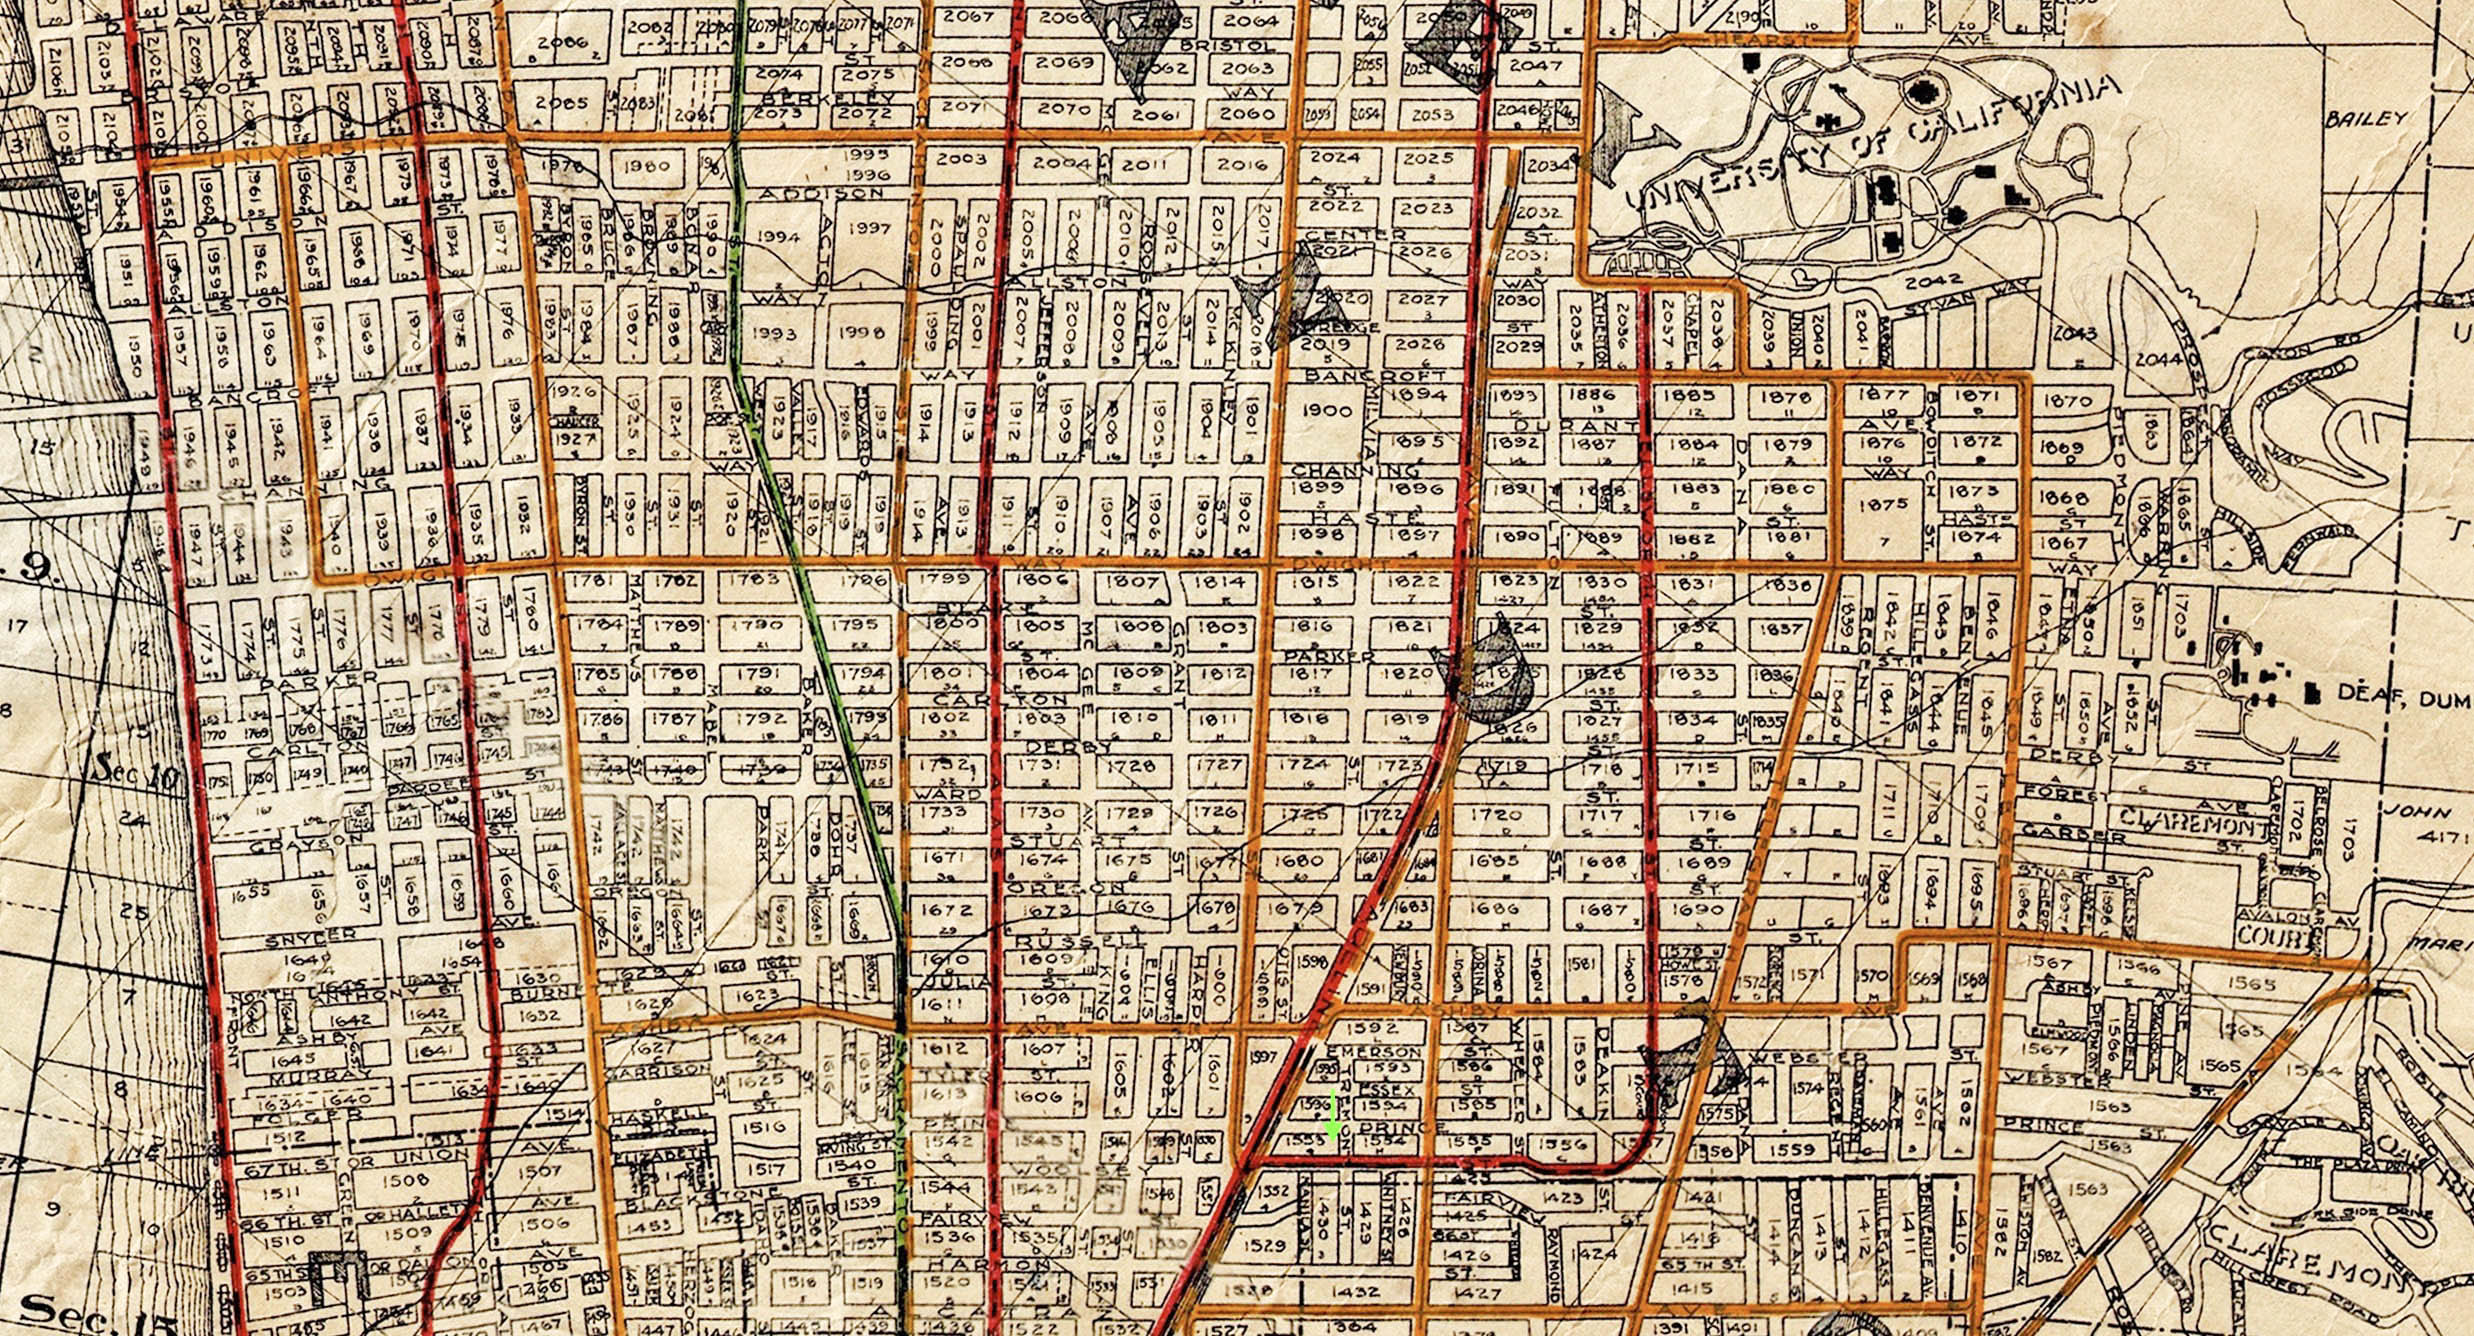
The Ellsworth line, green arrow in this map, however, was not part of a new real estate venture as it merely served as a way to go from the Oakland Pier to deep into the UC Berkeley campus. In those days the streets penetrated as far north as Allston Way before the construction oF Edwards Stadium as seen in this map from 1912, but the Ellsworth line was particularly entrapped in a sea of Oakland Traction streetcars and the Key Shattuck line. Given the few images existing documenting the Ellsworth Iine operation and abandonment, it is is covered in a separate update, click here.
L345-195-Realty Bonds and Finance Co. Map of Oakland and Vicinity, Courtesy John Bosko, (Image 40 of 42)
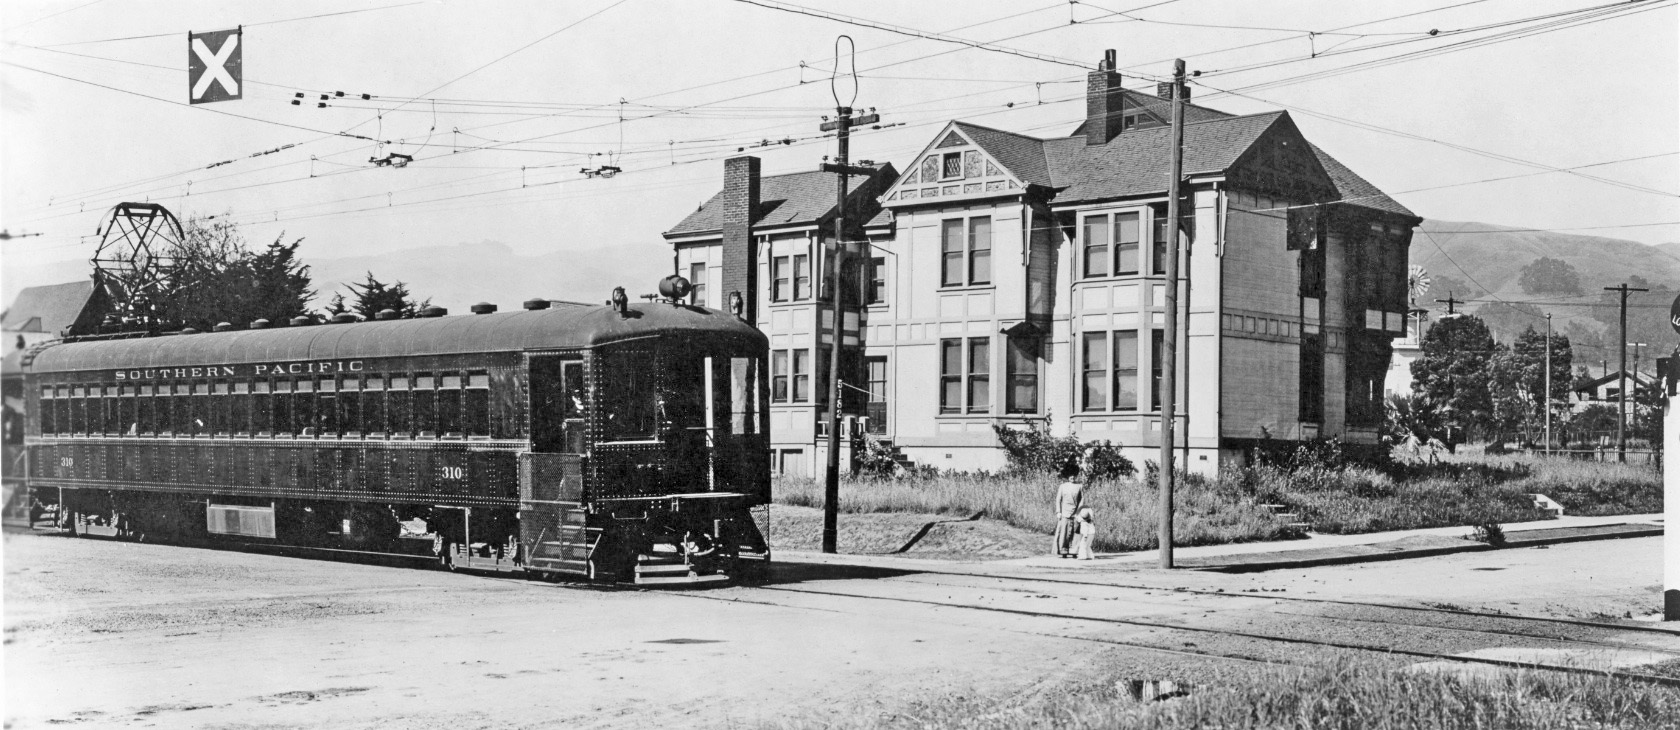
With the only image found of an Ellsworth St. train on its namesake street, here at the intersection with Prince St. ca. 1912-1914, the trains the SP were to employ on its new electric lines deserve comment. Bob Ford in his book has a very long and detailed description on pages 105-106 of these cars made by the American Car and Foundry Co.. For the purpose of this update, the cars were made of steel, and very long at 72 ft. and 10.5 inches, with double-length platforms for quick unloading. The green exterior and large windows at each end seen in this picture would be short-lived and picked up in the next update.
L345-200-Courtesy Peterson-Krambles Archive, (Image 41 of 42)
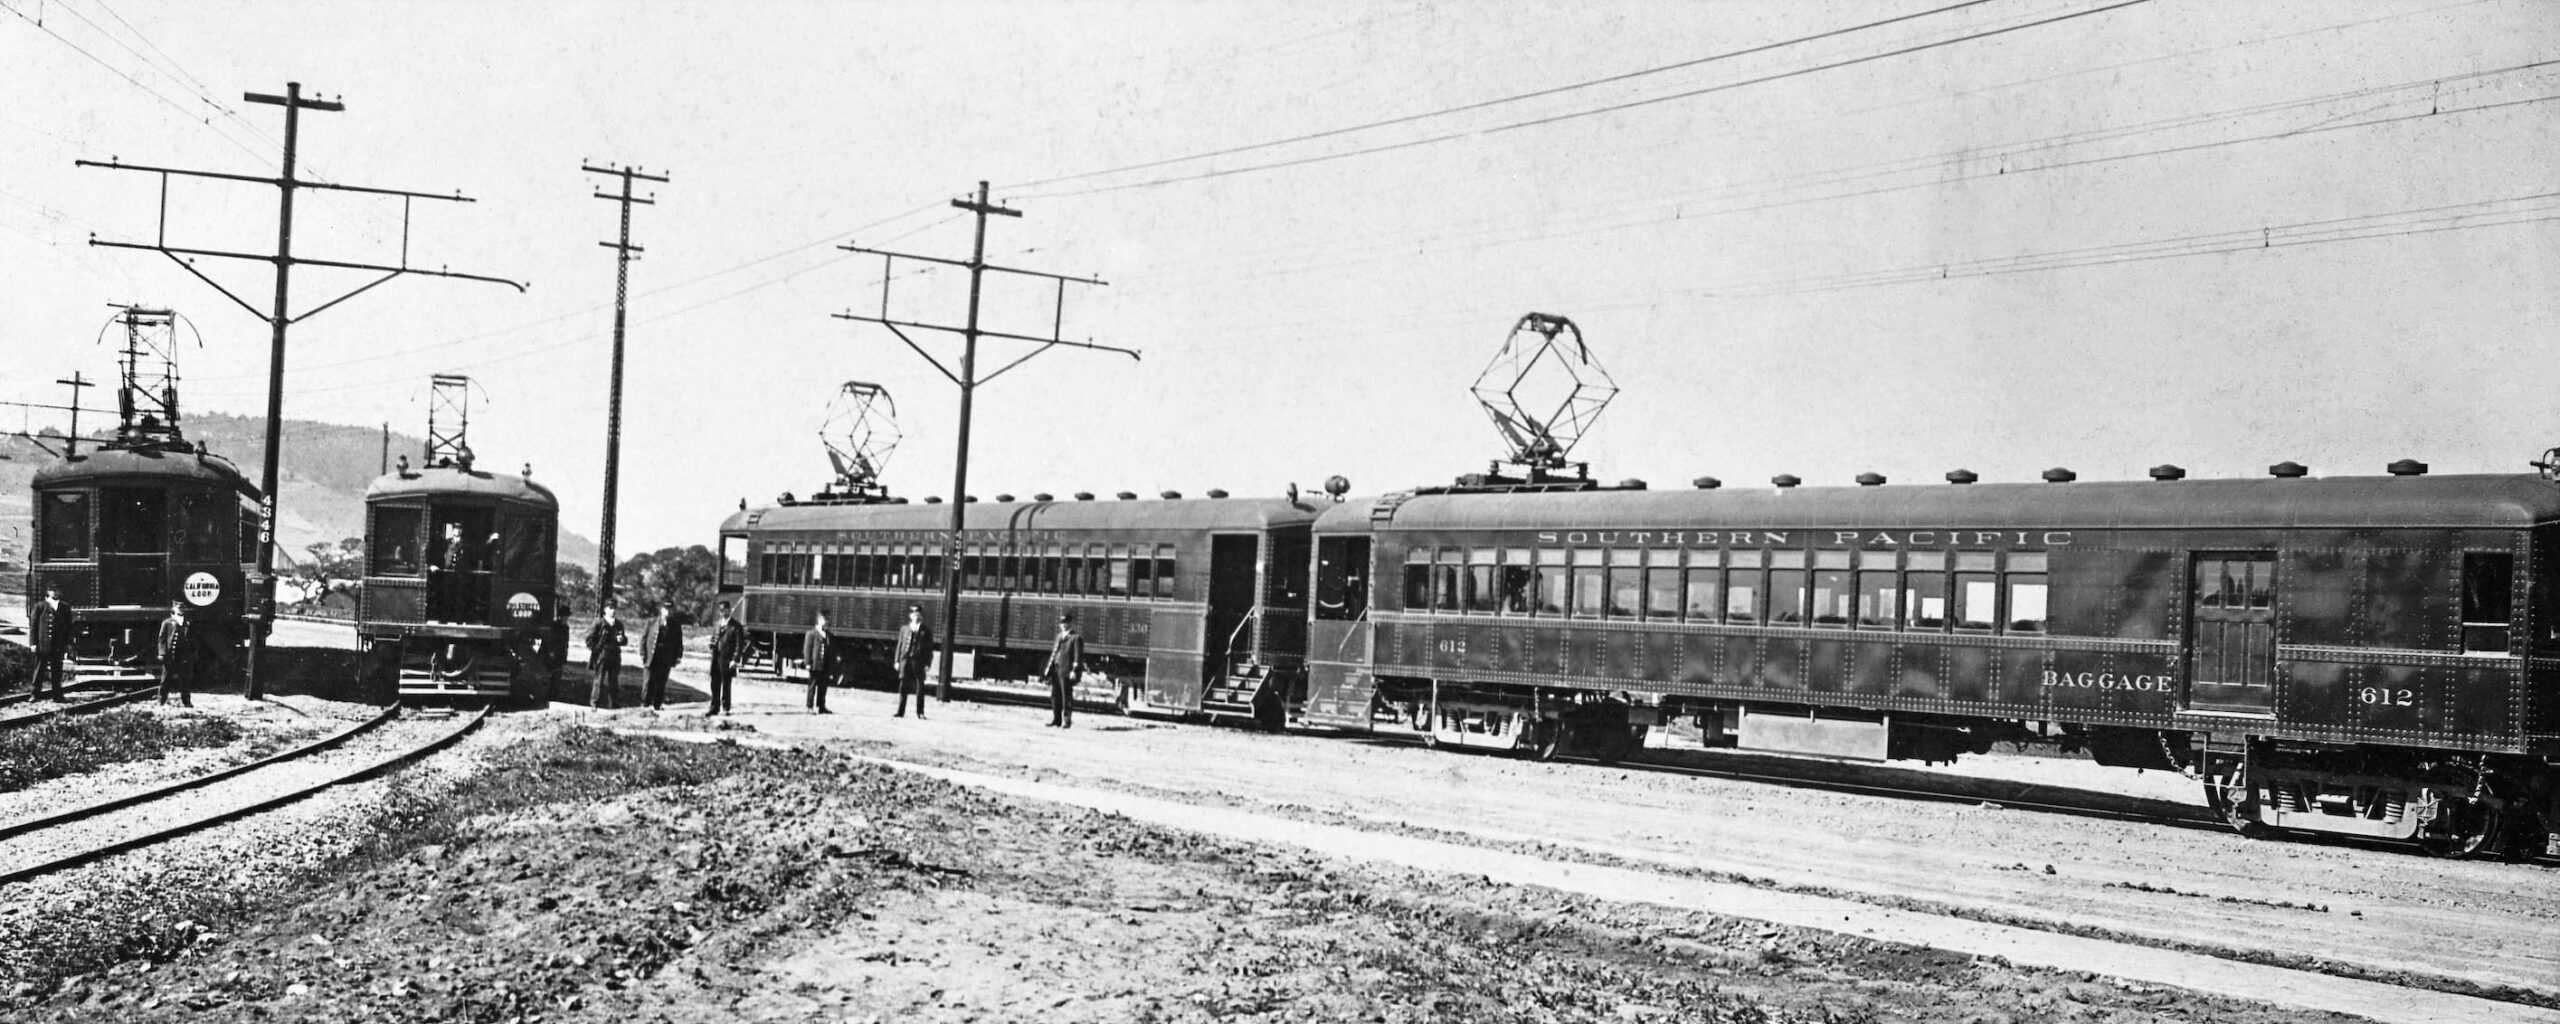
Early in 1912, this rare northwest view shows the three lines at Thousand Oaks. The California line, left, and Ninth St. line, center, both have “loop” indicated on their destination discs, but they did not travel in loops. Rather, each line physically formed a loop with the other, but the train routes ended here. In the next update, the struggle between the SP and Key for North Berkeley in the first decade of competitive operation will be examined.
L345-205-S.P. Official Photo, Sappers Collection, Courtesy BAERA, Western Railway Museum Archives, 25733oa&b, (Image 42 of 42)