Come and Gone on 5th St.
The survey of the architecture of Marysville continues with a trip down 5th St., starting at D St., yellow arrow, and ending short of the Feather River Bridge, orange arrow, as seen in this southeast view from 1940.
L241-05-Dorothea Lange Photo, U.S. National Archives and Records Administration, NARA-521573 , (Image 1 of 32)

This northeast view circa 1945 shows all the structures between D and E Sts. to be discussed in the first portion of this presentation.
L241-10-Eastman's Studio Photo B-4702, Moreau Coll., Courtesy BAERA, W. Railway Mus. Arch., 146438sn, (Image 2 of 32)
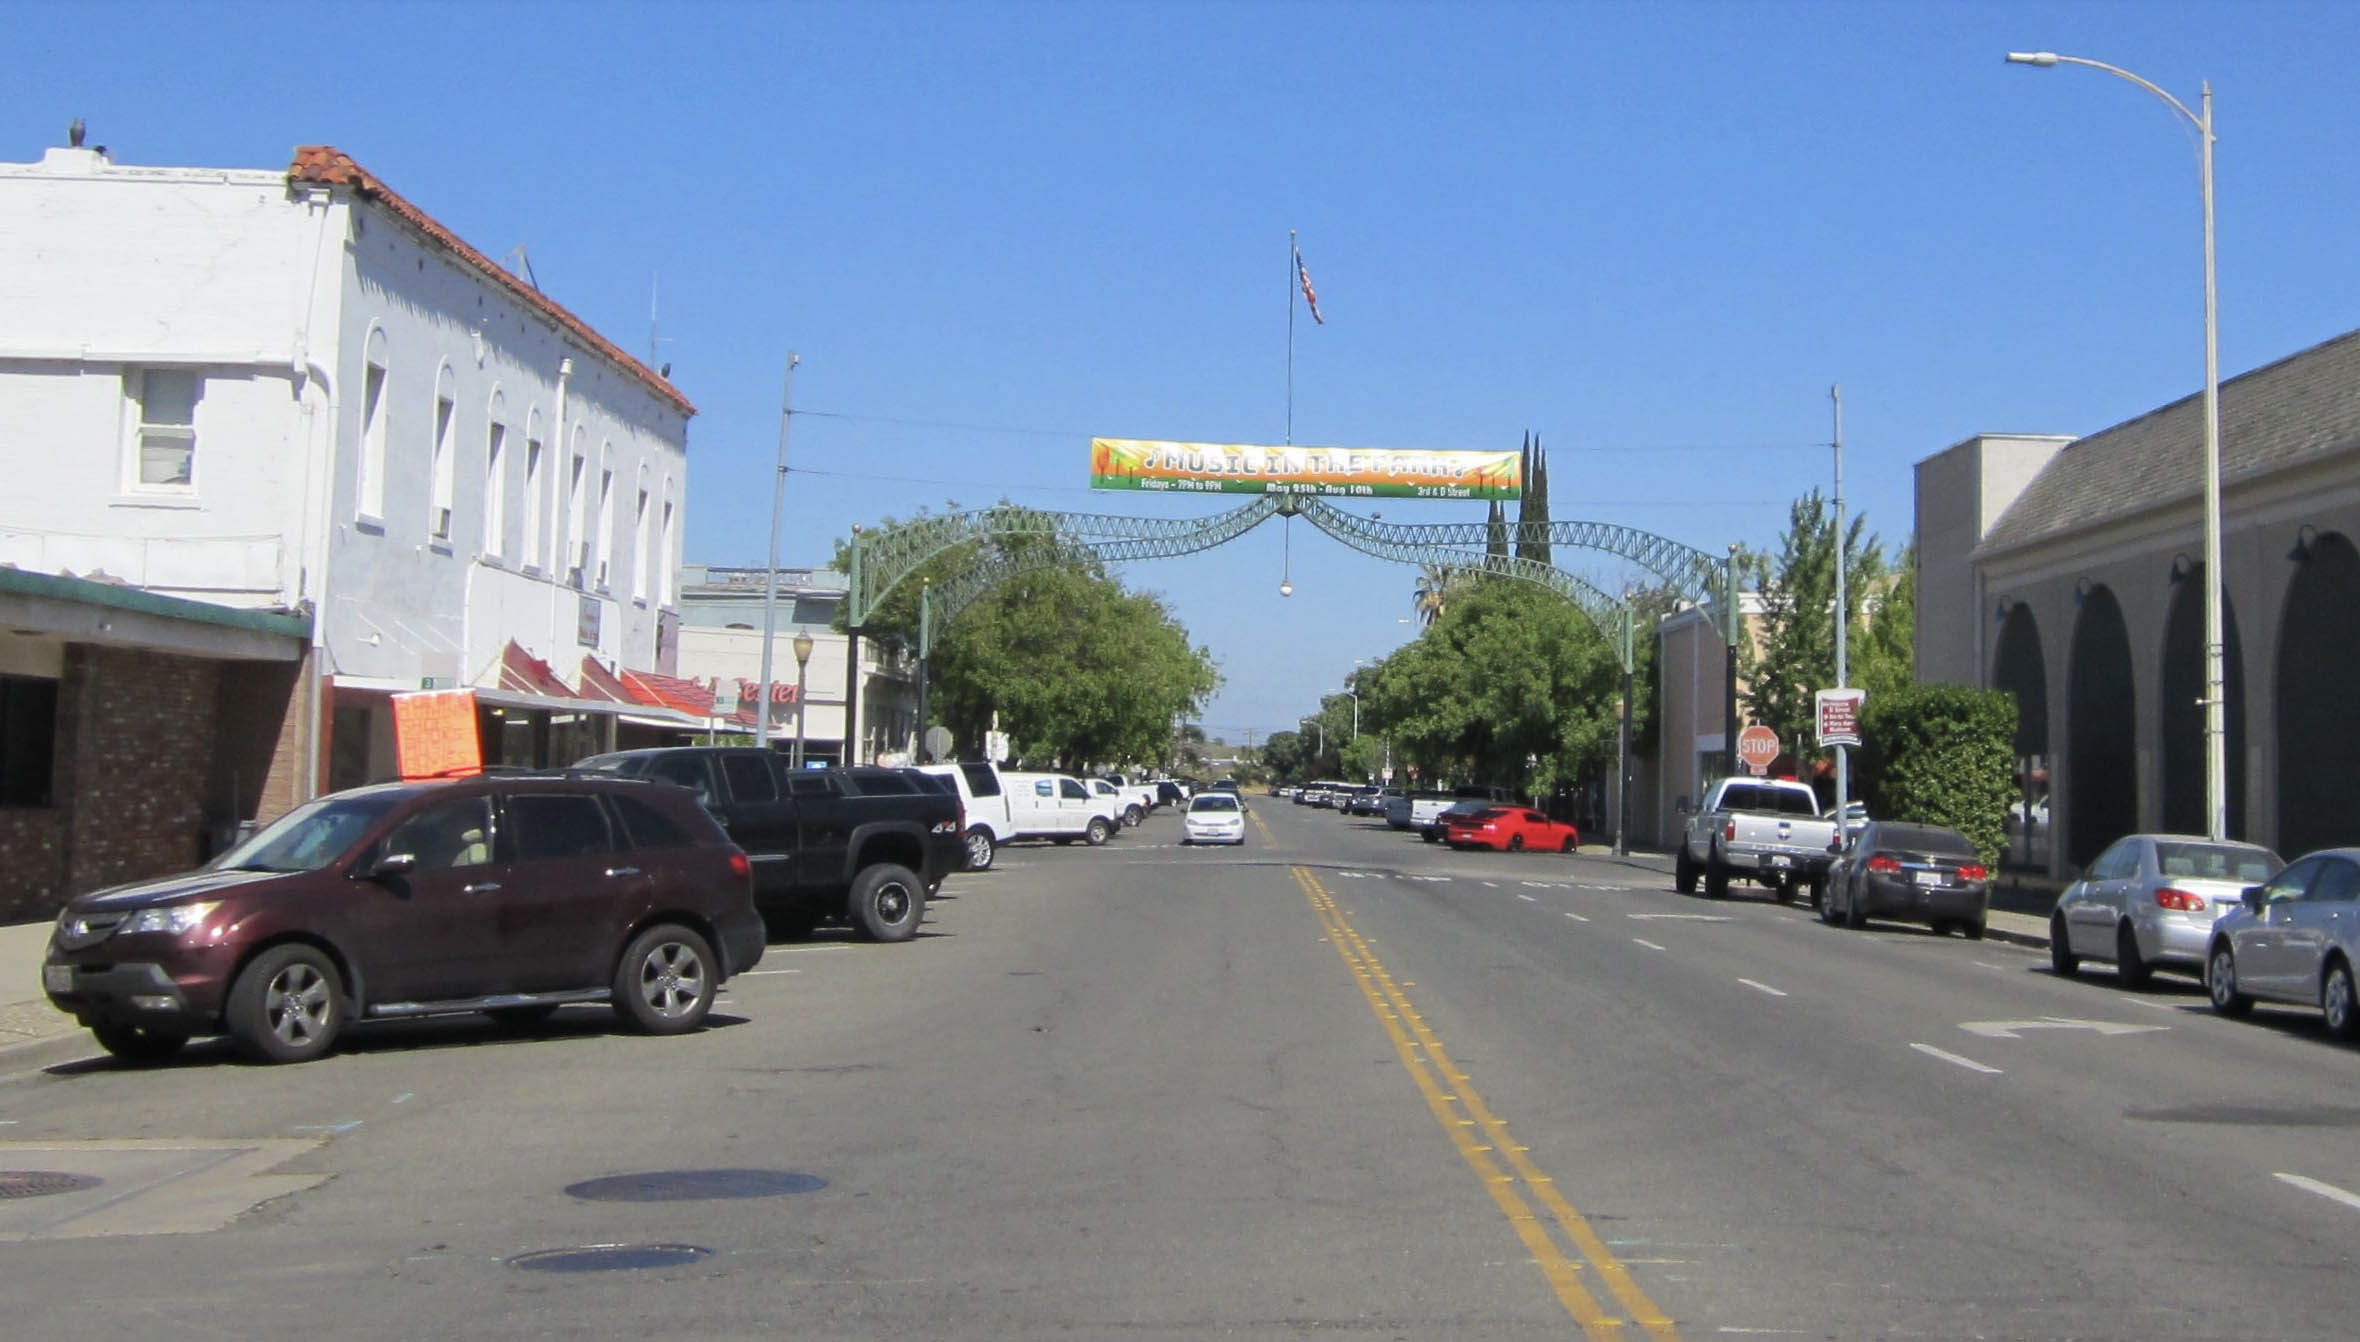
The tour starts with an east view up 5th St. at the D St. intersection in 2018.
L241-15-Stuart Swiedler Photo, (Image 3 of 32)
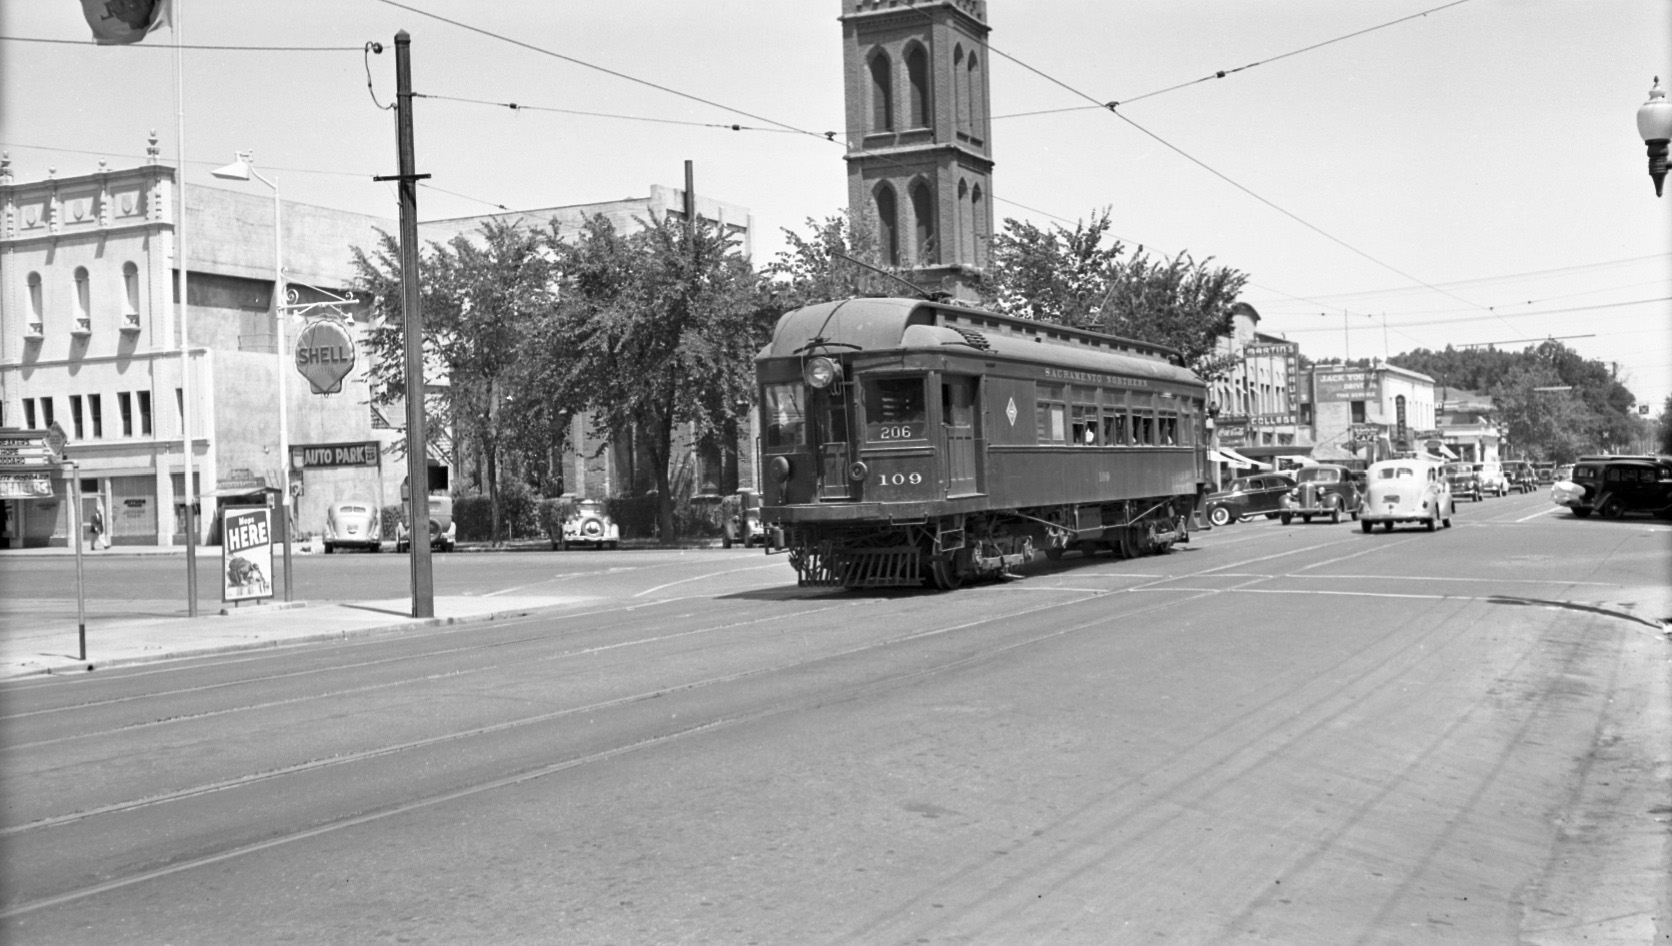
Turn back the clock to the same east view on Oct. 27th, 1940, the last Sunday of SN North End operation, as the Colusa Local as SN 109 is seen rounding the curve onto 5th St. as viewed from the rear of the SN Bidwell parlor car.
L241-20-Sappers Collection, Courtesy BAERA, Western Railway Museum Archives, 126019sn, (Image 4 of 32)
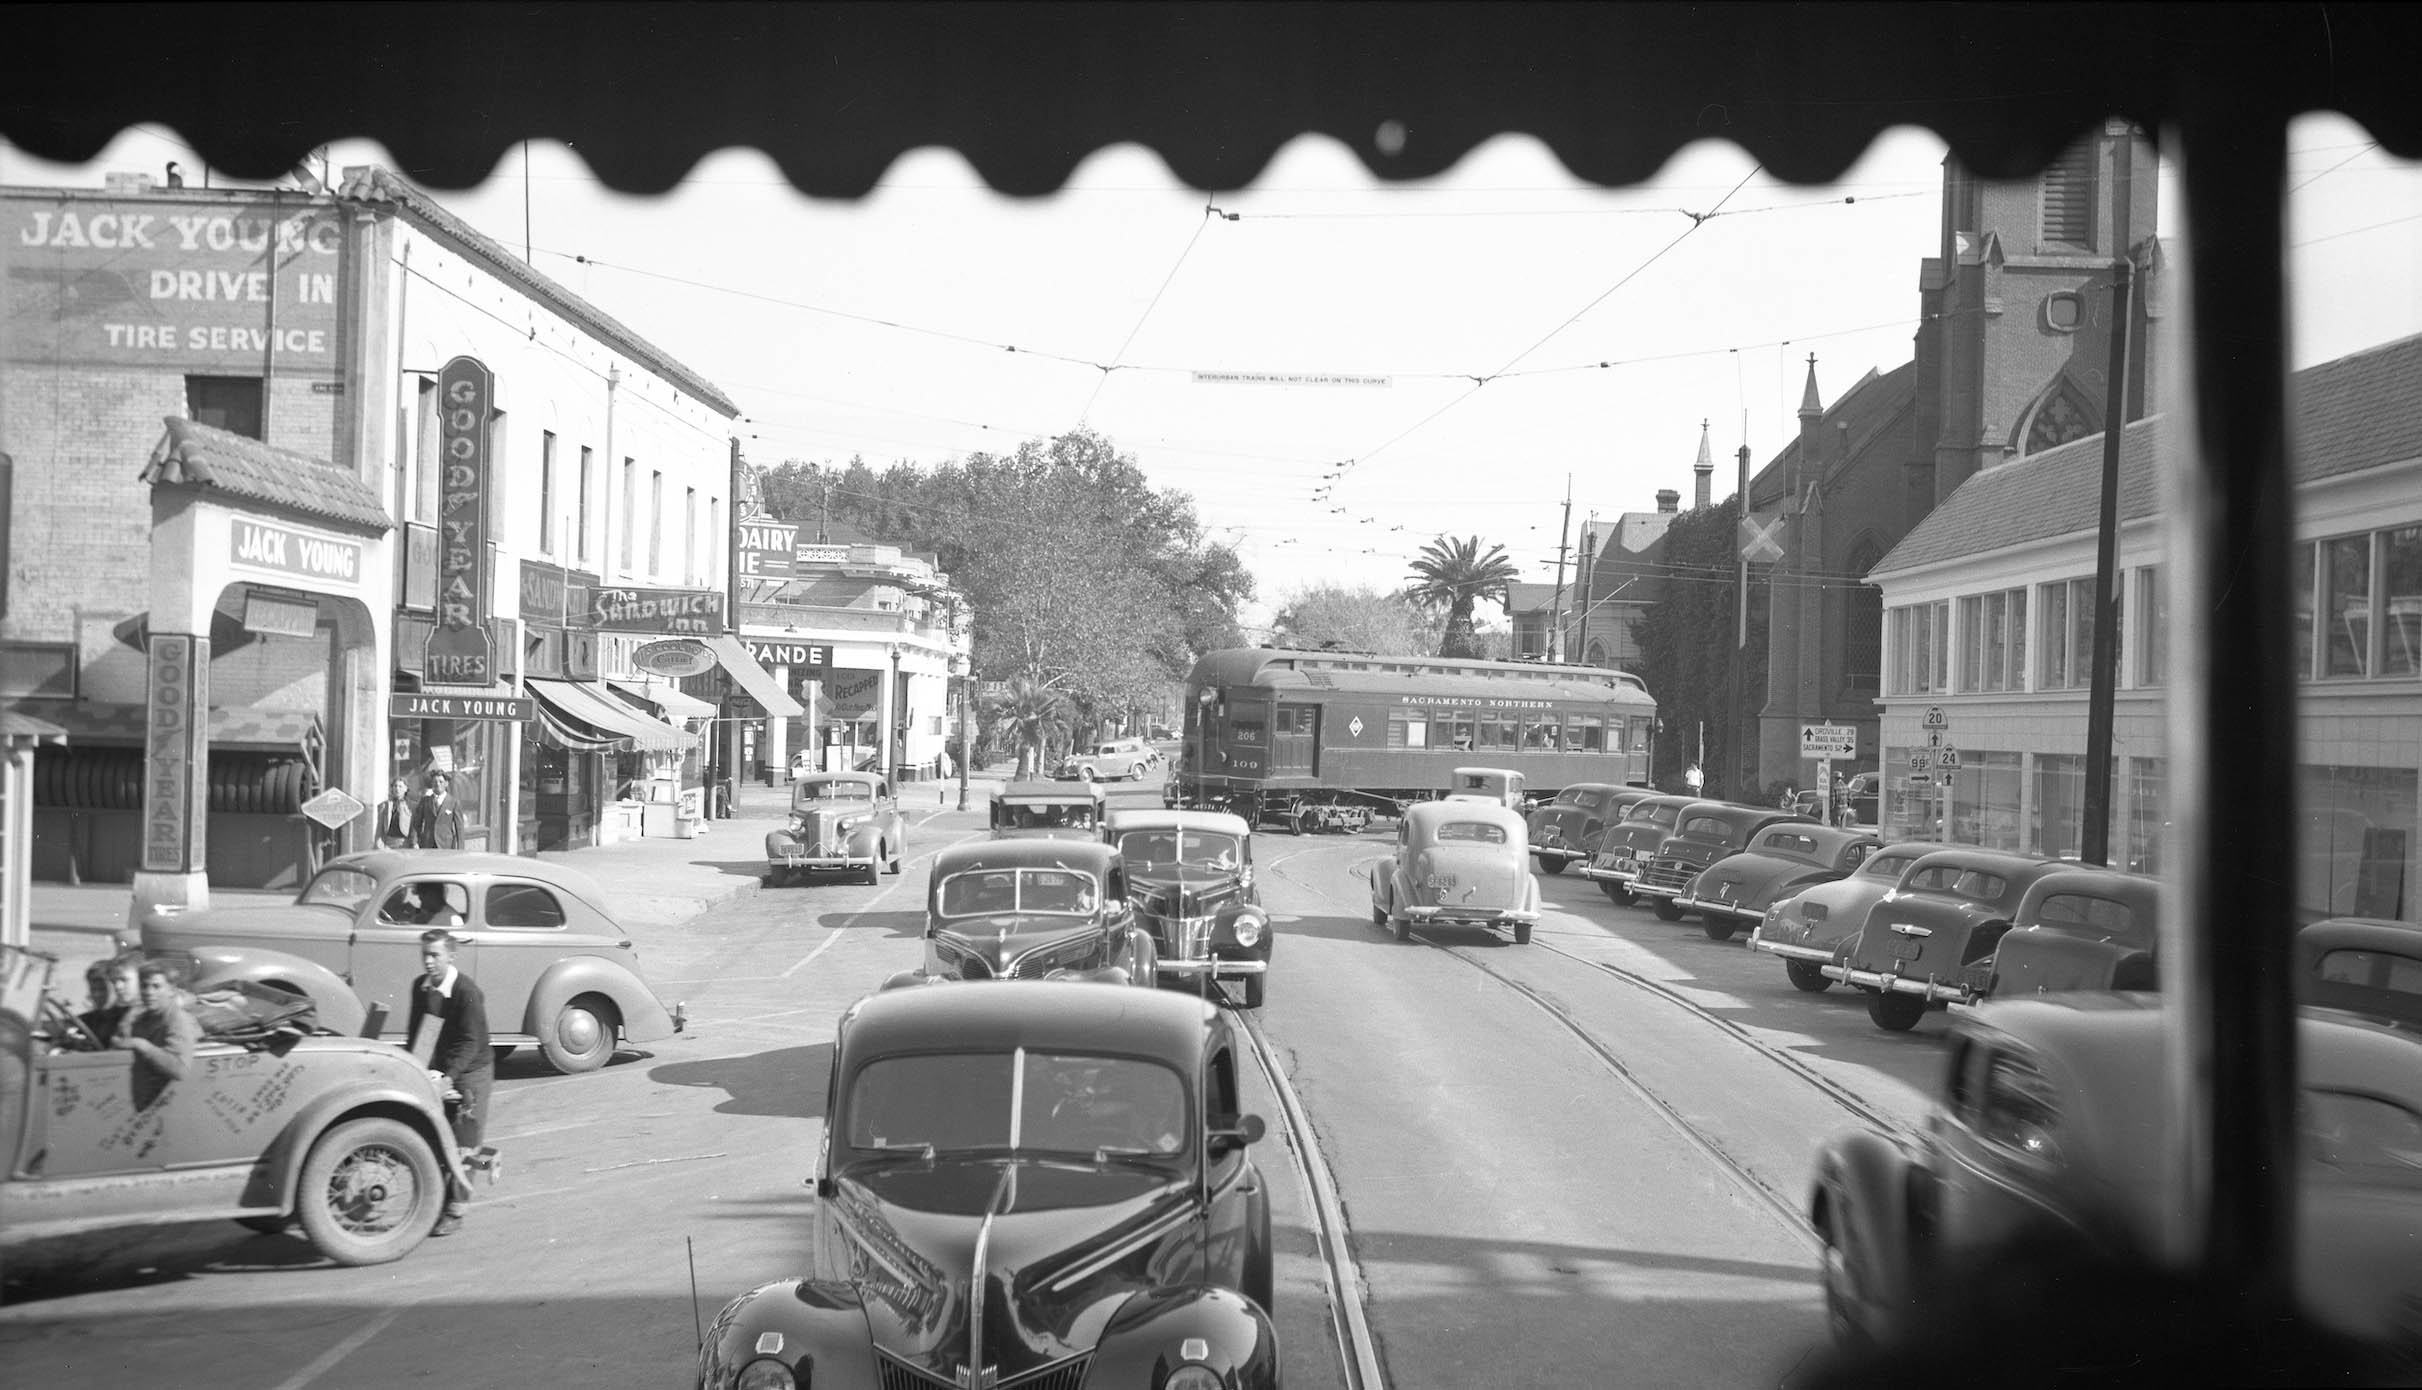
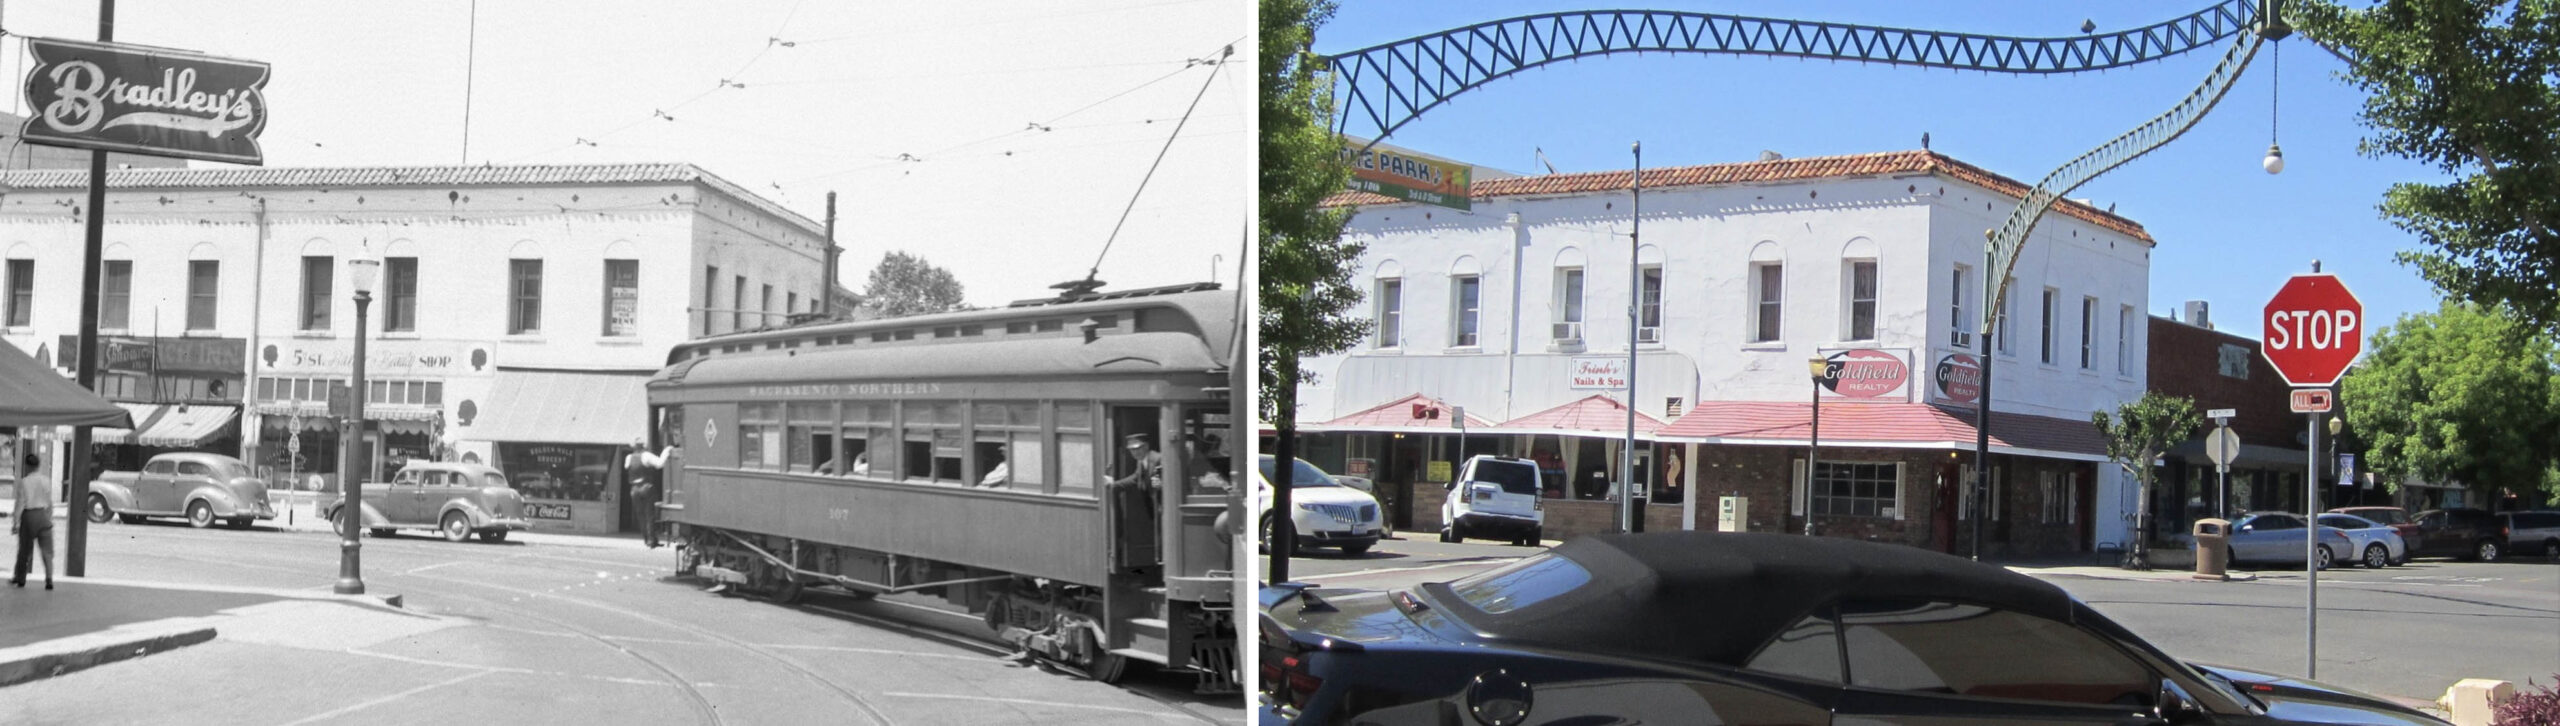
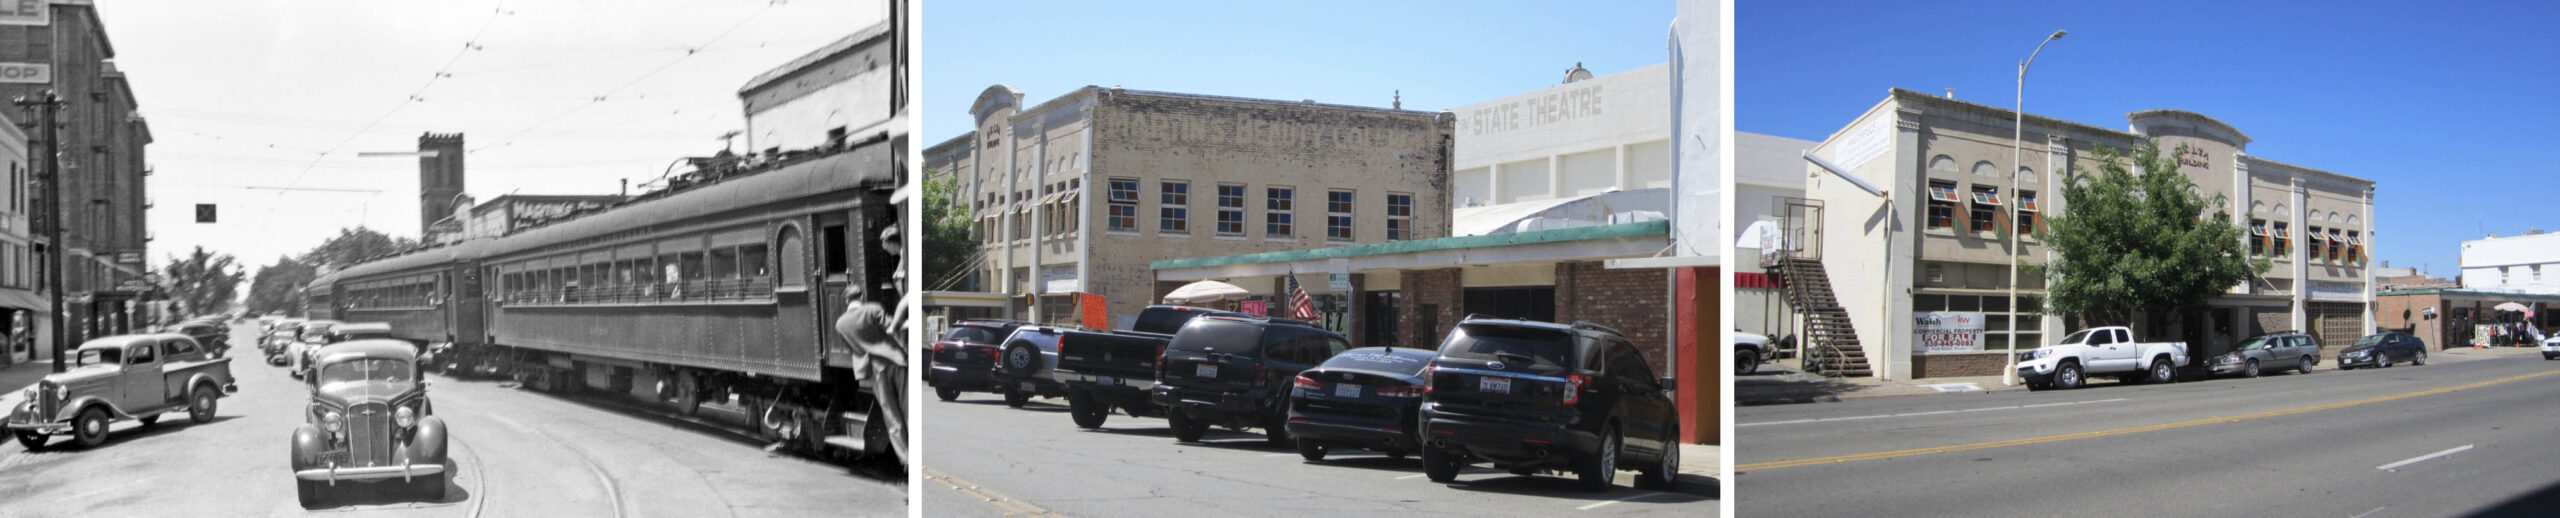
SN 107 leads the SN Sacramento parlor car from D St. onto 5th St. in this northwest view, left, to start an excursion to Colusa. The date was either June 16, 1940 or July 28, 1940. A comparable view from 2018, right, shows preservation of the second story detail, but the storefronts have been modified. In between this time period, the corner store had housed the Candy Box-Little Farmhouse confectionary store.
L241-25-Louis Bradas, Jr. Photo, Courtesy BAERA, Western Railway Museum Archives, 68467sn, (Image 5 of 32)
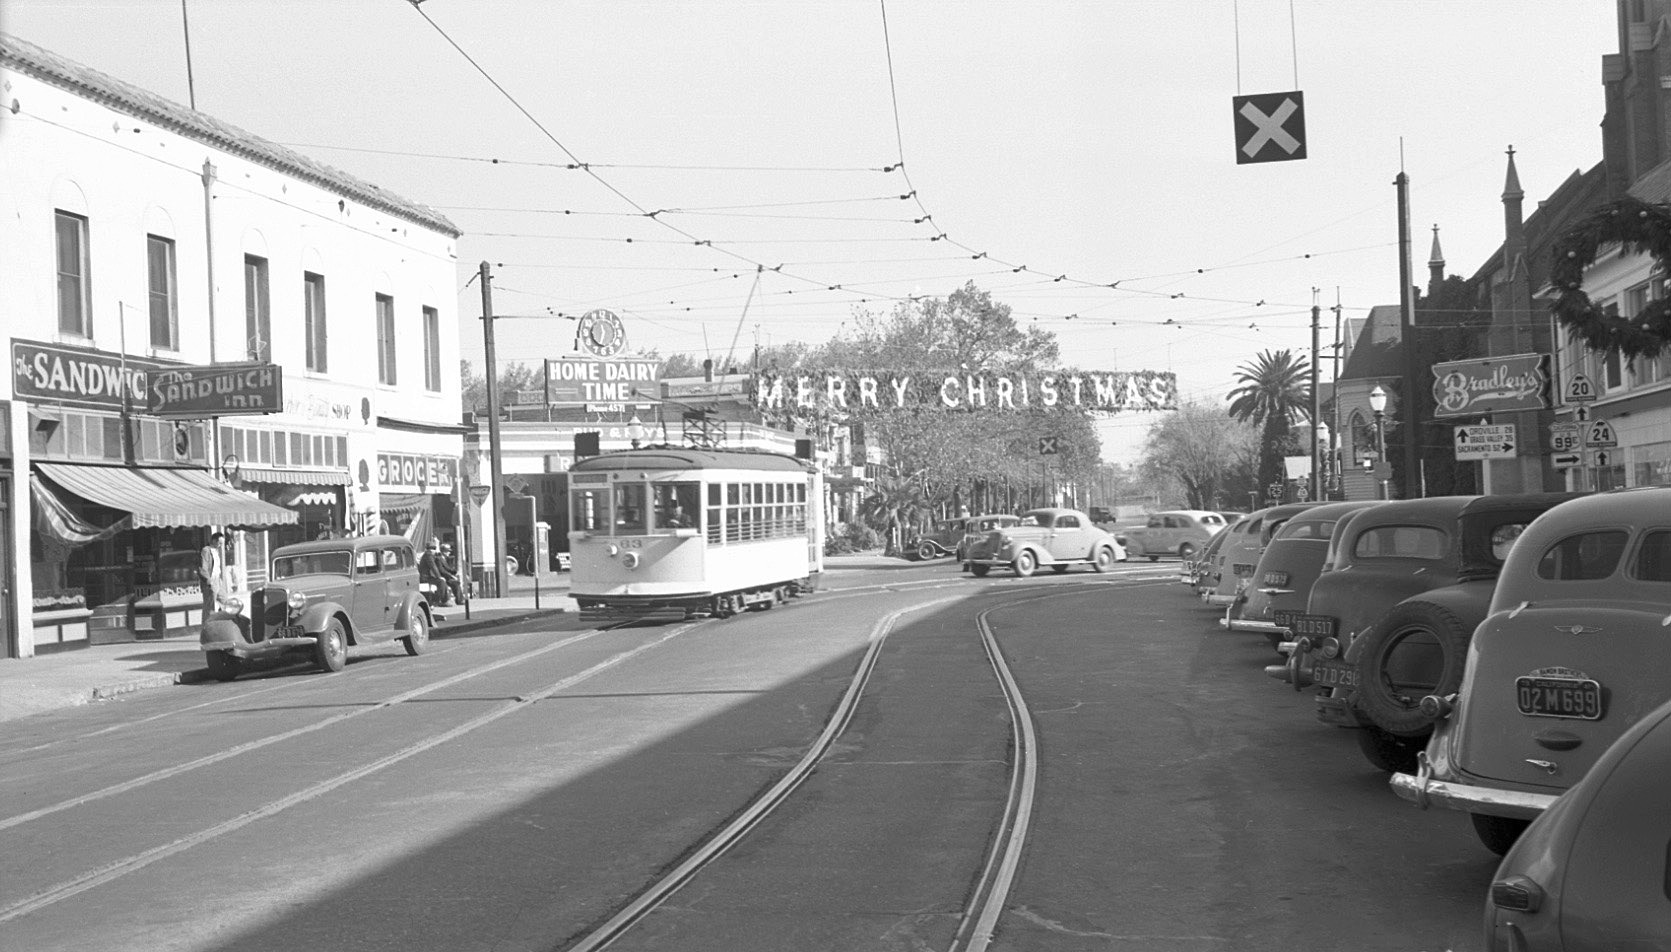
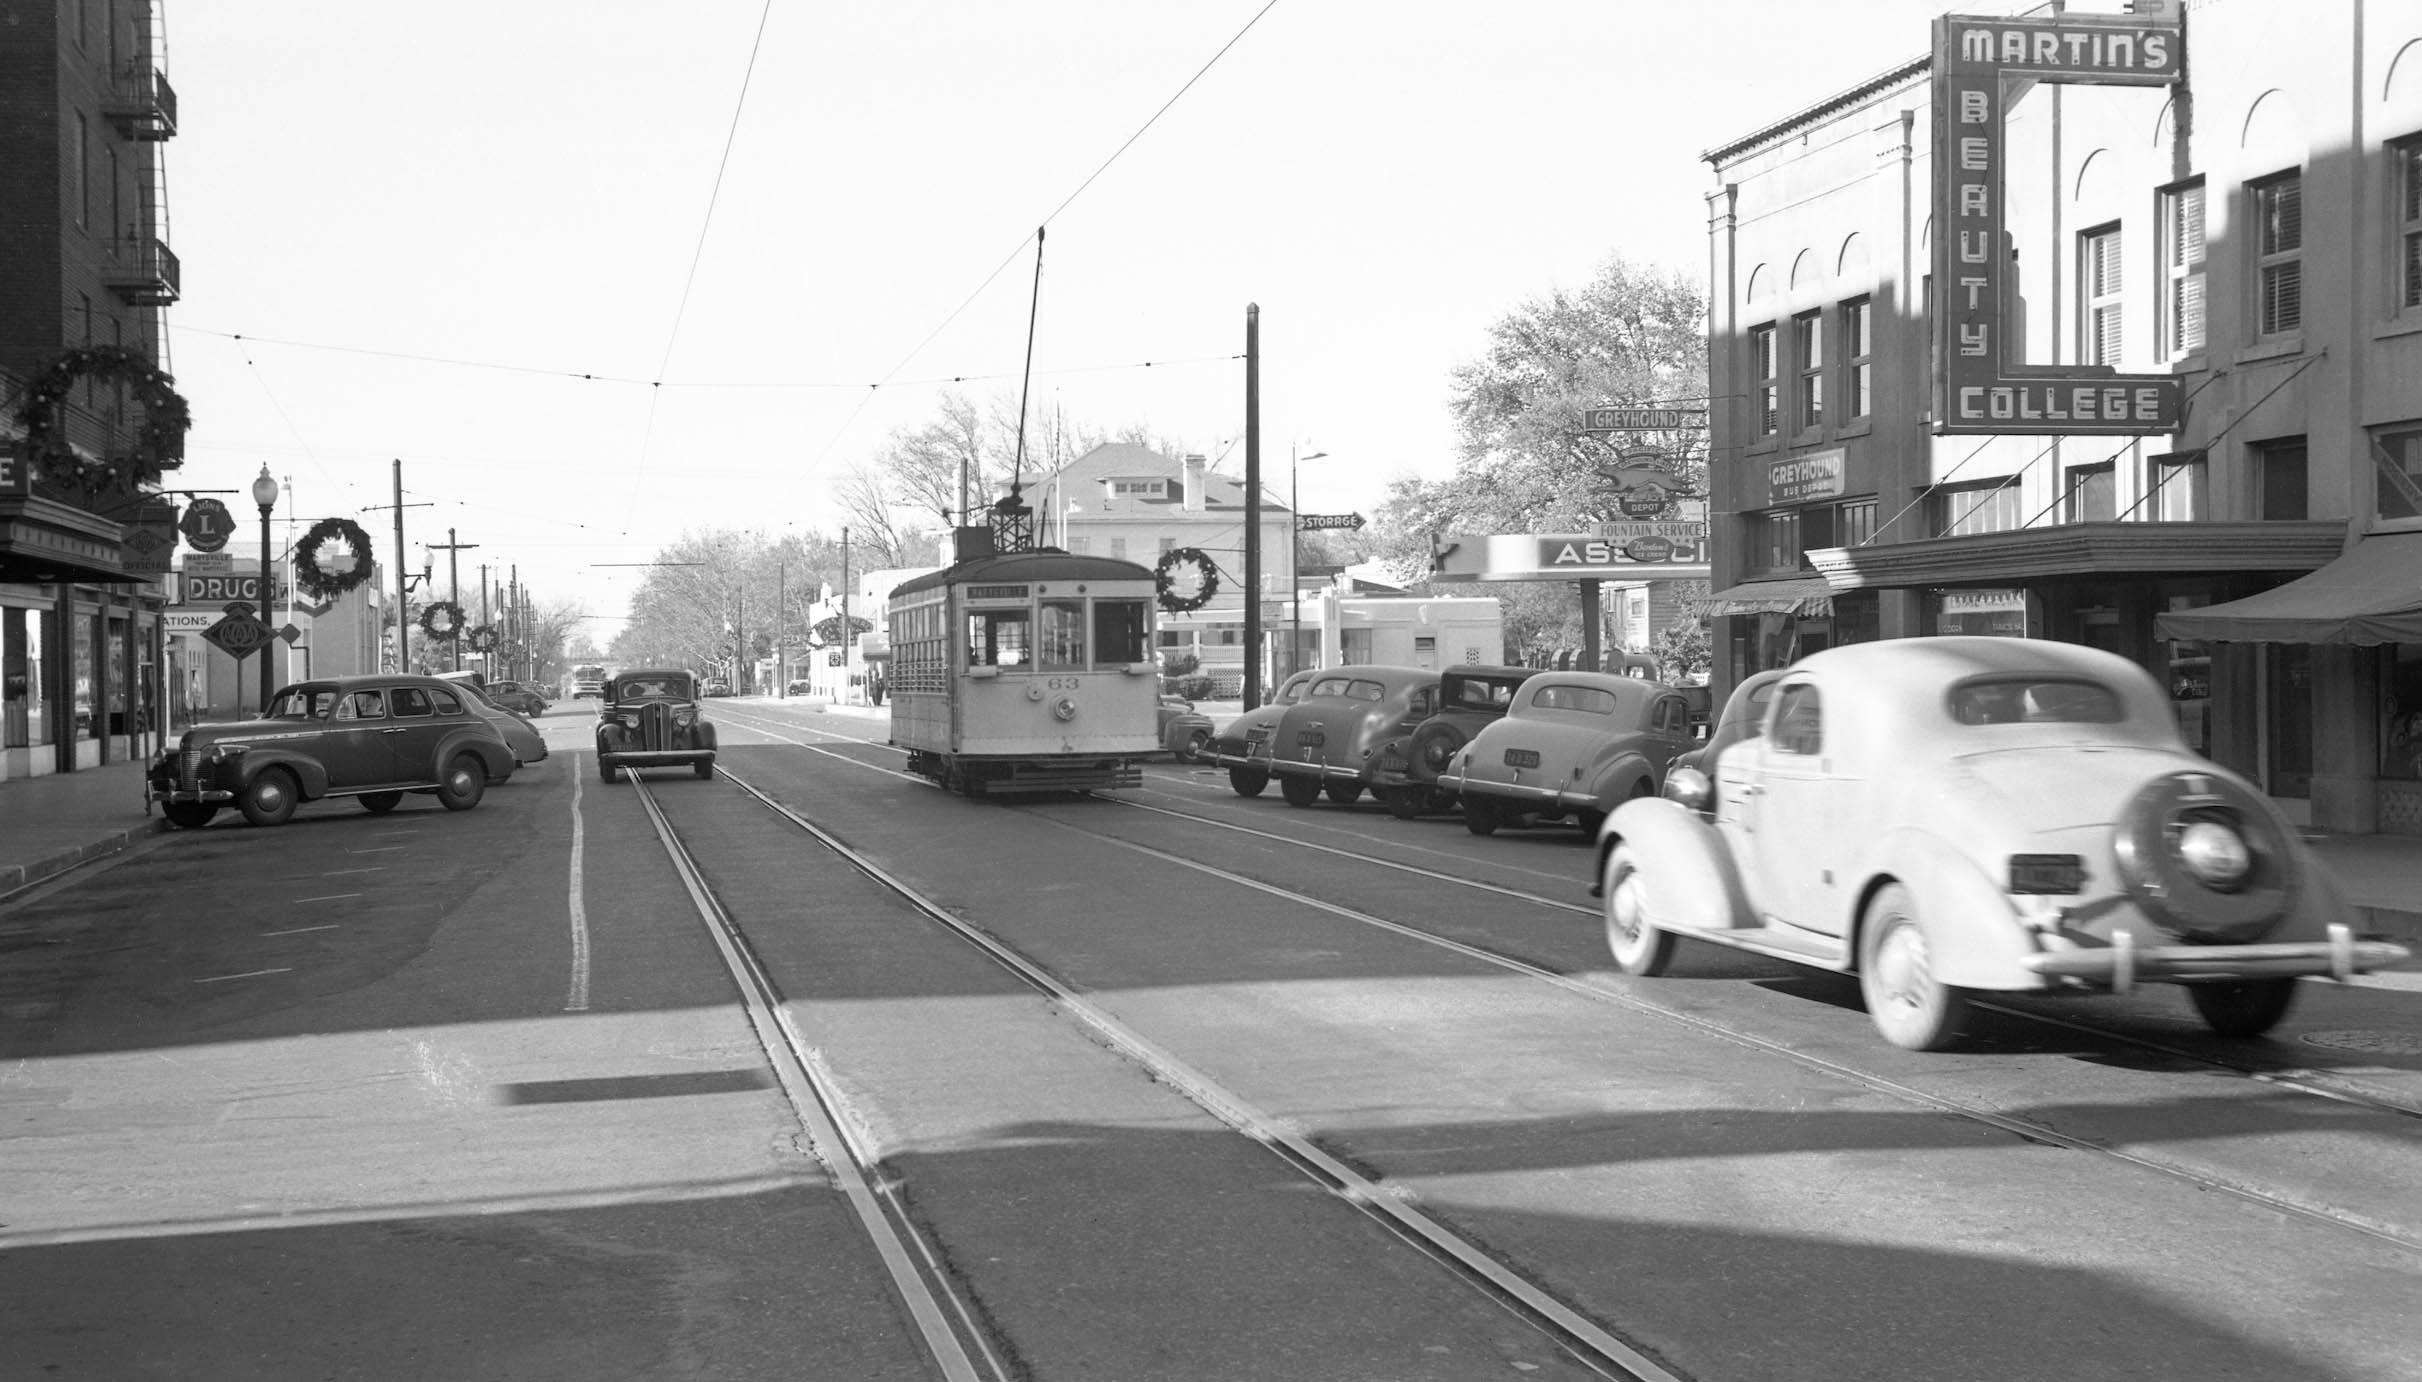
Birney 63 easily negotiates the turn onto 5th St. on Nov. 23, 1941. Bud Ramsey and Roy Cunningham’s drive-through service station featured the Home Dairy Time clock. Cunningham would later become a city councilman. This east view also provides a clear view of the Sandwich Inn, Beauty and Barber Shop, and Golden Rule Grocery on the north side, and all the road markers next to Bradley’s.
L241-30-Ted Wurm Photo, Courtesy BAERA, Western Railway Museum Archives, 32692sn, (Image 6 of 32)
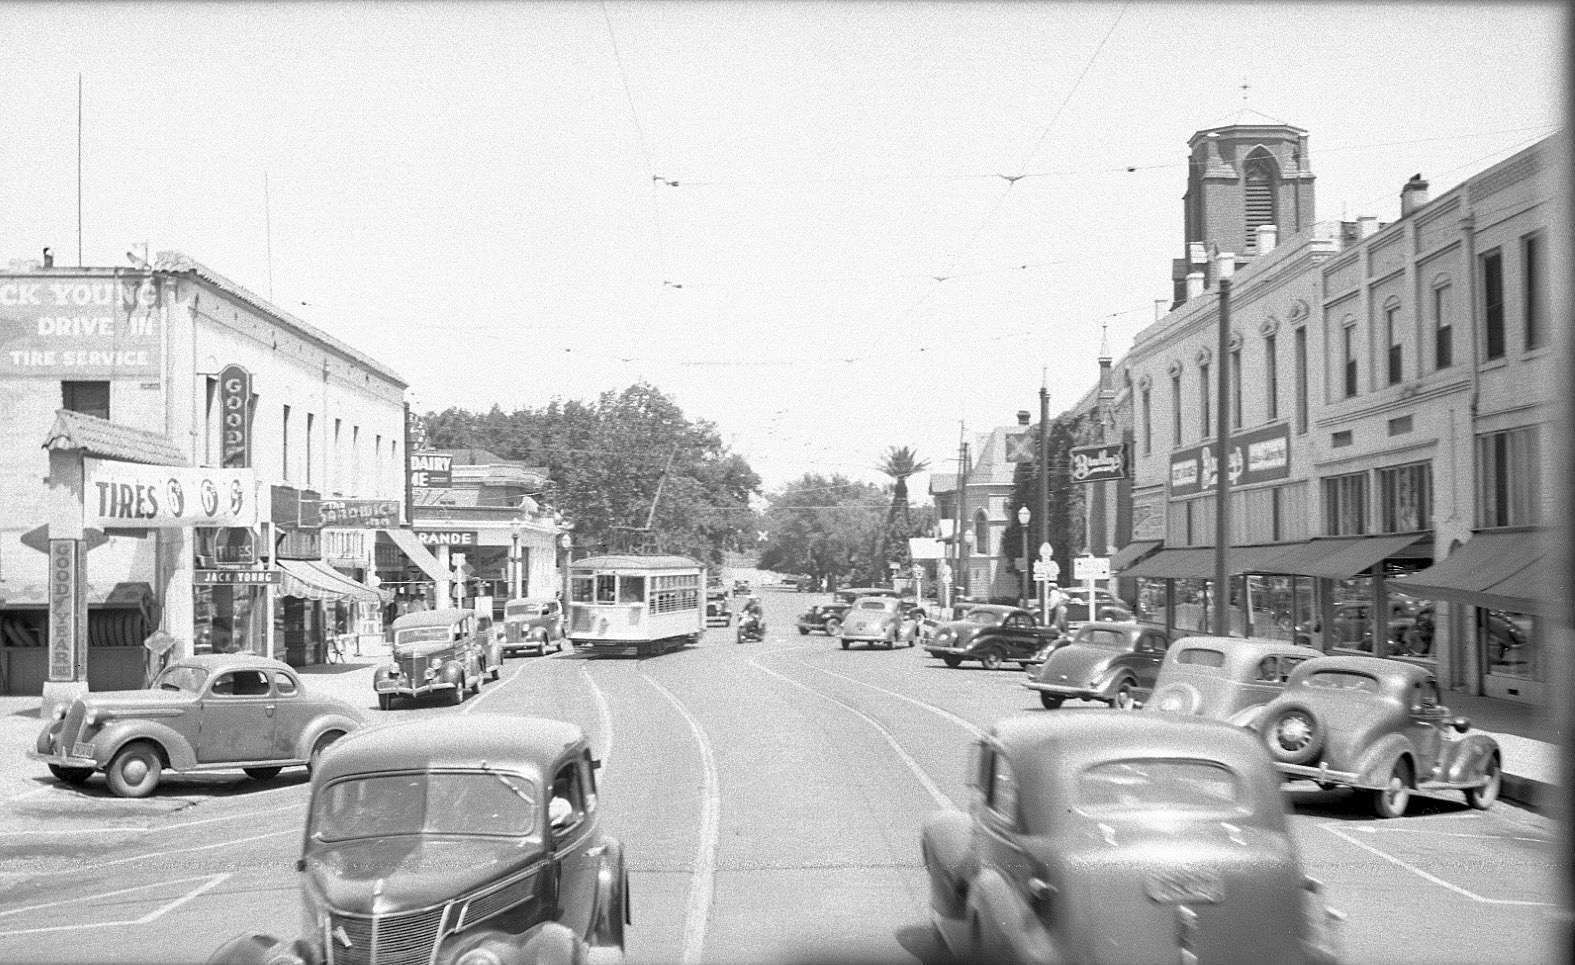
East views on 5th St. with Birney cars, here no. 63 on June 16, 1940, provide details beyond D St. including the drive-through service station. This image also includes the decapitated Presbyterian Church. Study the architectural details on the building housing Bradley’s along the right edge.
L241-35-Louis Bradas, Jr. Photo, Courtesy BAERA, Western Railway Museum Archives, 69122sn, (Image 7 of 32)
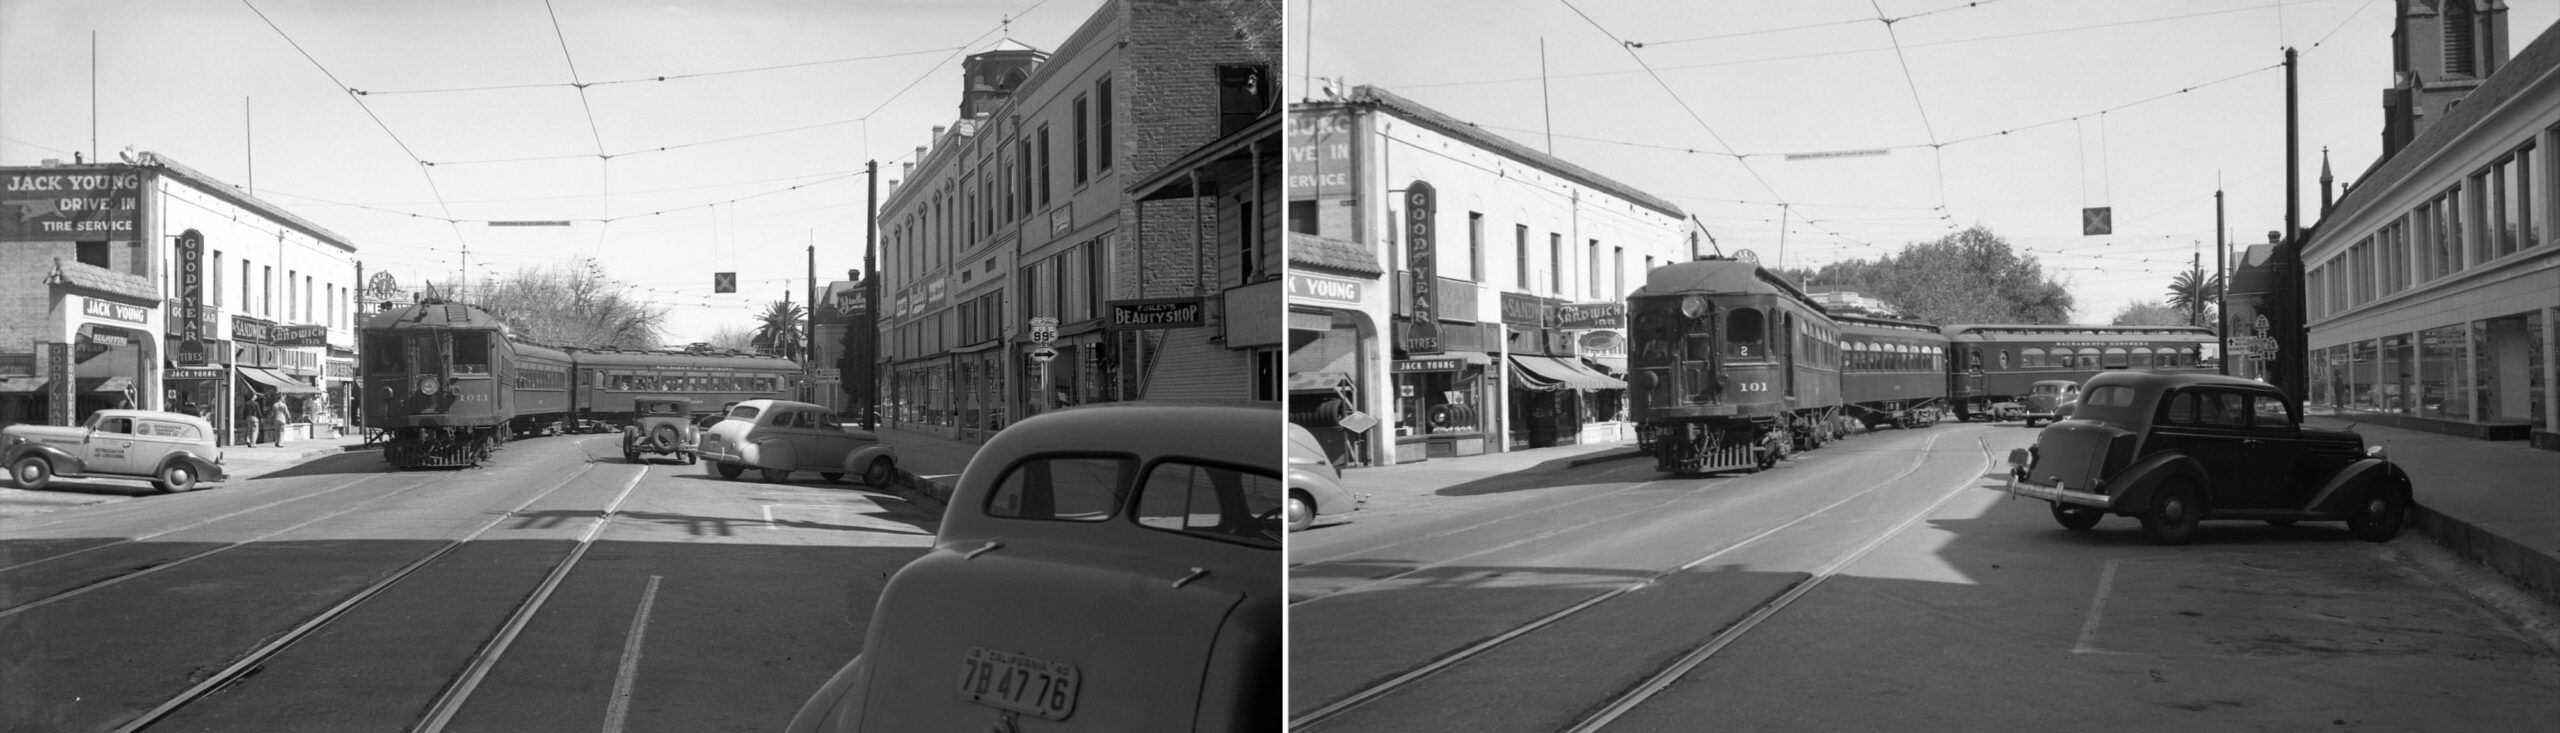
Two east views from 1940, on the left with two “Brill-type” cars and the Hall-Scott SN 1020, and three Niles cars on the right. Unlike Birneys, the sign above states, “interurban trains will not clear on this curve.” The right panel is from the last Sunday of service, Nov. 27, 1940, and unlike the earlier image on the left, all signs on Bradley’s are gone during this obvious renovation. Image L241-30 proves the main corner sign would return.
L241-40-Moreau Collection, Courtesy BAERA, Western Railway Museum Archives, 162565sn, l, (Image 8 of 32)
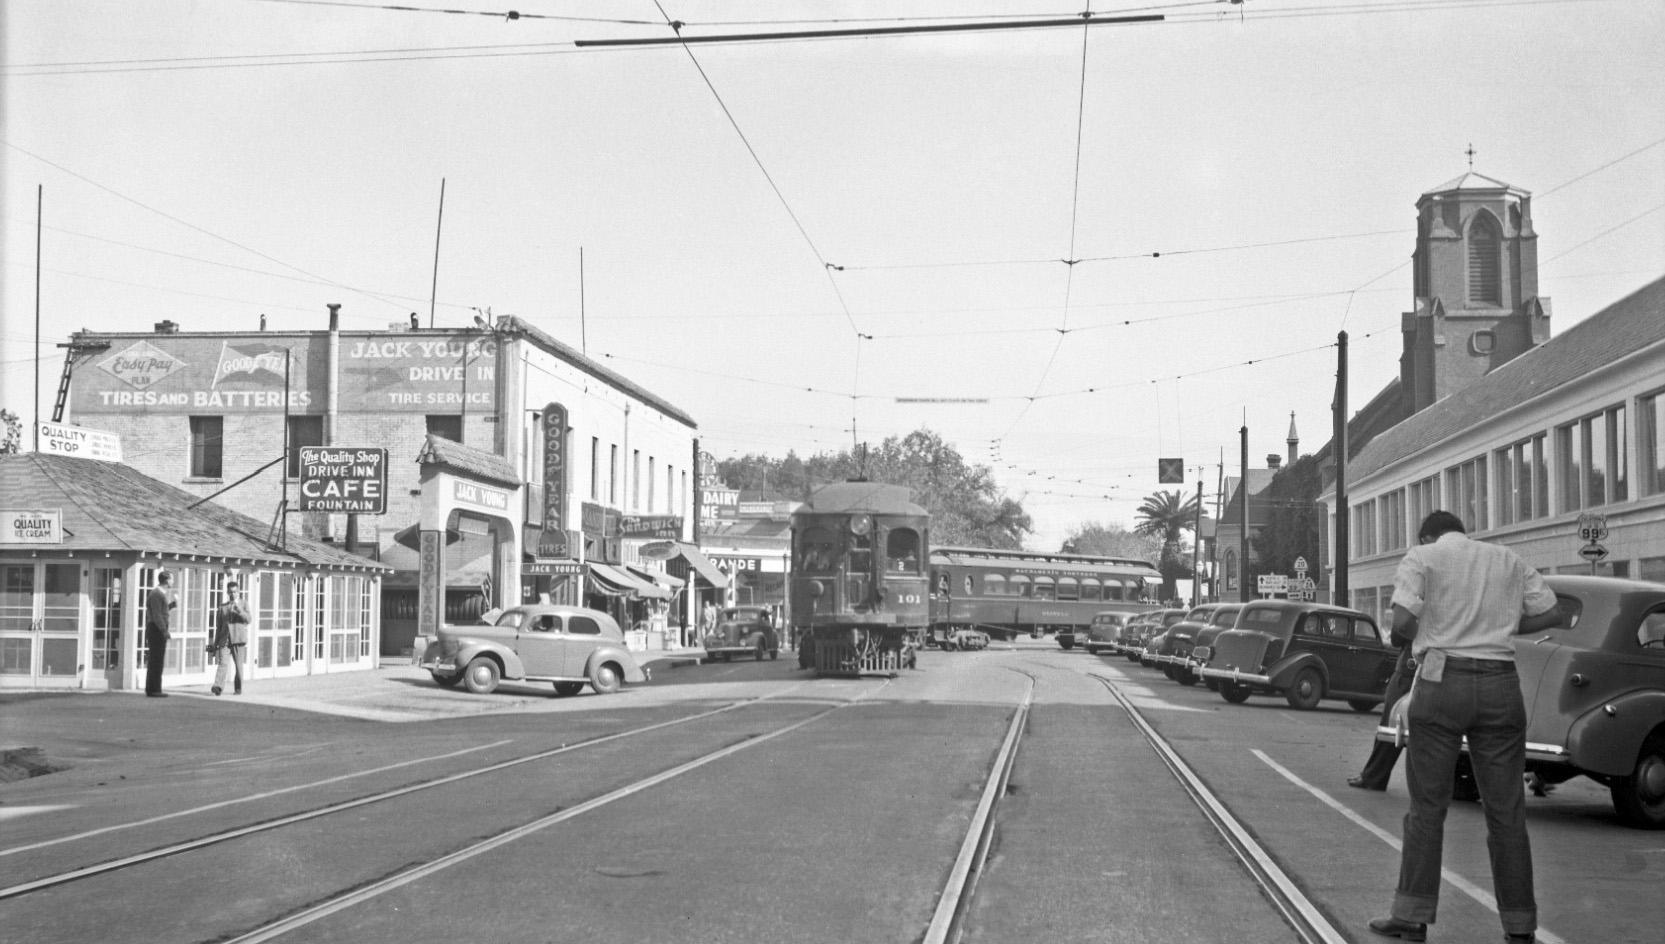
The unidentified photographer in the right panel of the last entry is seen here in a shot taken further west showing the same train with SN 101, SN 200, and the former SN 202, now the SN Bidwell parlor car, making the curve on Nov. 27, 1940. This east view documents that in addition to a drive-through service station and a drive-in tire and battery store, 5th St. also. had a drive-in cafe, The Quality Shop.
L241-45-Geo. Henderson Photo, Wurm Coll., Courtesy BAERA, W. Railway Museum Archives, 33074sn, (Image 9 of 32)
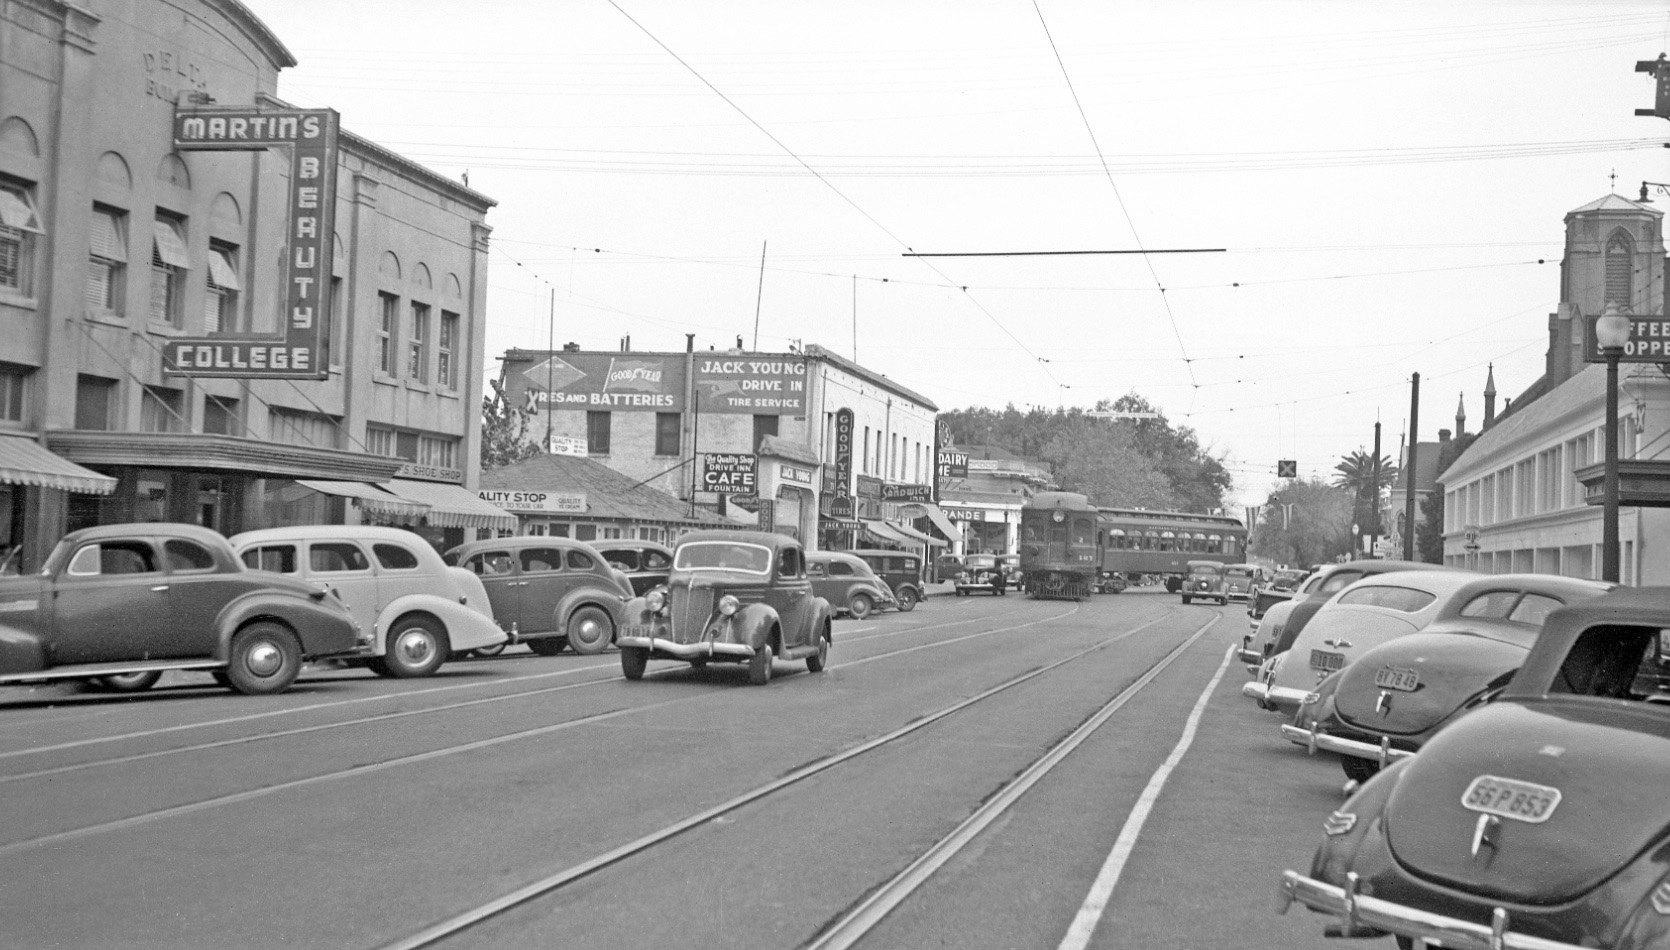
This east view taken further east in Sept. 1940 features SN 127 and trailer, and introduces the Delta Building, built in 1923, on the left or north, and the edge of the Hotel Marysville from 1926 on the right or south.
L241-50-Sappers Collection, Courtesy BAERA, Western Railway Museum Archives, 124703sn, (Image 10 of 32)
Two scenes from 2018 attest to the staying power of a few of the buildings on 5th St. and the surroundings. St. John’s Episcopal Church, once at 431 5th St. at the northeast corner with E St was not one of them, as seen in the left panel, a west view from 1940. The church was completed in Dec. 1855 for 7000 dollars, and demolished in 1941.
L241-55-Sappers Coll., Courtesy BAERA, W. Railway Museum Arch., 124685sn, and Stuart Swiedler Photos, (Image 11 of 32)
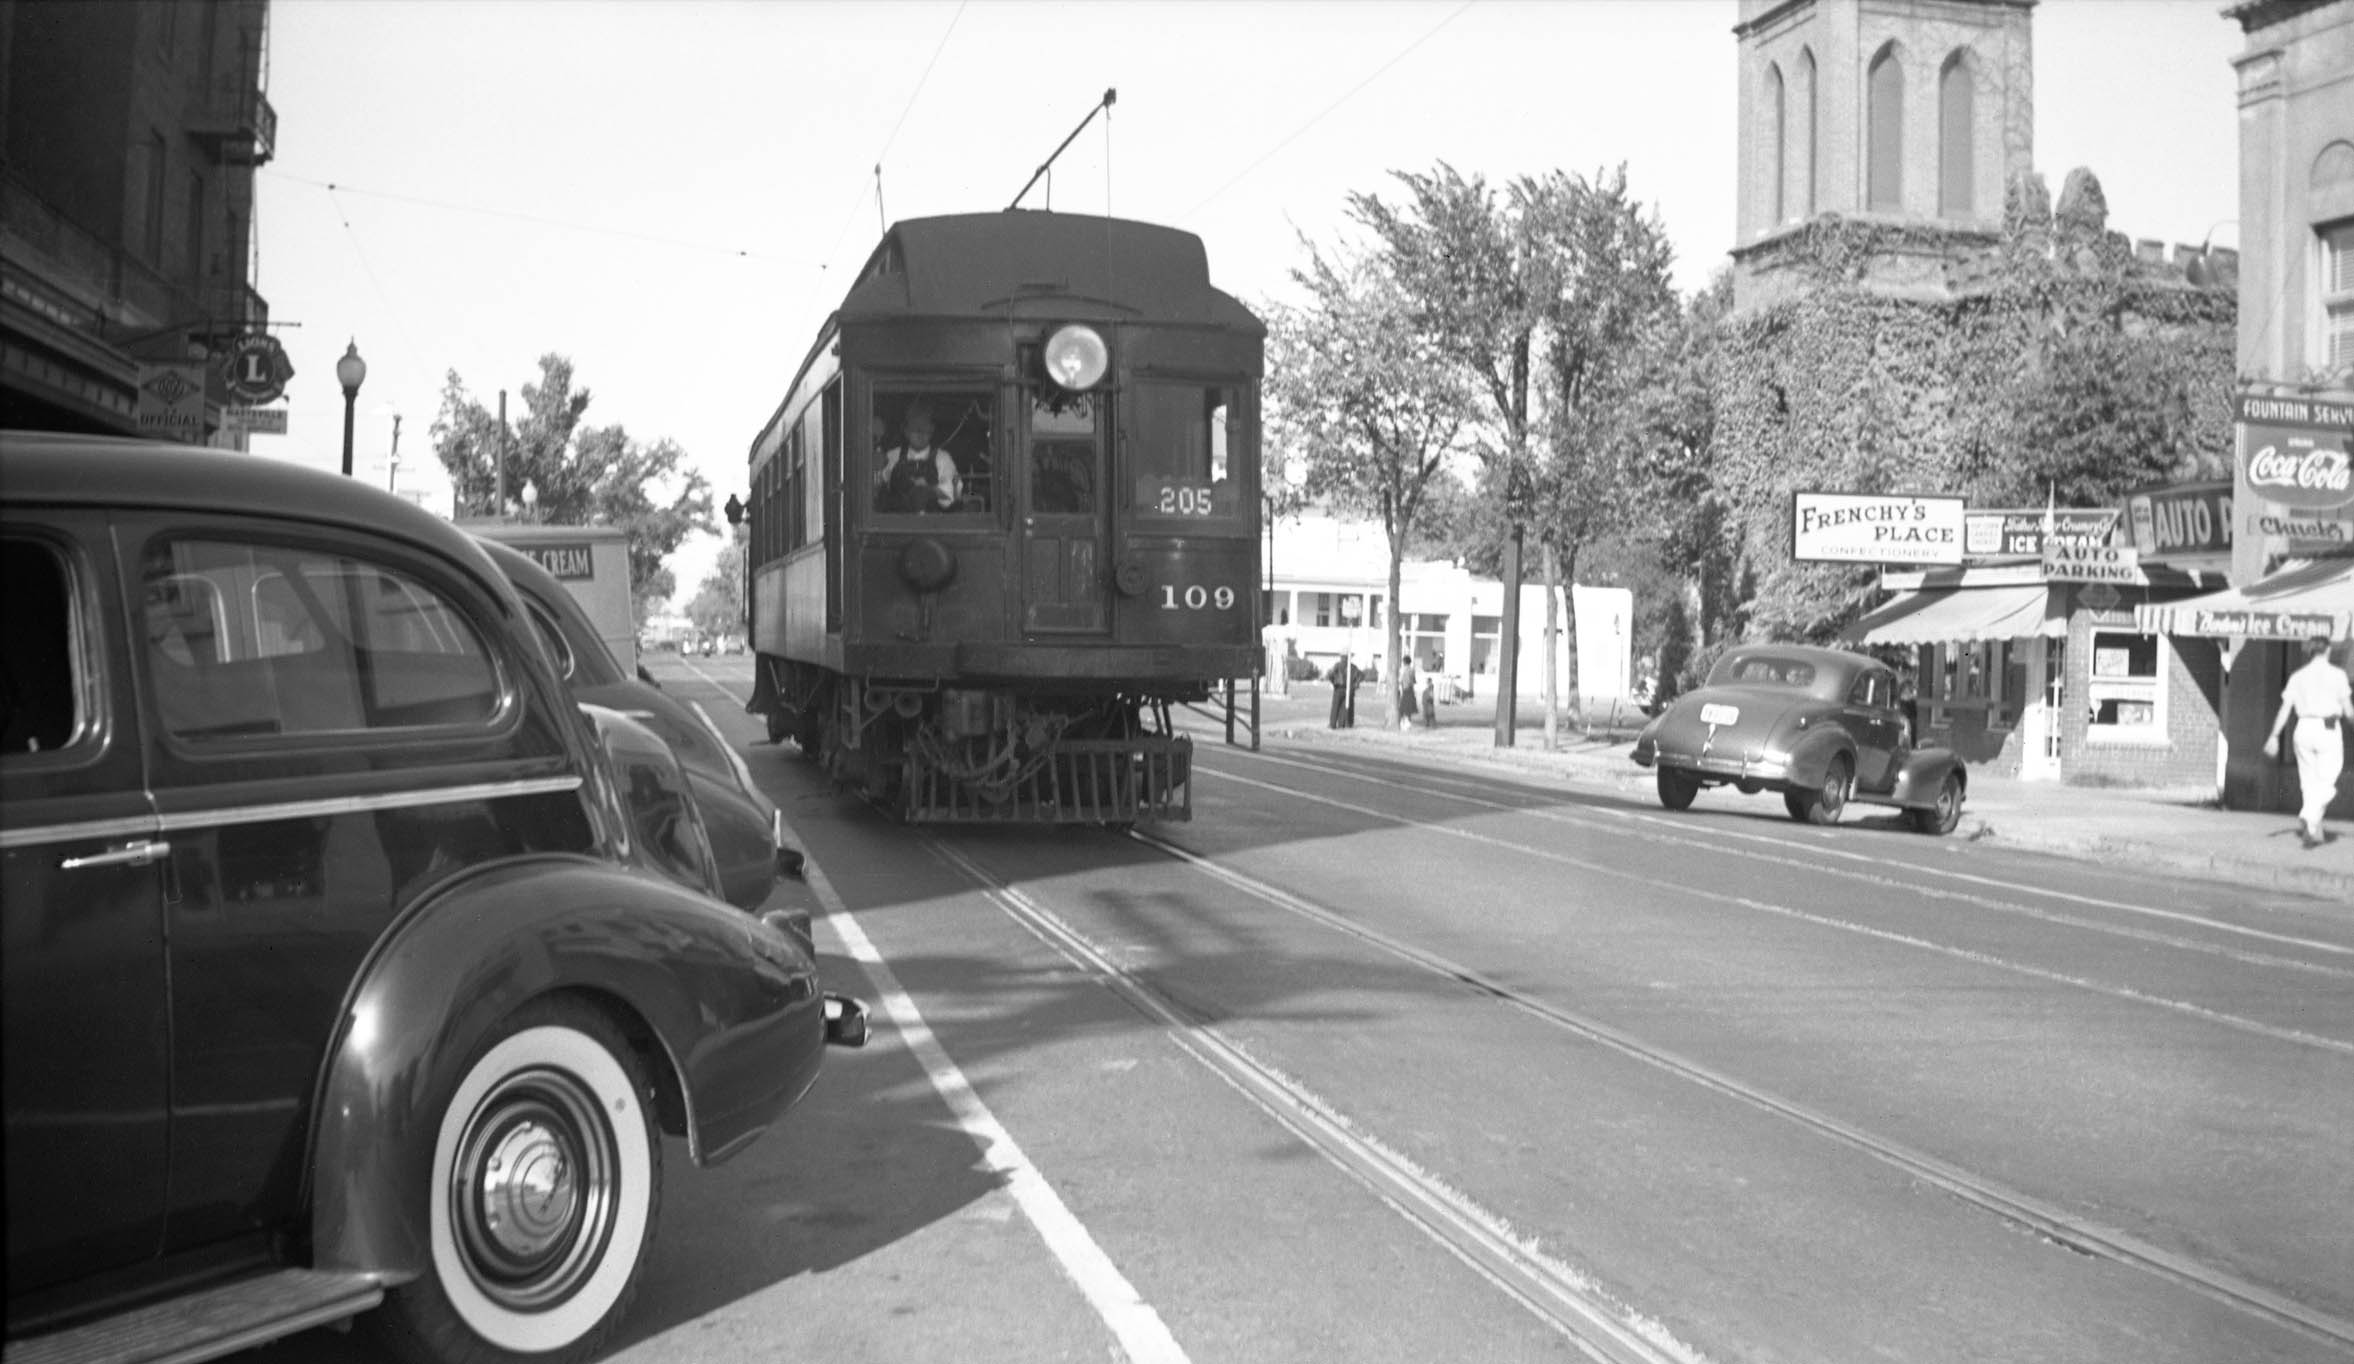
SN 109 handles Colusa service in Sept. 1940 at 5th St. and E St. in this west view. The Hotel Marysville is along the left edge, while Frenchy’s Place alongside St. John’s is the focus on the right edge.
L241-60-Addison Laflin Photo, Courtesy BAERA, Western Railway Museum Archives, 159929sn, (Image 12 of 32)
A very similar west view at 5th St. and E St. with Birney 63 circa 1940 is similar to the last image except the angle here cuts out the church and Frenchy’s Place.
L241-65-Moreau Collection, Courtesy BAERA, Western Railway Museum Archives, 176750sn , (Image 13 of 32)
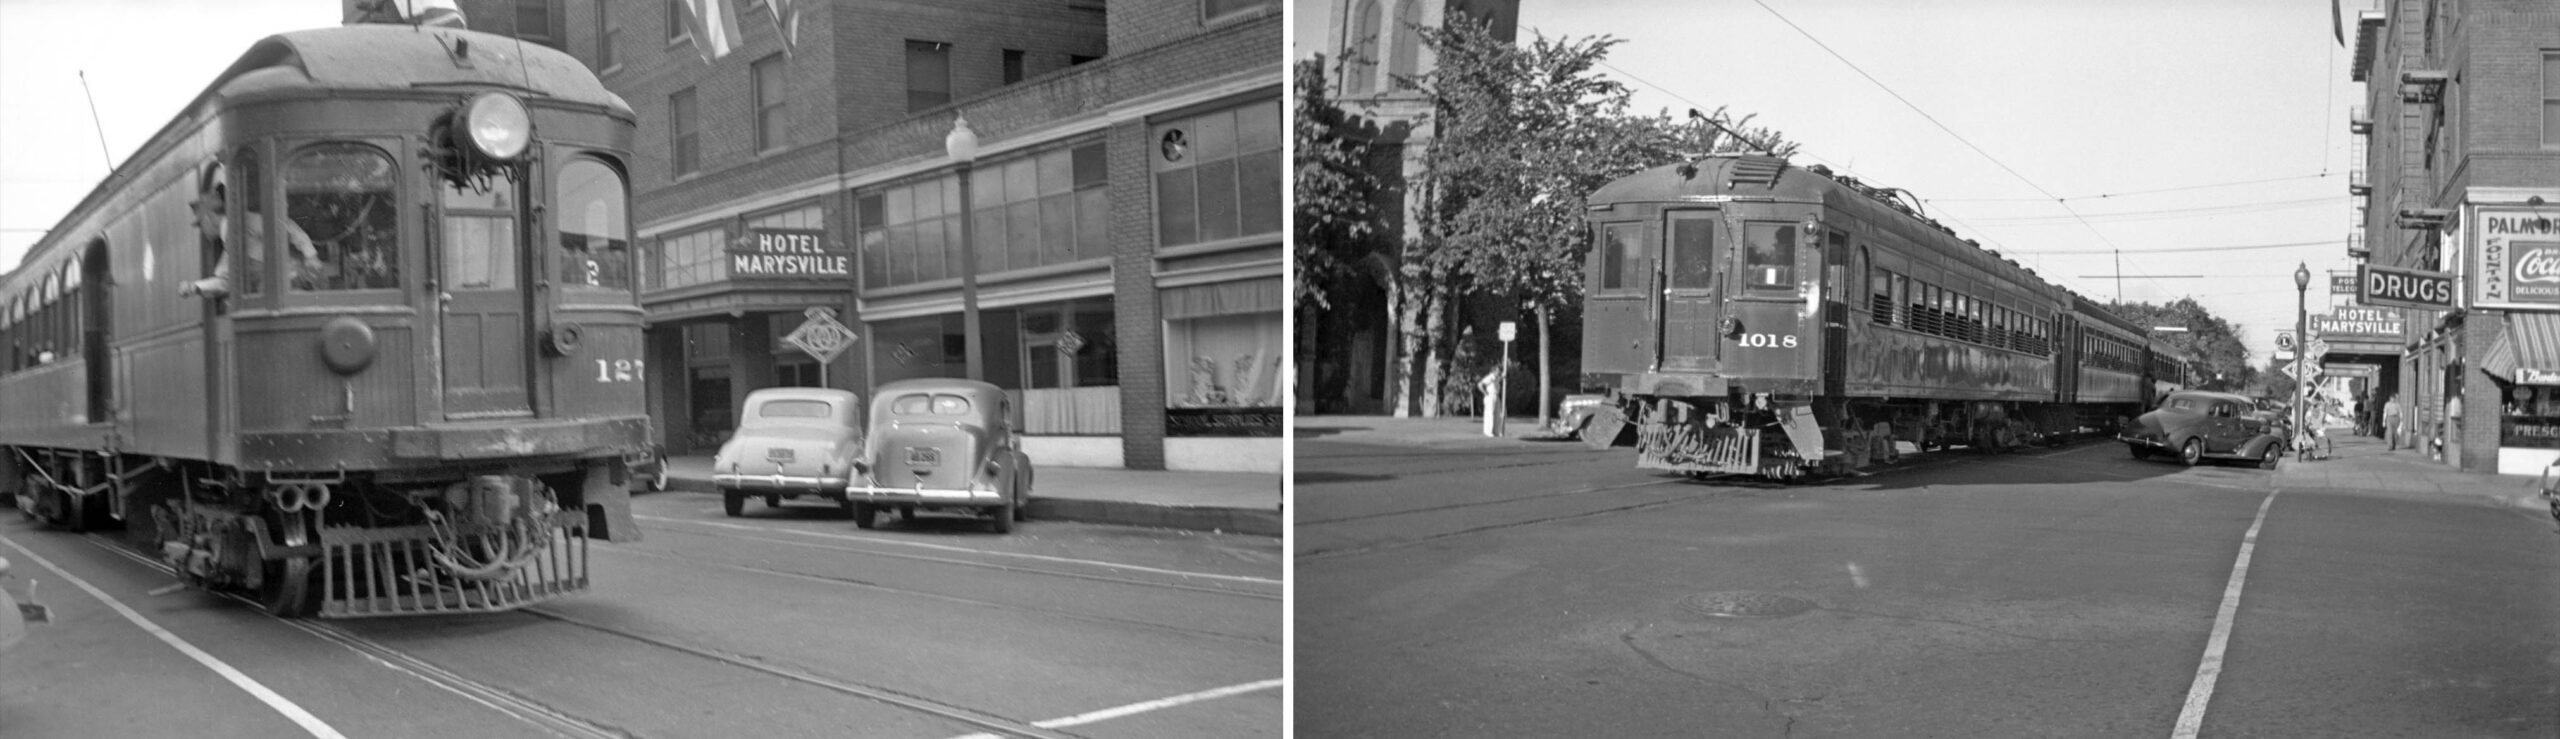
Two views focusing on and around the Hotel Marysville in 1940 are shown here. In the left panel, a southeast view of SN 127, and in the right panel, a northeast view of SN 1018 on the rear of a three-car train.
L241-70-Sappers Collection, Courtesy BAERA, Western Railway Museum Archives, 124681sn, l, 124079sn, , (Image 14 of 32)
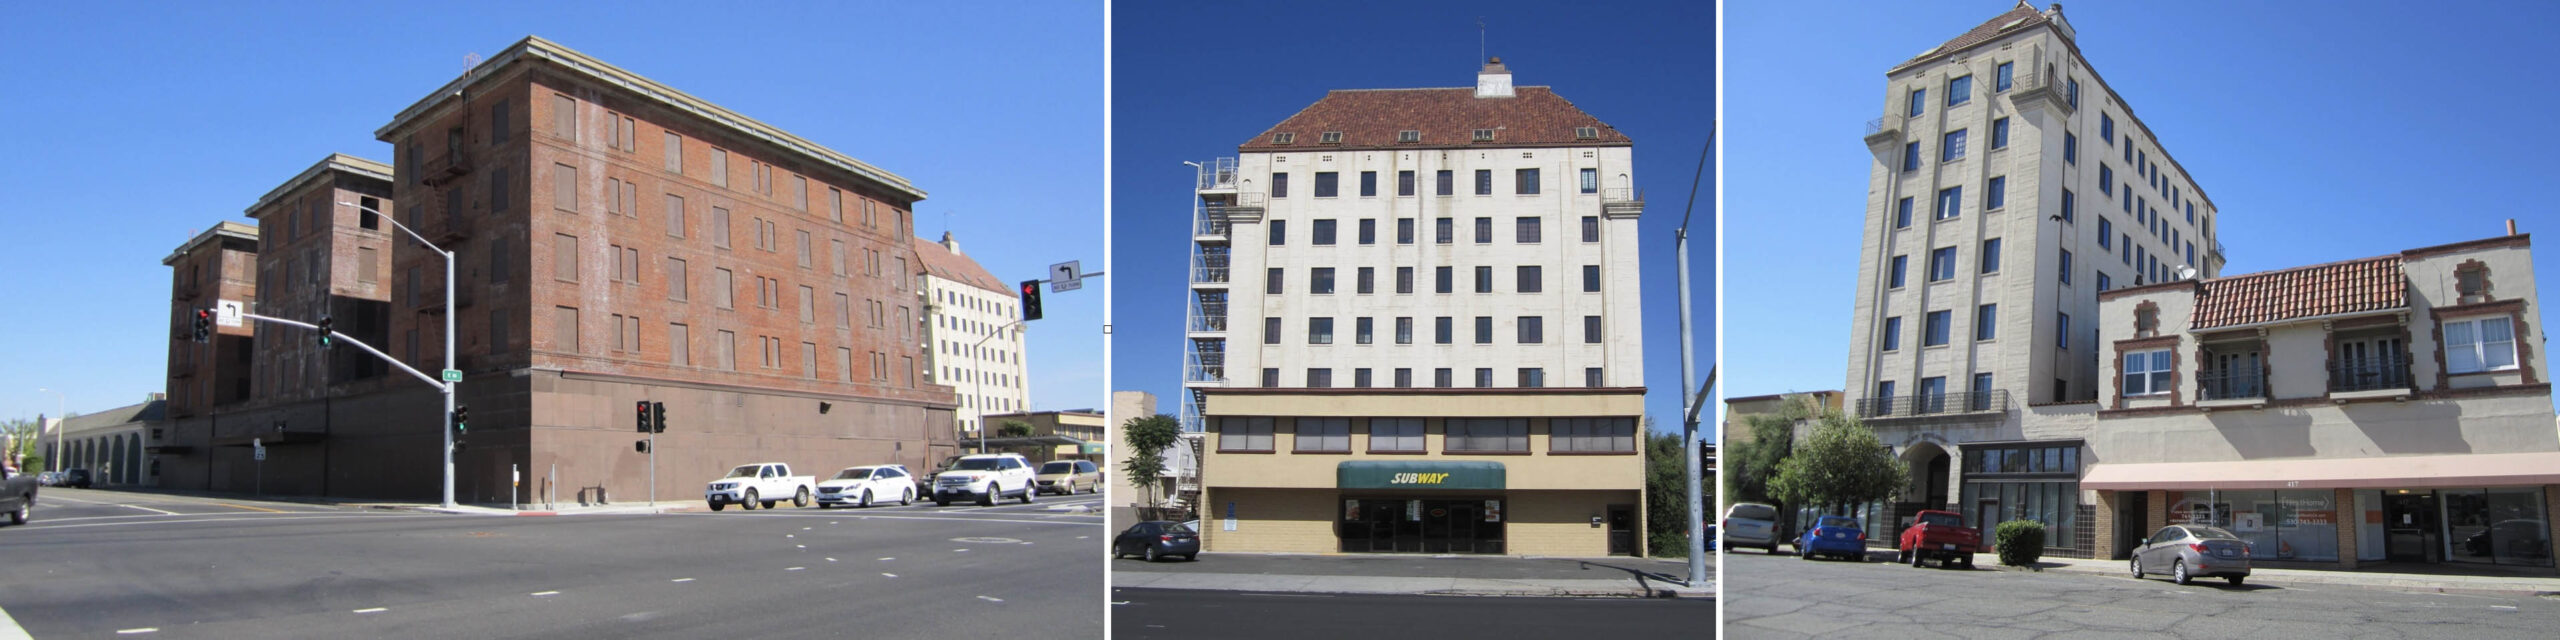
Both built in 1926, the Hotel Marysville at 418-430 5th St., southeast view, left, and the Hart Building, 421-425 4th St., east view center from E St., and from 4th St., north view, right, have experienced opposite fates. The concrete-reinforced hotel has been closed since 1986, the subject of innumerable redevelopment schemes that have not panned out. The Hart Building was designed by Dean and Dean, and is the tallest building in Yuba County. They serve as excellent location markers for panoramic images of the city.
L241-75-Stuart Swiedler Photos, (Image 15 of 32)
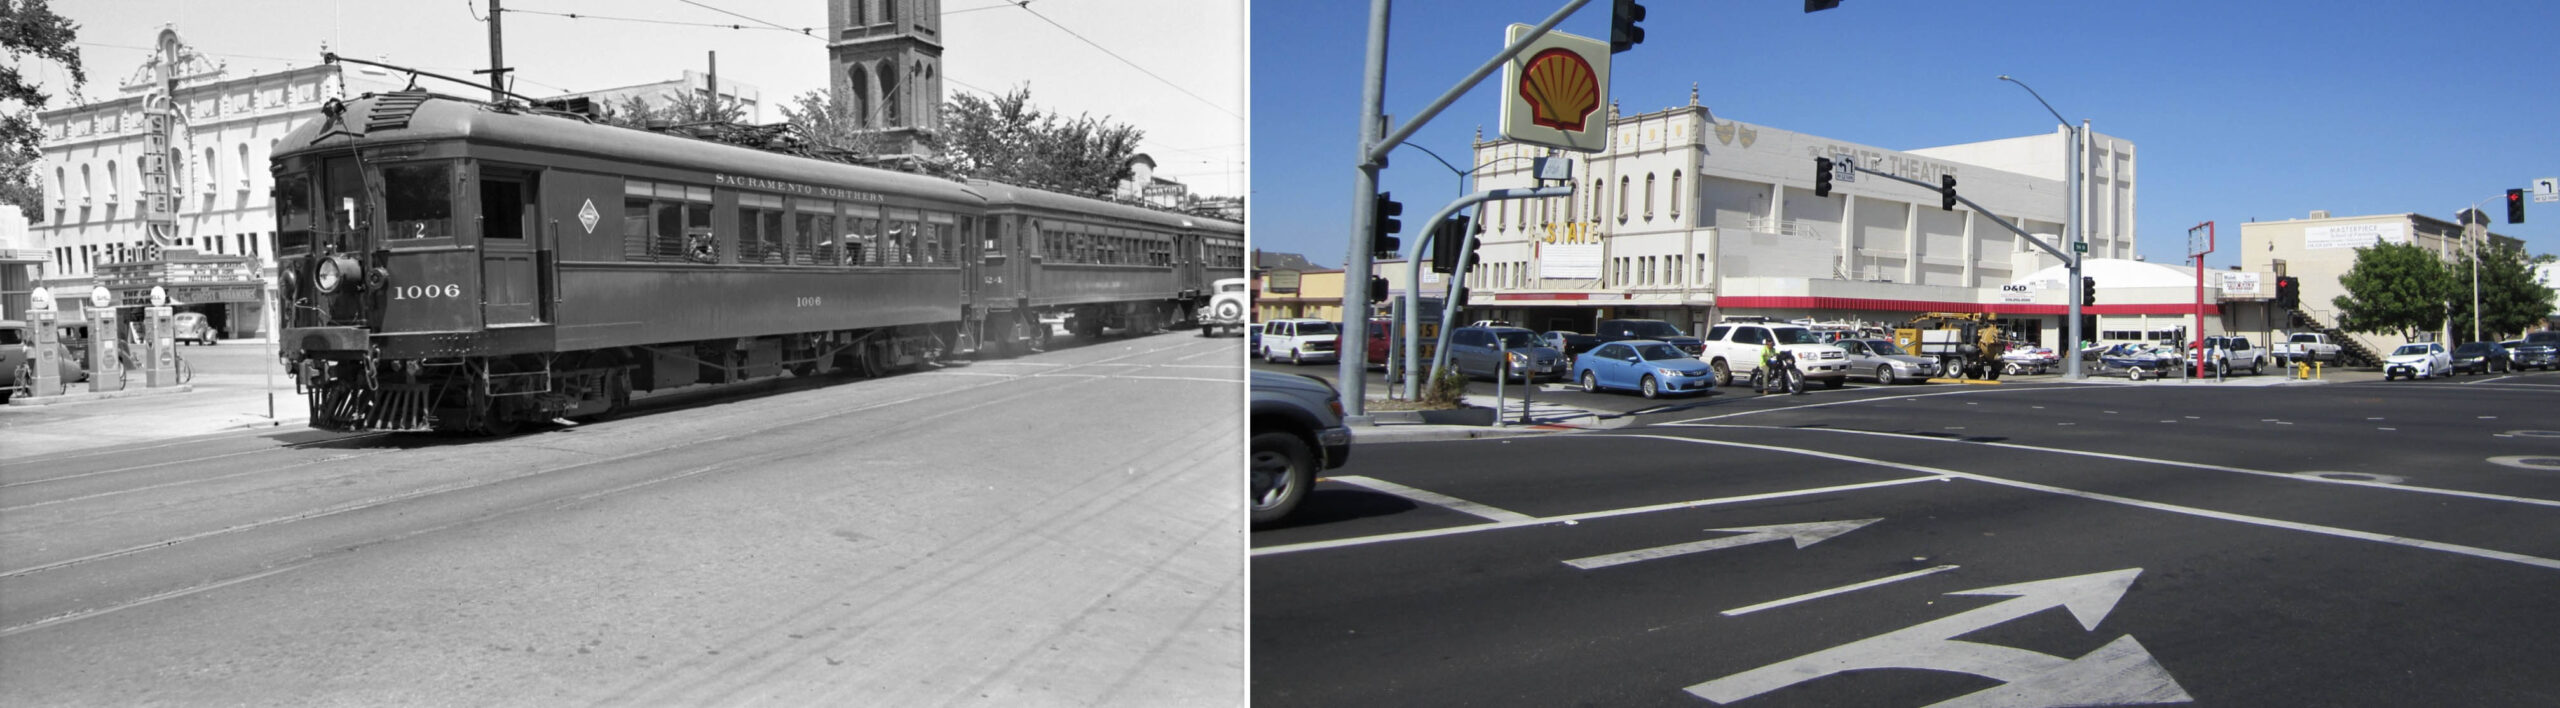
The northeast corner of 5th St. and E St. juxtaposed the St. John’s Episcopal Church with the State Theater, 515 E St., as seen in this northeast view of the Colusa Local circa 1940.
L241-80-Charles Savage Photo, Courtesy BAERA, Western Railway Museum Archives, 9733sn , (Image 16 of 32)
The State Theater was originally called the National Theater, and was built by T and D Enterprises in 1927. In the left panel, this northeast view from June 6, 1940 documents the showing of “The Ghost Breakers”, a comedy starring Bob Hope and Paulette Goddard. The last movie was shown there in 1996. The same view in 2018, right panel.
L241-85-Charles Savage Photo, Courtesy BAERA, Western Railway Museum Archives, 9927sn, (Image 17 of 32)
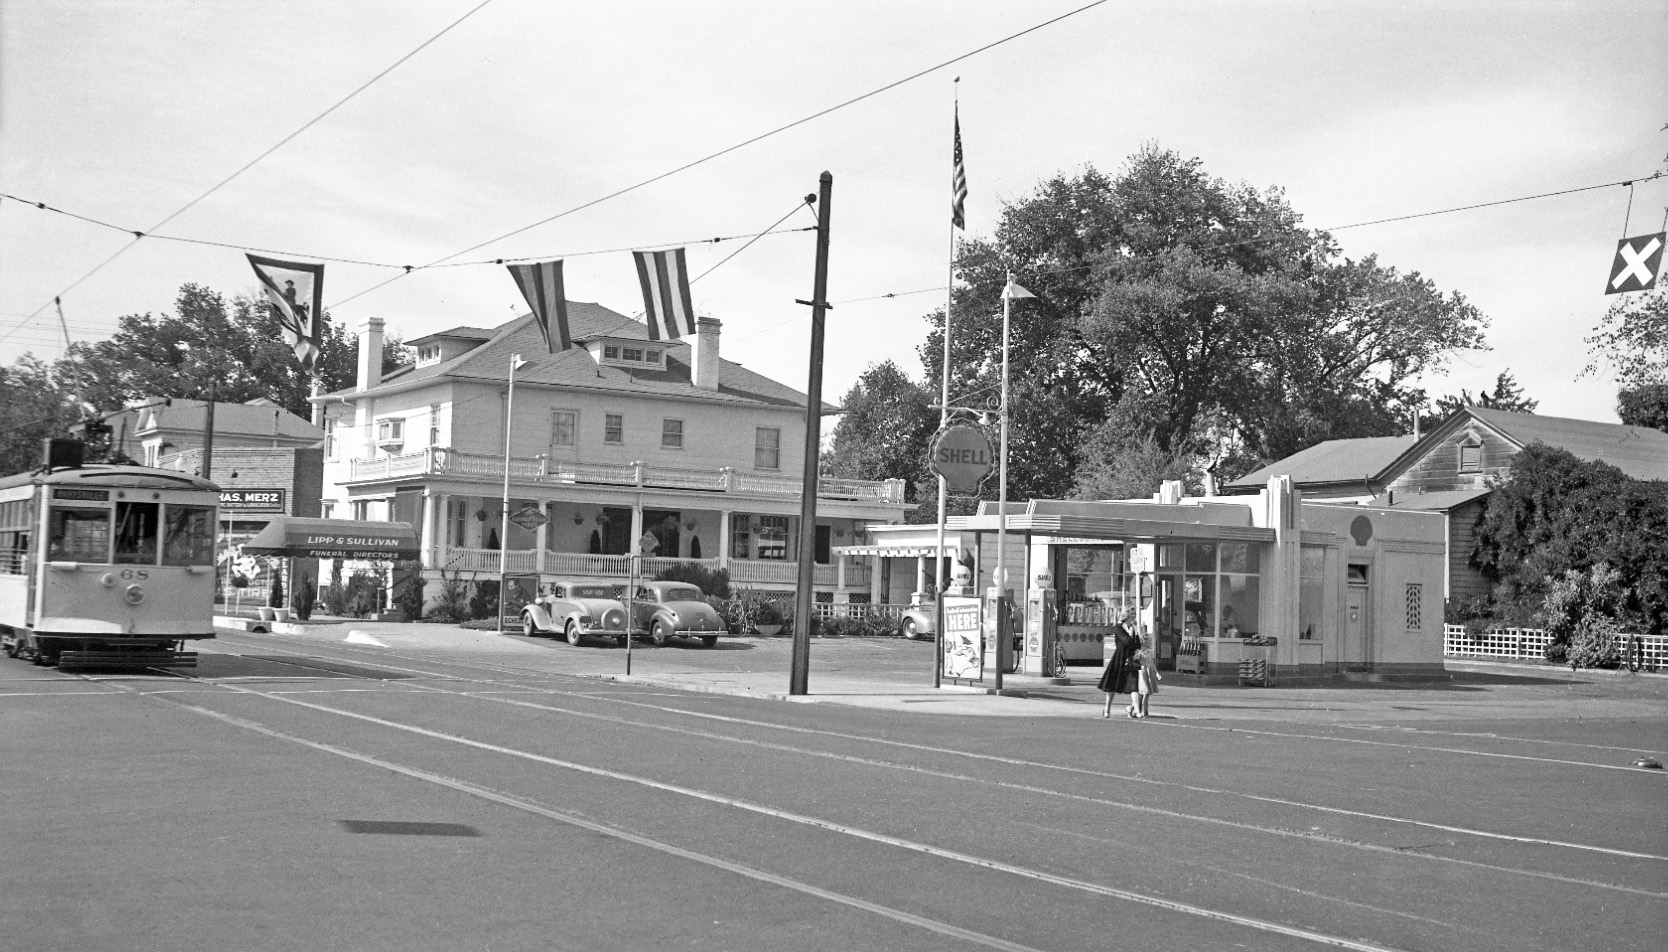
Once past E St., the north side of 5th St. sported a gas station as it does in 2021, and to the west, long gone Lipp and Sullivan Funeral Home and Chas. Merz tire store, as seen in this southwest view of Birney 68 from 1942.
L241-90-Sappers Collection, Courtesy BAERA, Western Railway Museum Archives, 107315sn , (Image 18 of 32)
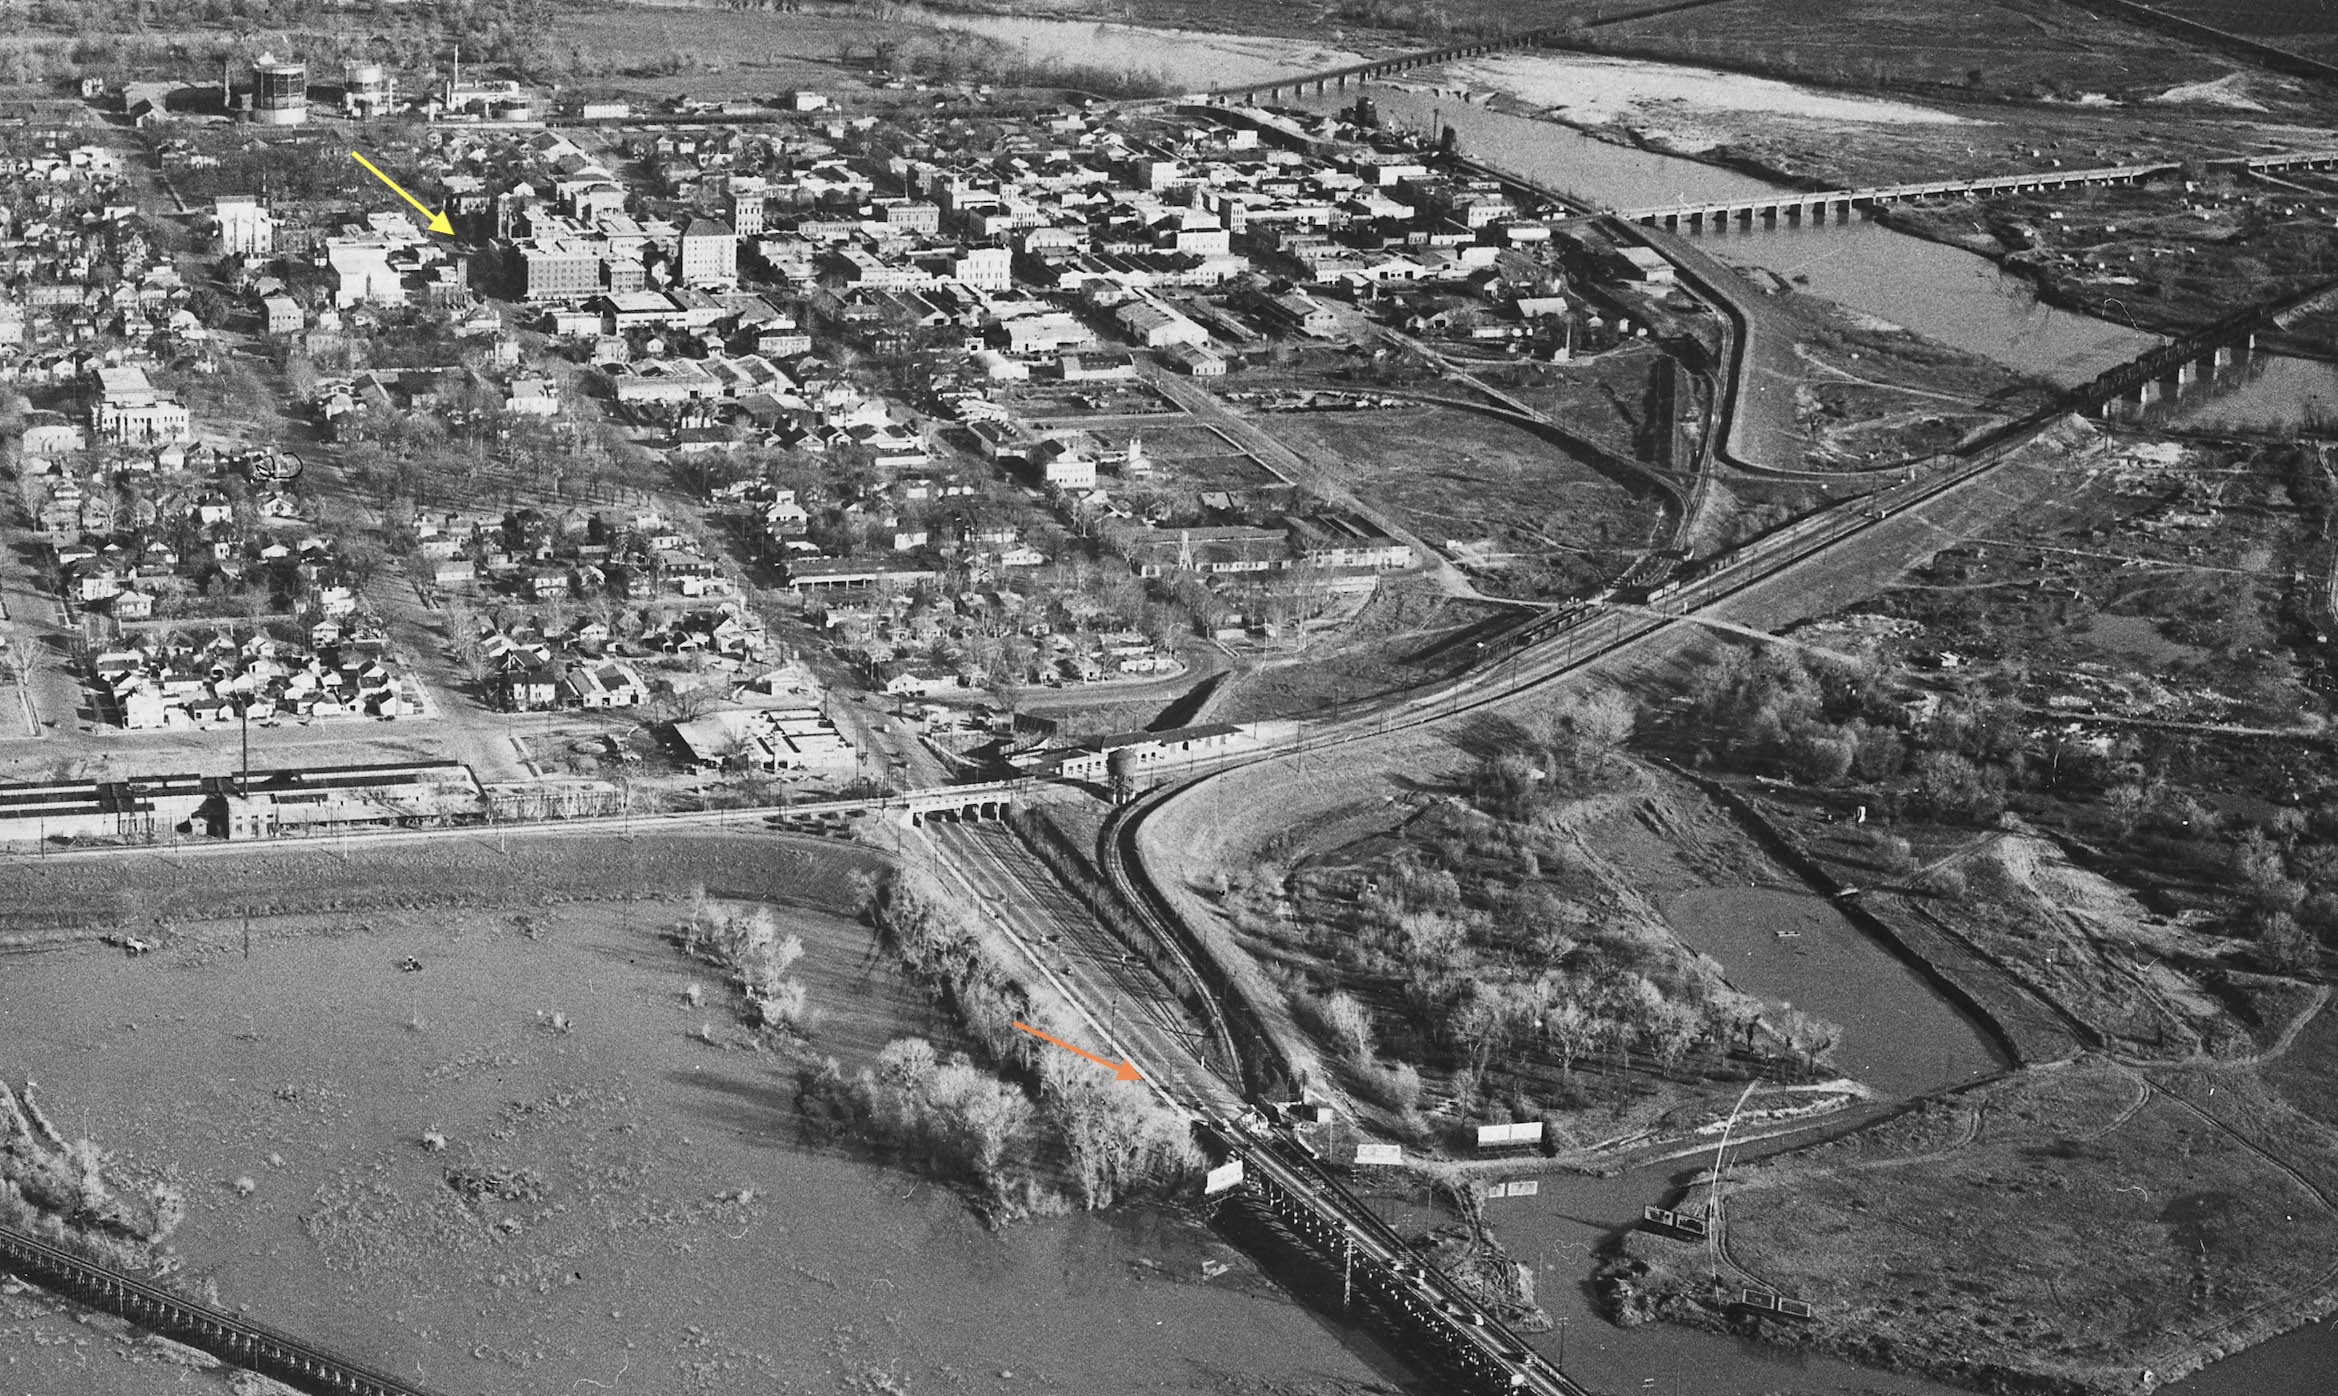
West from this point, these two aerial views show that the major landmark was Napoleon Square Park between G and H Sts., orange line. In 2000, the park was renamed Veterans Park. Ref: Left, Dorothea Lange Photo, U.S. National Archives and Records Administration, NARA-521573; Copyright California. Department of Transportation, 4724-14, 12/24/1955, right
L241-95-Courtesy U.S. NARA, and Copyright California Department of Transportation, (Image 19 of 32)
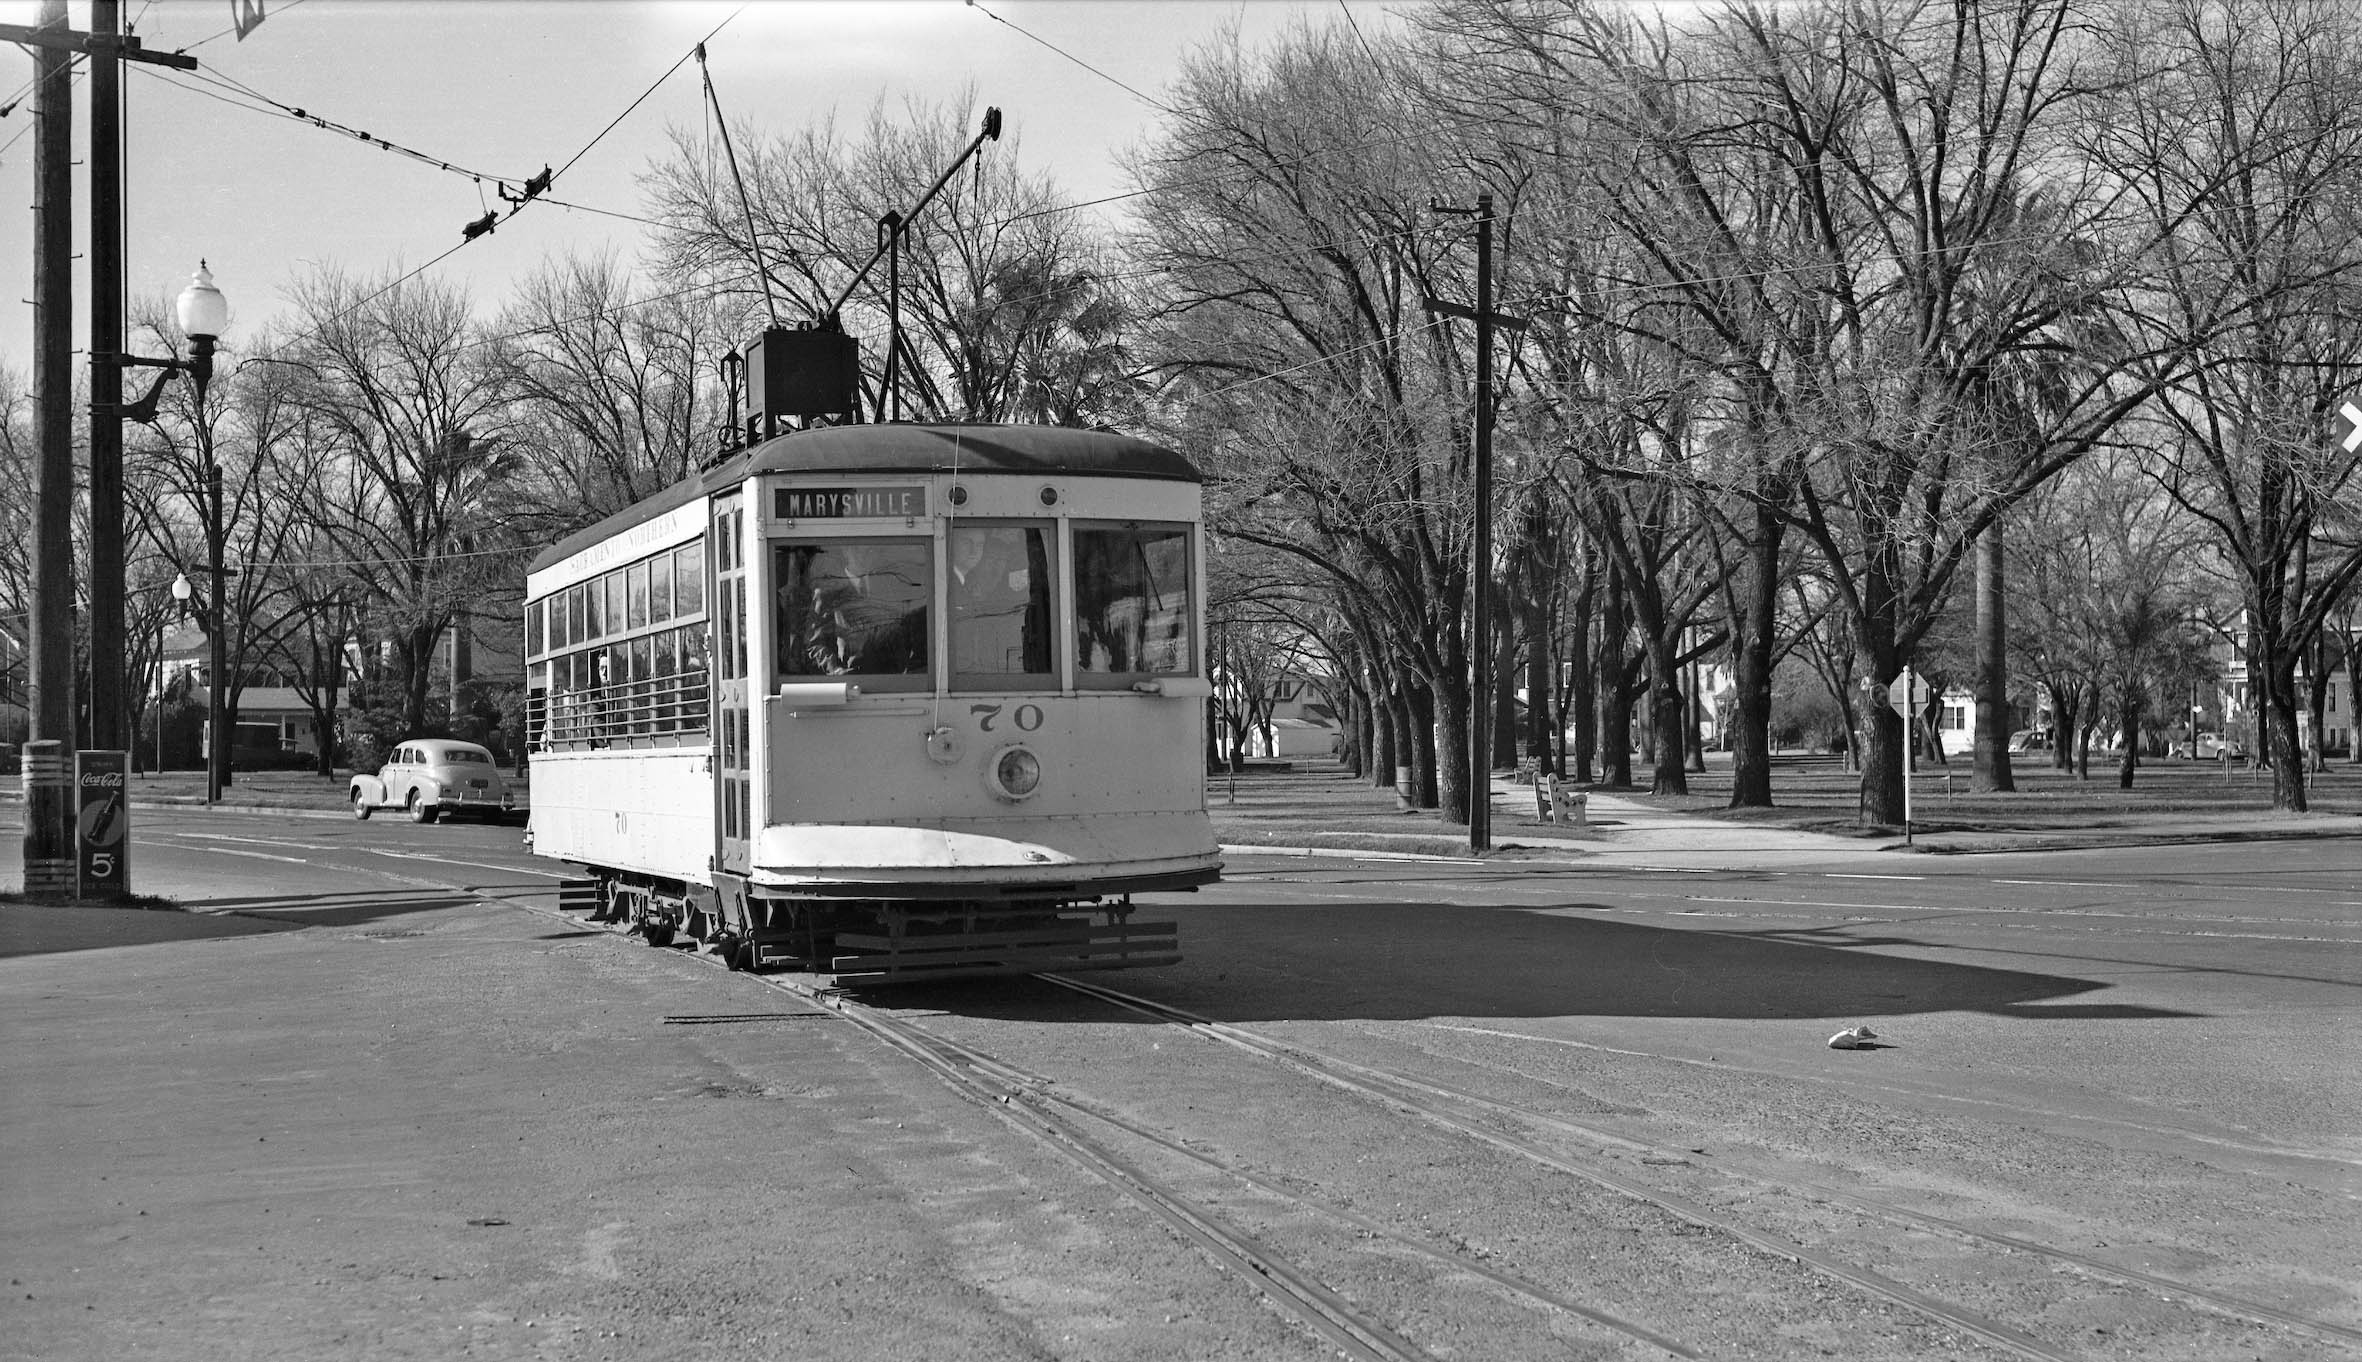
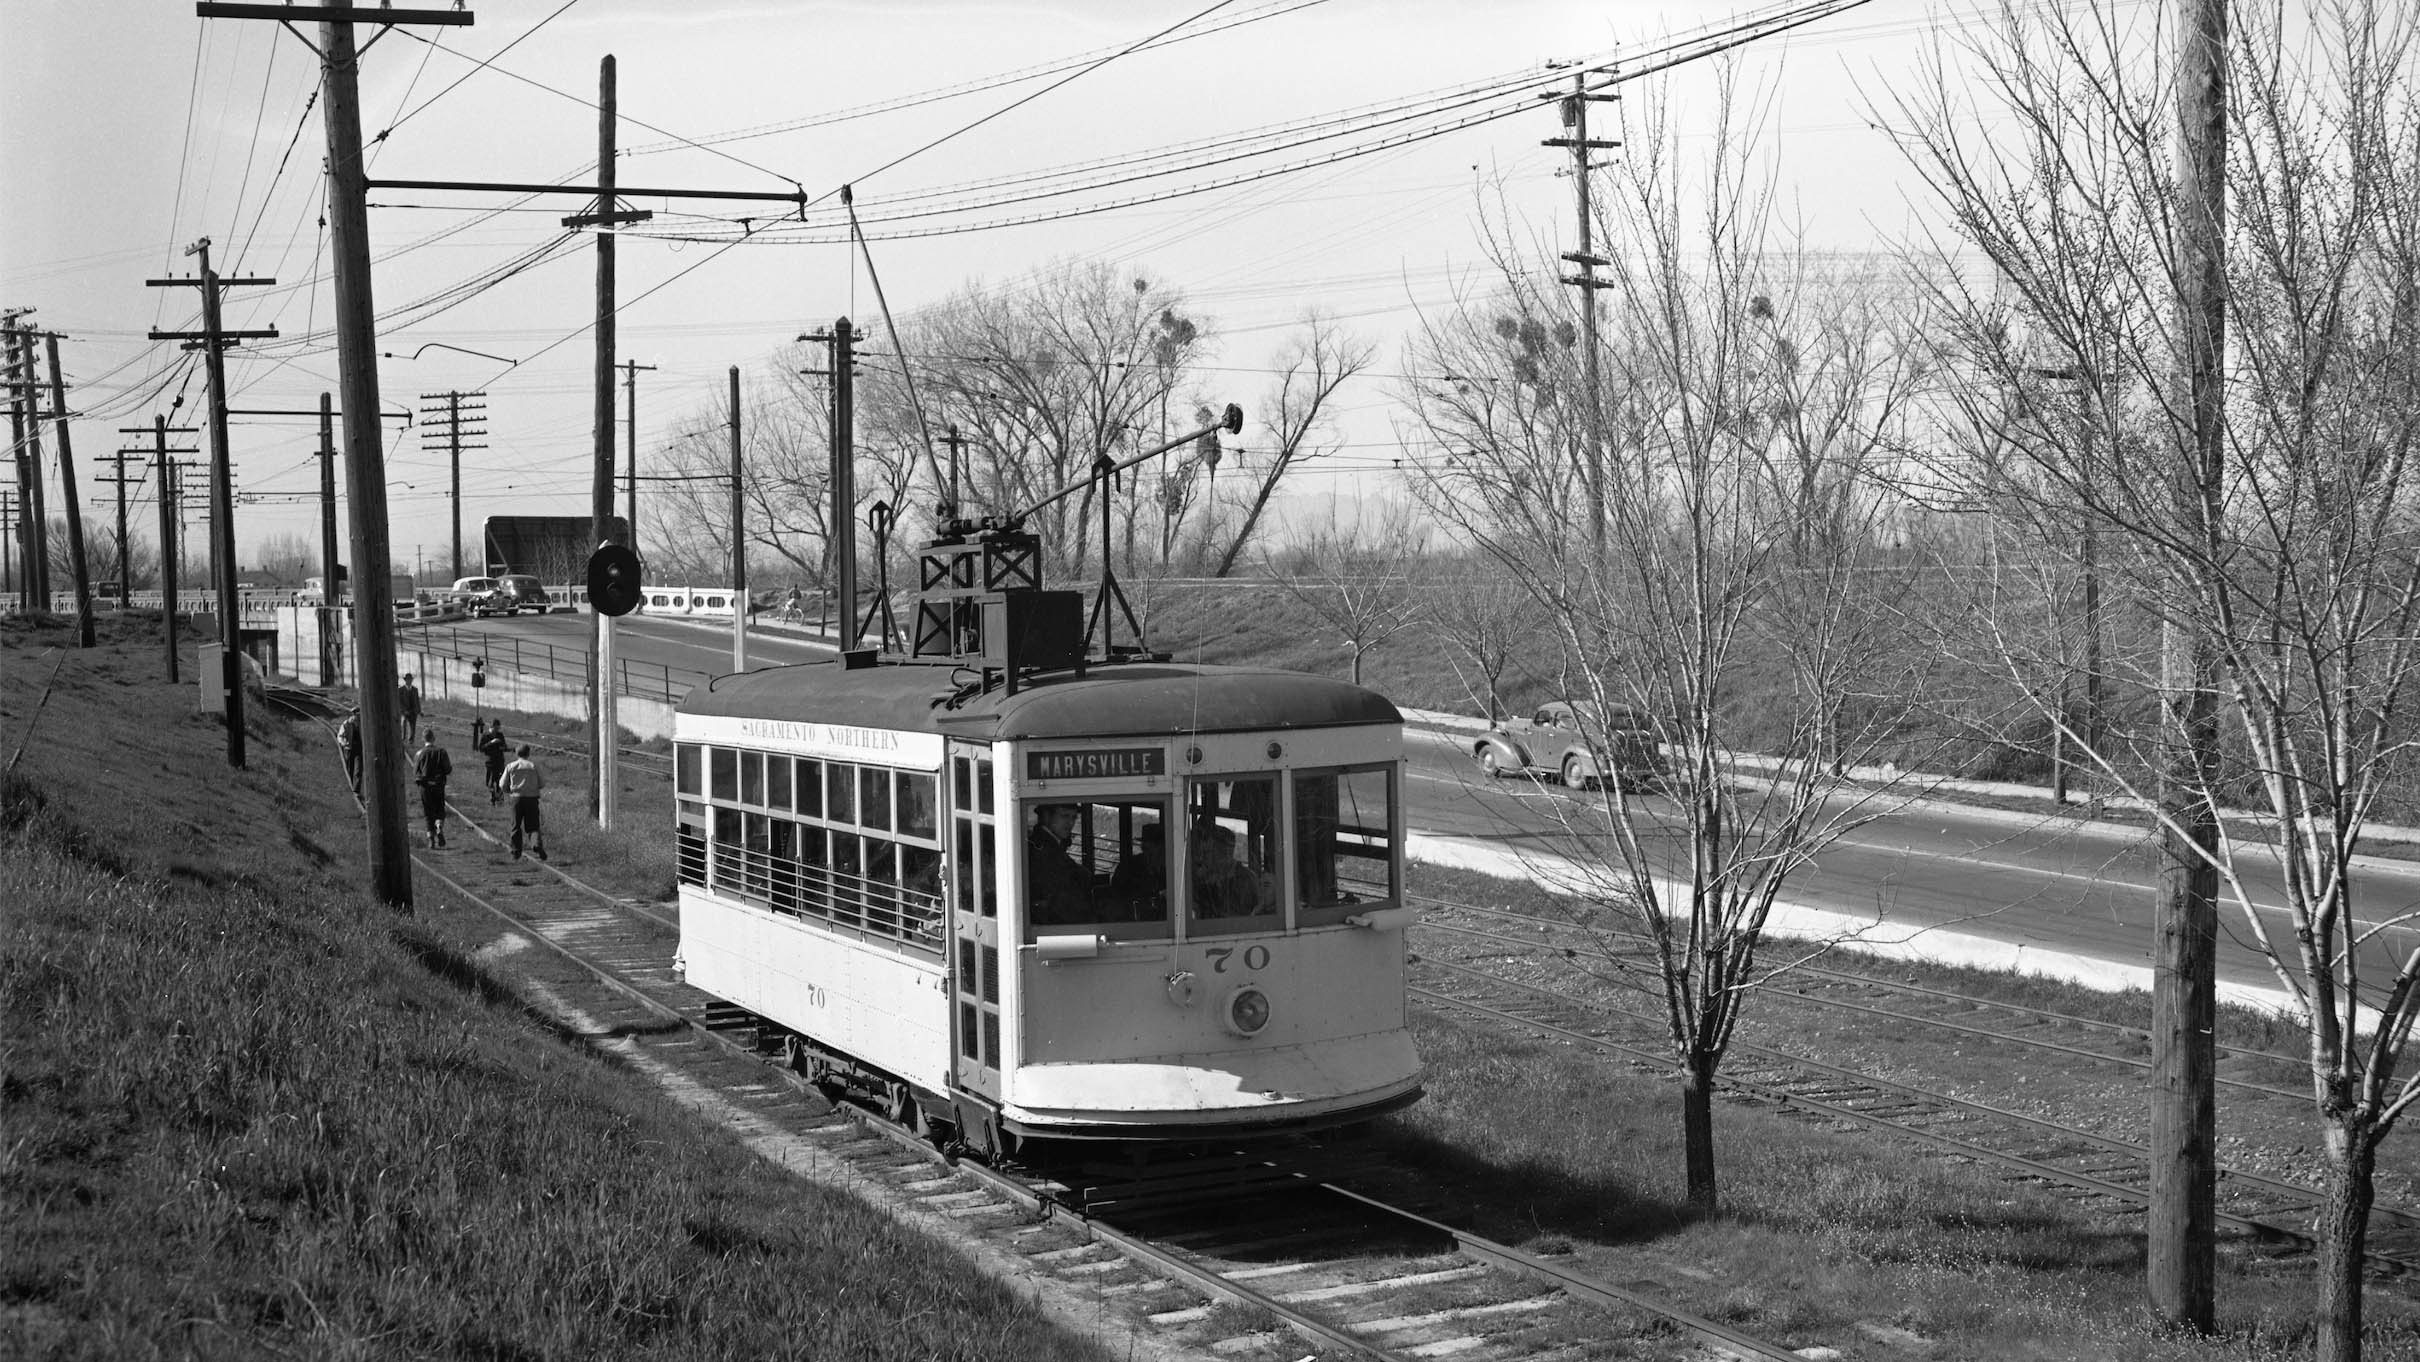
Just east of G St. was the switch track to the Orange St. connector to the SN-WP, Western Pacific, yards, freight depot and the SN Marysville passenger station. In this northwest view, Birney 70 takes the switch for the connector during the last day of operation, Feb. 15, 1942.
L241-100-Arthur Lloyd Photo Courtesy BAERA, Western Railway Museum Archives, 129784sn, (Image 20 of 32)
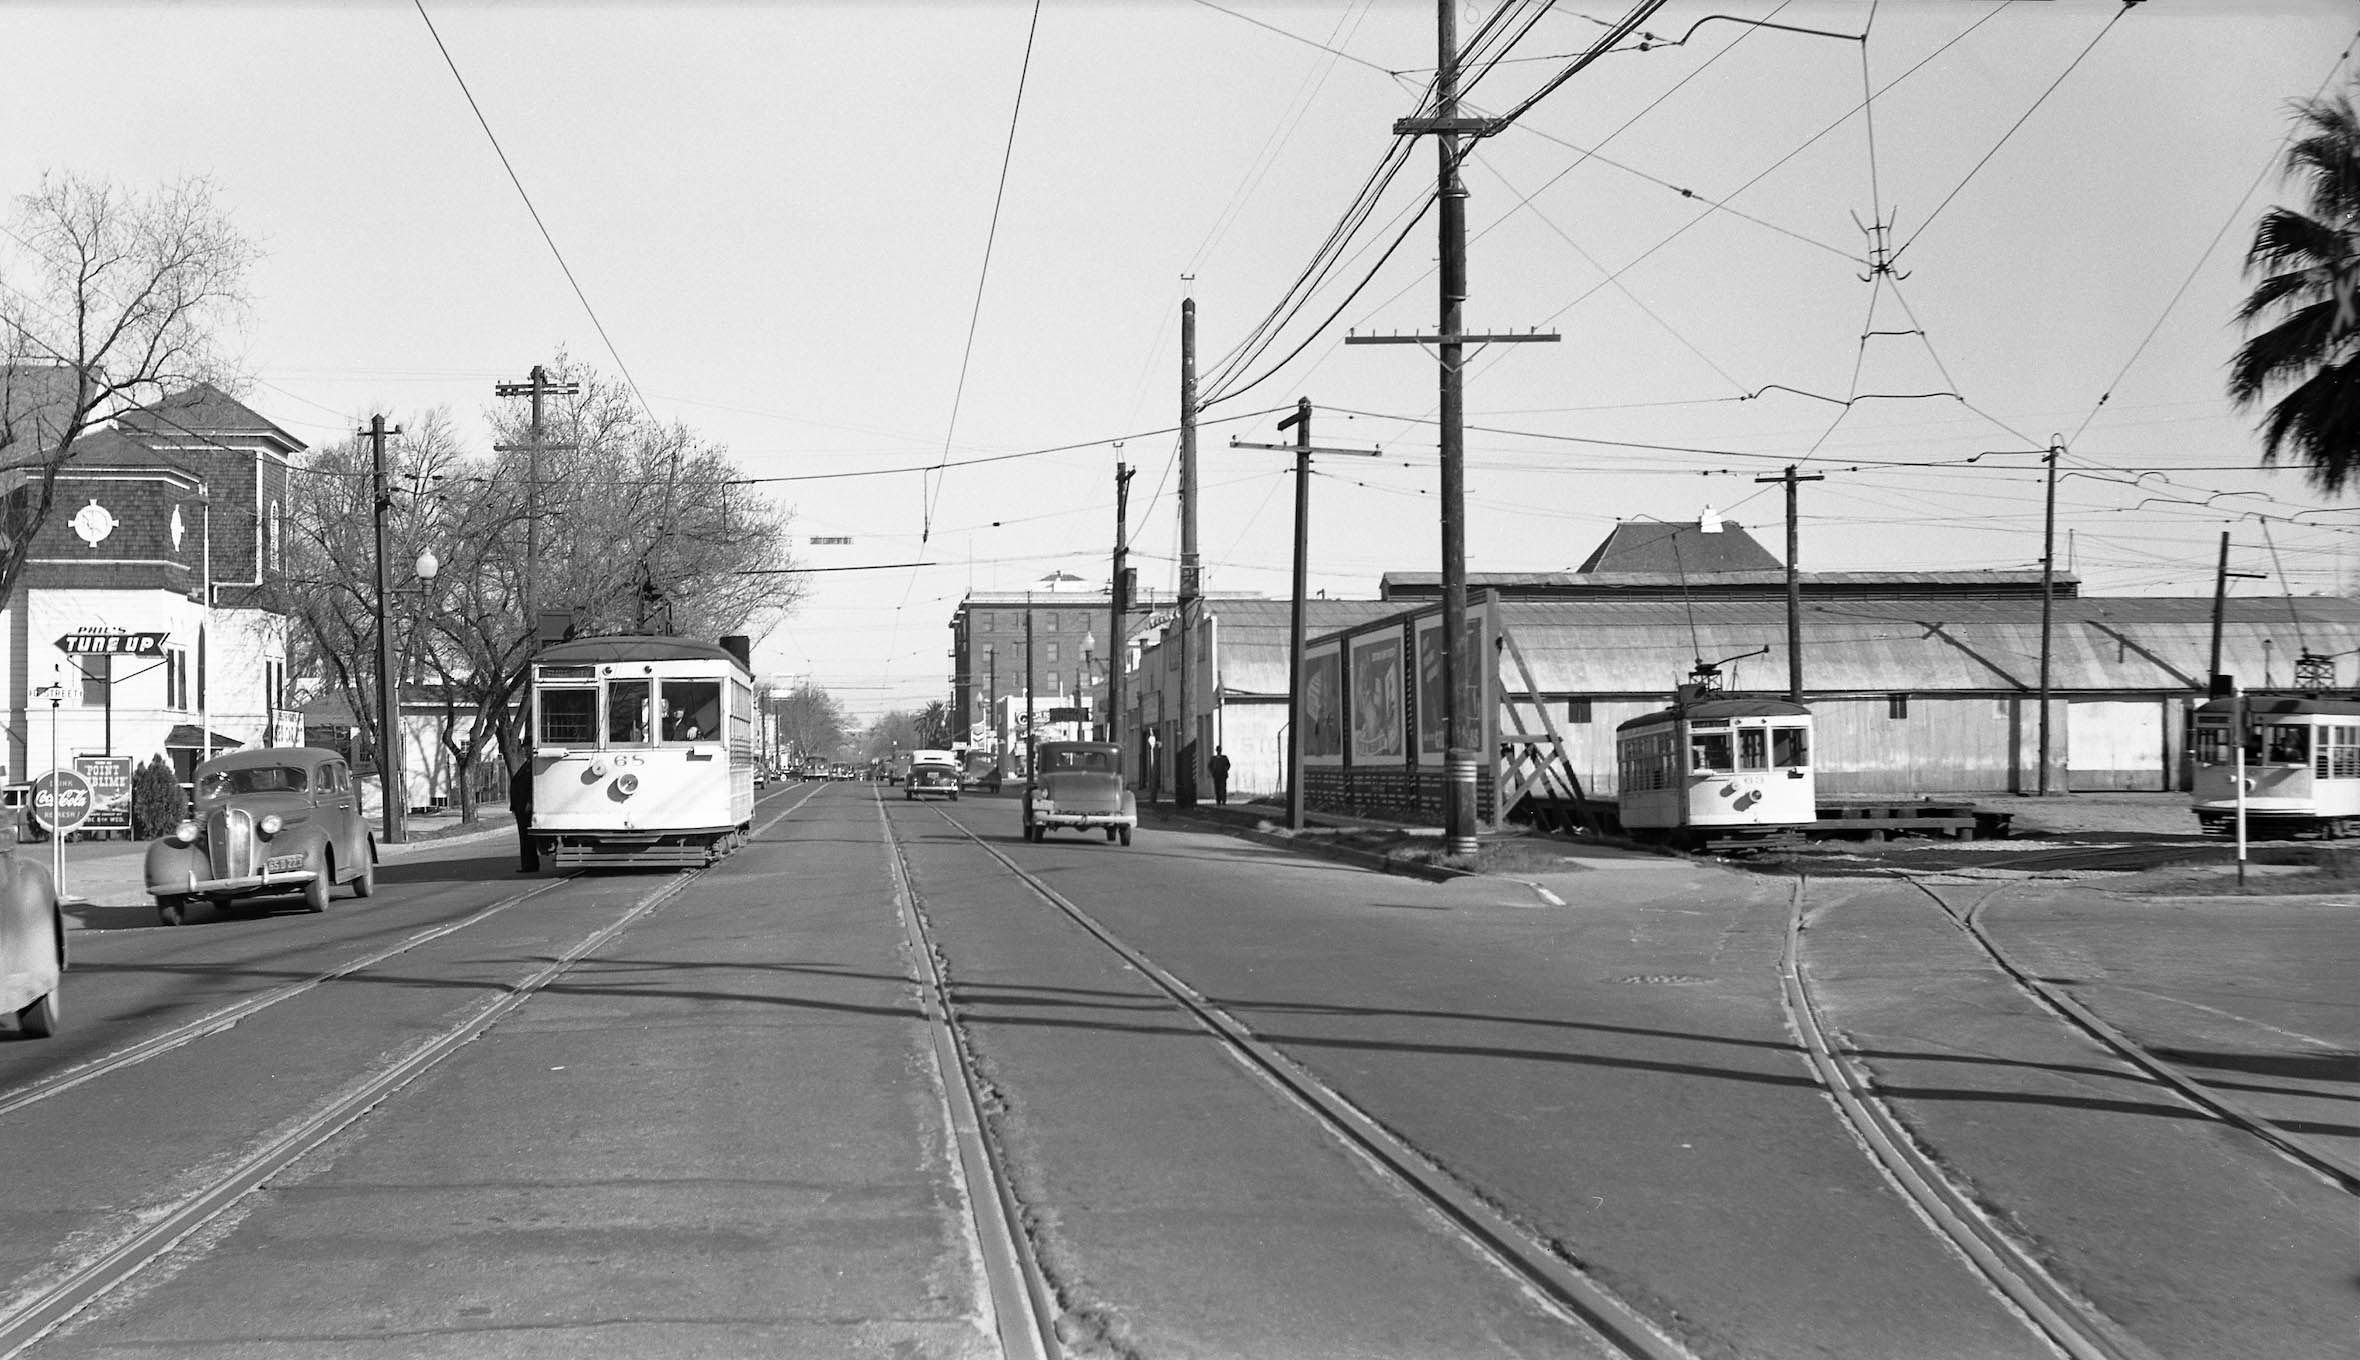
Complementing the last image, this east view near Phil’s Tune Up at G St. captures the connector spur and three Birney cars, 68-63-70 on Feb. 15, 1942. A detailed review of connector will be presented next time.
L241-105-Louis Bradas, Jr. Photo, Courtesy BAERA, Western Railway Museum Archives 69137sn, (Image 21 of 32)
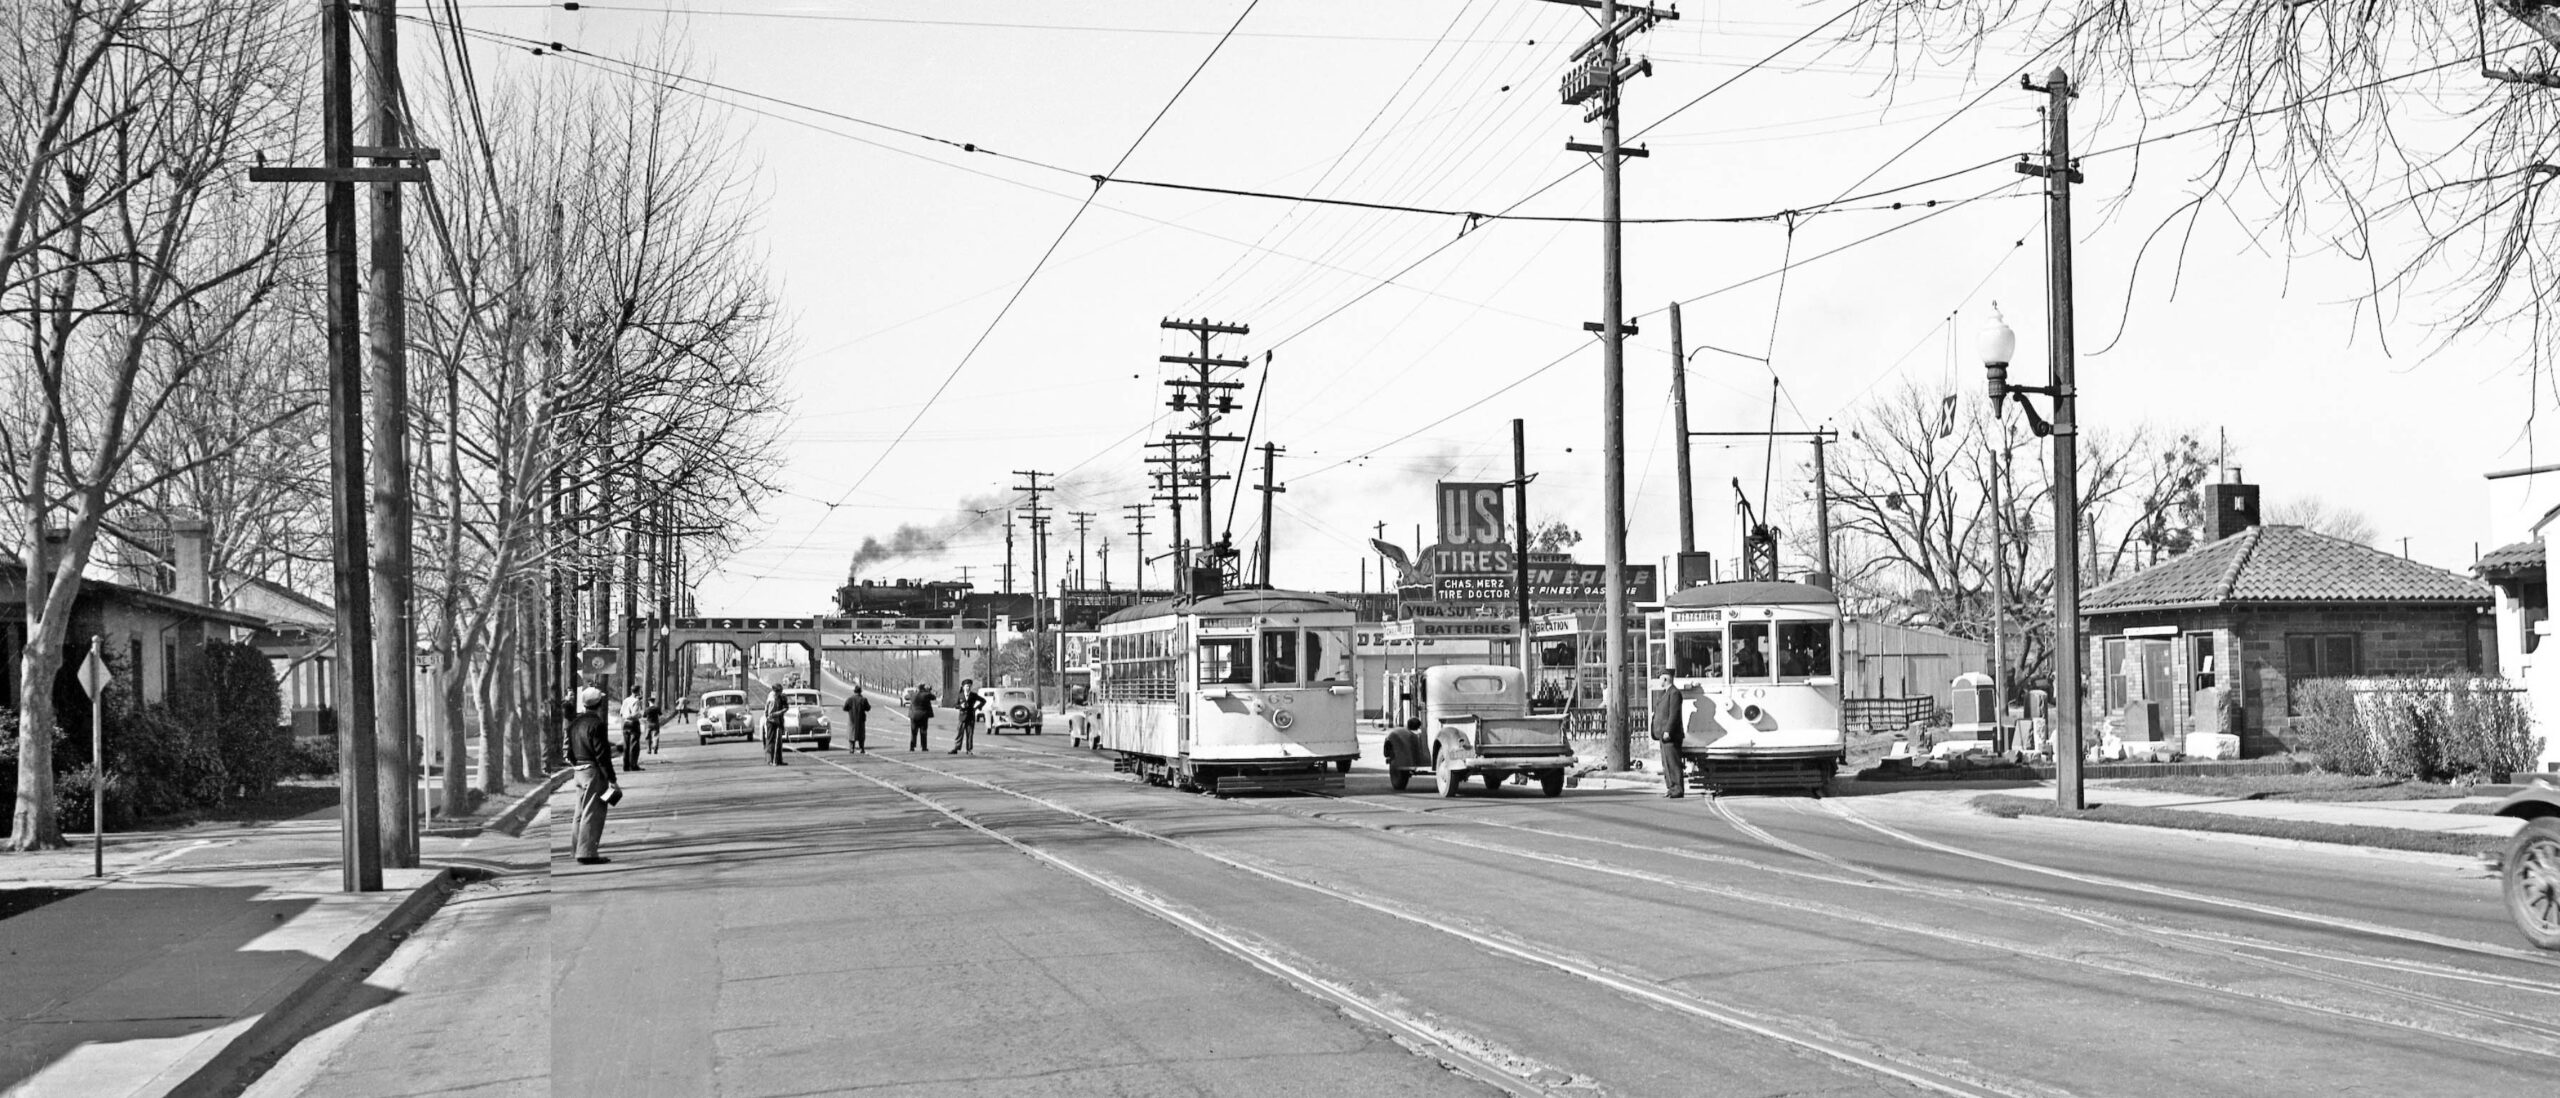
On the same day, Feb. 15, 1942, W.W. Nelson, SN Superintendent of Transportation, moves out of the way of oncoming Birney 70 from the connector as it joins Birney 68 on 5th St. in this northeast view.
L241-110-Addison Laflin Photo, Courtesy BAERA, Western Railway Museum Archives, 166755sn , (Image 22 of 32)
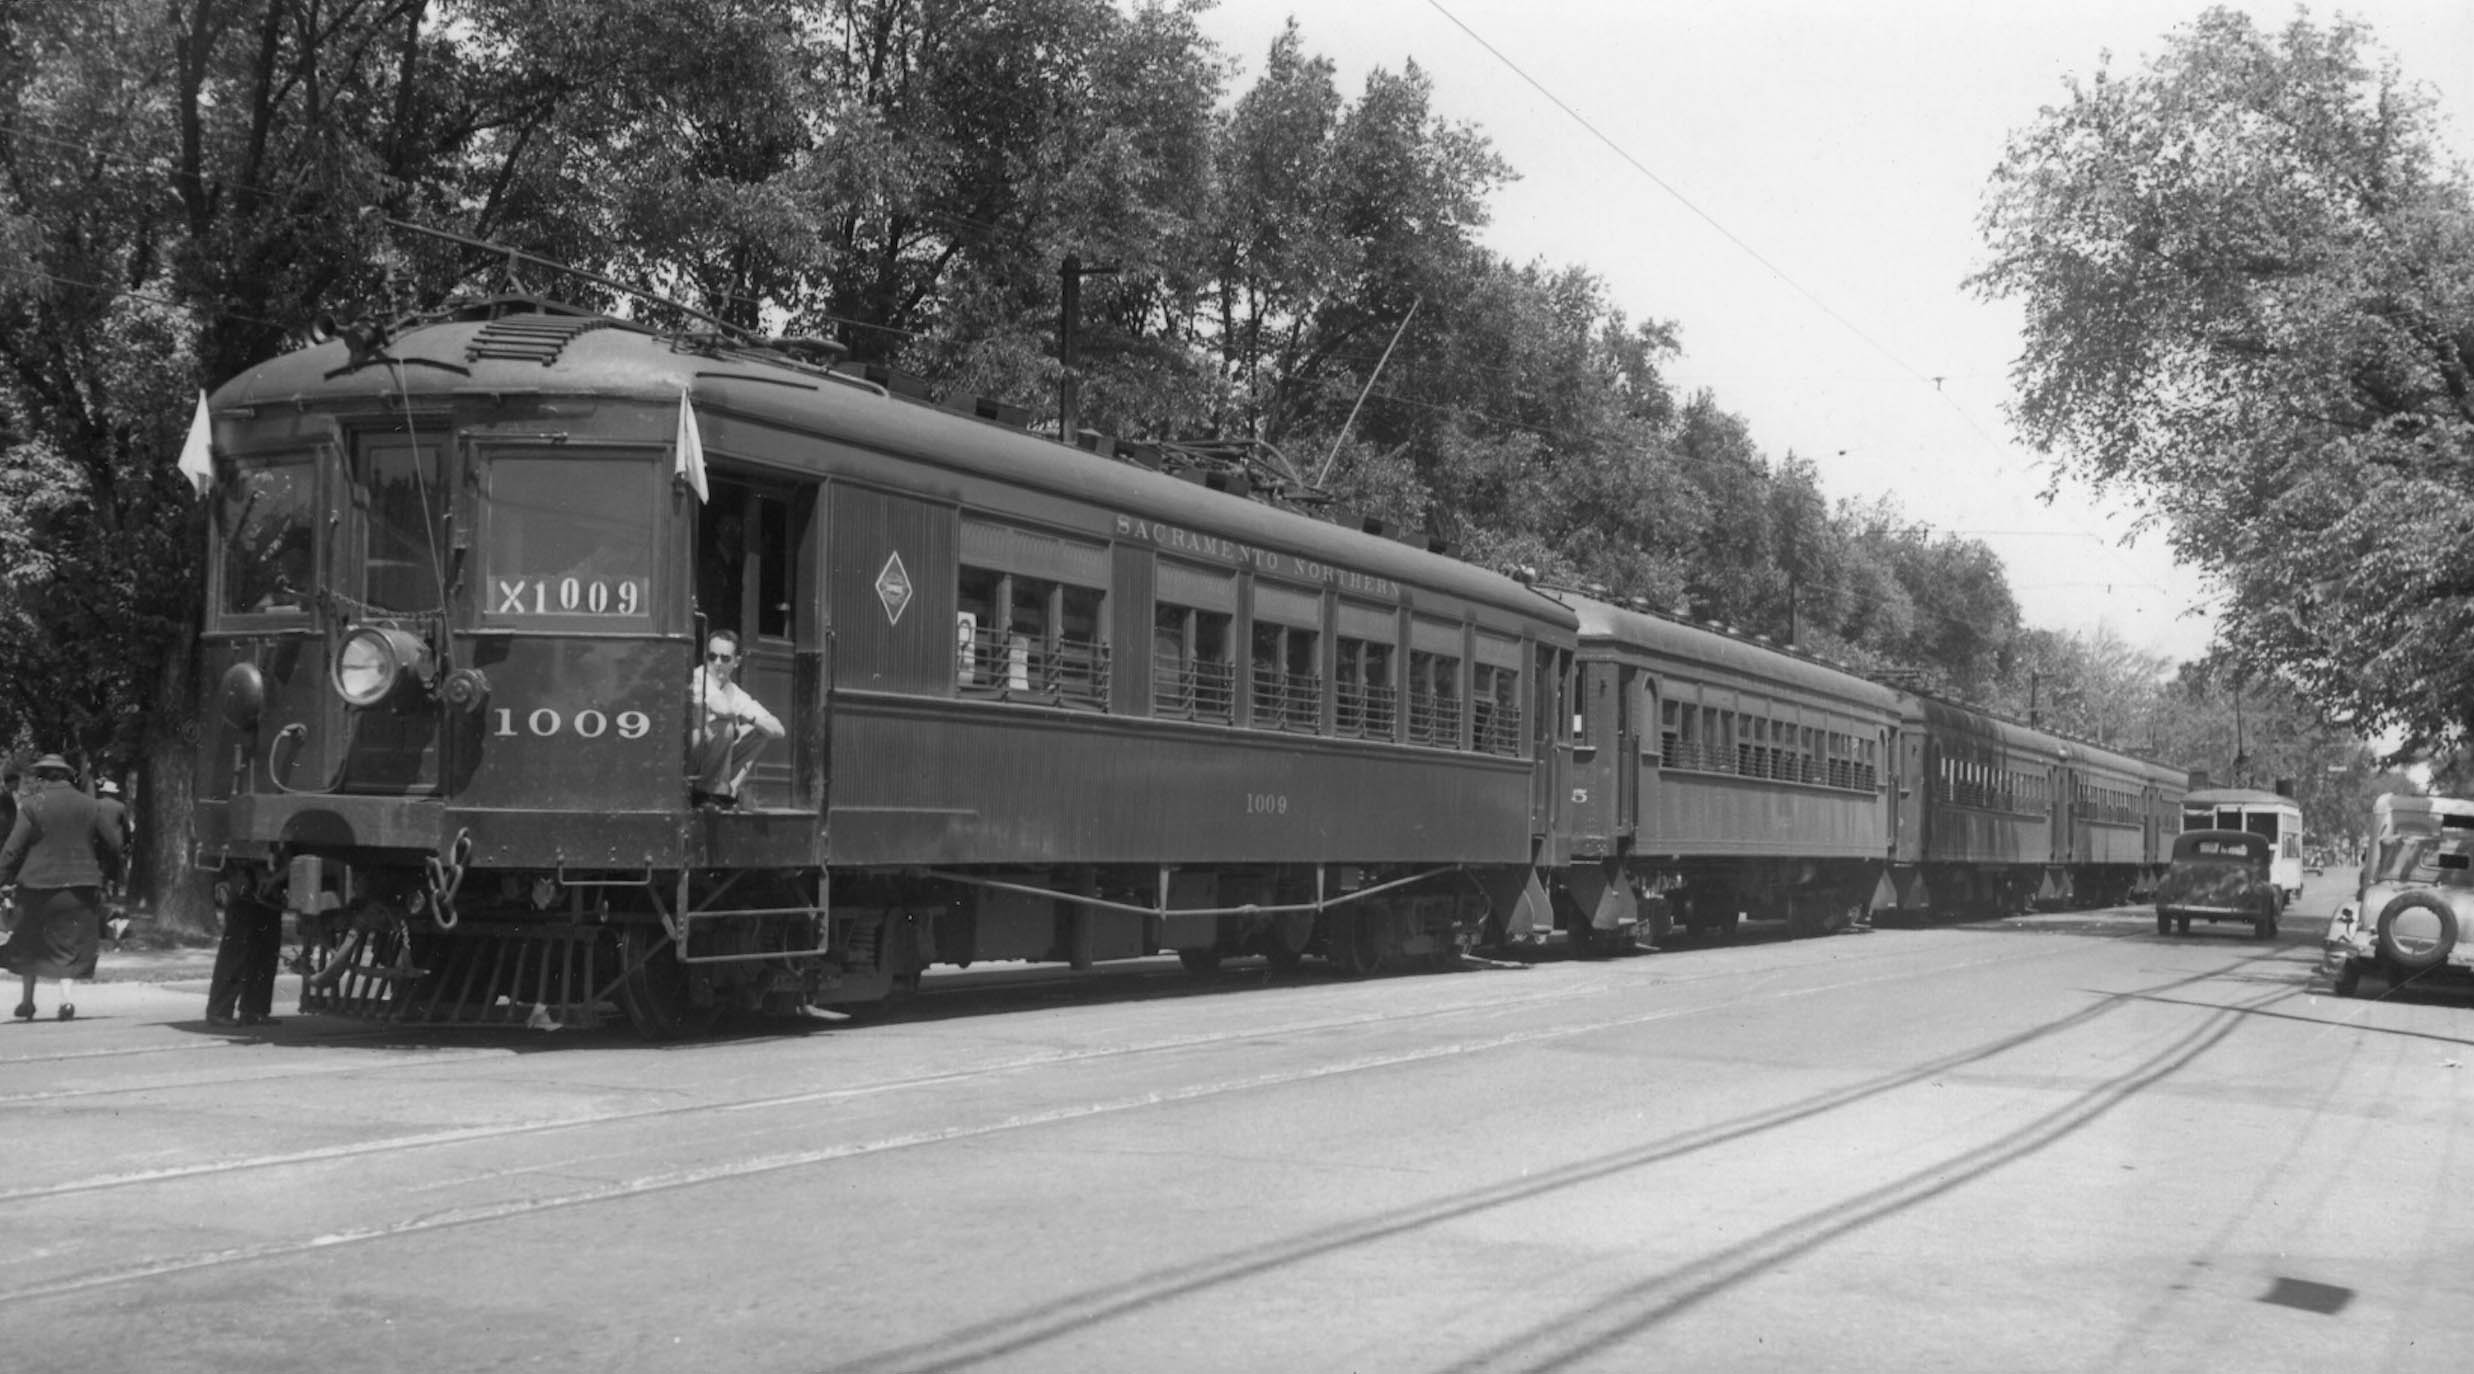
With a Birney car having passed, the Cal-Neva “Mystery Excursion to Colusa” led by SN 1009 sits along the park in this northeast view from May 8, 1938.
L241-115-Wilbur Whittaker Photo, Courtesy Arnold Menke and Garth Groff, (Image 23 of 32)
After H St., the next stop south is Pine St., arriving at this dramatic west image with Birney 70 on the the J St. spur, Birney 68 on 5th St., and WP 33 with freight on the WP overpass on Feb. 15, 1942. The left or south edge was imperfectly attached, derived from an Addison Laflin Photo, Sappers Coll., Courtesy BAERA, Western Railway Museum Archives, 124695sn. More on the J St. spur next time.
L241-120-Arthur Lloyd Photo, Courtesy BAERA, Western Railway Museum Archives, 129783sn, (Image 24 of 32)
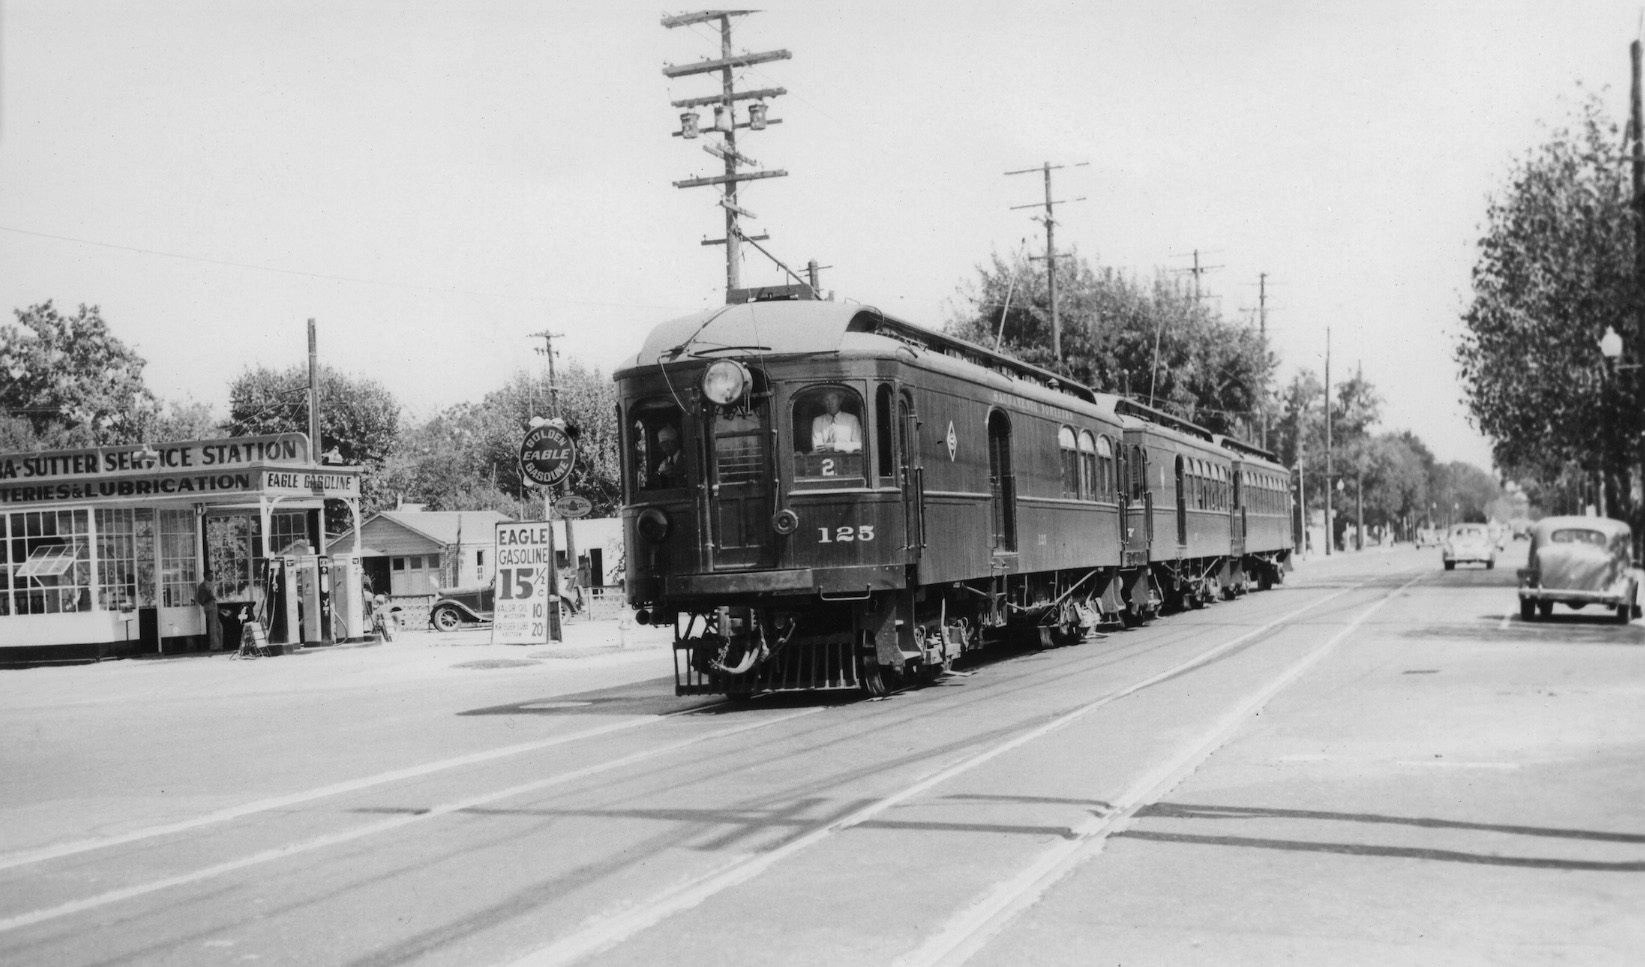
The small Yuba-Sutter Service Station just to the west of the J St. spur cut was visible in the last image, but a closer look is obtained in this circa 1940 northeast view with SN 125 and two trailers passing J St. The spot still features a gas station in 2021, although the cost of gasoline has risen a bit.
L241-125-Courtesy BAERA, Western Railway Museum Archives, 125453sn, (Image 25 of 32)
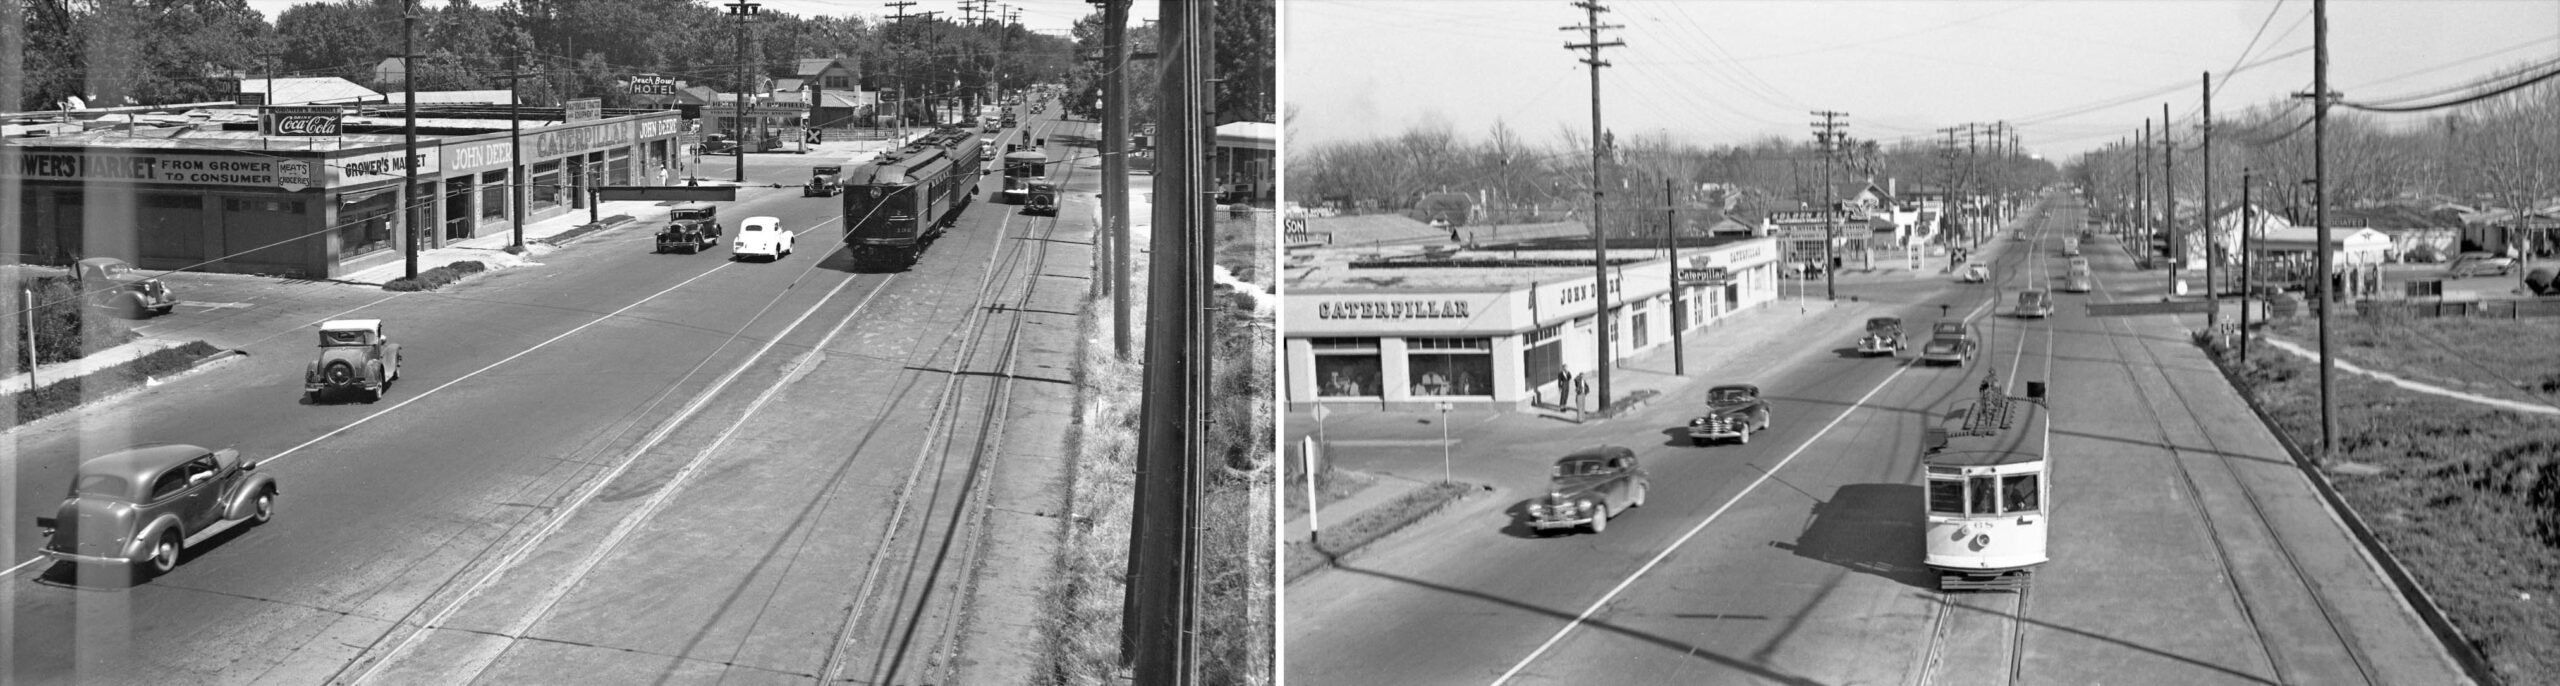
The Growers Market on the northeast corner of 5th St. and Olive St., left, survived through the interurban era, but not the Birney era, right, the last day of service on Feb. 15, 1942. Both east shots were taken from the WP overpass. Ref: Left, Silleman Bros. Photo, Holmes Bros. Coll.; Right, Louis Bradas, Jr. Photo
L241-130-Courtesy BAERA, Western Railway Museum Archives, 159526sn, 69121sn , (Image 26 of 32)
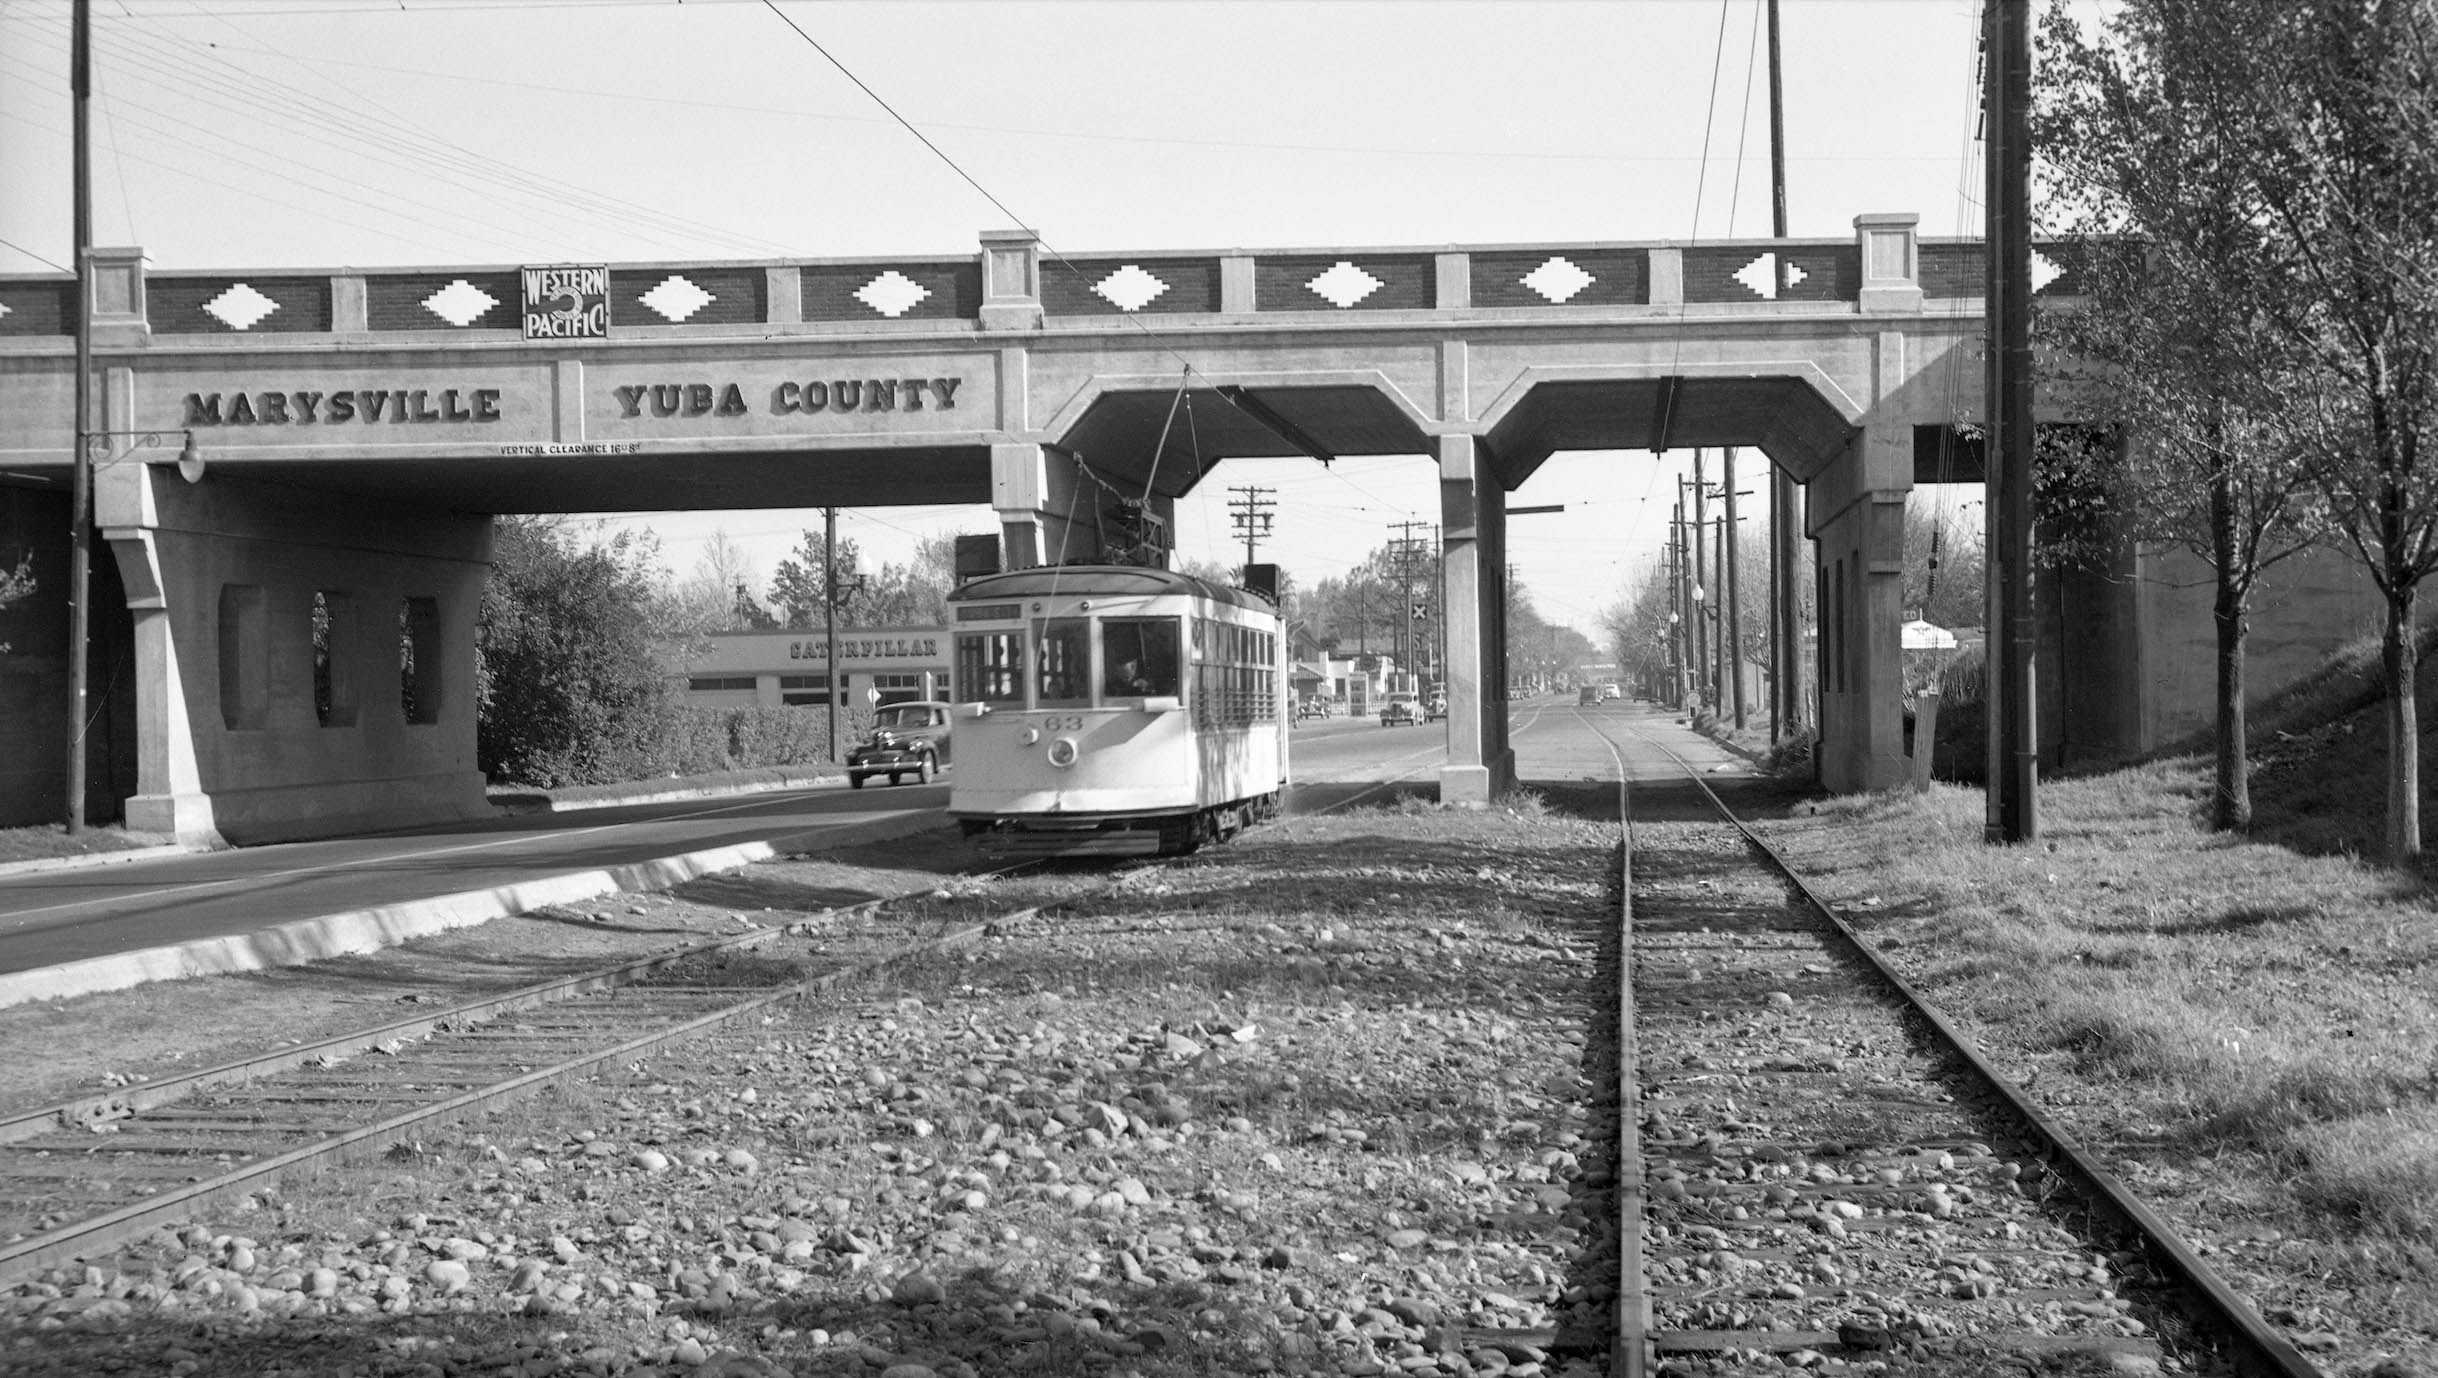
Clear views of the south side of 5th St. east of the WP overpass are rare. SN 1021 on the tail of a Niles combo approaches the Associated Service Station that occupied the southern intersection with J St.
L241-135-Silleman Bros. Photo, Holmes Bros. Coll., Courtesy BAERA, W. Railway Museum Arch., 159954sn, (Image 27 of 32)
Birney 63 has just cleared the WP overpass as it makes its way to the bridge over the Feather River in this east view circa 1940.
L241-140-Courtesy BAERA, Western Railway Museum Archives, 167253sn , (Image 28 of 32)
This northeast view from Feb. 15, 1942 shows Birney 70 on the freight connector to the WP mainline meeting up with Birney 68 on the SN mainline. The last poles of the short siding from the WP mainline that followed the north side of 5th St. for a few hundred feet is visible, as is the last portion of the WP station along the right edge, with the Hart Building rising above it in the distance.
L241-145-Arthur Lloyd Photo Courtesy BAERA, Western Railway Museum Archives, , 192786sn, (Image 29 of 32)
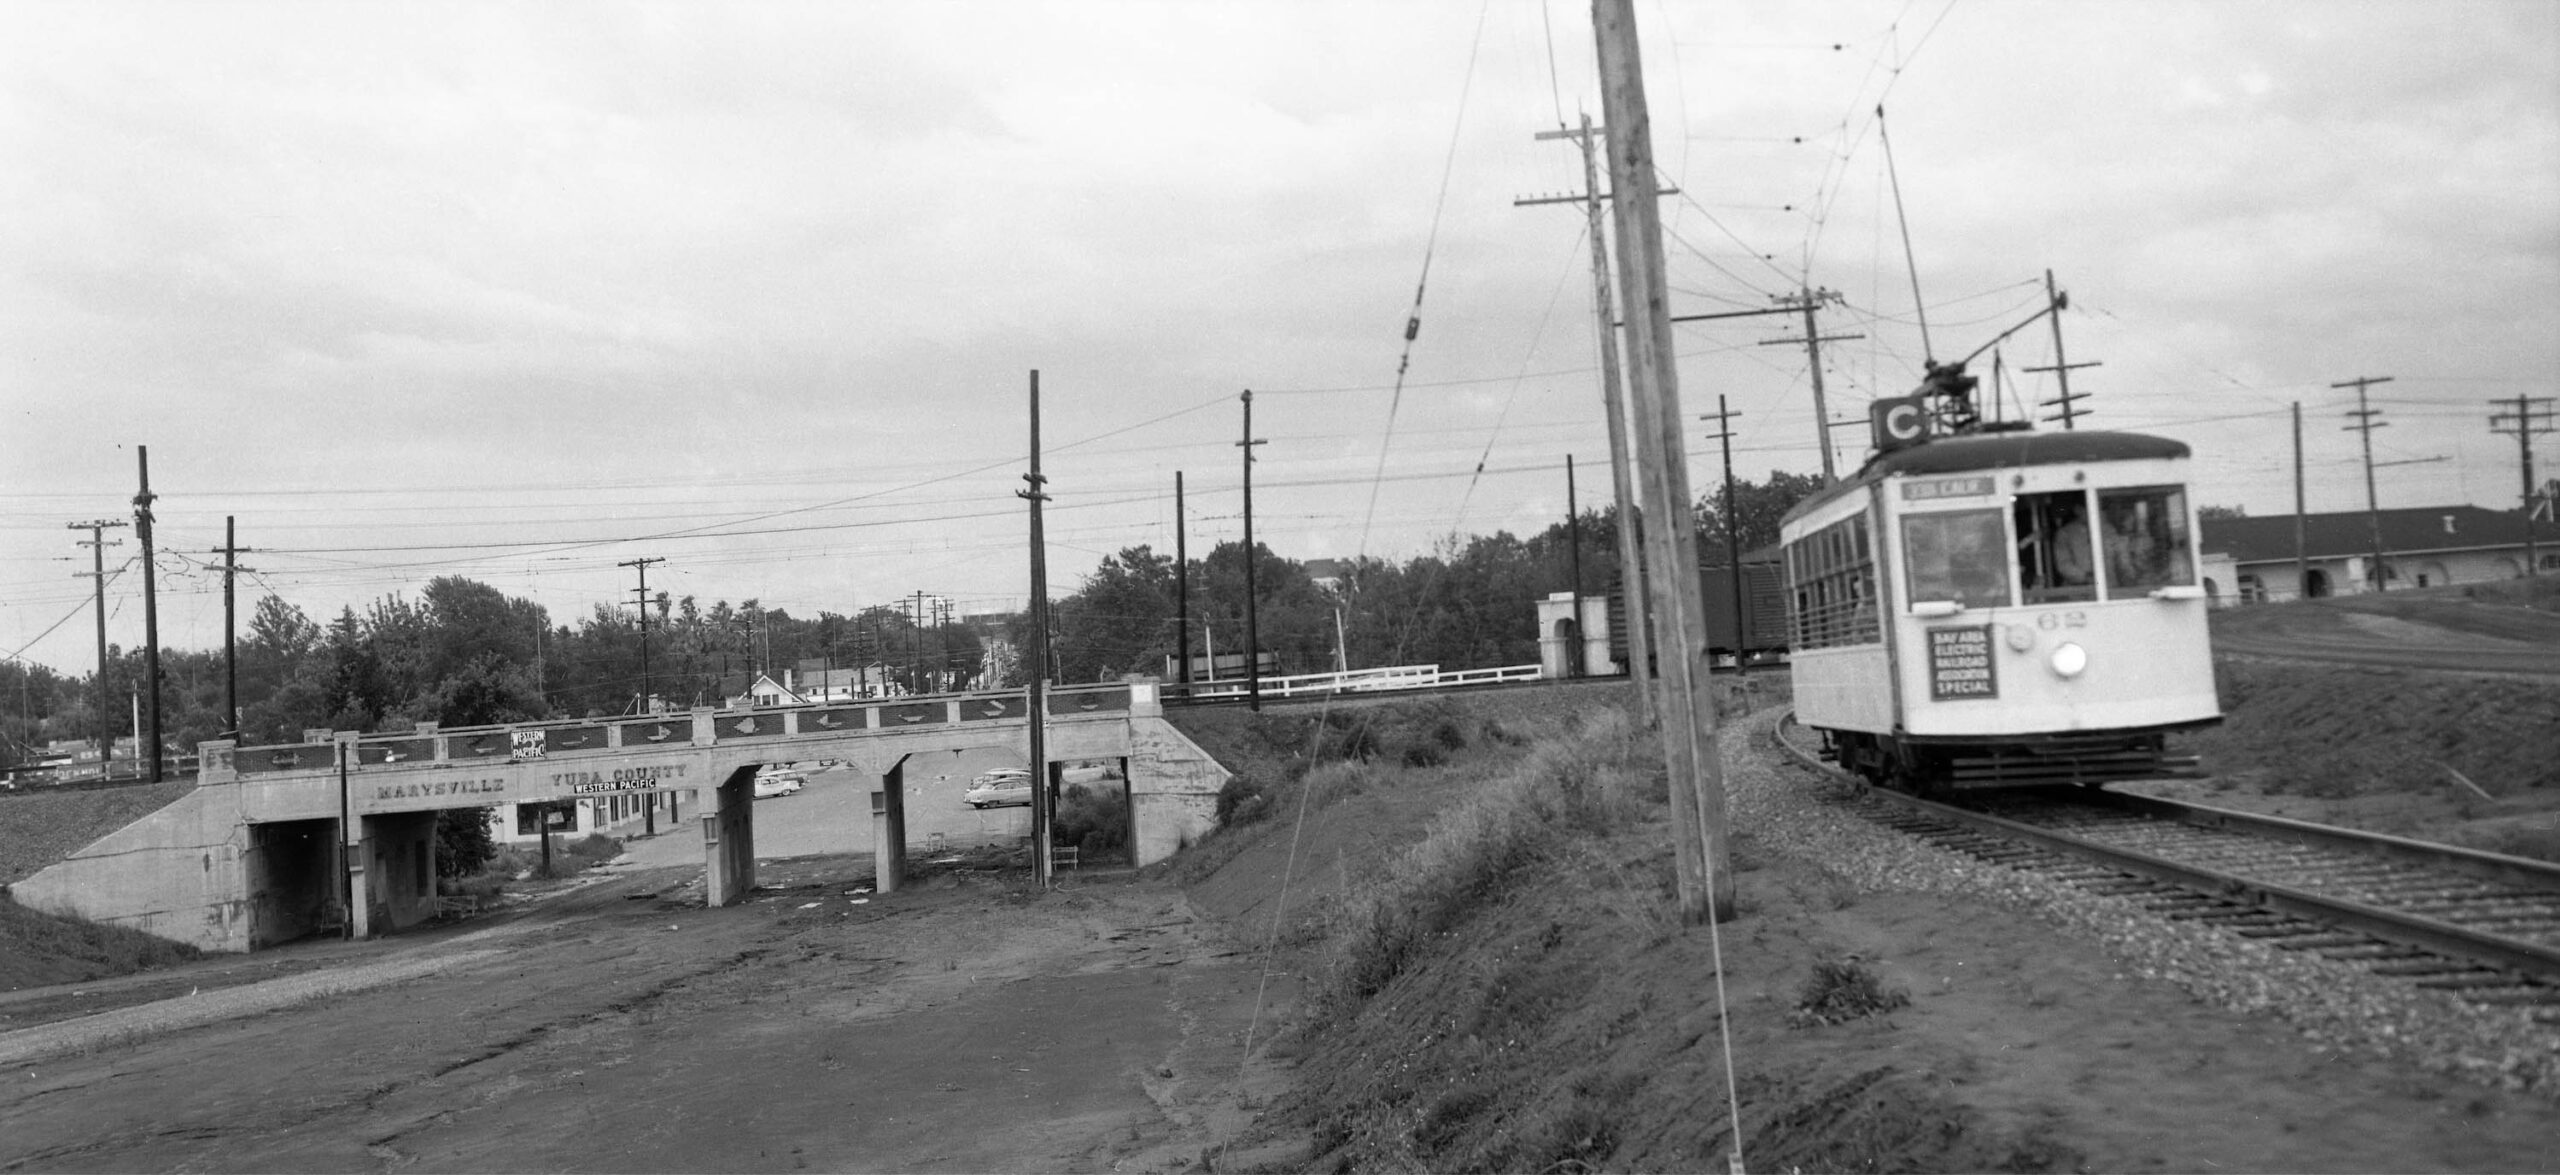
The scene is bleaker during the May 18, 1957 excursion with Birney 62 on the SN freight connector as its only means to the newly rebuilt Feather River Bridge, given that the mainline had been abandoned in 1942. The poor road surface reflects the damage done from the 1955 flood, the auto bridge over the river still not rebuilt. The addition of a second WP sign on the overpass cannot be explained.
L241-150-Vic Dubrutz Photo, Courtesy BAERA, Western Railway Museum Archives, 166764sn, (Image 30 of 32)
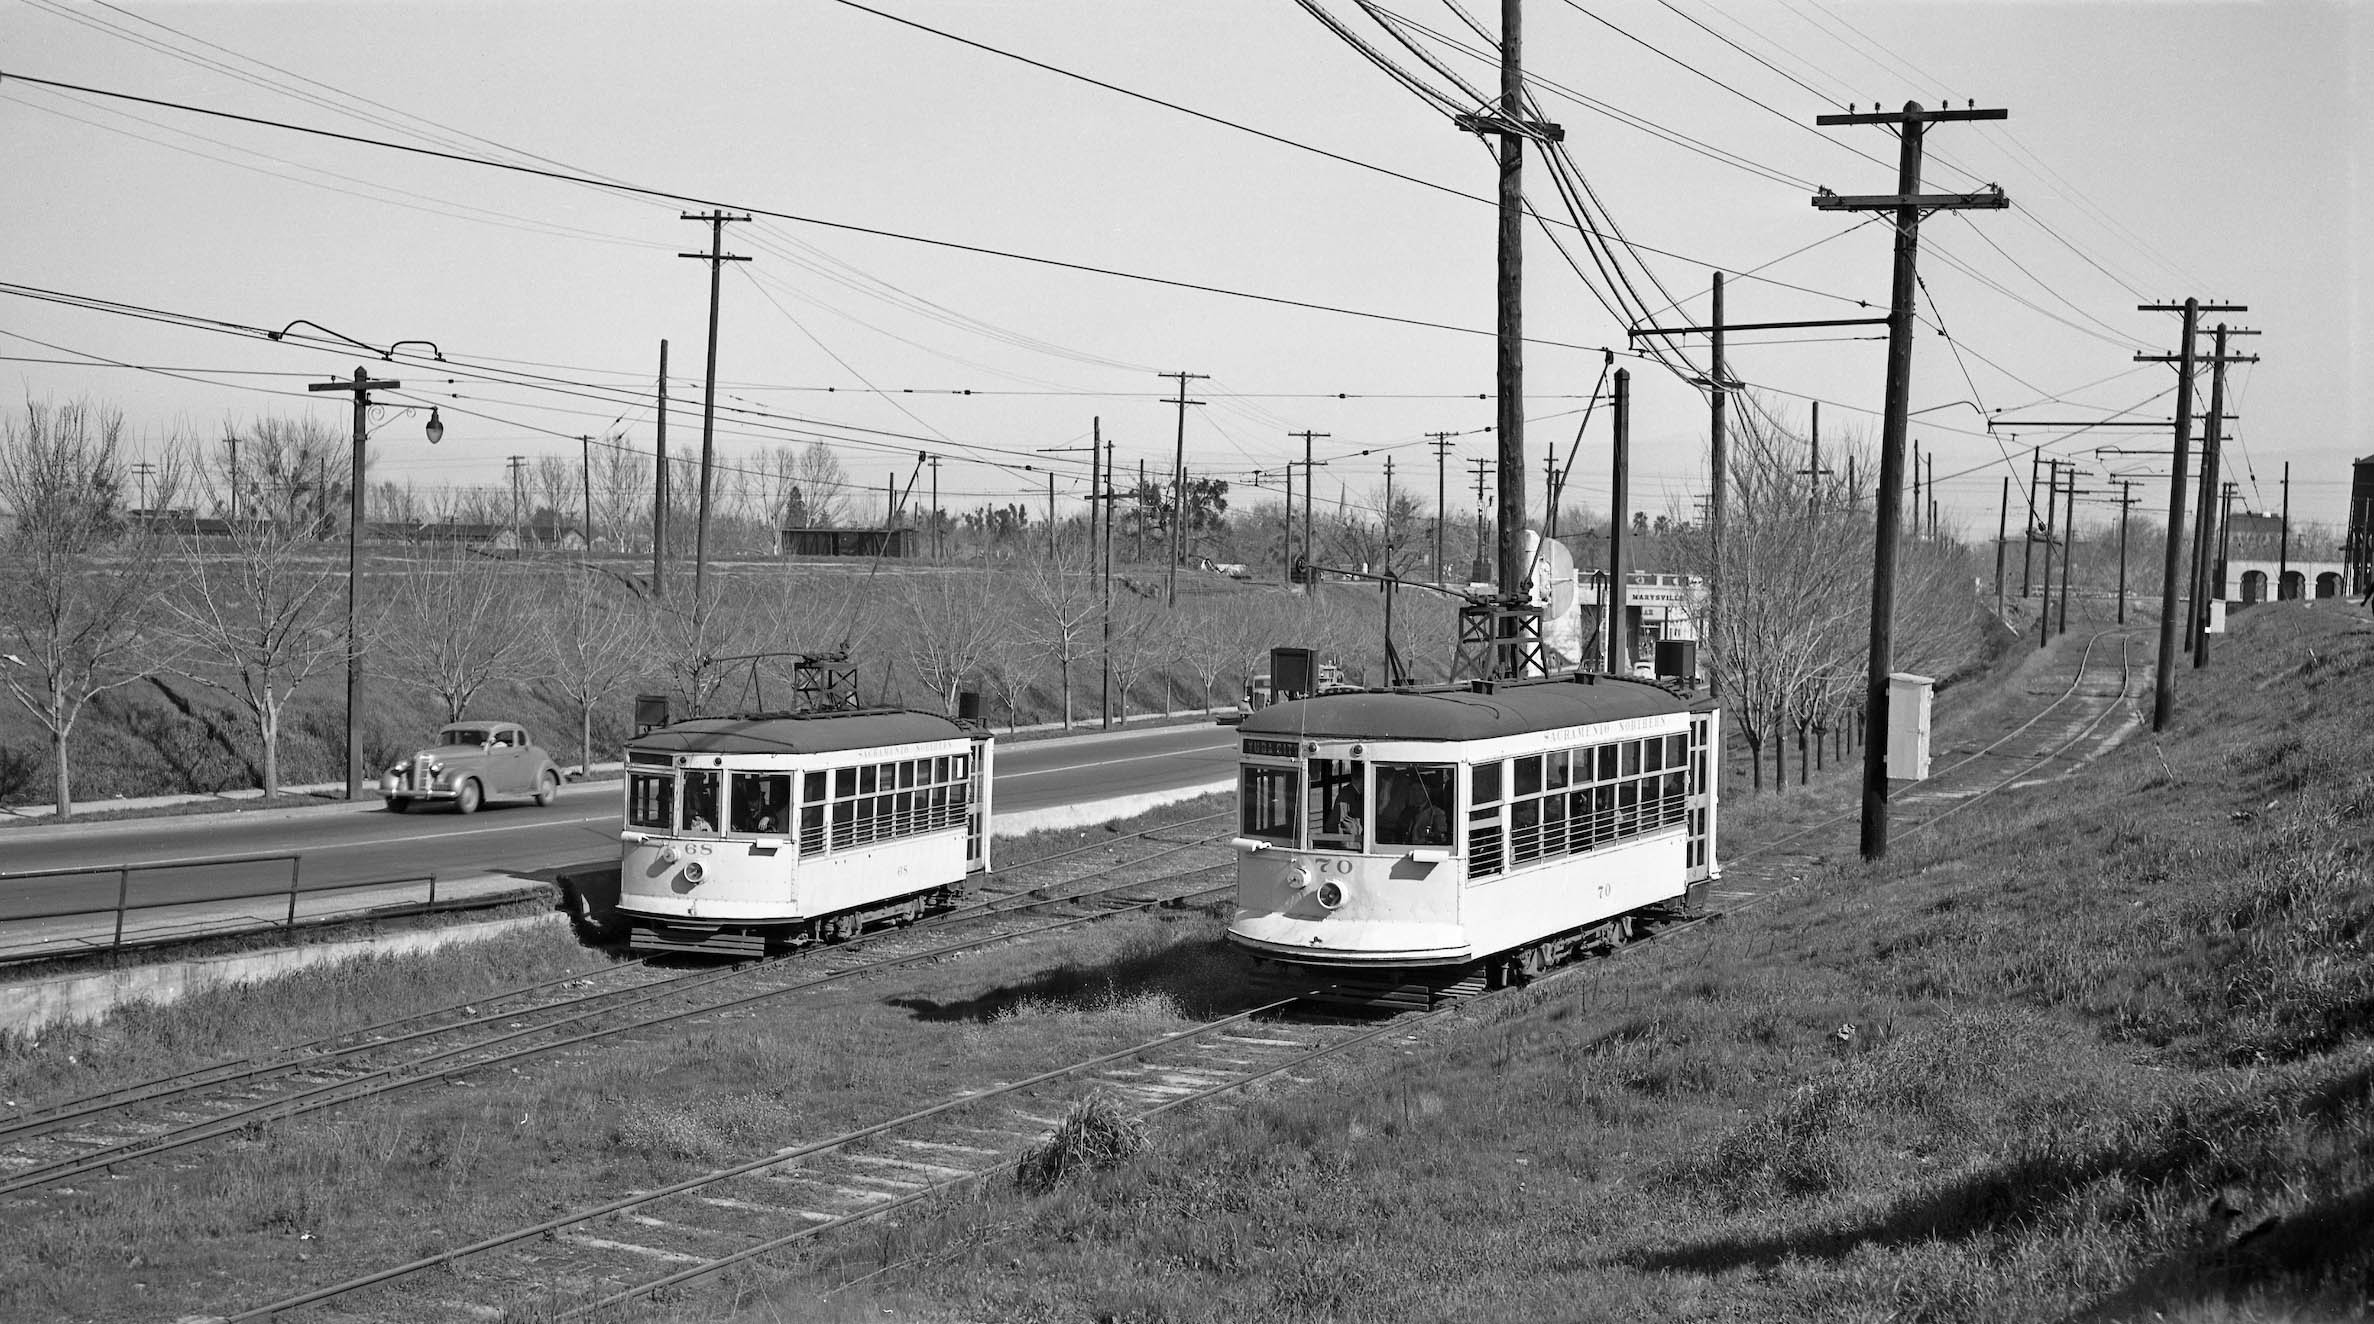
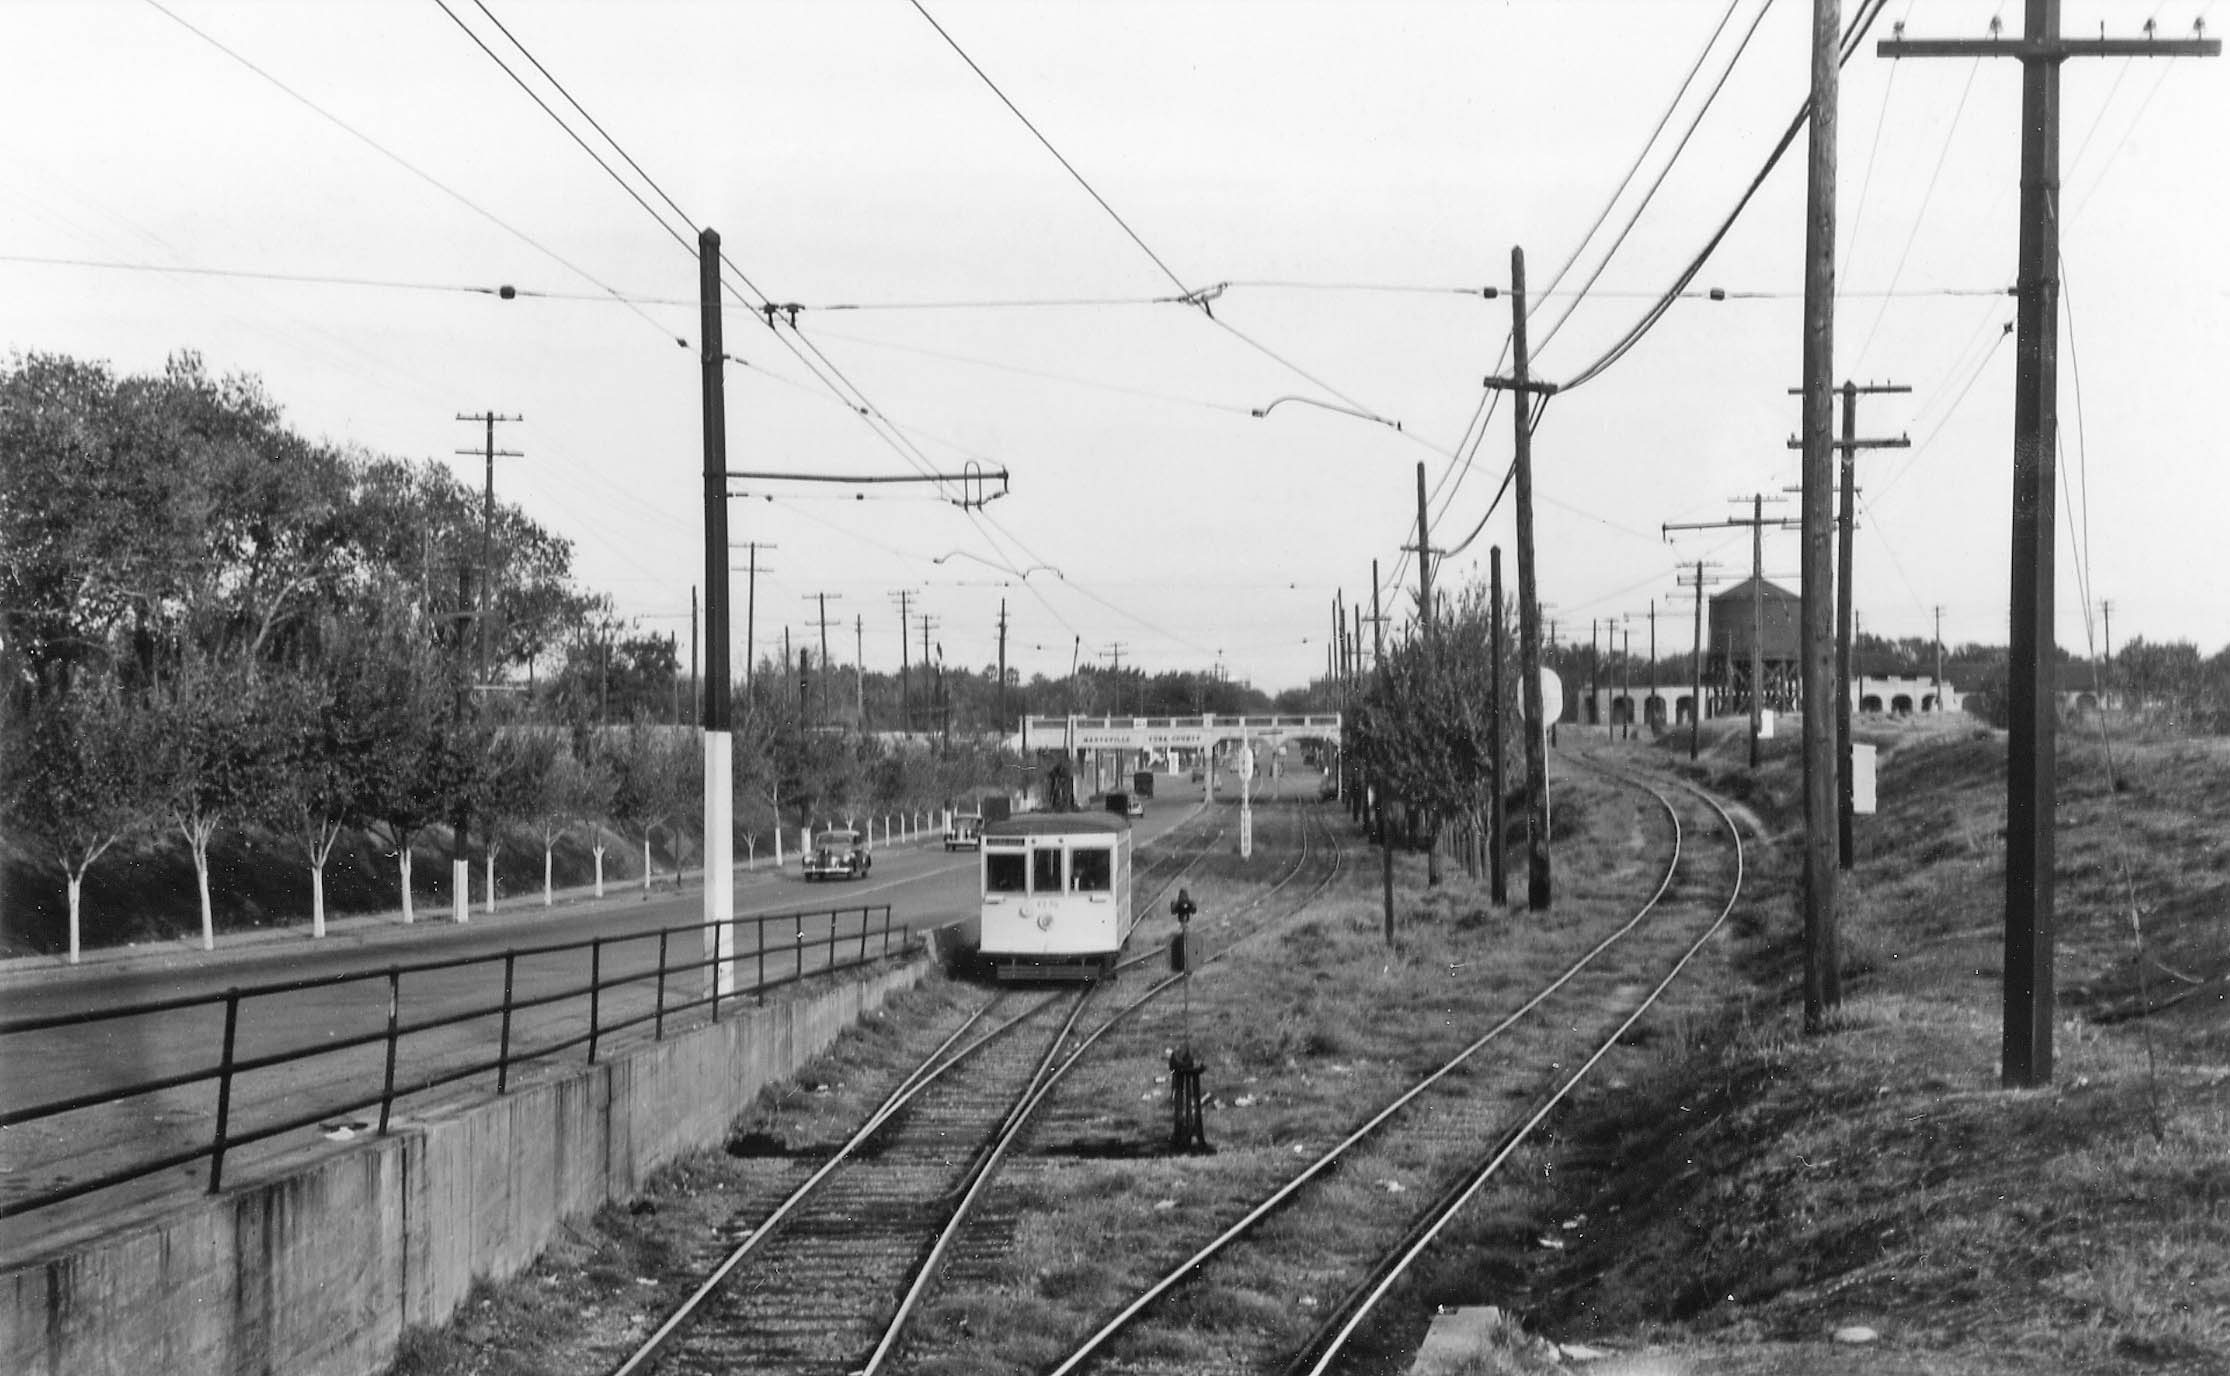
Eventually the passenger and freight tracks converged to a single track as illustrated in this east view of Birney 68 circa 1940.
L241-155-Moreau Collection, Courtesy BAERA, Western Railway Museum Archives, 162906sn, (Image 31 of 32)
Confirmation of the single track to the bridge is documented in this northwest image from the last day of streetcar service in Marysville, Feb. 15, 1942. Next time the SN spurs of Marysville.
L241-160-Addison Laflin Photo, Courtesy BAERA, Western Railway Museum Archives, 166757sn, (Image 32 of 32)