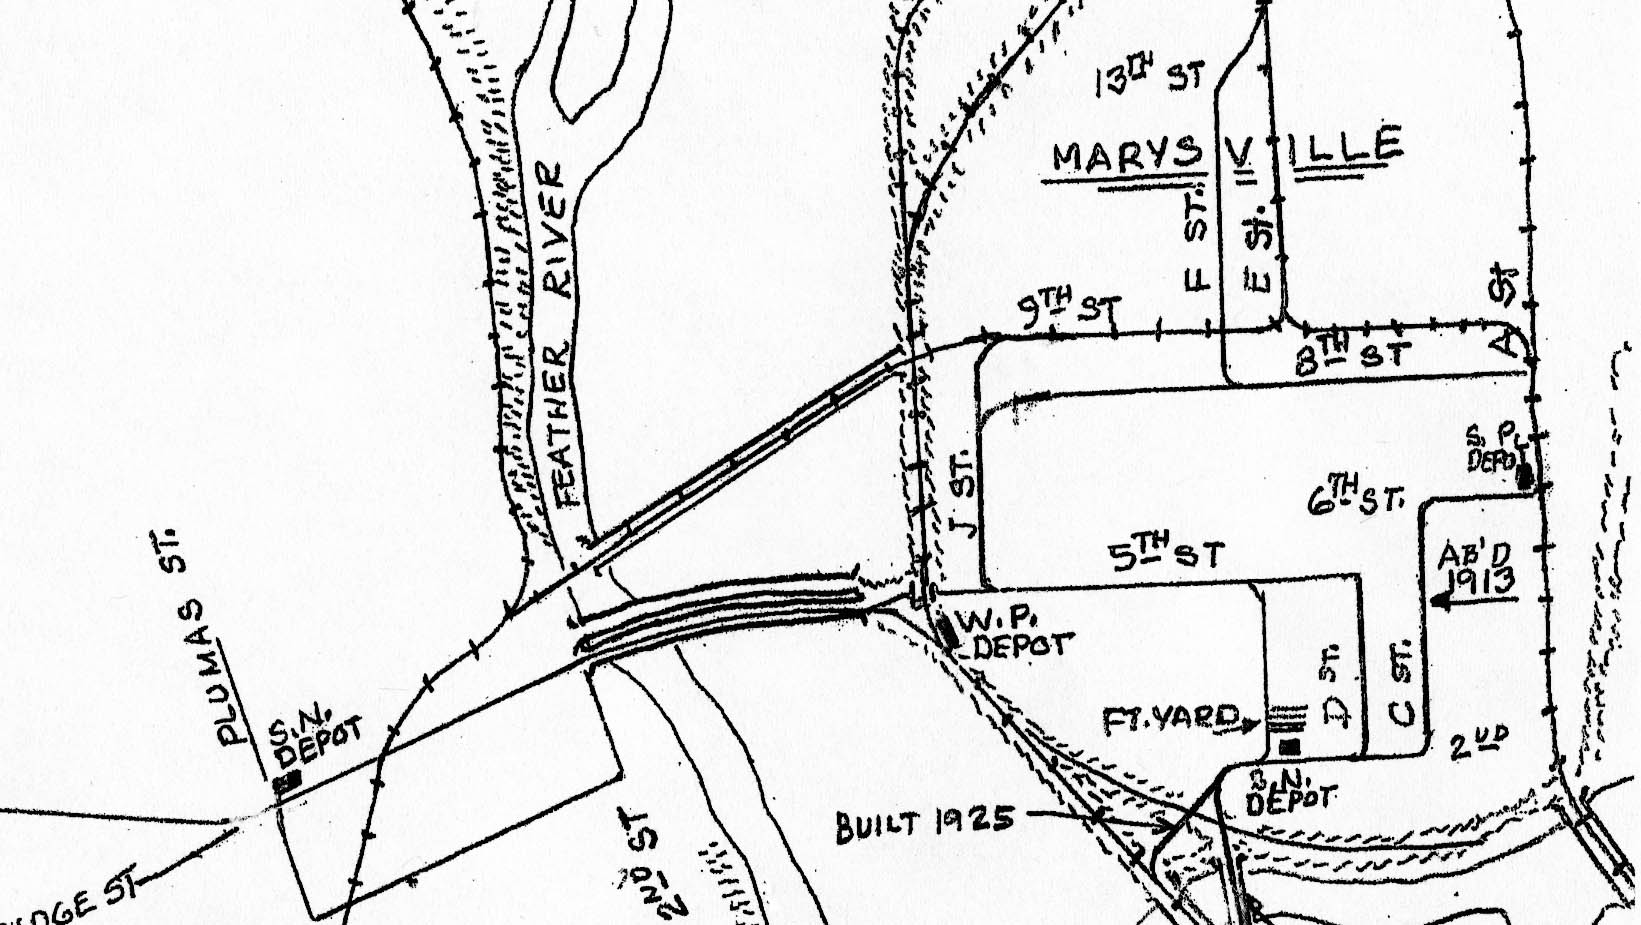
Connector and Siding Sightings
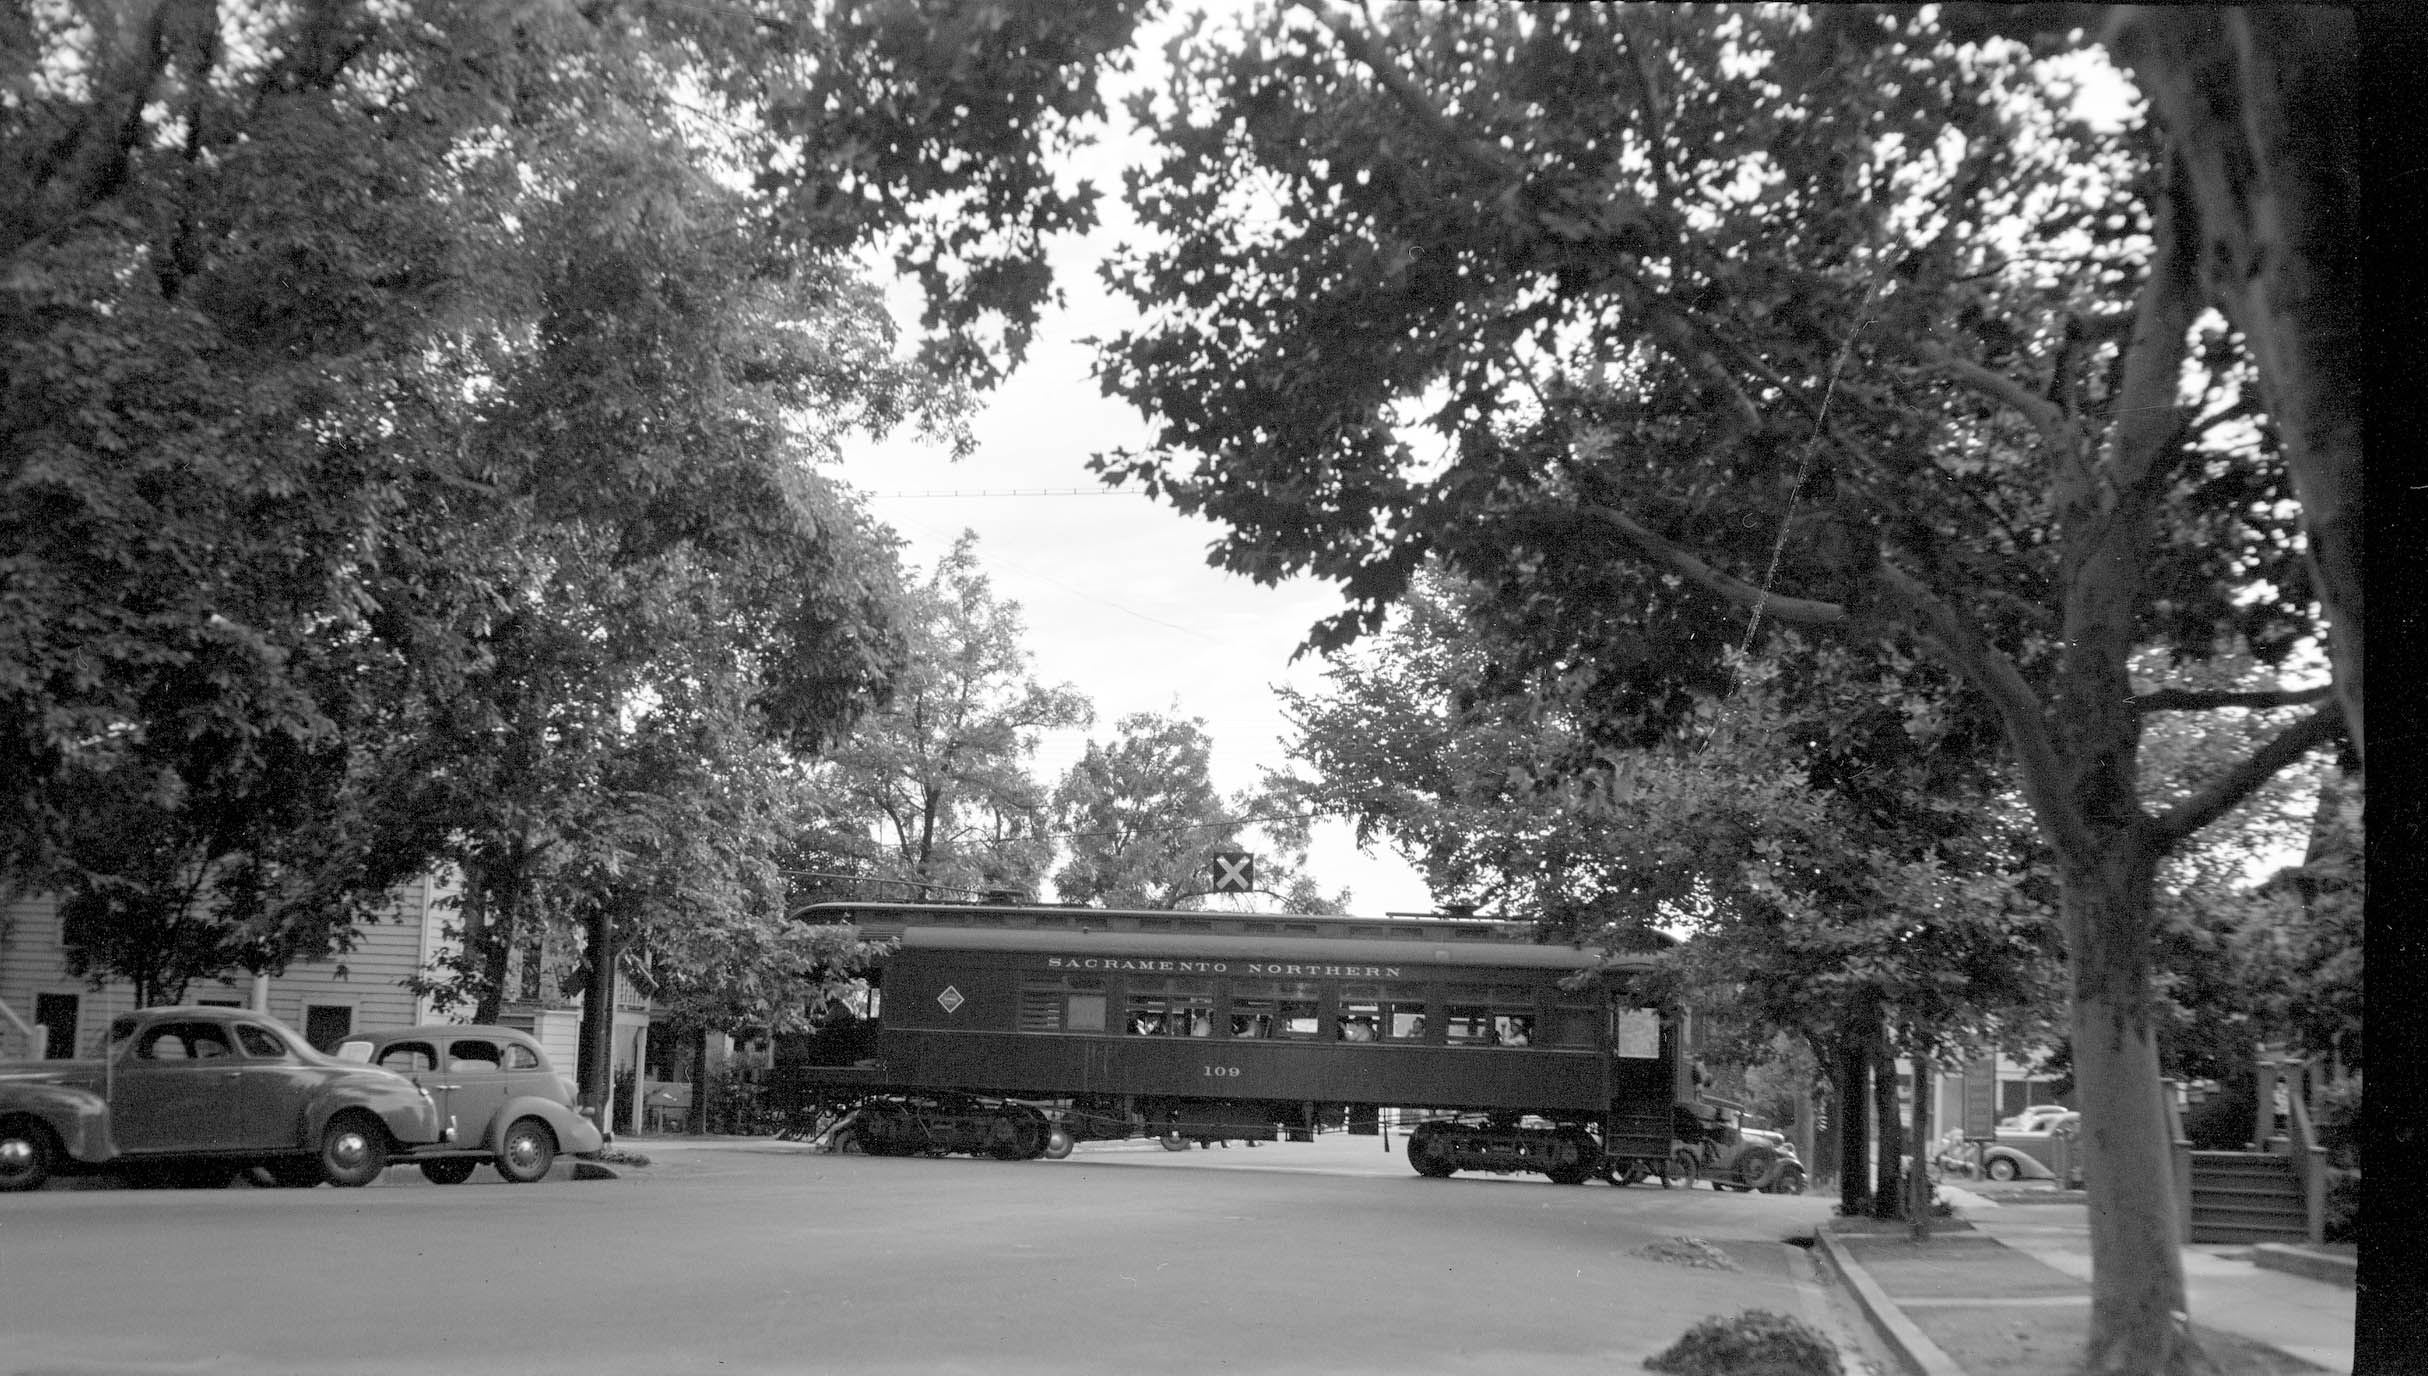
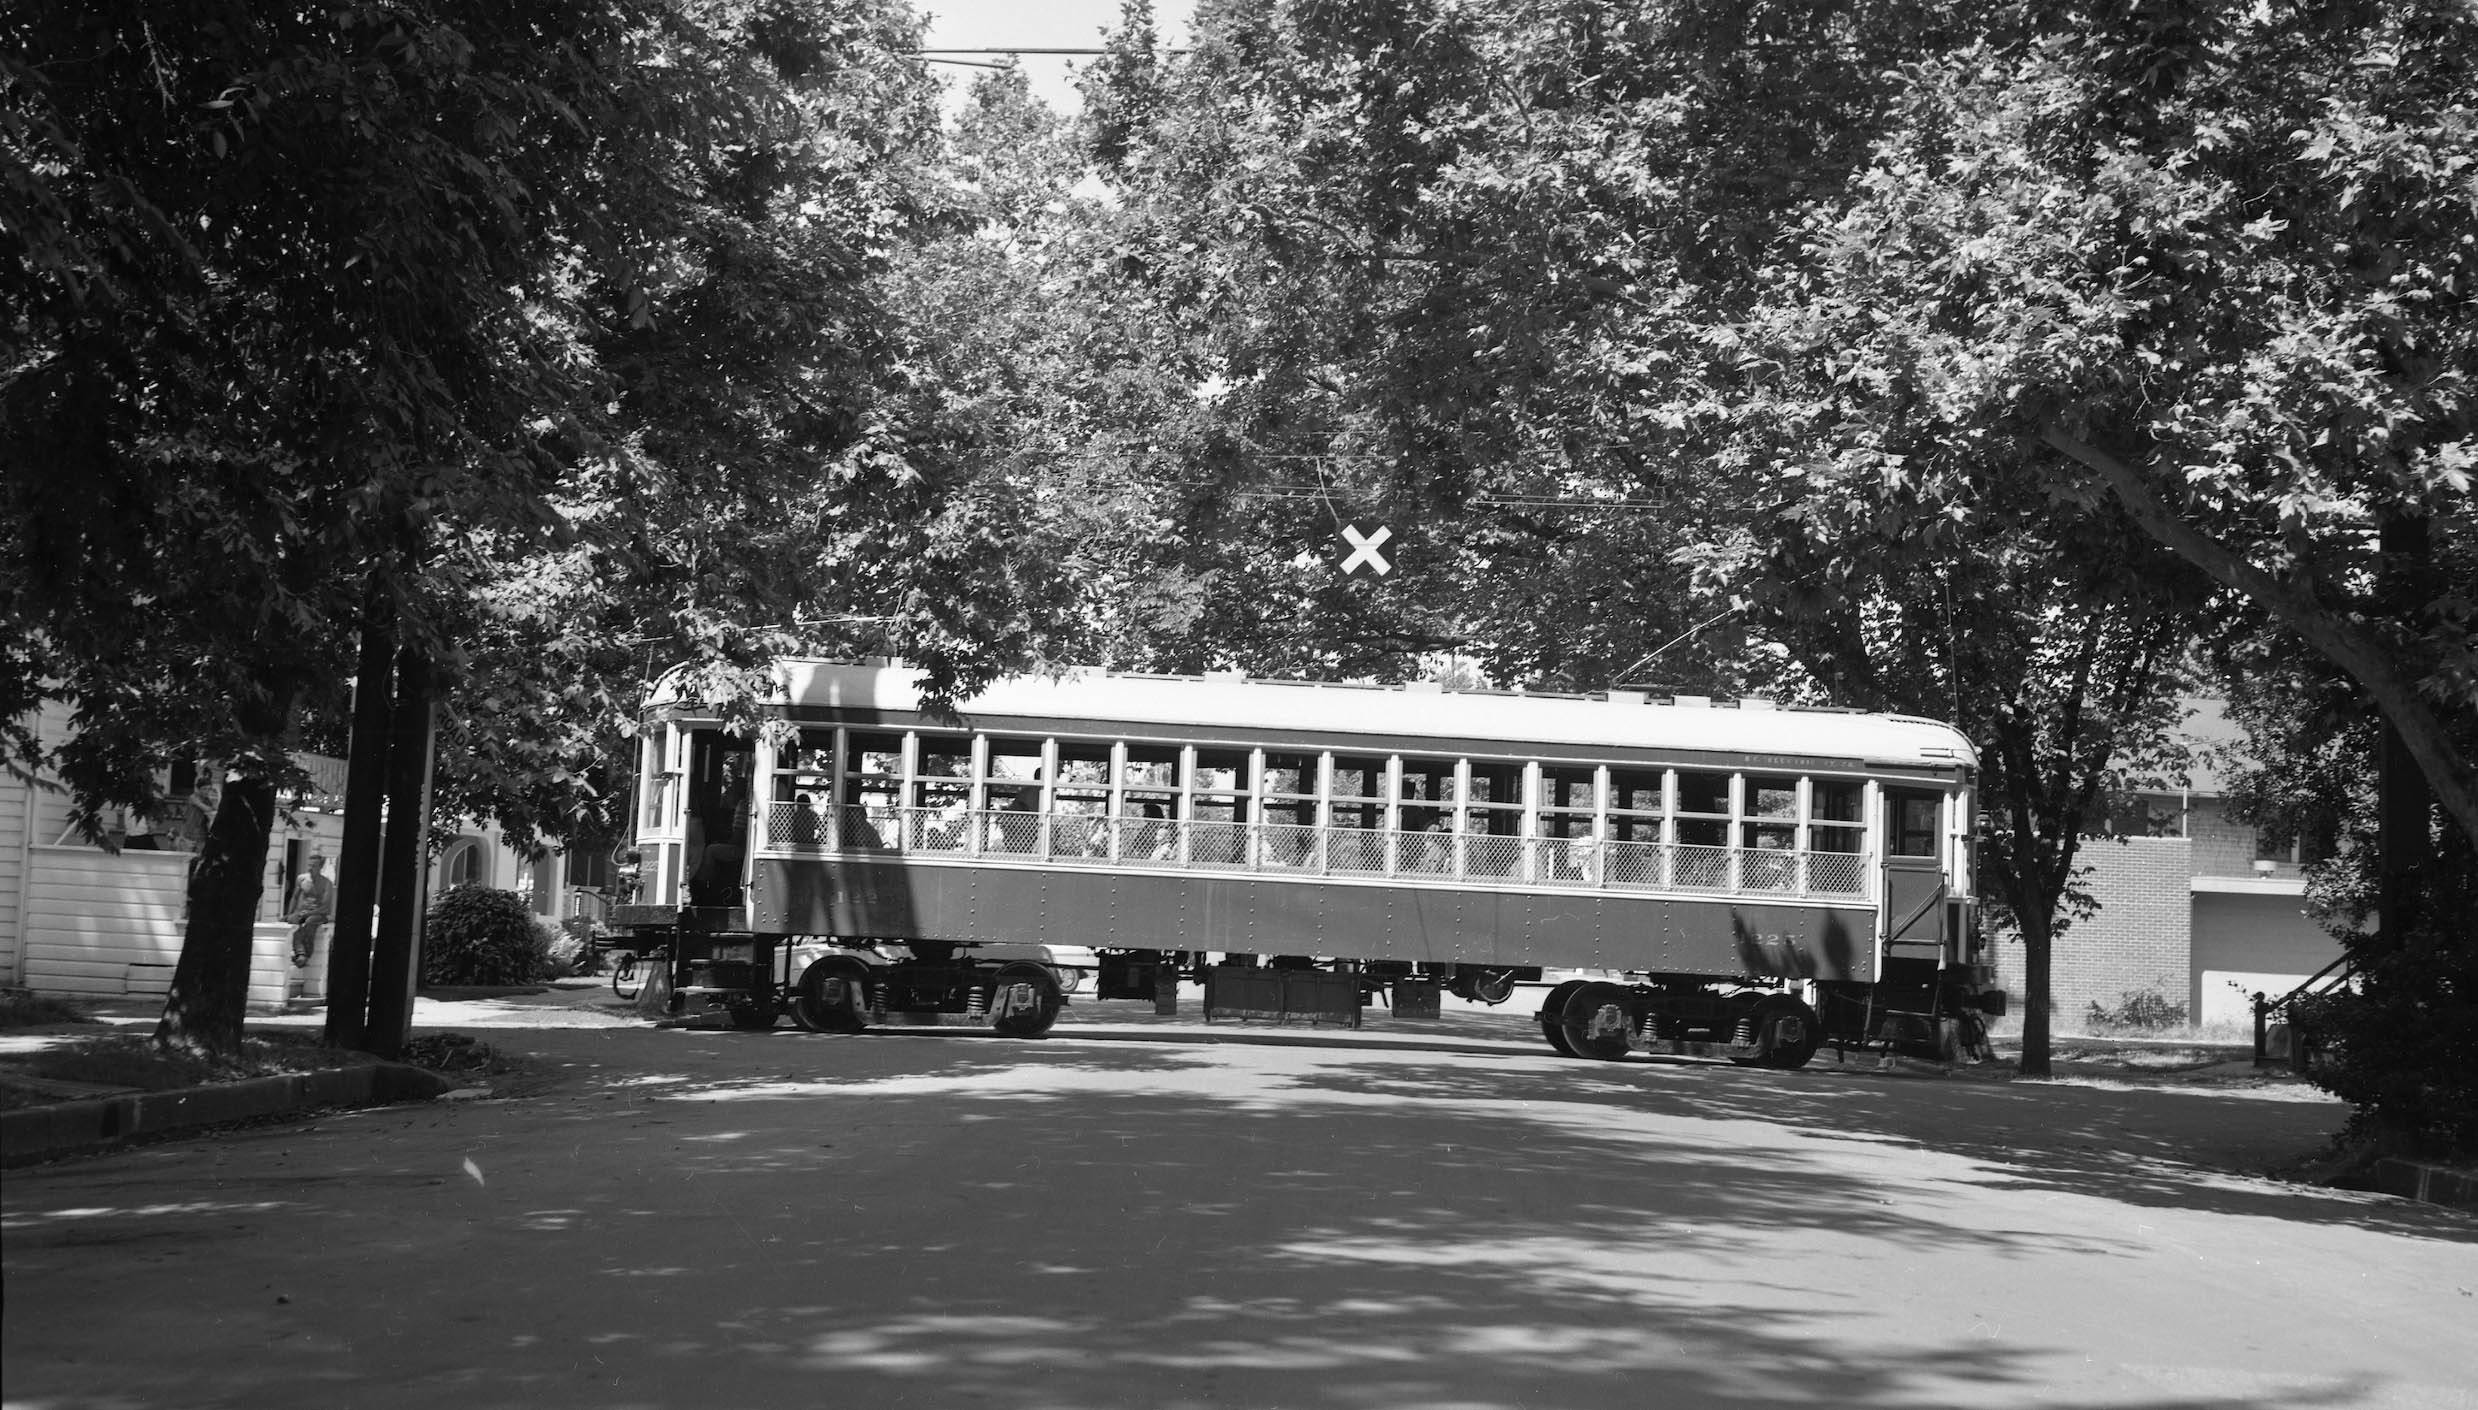
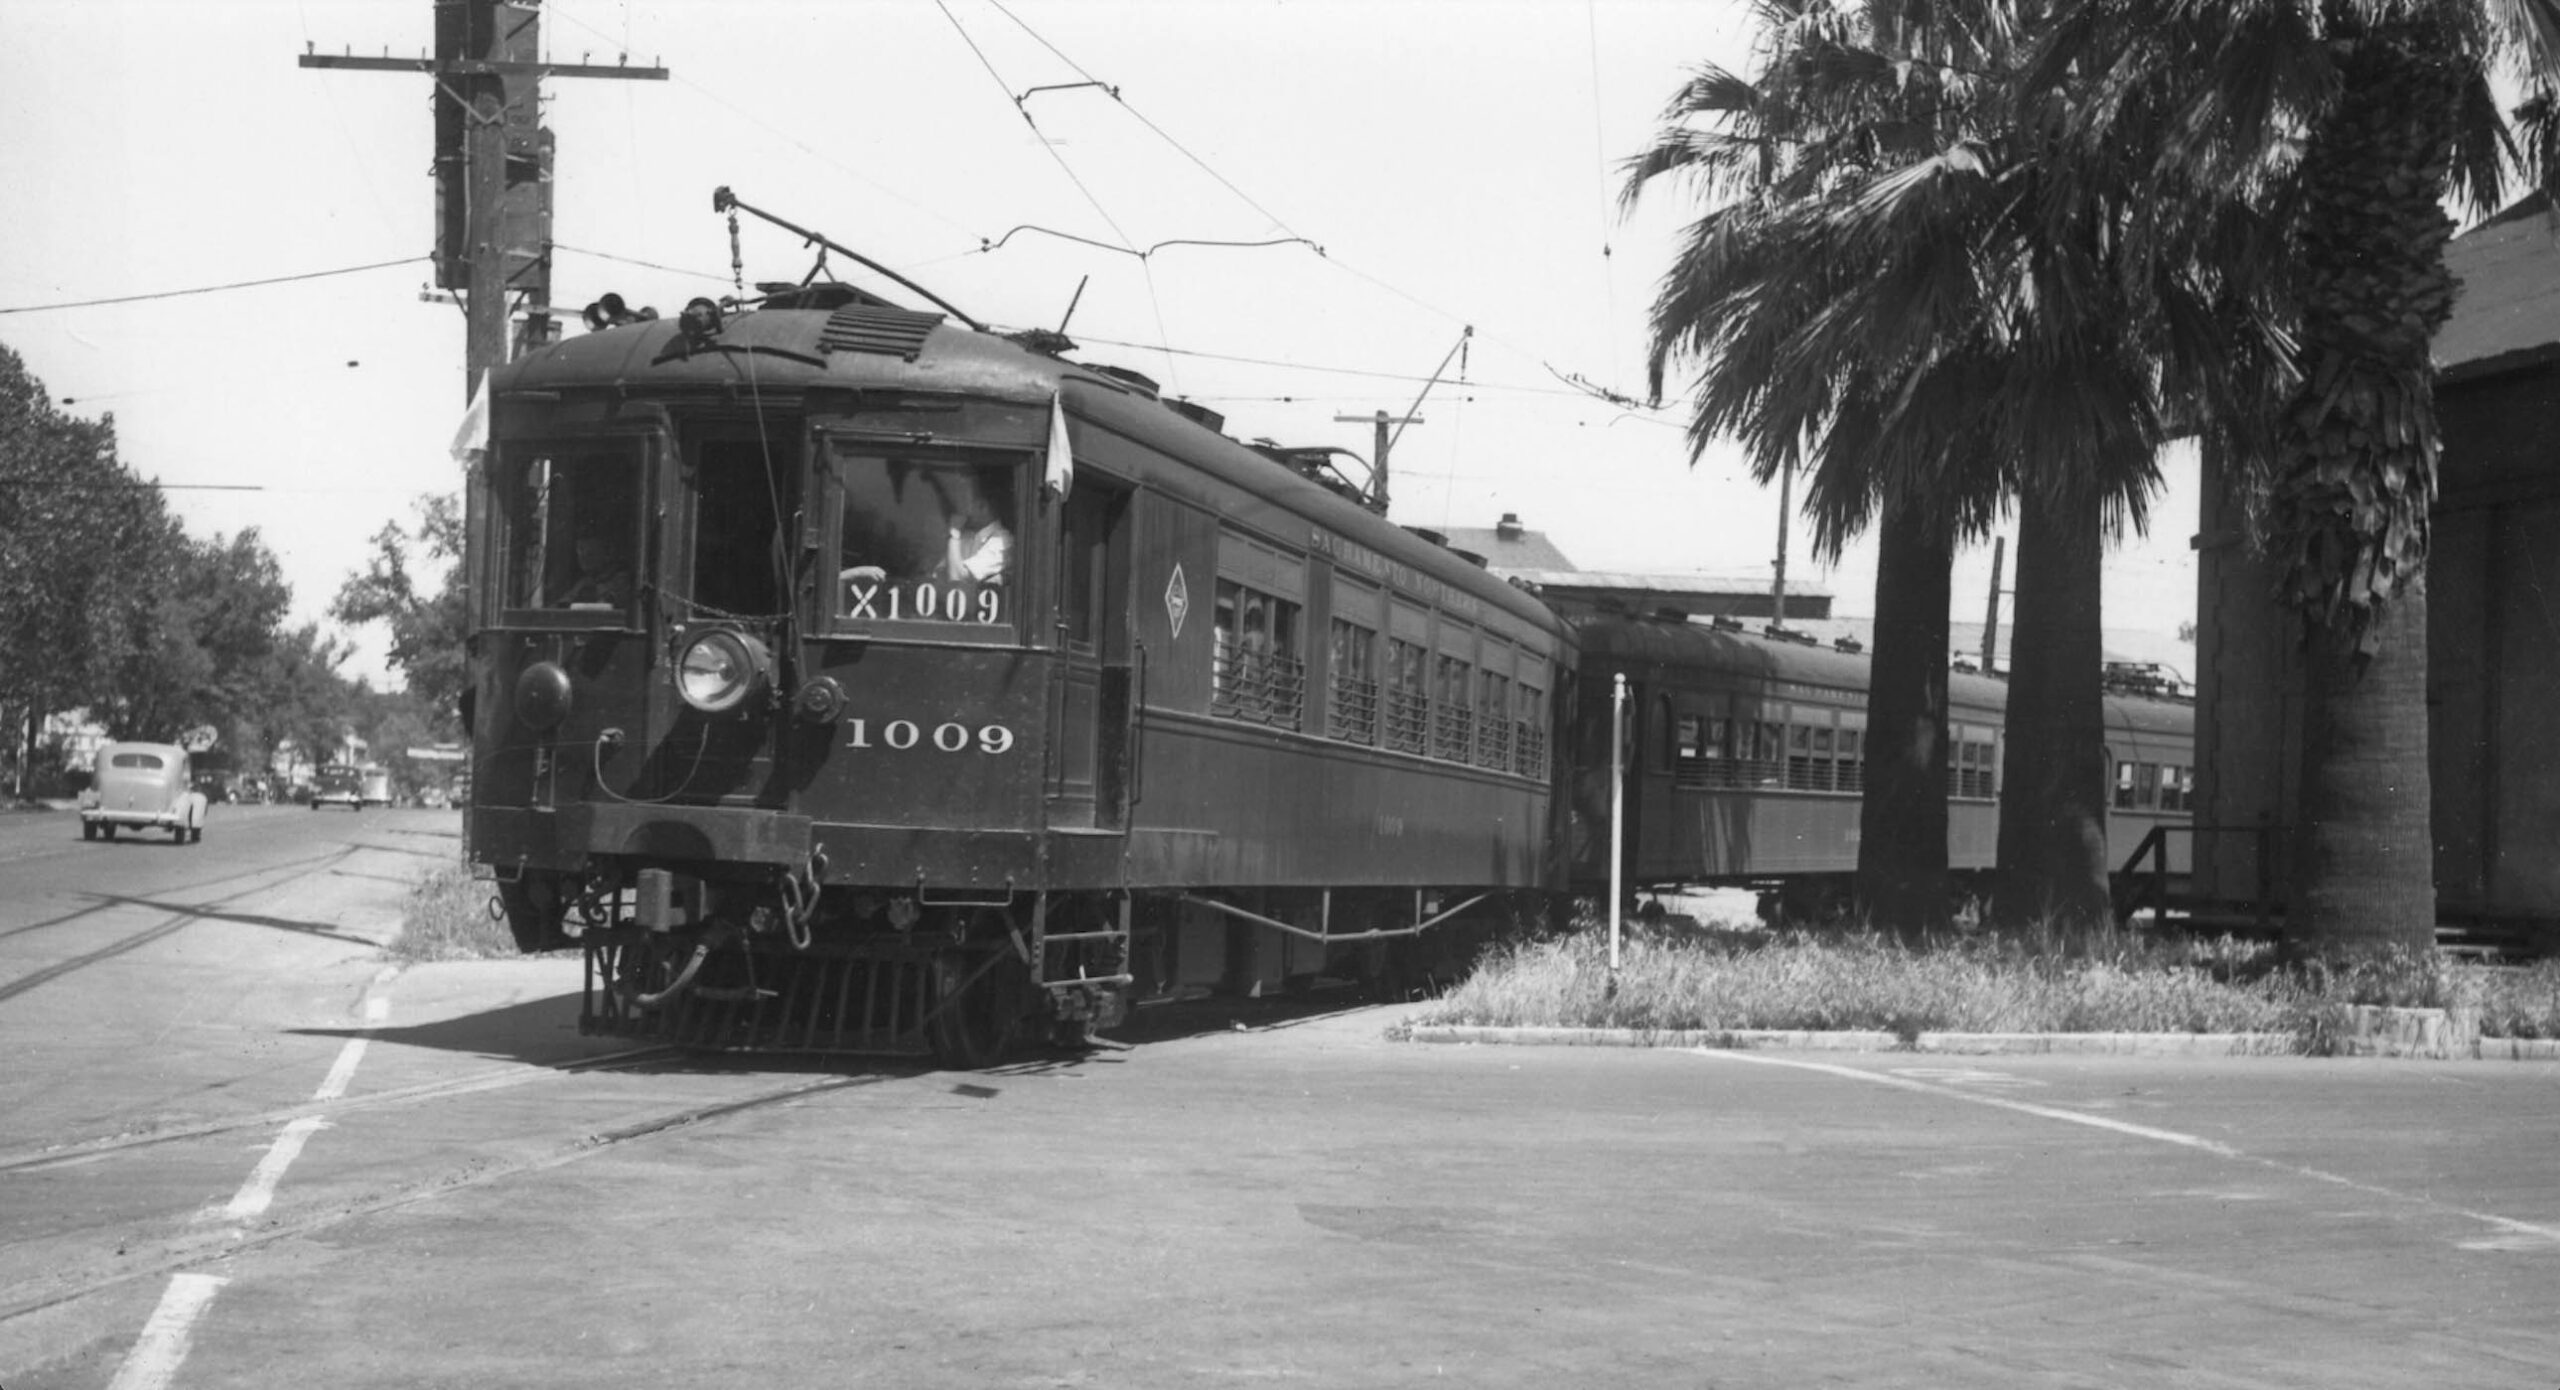
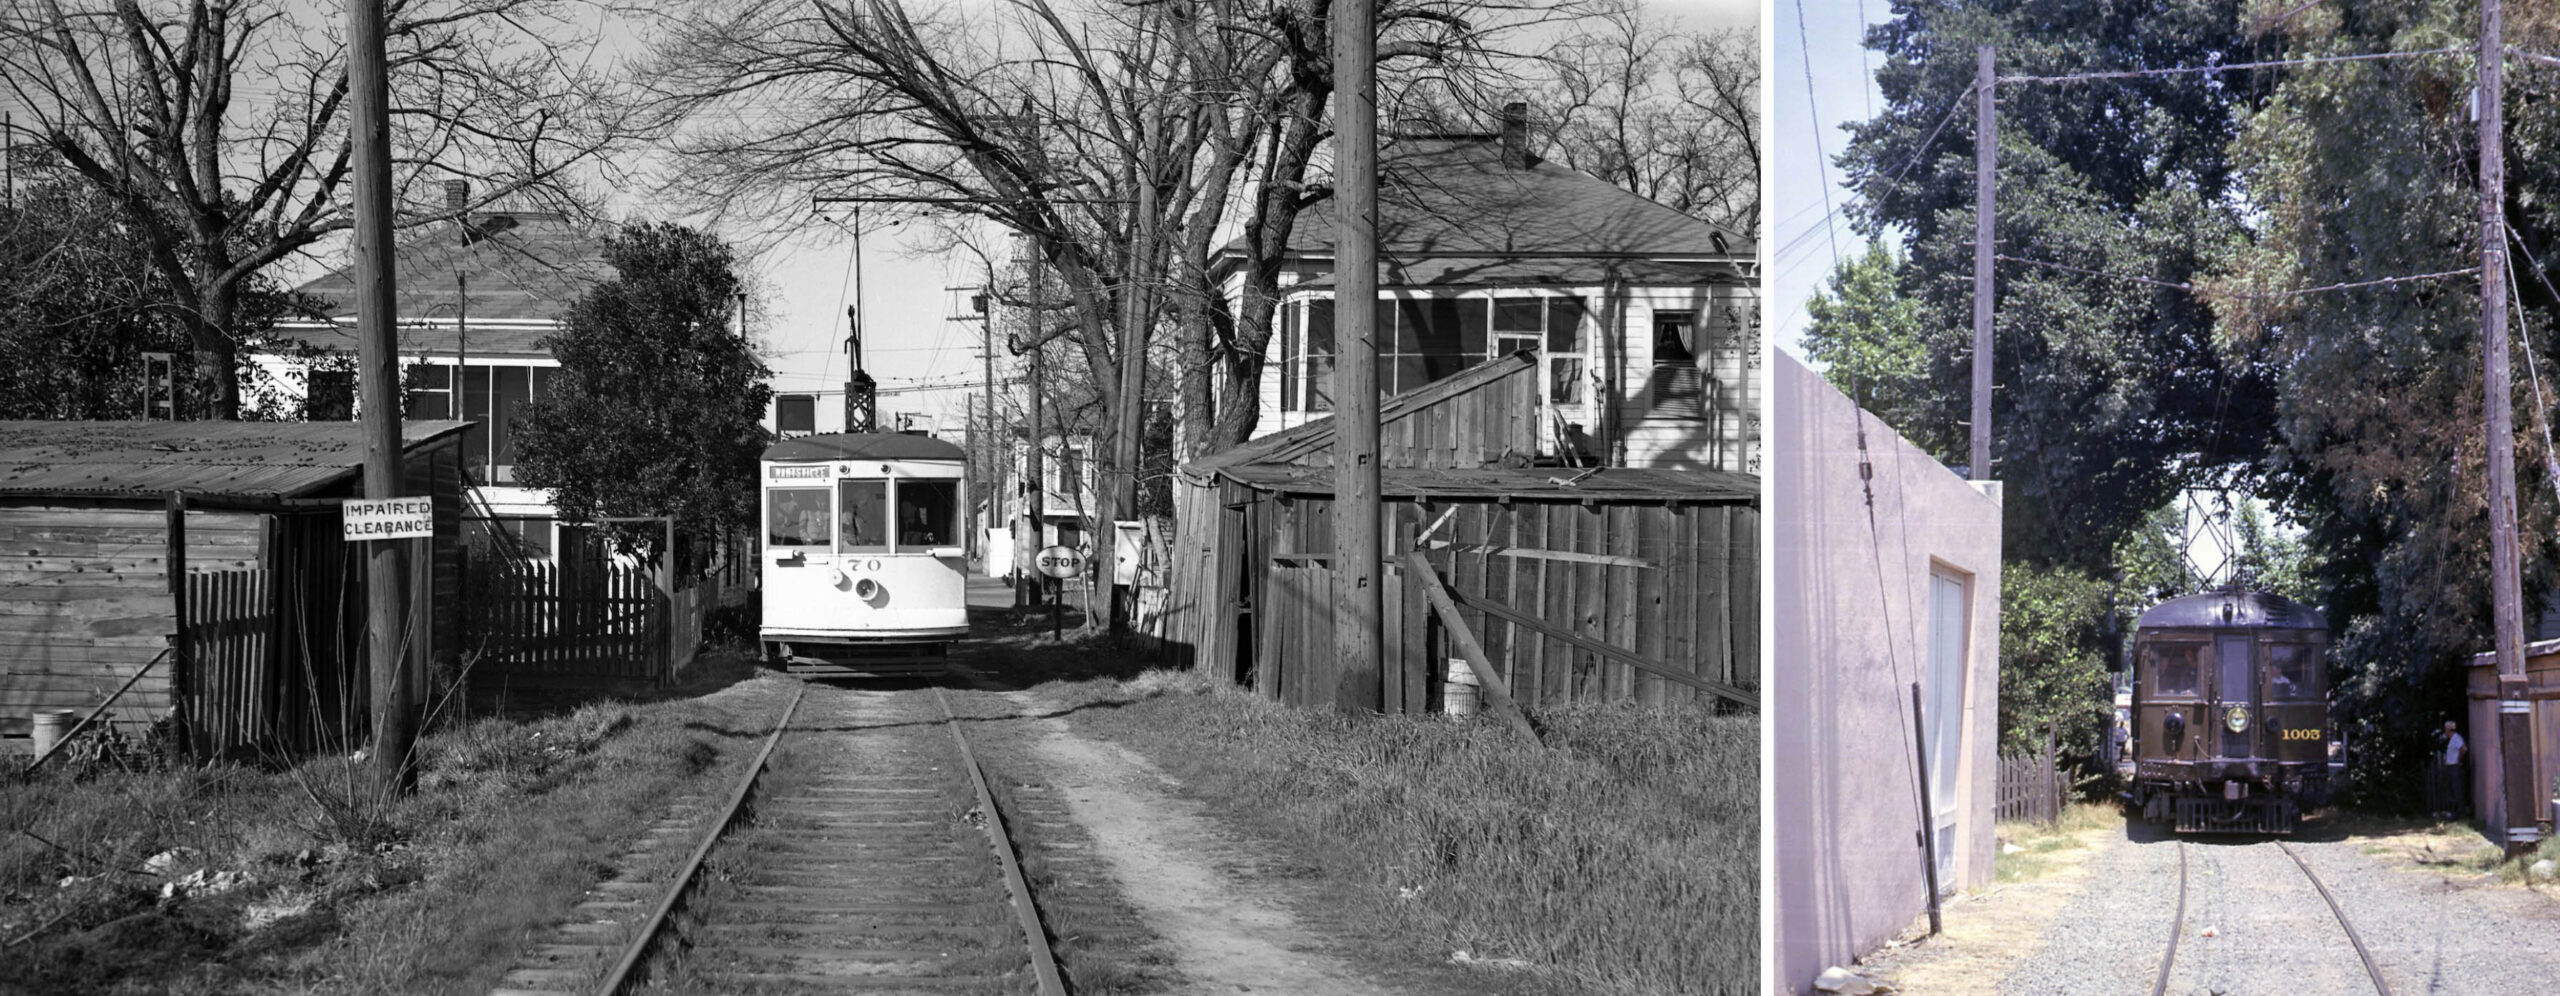
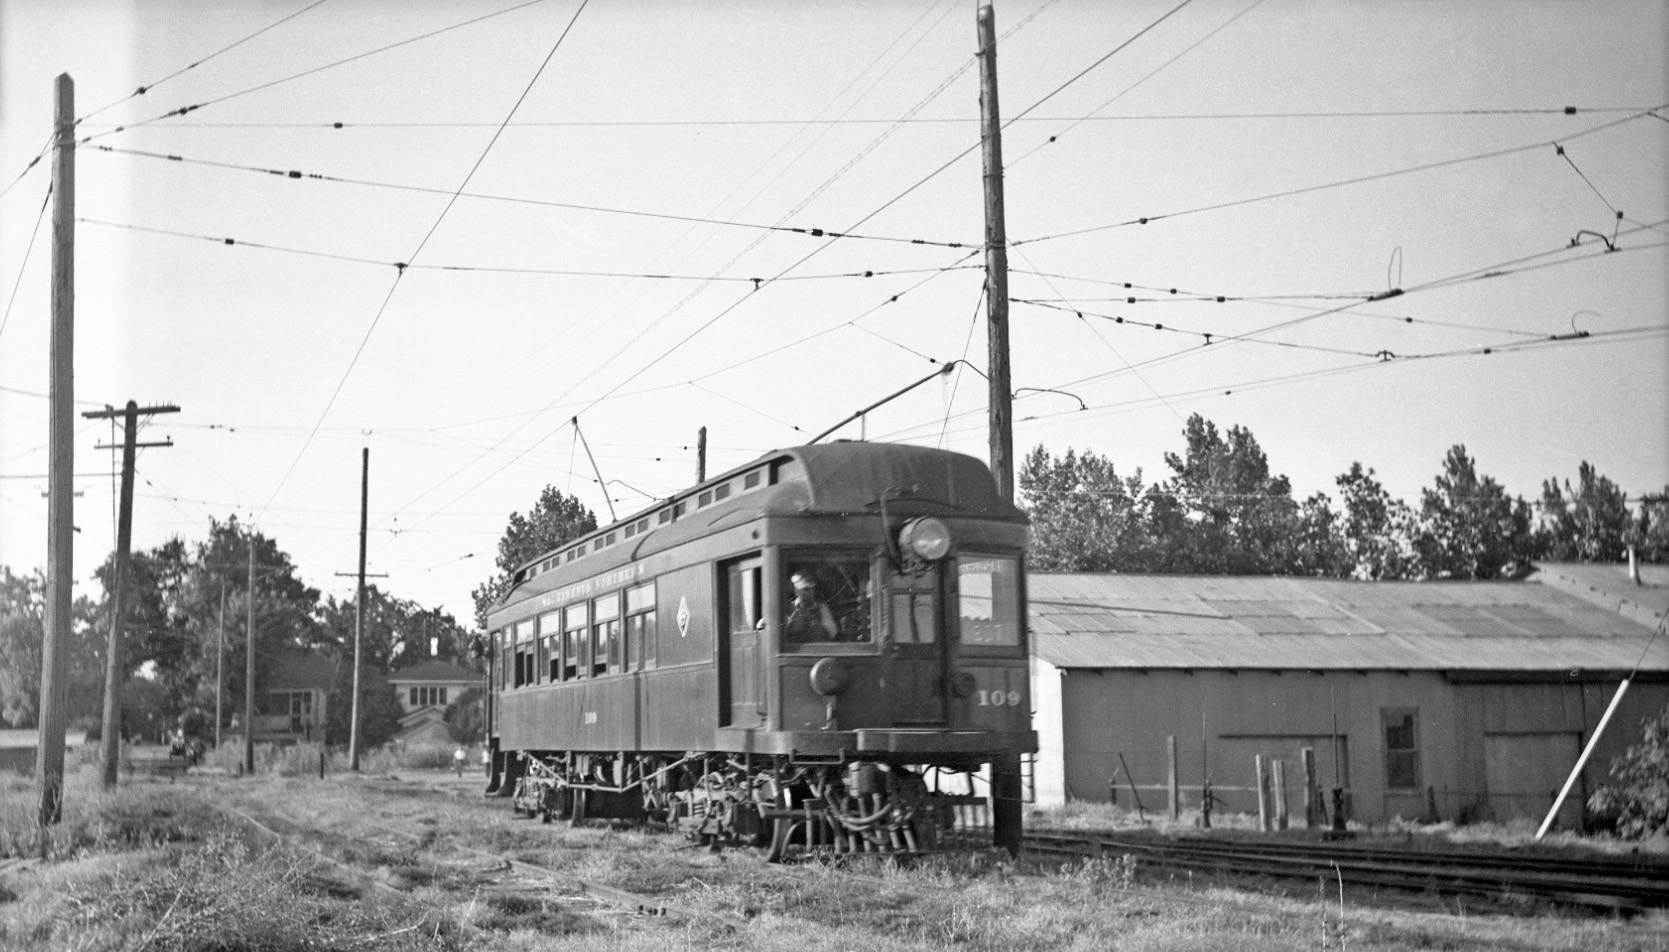
SN 109 sits at a tree-lined intersection with passengers in this west view from 1940. Mostly known as serving as the Colusa Local from Marysville, the question is where in the Marysville-Colusa route used by interurbans did such a tree-lined street exist?
L242-05-Silleman Bros. Photo, Holmes Bros. Coll., Courtesy BAERA, W. Railway Museum Arch., 159498sn, (Image 1 of 37)

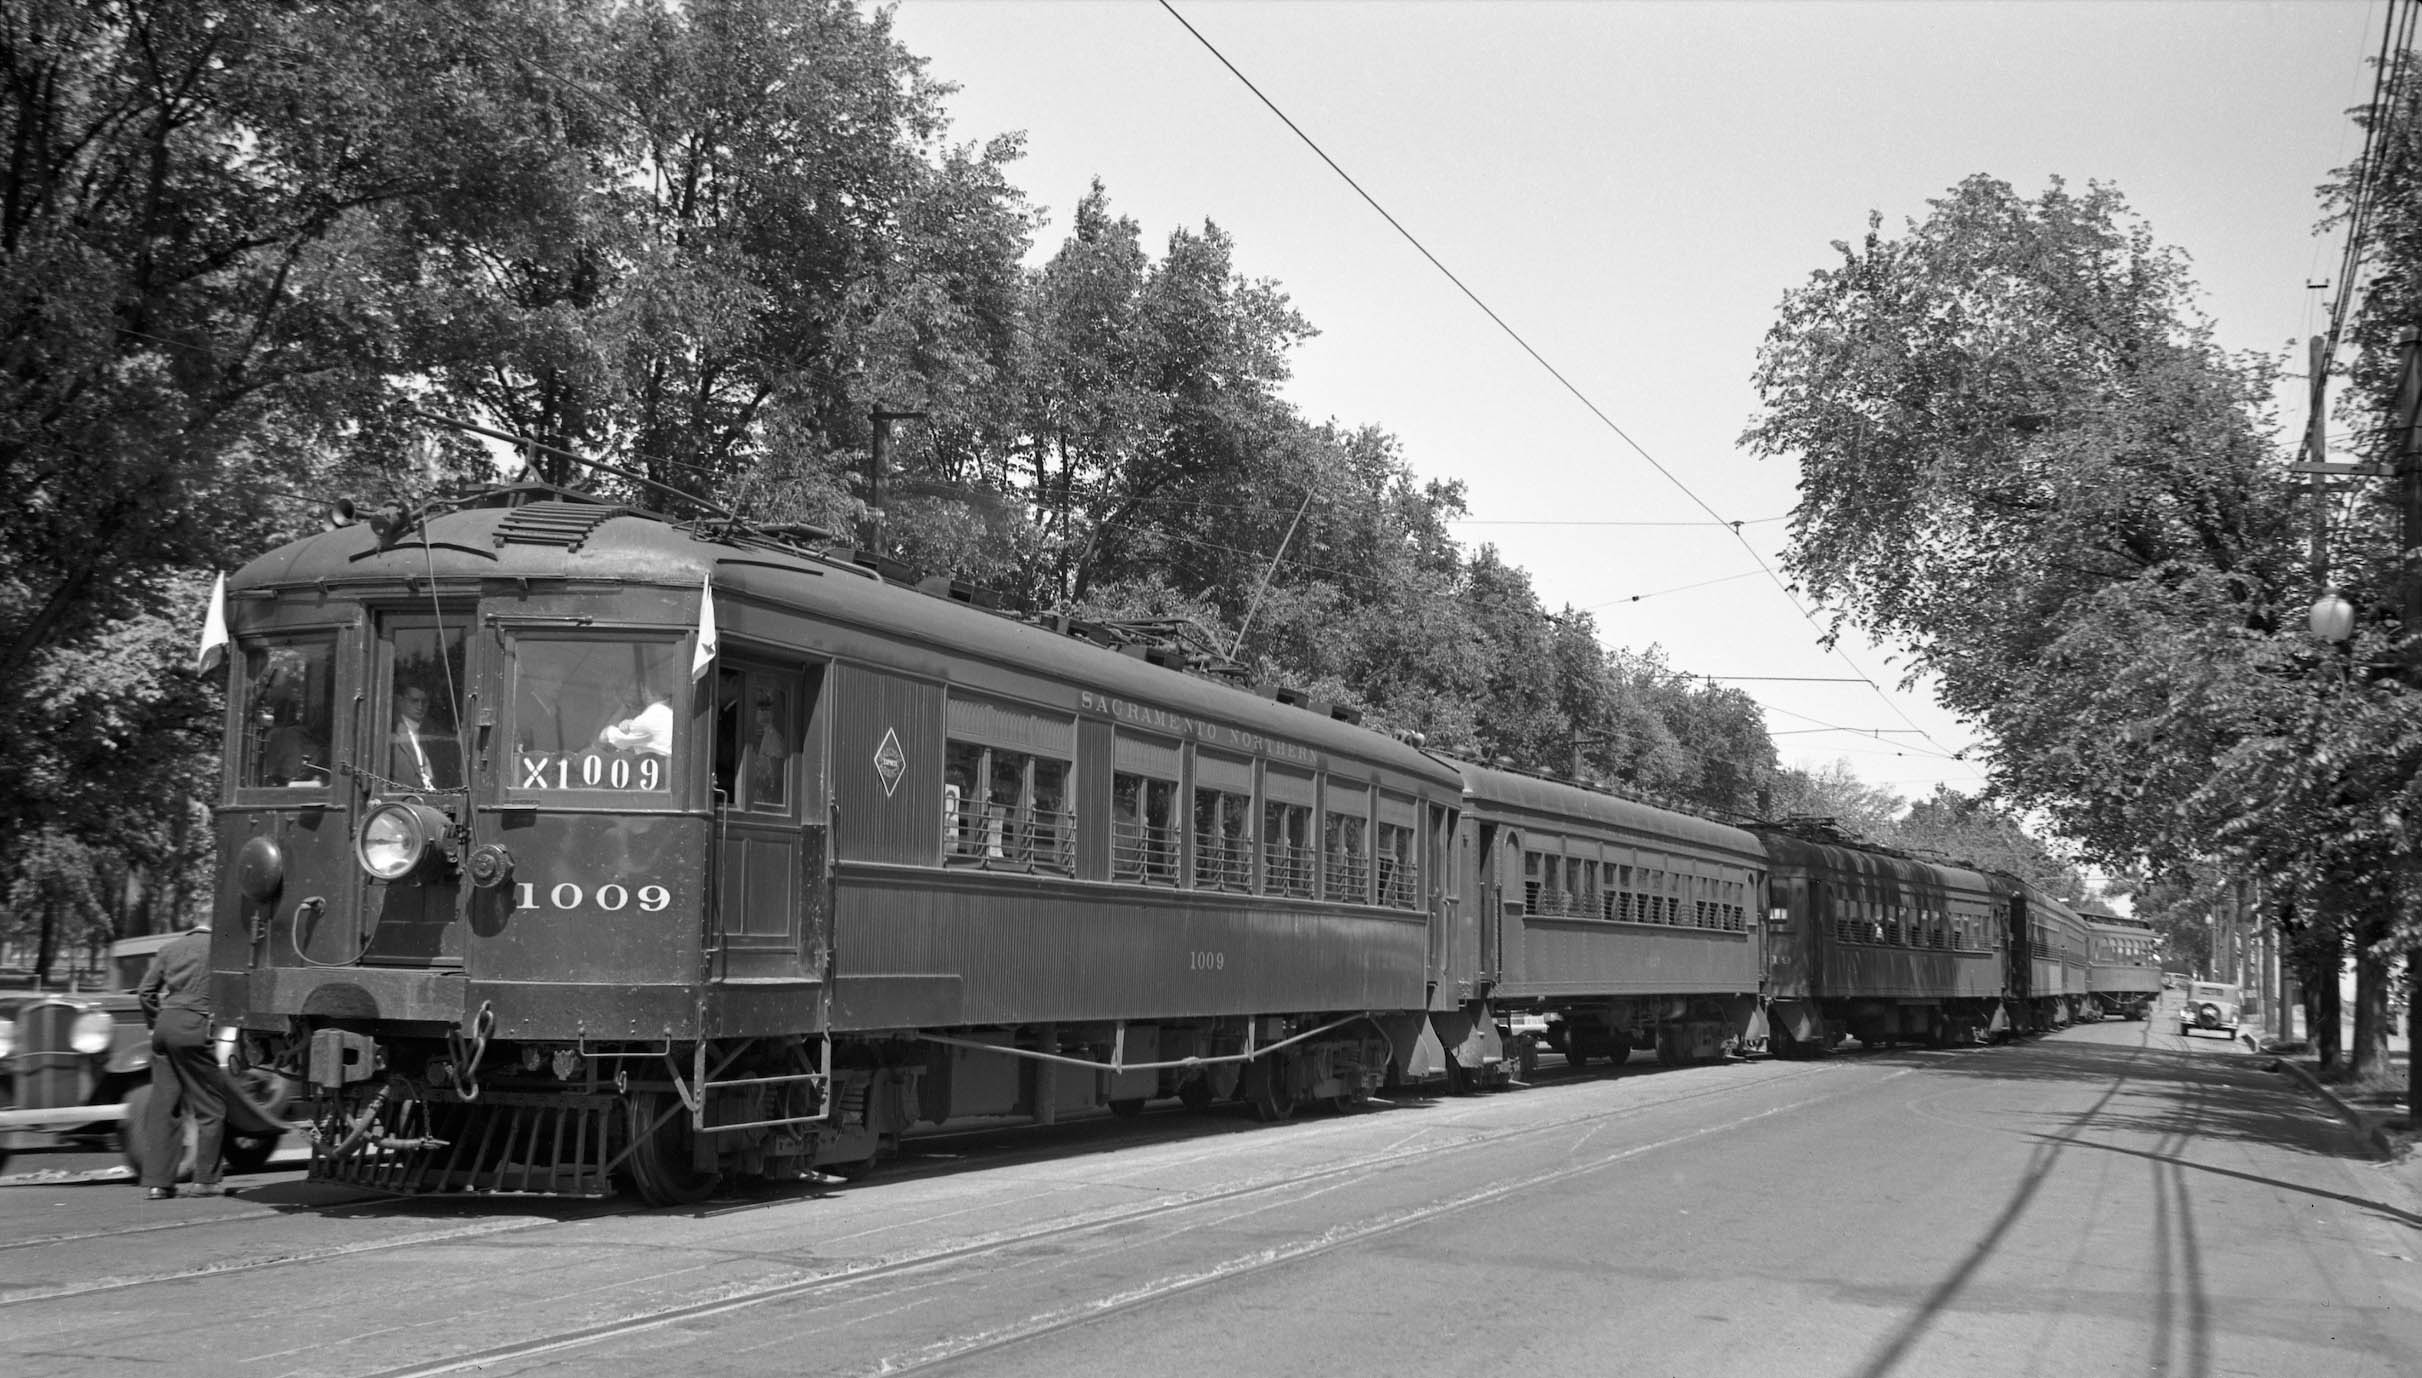
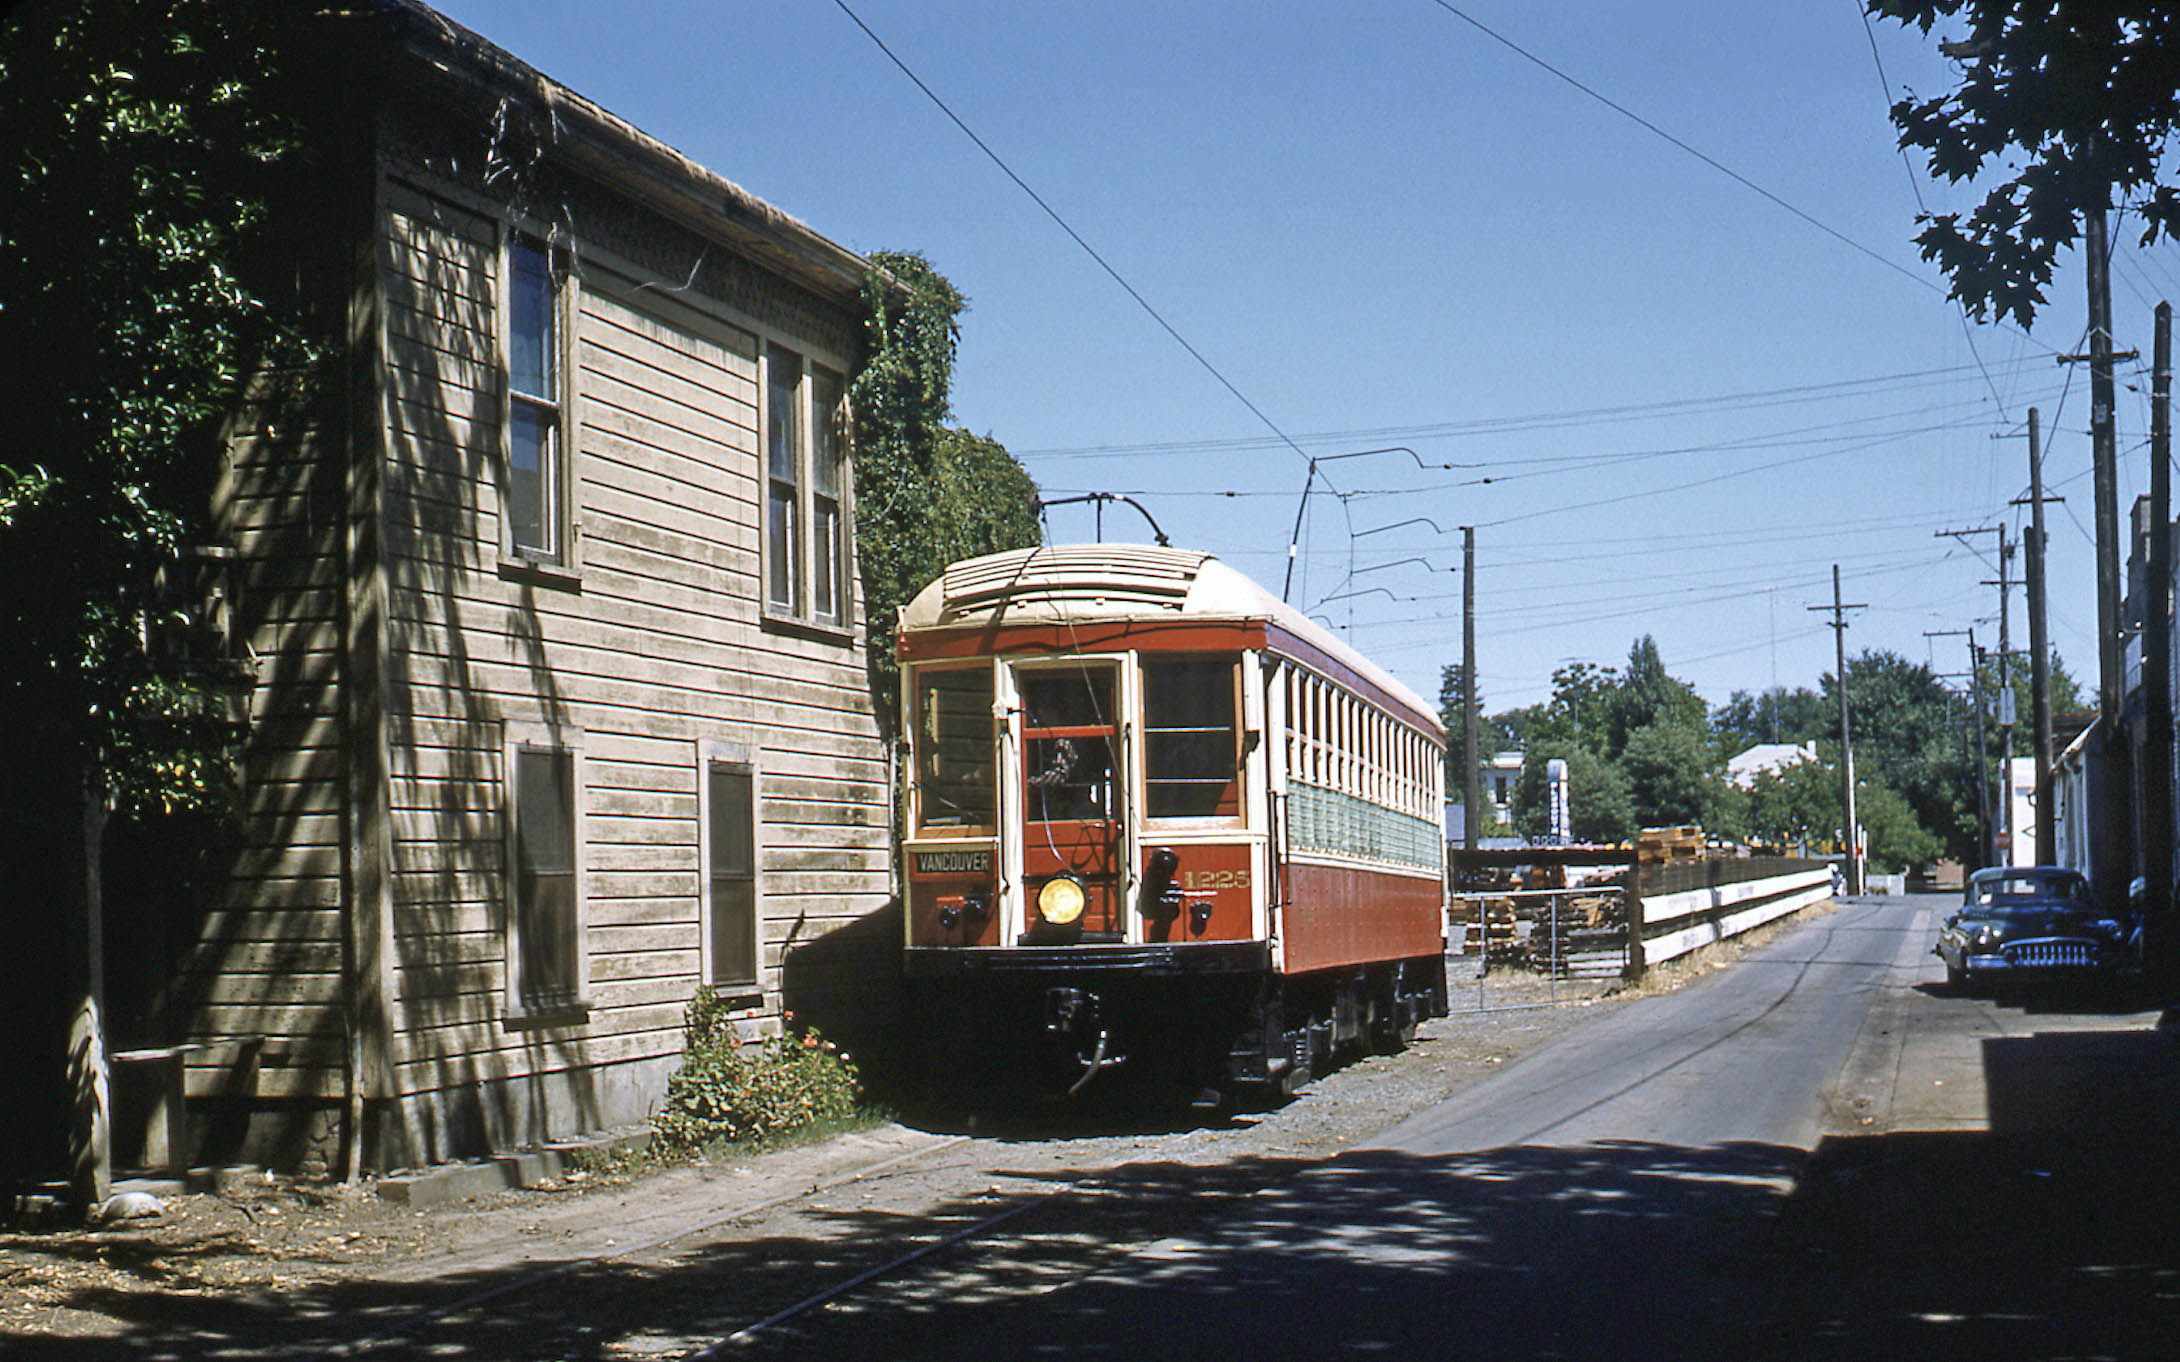
A clue to the question posed above is this west view with British Columbia Electric Railway’s 1225, BCER, on excursion on June 15, 1958. The date and trolley pole indicate the location is within Marysville or Yuba City, the only remaining outposts with overhead wire on SN trackage. Best to use an aerial map to explain exactly where this is.
L242-10-Addison Laflin Photo, Courtesy BAERA, Western Railway Museum Archives, 166760sn, (Image 2 of 37)
The location is not Yuba City, since interurbans only used the very broad Bridge St. Both images were taken in Marysville on 4th St., facing west toward Orange St., this indicated by the red arrow. How did a route previously used by SN 109 survive into the 1960s, two decades after the Colusa Local was abandoned?
L242-15-Dorothea Lange Photo, U.S. National Archives and Records Administration, NARA-521573, (Image 3 of 37)
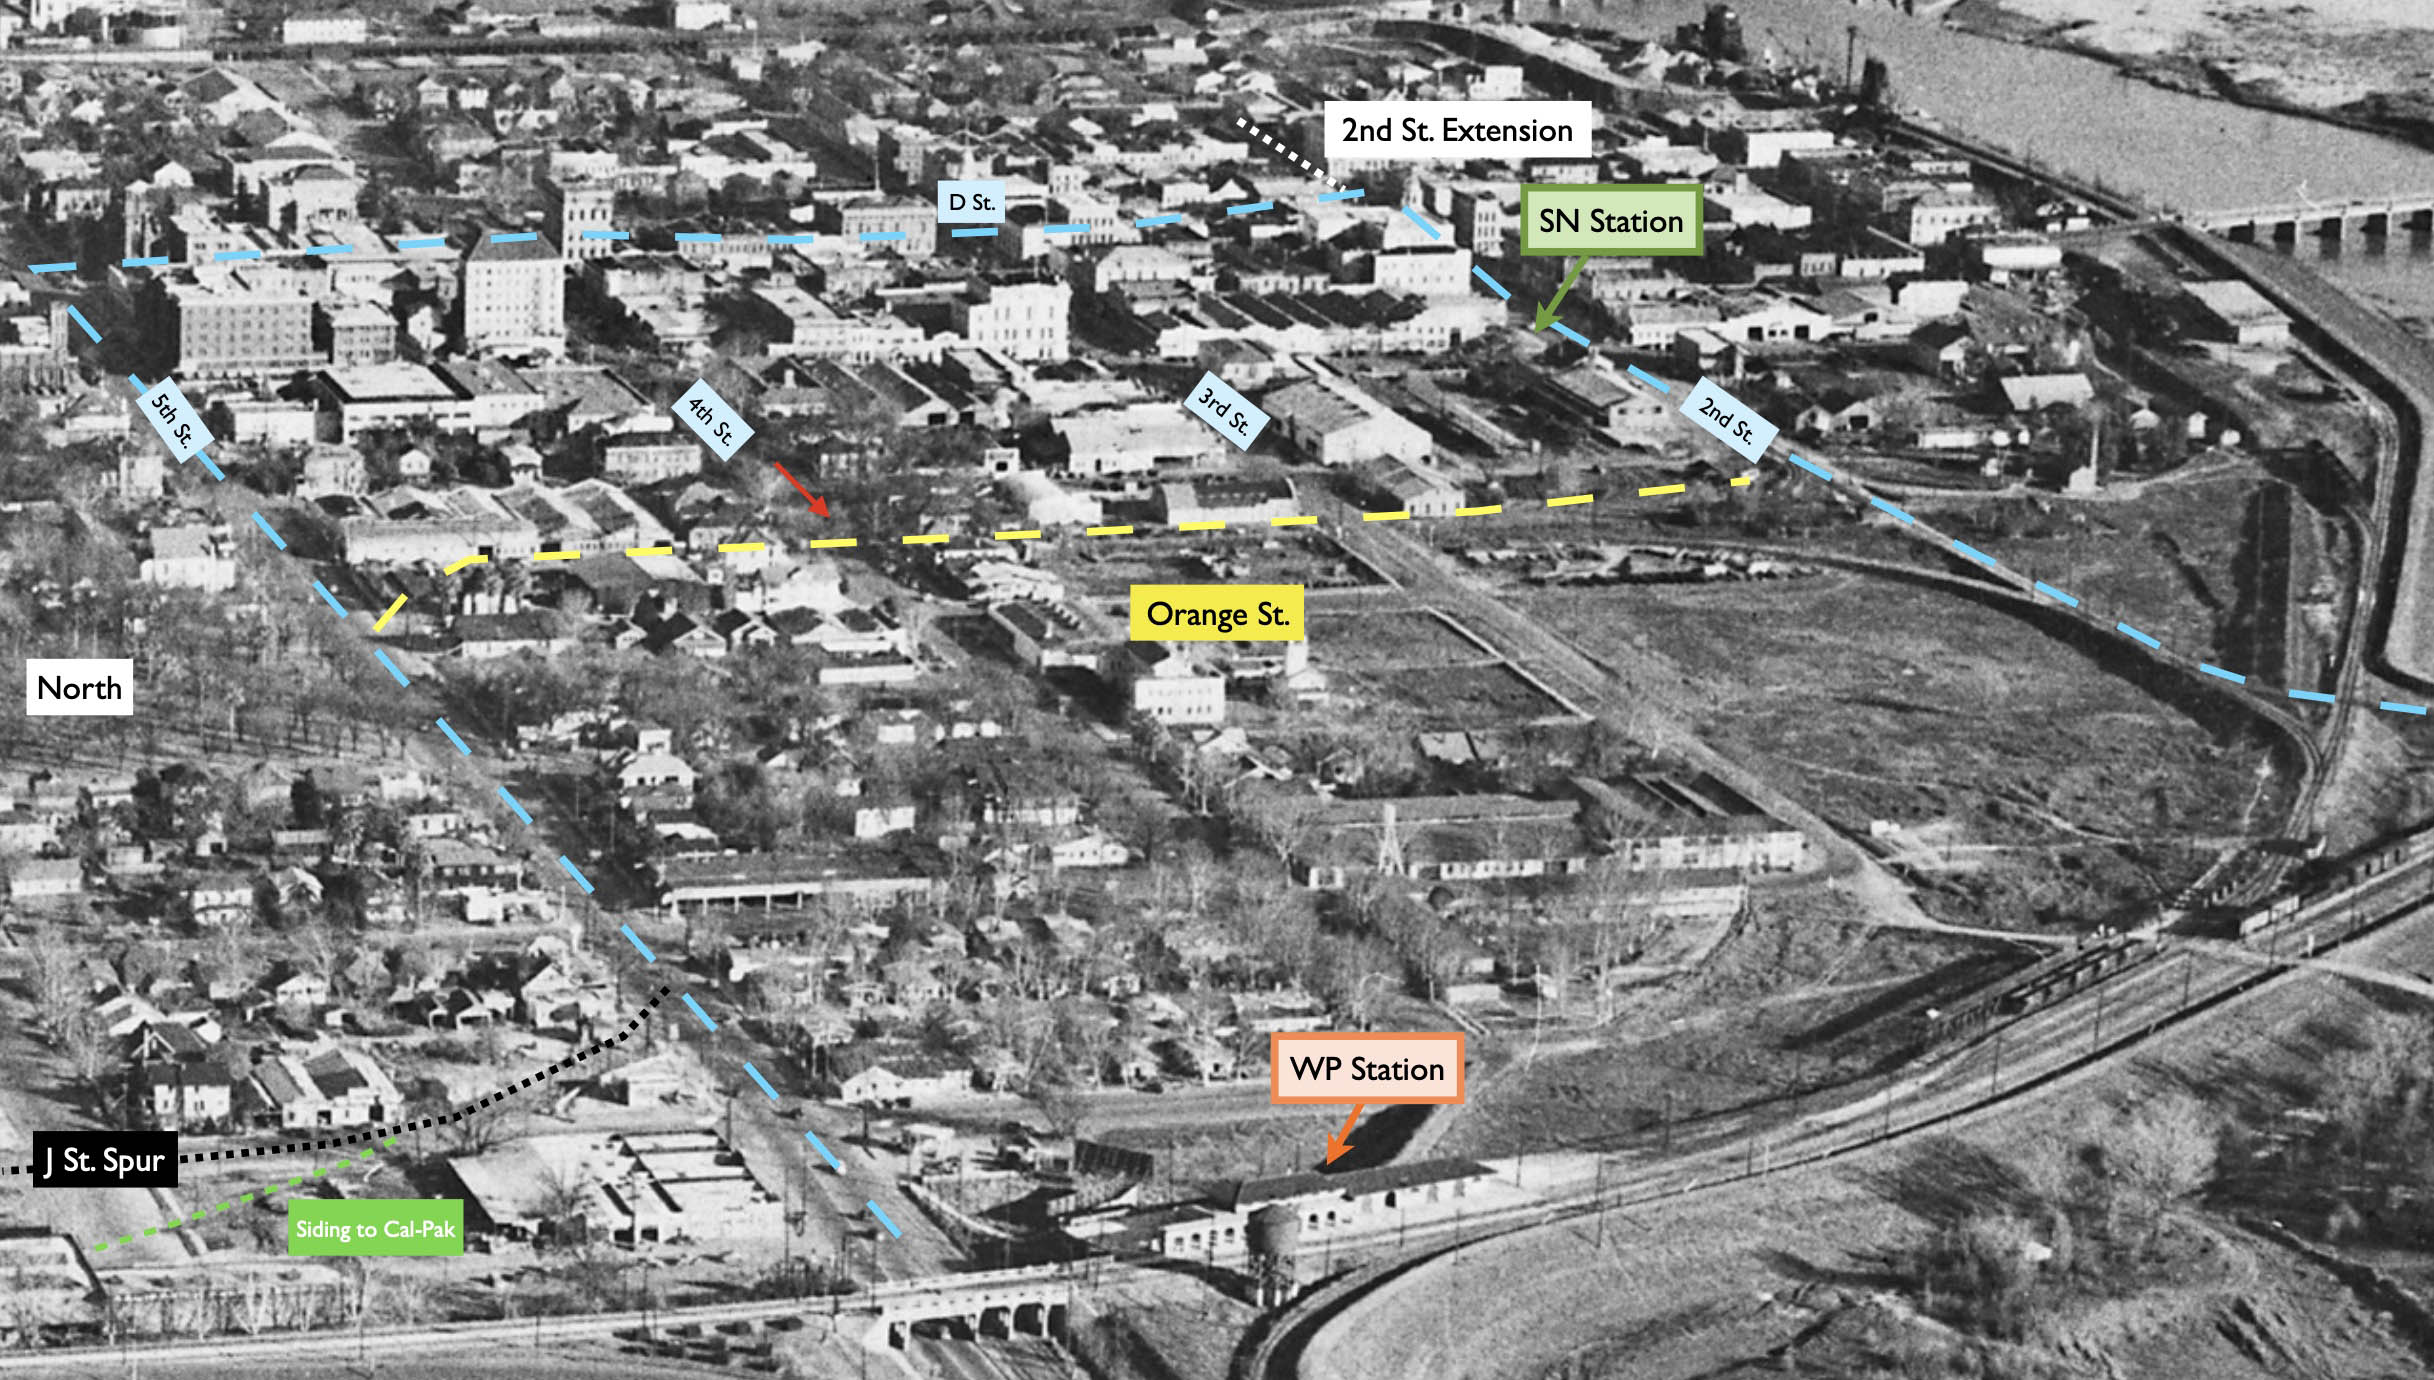
This north view from Aug. 1, 1960 identifies the Hart Building at C St. and 4th St., green arrow. Heading right to left, or west, down 4th St. leads to the intersection with Orange St., orange circle, a small enclave of homes amongst industrial buildings. Following the tracks to the south, all but one track curve to the east and end at the WP-SN freight station, yellow dot, or SN passenger station, blue dot. Survival of the track on Orange St. relied on the SN freight operation.
L242-20-Copyright California Department of Transportation, 7609-3, Detail , (Image 4 of 37)
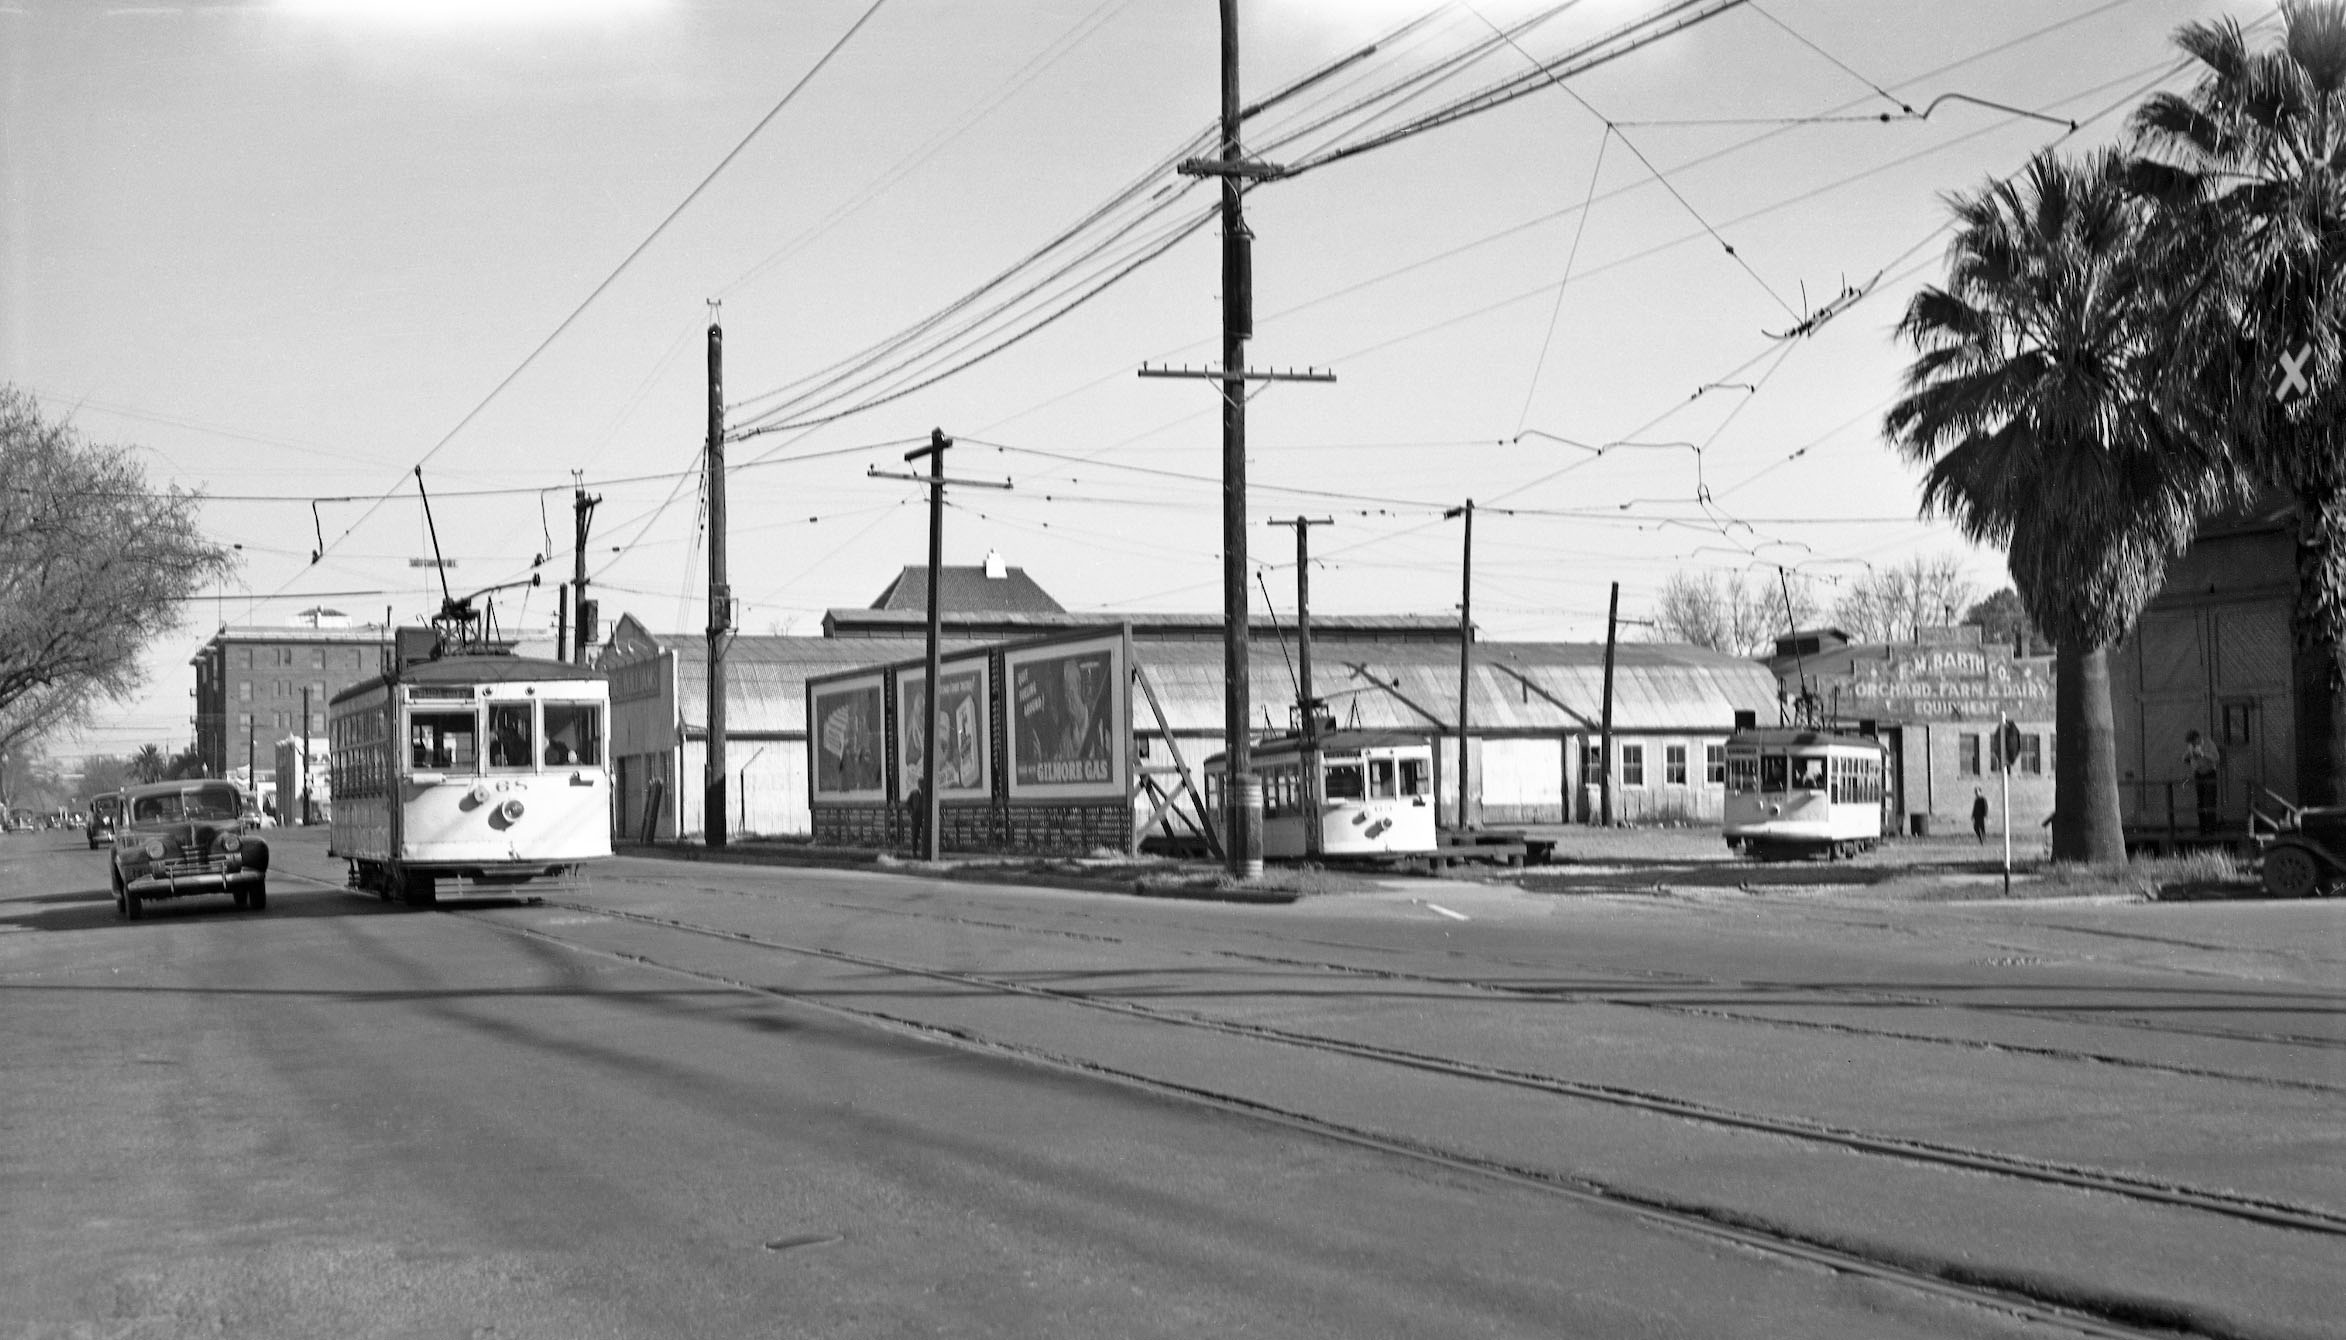
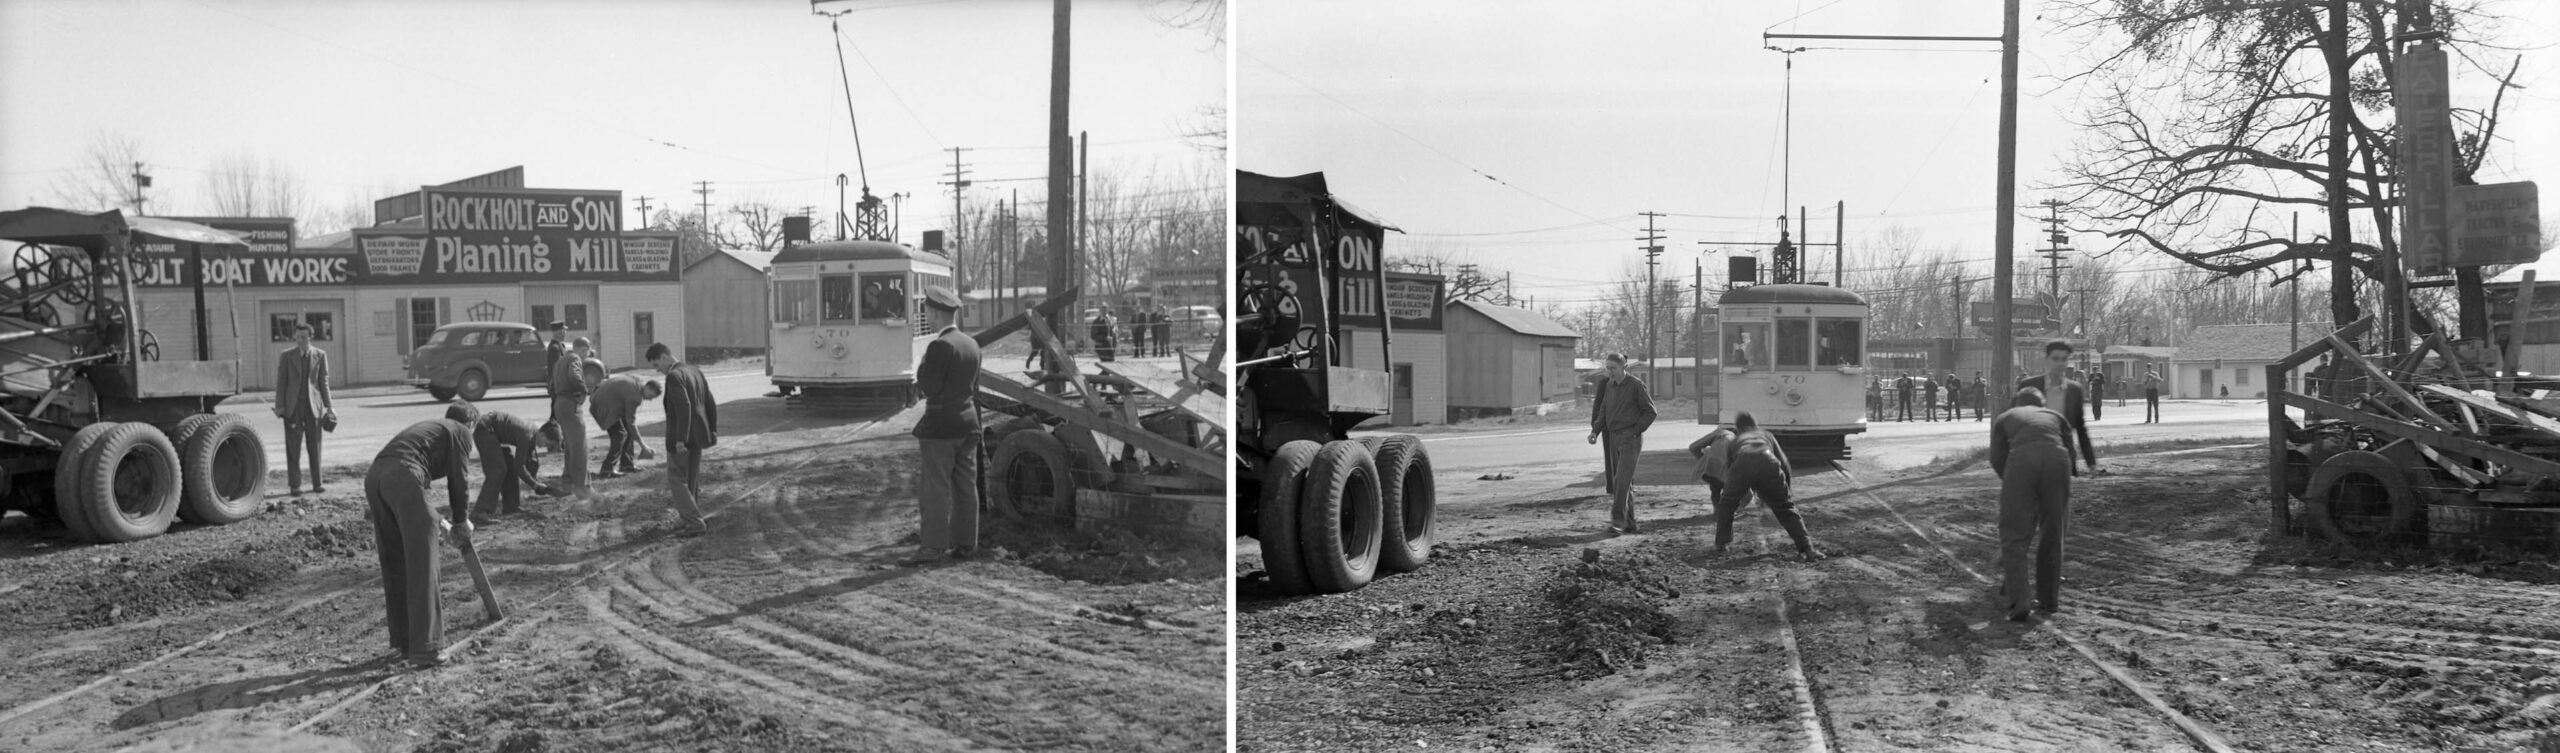
Next to 5th St. during the last day of streetcar operations Feb. 15, 1942, Birney cars 68, 63 and 70 are seen in a southeast view of the northern end of the Orange St. connector. The first building sign facing 5th St. is Williams, then F.M. Barth and Co., Orchard, Farm and Dairy Equipment along Orange St. Note the large palm tree and the building beside it before viewing the image that follows.
L242-25-Arthur Lloyd Photo, Western Railway Museum Archives, 129785sn, (Image 5 of 37)
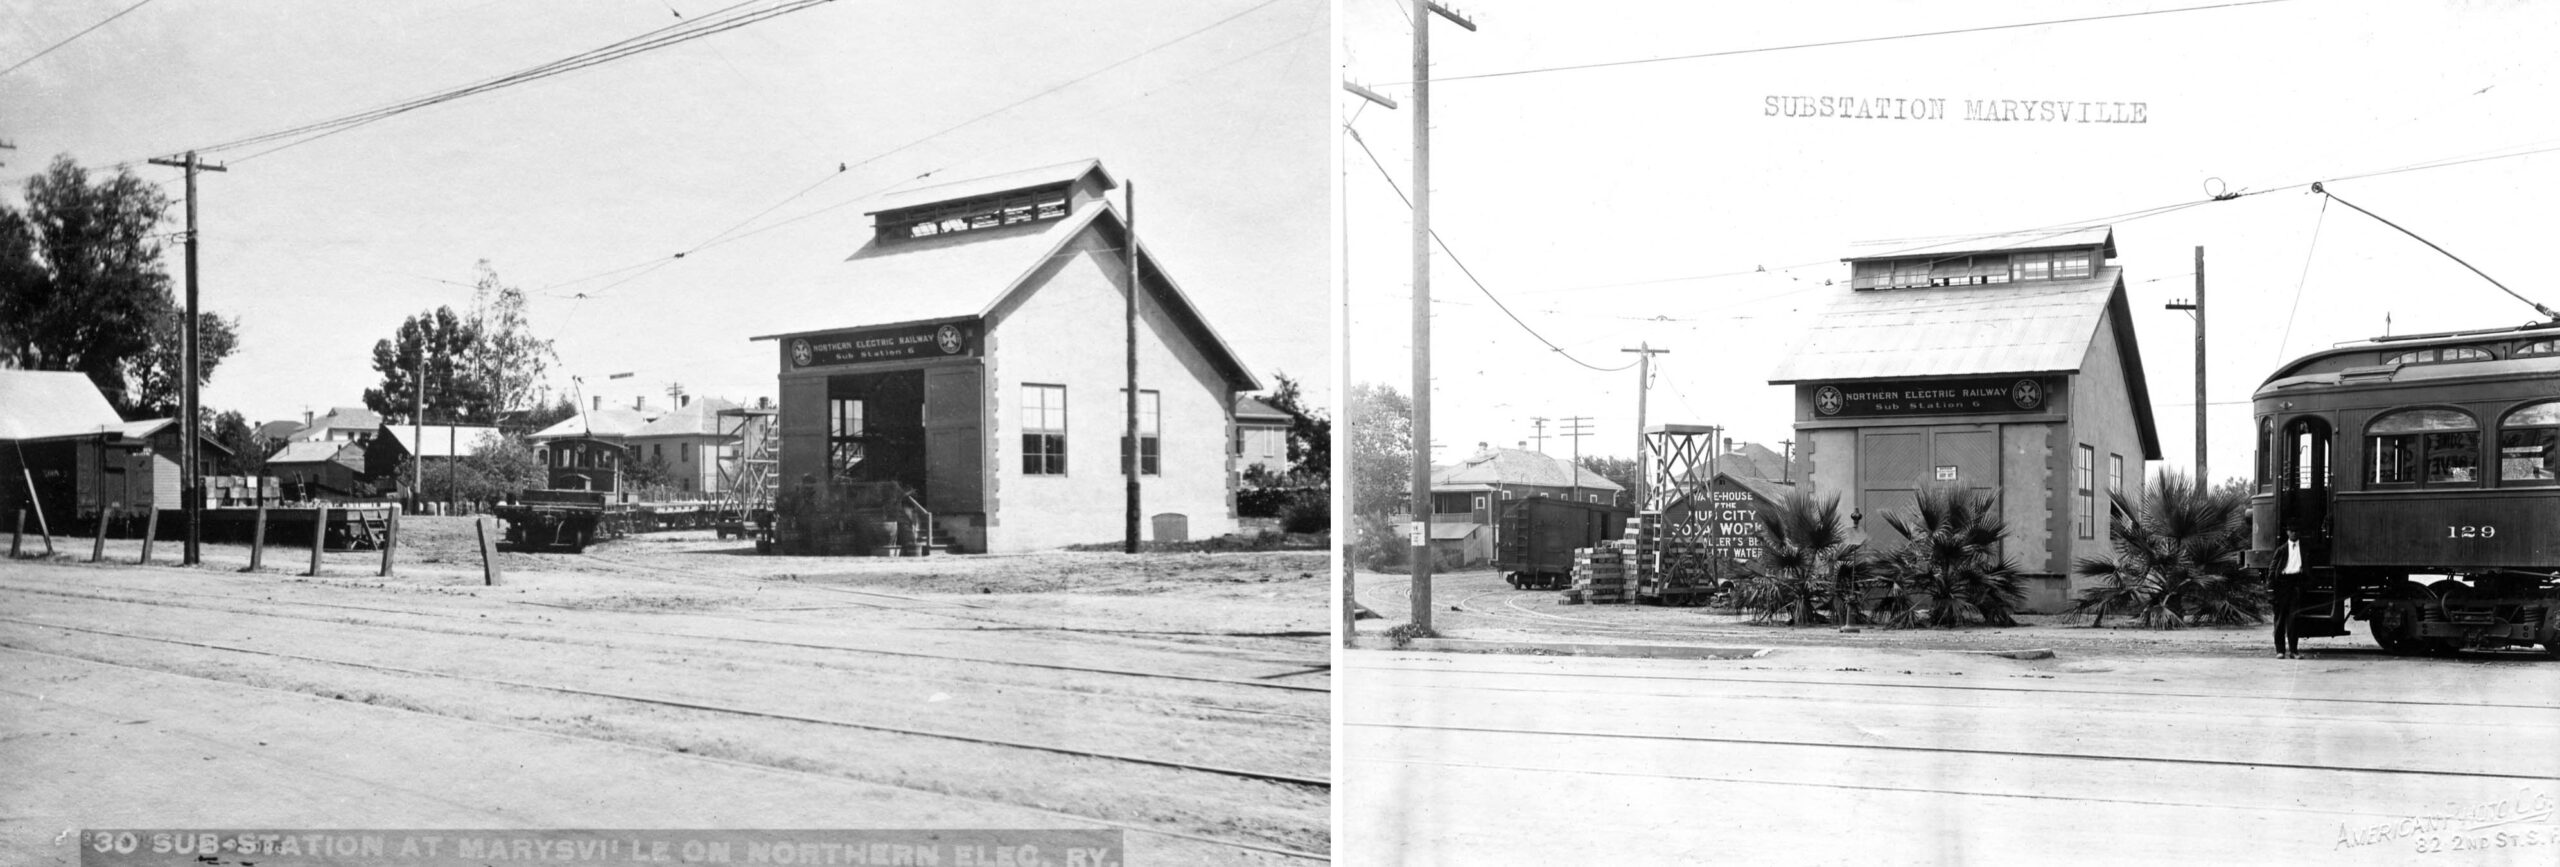
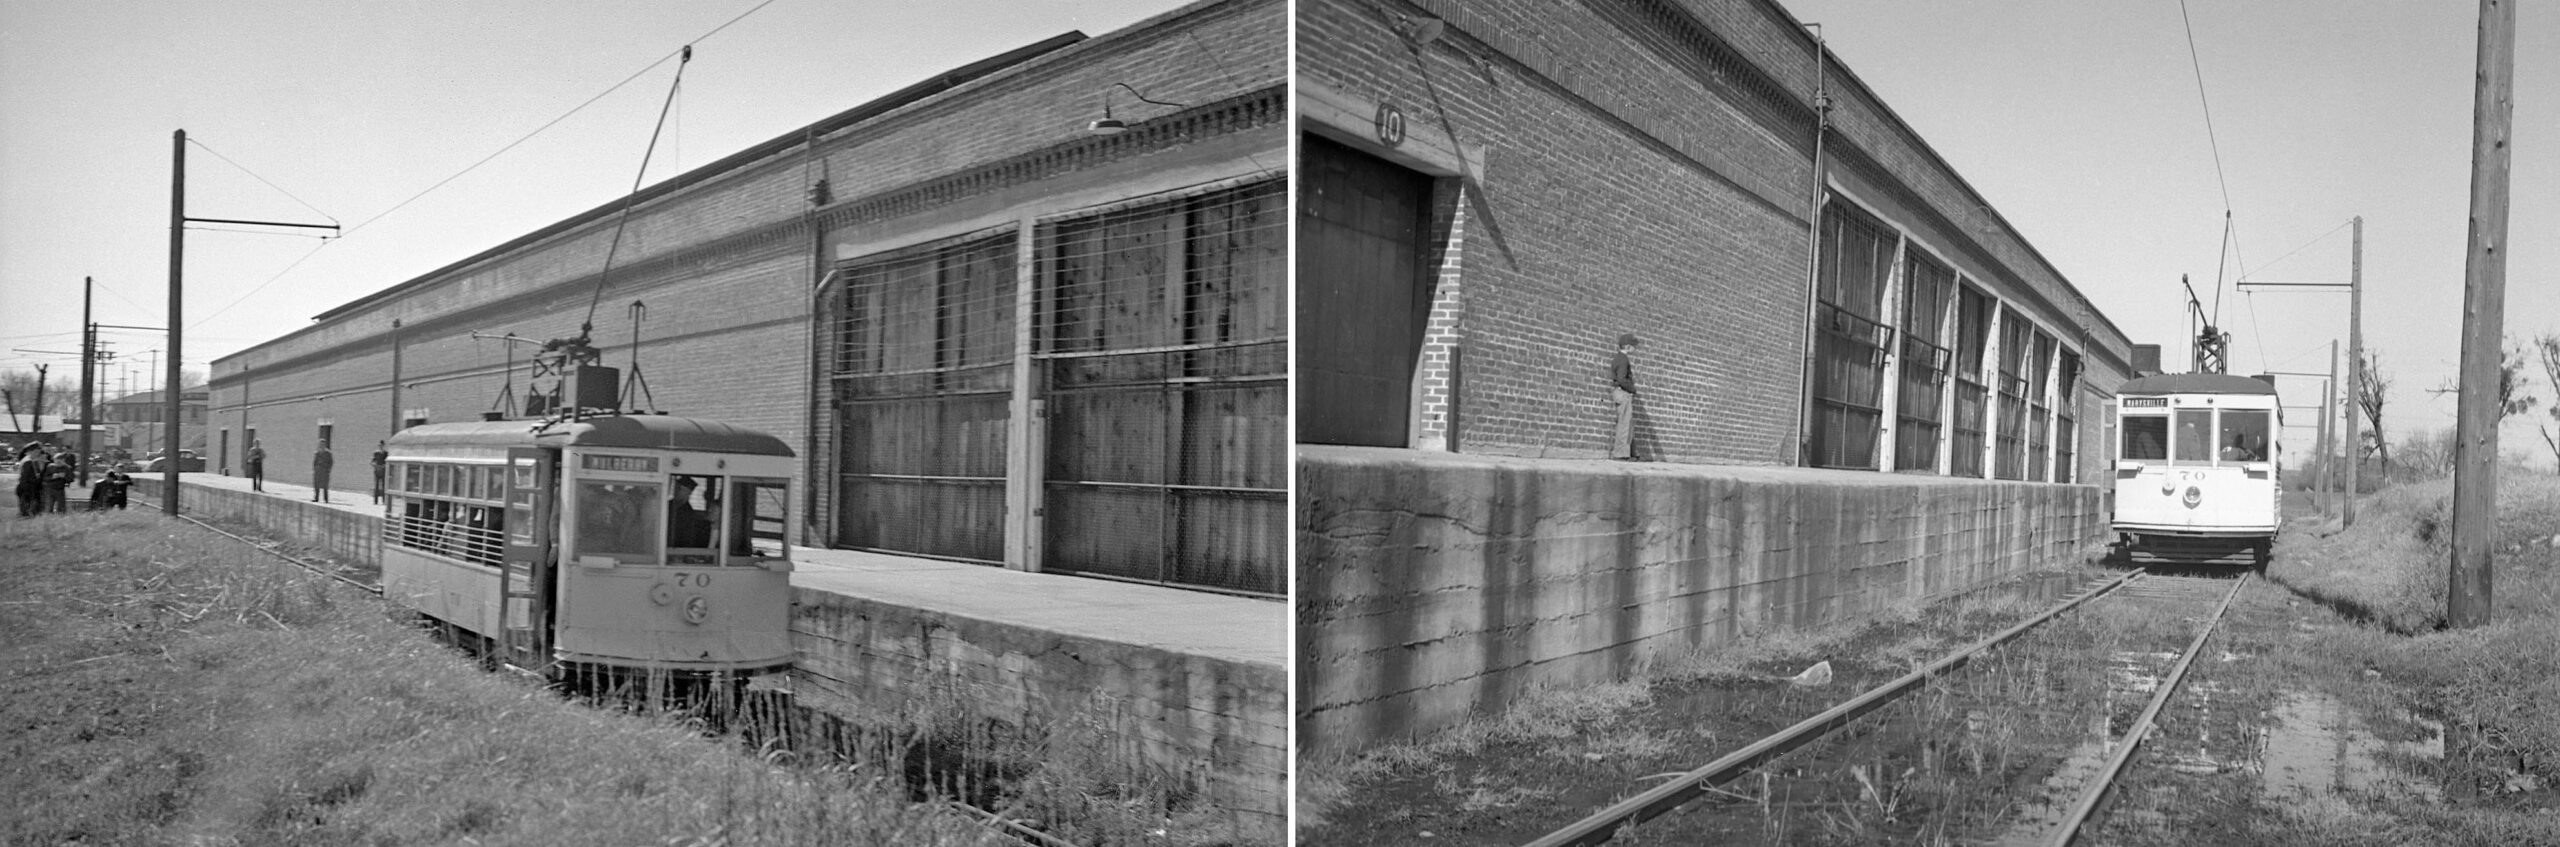
Same location, circa 1910 on the left, and sometime later based on the street paving, right, these southeast views show the building housing the Northern Electric Sub Station no. 6. The images shown so far document at least two sidings existed in addition to the principal track south, corroborated by a 1936 map of the area on page 412 in Jeff Asay’s book “The Iron Feather”. More freight details to come. Ref: NE Photo, l, American Photo Co. Photo, r.
L242-30-Courtesy BAERA, Western Railway Museum Archives, 121372sn, l, 125413sn, r , (Image 6 of 37)
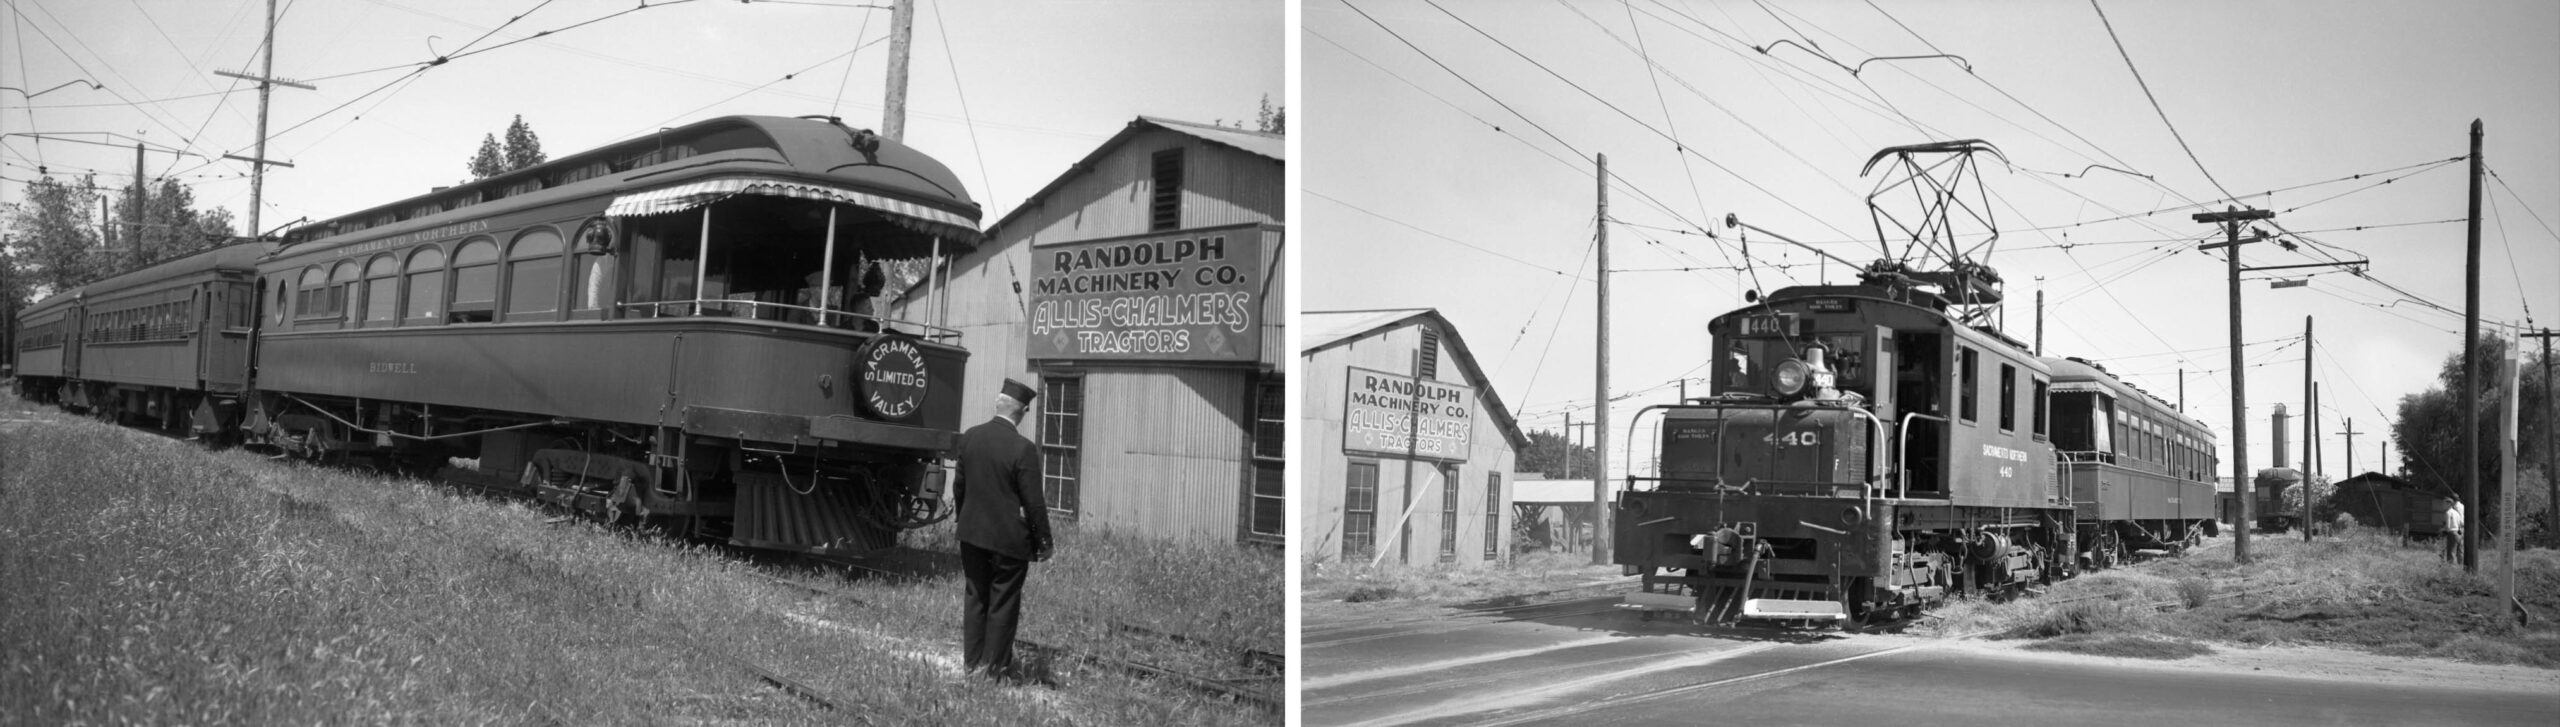
The Cal-Neva “Mystery Excursion to Colusa” led by SN 1009 sits poised to leave the Orange St. connector in this southeast view from May 8, 1938. The train will need to cross oncoming traffic to enter 5th St. on the southern-most or eastbound track, and then proceeding west against traffic to use the nearby second switch to access the westbound track on its way to Yuba City.
L242-35-Wilbur Whittaker Photo, Courtesy Arnold Menke and Garth Groff, (Image 7 of 37)
The visual proof for the previous description of the exit from the connector onto 5th St. is provided moments later from the previous scene as the train with SN 1009-1023-1019-1021-1020-Bidwell moves along 5th St. between G St. and H St., the Bidwell still on the last segment of the connector. East View, May 8, 1938.
L242-37-Dudley Thickens Photo, Courtesy BAERA, Western Railway Museum Archives, 60009sn, (Image 8 of 37)
This east view from Dec. 24, 1955 will be used to to review the progress made so far. The initial palm tree, turquoise arrow, substation building, orange arrow, and F.M. Barth and Co., green arrow, bring the southerly entrance of the connector closer to 4th St.
L242-40-Copyright California Department of Transportation, 4724-14, Detail, (Image 9 of 37)
A second view of BCER 1225 on excursion on June 15, 1958, here viewed to the north, poised to head back to 2nd and F St. The yard through which the trains accessed 5th St. is gated in this scene. The question at this time is whether trains actually entered 5th St. at this late date. The answer is no, as will be explained later. The sign across the street spells Plymouth.
L242-45-Ernest Haase Photo, Moreau Coll. Courtesy BAERA, W. Railway Museum Arch., 167261sn, (Image 10 of 37)
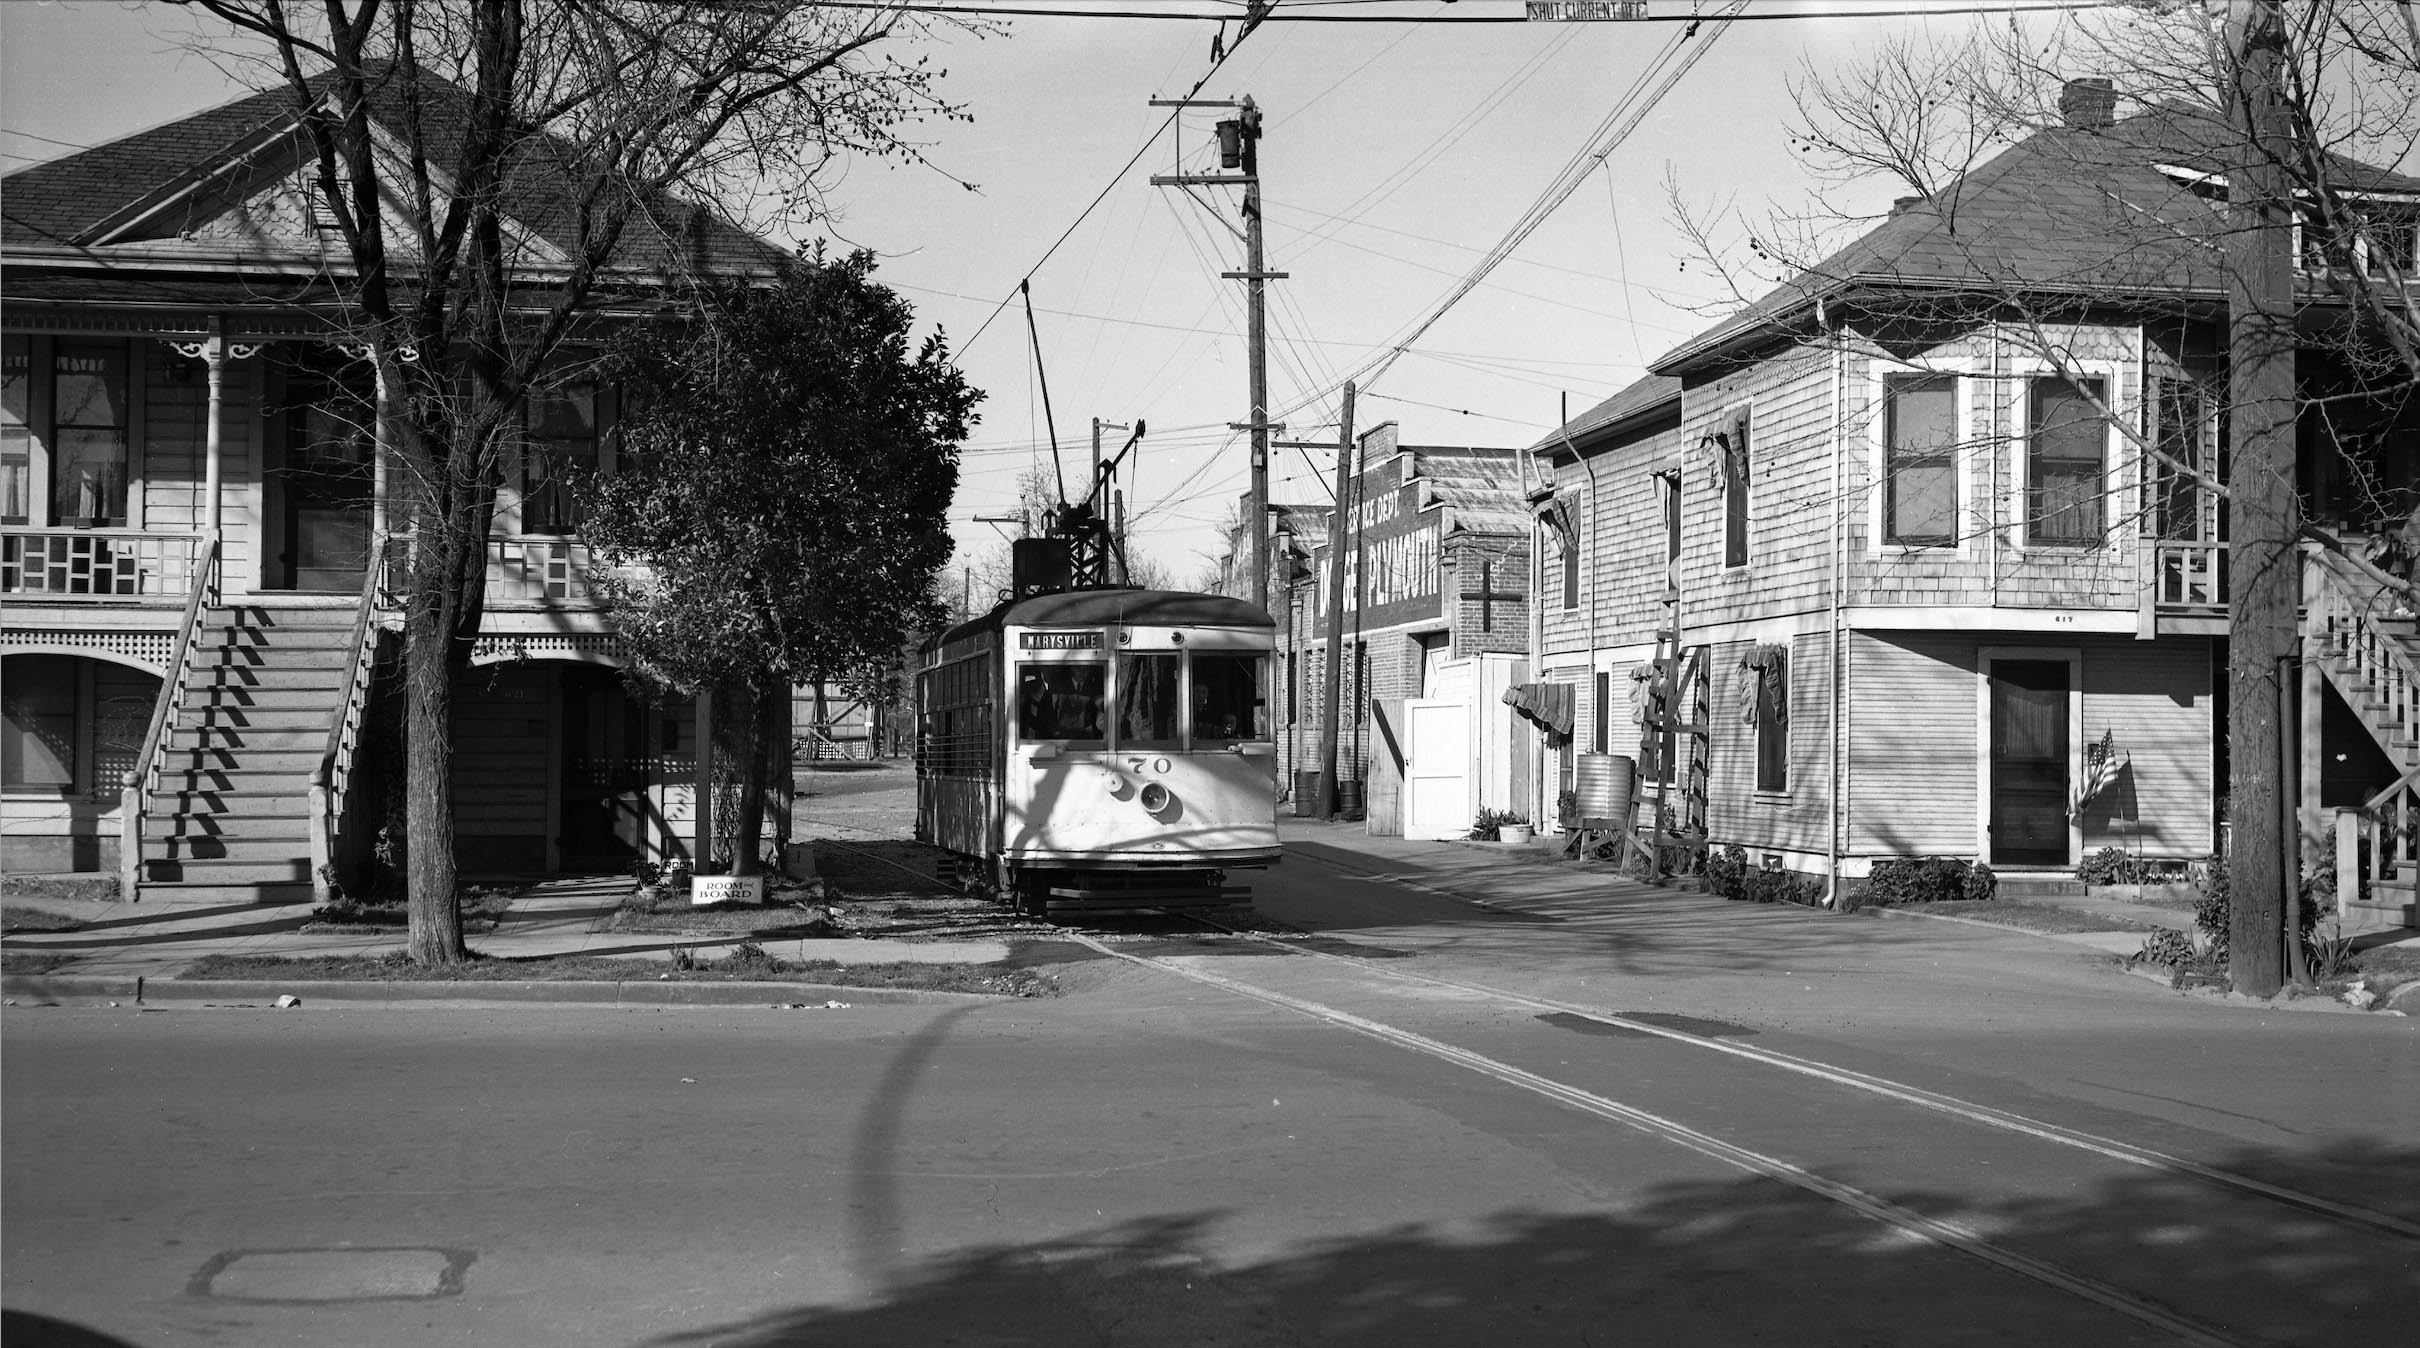
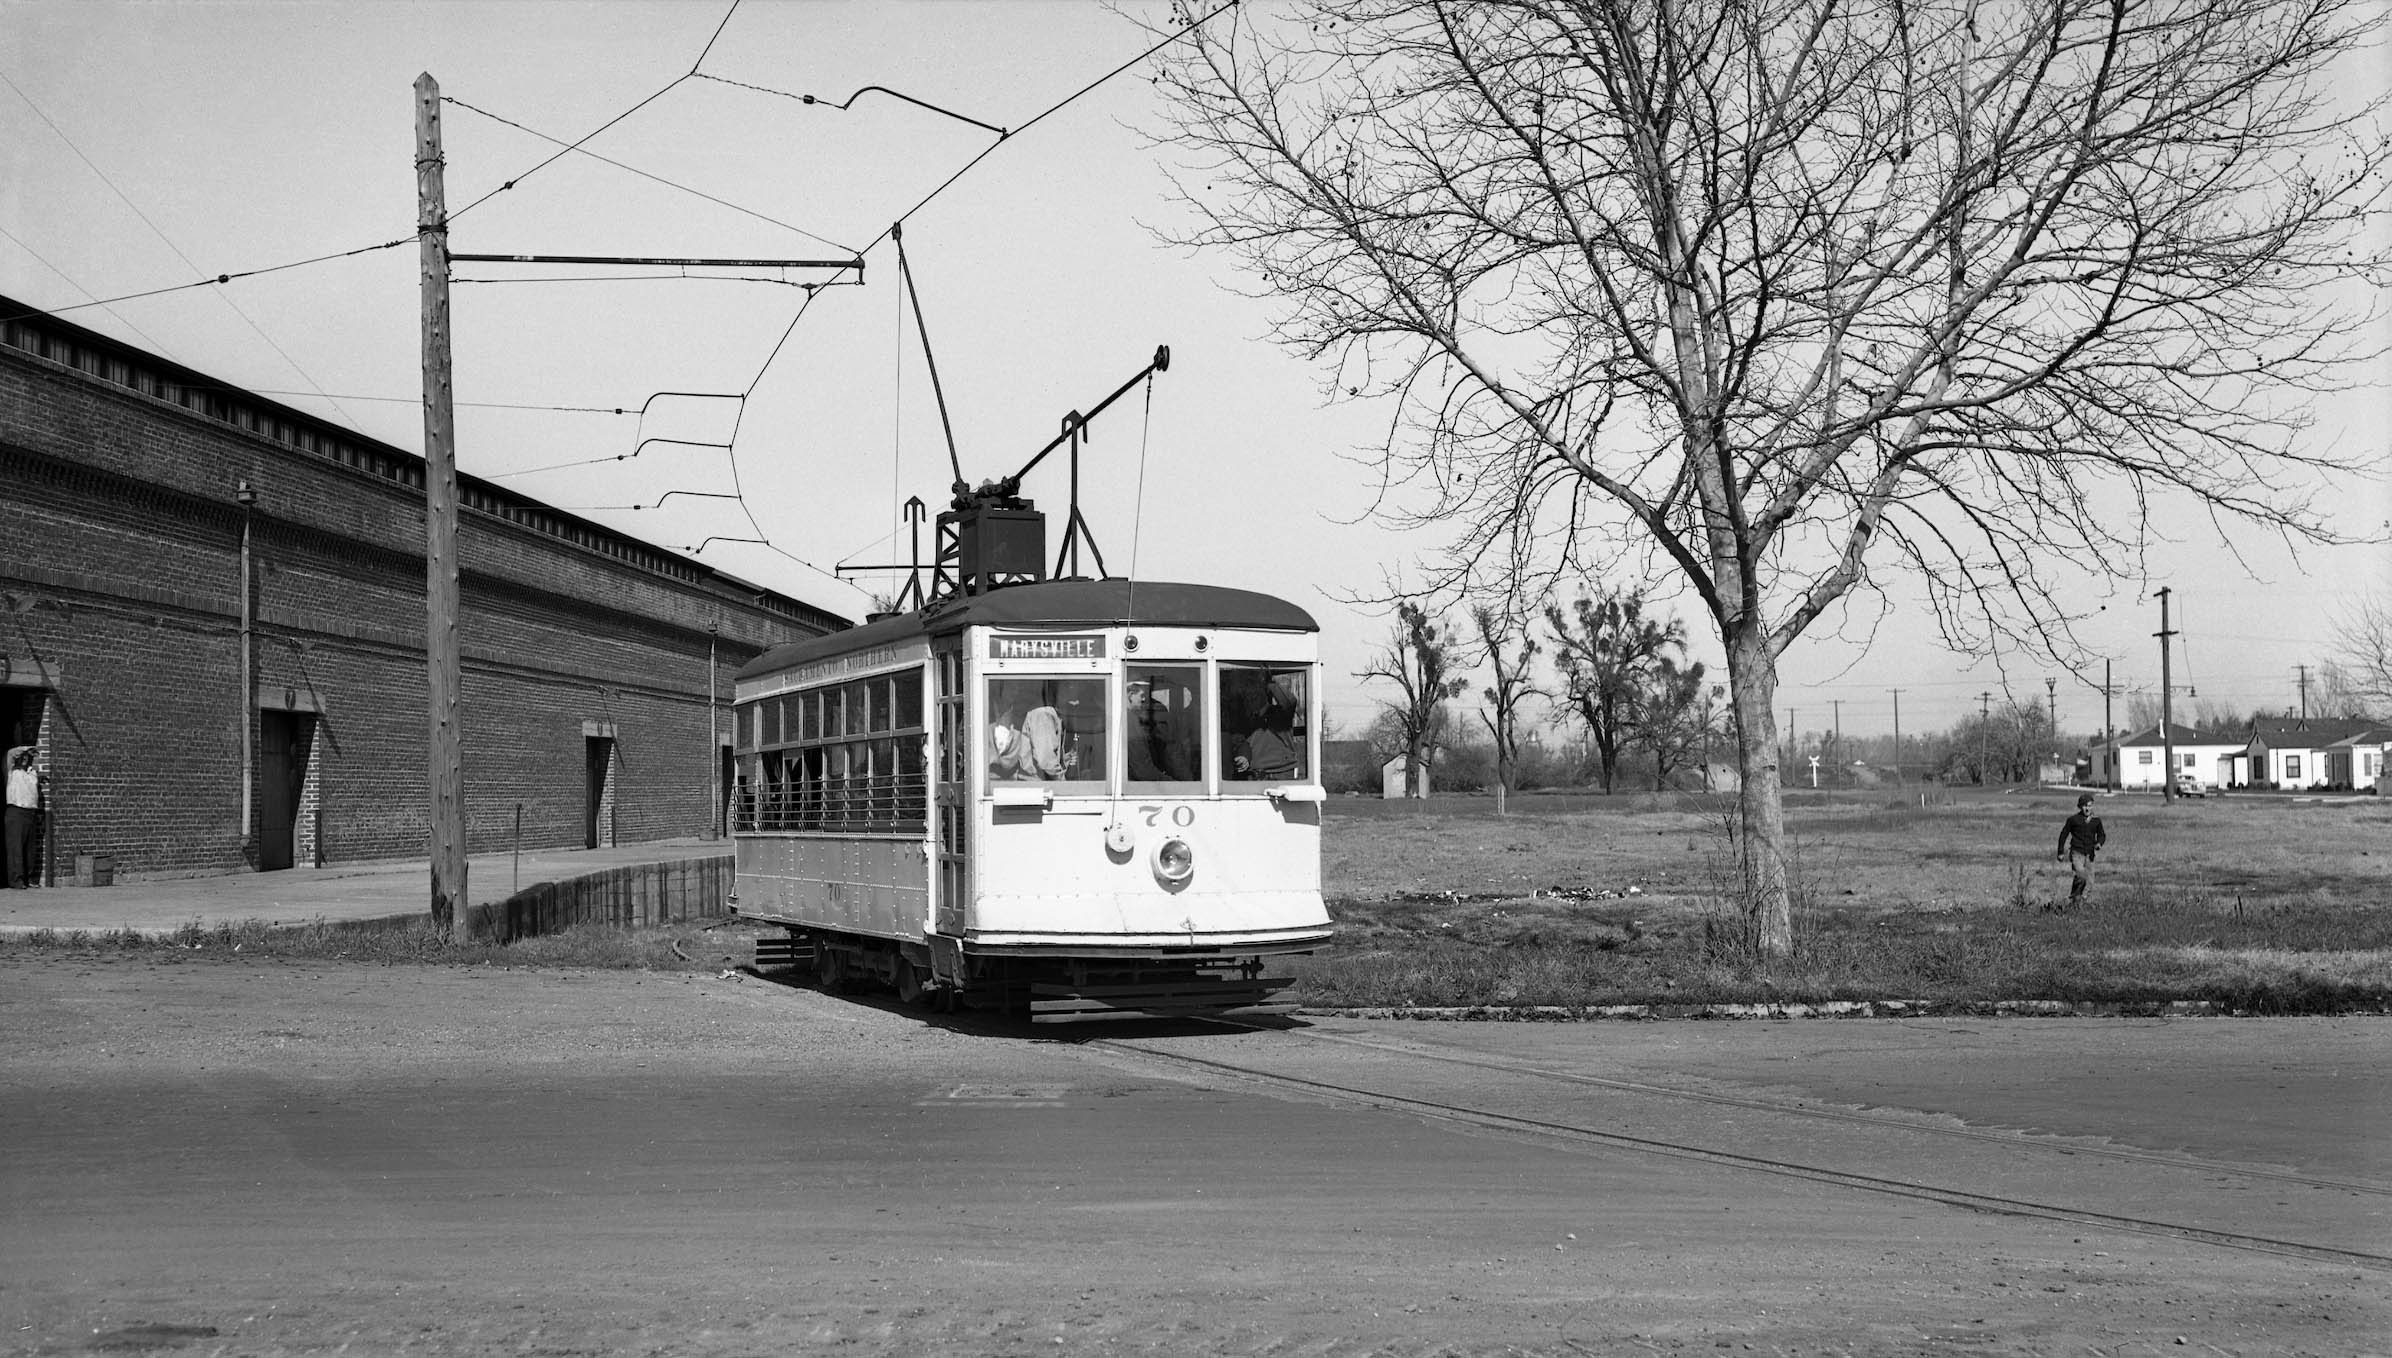
On the subject of Plymouth, the building after Barth’s is labeled Service Dept. Dodge Plymouth, associated with Hamon Bros. Plymouth-Chrysler at 701 4th St., corner of G St. Note the room and board sign just to the left of Birney 70 in this north view on Feb. 15, 1942. A good location to find a job in the area.
L242-50-Arthur Lloyd Photo, Courtesy BAERA, Western Railway Museum Archives, 129803sn, (Image 11 of 37)
Proceeding south across 4th St., north views of excursion trains became popular photos from Feb. 15, 1942 with Birney 70, left, until the final SN excursion to Marysville with SN 1005 on June 17, 1962, right. These images provided documentation of the structures along this segment. Ref: Arthur Lloyd Photo, l, Tony Perles Photo, r
L242-55-Courtesy BAERA, Western Railway Museum Archives, 129801sn, l, 118560sn, r, (Image 12 of 37)
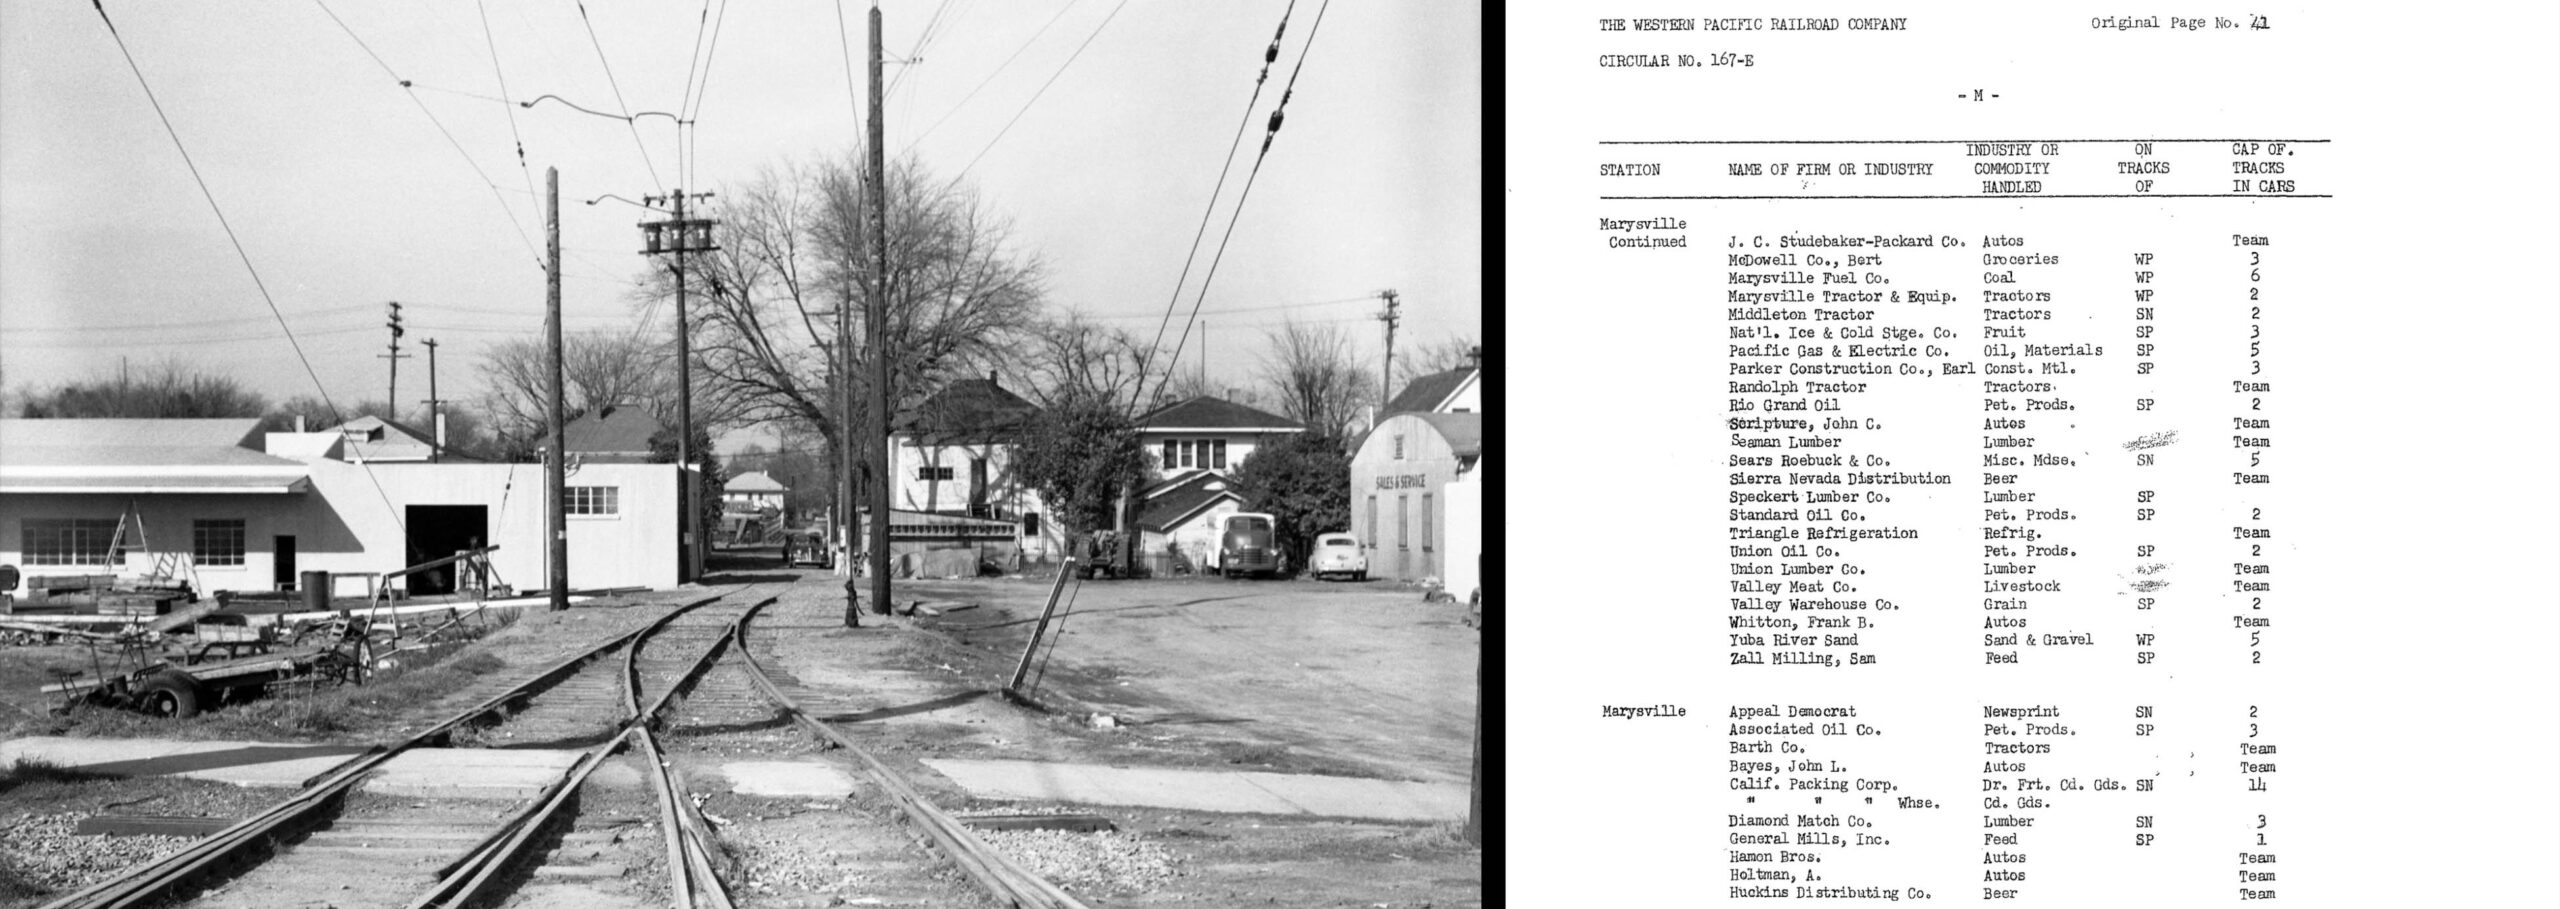
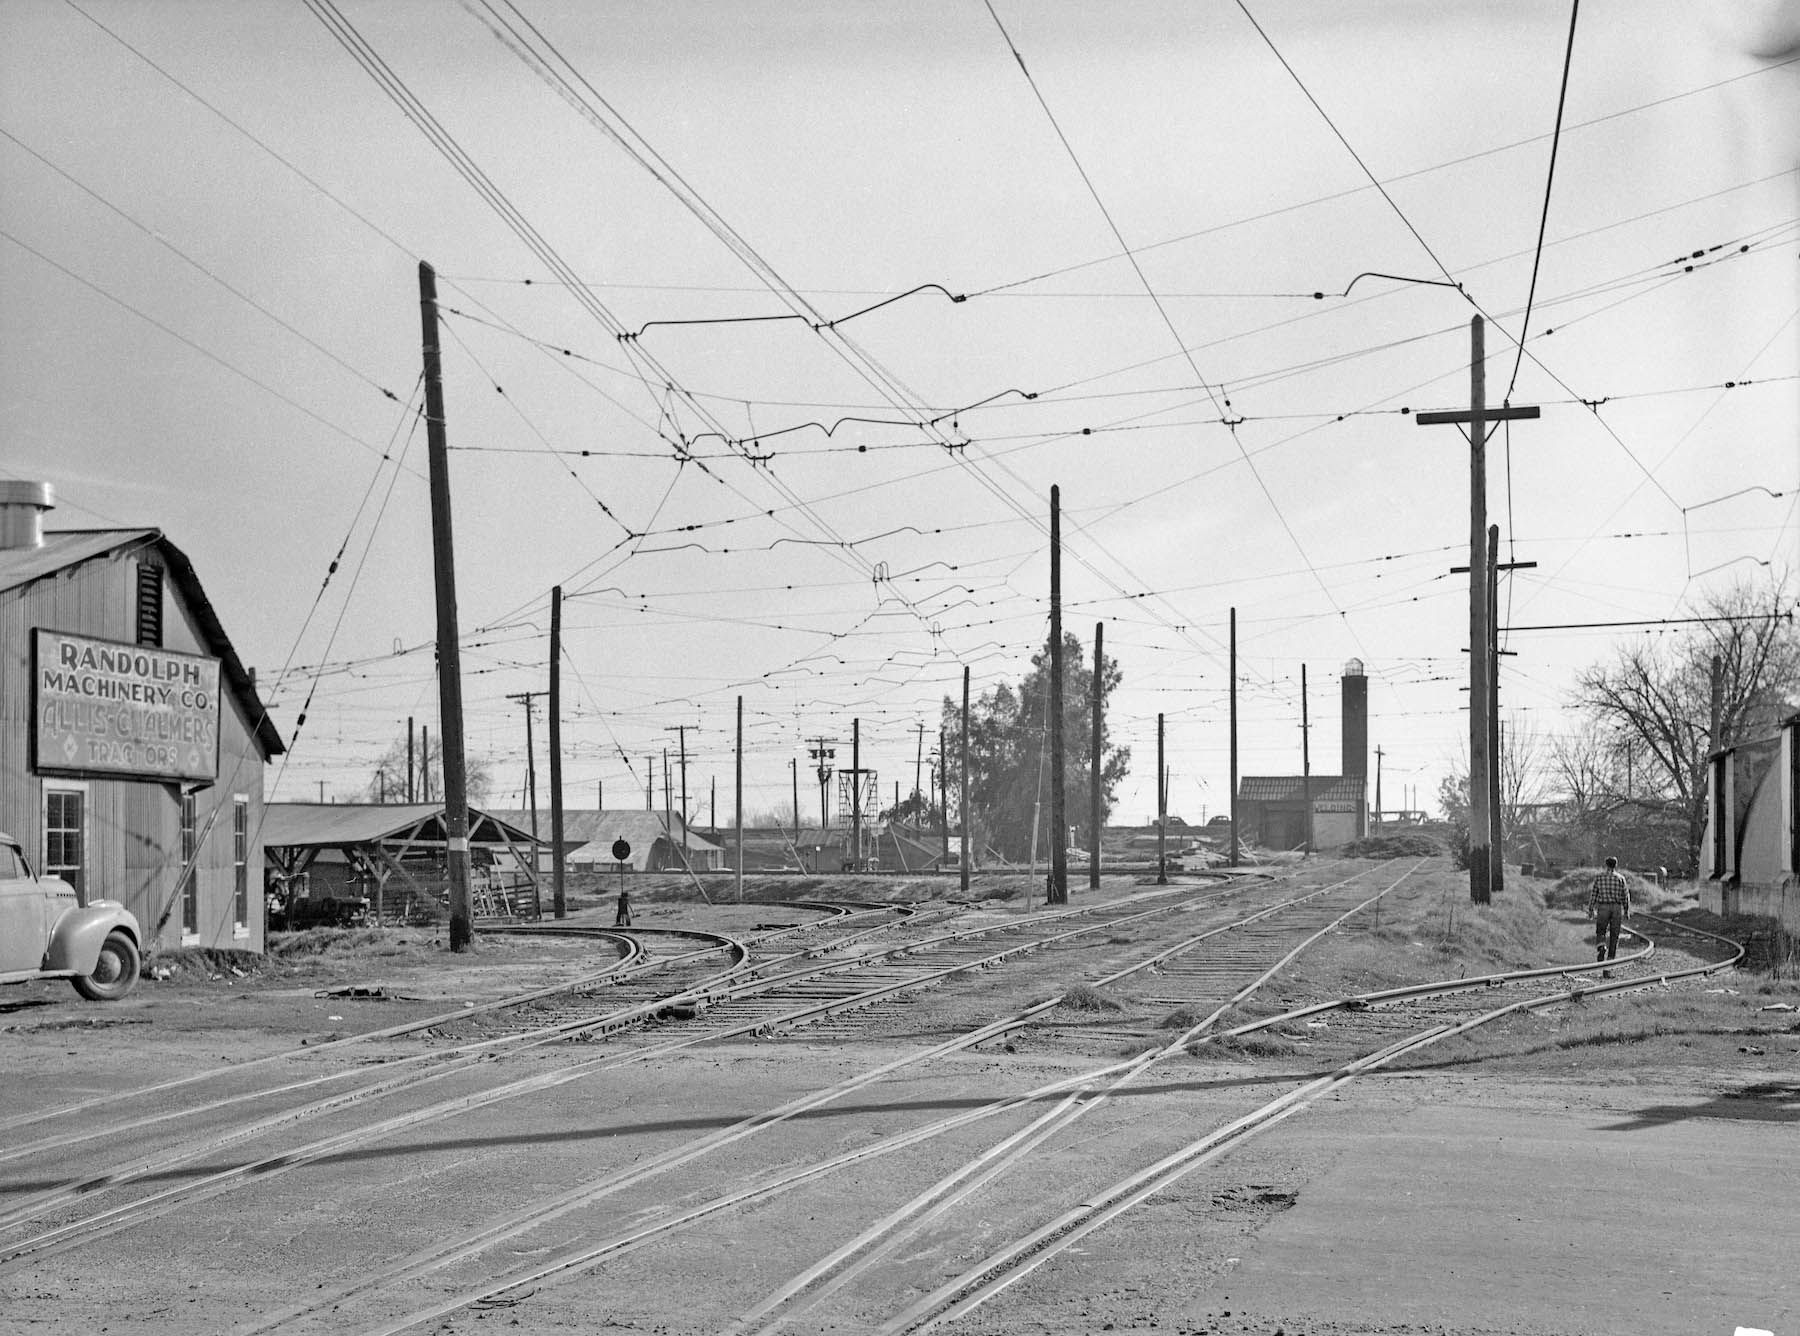
Excursions dominated connector photo archives, diminishing the connector’s main freight function. Bothers Jim and Richard Holmes documented the connector in Apr. 1950, beginning with this north view from Apr. 1950, left. The connector served trackside tenants. A list of all Marysville tenants for all three railroads from the circa 1957 WP Circular No. 167-E is provided, right.
L242-60-Holmes Bros. Photo, Courtesy BAERA, W. Railway Museum Arch., 99557sn, and Bruce Eldridge, (Image 13 of 37)
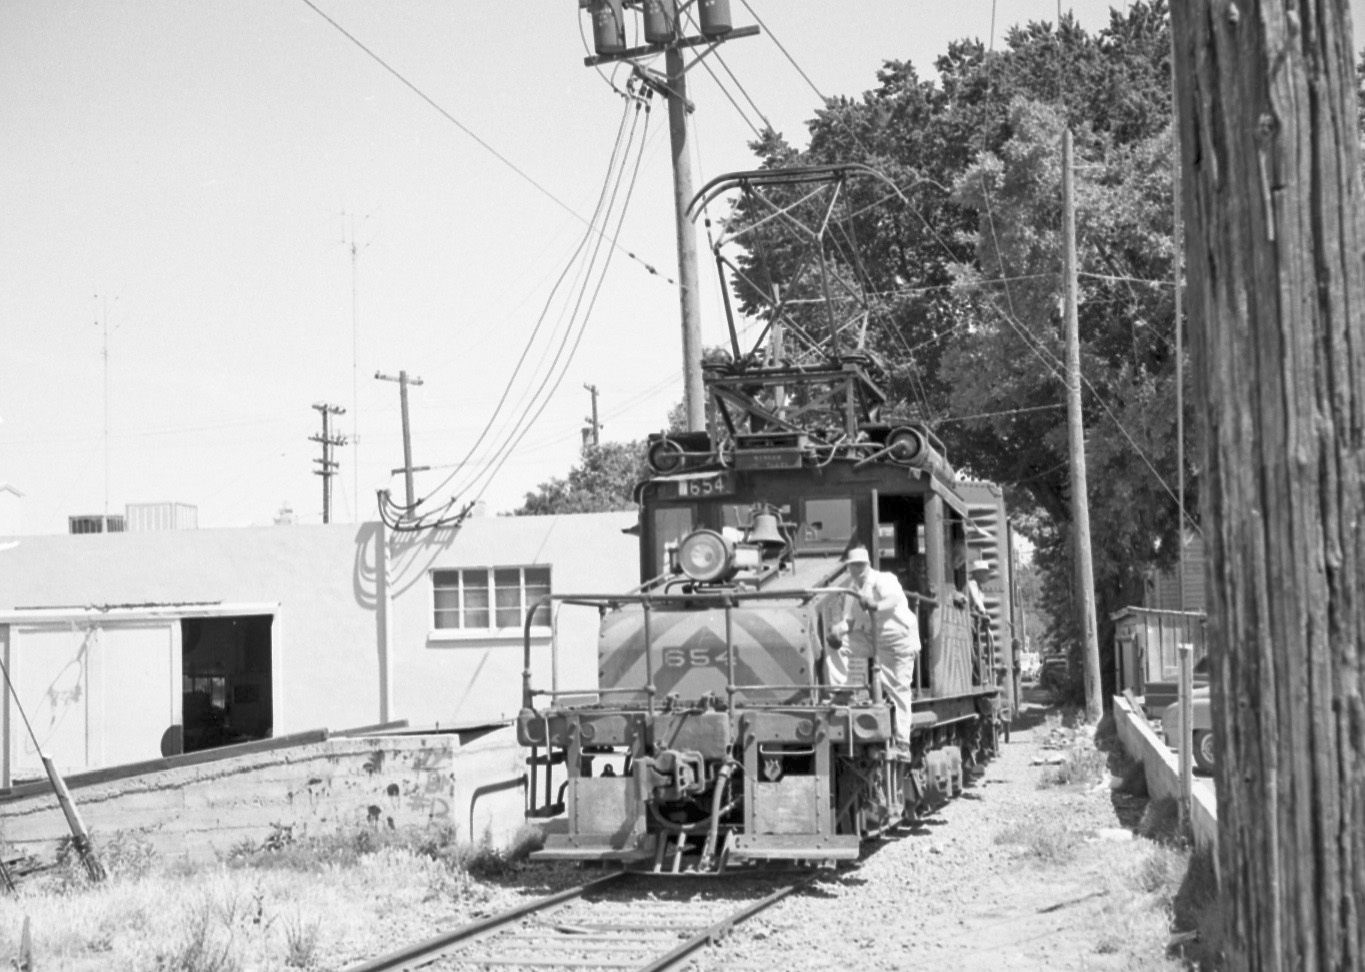
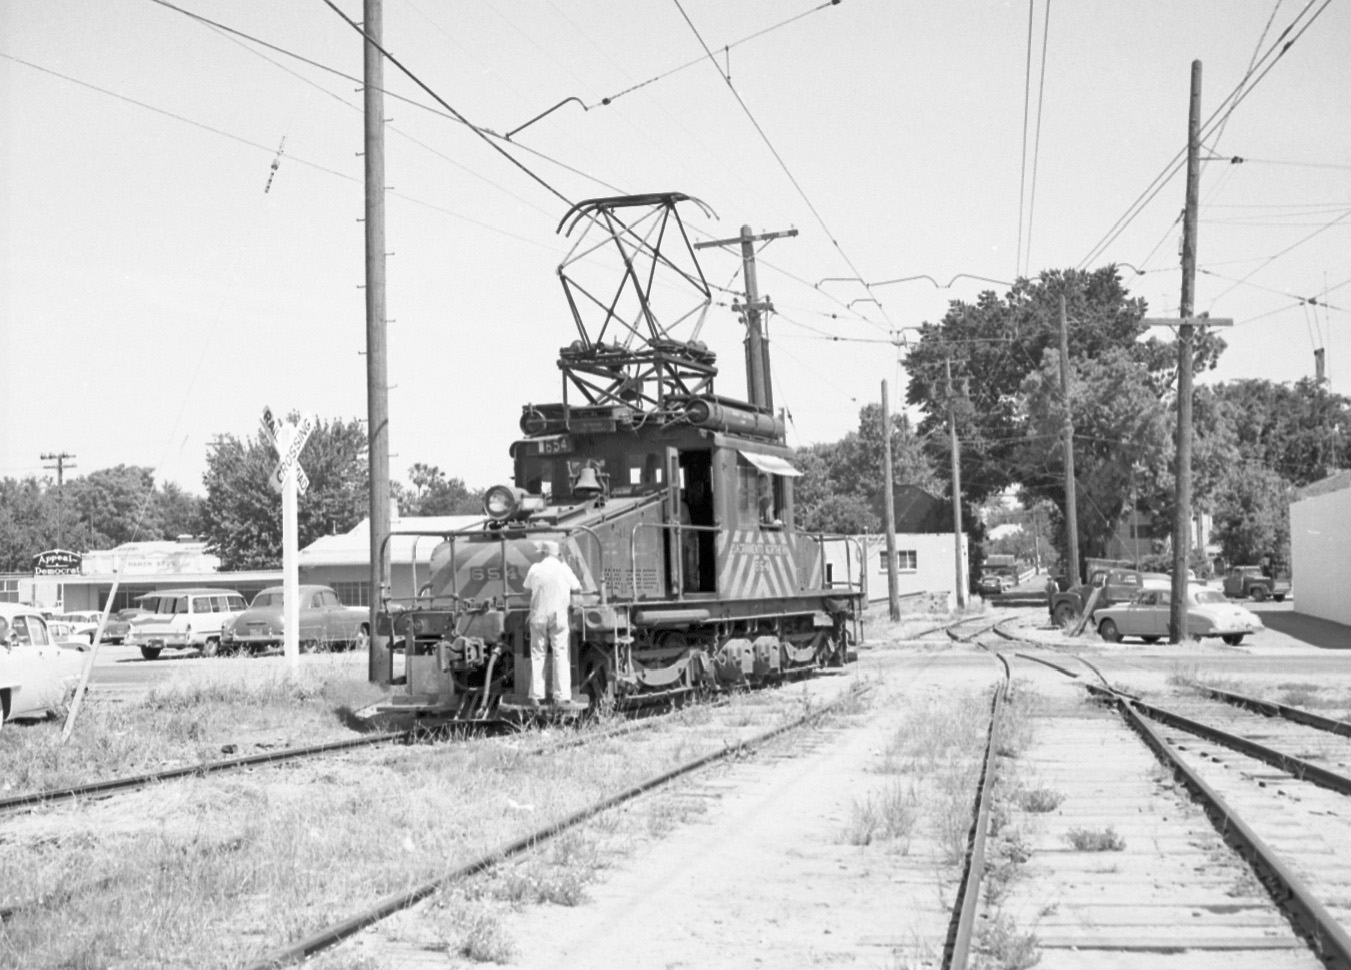
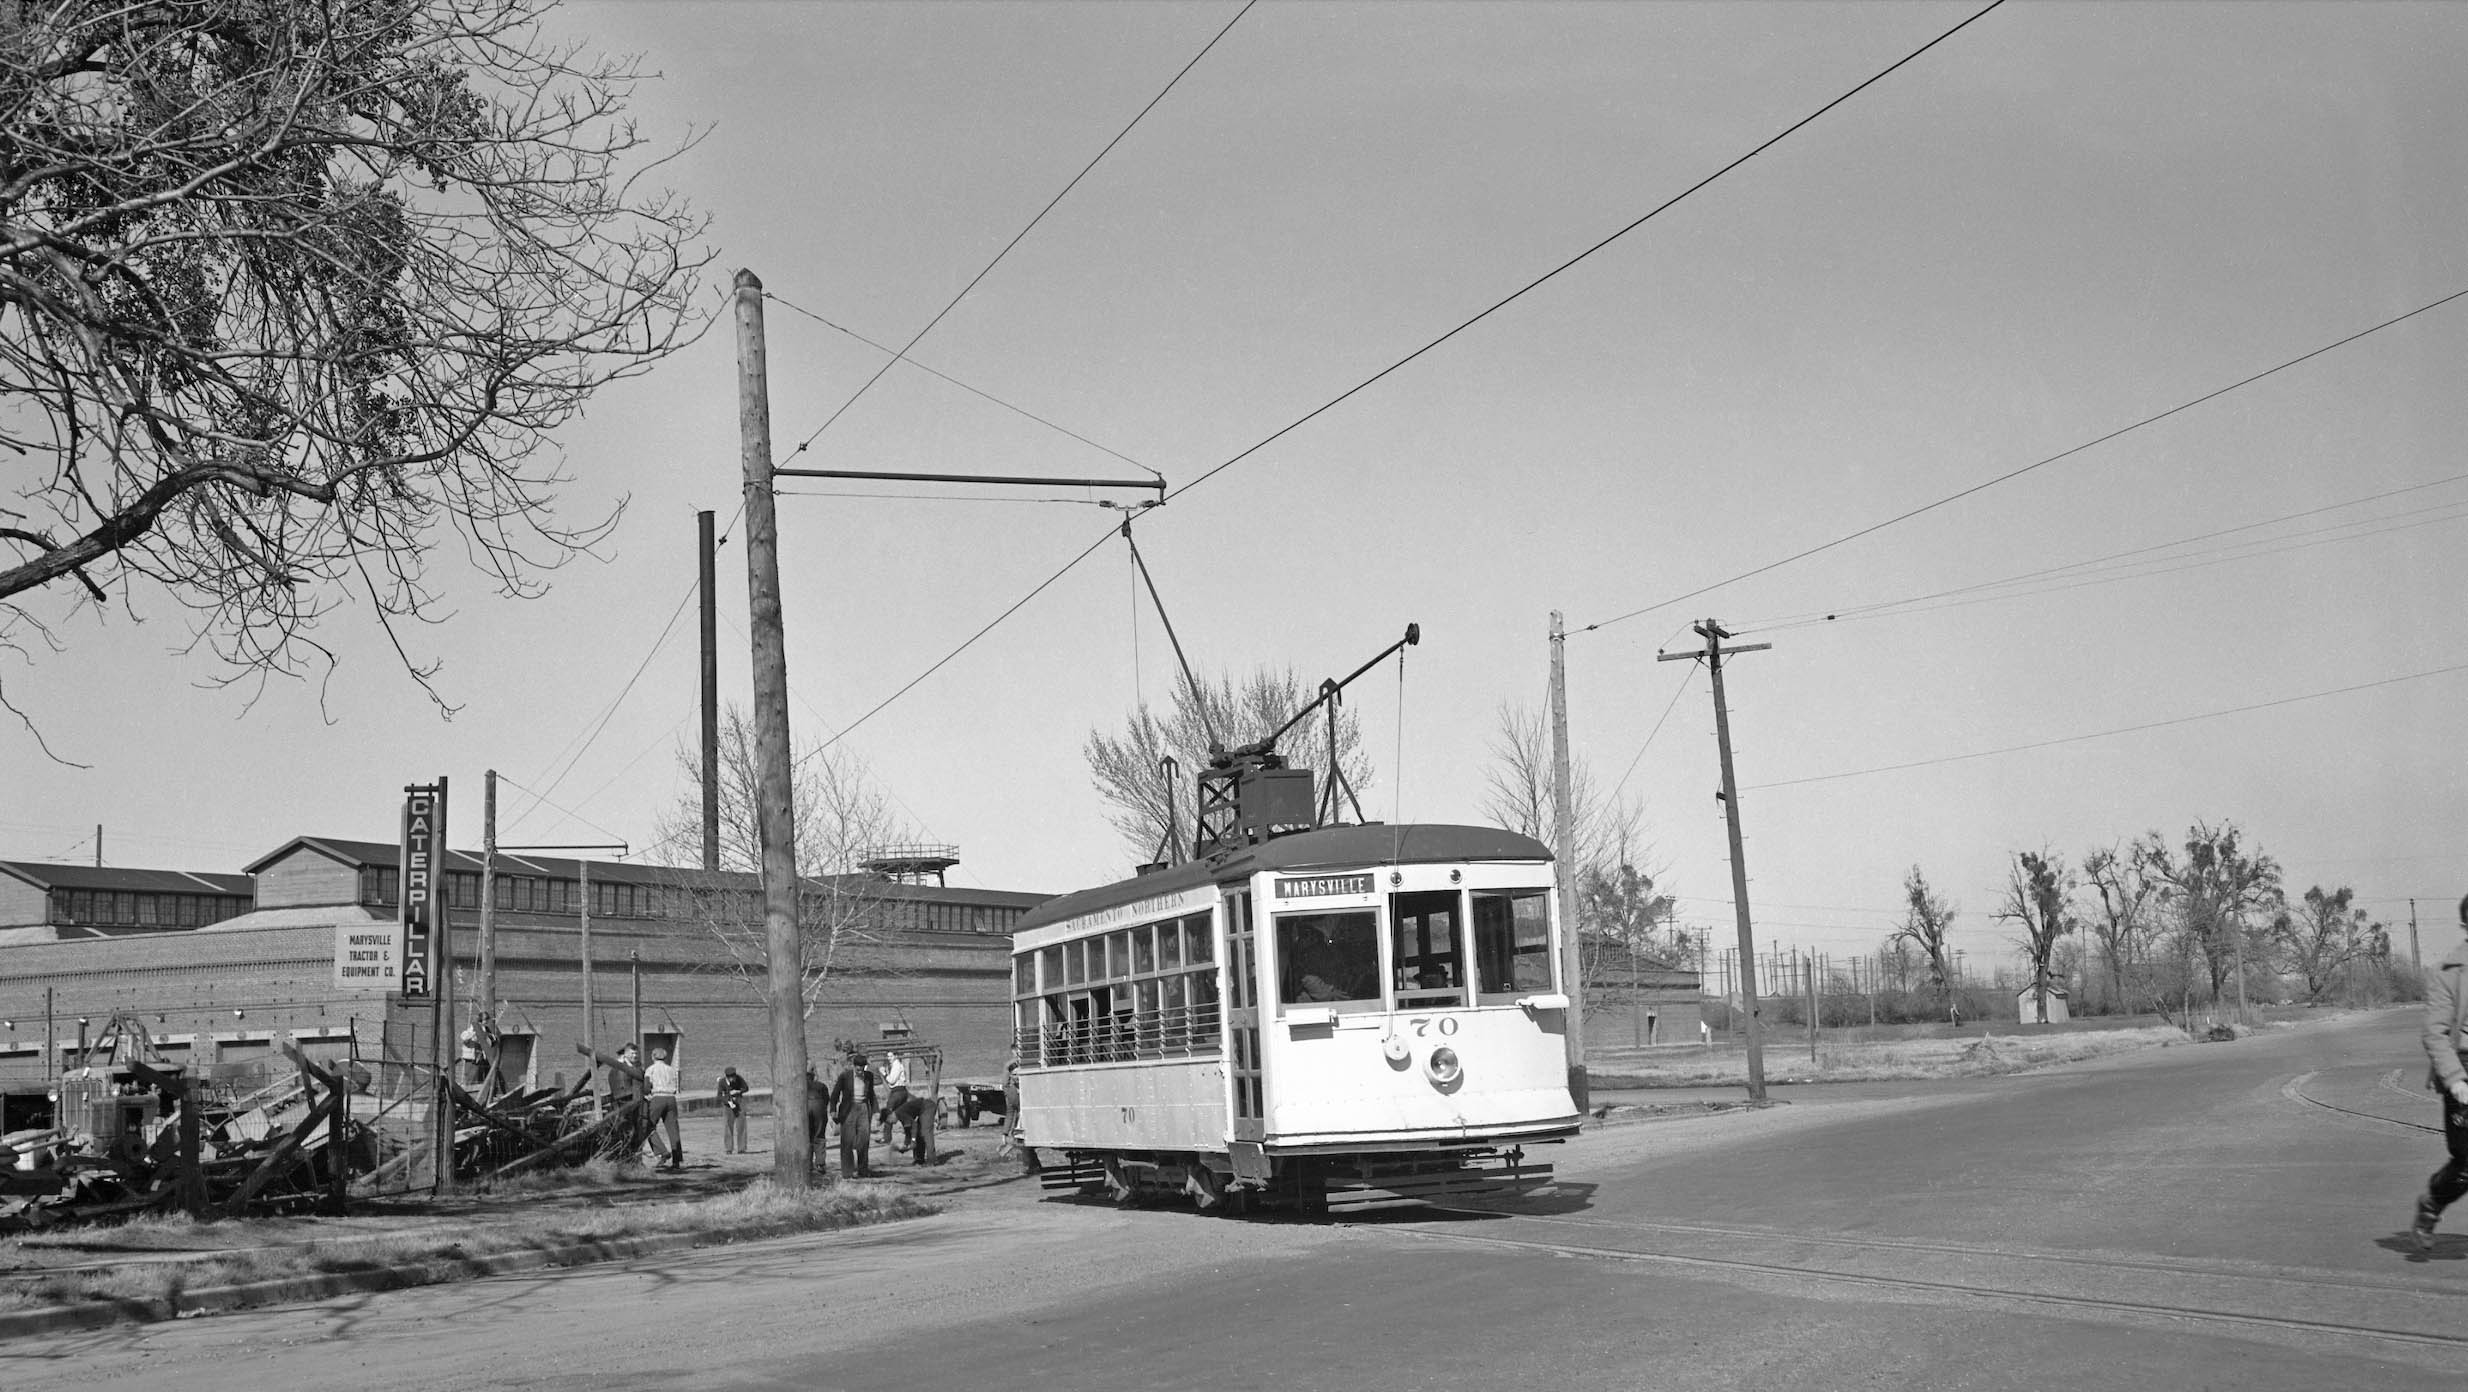
Freight images in the connector are scare. Ted Wurm documented one movement in the 1950s led by SN 654 in a set of three north views starting with this one. In addition to trackside tenants, the route hastened the connection of the SN’s two team tracks until about 1950, listed in the circa 1957 WP Circular No. 167-E as the Freight Yards at 2nd and E Sts., and 6th St. and J St.
L242-65-Ted Wurm Photo, Courtesy BAERA, Western Railway Museum Archives, 59233sn, (Image 14 of 37)
Further south, Ted Wurm continued to spot SN 654 and its boxcar, north view from the 1950s. Finally, the connector kept freights off the mainline inner city interurban route along 2nd St., D St., and 5th St. east of G St. No images were found of a freight leaving the connector for 5t St. from any time period.
L242-70-Ted Wurm Photo, Courtesy BAERA, Western Railway Museum Archives, 59234sn, (Image 15 of 37)
Sometime later or earlier sans boxcar, SN 654 is shown just south of the 3rd. St. grade crossing in this northwest view from the 1950s. Two customers, the newspaper Appeal Democrat and Hamon Bros. Plymouth-Chrysler-Dodge facilities can be seen in the background, left.
L242-75-Ted Wurm Photo, Courtesy BAERA, Western Railway Museum Archives, 59235sn, (Image 16 of 37)
South of the 3rd St. grade crossing was Randolph Tractor, seen in a northeast view from May 8, 1938, left, and from July 28, 1940, right. Of no architectural distinction, it remains a marker into 2020 panoramic images. Both scenes were from mystery trips to Colusa, however the later one originated in Maryville. SN 440 is set to back parlor car Sacramento to couple to SN 107, seen in the background. Ref: Wilbur Whittaker Photo, Vielbaum Coll., l, Art Alter Photo, Moreau Coll., r
L242-80-Courtesy BAERA, Western Railway Museum Archives, 132842sn, l, 166748sn, r , (Image 17 of 37)
The third section of the connector, from 3rd St. to 2nd St., is seen here in this north view from Aug. 1, 1960. The blue dot marks Randolph Tractor.
L242-85-Copyright California Department of Transportation, 7609-1, Detail , (Image 18 of 37)
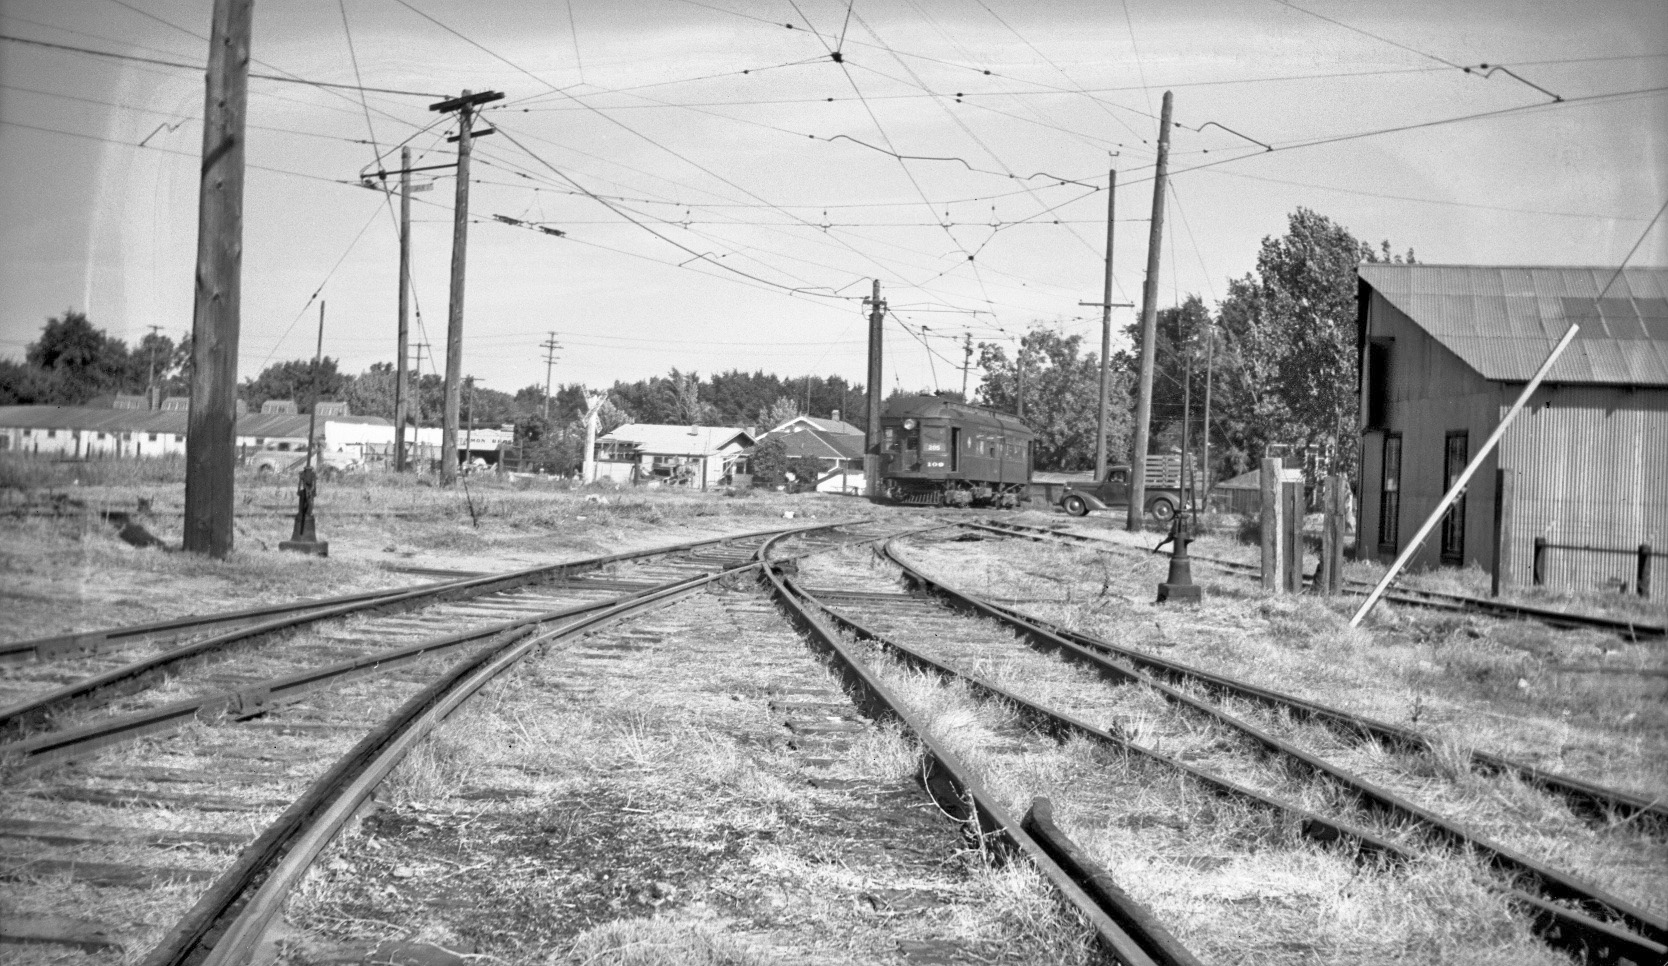
The Holmes brothers right-of-way survey from Apr. 1950 continues with a south view from the 3rd St. grade crossing. Several sidings are featured here, the customer to the right or west is still being sought.
L242-90-Holmes Bros. Photo, Courtesy BAERA, Western Railway Museum Archives, 99556sn, (Image 19 of 37)
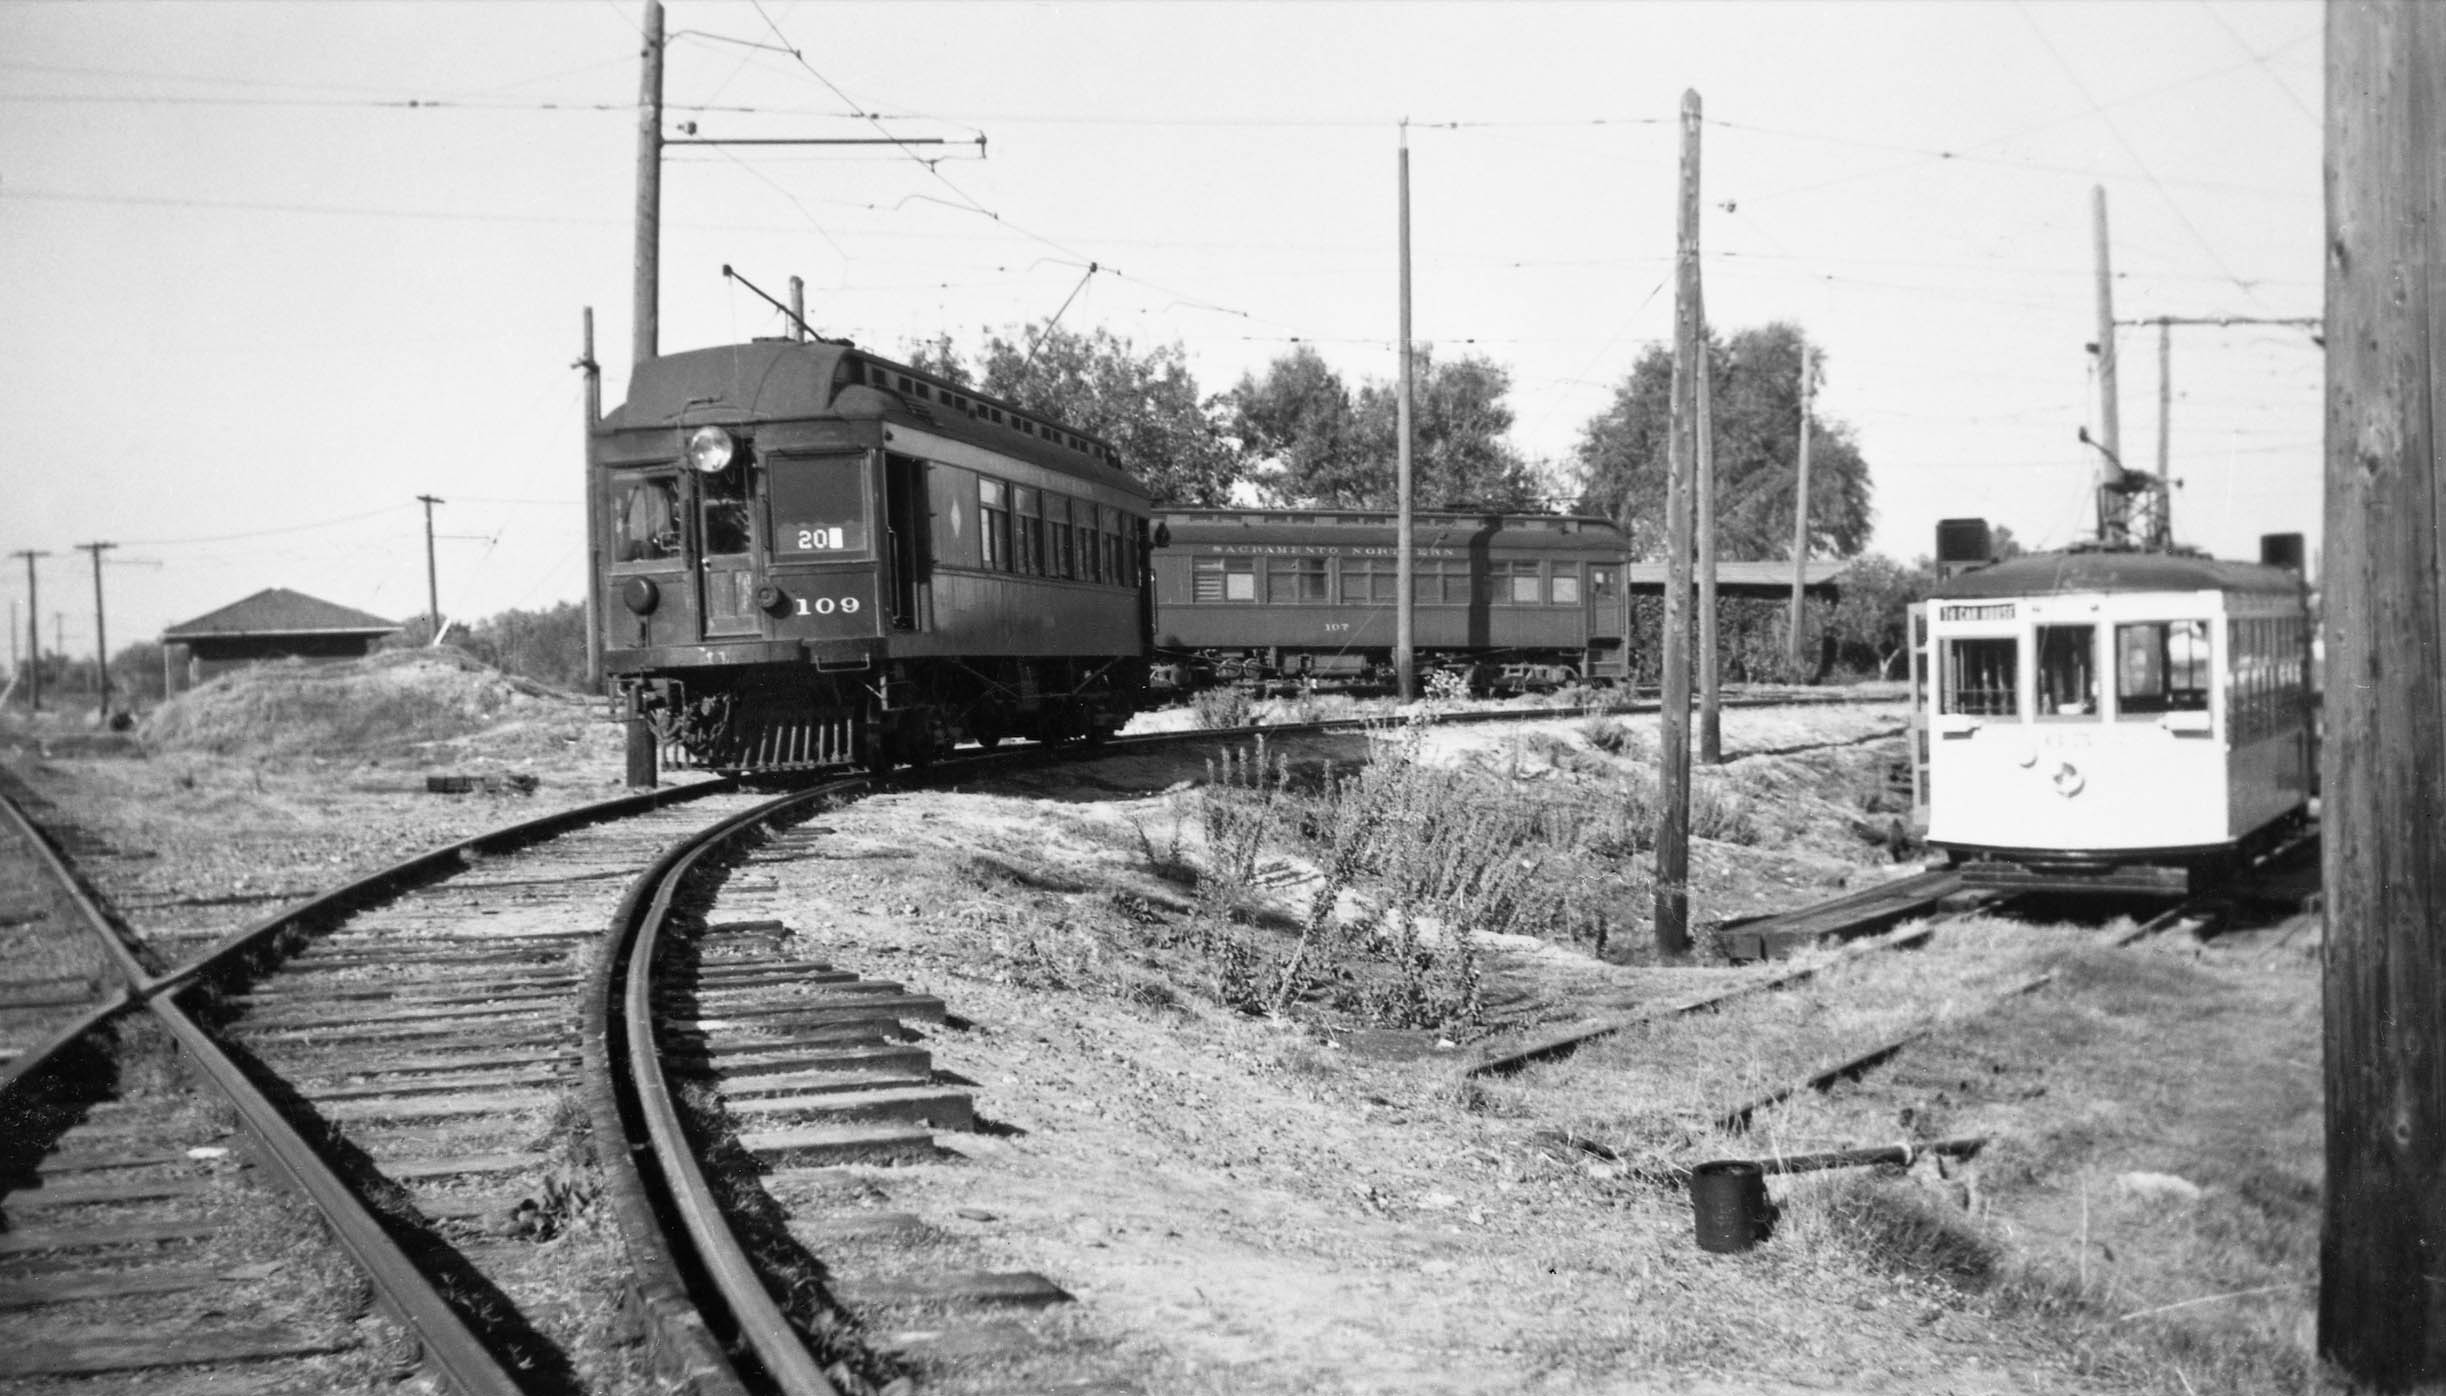
SN 109 is heading toward Colusa as it blocks the path of a truck at the 3rd St. grade crossing. The assignment of when the Local took the 2nd St-D St.-5th St. path versus the connector has not been determined. North view, 1940.
L242-95-Sappers Collection, Courtesy BAERA, Western Railway Museum Archives, 125276sn, (Image 20 of 37)
Randolph Tractor is seen in the image to the right, or east, of SN 109, the Colusa Local, as the passenger motor sprints toward the station in 1940, northeast view. Images of SN 109 heading in either direction on the connector or 2nd St-D St.-5th St. path have been found, but how the direction was assigned has not been deciphered.
L242-100-Sappers Collection, Courtesy BAERA, Western Railway Museum Archives, 124717sn, (Image 21 of 37)
A view of the first turn toward the freight depot yard circa 1912, southeast view, serves as a comparator to the images to follow.
L242-105-Clark and Henery Co. Photo, Courtesy BAERA, Western Railway Museum Archives, 125457sn, (Image 22 of 37)
SN 109 makes the final turn to the mainline on Oct. 26, 1940, northwest view. SN 107, which was shown earlier at this location, remained here during this time period, following its role as the Oroville Local until late 1937. Birney 65 sits where different inactive streetcars would be placed during this time.
L242-110-Moreau Collection, Courtesy BAERA, Western Railway Museum Archives, 125459sn , (Image 23 of 37)
SN 109 is ready to roll after waiting for a main line train with SN 1024 to pass the gaiting switch on its way to Sacramento in this west view from July 7, 1936. Note also the presence of Birney 65 and freight motor SN 402.
L242-112-Silleman Bros. Photo, Holmes Bros. Coll., Courtesy BAERA, W. Railway Museum Arch., 159475sn, (Image 24 of 37)
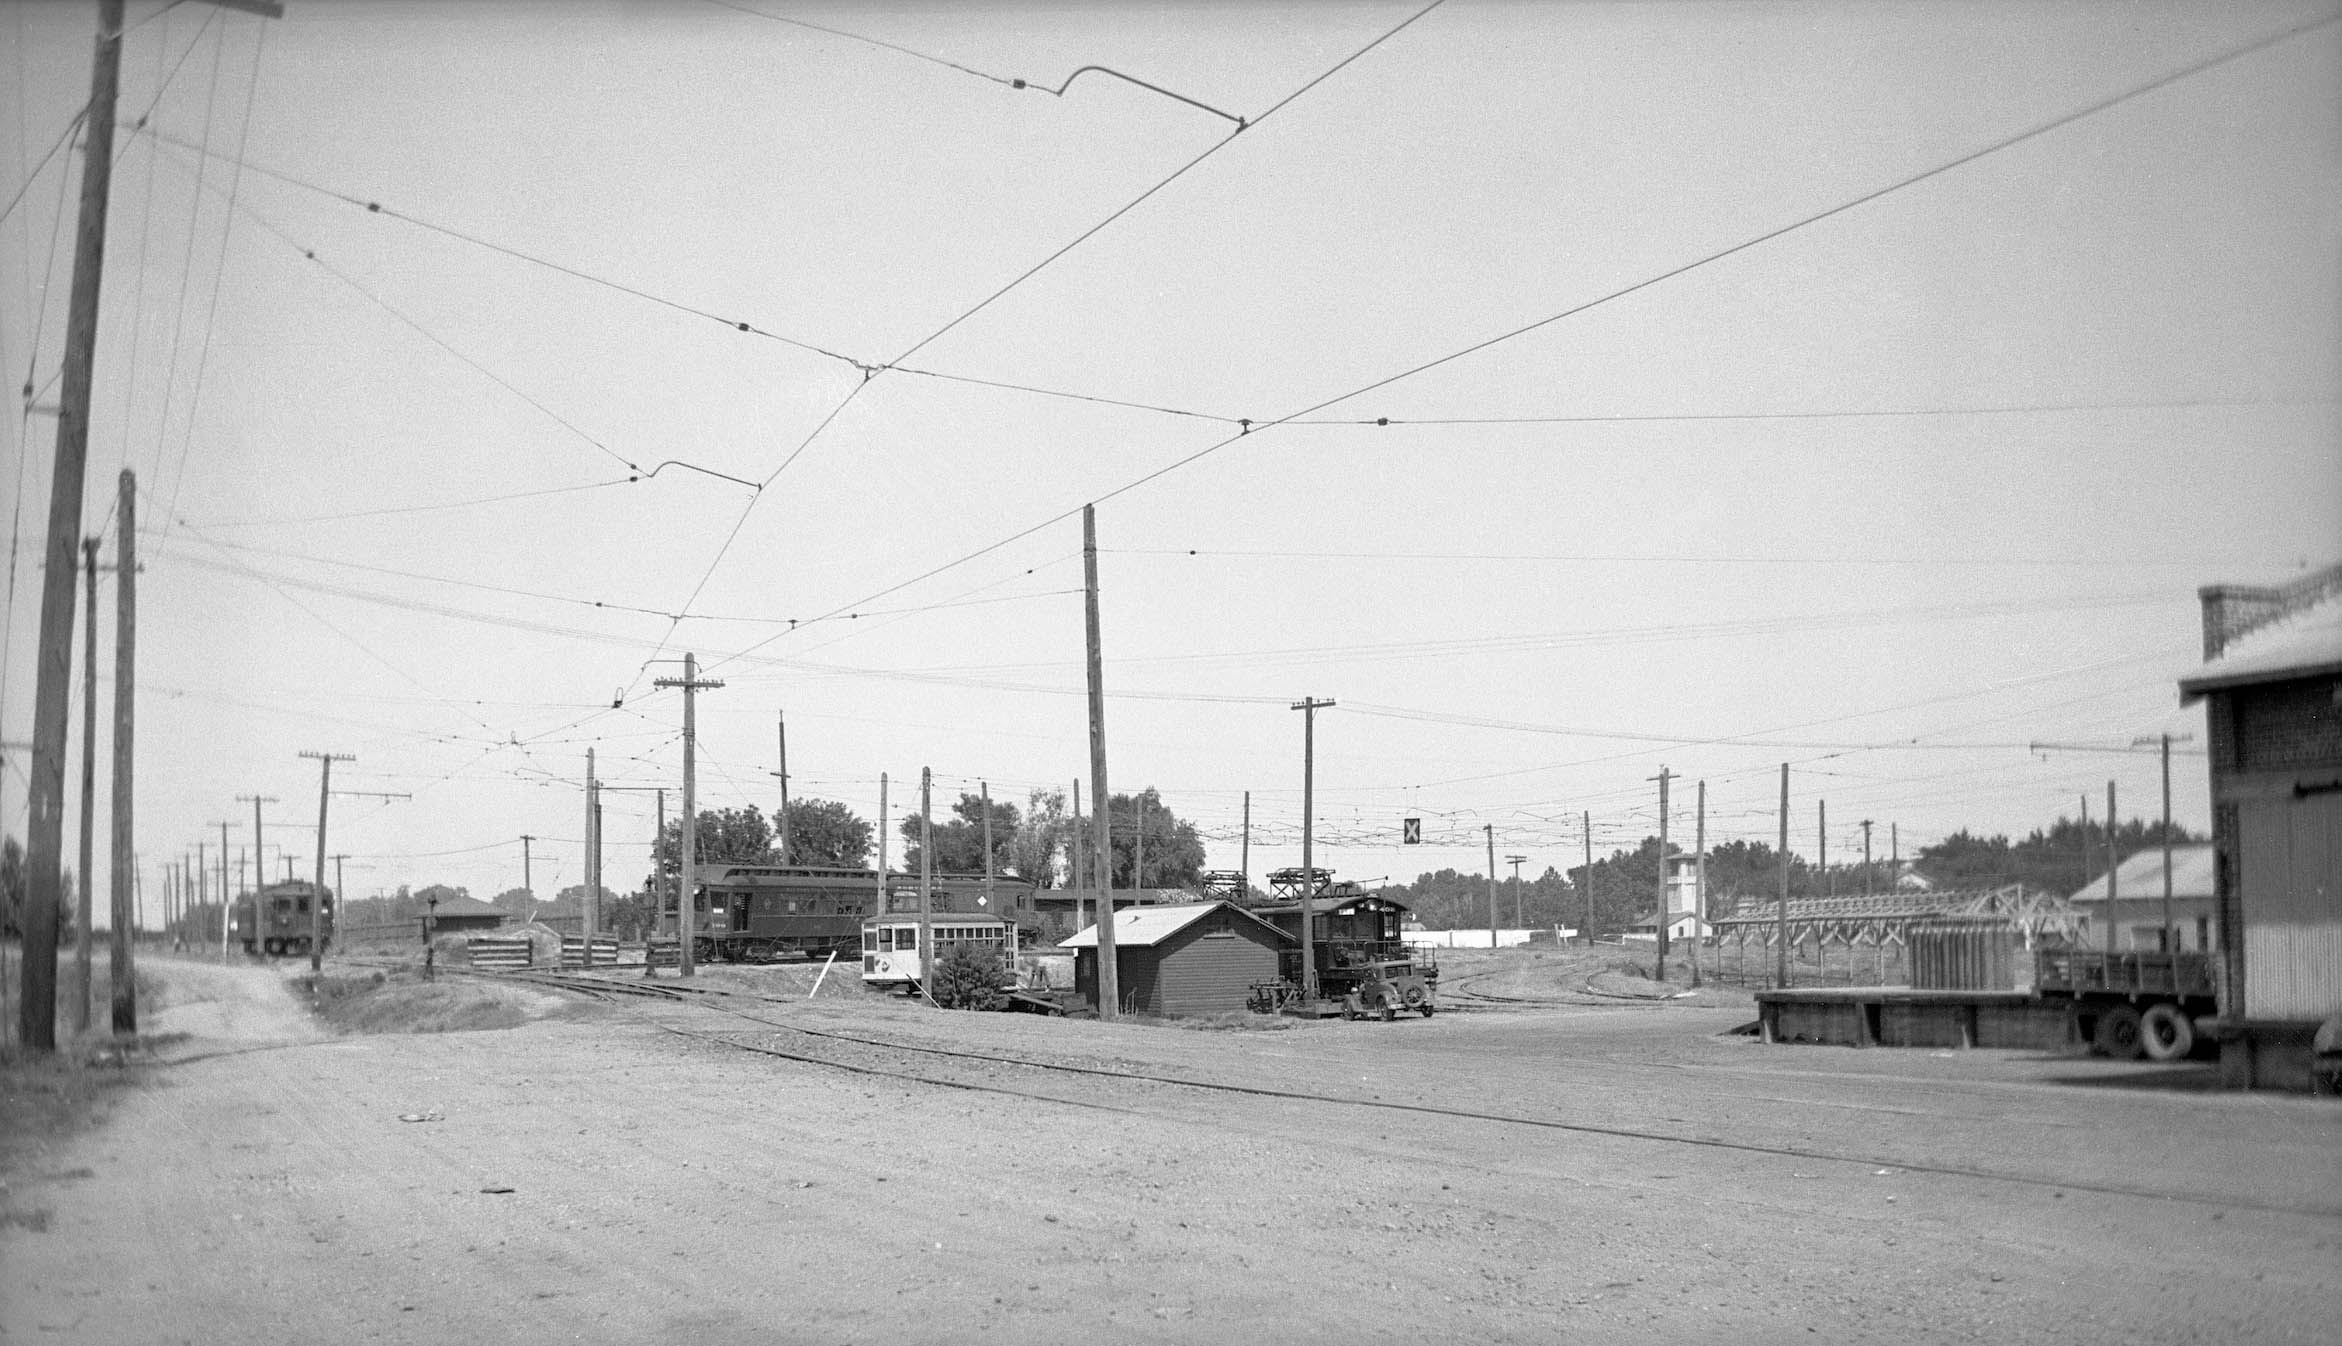
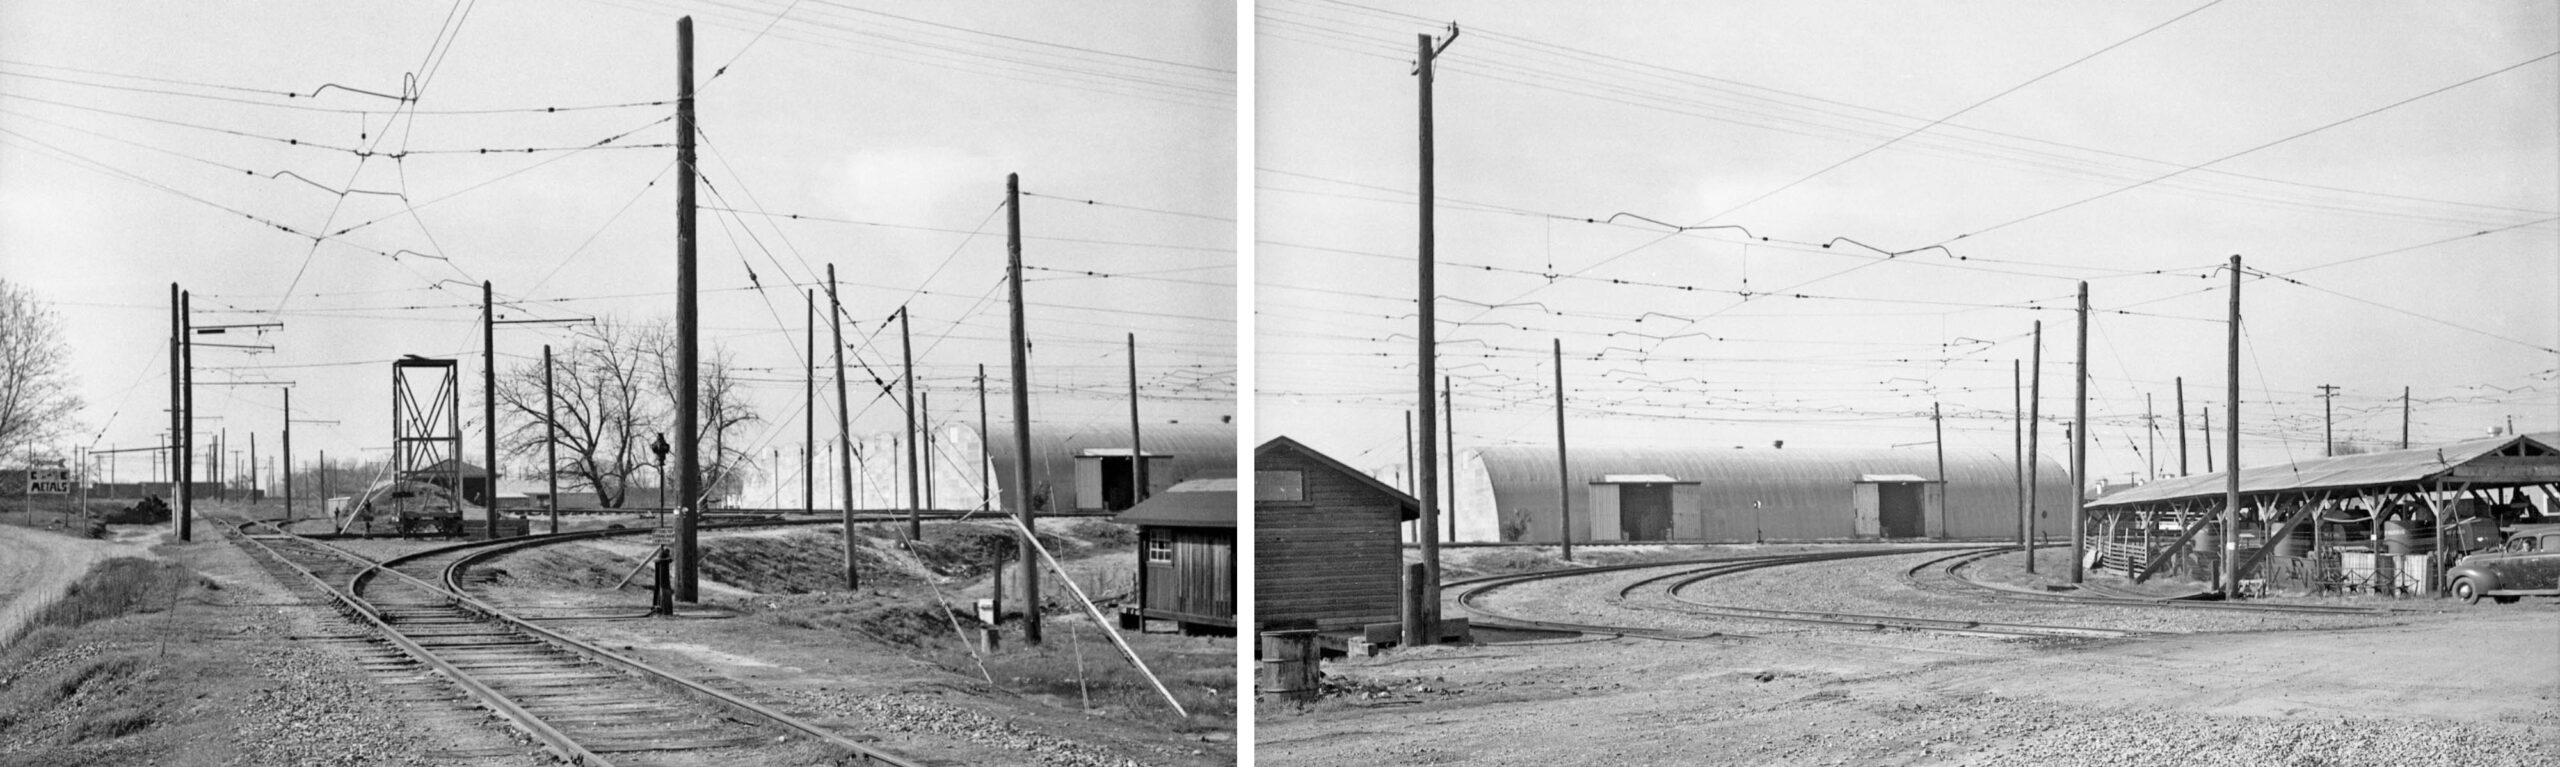
At least ten years later, April 1950, the area has been transformed by the large quonset hut now placed to the west of the facilities. McDowell Co., a wholesale grocery, was in this space from at least 1957-1968, and listed by the circa 1957 WP Circular No. 167-E as a WP client.
L242-115-Holmes Bros. Photos, Courtesy BAERA, Western Railway Museum Arch., 99555sn, l, 99553sn, r, (Image 25 of 37)
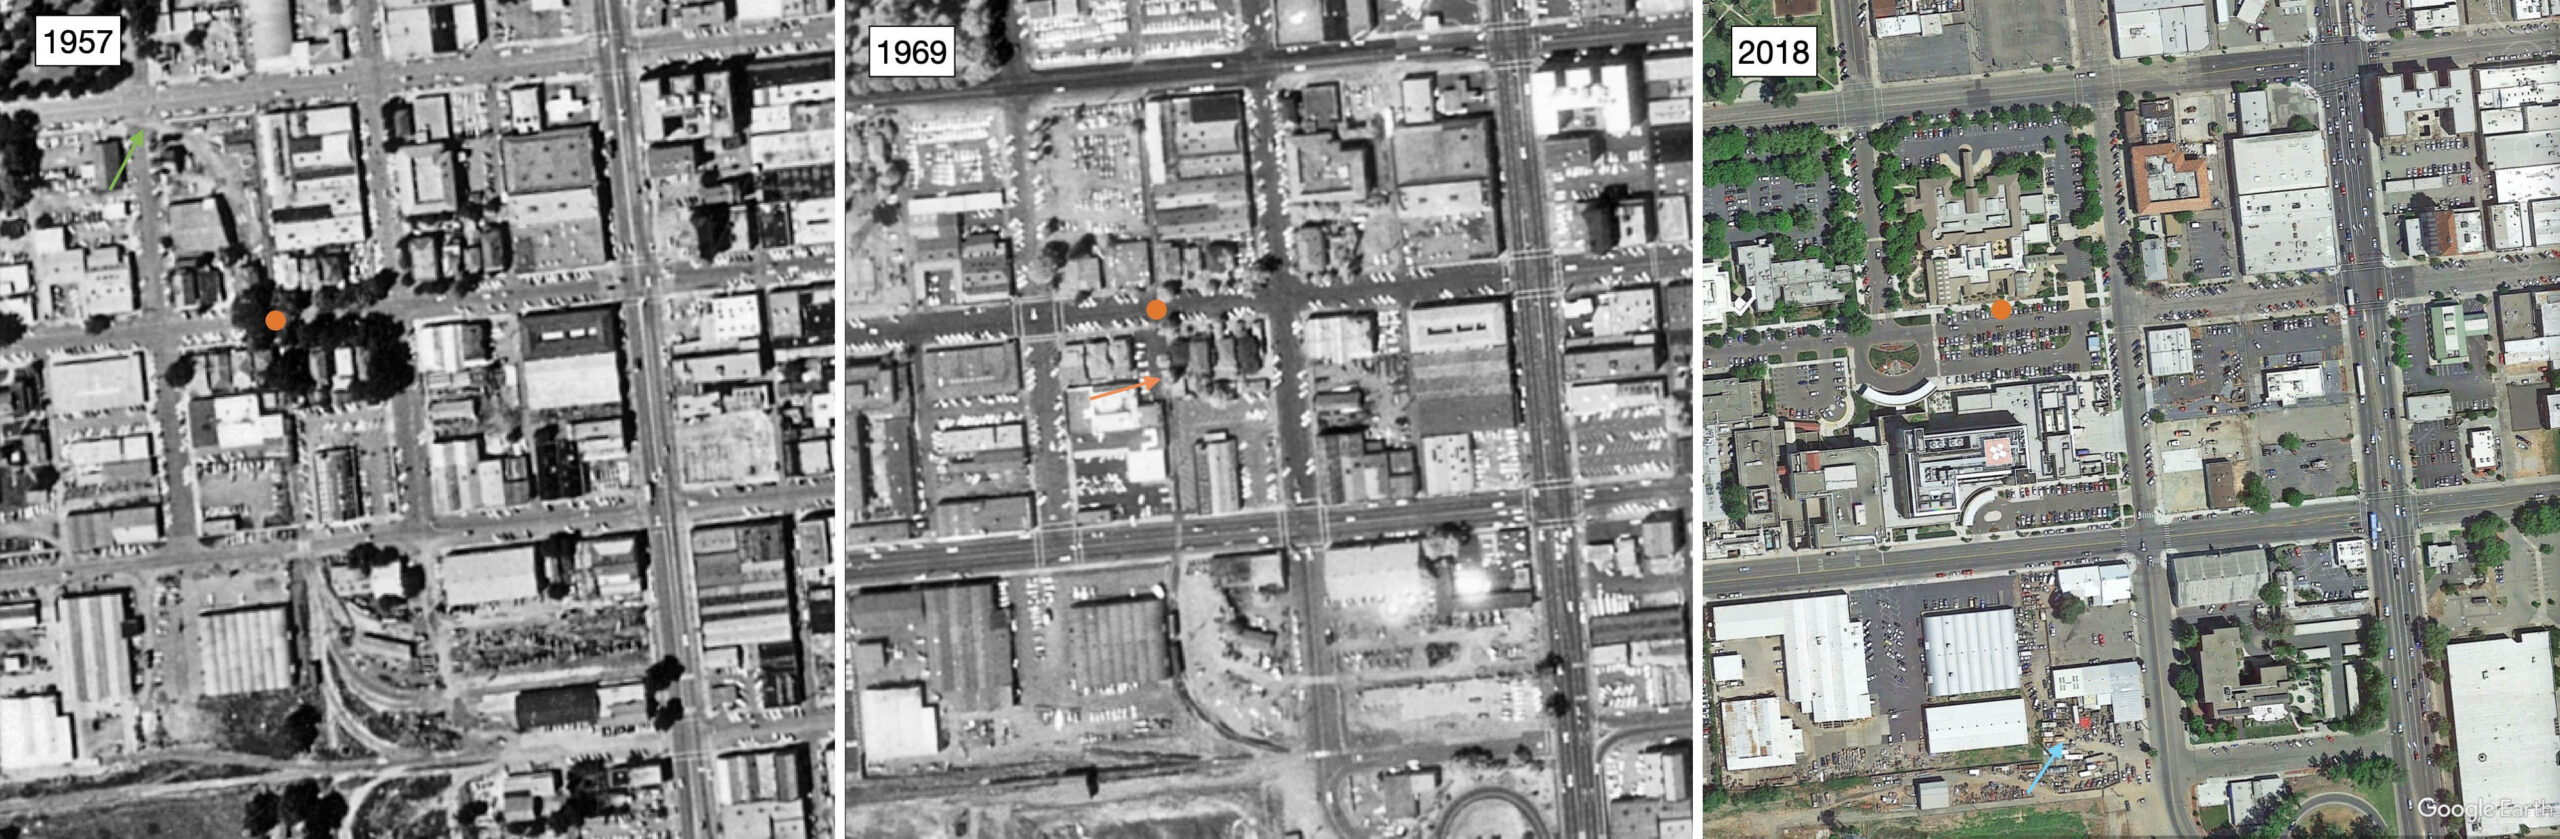
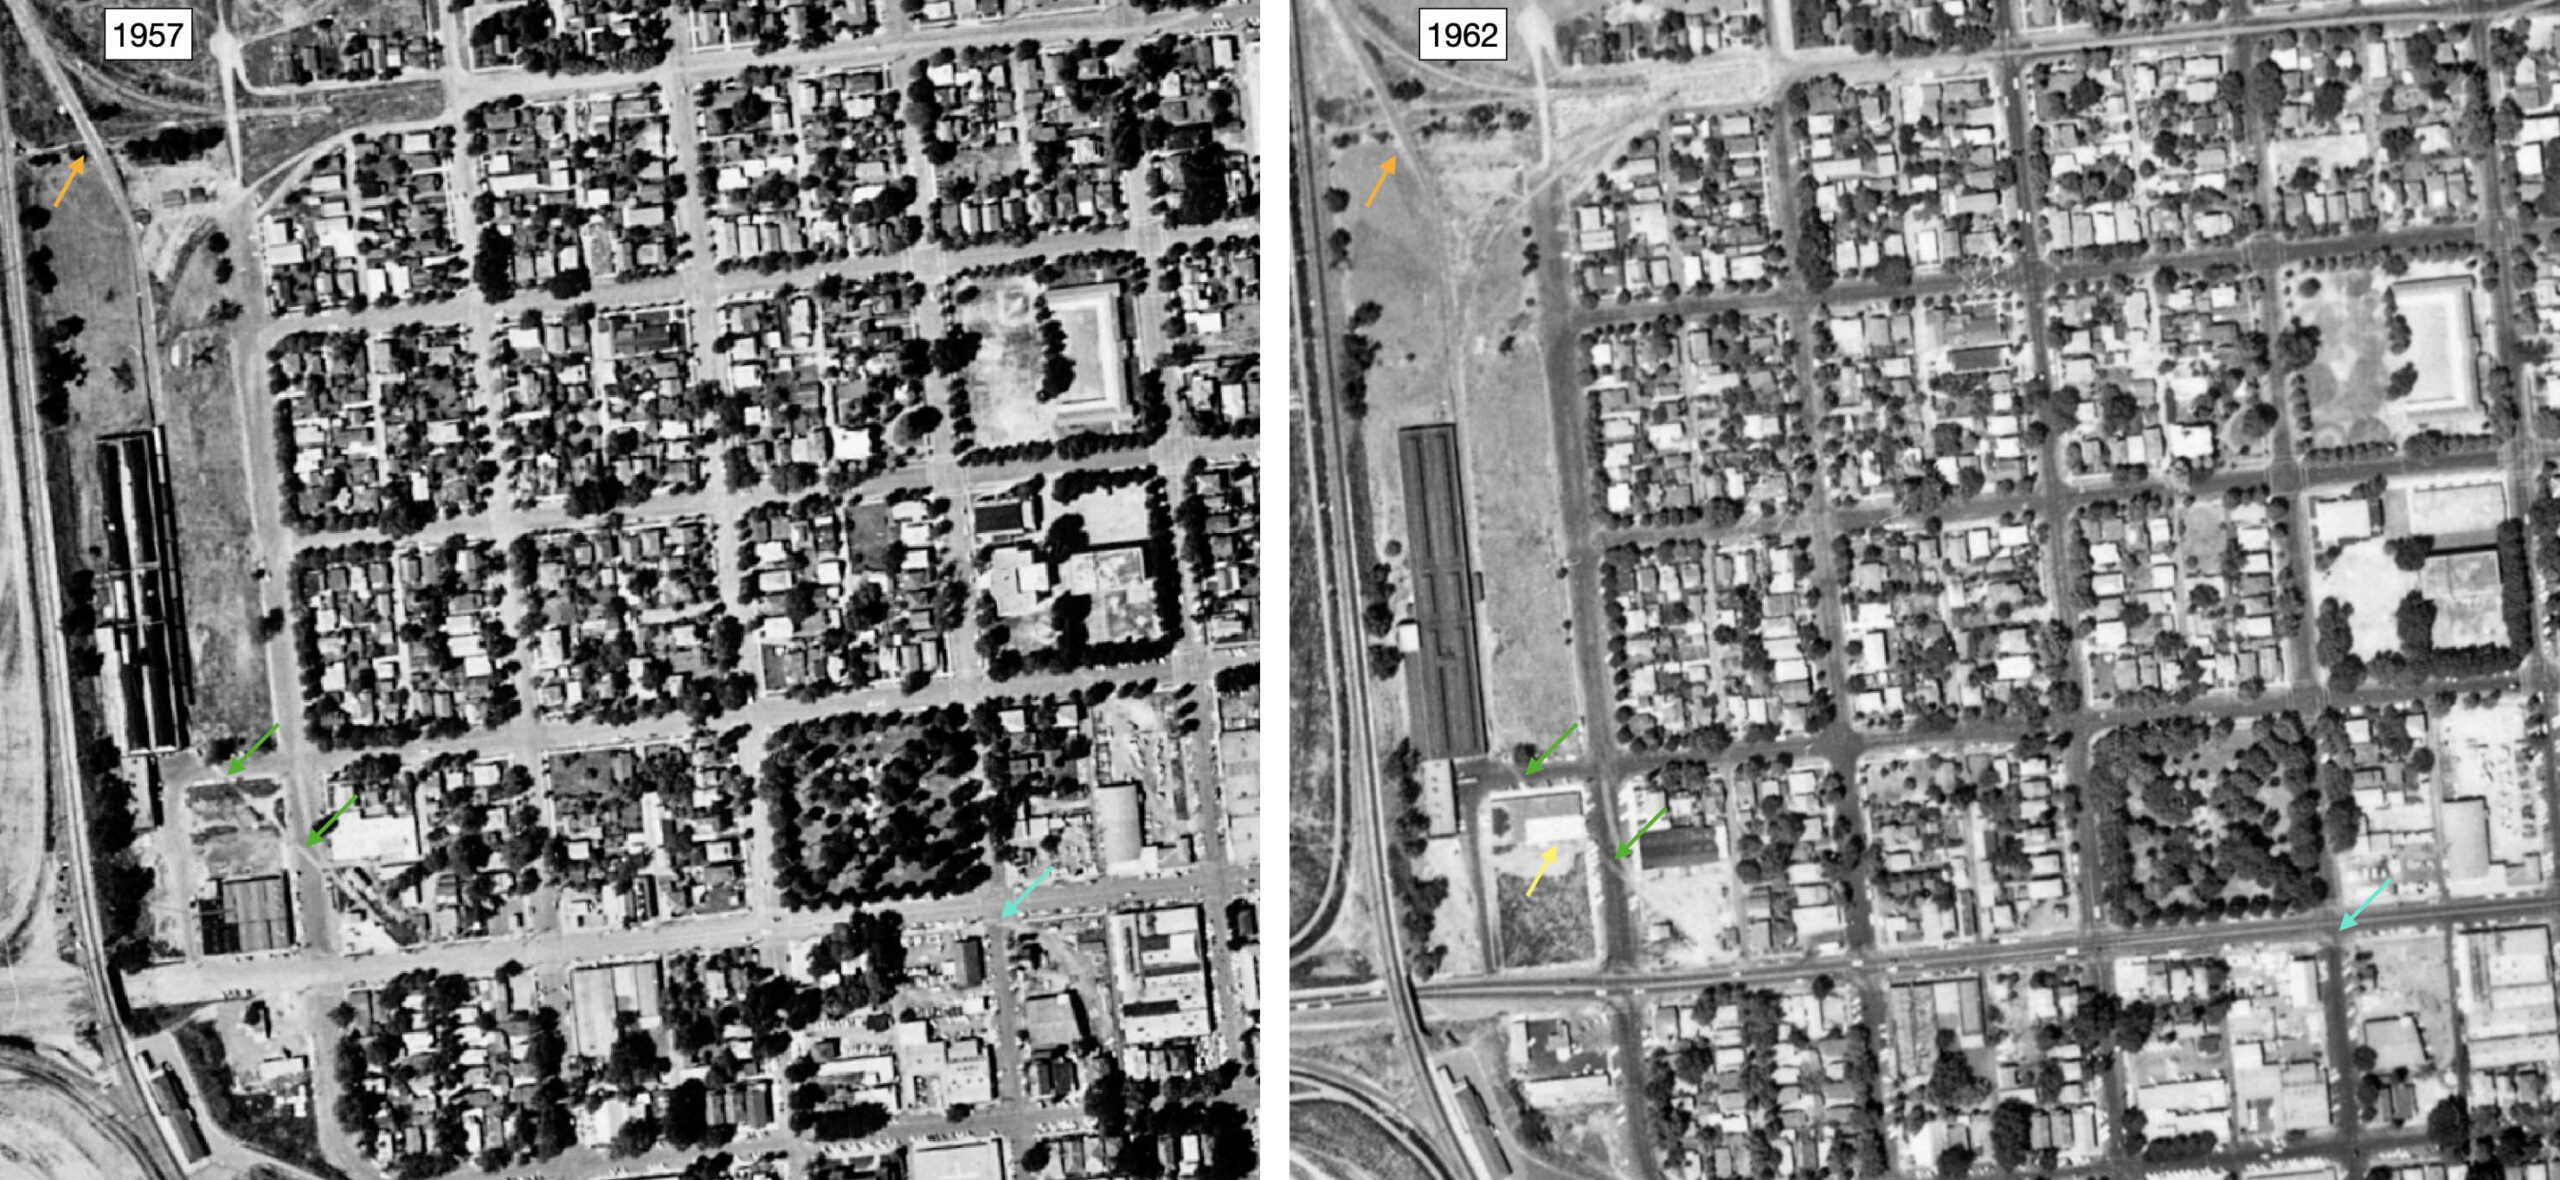
The connector remained functional at least through 1962. The orange dot marks the 4th St.-Orange St. intersection introduced at the beginning of this presentation. By 1969, it was reduced in length south of that intersection, and the only evidence in 2018 that Orange St. existed between 5th and 2nd Sts. is by the gravel curve left between 3rd and 2nd Sts., turquoise arrow. Refs: UCSB, cas-1957_Marysville 05/21/1957, and cas-2579_1-36, Marysville, 05/12/69
L242-120-Courtesy U.C. Santa Barbara Library, Special Research Collections, and Google Earth, (Image 26 of 37)
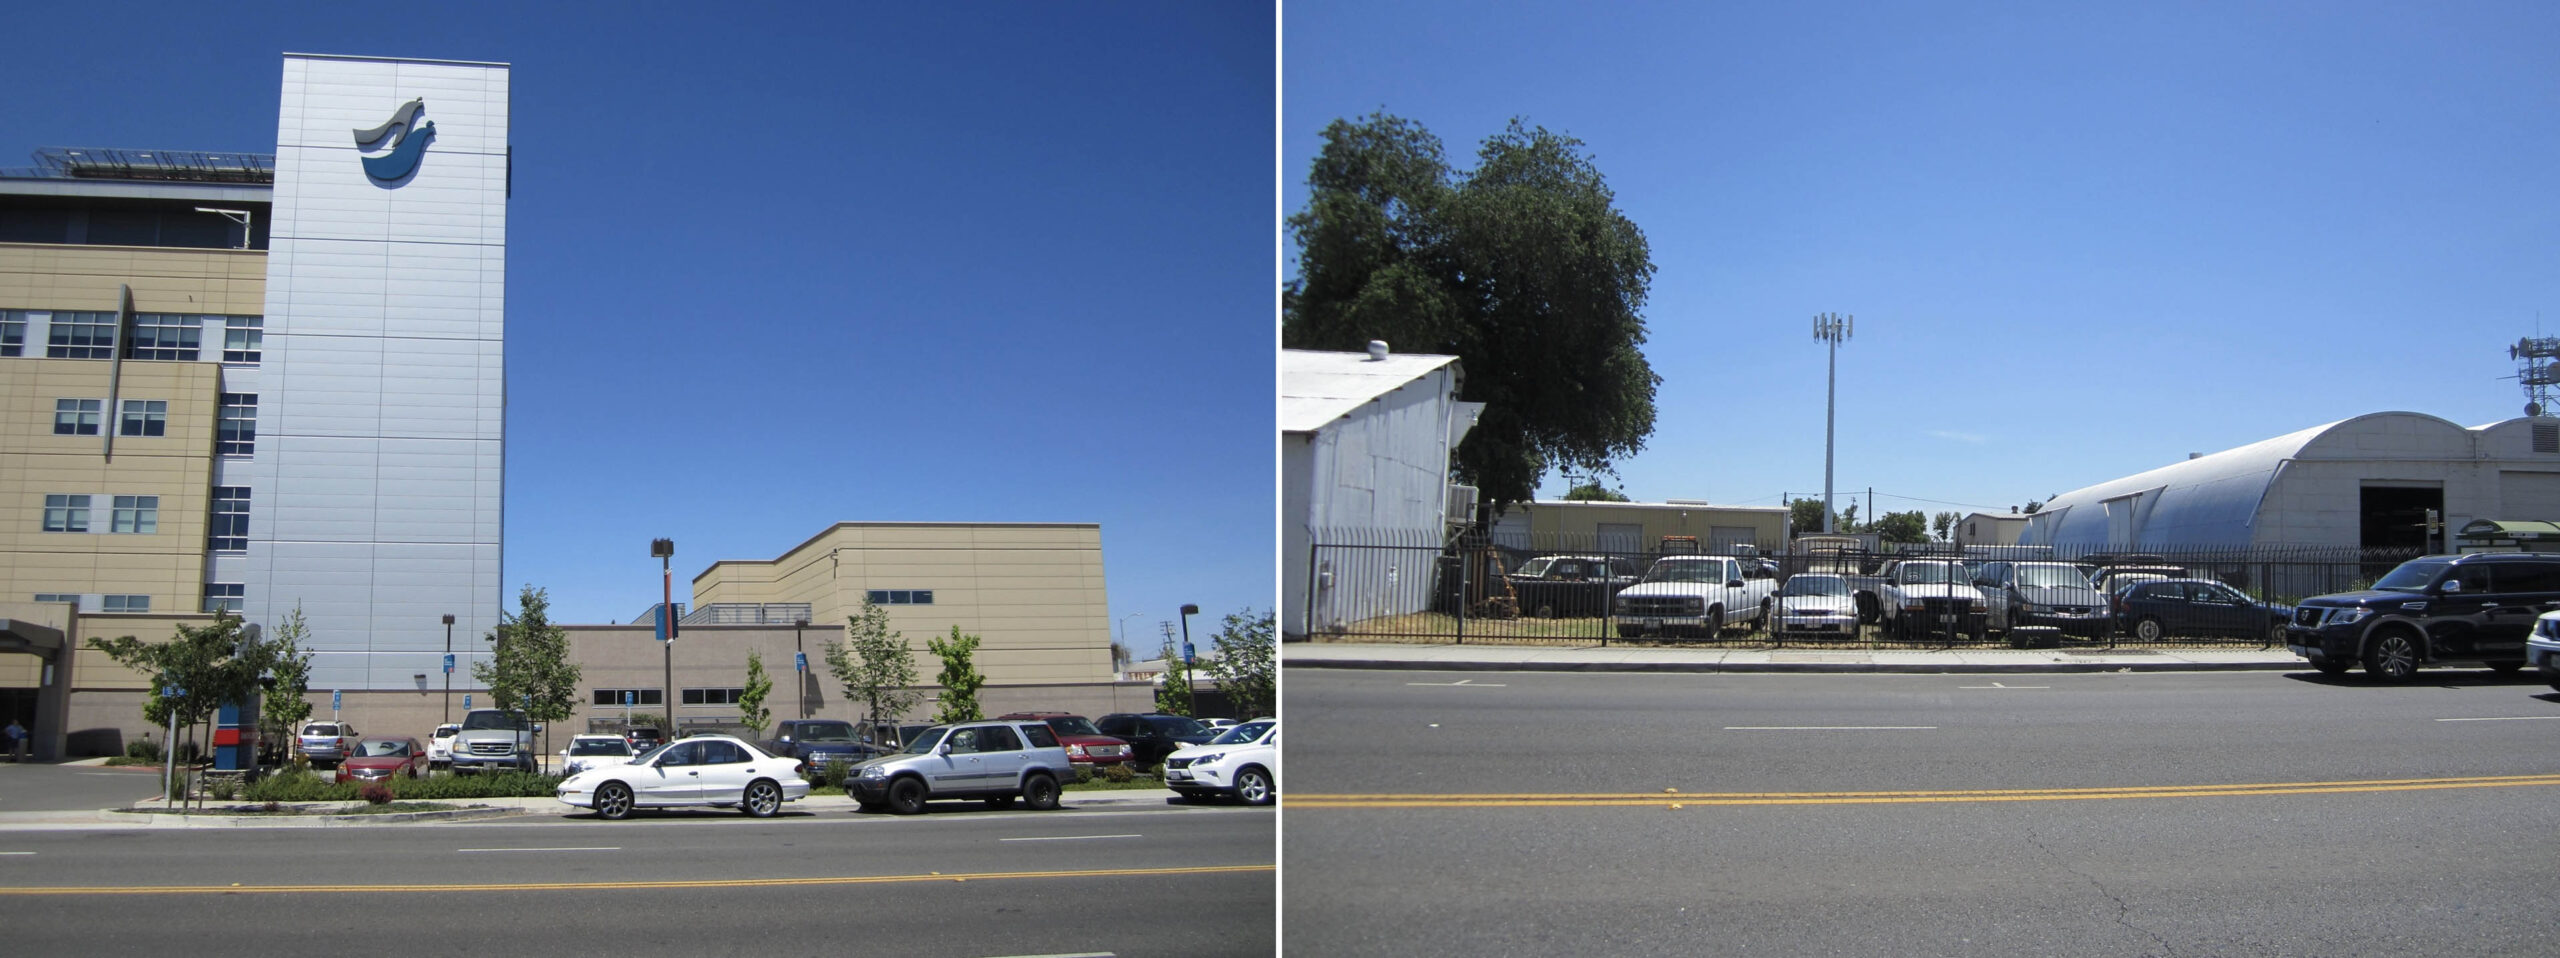
Viewed north in 2018 from 3rd St., Orange St. has been completely obliterated by Adventist Health and Rideout Medical Center to 5th St., left, but to the south, the remains of two familiar buildings on each flank matches with the days of the Orange St. connector.
L242-125-Stuart Swiedler Photos, (Image 27 of 37)
The tracks on J St. had once provided a connection at 9th St. with the SP Knights Landing Branch after the latter crossed the Feather River just north of the SN 5th St. bridge. No images were found of trains on J St., and a search for more information about its operation will be provided in the future. For now, the focus is on the surrounding architecture.
L242-130-Phillip Gale Drawing, Courtesy BAERA, Western Railway Museum Archives, 146437sn, Detail , (Image 28 of 37)
The small cut for the J. St. line occurred on 5th St., one half block to the east, red arrow, as seen in this east view from 1940. After half a block of catenary poles, blue arrows, an industrial siding branched off to the west, orange arrows, while the track on the street continued for three poles, yellow arrows, where it was truncated at 6th St.
L242-135-Dorothea Lange Photo, U.S. National Archives and Records Administration, NARA 521573, (Image 29 of 37)
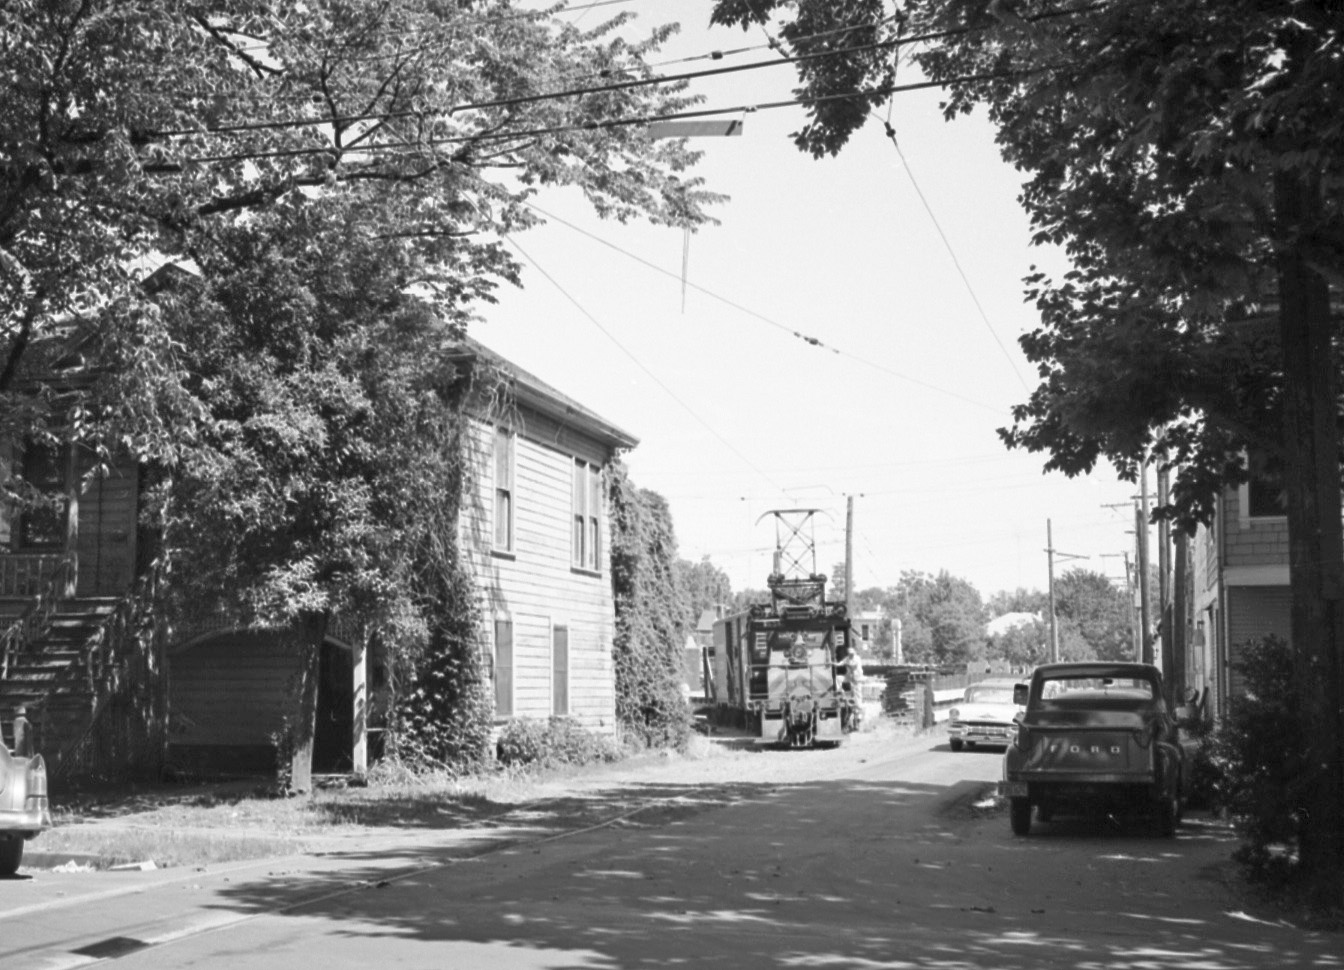
All the images that have been found of this branch were taken on the last day of streetcar operation, Feb. 15, 1942, and no images with freights were found. A northeast view with Birney 70 in the cut with SN 68 on 5th St., left, and the same car positions in a northeast view with W.W. Nelson, SN Superintendent of Transportation, right. Ref: left, Wilbur C. Whittaker Photo; right, 162600sn
L242-140-Courtesy BAERA, Western Railway Museum Archives, and Arnold Menke and Garth Groff, (Image 30 of 37)
This northwest view of Birney 70 on the siding from Feb. 15, 1942 shows the truncated J St. track along the right, Marysville Tractor and Equipment Co. as the first property on the siding, and the former Viden Packing or Cannery, by 1927 the California Packing Co., CalPak, building in background. The tractor company is listed in the circa 1957 WP Circular No. 167-E as a WP customer, consistent with the address in Polk’s circa 1940 as 1009 5th St., the company's other property across the street behind the WP passenger station.
L242-145-Addison Laflin Photo, Courtesy BAERA, Western Railway Museum Archives, 167255sn, (Image 31 of 37)
Of all the images in this update, these southeast view of Birney 70 on the siding from Feb. 15, 1942 are the most difficult to interpret. The scene would suggest that this siding had not been active in recent times. The circa 1957 WP Circular No. 167-E lists 6th and J Sts. as a SN track team location. Ref: Robert P. Townley Photo, l, Louis Bradas, Jr. Photo, r.
L242-150-Courtesy BAERA, Western Railway Museum Archives, 143659sn, l, 69136, r, (Image 32 of 37)
Moving along the siding at 6th St., Birney 70 leaves CalPak. This north view from Feb. 15, 1942 is of interest because of the cross buck seen in the distance, along the SP’s soon to be abandoned 9th St. track and the initial SN-SP interchange.
L242-155-Arthur Lloyd Photo Courtesy BAERA, Western Railway Museum Archives, 129799sn, (Image 33 of 37)
Not much activity at the CalPak siding, but it is a Sunday, Feb. 15, 1942, southwest view, left, north view, right. The circa 1957 WP Circular No. 167-E marks it as the largest single company siding in all of Marysville, handling 14 cars. Lots of good reading on the internet on Virden, too much to list here, just type in “Virden Cannery” or “Virden Packing”. The building features many tenants in 2021.
L242-160-Courtesy BAERA, Western Railway Museum Archives, 167257sn, l, 167256sn, r, (Image 34 of 37)
Based on a 1952 USGS map, the track on 5th St. from G St. to the J St. cut to the CalPak siding were removed coinciding with the ca. 1950 realignment of the WP-SN-SP interchange to north of 10th St. or Route 20. Consistent with this, the WP line map from 1948 on page 78 in Jeff Asay’s “Track and Time” shows the track along 5th St. to still be present. The approach to the CalPak siding was shifted to the north, orange arrows, from the WP mainline at about 10th St., under the bridge.
L242-165-Copyright California Department of Transportation, 7609-1 Detail, (Image 35 of 37)
Later aerial images are misleading as to the activity of the cut from 5th St. via J St. to CalPak since it is visible in 1957 and 1962, green arrows. By 1962, however, a building, yellow arrow, blocks the way of this path without other visible changes. The new approach to CalPak is marked by the orange arrow, and the end of the Orange St. connector by the turquoise arrow. Ref: UCSB, left, cas-1957_Marysville 05/21/1957; right, cas-yub_1-28, 7/26/1962
L242-170-Courtesy U.C. Santa Barbara Library, Special Research Collections, (Image 36 of 37)
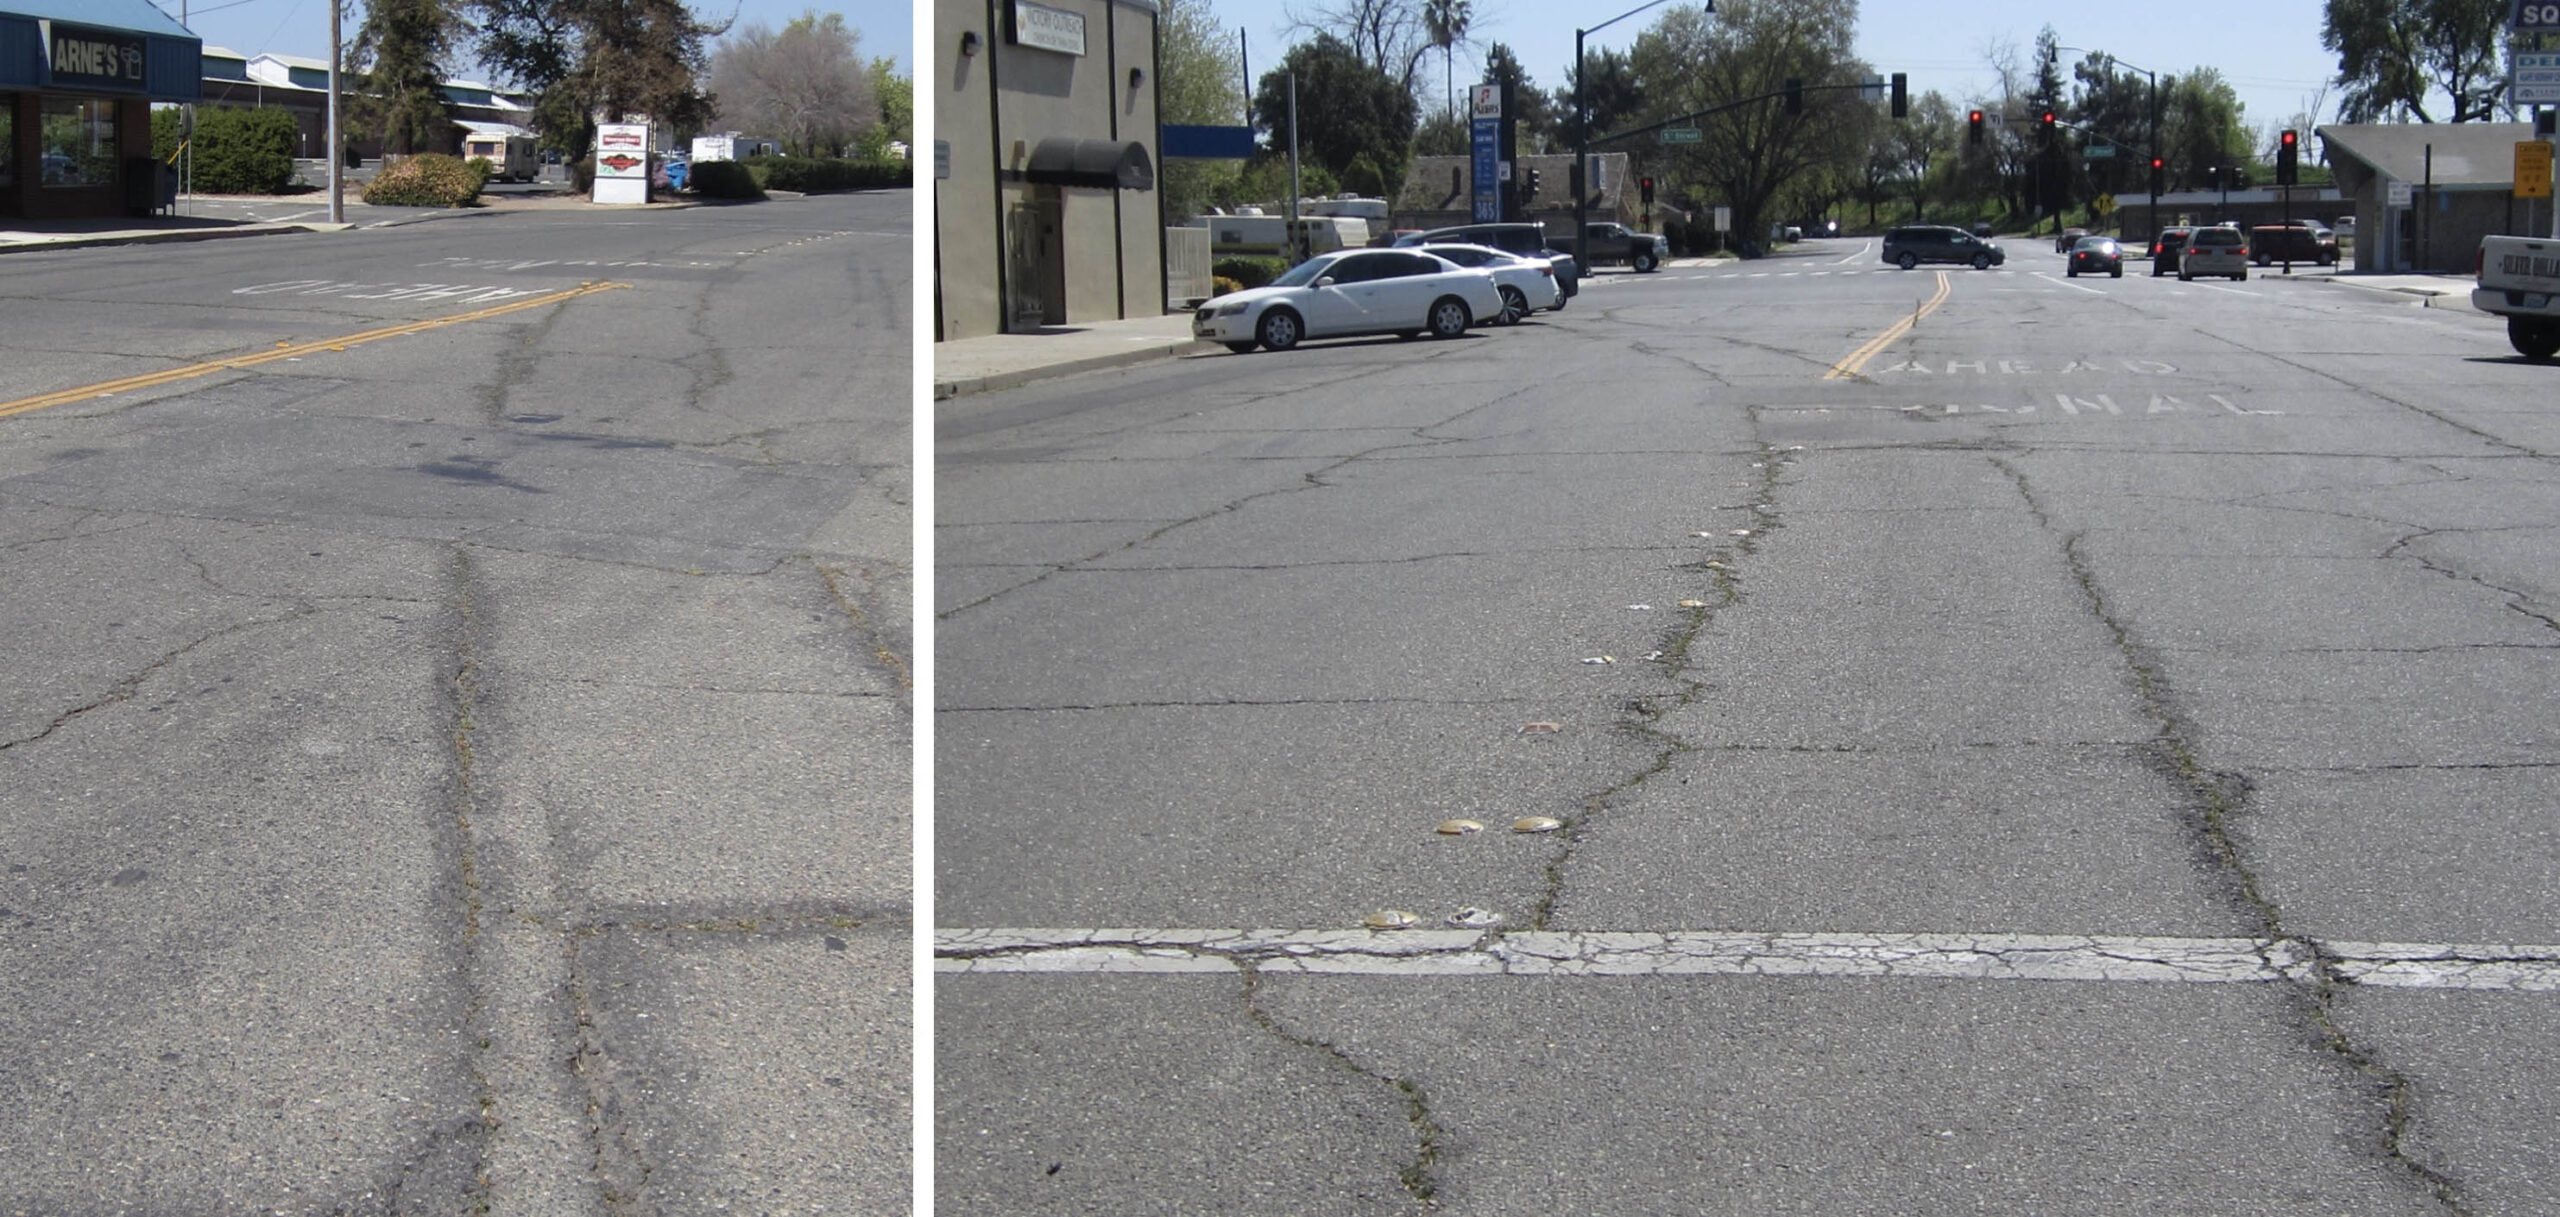
Unlike the Orange St. connector, previous activity of the SN on J St. is still visible in the asphalt. Northwest view, left, south view, right, 2021. Next time, completing the architectural review.
L242-175-Stuart Swiedler Photos, (Image 37 of 37)