Triangles of the Middle Canyon
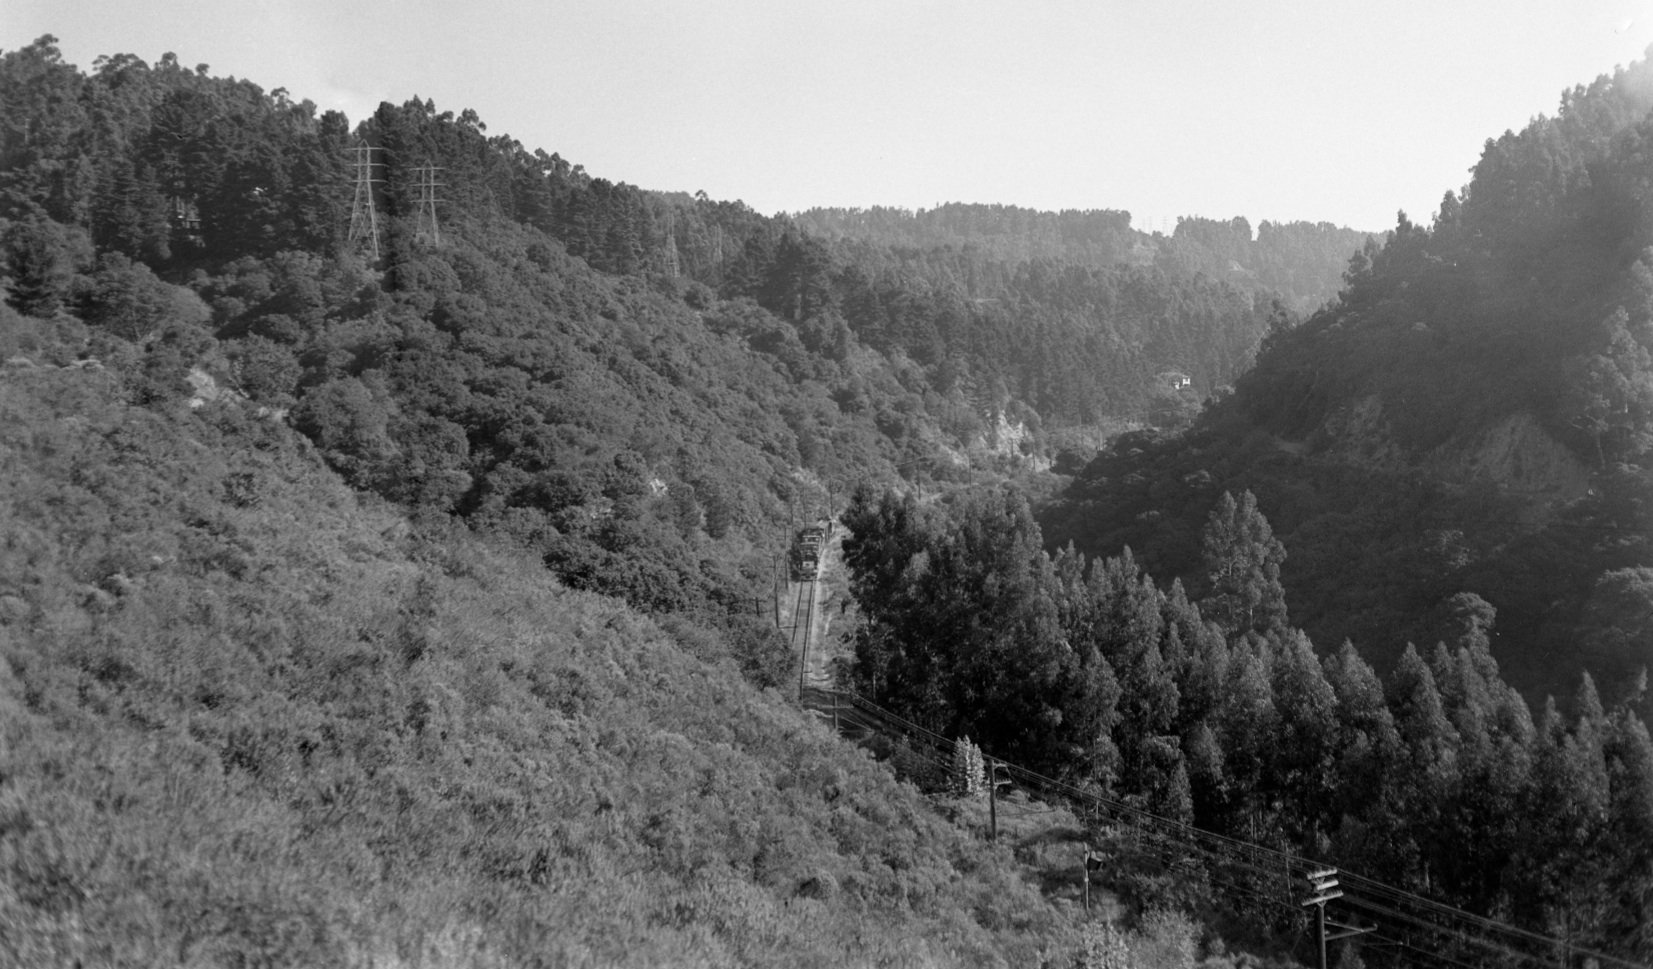
Shepherd Canyon provided photographers the opportunity for expansive views that captured the beauty of this section of the SN. Images of construction of this section were not forthcoming, but a consistent feature were the triangles sculpted on the northeast wall. Undated, northeast view, and photographer unknown. The home on Woodrow Drive, built in 1930, still stands.
L52-05-Courtesy Tom Gray, Obtained from Charles Savage , (Image 1 of 21)

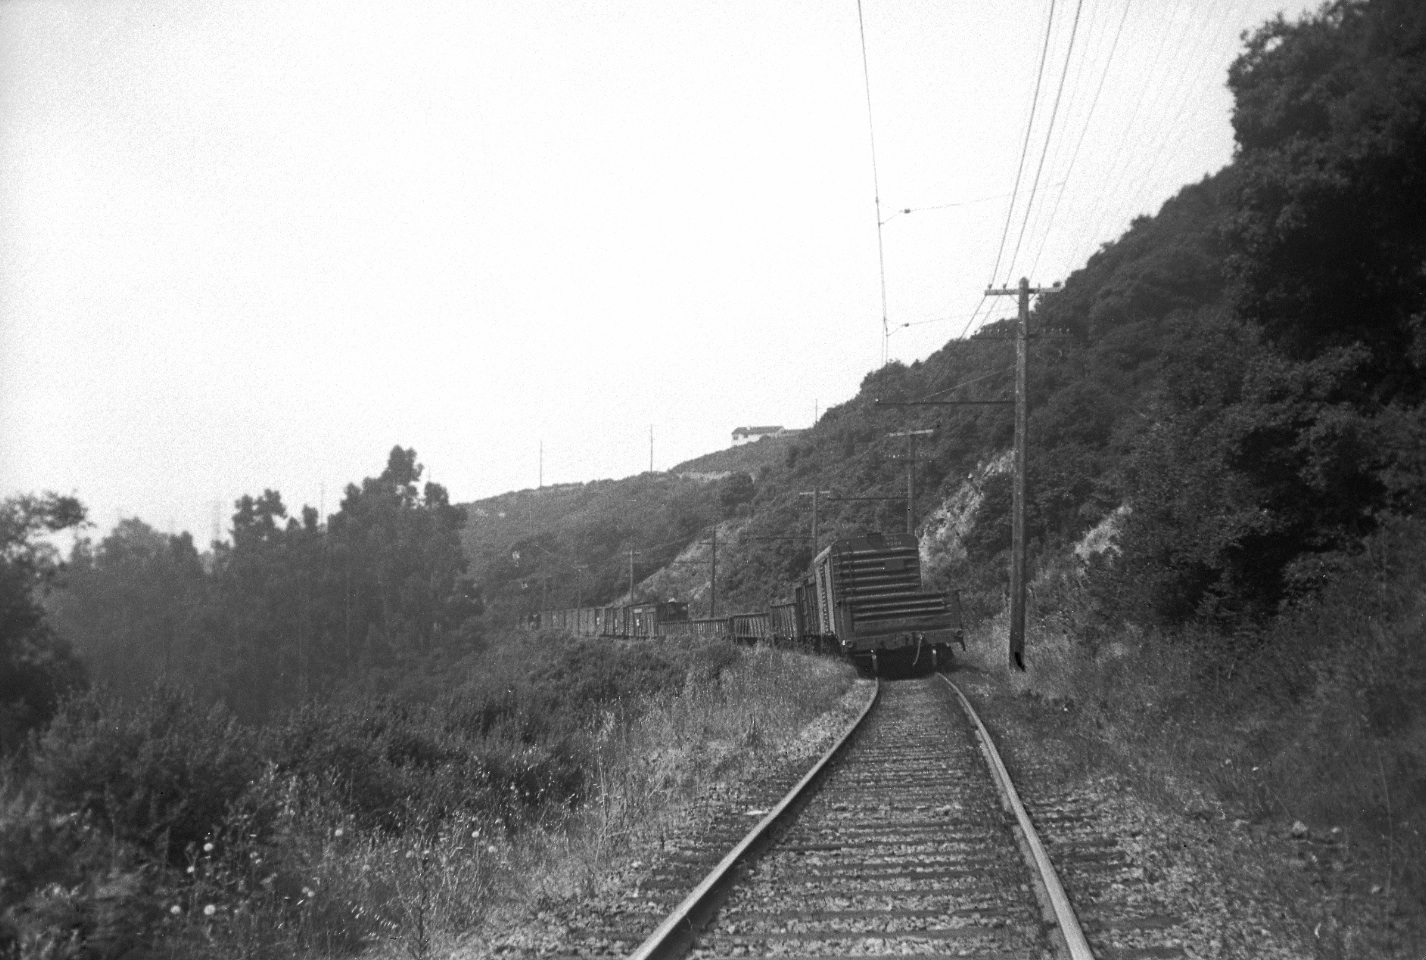
This northeast view of SN 1007 circa 1913 adds to the speculation that the triangles above the right-of-way allowed its construction, and the resulting loose dirt and rock were dumped to the downslope to bolster the roadbed.
L52-10-Cook and Cook Photo, Sappers Collection, BAERA, Western Railway Museum Archives, 24151sn, (Image 2 of 21)
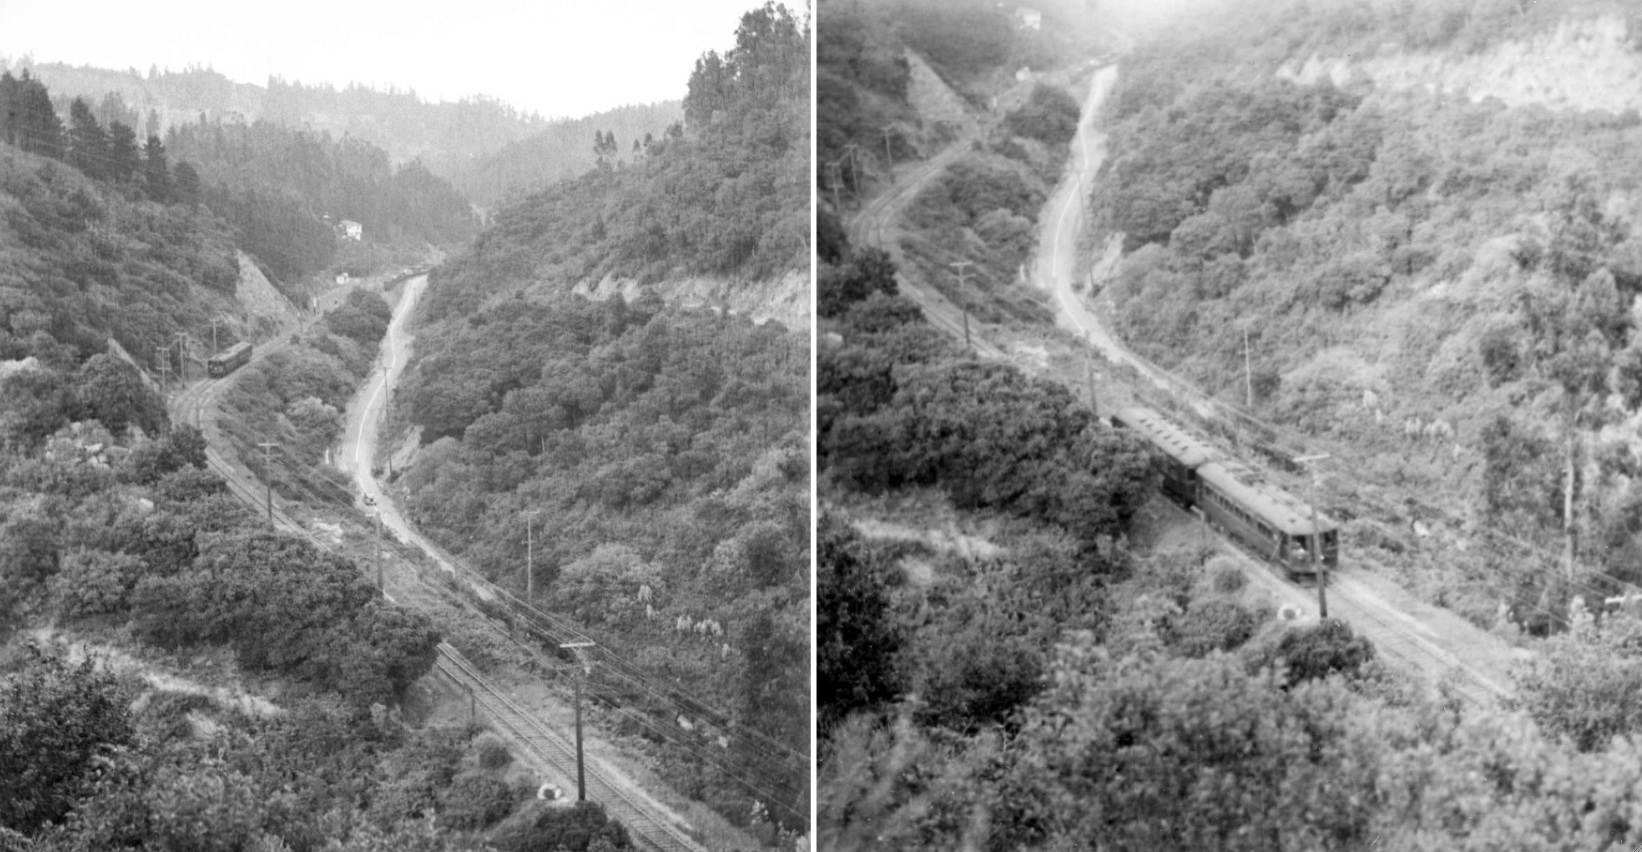
This may be the last known full-canyon panorama with a SN train present, a north view on Sept. 29, 1956. Except for the absence of the SN Havens shelter, it might as well been 1930 when Fred Matthews took this image, as all that is seen in the distance is 7051 Woodrow Dr. Several approaches were taken to record train movements in the canyon.
L52-15- Fred Matthews Photo, Courtesy Anonymous Donor, (Image 3 of 21)
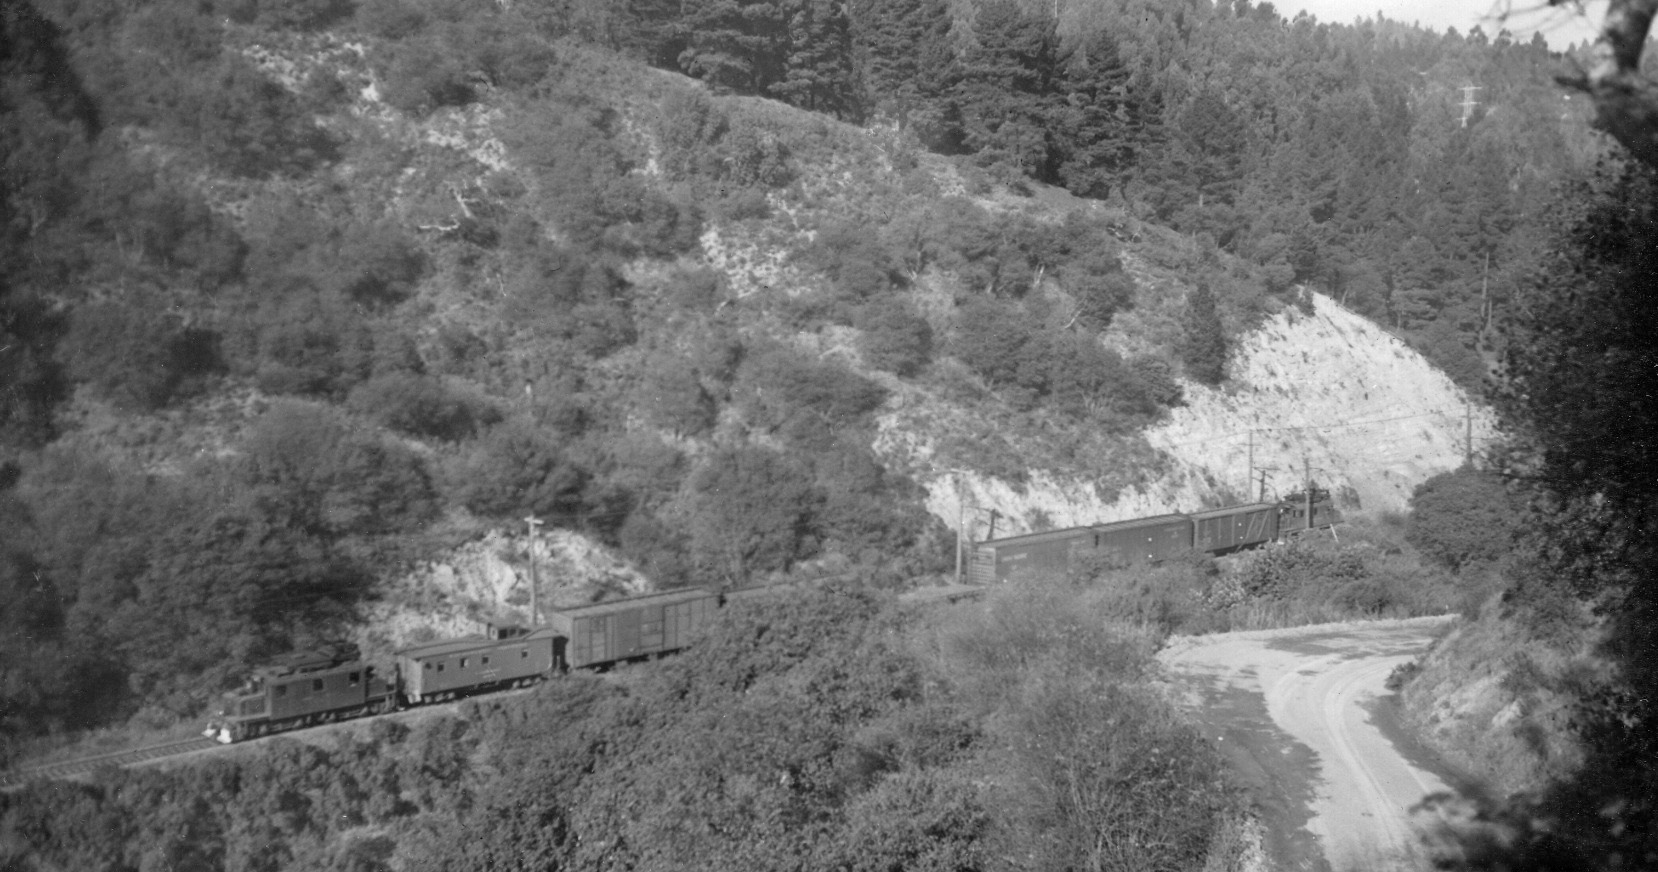
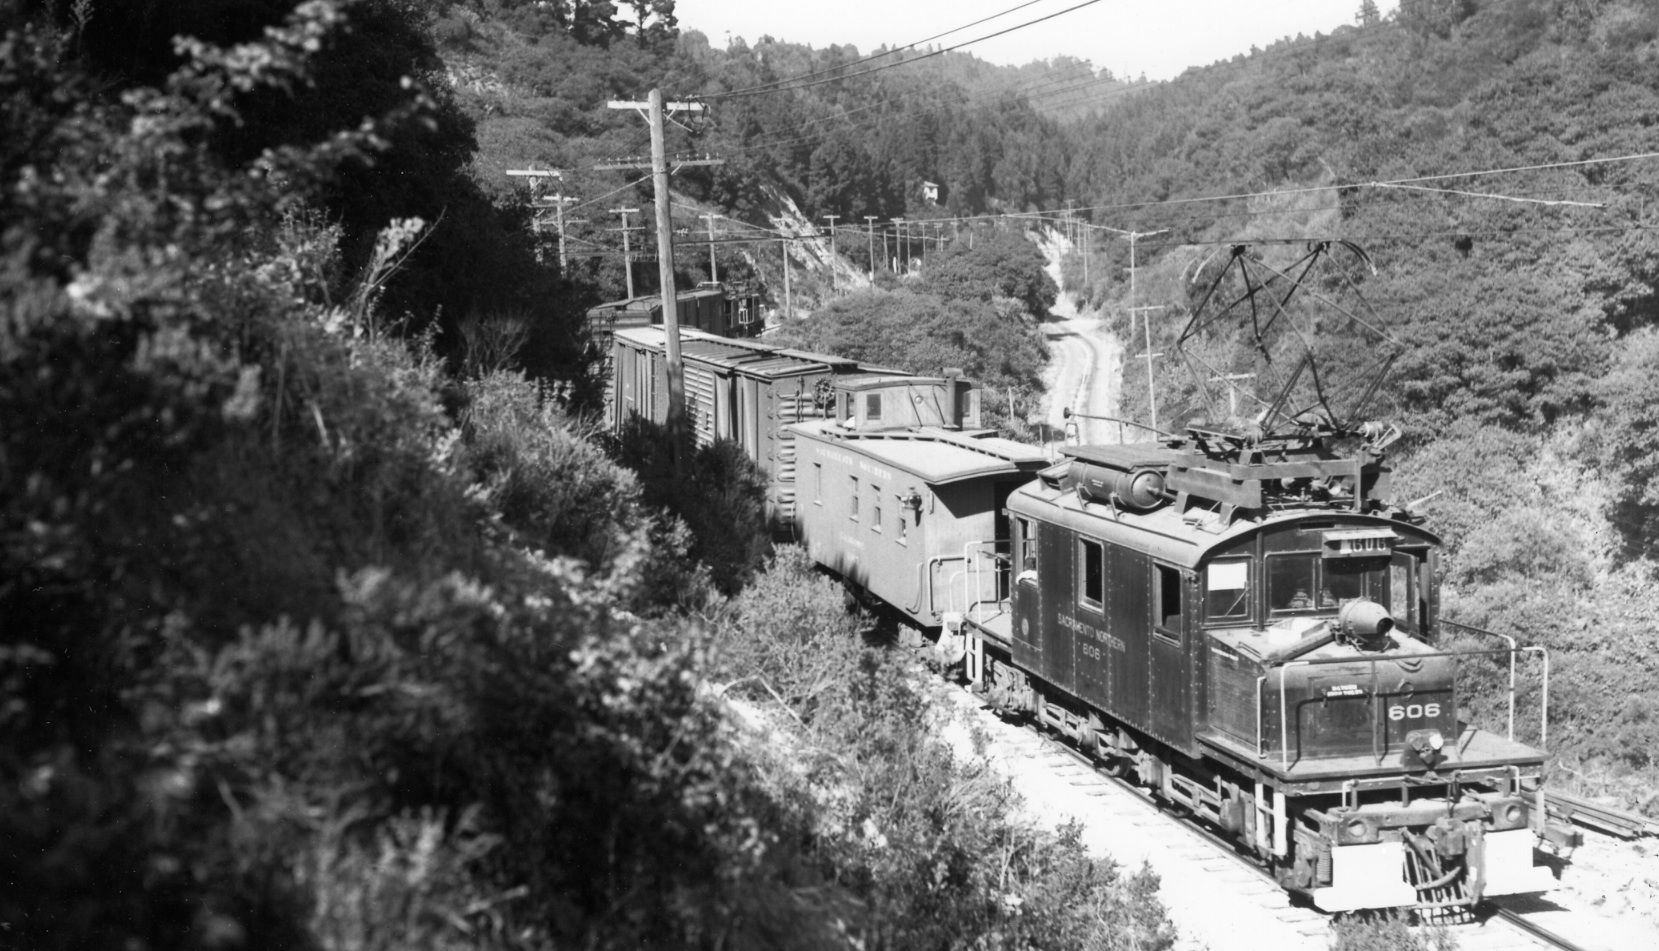
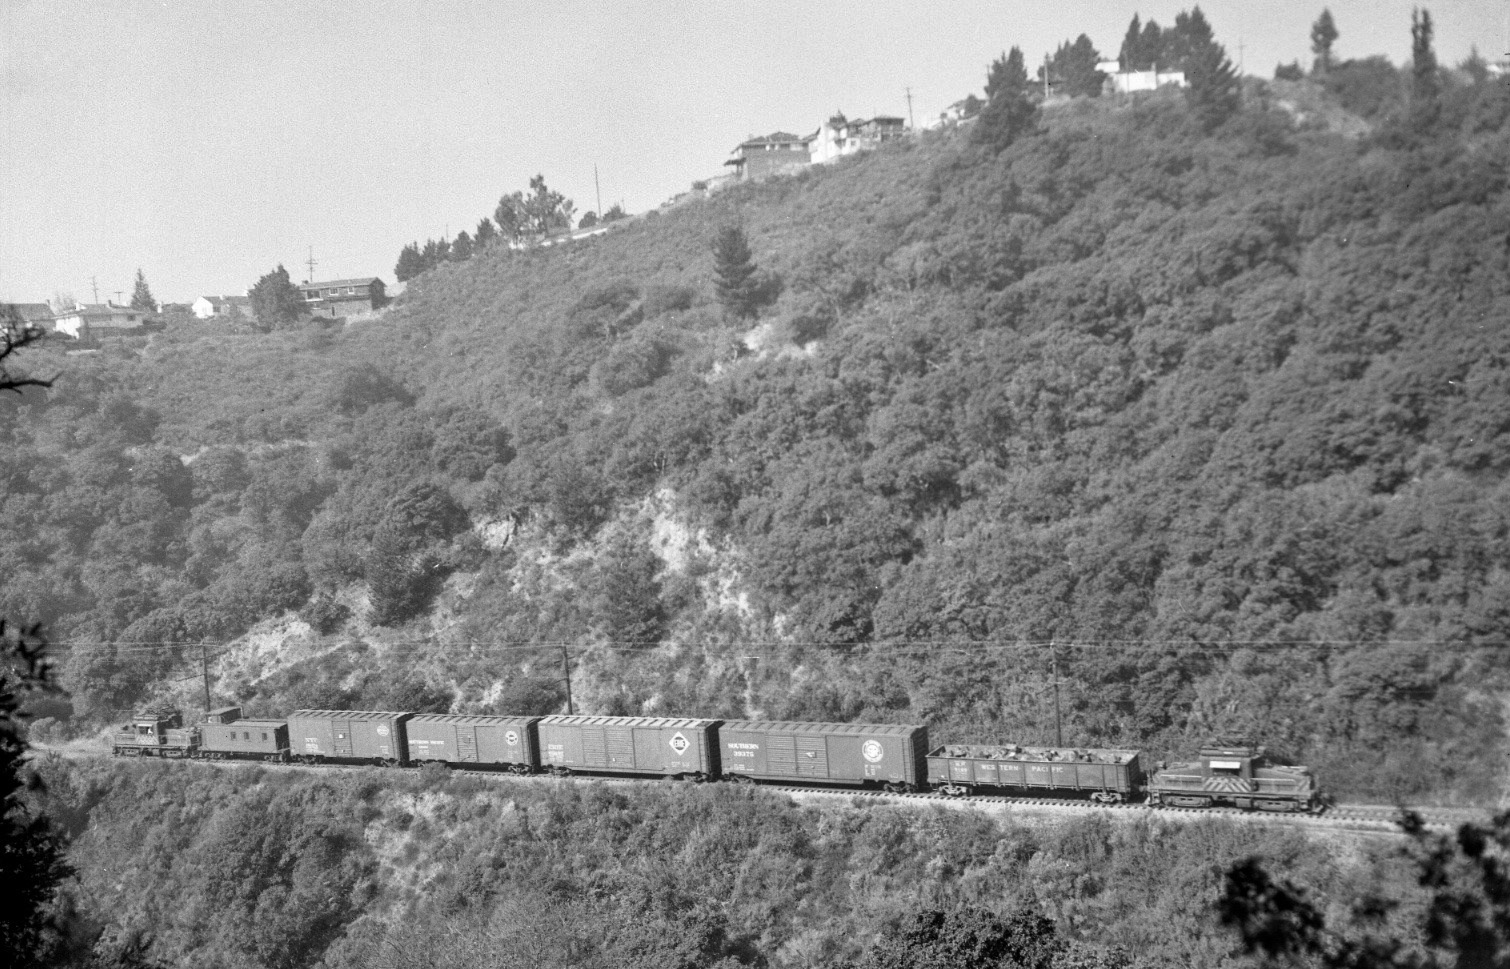
This rare northeast view captures SN 606 bringing up the rear of this war-time freight, Aug., 1944, and shows both sides of the canyon. The name of the road during SN operation, Park Blvd., outlasted the SN operation into the 1960s, after which it was changed to Shepherd Canyon Rd.
L52-20-Courtesy Arnold Menke and Garth Groff, (Image 4 of 21)
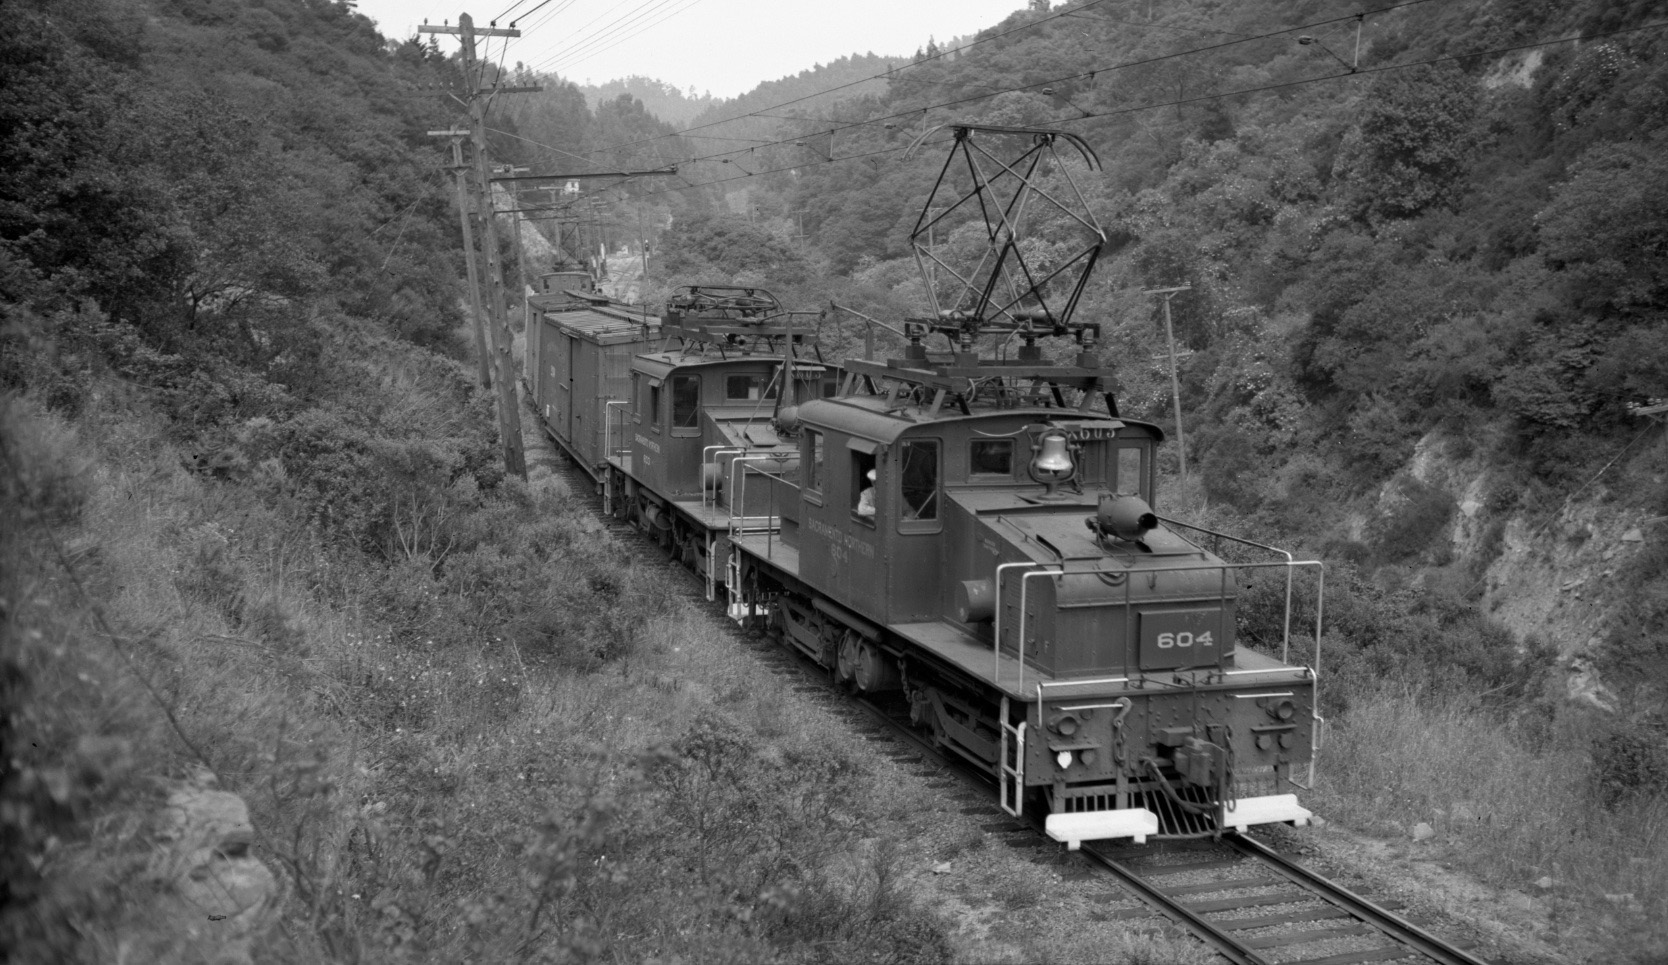
Charley Savage was also fond of taking images of motors with war-time shields on their lights as in this northeast view of SN 603 and SN 604 with freight on May 27, 1944. By moving slightly to the east of the previous image, he was able to provide a clear shot of the Havens shelter and the illusion that the canyon was devoid of a road.
L52-25-Charles Savage Photo, Courtesy BAERA, Western Railway Museum Archives, 9655sn, (Image 5 of 21)
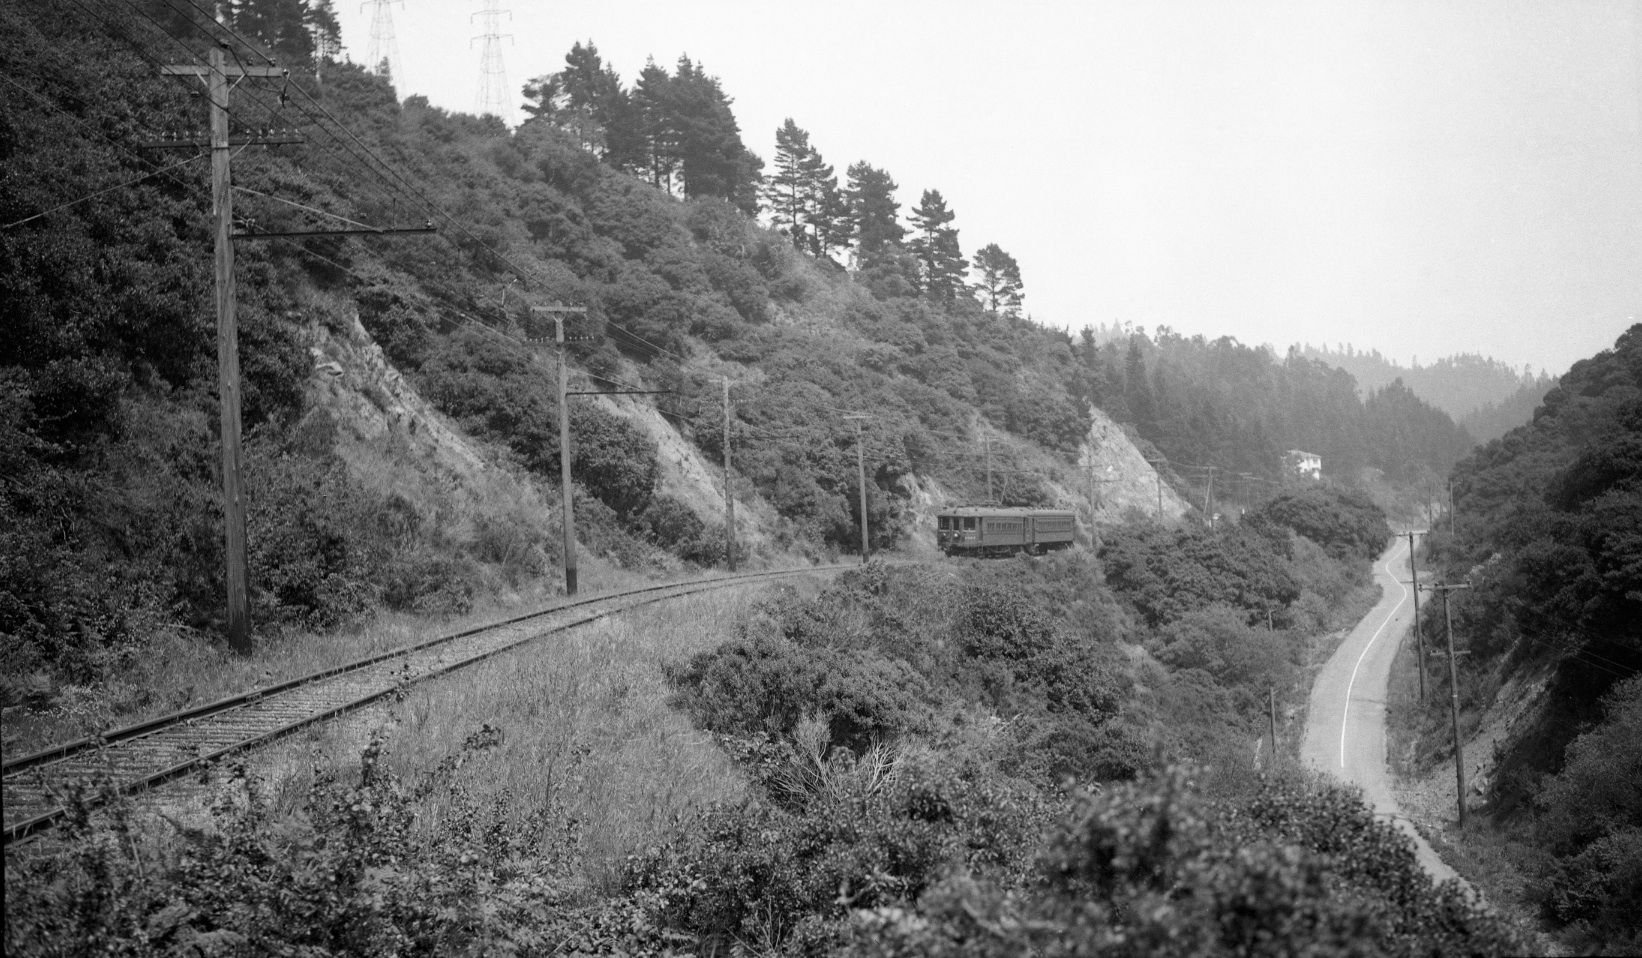
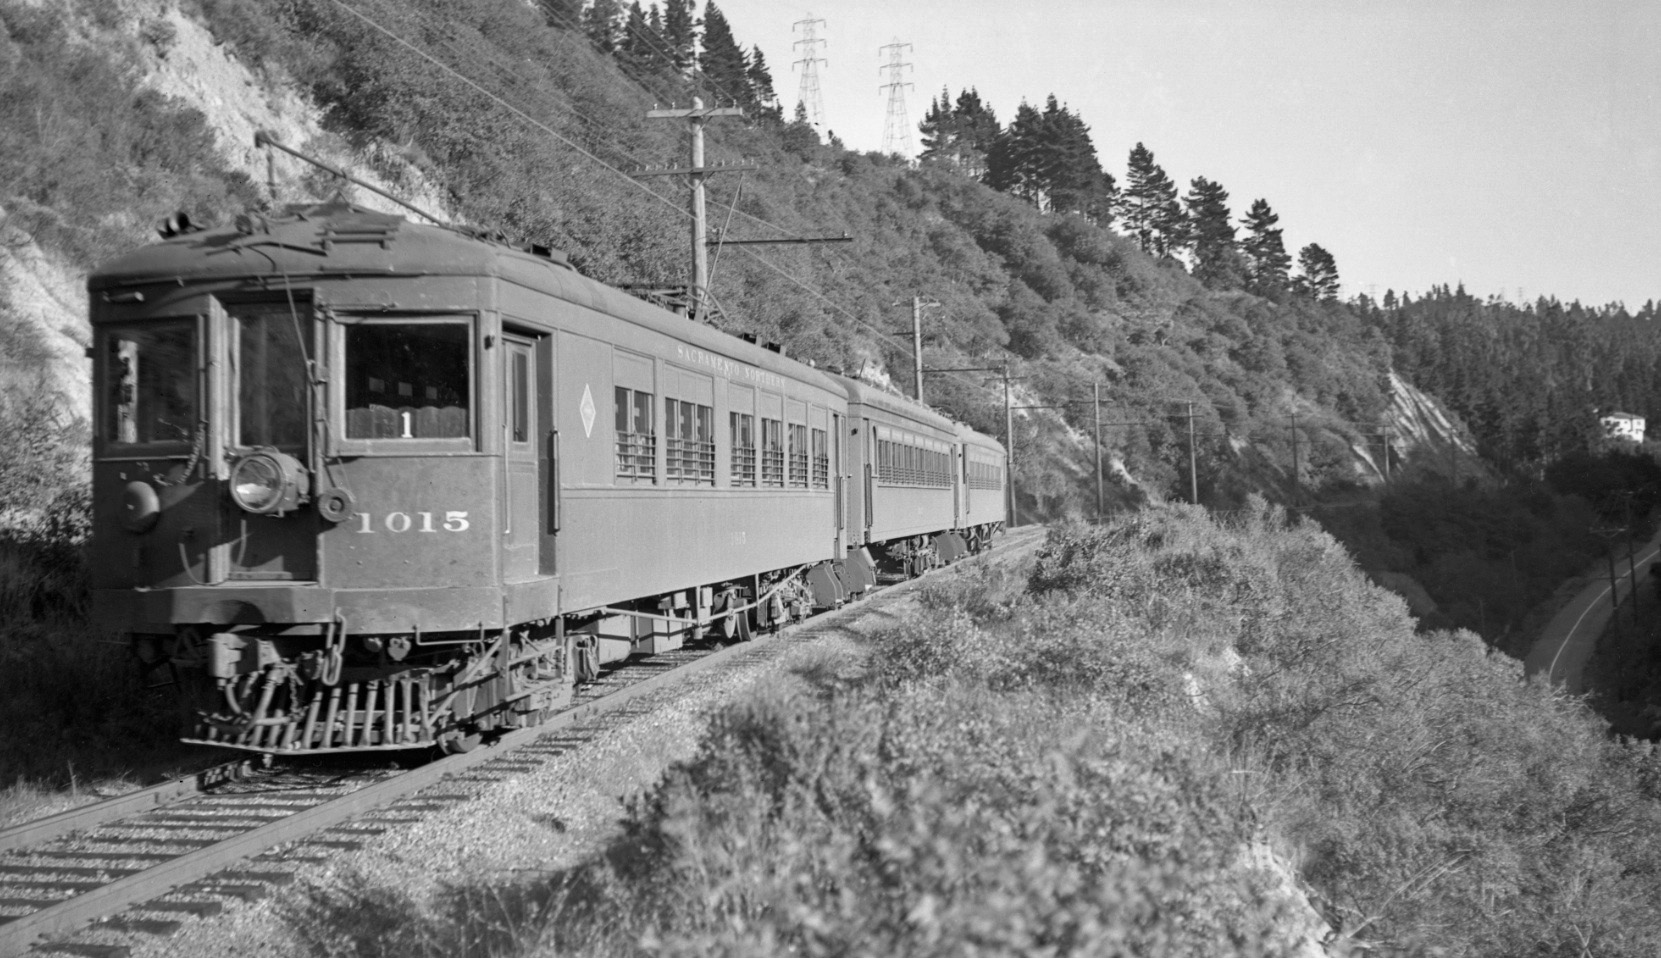
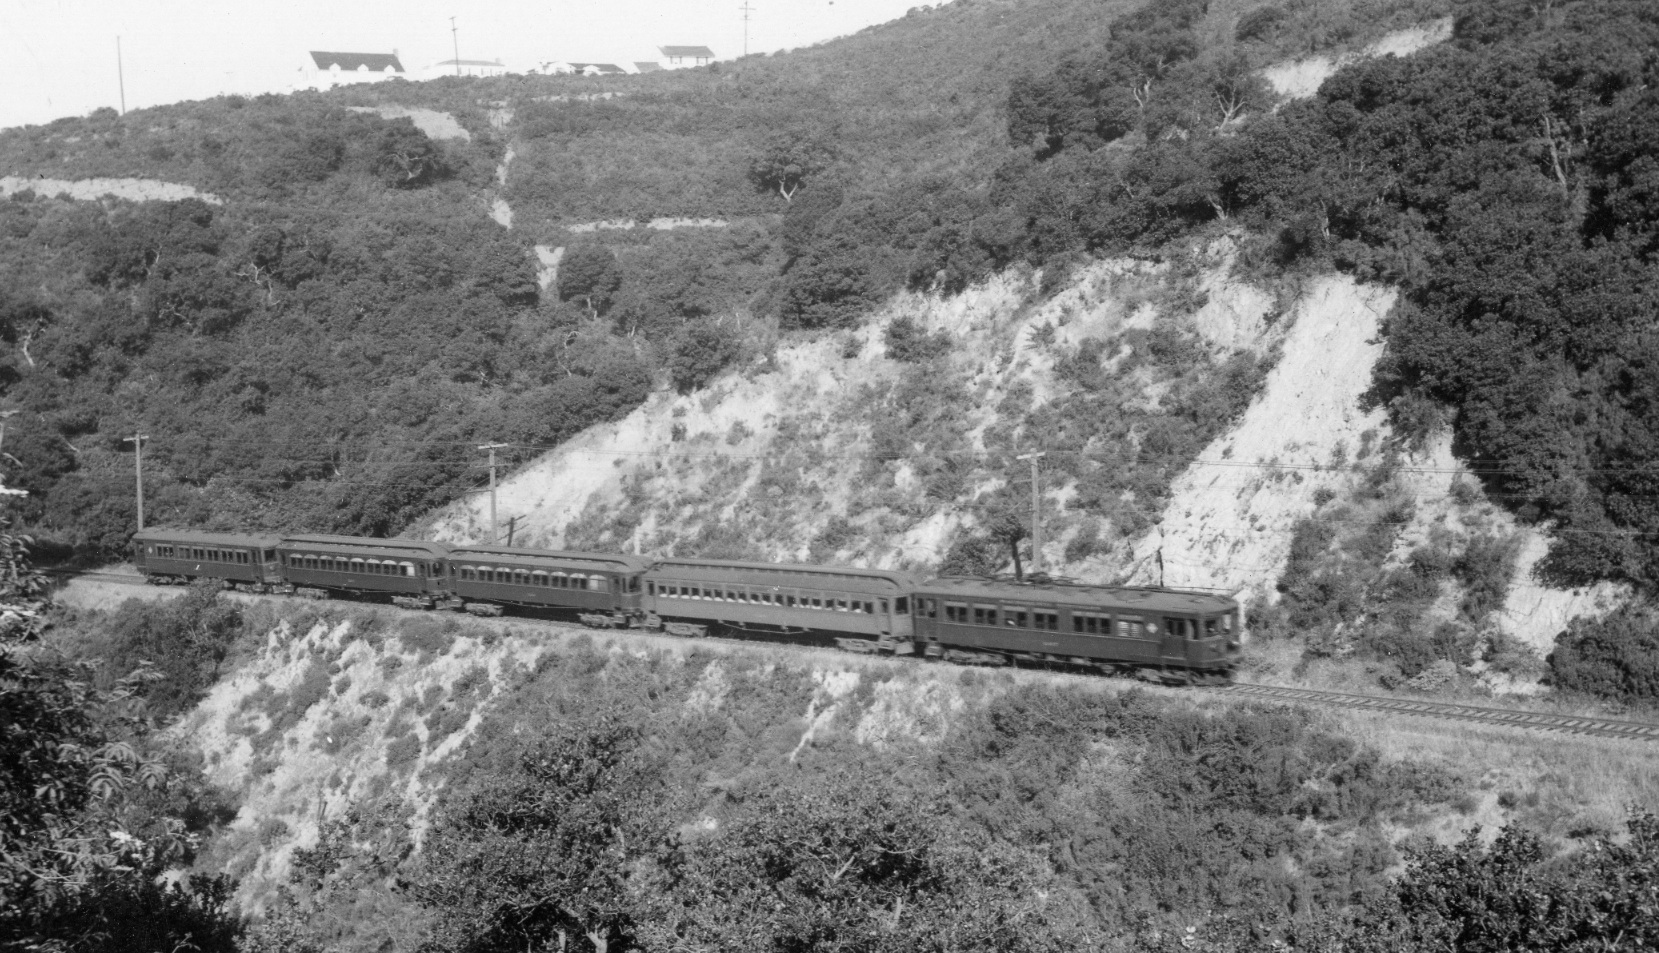
Art Alter took this image before US involvement in WWII in 1940, focusing on the three-car passenger train no. 1 led by SN 1015, but providing a bit of the road, the two electrical towers, and 7051 Woodrow Dr. to make the location of this northeast view unequivocal.
L52-30-Art Alter Photo, Moreau Collection, Courtesy BAERA, Western Railway Museum Archives, 81710sn, (Image 6 of 21)
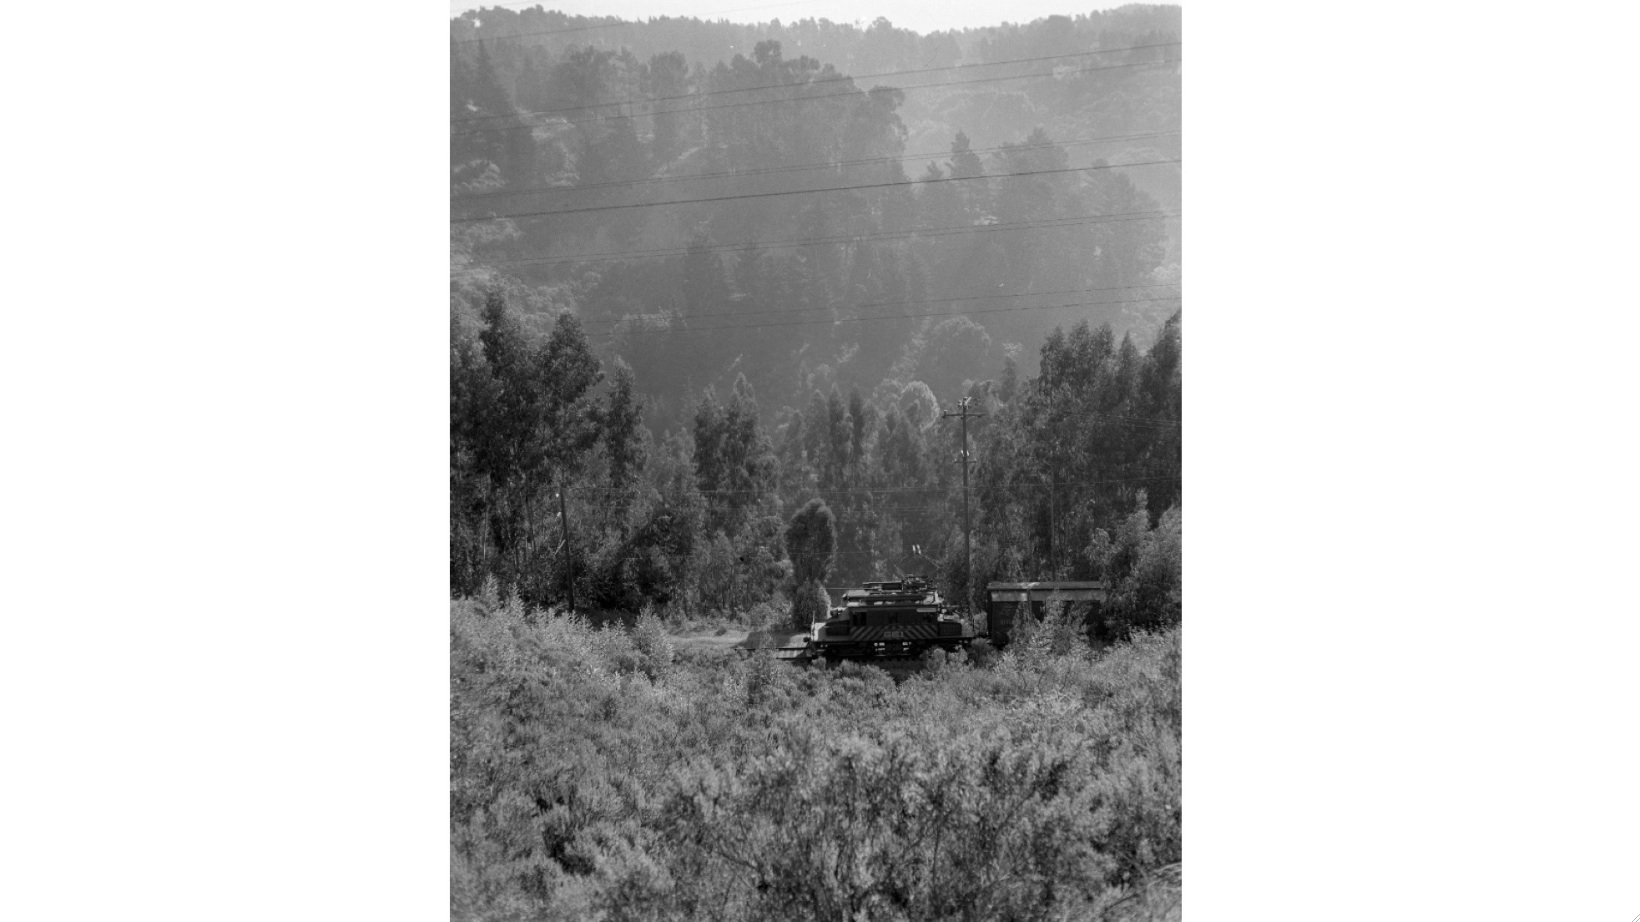
Taking southwest close-ups was also a second strategy, and Charley Savage waited until the train in L52-25 was past to catch the rear on May 27, 1944. In addition to catching the idyllic setting, this image documents that the SN used Tidewater Southern 106 during WWII with its original lettering, only to change it to SN 670 in 1948.
L52-35-Charles Savage Photo, Courtesy BAERA, Western Railway Museum Archives, 88057sn, (Image 7 of 21)
Norman Smith, in contrast to the previous southwest view, portrayed a tired out SN operation ca. 1950 after grueling wartime duty.
L52-40- Norman Smith Photo, Courtesy BAERA, Western Railway Museum Archives 56018sn, (Image 8 of 21)
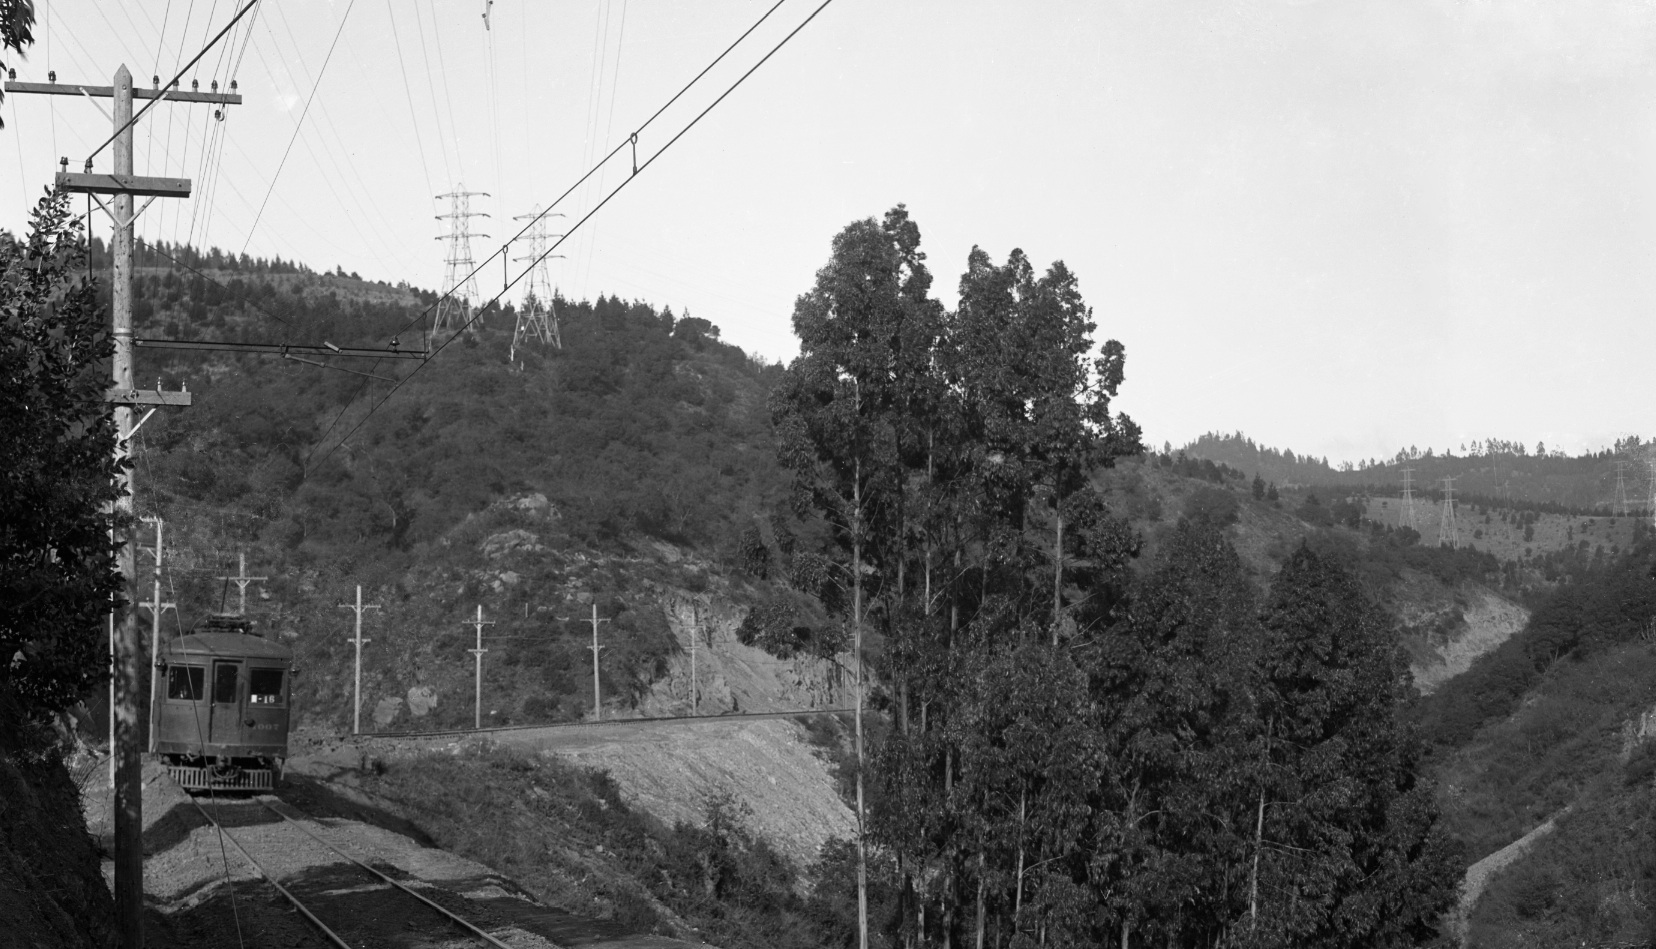
Another approach was to wait on the southern rim of the canyon to photograph the trains passing the emblematic triangles. Archived images tell us that Oakland resident Ted Wurm was busy on June 5, 1940 photographing the canyon, here displaying the western-most triangle in a northwest view just below homes in Montclair.
L52-45-Ted Wurm Photo, Courtesy BAERA, WRMA, 61982sn, (Image 9 of 21)
Vic DuBrutz may have taken the last known triangle-centric northwest image on Oct. 12, 1956, capturing a complete freight with two General Electric steel steeple motors, most likely SN 652 and SN 653. Contrast the increase in the number of homes on the north ridge relative to the last image from 1940.
L52-50-Victor DuBrutz, Courtesy BAERA, Western Railway Museum Archives, 77482sn, (Image 10 of 21)
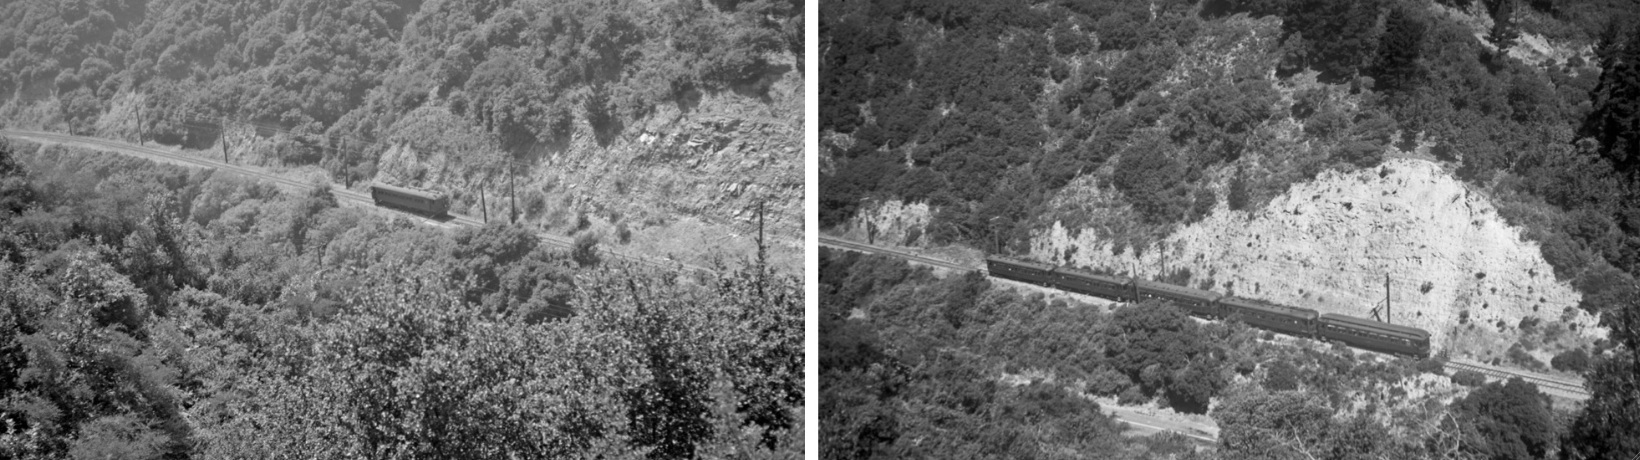
Northwest views of the first triangle, 1939-1956. A, Wilbur C. Whittaker Photo, Oct. 29, 1939, Courtesy Arnold Menke and Garth Groff; B, Roy Covert Collection, June 22, 1941, Courtesy BAERA, Western Railway Museum Archives; C, SN 660, Fred Matthews Photo, Sept. 7, 1956, Courtesy Anonymous Donor
L52-55-Multiple Attributions (see caption), (Image 11 of 21)
North Views of West End of Small Triangles, 1939-1956. Note these views were complicated by the presence of the electrical transmission towers. A, SN 1006, SN 224, and SN 1012, J.G. Graham Photo, 1939, Courtesy BAERA, Western Railway Museum Archives, 17824sn; B, SN 652 (rear), Fred Matthews Photo, Sept. 7, 1956, Courtesy Anonymous Donor; C, SN 605, Al Thoman Photo, April 22, 1950, Courtesy BAERA, Western Railway Museum Archives, 52480sn
L52-60-Multiple Attributions (see caption), (Image 12 of 21)
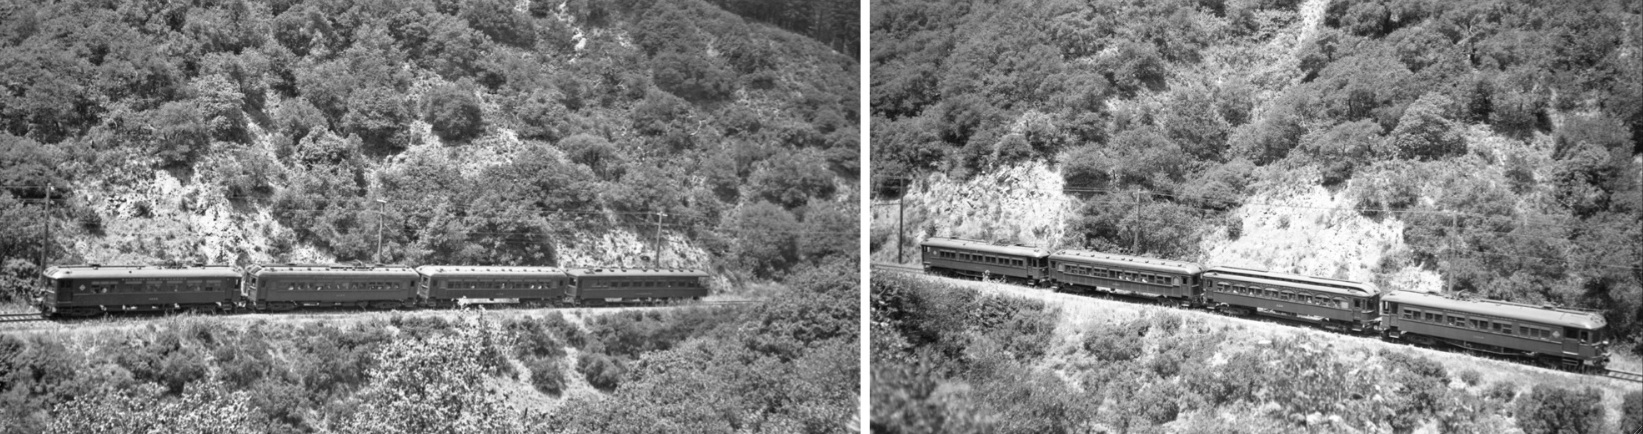
Art Alter kept his lens aimed lower to create a more model railroad effect with SN 1011, SN 1020, SN 1022 and the SN Sacramento parlor car on the rear in this north view from Dec. 11, 1938, left, and a northwest view of SN 1016, SN 226, SN 1021, and SN 1014 from June 19, 1938, right.
L52-65-Art Alter Photos, Moreau Coll., Courtesy WRM Archives, 81714sn, l, 81722sn, r, (Image 13 of 21)
Freight images of the middle triangles were popular as well. A and B, Wilbur C. Whittaker Photos, Dec 1, 1943 Courtesy Arnold Menke and Garth Groff; C, SN 661, Tom Gray Photo, ca. 1950, Courtesy Tom Gray; D, SN 605, Walt Vielbaum Photo, circa 1950, Courtesy BAERA, Western Railway Museum Archives, 133389sn
L52-70-Multiple Attributions (see caption), (Image 14 of 21)
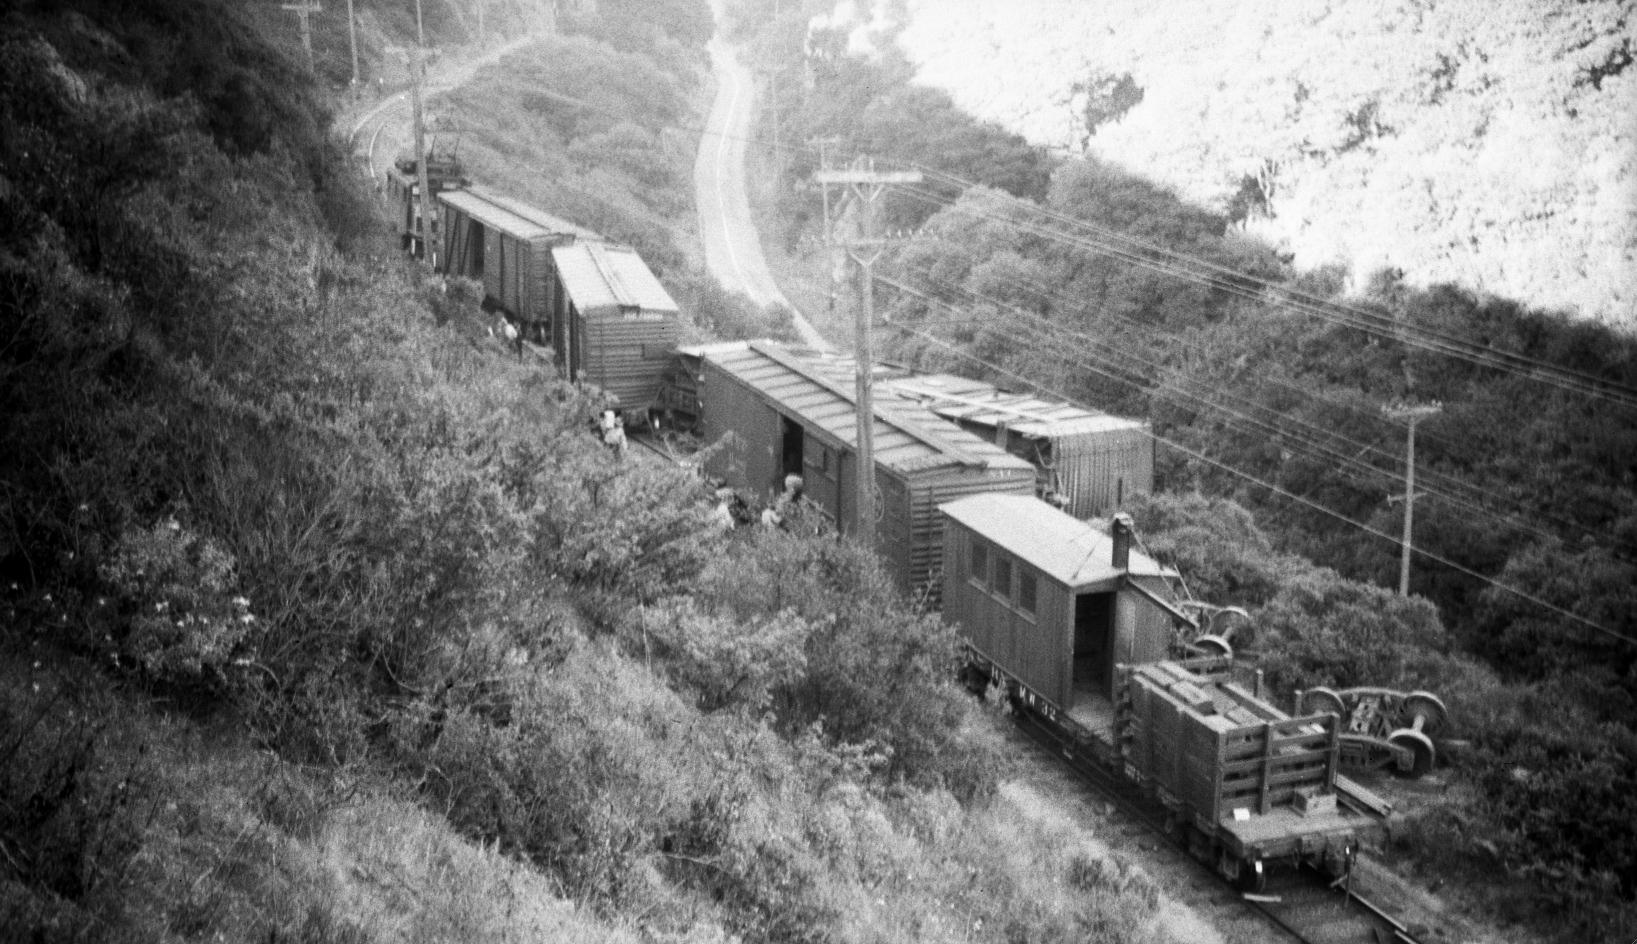
By the time the last triangle has been reached, the track and road begin to run together as seen in this very unique north view by Wil Whittaker of a freight on Dec. 1, 1943.
L52-75-Wilbur C. Whittaker Photos, Courtesy Arnold Menke and Garth Groff, (Image 15 of 21)
Images from the north viewing the trains in a south view would only have been possible to execute closer to Cape Horn or Melin Cut, and Fred Matthews did it on Oct. 29, 1956 with SN 661 as the central figure.
L52-85-Fred Matthews Photo, Courtesy Anonymous Donor, (Image 16 of 21)
Charlie Savage could not have been on the last SN passenger trip of July 12, 1941. He was creating another image for the model railroader to contemplate of this final journey near the large, eastern-most triangle, northwest view, left. On the right, a five-car passenger at the large triangle in a north view from Sept. 17, 1939. The appearance of the road signals the approach of the Havens shelter.
L52-80-Charles Savage Photos, Western Railway Museum Archives, 10078sn, l, 9823, r, (Image 17 of 21)
Not all events meshed with the bucolic scenery as in this derailment of a freight, with one car of pears destined for the Oakland Army Base off its trucks and tracks, northeast view, Sept., 1944.
L52-90-Tom Buckingham Photo, Courtesy BAERA, Western Railway Museum Archives, 54845sn, (Image 18 of 21)
A mid-canyon northeast view after abandonment, Apr. 22, 1960 to show the last remaining portions of the triangles.
L52-95-Copyright California Department of Transportation, 7453-1 Detail , (Image 19 of 21)
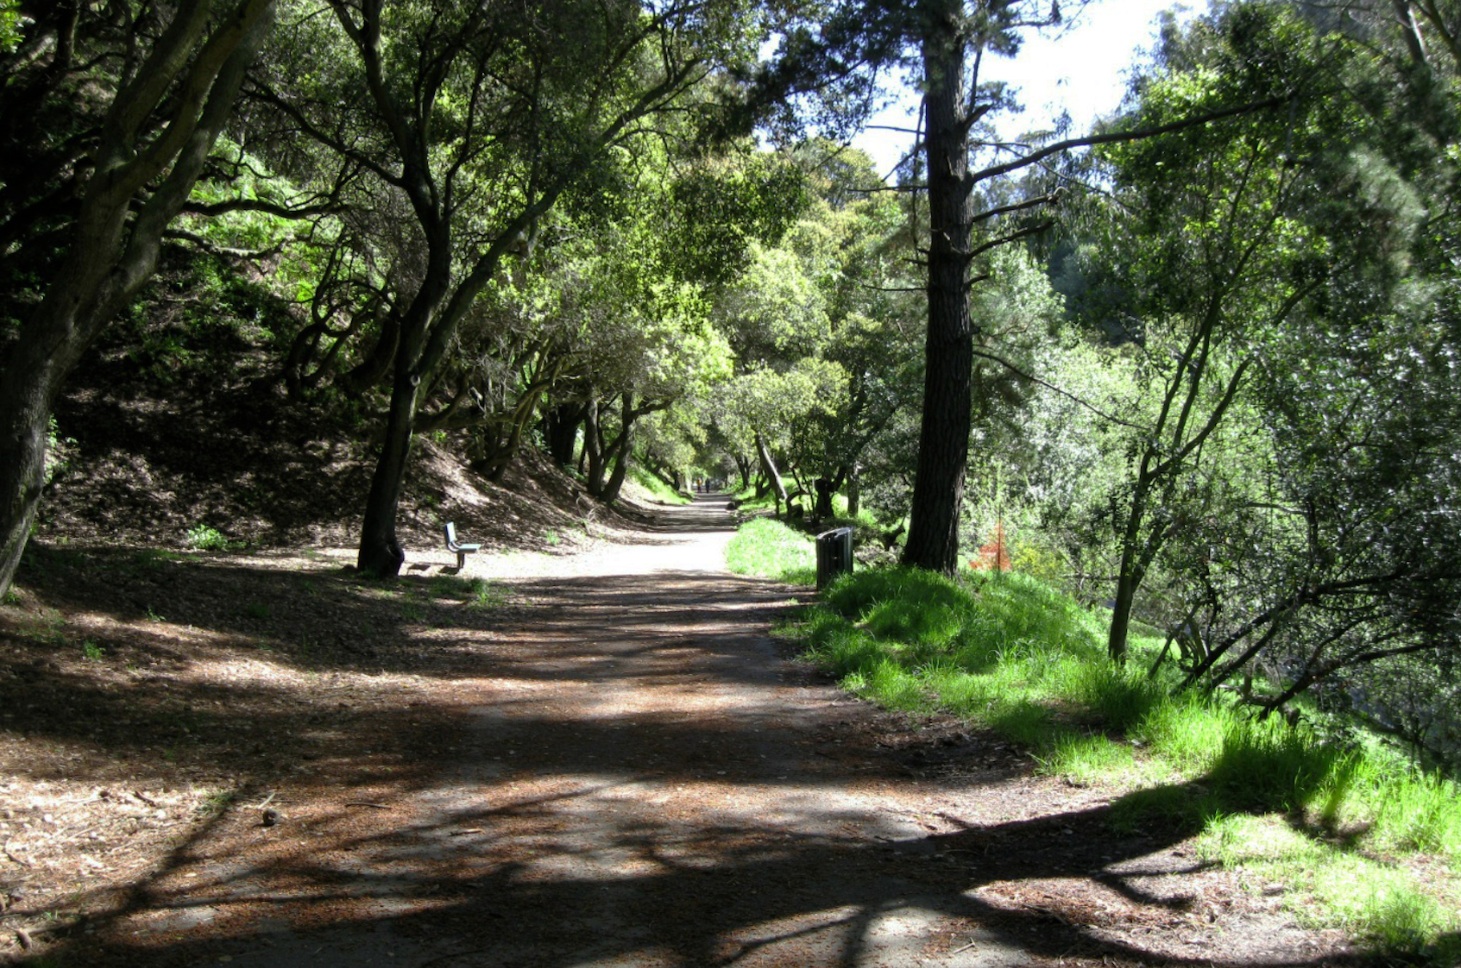
Closer inspection of the northeast wall along today’s Shepherd Canyon or Montclair Railroad Path reveal a small clue of the canyon’s past.
L52-100-Stuart Swiedler Photo, (Image 20 of 21)
Roy Covert was credited with taking one of these images, while one was unattributed, but judging by the same array of freight or tunnel cars at Havens, you can sure he took both of these northwest views in Apr. 1940, unless he had company. Next stop, Havens.
L52-105-Roy Covert Photos, Courtesy BAERA, WRMA, 67912sn, l and 93748sn, r, (Image 21 of 21)

.jpg)
.jpg)
.jpg)